Manual
DBQT
Database Query Tool
Table of Contents
1. INTRODUCTION ... 3
2. SYSTEM REQUIREMENTS ... 3
3. GRAPHICAL USER INTERFACE ... 4
3.1 MENU BAR ... 4
3.2 DATABASE OBJECTS TREE ... 4
3.3 QUERY EDITOR ... 4
3.4 RESULT GRID ... 4
4. NEW DATABASE CONNECTION ... 5
4.1 DATA LINK PROPERTIES DIALOG ... 5
4.2 USER SPECIFIC CONNECTION DIALOGS ... 8
4.2.1 SQL Server connection control ... 8
4.2.2 MySQL connection control ... 8
5. SAVE A DATABASE CONNECTION ... 9
6. OPEN A DATABASE CONNECTION ... 9
6.1 OPEN CONNECTION DIALOG ... 9
7. EXECUTE A QUERY ... 10
8. SAVE A QUERY ... 10
9. OPEN A QUERY ... 10
10. APPENDIX ... 11
10.1 PRODUCT HOMEPAGE ...11
1.
Introduction
The Database Query Tool, from now on referred to as DBQT, has been developed for advanced users who want to analyze their databases with the help of SQL (Standard Query Language). It supports all common subsets of SQL such as DML (Data Manipulating Language) and DDL (Data Definition Language). With DBQT you can connect to nearly any kind of database system as for example:
Microsoft SQL Server Microsoft Access Oracle
MySQL etc.
By default you can create a connection to any database which there is an OLE DB Provider installed for on your computer. Such an OLE DB connection will be created with the help of the “Data Link Properties” dialog that is an integral part of the Windows operating system. Moreover DBQT provides an interface that can be used to implement user-specific user controls for accessing any kind of database, on the only condition that there exists a managed .NET Framework data provider for it. The implementation of such a user control can easily be done by any .NET developer. That way it is possible to provide the possibility to create SQL Server connections using the native SqlClient data provider or it is possible to access MySQL databases with the help of the MySQL Connector/Net 5.1 database driver as well as it possible to attach Oracle databases using the OracleClient data provider for .NET.
2.
System requirements
DBQT requires the Microsoft .NET Framework 2.0 (or higher) to be installed on the target computer. If the .NET Framework is missing, DBQT will not be running. Furthermore, if you want to use the “Data Link Properties” dialog to create database connections, there are also needed the Microsoft Data Access Components (MDAC). You can find URLs from where you can download either one or both of these two components in the Appendix to this document.
CPU At least: Intel Pentium 400 MHz
Recommended: Intel Pentium 1 GHz or better
Memory At least: 96MB
Recommended: 512 MB or more
Operating System Windows 2000, Windows XP or a newer version
Free Disk Space 280 MB (x86) 610 MB (x64) for the .NET Framework 2.0 5 MB for DBQT and its components
Software Microsoft .NET Framework 2.0 or a newer version MDAC 2.8 or a higher version
3.
Graphical User Interface
The GUI is divided into four main areas:
Fig. 1: GUI Areas
3.1
Menu bar
The menu bar (yellow, area 1) contains the different menus that expose access to the different functions of the DBQT application. At the right end of the menu bar you’ll find a dropdown list that includes the different possibilities to create a database connection. If not a .NET developer has extended DBQT with one or more user-specific dialogs you will only be able to select the “Data Link Properties Dialog” entry from this dropdown list.
Fig. 2: Dropdown list for creating a database connection
3.2
Database objects tree
If available, the database objects tree (red, area 2) will display all of the objects of the connected database such as tables, views or stored procedures.
3.3
Query editor
You will write your SQL statements which you want to execute against the connected database into the Query-editor (blue, area 3) whereat a syntax-highlighter will highlight SQL keywords like “SELECT”, “UPDATE”, etc.
3.4
Result grid
After having executed a SELECT statement, the result set will be displayed within the Result grid (green, area 4).
4.
New database connection
To create a new database connection you can either go to the “File” menu and click the item named “New Connection…” or you select your preferred connection dialog directly from the dropdown list that is located at the right end of the menu bar. But if not a .NET developer has extended DBQT with one or more user-specific dialogs you will only be able to select the “Data Link Properties Dialog” entry from this dropdown list.
Fig. 3: Choose your preferred connection dialog
4.1
Data Link Properties dialog
By default DBQT only supports the Data Link Properties dialog that assists you in creating a new database connection. This dialog box exposes all the properties of all the OLE DB providers that are installed on your machine. It helps you configuring connection strings to data sources by using one of the installed OLE DB providers. The following two examples illustrate how a connection to a Microsoft SQL Server 2005 database and how a connection to a Microsoft Access database-file can be established.
Example 1: Connecting to a Microsoft SQL Server 2005 database 1. In the Data Link Properties Dialog select the 1st tab named “Provider”.
2. In the OLE DB-Provider List select the entry “Microsoft OLE DB Provider for
SQL Server”.
3. Click the “Next >>” button. 4. Within the “Connection” tab:
a. Enter the name of the server where the database is hosted.
b. Specify how you want to log on to the server (Windows NT integrated security or a specific user name and password combination).
c. Select the database on the server.
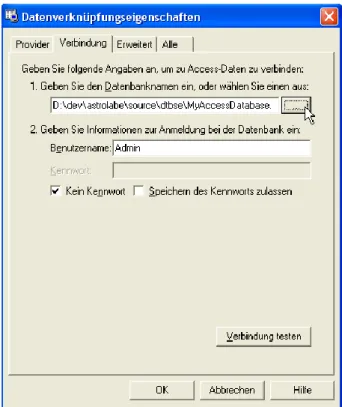
5. Click the “OK” Button to finish – DBQT is now connected to the specified database. Example 2: Connecting to a Microsoft Access database file (mdb)
1. In the Data Link Properties Dialog select the 1st tab named “Provider”. 2. In the OLE DB-Provider List select the entry “Microsoft Jet 4.0 OLE DB
Provider”.
3. Click the “Next >>” button.
4. Within the “Connection” tab select the Access mdb-file by clicking the “…” button. 5. Click the “OK” Button to finish – DBQT is now connected to the specified database.
Fig. 4: Data Link Properties - Provider tab
4.2
User specific connection dialogs
DBQT provides an interface named “IConnectionUserControl” that enables a .NET developer to implement a user specific connection dialog that in addition to the Data Link Properties dialog can be used to configure and open database connections. .NET developers may want to have a look at the developer documentation how this can be done. The developer documentation can be downloaded from the following URL:
http://www.unu.ch/DBQT/download/DBQT_DeveloperDocumentation.pdf 4.2.1 SQL Server connection control
If you want to use DBQT to connect to a Microsoft SQL Server database using the native (and much faster) .NET SqlClient data provider you can select the entry “Microsoft SQL Server…” in the connection dropdown list. Selecting this entry will pop up a dialog that assists you in creating a new connection to a SQL Server database.
Fig. 7: Create a SQL Server connection using the “DBQueryTool.SQLServerConnectionControl” 4.2.2 MySQL connection control
You will find an entry named “MySql…” in the connection dropdown list. Selecting this entry will pop up a dialog that assists you in creating a new connection to a MySQL database.
5.
Save a database connection
Once you have created a database connection you can save it for later use. To save a database connection you can use the appropriate button in the toolbar or you can go to the “File” menu and click the item named “Save connection…”. Then a dialog appears where you have the possibility to enter a description before you save the connection.
Fig. 9: The “Save Connection” toolbar button
6.
Open a database connection
To open connection, you can use the appropriate button in the toolbar or you can go to the “File” menu and click the item named “Open Connection…” which will pop up the “Open connection” dialog.
Fig. 10: The “Open Connection” toolbar button
6.1
Open connection dialog
The “Open connection” dialog is used to open a previously saved connection without the need to re-enter any connection parameters. To open a connection you have to select an entry from the list and then click the “Open” button. If you want to delete a connection from the list, you can select the row and just press the “Del” button on your keyboard.
7.
Execute a query
To execute a query that you have entered into the query editor you can either press the “F5” short cut button or you go to the “Query” menu and click the item named “Execute”. If the query is of correct syntax and executes successfully, the result set will be displayed in the result grid area.
8.
Save a query
You can save a query to the file system when you want to use it again sometime later. To save a query you can use the appropriate button in the toolbar or you can go to the “Query” menu and click one of the items named “Save” or “Save as…”.
Fig. 12: The “Save Query” toolbar button
9.
Open a query
You open a query, you can use the appropriate button in the toolbar or you can go to the “Query” menu and click the item named “Open…” which will pop up the “Open query” dialog.
10.
Appendix
10.1
Product homepage
Please visit the product homepage at:
http://www.unu.ch/DBQT
10.2
Downloads
Microsoft .NET Framework 2.0:
http://www.microsoft.com/downloads/details.aspx?FamilyID=0856EACB-4362-4B0D-8EDD-AAB15C5E04F5&displaylang=en Microsoft Data Access Components (MDAC):
http://www.microsoft.com/downloads/details.aspx?FamilyID=6C050FE3-C795-4B7D-B037-185D0506396C&displaylang=de .NET data provider for MySQL