Microsoft
System
Center
Yung Chou
nKeith Mayer
Mitch Tulloch, Series Editor
Cloud Management
with App Controller
PUBLISHED BY Microsoft Press
A Division of Microsoft Corporation One Microsoft Way
Redmond, Washington 98052-6399
Copyright © 2013 Microsoft Corporation (All)
All rights reserved. No part of the contents of this book may be reproduced or transmitted in any form or by any means without the written permission of the publisher.
Library of Congress Control Number: 2013952564 ISBN: 978-0-7356-8308-2
Microsoft Press books are available through booksellers and distributors worldwide. If you need support related to this book, email Microsoft Press Book Support at [email protected]. Please tell us what you think of this book at http://www.microsoft.com/learning/booksurvey.
Microsoft and the trademarks listed at http://www.microsoft.com/about/legal/en/us/IntellectualProperty/ Trademarks/EN-US.aspx are trademarks of the Microsoft group of companies. All other marks are property of their respective owners.
The example companies, organizations, products, domain names, email addresses, logos, people, places, and events depicted herein are fictitious. No association with any real company, organization, product, domain name, email address, logo, person, place, or event is intended or should be inferred.
This book expresses the author’s views and opinions. The information contained in this book is provided without any express, statutory, or implied warranties. Neither the authors, Microsoft Corporation, nor its resellers, or distributors will be held liable for any damages caused or alleged to be caused either directly or indirectly by this book.
Acquisitions Editor: Anne Hamilton
Developmental Editor: Karen Szall
Project Editor: Karen Szall
Editorial Production: Diane Kohnen, S4Carlisle Publishing Services
Copyeditor: Andrew Jones
Cover Illustration: Twist Creative • Seattle
iii What do you think of this book? We want to hear from you!
Microsoft is interested in hearing your feedback so we can continually improve our books and learning resources for you. To participate in a brief online survey, please visit:
microsoft.com/learning/booksurvey
Contents
Introduction vii
Chapter 1 App Controller essentials
1
System requirements . . . .1 Installation prerequisites . . . .1 Windows Assessment and Deployment Kit for Windows 8.1 2 Installation user and App Controller service account 3
Microsoft SQL Server instance 3
Performing the installation . . . .4
Product key 5
Prerequisites checker 5
Installation path 6
App Controller services 7
SSL certificate 8
SQL Server instance and App Controller database 9
Reviewing the installation results 10
Verifying installation log files 10
Verifying App Controller services 11
Role-based security model . . . .11
User roles and delegation 12
Fabric visibility 14
Operations model and UI . . . .14
App Controller resource configuring 14
Chapter 2 Managing private clouds
17
Which private clouds can be managed? . . . .17
App Controller and Virtual Machine Manager . . . .18
Preparing for self-service private cloud management . . . .19
Signing in at the portal . . . .21
Branding the portal experience . . . .22
Connecting to private clouds using App Controller . . . .22
Adding a network file share to App Controller . . . .26
Managing Run As accounts . . . .28
Deploying new workloads to private clouds . . . .30
Managing private cloud workloads . . . .38
Moving files to/from private clouds . . . .41
Chapter 3 Managing public clouds
43
Why public cloud? . . . .44Introducing Windows Azure . . . .44
Managing Windows Azure with the Windows Azure Management Portal . . . .45
Managing Windows Azure with System Center 2012 R2 App Controller . . . .46
Preparing for self-service public cloud management . . . .47
Creating a self-signed management certificate. . . .47
Uploading a management certificate to Windows Azure . . . .50
Connecting to public clouds . . . .52
Delegating access to public clouds . . . .55
v Contents
Deploying new workloads to a public cloud . . . .60
Configuring a cloud service 63
Configuring a virtual network 64
Configuring a virtual machine 65
Ready to deploy 69
Managing public cloud workloads . . . .70 Managing files, disks, and images in public clouds . . . .72 Moving files to/from Windows Azure storage accounts 72
Adding disks and images 73
Chapter 4 Managing hybrid clouds
75
Copying a VHD from VMM to Windows Azure . . . .75 Deploying a cloud service in Windows Azure
using an uploaded VHD . . . .78
Destination 79
Container 79
Topology and logistics 81
Payload 81
Completing the deployment 85
Copying virtual machines from VMM to Windows Azure . . . .87
Chapter 5 App Controller cmdlets
93
How App Controller cmdlets work . . . .93
Why App Controller cmdlets? 94
Importing the AppController module 94
Connecting with the App Controller server . . . .96 Connecting to VMM . . . .97 Connecting to Windows Azure. . . .98
Adding a library share to copy and paste resources
between clouds . . . .101 Adding a VHD to a Windows Azure storage account container . . . .102 Adding a VHD to a Windows Azure image store . . . .103 Acquiring a VHD from a virtual machine, template, or
the VMM library . . . .104
What do you think of this book? We want to hear from you! Microsoft is interested in hearing your feedback so we can continually improve our books and learning resources for you. To participate in a brief online survey, please visit:
vii
Introduction
M
icrosoft System Center 2012 R2 App Controller is uniquely positioned as both an enabler and a self-service vehicle for connecting clouds and implementing the hybrid computing model. In Microsoft’s cloud computing solutions, both System Center and Windows Azure play critical roles. System Center can be used to transform enterprise IT from a device-based infrastructure and deployment strategy to a service-based user-centric consumption model based on private cloud computing. Windows Azure on the other hand is a subscription-based public cloud platform that enables the development, deployment, and management of cloud solutions. App Controller is the glue that unifies these two platforms by providing a single interface that enables administrators to perform complex operations without overwhelming them with the underlying technical complexities involved.This book serves as an introduction to implementing and managing the hybrid computing solutions using App Controller. It describes the basic concepts, processes, and operations involved in connecting, consuming, and managing resources that are deployed both on and off premises. Each chapter provides a concise, self-contained walkthrough for a specific aspect of managing private, public, and hybrid clouds using App Controller.
While cloud computing is still evolving, the hybrid approach will likely continue to emerge as the go-to IT computing model for the foreseeable future. Using App Controller to strategically connect both on-premises System Center private clouds with off-premises deployments in both Windows Azure and third-party cloud hosting providers enables new scenarios, develops new possibilities, and offers exciting new opportunities that can help IT transition better into the next generation of enterprise computing.
Errata & book support
We’ve made every effort to ensure the accuracy of this content. Any errors that have been reported since this content was published are listed on our Microsoft Press site:
http://aka.ms/SCAppController/errata
If you find an error that is not already listed, you can report it to us through the same page.
If you need additional support, email Microsoft Press Book Support at [email protected].
Please note that product support for Microsoft software is not offered through the addresses above.
We want to hear from you
At Microsoft Press, your satisfaction is our top priority, and your feedback our most valuable asset. Please tell us what you think of this book at:
http://aka.ms/tellpress
The survey is short, and we read every one of your comments and ideas. Thanks in advance for your input!
Stay in touch
Let’s keep the conversation going! We’re on Twitter: http://twitter.com/ MicrosoftPress.
1
C H A P T E R 1
App Controller essentials
M
icrosoft System Center 2012 R2 App Controller is a component of System Center, an extension of Virtual Machine Manager (VMM), and relatively easy to implement. App Controller is a web-based self-service vehicle to facilitate the deployment of virtual machines (VMs) and services. App Controller can connect to private clouds based on a VMM server, to Windows Azure subscriptions, and to third-party hosting providers and can manage resources among these three environments. Based on VMM’s role-based security model which defines who can do what and to what extent, App Controller can delegate authority by modeling a business function as a user role, thereby noticeably simplifying the security administration and management of a multitenant environment. Above all, as hybrid cloud becomes an emerging platform for next-generationcomputing, App Controller enables deployment of such hybrid scenarios and helps accelerate their adoption.
This chapter covers some of the basics including the system requirements, prerequisites, installation, role-based security model, operations model, and user interface (UI) of App Controller.
System requirements
The system requirements for installing the App Controller server, the App Controller web console on a client computer, and the Windows PowerShell Module for App Controller can be found in the Microsoft TechNet Library at http://technet.microsoft.com/library/ dn249764.aspx so they won’t be repeated here. Note that an App Controller installation is an extension of a targeted VMM server which must be specified during installation of App Controller.
Installation prerequisites
This section summarizes the prerequisites for installing the App Controller server in your environment.
Windows Assessment and Deployment Kit for Windows 8.1
The Windows Assessment and Deployment Kit (ADK) for Windows 8.1 is a required
component for installing System Center 2012 R2 App Controller. The ADK for Windows 8.1 is available as a free download from Microsoft at http://www.microsoft.com/en-us/download/ details.aspx?id=39306. The ADK for Windows 8.1 is a realization of Microsoft deployment and assessment methodologies and includes a suite of free tools to facilitate and improve the quality of Windows deployment and fundamentally reduce the overall costs associated with deployment. The ADK for Windows 8.1 includes the following:
■
■ Application Compatibility Toolkit (ACT) This can be used to build inventories and assess compatibility when migrating an application. The ACT uses a database instance that must be running on Microsoft SQL Server 2005 (or Express edition) or later. ■
■ Deployment Tools These are tools can be used for customizing disk images and automating Windows deployments.
■
■ Windows Preinstallation Environment Also known as Windows PE, this is a minimal operating system that can be used to prepare a computer for installation or servicing. Windows PE requires the Deployment Tools.
■
■ User State Migration Tool (USMT) This can be used for migrating user data from an existing Windows installation to a new one. USMT includes three tools: ScanState, LocalState, and USMTUtils.
■
■ Volume Activation Management Tool (VAMT) This can be used for automating
and managing Windows activations of Windows and Microsoft Office. It employs a database which must be a Microsoft SQL Server 2008 (or Express edition) instance or later.
■
■ Windows Performance Toolkit (WPT) This can be used to monitor and profile Windows operating systems and applications. WPT includes the Windows Performance Recorder, Windows Performance Analyzer, and Xperf tools.
■
■ Windows Assessment Toolkit This is a 2.4 GB download that can be used to produce diagnostics and remediation information of a local system by running jobs to measure and record the performance, reliability, and functionality. The Windows Assessment Toolkit requires the Deployment Tools, Windows PE, WPT, and SQL Server 2012 Express which is also included in the download.
For installing App Controller, the Deployment Tools and Windows PE are especially essential. Figure 1-1 shows the initial installation screen for installing the ADK for Windows 8.1, which is currently in preview at the time of this writing.
Installation prerequisites CHAPTER 1 3
FIGURE 1-1 The components list for the Windows ADK.
At the end of the ADK installation, there is a check box to bring up the ADK Getting Started Guide which offers an overview of the ADK along with scenarios to help you better understand Microsoft’s deployment and assessment methodologies. The guide now has a tile that can be pinned for frequent access as shown in Figure 1-2.
Installation user and App Controller service account
Installing App Controller on a server requires a domain user account with local Administrator privileges. The service account to run App Controller services can be the built-in Network Service account or a domain account.
Microsoft SQL Server instance
Prior to installing App Controller, be sure to identify a supported version of a Microsoft SQL Server instance in your environment or create a new instance. The user account installing App Controller must have at least database owner (DBO) permissions on the database associated with your App Controller installation.
FIGURE 1-2 A view of the ADK Getting Started Guide.
Performing the installation
The System Center 2012 R2 App Controller installation process is very similar to that of System Center 2012 App Controller and is initialized by running Setup.exe as an administrator. The installation startup screen has links to important online content including the Release Notes, Installation Guide, and so on (see Figure 1-3). There is also an option on this screen to install the Windows PowerShell module for App Controller.
Performing the installation CHAPTER 1 5
FIGURE 1-3 The installation screen for App Controller Setup.
Product key
If you do not provide a product key during installation, App Controller will be installed as an evaluation edition. To provide a product key afterwards, simply rerun the setup program again and select the Upgrade option.
Prerequisites checker
There are a number of prerequisites for installing App Controller in an environment. When starting the installation process, a built-in prerequisites checker will identify the hardware/ software components in place and suggest follow-up actions, as applicable, for any missing components. For example, Figure 1-4 shows an example of a blocked installation attempt where some prerequisites are missing. If desired, you can install the missing prerequisites at this time and then afterwards click the Verify Prerequisites Again link to rerun the prerequisites checker.
FIGURE 1-4 The App Controller prerequisites checker indicating the installation has failed.
Once all of the prerequisites have been met, the Setup Wizard will continue and the installation process can proceed to the next step.
Installation path
By default, the setup program installs App Controller at C:\Program Files\Microsoft System Center 2012 R2\App Controller.
Performing the installation CHAPTER 1 7
App Controller services
Either the built-in Network Service account or a domain account can be used as the service account for running the App Controller services. The default port for the internal communication of App Controller services is 18622 but this is customizable as shown in Figure 1-5.
SSL certificate
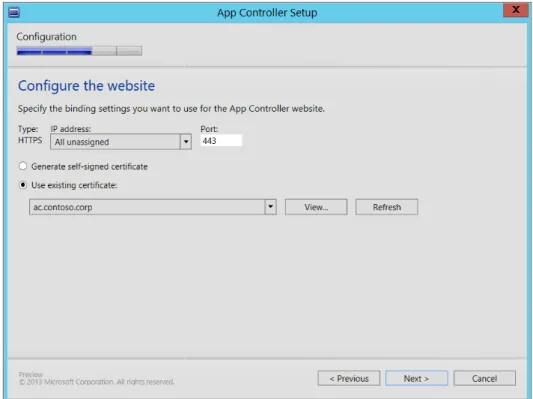
The installation process provides the opportunity to specify the IIS website binding (IP address and TCP port). The default port is the SSL port 443 as shown in Figure 1-6. Setup can generate a self-signed certificate or you can select an existing x.509 certificate that has already been installed on the local machine. The figure shows an existing certificate named as ac.contoso.corp being designated as the SSL certificate for the App Controller website. By using IIS, which is required when installing App Controller, you can easily generate an SSL certificate using your enterprise public key infrastructure (PKI).
Performing the installation CHAPTER 1 9
SQL Server instance and App Controller database
The default App Controller database is named AppController, as shown in Figure 1-7, but this is customizable.
Reviewing the installation results
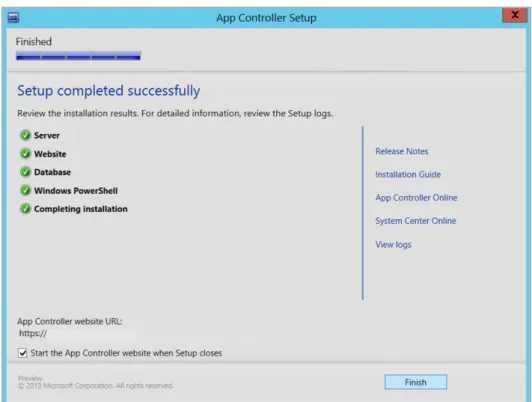
Once App Controller has been successfully installed as indicated by all checkmarks in a green circle on the final page of the App Controller Setup Wizard, be sure to review and document the installation logs by clicking the View Logs link as shown in Figure 1-8.
FIGURE 1-8 A view of the App Controller setup after a successful completion.
Verifying installation log files
The App Controller installation log files are stored in either %LOCALAPPDATA%\ AppController\Logs or \ProgramData\AppControllerLogs. Figure 1-9 shows the log files folder of a typical App Controller installation.
Role-based security model CHAPTER 1 11
FIGURE 1-9 A view of the App Controller installation log files.
Verifying App Controller services
The Services node in Computer Management in Figure 1-10 shows that four services are installed by the App Controller setup program.
FIGURE 1-10 A view of the installed App Controller services.
Role-based security model
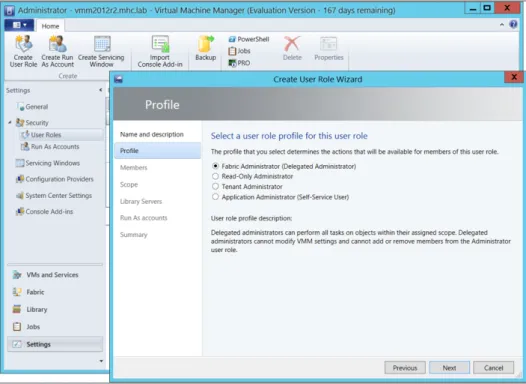
Before examining the experience of using App Controller, we will first review the App Controller security model to better understand the targeted usage scenarios. As mentioned earlier, App Controller is a self-service portal for an authorized user to manage service
deployments. The authorization model that App Controller uses is inherited from that of the associated VMM server. In the VMM administration console, the Security node in the Setting workspace can be used to define new user roles as shown in Figure 1-11.
FIGURE 1-11 You can create and manage user roles using VMM.
User roles and delegation
A user role is a policy consisting of membership and a profile. The latter specifies a set of operations that can be operated on authorized objects. Specifically, a user role defines not only what tasks a user can perform on authorized resources, but also to what extent with what privileges such tasks can be performed. Once a user has been authenticated, those roles that the user is a member of are in effect.
A key benefit of this model is that with membership and a profile, that is, who and what to do, you can model an individual performing a specific business function with a particular set of tasks. This delegation model is called role-based security and significantly simplifies security administration because instead of specifying many individual operations on many individual objects, you can tie business functions to membership in a particular user role. By adding or removing a user from a user role, the user automatically inherits or is deprived of the operations, scopes, and privileges defined in the associated profile. Employing user roles also offers consistency in authorizing resources and provides a user-defined abstraction that translates security and administration requirements into the customer’s business functions.
Role-based security model CHAPTER 1 13 In System Center 2012 R2 App Controller there are four user role profiles. These roles are
briefly described in the sections that follow.
Fabric Administrator (Delegated Administrator)
The Fabric Administrator role is a privileged role that can perform all tasks on authorized objects.
Read-Only Administrator
The Read-Only Administrator role can read the information of, but not modify, an object. The Read-Only Administrator role is intended for monitoring and auditing purposes.
Tenant Administrator
The Tenant Administrator role is a project/release/function leadership role. Users assigned this role can manage self-service users, virtual machines, and service deployment including user access and quotas.
Application Administrator (Self-Service User)
The Application Administrator role manages resources deployed by the individual. Users assigned this role can perform only those tasks specifically marked in the Permissions page of the profile. Figure 1-12 shows the list of tasks available for the Application Administrator role.
Fabric visibility
Each of the above user roles can access resources using either the App Controller web-based interface or the VMM administration console. The visibility of the underlying fabric (that is, the servers, networking, and storage resource pools) will vary depending on user role. One key distinction of accessing resources with App Controller and VMM Admin Console is that App Controller does not reveal fabric regardless of whether the account is a VMM administrator or one with a Fabric Administrator role. However, accessing with VMM admin console, a VMM administrator and a Fabric Administrator will see fabric workspace while a Tenant Administrator or an Application Administrator will not. In fact, an idea of App Controller is to enable a service owner or technical leadership to manage a service deployment without concerning the underlying infrastructure and technical complexities. Limiting fabric visibility is here an advantage. For those who need an access to fabric, log in a VMM admin console instance instead.
Operations model and UI
This section briefly describes the App Controller operations model and user interface. Further information on configuring App Controller and using the user interface will be found in later chapters throughout this book.
App Controller resource configuring
After installing App Controller, a VMM administrator can log on using the App Controller web-based interface and connect a VMM server, clouds, Windows Azure subscription, third-party hosting, and network shares. Once the user has been authenticated, resources authorized for the user become accessible based on the user role assigned to the user.
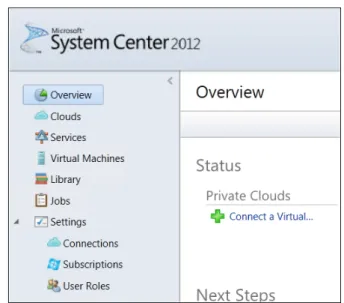
Figure 1-13 shows an example of what a VMM administrator might see upon first logging on to the web-based interface after the App Controller installation process has finished. The Overview page includes Next Steps with a list of links for performing common tasks needed for configuring the App Controller environment. The navigation pane has a Settings workspace available for the VMM administrator to use. In the next chapter, we will walk through such steps as branding the App Controller website, connecting to VMM and Windows Azure, consuming services, and operating on deployment instances.
Operations model and UI CHAPTER 1 15
FIGURE 1-13 A view of the App Controller UI.
NOTE Cloud service providers can provide multiple instances of App Controller targeting different users with different resources for different deployment scenarios to best serve the intended users.
App Controller UI
As Figure 1-13 shows, the navigation pane for the App Controller web-based interface shares some similarity with the VMM admin console. But since App Controller is mainly a vehicle for consuming and managing resources, the web-based interface is used for deploying and operating on instances instead of for defining and configuring resources. From the top of the navigation pane, the workspaces are as follows:
■
■ Overview This is a snapshot of the resources that are manageable based on what has
been configured in the Settings workspace in the VMM administration console. Unlike in the VMM administration console, the Settings workspace is not visible to users in the App Controller web-based interface. In addition, the visibility and operability of resources like clouds, services, VMs, and library items are based on the user roles relevant to the authenticated user. The operations model for App Controller is to have only those resources authorized for the user to be visible so that the user can self-serve and deploy services with minimal IT support, if any.
■
■ Cloud This is a logical container for the host services. ■
■ Services This shows VMs that can be identified, managed, and operated as a single entity in order to deliver a particular line-of-business (LOB) application.
■
■ Virtual Machines This shows deployed instances of VM templates. Here the individual VMs can be viewed and operated as individual objects.
■
■ Library This is a repository for all of the resources available for creating virtual machines.
■
■ Jobs This records a history of the jobs performed by App Controller. ■
■ Settings This is where you can establish connections and access VMM and Windows Azure.
17
C H A P T E R 2
Managing private clouds
M
icrosoft System Center 2012 R2 App Controller adds self-service managementcapabilities to your on-premises private clouds via an intuitive web-based GUI. In Chapter 1, we discussed that self-service management is a key ingredient for enabling a standardized approach for deploying applications in private and public clouds. In this chapter, we’ll focus our attention specifically on private clouds. We’ll walk through the steps of configuring and leveraging App Controller so that users, such as other administrators and developers on our IT teams, to whom we’ve delegated private cloud resources can easily deploy and manage workloads using nothing more than a web browser.
Specifically, we’ll be targeting the following topics in this chapter:
■
■ Which private clouds can be managed? ■
■ App Controller and Virtual Machine Manager ■
■ Preparing for self-service private cloud management ■
■ Signing in at the portal ■
■ Branding the portal experience ■
■ Connecting to private clouds ■
■ Adding a network file share ■
■ Managing Run As accounts ■
■ Deploying new workloads to a private cloud ■
■ Managing Private Cloud Workloads ■
■ Moving Files to/from Private Clouds
Which private clouds can be managed?
System Center 2012 R2 App Controller can provide self-service management for any private clouds that are defined using System Center 2012 R2 Virtual Machine Manager (VMM). Realistically, private clouds can include a heterogeneous mix of compute,
storage, and networking resources—after all, whose data center these days consists of only a single vendor solution? Luckily, VMM provides the ability to compose private clouds as pools of resources that leverage the multivendor environment that likely exists in your data center today. Such pools of resources could include:
■
■ Compute Microsoft Hyper-V in Windows Server 2008 R2, Windows Server 2012, or Windows Server 2012 R2; VMware ESX/ESXi 4.1, 5.0 or 5.1 with VMware vCenter Server 4.1, 5.0 or 5.1; or Citrix XenServer 6.0.
■
■ Storage Storage providers supporting the Storage Management Initiative
Specification (SMI-S), a native Windows Management Instrumentation (WMI) Storage Management Provider (SMP) or Server Message Block (SMB) 3.0 storage management protocols.
■
■ Network Top-of-rack (TOR) network switches that support the Common Information Model (CIM) standard for network device management; and virtual switch extensions, network switches, load balancers and Hyper-V Network Virtualization (HNV) gateways that offer a configuration provider module for System Center 2012 R2.
App Controller and Virtual Machine Manager
To use System Center 2012 R2 App Controller for self-service management of private clouds, you’ll first need to install and configure System Center 2012 R2 VMM. After VMM is deployed and running, you’ll then need use the VMM management console to build your private cloud fabric of compute, storage, and networking resources. You’ll also need to define and delegate at least one private cloud as a pooled set of fabric resources. Optionally, you’ll want to populate your VMM library with any profiles, VM templates and Application Service templates that you’ll be leveraging via the App Controller web portal for deploying new workloads. Once you’ve completed these steps from the System Center 2012 R2 VMM management console, you’re then ready to connect up App Controller to complete your private cloud management solution.
TIP If you’ve not yet deployed System Center 2012 R2 VMM within your environment, take a break here to get it installed and configured first. For details on the process of building private clouds with VMM, be sure to leverage the information and step-by-step walkthroughs provided at http://aka.ms/BuildYourCloud. After you’ve installed System Center 2012 R2 VMM and have at least one private cloud defined and delegated, you can pick back up here to continue with the rest of this chapter.
Preparing for self-service private cloud management CHAPTER 2 19
Preparing for self-service private cloud management
To enable self-service management of your private clouds with System Center 2012 R2 App Controller, you’ll need to install App Controller in your data center environment. The server hardware and software requirements for System Center 2012 R2 App Controller are shown in Table 2-1. Note that App Controller deployments are supported on either physical hardware or as a virtual machine, as long as the system requirements are being met. Detailed server requirements are also available online at http://aka.ms/SC2012AC-Requirements.
TABLE 2-1 Server software and hardware requirements for System Center 2012 App Controller
Component Minimum Recommended
Processor Pentium 4, 2 GHz (x64) Dual-Processor, Dual-Core, 2.8 GHz (x64) or greater
RAM 1 GB 4 GB
Available hard disk space 512 MB 1 GB
Server operating system Windows Server 2008 R2 Standard, Enterprise, or
Datacenter edition Windows Server 2012 / 2012 R2 Standard or Datacenter edition .NET Framework Microsoft .NET Framework 4.0 is required by System Center 2012 R2 App
Controller. Microsoft .NET Framework 3.5.1 is required by the Windows PowerShell module for App Controller.
Web Server (IIS) The Web Server (IIS) role is required for hosting the App Controller management portal. It is recommend that you use the App Controller setup program to install
and configure this role, rather than attempting to manually pre-install this role.
SQL Server Database SQL Server 2008 R2 Service Pack 2 Standard,
Enterprise or Datacenter edition SQL Server 2012 Service Pack 1 Standard or Enterprise edition running on a separate database server.
Active Directory Any servers on which you are installing System Center 2012 R2 App Controller and/or Microsoft SQL Server must be members of an Active Directory domain. VMM Management
Console Any servers on which you are installing System Center 2012 R2 App Controller must have the management console software for System Center 2012 R2 VMM pre-installed. App Controller uses the VMM management console to programmatically communicate with VMM management servers for private cloud management. The complete steps for installing the VMM management console are available at http://aka.ms/SC2012AC-VMMConsole.
TIP Before launching the System Center 2012 R2 App Controller web console, ensure that your delegated private cloud management users have PCs that meet the following minimum requirements:
■
■ Operating system: Windows Vista or later version ■
■ Web browser: A 32-bit browser that supports Microsoft Silverlight, such as Internet Explorer 8 or later
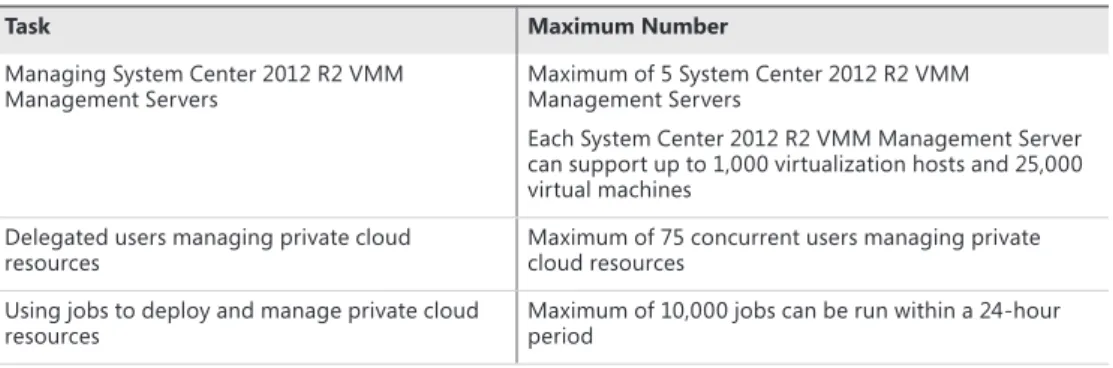
In terms of performance when managing private clouds, the recommended configuration in Table 2-1 has been tested to support the scalability limits presented in Table 2-2. As you can see from this table, using System Center 2012 R2 App Controller and VMM together, you can extend self-service private cloud management for even the largest virtualized data centers—up to 5 VMM management servers, 5,000 virtualization hosts, and 125,000 virtual machines!
TABLE 2-2 Private cloud performance and scale of System Center 2012 R2 App Controller
Task Maximum Number
Managing System Center 2012 R2 VMM
Management Servers Maximum of 5 System Center 2012 R2 VMM Management Servers
Each System Center 2012 R2 VMM Management Server can support up to 1,000 virtualization hosts and 25,000 virtual machines
Delegated users managing private cloud
resources Maximum of 75 concurrent users managing private cloud resources Using jobs to deploy and manage private cloud
resources Maximum of 10,000 jobs can be run within a 24-hour period For highly available App Controller installations, System Center 2012 R2 also supports the following high availability configurations:
■
■ Database Server Install the database server as a clustered installation of SQL Server ■
■ App Controller Install App Controller in a Highly Available Virtual Machine (HAVM) on a Hyper-V Host Cluster
With System Center 2012 R2, multiple App Controller servers can also be located behind a load balancer. Note that in a load-balanced configuration, each App Controller server will need to share a common encryption key. After installing the first App Controller server, you can export the encryption key by using the Export-SCACAesKey Windows PowerShell cmdlet. You will then provide this same exported encryption key when installing the other App Controller servers.
Once you’ve verified the server prerequisites, you’re ready to install System Center 2012 R2 App Controller. Good news—the software installation process is very straightforward and can be accomplished in a short time. To assist in installing System Center 2012 R2 App Controller in your lab environment, take a break here and use these resources to build your lab server:
■
■ Download System Center 2012 R2 Evaluation Kit (http://aka.ms/SC2012AC-Download) ■
■ Install System Center 2012 R2 App Controller (http://aka.ms/SC2012AC-Install) During the installation of System Center 2012 R2 App Controller, the setup program will automatically install .NET Framework 4.0 and the Web Server (IIS) role. In addition, on Windows Server 2008 R2 servers, .NET Framework 3.5.1 will also be automatically installed to support the Windows PowerShell module for App Controller. On Windows Server 2012 and later, .NET Framework 3.5.1 must be manually installed to use the Windows PowerShell module for App Controller.
Signing in at the portal CHAPTER 2 21 Once you’ve completed the installation of System Center 2012 R2 App Controller, you can
test the App Controller web portal by browsing to https://<your_app_controller_server_name>. If you chose the option to generate a self-signed SSL certificate during the App Controller installation process for your lab, you might initially be presented with a certificate warning dialog box. Simply click the option to Continue To This Website to navigate to the App Controller login page. When installing System Center 2012 R2 App Controller in a production environment, it is recommended that you use a registered SSL certificate from a trusted certificate provider to eliminate this warning dialog box. In this case, the trusted certificate provider that you use could be either an internal trusted Certificate Authority (CA) within your organization or a publicly trusted CA. See http://go.microsoft.com/fwlink/?LinkID=269988 for a current list of publicly trusted Root CAs that are distributed by Microsoft with Windows and Windows Server.
Signing in at the portal
When browsing to the App Controller portal page, you’ll be prompted to sign in with Active Directory credentials to authorize your portal access, as shown in Figure 2-1.
FIGURE 2-1 You can sign in to the System Center 2012 R2 App Controller portal.
At the App Controller sign-in page, enter the same Active Directory user credentials that you used when installing System Center 2012 R2 VMM and System Center 2012 R2 App Controller. Click the Sign In button to continue. Upon successful sign in, you will be presented with the System Center 2012 App Controller Overview portal page shown in Figure 2-2.
FIGURE 2-2 An example of the Overview page on the System Center 2012 App Controller portal.
Branding the portal experience
If desired, the System Center 2012 R2 App Controller portal pages can be easily branded for a particular organization. In Figure 2-2, the logos on the top navigation bar, called out in the figure with boxes, can be substituted for alternate graphics that align to internal branding for an IT organization by replacing specific files located in the C:\Program Files\Microsoft System Center 2012\App Controller\wwwroot folder on each App Controller server:
■
■ Top-left logo Replace SC2012_WebHeaderLeft_AC.png with a 213px x 38px PNG file containing a transparent background
■
■ Top-right logo Replace SC2012_WebHeaderRight_AC.png with a 108px x 16px PNG
file containing a transparent background
Connecting to private clouds using App Controller
After signing in to the System Center 2012 R2 App Controller portal, you will need to connect App Controller to at least one System Center 2012 R2 VMM management server to begin managing private clouds via App Controller.
Connecting to private clouds using App Controller CHAPTER 2 23 To add a VMM management server to the App Controller portal, complete the following
steps:
1. Click the Connect A Virtual Machine Manager Server And Clouds link shown in Figure 2-3.
FIGURE 2-3 An example of adding a VMM management server to the App Controller portal.
2. In the Add A New VMM Connection dialog box that is displayed, provide the following information (see Figure 2-4):
■
■ Connection Name A display name for this VMM connection. ■
■ Description Text that describes the private clouds accessible via this VMM connection.
■
■ Server Name The Fully Qualified Domain Name (FQDN) of the System Center 2012 R2 VMM management server.
■
■ Port TCP port used for communication with the VMM management server (default = TCP/8100).
■
■ Automatically Import SSL Certificates Select this check box to import SSL
certificates that App Controller will use for secure communication with the VMM server.
FIGURE 2-4 An example of adding a new VMM connection.
3. Click the OK button to add the new VMM connection.
If you have been delegated more than one user role for managing private clouds in System Center 2012 R2 VMM, you will be prompted for the user role to use when managing private clouds via this connection as shown in Figure 2-5. If you are assigned only a single user role within VMM, this dialog box will not be displayed.
Connecting to private clouds using App Controller CHAPTER 2 25
4. If prompted, select the desired user role and click the OK button.
The selected user role, and the associated delegated scope and allowed actions in VMM, will be used to determine the list of private clouds and actions that App Controller will make available from within the portal.
NOTE The selected user role is valid only for the current portal session. Each time you browse to the portal and open a new authenticated session, you will be prompted for the user role to use for that session if you are assigned to multiple roles for private clouds in VMM.
After your connection is established to the VMM management server, a summarized status of the private clouds and virtual machines currently manageable via this connection will be displayed on the Overview page as shown in Figure 2-6.
FIGURE 2-6 The Overview page showing the private clouds.
At this point, you’ve successfully connected to private clouds using System Center 2012 R2 App Controller.
After a VMM connection is established, to manage, add, or remove VMM connections from the App Controller portal, you may use the Settings\Connections portal page, as shown in Figure 2-7.
FIGURE 2-7 You can use the Connections page when managing private cloud connections.
Adding a network file share to App Controller
In addition to connecting to one or more VMM management servers, App Controller also provides the ability to connect to one or more network file shares to which you have previously been granted permissions. Network file shares are useful in App Controller when copying virtual machine files from other locations to/from a VMM library for deployment within a private cloud.
NOTE If files will be copied to/from an added file share via the App Controller portal, the machine account for each App Controller server must also be granted Full Control permissions to each added file share.
To add a new network file share to the App Controller portal, complete the following steps:
1. Click the Add A Network File Share link under Common Tasks in the Next Steps section of the Overview portal page as shown in Figure 2-8.
Adding a network file share to App Controller CHAPTER 2 27
FIGURE 2-8 You can add a network file share from the Overview page.
2. In the Add A Network Shared Folder dialog box, enter the share path in UNC (for example, \\server\share) format and click OK as shown in Figure 2-9.
FIGURE 2-9 You can see the path in the Add A Network Shared Folder dialog box.
3. After a network file share has been added to the App Controller portal, it can be accessed by navigating to the Library page within the portal, as shown in Figure 2-10.
FIGURE 2-10 You can view the Shares within the Library.
On the Library portal page, network file shares and VMM libraries that were configured during VMM installation are displayed. From this portal page, you can browse the contents of each network file share and VMM library, copy files to/from each location, and add or remove network file shares. Later in this chapter, we’ll step through the process of copying files to/from network file shares to prepare for deploying new workloads within a private cloud.
Managing Run As accounts
When deploying and managing application workloads, administrators regularly encounter several sets of administrative credentials and service account credentials that are needed to properly configure applications for connecting with underlying operating system resources, databases, and other application components. In System Center 2012 R2, the handling of administrative credentials is both simplified and standardized through the use of Run As accounts. Rather than being forced to remember a long list of administrative usernames and passwords for each application, administrators can instead create one set of Run As accounts that contain the necessary credentials. During deployment time, the appropriate Run As accounts can be selected, and System Center 2012 R2 will automatically supply the saved usernames and passwords that are associated with the selected accounts. Run As accounts also provide an effective means of delegating access to other IT administrators or developers for leveraging these credentials when deploying their private cloud workloads without needing to reveal the specific username and password values to these self-service IT users.
To manage the current list of Run As accounts for a set of private clouds, complete the following steps:
1. Click the Clouds page in the App Controller portal and right-click one of the displayed private clouds and click the Manage Run As Accounts option shown in Figure 2-11.
Managing Run As accounts CHAPTER 2 29
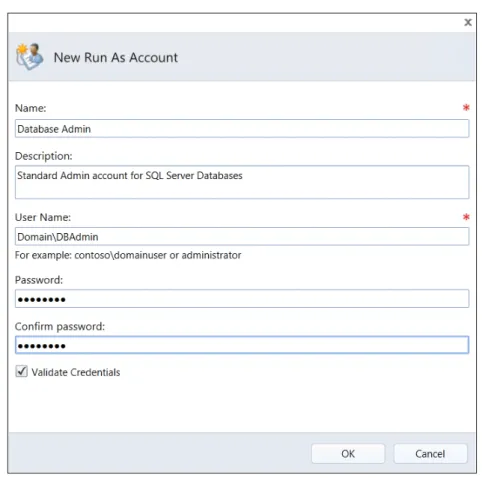
FIGURE 2-11 An example of managing a Run As account.
2. From the right-click menu, click Manage Run As Accounts to display the Create, Edit Or Delete Run As Accounts page as shown in Figure 2-12.
3. To define a new Run As account, click Create to navigate to the New Run As Account page, as displayed in Figure 2-13.
FIGURE 2-13 You can specify details in the New Run As Account dialog box.
4. Enter the username and password of an existing administrative account or service account, and then click OK to save these credentials as a new Run As account. Click Close when finished managing Run As accounts.
Deploying new workloads to private clouds
It is easy to deploy new application workloads to private clouds from the System Center 2012 R2 App Controller portal. During deployment, existing private clouds, delegated access rights, and template resources that were previously defined within System Center 2012 R2 VMM can be leveraged to safely extend deployment operations to authorized self-service IT users. To learn more about defining these configuration items in System Center 2012 R2 VMM, see the following modules in the Build Your Private Cloud (http://aka.ms/BuildYourCloud) online series:
■
Deploying new workloads to private clouds CHAPTER 2 31 ■
■ Module 9 Deploying and Managing Private Cloud Applications with System Center 2012 VMM
To deploy a new application workload to an existing private cloud using System Center 2012 R2 App Controller, complete the following steps:
1. Click the Clouds page and then right-click the private cloud to which the new application workload should be deployed and select the Deploy option shown in Figure 2-14.
FIGURE 2-14 A new workload can be deployed to a private cloud.
2. From the right-click menu, select Deploy to launch the New Deployment dialog box, as shown in Figure 2-15.
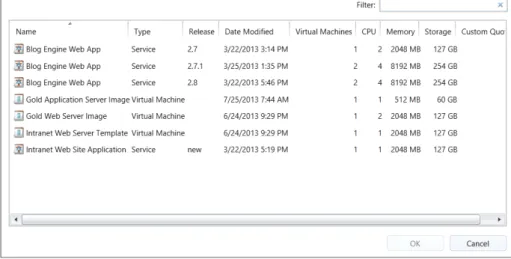
3. On the New Deployment dialog box, click Select A Template and select the appropriate VM Template or Service Template previously defined in System Center 2012 R2 VMM (see Figure 2-16). VM Templates are used to specify a template configuration for a single VM being deployed to a private cloud, whereas Service Templates can include a template configuration for more complex multi-tier applications that can involve multiple virtual machines, applications, virtual networks, and load balancers as part of a single template.
TIP You’ll also find a Copy URL To Clipboard link located at the top-right corner of the New Deployment page. This link is useful for copying the direct link to this page and sharing it with other authorized users as a shortcut for deploying additional workloads to this same private cloud.
Deploying new workloads to private clouds CHAPTER 2 33
4. After selecting the desired template for deploying a new workload, click OK. This will return to the prior New Deployment dialog box where you’ll be presented with options to configure the settings for this new deployment, as shown in Figure 2-17.
FIGURE 2-17 Use the Configure Settings from the New Deployment dialog box to configure the deployment.
5. On the New Deployment dialog box, click Configure in the SERVICE box to configure the general configuration properties for this new application workload. This will display the Properties page for the new service, or application workload, being deployed to the selected private cloud (see Figure 2-18).
Deploying new workloads to private clouds CHAPTER 2 35
6. In the Properties page, enter a Service name for the new service being deployed, and optionally assign a Description, Priority, and Cost Center. Click OK to save this configuration information for the Service and return to the New Deployment dialog box, as displayed in Figure 2-19.
FIGURE 2-19 A summary of the new deployment showing the configured service.
7. Similarly, to configure each VM in each Machine Tier of the service being deployed, click each Configure in the INSTANCE box in the New Deployment dialog box to enter virtual machine configuration settings, if required by the template being used for deployment (see Figure 2-20).
FIGURE 2-20 You can set the name and description in the Properties Of New Virtual Machine page.
8. For the Service Template that is being used in this example, all VM properties have been completed automatically by the template, so there’s no additional configuration information needed. Click OK to return to the prior New Deployment page.
9. To deploy the new application workload to the selected private cloud, click Deploy. Depending on the complexity of the Service Template or VM Template being deployed to a private cloud, the deployment process can require several minutes to complete. While the deployment is being processed, the Jobs page on the App Controller portal can be used to confirm the status of in-progress jobs. When all jobs associated with the new deployment are displayed with a Completed status, the new application workload will have been successfully deployed, as shown in Figure 2-21.
After the successful deployment of the application workload to the selected private cloud, the Services and Virtual Machines pages in the App Controller portal can be used to confirm workload status and manage the deployed workloads, as shown in Figure 2-22 and Figure 2-23.
Deploying new workloads to private clouds CHAPTER 2 37
FIGURE 2-21 The App Controller Portal allows you to view the Jobs page.
FIGURE 2-23 You can view the deployed Virtual Machine instances in a private cloud.
Managing private cloud workloads
After successful deployment of new workloads to a private cloud, these workloads can be managed from the Services and Virtual Machines pages in the App Controller portal. By right-clicking existing deployed Services or VMs on these pages, a set of convenient management actions is presented (see Figure 2-24).
Managing private cloud workloads CHAPTER 2 39
FIGURE 2-24 You can manage services in a private cloud by right-clicking the deployed service.
Right-clicking an existing deployed service on the Services page in the App Controller portal presents a list of actions for managing all components of a service as a single unit. Actions are available to Start, Stop, Suspend, Resume, and Shutdown all VMs associated with this service in a coordinated manner (see Figure 2-25).
In addition, when upgrades to this service need to be deployed, an Upgrade action is presented that permits a new version of a Service Template to be selected for orchestrated deployment across all VMs in that service. This is a powerful feature that permits workload upgrades to be rolled forward and/or rolled backward as needed to support the lifecycle of a deployed application through pilot testing, production roll-outs, patches, and ongoing code revisions.
FIGURE 2-25 You can right-click a VM name to manage VMs in a private cloud.
Right-clicking an existing VM on the Virtual Machines page in the App Controller portal presents a list of actions for managing individual VMs, which could be a subset of a larger service that has been deployed or could simply be discrete VMs that were directly deployed to a private cloud using a VM Template. Actions are available to Start/Shutdown, Pause/Resume, Turn On/Off, and Save VMs.
In addition, two remote control options are available for interacting with the operating system and applications running within each VM:
■
■ Console Used to establish a virtual KVM (Keyboard, Video, and Mouse) connection to the virtual machine’s console from within a webpage
■
■ Remote Desktop Used to establish a remote console connection via the Remote Desktop Protocol (RDP) using Remote Desktop Connection (RDC) client software, assuming the VM is in a state that can accept incoming RDP sessions
Other useful items on this menu include: ■
■ Mount image Used to make an ISO image available to a VM for virtual CD/DVD support
■
■ Store Used to store a VM in a VMM library for use as a VM template to support future workload deployments
■
Moving files to/from private clouds CHAPTER 2 41
Moving files to/from private clouds
When managing private clouds from the App Controller portal, certain tasks might require moving files between network file shares and private cloud VMM libraries. Developer and test lab environments present a common scenario where files might need to be moved in this manner—developer and/or test lab VMs can exist outside of the context of private clouds managed by System Center 2012 R2, and to deploy these VMs to one or more private clouds, these files first need to be moved to a VMM library.
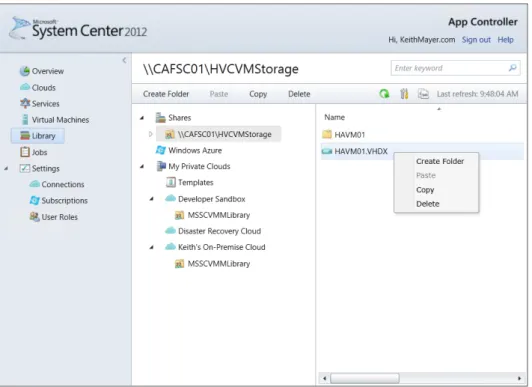
It is easy to move files between network file shares and VMM libraries via the Library page in the App Controller portal, as shown in Figure 2-26.
FIGURE 2-26 You can move files to or from private clouds using VMM libraries.
To move files, such as VM virtual hard disks (for example, .VHD or .VHDX files), from a network file share to a VMM library, select the file from the network file share that was previously added to the App Controller portal and right-click. On the right-click menu, select Copy. After the files have been selected for a copy operation, click the appropriate VMM library folder and then click Paste on the top toolbar.
To move files from a VMM library to a network file share, simply reverse this process by selecting the files for a copy operation from within the appropriate VMM library folder, and then paste into the desired network file share.
43
C H A P T E R 3
Managing public clouds
I
n Chapter 2, “Managing private clouds,” we discussed the capabilities of System Center 2012 R2 App Controller for supporting on-premises private cloud management. In addition to managing private clouds, App Controller also extends self-service management capabilities to public clouds, such as Windows Azure. Being able to provision and manage resources, whether serviced by a private or public cloud, from a single intuitive, web-based portal unifies cloud management with a consistent set of processes for managing application workloads regardless of the location of those workloads.In this chapter, we’ll look at the process for enterprise management of Windows Azure public cloud subscriptions with App Controller as we progress through the following topics:
■
■ Why public cloud? ■
■ Introducing Windows Azure ■
■ Managing Windows Azure with the Windows Azure Management Portal ■
■ Managing Windows Azure with System Center 2012 R2 App Controller ■
■ Preparing for self-service public cloud management ■
■ Creating a self-signed management certificate ■
■ Uploading a management certificate to Windows Azure ■
■ Connecting to public clouds ■
■ Delegating access to public clouds ■
■ Creating a Windows Azure storage account ■
■ Deploying new workloads to a public cloud ■
■ Managing public cloud workloads ■
Why public cloud?
Public cloud platforms, such as Windows Azure, provide globally connected cloud-based data centers that have elastic capacities for delivering extreme volumes of compute, networking, and storage resources on an as-needed basis. This extreme elasticity of resources is attractive to many organizations for augmenting their on-premises data center with additional
on-demand capacity. Otherwise, these organizations are finding that they are increasingly limited by the finite capacity and location of their own data centers alone.
Some of the key scenarios where organizations have seen great successes in leveraging public cloud platforms today include applications that have the following characteristics:
■
■ “On and Off” workloads, such as on-demand development and test lab environments ■
■ Fast capacity growth, such as evaluating and piloting new applications that might need to move quickly to production scale-out
■
■ Unpredictable needs, such as off-site disaster recovery solutions for on-premises applications
■
■ “Bursty” application requests, such as Internet-facing web applications and web services
■
■ Applications requiring high scale of resources for short periods of time, such as batch processing applications and high-performance computing (HPC) calculations.
Of course, there are many different scenarios that make sense for leveraging public cloud platforms, but the scenarios we’ve listed are some of the most common application “patterns” to help you get started in thinking about public clouds in terms of your applications.
Introducing Windows Azure
Windows Azure is Microsoft’s public cloud platform that provides on-demand, self-service provisioning of cloud resources across a global network of Microsoft cloud data centers. Windows Azure is the only cloud platform today that supports the flexibility of all three of the common cloud computing models in the industry (see Figure 3-1):
■
■ Infrastructure as a Service (IaaS) Provision, manage, and migrate cloud-based infrastructure resources, such as virtual machines (VMs), virtual networks, and cloud-based storage. IaaS is ideal for migrating existing on-premises applications to a cloud platform without needing to rewrite application code.
■
■ Platform as a Service (PaaS) Develop and deploy new custom applications designed to take advantage of the scale of cloud platforms. PaaS is ideal for quickly developing new applications or enhancements to existing applications on a cloud platform. PaaS generally provides better cloud cost economics than IaaS for newly developed applications due to an optimized, managed virtual environment that provides the application programming interfaces (APIs) and underlying operating systems.
Managing Windows Azure with the Windows Azure Management Portal CHAPTER 3 45 ■
■ Software as a Service (SaaS) Quickly provision new packaged software in the cloud. SaaS is ideal for making prepackaged software, such as third-party web applications, available to users on a cloud platform. For these prepackaged applications, SaaS generally provides the lowest cloud costs due to optimized and managed software applications.
FIGURE 3-1 Three common cloud computing models.
By supporting all three of the common cloud computing models, Windows Azure provides a public cloud platform that can be leveraged throughout an application’s lifecycle for initially migrating applications to the IaaS model, enhancing applications with the PaaS model, and ultimately consuming those applications as mature, packaged cloud applications with the SaaS model.
You can learn more about the capabilities of Windows Azure and sign up for a free trial subscription for hands-on evaluation at http://aka.ms/WindowsAzureFreeTrial.
Managing Windows Azure with the Windows Azure
Management Portal
As a self-service and on-demand cloud platform, Windows Azure subscriptions can be conveniently managed on an individual basis via the Windows Azure Management Portal. The Windows Azure Management Portal is a web-based portal accessible from any modern web browser supporting HTML5 and JavaScript. Via this portal, the complete portfolio of Windows Azure cloud platform services across IaaS, PaaS, and SaaS models can be directly managed by a subscribing user. The Windows Azure Management Portal can be accessed at http://manage.windowsazure.com.
After signing in to the Windows Azure Management Portal with a Microsoft Account (formerly known as a Microsoft Windows Live ID) that is associated with a valid Windows Azure paid subscription or trial subscription, the portal page shown in Figure 3-2 will be
displayed. From this portal page, the blue navigation bar located on the left edge of the page can be used to select a particular Windows Azure cloud service to be provisioned or managed, such as Virtual Machines, Networks, or Storage. Once a particular service is selected, the page for that particular service will be displayed and the black toolbar located at the bottom edge of the page can be used to provision new cloud resources using the +NEW toolbar button, or manage existing cloud resources using the other toolbar buttons.
FIGURE 3-2 The Windows Azure Management Portal.
To learn more about Windows Azure infrastructure services, be sure to leverage the free online content available as part of the Early Experts cloud program. You’ll find this content available at http://aka.ms/EarlyExpertsCloud.
Managing Windows Azure with System Center 2012
R2 App Controller
As we discussed in the prior section, managing Windows Azure via the web-based Windows Azure Management Portal is quite easy and straightforward for individual users; however, access to this management portal can be challenging to manage across an entire
Creating a self-signed management certificate CHAPTER 3 47 organization. The Windows Azure Management Portal leverages Microsoft Accounts
(formerly Microsoft Windows Live IDs) for authentication, and in larger organizations this can make it challenging to provide several IT administrators or developers with delegated access to Windows Azure. Additionally, most organizations require the ability to assign only the self-service access permissions needed to provision and manage cloud services to authorized members of an IT, development, or business unit team, rather than granting full administrative access to all members of the organization.
Preparing for self-service public cloud management
To manage public clouds via App Controller, you’ll need at least one Windows Azure subscription. If you don’t currently have an active subscription for Windows Azure, you can sign up for a free trial subscription, which is suitable for evaluating Windows Azure in a lab environment with App Controller. You can sign-up for your free Windows Azure trial subscription at http://aka.ms/WindowsAzureFreeTrial.
After you have access to an active Windows Azure subscription, you’ll next need to set up a management certificate. To maintain a secure connection between App Controller and Windows Azure, a management certificate is used to authenticate the connection. In a production environment, you’ll typically want to provision this management certificate via an internal Public Key Infrastructure (PKI) so that certificates can be easily managed and renewed on a centralized basis. For production environments, Windows Server 2012 can be configured with the Active Directory Certificate Services (AD CS) role to host an internal PKI, and while this topic is outside the scope of this book, you can find additional details on planning and deployment of AD CS in the Microsoft TechNet library at http://aka.ms/SC2012AC-ADCS. Alternatively, in a lab environment, you can also quickly create a self-signed management certificate using the process included in the next section of this chapter.
Creating a self-signed management certificate
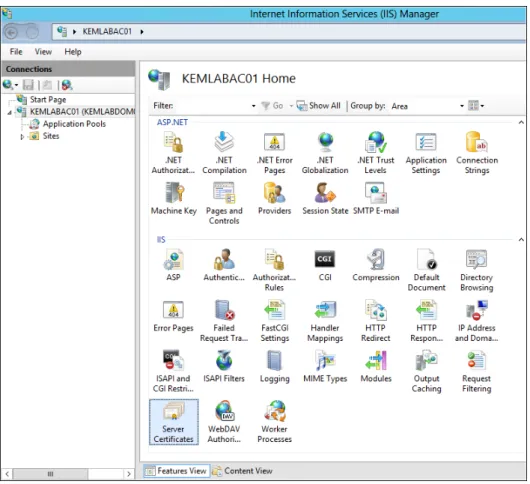
In a lab environment, you can quickly set up a self-signed certificate from the App Controller server console using the IIS Manager tool. This self-signed certificate does not provide the same level of centralized trust and management as a full PKI, but it can be used to provide a secure set of credentials suitable for evaluating public clouds with App Controller. At the App Controller server console, you can launch the IIS Manager tool by selecting Tools and then Internet Information Services (IIS) Manager from the Windows Server 2012 Server Manager tool, as shown in Figure 3-3.
FIGURE 3-3 You can launch IIS Manager from Server Manager.
After the IIS Manager tool has launched, double-click Server Certificates at the bottom of the IIS Manager Home page to create and manage certificates as shown in Figure 3-4.
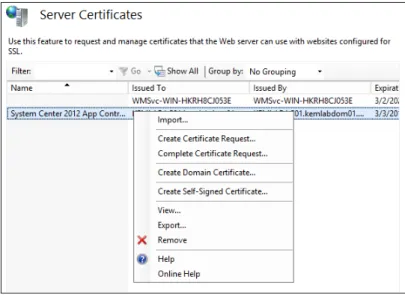
Creating a self-signed management certificate CHAPTER 3 49 On the Server Certificates page of the IIS Manager tool, you can then create a self-signed
management certificate by clicking Create Self-Signed Certificate in the Actions pane located on the right side of the IIS Manager console as shown in Figure 3-5.
FIGURE 3-5 A view of the Server Certificates page in IIS Manager.
In the Create Self-Signed Certificate dialog box, enter a descriptive name for the new certificate being created and click OK to complete the certificate creation process, as shown in Figure 3-6.
FIGURE 3-6 The Create Self-Signed Certificate dialog box allows you to name the certificate.
A new self-signed management certificate has now been created and should be visible on the Server Certificates page of the IIS Manager tool.
Uploading a management certificate to Windows
Azure
After a management certificate has been created, the public keys associated with this certificate must be exported and uploaded to Windows Azure. This will provide Windows Azure with the credentials needed to authenticate your connection from App Controller. To export the public keys from the new certificate, right-click the certificate that is displayed on the Server Certificates page of the IIS Manager tool and select View from the pop-up context menu as shown in Figure 3-7.
FIGURE 3-7 The context menu allows you to view an existing certificate.
Note that you should be careful to select the View option and not the Export option from the menu. Export saves a copy of both public keys and private keys associated with a certificate, and is useful for configuring the App Controller server, which you’ll do in a later section of this chapter, or storing a local backup copy of the certificate. However, a certificate exported in this manner cannot be uploaded to the Windows Azure Management Portal because Windows Azure expects to receive only the public keys associated with a certificate.
After selecting View to show the new certificate properties, select the Details tab in the Certificate dialog box and click Copy To File, as shown in Figure 3-8.
In the Certificate Export Wizard, accept all default values and specify a filename to which you will export the public keys associated with your management certificate. After the export process is complete, you will have a DER-encoded binary X.509 certificate file with a .CER filename extension.
Uploading a management certificate to Windows Azure CHAPTER 3 51
FIGURE 3-8 You can copy an existing certificate to a file from this dialog box.
To upload the exported certificate file to Windows Azure, navigate to the Windows Azure Management Portal at http://manage.windowsazure.com and sign in with the same Microsoft Account (that is, Windows Live ID) user credentials that you used when activating your Windows Azure subscription. On the Windows Azure Management Portal page, select Settings on the blue navigation bar located on the left side of the page (see Figure 3-9).