Tandem Computers Incorporated
NonStop NET/MASTER
MS Operator's Guide
Abstract This manual describes the user interface to NonStop NET/MASTER Management Services (MS). It provides the information users need to get started with NonStop NET/MASTER MS and to use basic NonStop NET/MASTER MS facilities.
Part Number 106379
Edition First
Published December 1994
Product Version NonStop NET/MASTER D30
Release ID D30.00
Copyright Copyright © 1994 by Tandem Computers Incorporated. Printed in the U.S.A. All rights reserved. No part of this document may be reproduced in any form, including photocopying or translation to another language, without the prior written consent of Tandem Computers Incorporated.
Document Disclaimer Information contained in a manual is subject to change without notice. Please check with your authorized Tandem representative to make sure you have the most recent information.
Export Statement Export of the information contained in this manual may require authorization from the U. S. Department of Commerce. Examples Examples and sample programs are for illustration only and may not be suited for your particular purpose. Tandem does
not warrant, guarantee, or make any representations regarding the use or the results of the use of any examples or sample programs in any documentation. You should verify the applicability of any example or sample program before placing the software into productive use.
Ordering Information For manual ordering information: Domestic U.S. customers, call 1-800-243-6886; international customers, contact your local sales representative.
First 106379 D30 D30.00 December 1994
New editions incorporate any updates issued since the previous edition.
A plus sign (+) after a release ID indicates that this manual describes function added to the base release, either by an interim product modification (IPM) or by a new product version on a .99 site update tape (SUT).
Note This manual replaces the manual NonStop NET/MASTER Management Services (MS) Operator's Guide, part number 103937, which was published in January 1994.
New and Changed Information
106379 Tandem Computers Incorporated iii
The operating system for Tandem NonStop systems, formerly called the Guardian operating system, is now called the Tandem NonStop Kernel. This change reflects Tandem’s current and future operating system enhancements that further enable open systems and application portability.
The Sterling Software services to which NonStop NET/MASTER MS connects, formerly the product called NET/MASTER, is now referred to as the SOLVE management services.
References to the NCL Automation Rule Set (NARS) have been removed from the manual.
The titles of all NonStop NET/MASTER MS manuals and reference summaries, except the NonStop NET/MASTER Messages Manual, have changed. (The title of this manual was formerly the NonStop NET/MASTER Management Services (MS) Operator’s Guide.) Cross-references reflect the changed titles.
All sections have minor changes, which include updated screen displays, examples, and figures. The following sections have major changes:
Notation Conventions
The notation conventions information has been expanded.
Section 1 Getting Started With NonStop NET/MASTER MS
The subsection “Using the NonStop NET/MASTER MS Help Facility” consolidates and expands information from Sections 3 through 6 about how to get help for facilities, services, panels, commands, and messages.
Section 2 User ID Management Services (UMS)
The subsection “Browsing Your User ID Definition Record” has new information about the NCL procedure library and NCL object file search paths, and about the panel library and panel object file search paths. The subsection “Valid Passwords” has new criteria for valid passwords.
Section 3 Issuing NonStop NET/MASTER MS Commands
The subsection “Command Authority Levels” has new information on the SHOW COMMANDS command, which is used to display command and operand authority levels. Information in the subsection “Getting Help for Commands” has been moved to Section 1.
Section 4 Operator Control Services (OCS)
Information in the subsection “Getting Help for Commands” has been moved to Section 1. Information related to message help in the subsection “The Event Message Flow” has been moved to Section 1.
Section 5 System Support Services
Information related to command help and message help in the subsection “The Command Entry Facility” has been moved to Section 1.
Section 6 Examining the Activity Log
Information in the subsection “Finding Out More About a Message” has been moved to Section 1.
Section 7 Accessing External Utilities and Applications
The subsection “Running Block-Mode Applications” mentions that you can use the PROGRUN command to run an application from a remote system.
Section 8 Communicating With Remote Systems
The section has new information about using background color to display and identify messages from remote systems.
Section 9 Using Edit Services
The subsection “Your Default Library” discusses the distributed NCL object file. The subsection “Testing a Panel” discusses the distributed panel object file.
Section 10 Automating Operations Tasks With NCL Procedures
The subsection “Performing a Test Compilation on an NCL Procedure” distinguishes between three types of mistakes that are detected during compilation: warnings, errors, and fatal errors. The subsection “Executing Persistent NCL Processes” is new. The subsection “The Default NCL Procedure Search Path” has new information about the default NCL procedure search path.
Glossary The glossary has been expanded.
Contents
106379 Tandem Computers Incorporated v
About This Manual xvii Notation Conventions xxiii
Section 1
Getting Started With NonStop NET/MASTER MS
What Is in This Section 1-1
What Is NonStop NET/MASTER MS? 1-1 Terminals Supported 1-2
Function Key Conventions 1-2
Managing Networks With NonStop NET/MASTER MS 1-3 Windows, Panels, and Menus 1-5
Before You Can Log On to NonStop NET/MASTER MS 1-5 Logging On to NonStop NET/MASTER MS 1-6
The Logon Screen 1-6
If the Logon Screen Is Not Displayed—Starting a Session 1-6 Steps for Logging On 1-7
Logging Off From NonStop NET/MASTER MS 1-8 The NonStop NET/MASTER MS Primary Menu 1-8 The Primary Menu Options 1-9
The Menu Hierarchy 1-10
Navigating Through the Menu Hierarchy 1-12 Selecting an Option From a Menu 1-12
Directly Accessing Menu Options—Panel Skipping 1-12 Returning to the Previous Panel—EXIT Key 1-12 Returning to the Previous Menu—RETURN Key 1-12 Using the NonStop NET/MASTER MS Help Facility 1-13
Help for a Service, Facility, or Panel 1-13 Help for a Message 1-13
Help for a Command 1-15 The Function Keys 1-17
Working With Two Windows 1-18 Splitting Windows 1-18 Swapping Windows 1-20
Section 2
User ID Management Services (UMS)
What Is in This Section 2-1 Accessing UMS 2-1
Browsing Your User ID Definition Record 2-3 The User Details Screen 2-3
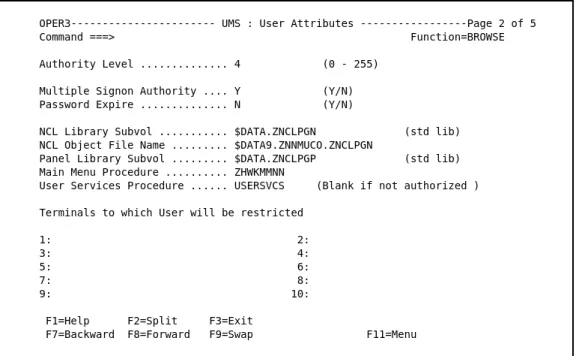
The User Attributes Screen 2-5 The Access Authorities Screen 2-7
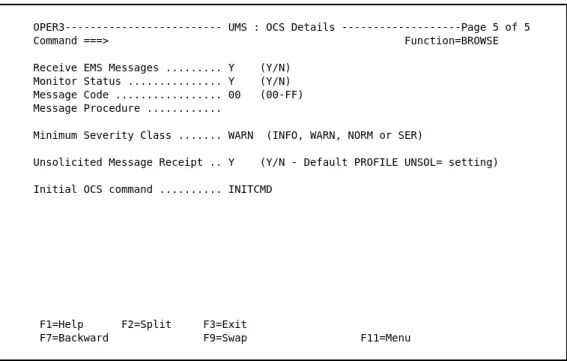
The User Installation Attributes Screen 2-9 The OCS Details Screen 2-10
Listing User ID Definition Records of Other Users 2-12 Scrolling Through the User Definition List 2-15 Locating a Record in the User Definition List 2-16
Viewing the User ID Definition Record of Another User 2-18 Exiting From the User Definition List 2-18
Changing Your Password 2-18 Valid Passwords 2-21
Changing Your User Name, Location, or Telephone Number 2-23 Refreshing Your User ID Definition Record 2-24
If You Forget Your Password 2-24 Console Extras Configurations 2-24
Browsing Console Extras Configurations 2-25 The Console Extras Utility Details Screen 2-28 Terminal Timeouts 2-29
How Global Configuration Values Affect Your Operations Environment 2-29
Section 3
Issuing NonStop NET/MASTER MS Commands
What Is in This Section 3-1 Command Authority Levels 3-1
Issuing NonStop NET/MASTER MS Commands 3-3
Manually Entering NonStop NET/MASTER MS Commands 3-3 Abbreviating Commands 3-3
Concatenating Commands 3-3
Using Function Keys to Issue NonStop NET/MASTER MS Commands 3-4
106379 Tandem Computers Incorporated vii
Issuing Timer Commands 3-5
Attributes of Timer Commands 3-5 The Timer Queue 3-6
Executing Timer Commands When You Are Not Logged On 3-6 Using the KEEP Operand 3-6
Using the ROUTE Operand 3-6
Sending a Timer Command to Another User 3-6
Limiting the Number of Times a Command Is Executed 3-7 Purging a Timer Command 3-7
System-Wide Customized Commands 3-8 Global Equates 3-8
Command Replacements 3-9
Executing NonStop NET/MASTER MS Commands in the Background 3-10 Virtual Users 3-10
Submitting Commands to Virtual Users 3-11
Section 4
Operator Control Services (OCS)
What Is in This Section 4-1 What Is OCS? 4-1
Entering and Exiting OCS 4-1 The Standard OCS Window 4-2 The OCS Message Display Area 4-2
Roll-Delete Messages 4-3
Temporarily Suspending Roll-Delete Message Delivery 4-4 Controlling the Roll-Delete Message Display Flow 4-4 The Message Hold Queue 4-6
Reorganizing the Message Display Area 4-6 Clearing the Roll-Delete Message Area 4-6 Non-Roll-Delete (NRD) Messages 4-7
Full NRD Messages 4-7
NRD Messages With the OPER Attribute 4-8
When a NRD Message Is Displayed on an OCS Window 4-8 Pending NRD Messages 4-9
Removing NRD Messages From Your OCS Window 4-9 Restoring Full NRD Messages to Your OCS Window 4-9
Deleting NRD Messages From Your OCS Window and the Central Queue 4-9
The Information Line 4-11 The Command Input Line 4-11 The Mode Indicator 4-12 The OCS Recall Buffer 4-13
Entering and Exiting the Recall Buffer 4-13 The Recall Buffer Screen 4-14
The Recall Buffer Function Keys 4-15 Using the OCS Function Keys 4-17
Displaying the Current Function Key Definitions 4-17 Customizing Function Keys 4-18
Your OCS Operator Profile 4-21
Displaying Your Operator Profile 4-21
Modifying Your Operator Profile for the Current Session 4-21 Customizing Your Initial Operator Profile 4-22
Issuing NonStop NET/MASTER MS Commands From OCS 4-22 Entering Commands on the Command Input Line 4-22
Suppressing the Command Echo 4-22
Retaining Commands on the Command Input Line 4-23 Defining Function Keys to Issue Commands 4-23
Reexecuting Previously Entered Commands 4-23 Executing Commands From an NCL Procedure 4-24 Creating Customized Commands in OCS 4-24
Local Equates 4-24
Deleting a Local Equate 4-24 Monitoring Events 4-25
The Event Message Flow 4-26
Message Color and Highlighting 4-28 Event Message Codes 4-29
Viewing Messages in the Activity Log 4-29 Working With Two OCS Windows 4-30
Opening a Second OCS Window 4-30 Moving Between Two OCS Windows 4-30 Naming Windows 4-31
106379 Tandem Computers Incorporated ix
Section 5
System Support Services
What Is in This Section 5-1
Entering System Support Services 5-1 The Command Entry Facility 5-2
Entering the Command Entry Facility 5-3 The Command Entry Function Keys 5-4 The Command Entry Screen 5-5
Receiving Unsolicited Messages 5-7 Entering Commands 5-7
The Command Stack 5-8 The Capture Buffer 5-9
Examining the Capture Buffer 5-11 Printing the Capture Buffer 5-14 Emptying the Capture Buffer 5-15
The Display/Update SYSPARMS Settings Facility 5-16
Entering the Display/Update SYSPARMS Settings Facility 5-16 The Display/Update SYSPARMS Function Keys 5-17
The Display/Update SYSPARMS Operands Screen 5-18 Examining the SYSPARMS Values 5-18
Updating a SYSPARMS Operand Value 5-19 Resetting a SYSPARMS Operand Value 5-20
Section 6
Examining the Activity Log
What Is in This Section 6-1 What Is the Activity Log? 6-1
Entering and Exiting the Activity Log Browse Facility 6-2 How Activity Log Records Are Displayed 6-2
Short Record Format 6-3 Normal Record Format 6-4 Full Record Format 6-4 Refreshing the Record Display 6-5
Examining the Activity Log 6-5
Searching Activity Log Records by Date 6-9 Searching Activity Log Records by Time 6-10
Searching the Activity Log by String or Field Value 6-11 Marking and Locating a Position in the Activity Log 6-14
Marking a Position 6-14 Locating a Position 6-15 Changing the Search Scope 6-16
Modifying the Number of Records to Be Searched 6-16 Defining the Region to Be Searched 6-17
Browsing Through Another Activity Log File 6-17
Browsing Through an Earlier Activity Log File in the Current Log Set 6-18
Browsing Through an Archived Activity Log File 6-18 Browsing Through a Remote Activity Log File 6-18
Issuing NonStop NET/MASTER MS Commands From the Activity Log Browse Facility 6-19
Sending Messages to the Activity Log 6-19 Opening a New Activity Log File 6-19
Displaying Information About Activity Log Files 6-20
Section 7
Accessing External Utilities and Applications
What Is in This Section 7-1 Overview of DSNM 7-3
Issuing DSNM Commands With OPSYS 7-4 DSNM Command Format 7-4
Getting Help for DSNM Subsystem Commands 7-5 Running Conversational Guardian Utilities 7-6
The DSNM Utility Access Command Set 7-6
Getting Help for DSNM Utility Access Commands 7-7 Utility Access Security 7-7
Starting a Session With a Utility 7-8 Sending Commands to a Utility 7-10
Responding to Prompts Generated by Utilities 7-13 Sending a BREAK Message to a Utility 7-16
106379 Tandem Computers Incorporated xi
Running Block-Mode Applications 7-20
The Two Forms of the PROGRUN Command 7-21 Running NetStatus 7-23
Entering Commands From Within NetStatus 7-26 Viewing Command Responses in NetStatus 7-27 Sending a Problem to DSM/PM 7-28
The Console Extras Facility 7-29
Entering the Console Extras Facility 7-29 The Console Extras Function Keys 7-30 The Console Extras Utility List Screen 7-30 Running a Utility 7-31
Browsing the Details of a Utility 7-31
The Console Extras Utility Details Screen 7-32
Section 8
Communicating With Remote Systems
What Is in This Section 8-1
Establishing a Session With a Remote System 8-1 Receiving Solicited and Unsolicited Messages 8-2 Local User ID Requirements 8-2
Remote User ID Requirements 8-2 Displaying Information About Links 8-3 Starting a Link With a Remote System 8-3 Logging On to a Remote System 8-3
Explicitly Logging On to a Remote System 8-3 Password Considerations 8-4
If the Remote System Is Inactive 8-4 Specifying a Message Prefix 8-5
Overriding the Configured Background Color, Text Color, and Highlighting of Messages 8-5
If the Link Fails 8-5
Automatically Logging On to a Remote System 8-6 Logging On to Multiple Remote Systems 8-6
Sending Commands Directly to a Remote System 8-6 Sending Commands Through Intermediate Systems 8-7 Monitoring Events From Remote Systems 8-8
Remote Message Display 8-8
Logging Off From a Remote System 8-9 Stopping a Link 8-9
Resetting a Link 8-9 INMC Link Failures 8-10
Section 9
Using Edit Services
What Is in This Section 9-1 Entering Edit Services 9-1
The Edit Services Selection List 9-2 Your Default Library 9-2
Switching to a Different Procedure Library 9-3 The Edit Services Function Keys 9-4
Creating a New File 9-5
Ownership and Security Attributes of New Files 9-5 Changing the Security on a File 9-6
Locating a File or Group of Files 9-7 Editing a File 9-8
Browsing a File 9-8 Deleting a File 9-9
Restrictions on Using TEDIT 9-9
Performing a Trial Compilation of an NCL Procedure 9-10 Checking the Results if There Are Errors or Warnings 9-10 Testing a Panel 9-11
Section 10
Automating Operations Tasks With NCL Procedures
What Is in This Section 10-1 Creating NCL Procedures 10-1
Executing NonStop NET/MASTER MS Commands From an NCL Procedure 10-1
Executing a NonStop NET/MASTER MS Command With an NCL CMD Statement 10-1
Executing a NonStop NET/MASTER MS Command With an NCL INTCMD Verb 10-2
106379 Tandem Computers Incorporated xiii
Sample NCL Procedure 10-4
Performing a Test Compilation on an NCL Procedure 10-6 Compiling an NCL Procedure 10-7
Executing NCL Procedures 10-7
Executing Persistent NCL Processes 10-8 NCL Procedure Libraries 10-8
The Default NCL Procedure Search Path 10-9 The NCL Process Identifier 10-10
Terminating Execution of an NCL Process 10-10 Viewing the Contents of NCL Libraries and Files 10-10 Using Timer Commands to Execute NCL Procedures 10-11 Executing NCL Procedures in the Background 10-11 The Concept of Processing Environments 10-12
The Primary Processing Environment 10-12 The Background Processing Environment 10-12 The Dependent Processing Environment 10-12 The Current Processing Environment 10-13
Section 11
User Services
What Is in This Section 11-1
Glossary
Glossary–1Figures
Figure 1. Documentation Road Map xxiFigure 1-1. Example of Using NonStop NET/MASTER MS to Manage a Homogeneous Network 1-3
Figure 1-2. Example of Using NonStop NET/MASTER MS to Manage a Heterogeneous Network 1-4
Figure 1-3. The NonStop NET/MASTER MS Menu Hierarchy 1-11 Figure 4-1. The Standard OCS Window 4-2
Figure 4-2. The Event Message Flow 4-28
Figure 5-1. The Command Entry Capture Buffer 5-10 Figure 5-2. The Command Entry Print Details Screen 5-14 Figure 6-1. Switching Between Activity Log Record Formats 6-3
Figure 7-1. The Interface Between NonStop NET/MASTER MS and Other Tandem Network Management Facilities 7-2
Figure 7-2. How the Guardian User ID of External Processes is Determined 7-18
Figure 9-1. Edit Services Selection List Screen 9-2 Figure 9-2. How File Ownership Is Determined 9-6 Figure 10-1. Default NCL Procedure Search Path 10-9
106379 Tandem Computers Incorporated xv
Tables
Table 1-1. Moving Through Message Help Databases 1-14Table 1-2. Scrolling Through the Command Tutorial Selection List 1-16 Table 1-3. Default Function Key Definitions 1-17
Table 2-1. UMS User Details Fields 2-4 Table 2-2. UMS User Attributes Fields 2-5 Table 2-3. UMS Access Authorities Fields 2-8 Table 2-4. UMS OCS Details Fields 2-10
Table 2-5. Scrolling Through the User Definition List 2-15 Table 2-6. Locating a Record in the User Definition List 2-16 Table 4-1. AUTOHOLD Settings 4-5
Table 4-2. Holding-Mode Messages 4-11 Table 4-3. The Mode Indicator 4-12
Table 4-4. Recall Buffer Function Key Definitions 4-15 Table 4-5. Types of Function Key Assignments 4-19 Table 4-6. Event Message Codes 4-29
Table 5-1. Command Entry Function Key Definitions 5-4 Table 5-2. Command Entry Screen Fields 5-5
Table 5-3. Examining the Command Entry Capture Buffer 5-11 Table 5-4. Display/Update SYSPARMS Function Key Definitions 5-17 Table 5-5. Examining the SYSPARMS Operands 5-18
Table 6-1. Activity Log Browse Function Key Definitions 6-5 Table 6-2. Examining the Activity Log 6-6
Table 7-1. The DSNM Subsystem Commands Available With OPSYS 7-4 Table 7-2. The DSNM Utility Access Commands Available With
OPSYS 7-6
Table 7-3. Viewing Command Responses in NetStatus 7-27 Table 7-4. Console Extras Function Key Definitions 7-30 Table 7-5. Console Extras Utility Details Screen Fields 7-32 Table 9-1. Edit Services Function Key Definitions 9-4
About This Manual
106379 Tandem Computers Incorporated xvii
This manual describes the user interface to the NonStop NET/MASTER Management Services (MS) product.
NonStop NET/MASTER MS belongs to the set of Tandem management products known collectively as Distributed Systems Management (DSM). It is a menu-driven, customizable application that allows you to monitor and manage a single Tandem system or a heterogeneous network from a single terminal.
Who Should Read
This Manual
This manual is written for those who use NonStop NET/MASTER MS to monitor and manage the day-to-day operation of a system or network.
How This Manual Is
Organized
The NonStop NET/MASTER MS Operator’s Guide is a task-oriented manual that
provides the information you need to get started with NonStop NET/MASTER MS. It describes the NonStop NET/MASTER MS facilities you can use every day to perform system and network management tasks.
Section 1, “Getting Started With NonStop NET/MASTER MS,” introduces NonStop NET/MASTER MS and familiarizes you with the NonStop NET/MASTER MS operations environment.
It describes the options you can choose from the NonStop NET/MASTER MS Primary Menu, with a map of how the rest of the manual is organized in relation to the Primary Menu options. It presents a hierarchy of all the subordinate menus, shows you how to navigate through the menu hierarchy, and describes the
NonStop NET/MASTER MS help facility.
Section 2, “User ID Management Services (UMS),” describes how to perform basic tasks using UMS, such as changing your password and updating your name, location, and telephone number.
Section 3, “Issuing NonStop NET/MASTER MS Commands,” introduces the NonStop NET/MASTER MS command set. It discusses command authority levels, command syntax rules, timer commands, customized commands, and submitting commands to be executed in the background. Additionally, it gives an overview of some of the commonly used NonStop NET/MASTER MS system management commands.
Section 4, “Operator Control Services (OCS),” discusses the OCS event monitoring and command entry facilities.
Section 5, “System Support Services,” describes the Command Entry and Display/Update SYSPARMS facilities available from System Support Services. Section 6, “Examining the Activity Log,” describes the NonStop NET/MASTER MS activity log, where events about network activity are recorded, and shows how to examine this log by using the Activity Log Browse facility.
How This Manual Is Organized
Section 7, “Accessing External Utilities and Applications,” describes the NonStop NET/MASTER MS interfaces to:
The Distributed Systems Network Management (DSNM) product, which processes commands for monitoring and controlling network subsystems and objects
Guardian utilities, TACL routines, and other external conversational-mode and block-mode applications
The NetStatus network monitoring application The DSM/Problem Manager (DSM/PM) product
Section 8, “Communicating With Remote Systems,” tells you how to start and stop links, establish sessions, and communicate with remote systems.
Section 9, “Using Edit Services,” describes the Edit Services facility, from which you can create, modify, view, and delete edit files and perform trial compilations of Network Control Language (NCL) procedure source files. You can also use the facility to test NCL panels.
Section 10, “Automating Operations Tasks With NCL Procedures,” introduces the NonStop NET/MASTER Network Control Language (NCL) and provides basic instruction on creating and executing NCL procedures to automate operations tasks.
Section 11, “User Services,” describes the User Services facility, which allows you to access custom applications written specifically for your installation.
The glossary defines NonStop NET/MASTER MS and Tandem system terms and abbreviations used in this manual.
The index provides an alphabetic access point to significant terms and topics discussed in this manual.
Where to Go for More Information
106379 Tandem Computers Incorporated xix
Where to Go for More
Information
Because it is not possible to know exactly which tasks may be required of operators at a particular installation, the NonStop NET/MASTER MS Operator’s Guide might not provide all the information you need to get your job done. For example, at some sites, tasks described in the NonStop NET/MASTER MS System Management Guide may be tasks that are routinely performed by those we have identified as system or network “operators.” For more information on NonStop NET/MASTER MS, you should consult the:
NonStop NET/MASTER MS Command Reference Manual, for the complete syntax,
default authority level, usage considerations, and examples of all NonStop NET/MASTER MS commands.
NonStop NET/MASTER MS System Management Guide, for all the information
required to plan for, install, customize, and support NonStop NET/MASTER MS on a Tandem system.
NonStop NET/MASTER Messages Manual, for an explanation of all messages,
event-message tokens, and NCL error codes issued by NonStop NET/MASTER MS. For messages, the manual includes probable causes, effects, and recovery actions.
NonStop NET/MASTER NCL Programmer’s Guide, for an overview of NCL concepts
and terms, and how to use NCL.
NonStop NET/MASTER NCL Reference Manual, for a complete description of NCL
constructs.
NonStop NET/MASTER RMS Management and Operations Guide, for information on
using RMS.
You may also find the following reference summaries helpful as you are using NonStop NET/MASTER MS and NCL:
NonStop NET/MASTER MS Command Reference Summary, for a summary of all
NonStop NET/MASTER MS commands.
NonStop NET/MASTER NCL Reference Summary, for a summary of NCL constructs.
You might need more information about the Tandem products that can be accessed from NonStop NET/MASTER MS. Distributed Systems Network Management (DSNM) is a prerequisite product for NonStop NET/MASTER MS, and NetStatus is an optional network monitoring application that can be used directly from NonStop NET/MASTER MS. For information about these products, refer to the:
User’s Guide to DSNM Commands, which describes the DSNM command set. NetStatus User’s Guide, which provides instructions for using NetStatus to perform
network management tasks.
In addition, if you are involved with configuring DSNM, you will require the
Distributed Systems Management Solutions (DSMS) System Management Guide, which
contains step-by-step instructions for installing, configuring, and managing DSNM. (This manual lists other manuals that are helpful when you are installing DSNM.)
Your Comments Invited
You should also have access to subsystem-specific manuals for any of the subsystems being managed either through DSNM or through other subsystem management utility programs.
The following manuals describe how to use DSM/Problem Manager, the Event Management Service analyzer, the Object Monitoring Facility, and the ViewSys system resource monitor that you can access from NonStop NET/MASTER MS:
DSM/Problem Manager User’s Guide
DSM/Problem Manager Installation and Customization Guide
Event Management Service (EMS) Analyzer User’s Guide and Reference Manual Object Monitoring Facility (OMF) User’s Guide and Reference Manual
ViewSys User’s Guide
Finally, if the network being managed with NonStop NET/MASTER MS contains systems running on an IBM platform, appropriate SOLVE management services and IBM manuals are also required.
Figure 1 illustrates the functional breakdown of the NonStop NET/MASTER product manual set as well as its relationship to other Tandem manuals.
Your Comments
Invited
After you have had a chance to use this manual, please take a moment to fill out the Reader Comment Card and send it to us. The Reader Comment Card is located at the back of the printed manual and as a separate file in the CD Read Document List. You can fax the card to us at (408) 285-6660 or mail the card by using the business reply address on the back of the card in the printed manual. Many of the improvements you see in Tandem manuals are a result of suggestions from our customers. Please take this opportunity to help us improve future manuals.
Documentation Road Map
106379 Tandem Computers Incorporated xxi
Figure 1. Documentation Road Map
001
Other related manuals Legend Manuals specific to NonStop NET/MASTER Configuring and Managing NonStop NET/MASTER Using NonStop NET/MASTER NCL Programming NonStop NET/MASTER NCL Programmer’s Guide NonStop NET/MASTER NCL Reference Manual NonStop NET/MASTER MS System Management Guide NonStop NET/MASTER MS Operator's Guide NonStop NET/MASTER MS Command Reference Manual NonStop NET/MASTER Messages Manual Subsystem-Specific Management Guides NetStatus User's Guide User's Guide to DSNM Commands Introduction to Distributed Systems Management (DSM) DSMS System Management Guide Distributed Name Service (DNS) Management Operations Manual EMS Manual NonStop NET/MASTER RMS Mgmt and Operations Guide
Documentation Road Map
Notation Conventions
106379 Tandem Computers Incorporated xxiii
General Syntax
Notation
The following list summarizes the notation conventions for syntax presentation in this manual.
UPPERCASE LETTERS Uppercase letters indicate keywords and reserved words; enter these items exactly as shown. Items not enclosed in brackets are required. For example:
MAXATTACH
lowercase italic letters Lowercase italic letters indicate variable items that you supply. Items not enclosed in brackets are required. For example:
file-name
Brackets [ ] Brackets enclose optional syntax items. For example:
TERM [\system-name.]$terminal-name INT[ERRUPTS]
A group of items enclosed in brackets is a list from which you can choose one item or none. The items in the list may be arranged either vertically, with aligned brackets on each side of the list, or horizontally, enclosed in a pair of brackets and separated by vertical lines. For example:
LIGHTS [ ON ] [ OFF ] [ SMOOTH [ num ] ] K [ X | D ] address-1
Braces { } A group of items enclosed in braces is a list from which you are required to choose one item. The items in the list may be arranged either vertically, with aligned braces on each side of the list, or horizontally, enclosed in a pair of braces and separated by vertical lines. For example:
LISTOPENS PROCESS { $appl-mgr-name } { $process-name } ALLOWSU { ON | OFF }
Vertical Line | A vertical line separates alternatives in a horizontal list that is enclosed in brackets or braces. For example:
INSPECT { OFF | ON | SAVEABEND }
Underline _ An underlined syntax item in a horizontal or vertical list is the default value. If you do not choose any item in a list, the default value is used. For example:
NONE BLUE GREEN PINK RED TURQUOISE WHITE YELLOW
General Syntax Notation
Ellipsis ... An ellipsis immediately following a pair of brackets or braces indicates that you can repeat the enclosed sequence of syntax items any number of times. For example:
M address-1 [ , new-value ]... [ - ] {0|1|2|3|4|5|6|7|8|9}...
An ellipsis immediately following a single syntax item indicates that you can repeat that syntax item any number of times. For example:
"s-char..."
Punctuation Parentheses, commas, semicolons, and other symbols not previously described must be entered as shown. For example:
error := NEXTFILENAME ( file-name ) ; LISTOPENS SU $process-name.#su-name
Item Spacing Spaces shown between items are required unless one of the items is a punctuation symbol such as a parenthesis or a comma. For example:
CALL STEPMOM ( process-id ) ;
If there is no space between two items, spaces are not permitted. In the following example, there are no spaces permitted between the period and any other items:
$process-name.#su-name
Boldface Boldface characters indicate the minimum number of characters that uniquely identify a command or operand. For example:
PROFILE
Boldface used in narrative text introduces new terms and terms specific to the Tandem operating environment. These terms are defined in the glossary at the end of this manual.
1 Getting Started With
NonStop NET/MASTER MS
106379 Tandem Computers Incorporated 1–1
What Is in This Section
This section introduces the NonStop NET/MASTER Management Services (MS) product and explains the concepts and terminology used to discuss it.The intent of this section is to get you started with NonStop NET/MASTER MS and to introduce you to the services available through NonStop NET/MASTER MS. It describes the features, such as online help and multiple windows, that will facilitate your actual use of the product.
It also illustrates how the rest of the manual is organized in terms of the options available from the NonStop NET/MASTER MS Primary Menu. The menu is displayed when you initially log on to NonStop NET/MASTER MS.
After reading this section, you should understand:
How to log on to and off from the NonStop NET/MASTER MS product What options are available through the NonStop NET/MASTER MS Primary Menu
How to navigate through the NonStop NET/MASTER MS menu hierarchy How to use the function keys
How to use the NonStop NET/MASTER MS help facility How to split your screen and swap windows
What to do if you are suddenly logged off or locked out
What Is NonStop
NET/MASTER MS?
NonStop NET/MASTER MS belongs to the set of Tandem management products known collectively as Distributed Systems Management (DSM). It is a network management environment that allows you to monitor and manage a single Tandem system or an entire network from a single terminal. Having NonStop NET/MASTER MS installed on your system also allows your local system to be monitored and/or managed remotely as part of a network of systems managed by NonStop
Terminals Supported
With NonStop NET/MASTER MS, you can:
View event messages generated by both local and remote systems throughout a network.
Issue commands to remotely control and gather information about any peer system in the network, and have the responses displayed on your local terminal. Run Guardian utilities, TACL routines, and other external conversational-mode utilities, and control the running of Tandem block-mode applications.
Write and execute custom applications and operations management automation procedures by using the NonStop NET/MASTER Network Control Language (NCL), a high-level language created specifically for automating system and network management tasks.
Browse log files, where messages arriving at your local NonStop NET/MASTER MS system are logged. These messages report activity occurring throughout the network.
Tailor your individual operations environment.
NonStop NET/MASTER MS provides a hierarchical menu structure and a set of commands with which you accomplish these network management tasks.
Terminals Supported
You can run NonStop NET/MASTER MS from the following terminals: A Tandem 6530 or compatible terminalAn IBM 3270 or compatible terminal
NonStop NET/MASTER MS supports color and highlighting if such features are available on your terminal.
Function Key
Conventions
In this manual, function keys are referred to by their Tandem 6530 keyboard names, followed by their IBM 3270 keyboard equivalents in parentheses: for example, F1 (PF01) function key.
In addition, the key you press to execute a command is always referred to as the ENTER key. (This is to distinguish it from the RETURN function, which returns you to the menu from which your current operations facility was invoked and which, in NonStop NET/MASTER MS, is executed by pressing the F4 (PF04) function key.)
Caution Other keyboards may have different but equivalent function keys; refer to the manual appropriate to the keyboard you are using. For example, if you are using the PC6530 software to emulate a 6530 terminal on an IBM PC with a 12-function key keyboard, the equivalent for function key for F13 is Alt and F3.
Managing Networks With NonStop NET/MASTER MS
106379 Tandem Computers Incorporated 1–3
Managing Networks
With NonStop
NET/MASTER MS
With NonStop NET/MASTER MS, you can manage a single Tandem system, a network of Tandem systems, or a heterogeneous network comprising both Tandem and IBM-supported systems from a local terminal.
Figure 1-1 illustrates a network consisting of Tandem systems. This configuration requires that NonStop NET/MASTER MS be installed on each node in the network.
Figure 1-1. Example of Using NonStop NET/MASTER MS to Manage a Homogeneous Network
002
Paris London
Sydney Los Angeles
Tokyo New York
Indicates a node with human operators. In the other nodes, routine operations tasks have been automated with NCL procedures that analyze events as they are reported and issue commands to correct them. 1 Legend 1 1 1
Managing Networks With NonStop NET/MASTER MS
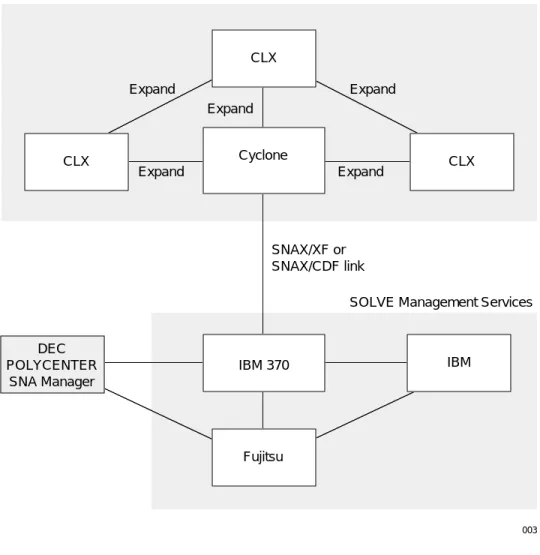
Figure 1-2 illustrates a network consisting of several Tandem systems connected to another network managed by an IBM system. This arrangement requires that
NonStop NET/MASTER MS be installed on the Tandem systems and that the SOLVE management services product be installed on systems running on an IBM platform.
Figure 1-2. Example of Using NonStop NET/MASTER MS to Manage a Heterogeneous Network
003 CLX CLX CLX Cyclone Expand Expand Expand Expand Expand DEC POLYCENTER SNA Manager IBM Fujitsu IBM 370 SNAX/XF or SNAX/CDF link NonStop NET/MASTER Management Services
Before You Can Log On to NonStop NET/MASTER MS
106379 Tandem Computers Incorporated 1–5
Windows, Panels, and
Menus
In NonStop NET/MASTER MS, you can divide your physical screen into two logical screens called windows. Each window operates independently of the other, enabling you to perform multiple functions concurrently.
A panel is a formatted display that partially or completely overlays a window. A panel can be used to:
Retrieve and present information, such as panels displaying online help and user ID information.
Receive information, such as panels used for defining user ID information to NonStop NET/MASTER MS.
A menu is a panel that displays a list of options. The options allow you to choose what you want to do next. Each option can initiate another menu or function.
Before You Can Log
On to NonStop
NET/MASTER MS
Before you can log on to the NonStop NET/MASTER MS product, your system manager must add information about you to the database of NonStop NET/MASTER MS users. This information is referred to collectively as your user ID definition
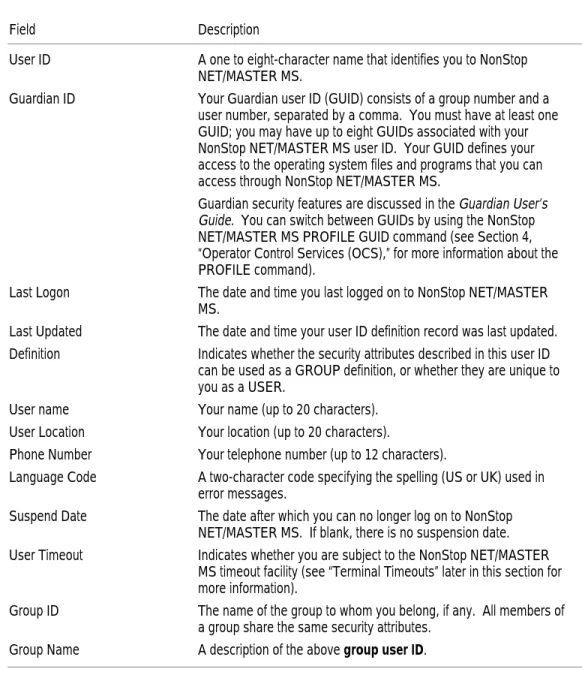
record, and includes the following:
Personal information, such as your name, location, telephone number, user ID, and password.
Security information, which determines the NonStop NET/MASTER MS facilities and commands you are allowed to use. Two important aspects of your user ID definition record are:
Authorized functions that define which options you are allowed to select from the NonStop NET/MASTER MS Primary Menu and which functions you are allowed to perform within the various NonStop NET/MASTER MS options. An authority level that determines which NonStop NET/MASTER MS commands you are allowed to issue, which Guardian utilities and other external applications you are able to access from within NonStop
NET/MASTER MS, and which commands within external applications you are allowed to use.
Your user ID definition record also determines attributes such as whether: You can log on to remote systems in addition to your local system
Your access to NonStop NET/MASTER MS is restricted to specific terminals You are allowed to log on to NonStop NET/MASTER MS dynamically from any terminal
You must change your password periodically
All the fields in your user ID definition record are discussed in detail in Section 2, “User ID Management Services (UMS).”
Logging On to NonStop NET/MASTER MS
Logging On to
NonStop NET/MASTER
MS
You log on to NonStop NET/MASTER MS from the NonStop NET/MASTER MS
logon screen.
If your terminal is a dedicated NonStop NET/MASTER MS terminal, the logon screen is displayed whenever you are not actually working in NonStop NET/MASTER MS.
The Logon Screen The NonStop NET/MASTER MS logon screen is as follows:
___ ___
/ // //| NonStop NET/MASTER Management Services / // // | T6581D30 - 31OCT94 / // / | | /__//__//|| | # # #### / || / ## # # # | ||/ # # # #### #### ## ##### #### #### | | # ## # # # # # # # # # # | / # # #### # # #### # #### #### |/ # # # #### ##### # # # ## #### ##### #### #### ## # # # # ## ## # # # # # # # # # # ### # # # ## # #### ## # ### ### # ## # # # # # # # # # # # # # # #### # # # # # # #### # #### # #
Enter User ID ===> Password ===>
NonStop is a trademark of Tandem Computers Incorporated NET/MASTER is a registered trademark of Software Developments Pty Ltd
If the Logon Screen Is Not Displayed—Starting a Session
If the logon screen is not displayed on your terminal, and if you are authorized to dynamically access NonStop NET/MASTER MS, you can display the logon screen on your terminal by using the NNM utility program from your TACL prompt.
You must specify the process name of the NonStop NET/MASTER MS control process (NCP) when you use the NNM program, unless it is $ZNNM (the default), in which case you can omit the process name. For example, to display the logon screen for $ZNNM, type either of the following commands from your TACL prompt:
TACL> NNM
TACL> NNM $ZNNM
To display the logon screen for $ANNM, type the following command from your TACL prompt:
TACL> NNM $ANNM
(You can also display the logon screen for a NonStop NET/MASTER MS system on another Tandem node. Refer to the NonStop NET/MASTER MS System Management
Logging On to NonStop NET/MASTER MS
106379 Tandem Computers Incorporated 1–7
The NNM utility is loaded into $SYSTEM.SYSTEM as part of the NonStop NET/MASTER MS installation process.
If you have any problems, contact your system manager or refer to the NonStop
NET/MASTER MS System Management Guide. It may be that the NNM utility program
has been moved from $SYSTEM.SYSTEM to another location, or that you are using the wrong process name for the NCP.
Steps for Logging On Follow these steps to log on to the NonStop NET/MASTER MS application: 1. Type your user ID in the Enter User ID field.
A valid user ID is from one through eight alphanumeric or national characters in length (in English, national characters are: # $ @). You can enter your user ID by using any combination of uppercase and lowercase letters (user IDs are not case-sensitive, and letters are converted to uppercase).
2. Move your cursor to the Password field and type your password.
You must enter your password with the proper uppercase and lowercase letters (passwords are case-sensitive). Your password is not displayed as you type. Section 2, “User ID Management Services (UMS),” discusses the criteria for valid passwords.
3. Press the ENTER key.
If you enter either your user ID or your password incorrectly, the following message appears in the top left corner of the logon screen.
NNM1234 SECURITY CHECK FAILED
Reenter the correct user ID and password and press the ENTER key. If you enter both your user ID and your password correctly, one of the following occurs:
The NonStop NET/MASTER MS Primary Menu appears.
You automatically enter into one of the NonStop NET/MASTER MS Primary Menu options.
The UMS Details (Function=EXPIRED) panel appears.
If you are logging on to NonStop NET/MASTER MS for the first time, or if your password has expired (this occurs at regular intervals), you must change your password before you can proceed. See Section 2, “User ID Management Services (UMS),” for further information.
Logging Off From NonStop NET/MASTER MS
Logging Off From
NonStop NET/MASTER
MS
You can log off from NonStop NET/MASTER MS from the NonStop NET/MASTER MS Primary Menu by performing one of the following:
Press the F3 (PF03), F4 (PF04), F16 (Alt PF06), or SF16 (Alt Shift PF06) function key. Type "X" in the Select Option field and press the ENTER key.
If you are in any panel other than the NonStop NET/MASTER MS Primary Menu, you can log off using the panel skipping feature by entering =X in the command field of the panel. (The panel skipping feature is discussed later in this section under “Navigating Through the Menu Hierarchy.”)
If you originally logged on to NonStop NET/MASTER MS from a dedicated
NonStop NET/MASTER MS terminal (one that displays the NonStop NET/MASTER MS logon screen when you log off), the logon screen is redisplayed when you log off; otherwise, the TACL prompt is redisplayed.
Note If you are using two windows, the logoff operation will not log you off from NonStop NET/MASTER MS; the operation will only close the window that you log off from.
The NonStop
NET/MASTER MS
Primary Menu
The NonStop NET/MASTER MS Primary Menu appears after you successfully log on (unless your user ID definition record has been configured so that you automatically enter a particular NonStop NET/MASTER MS facility). The following sample shows the Primary Menu for a user who performs functions generally regarded as the responsibility of an operator, and whose site has a User Services option configured (see Section 11, “User Services”). Options that you are not authorized to select do not appear on your Primary Menu.
SYS1--- NonStop NET/MASTER MS T6581D30 - 31OCT94 : Primary Menu ---SYS1 Select Option ===>
2 - Operator Control Services Userid OPER1 8 - Edit Services Term #5313909 E - Console Extras Time 10:23:43 M - User ID Management Services THU 10-NOV-1994 S - System Support Services OPSYS GUARDIAN U - User Services Window 1 X - Terminate Window.Exit
Last logged on THU 10-NOV-1994 10:22 at terminal $ATP2.#TERM1
The Primary Menu Options
106379 Tandem Computers Incorporated 1–9
The Primary Menu
Options
The options displayed in the preceding NonStop NET/MASTER MS Primary Menu let you perform the following functions:
Operator Control Services (OCS) is the central NonStop NET/MASTER MS management service. It provides a network operations control environment to perform the following:
Enter NonStop NET/MASTER MS commands to control and retrieve information about the subsystems and objects on your network, and to customize your NonStop NET/MASTER MS operations environment Monitor event messages in the network
OCS is described in detail in Section 4, “Operator Control Services (OCS).” The Edit Services facility allows you to create, modify, browse, and delete
Network Control Language (NCL) procedures, panel description files, and other
edit files with the Tandem full-screen editor, TEDIT. It also provides facilities for checking NCL source files, for listing NCL syntax errors, and for testing panels. Edit Services is described in detail in Section 9, “Using Edit Services.”
The Console Extras facility provides you with a panel that displays a utility list. You can access up to 16 external utilities from the panel: that is, Guardian block-mode utilities and application programs that exist independently of NonStop NET/MASTER MS. NonStop NET/MASTER MS can be configured with a customized set of Console Extra programs, or the individual user can have a personal Console Extras utility list.
Console Extras is described in detail in Section 7, “Accessing External Utilities and Applications.” A User ID Management Services option to browse Console Extras utility lists is described in Section 2, “User ID Management Services (UMS).”
User ID Management Services (UMS) provides the security facility for NonStop NET/MASTER MS. UMS is where:
User ID definition records are added to, modified, and deleted from the database of NonStop NET/MASTER MS users
Console Extras utility lists are configured
Programs, such as Guardian utilities, that are external to but accessible from within the NonStop NET/MASTER MS environment are defined
Section 2, “User ID Management Services (UMS),” describes UMS.
System Support Services provides several options that support network problem determination (the Activity Log Browse facility), command entry (the Command Entry facility), and system configuration tasks (the Display/Update SYSPARMS facility).
System Support Services is described in detail in Section 5, “System Support Services.”
The Menu Hierarchy
User Services provides you with an entry point into site-specific services. Different operators may have access to different User Services options. User Services is described in Section 11, “User Services.”
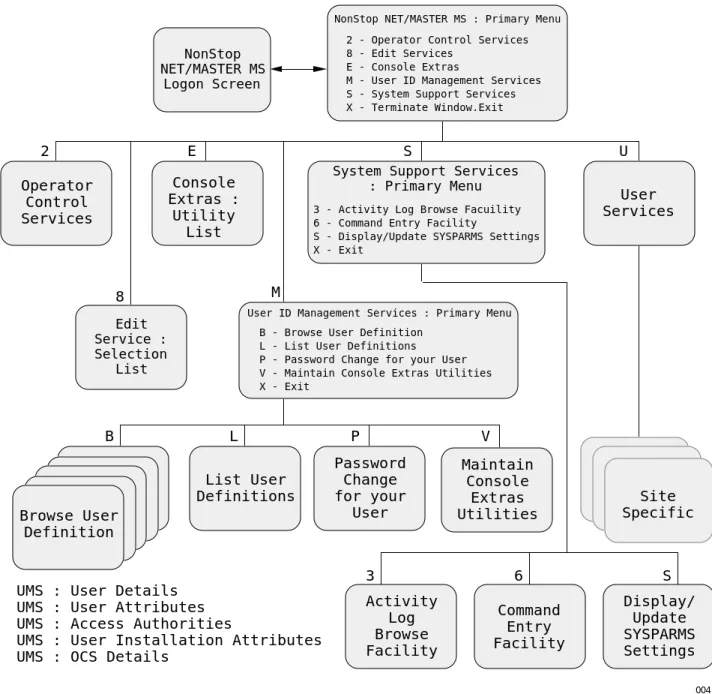
The Menu Hierarchy
The services that NonStop NET/MASTER MS provides are ordered in a hierarchy, as illustrated in Figure 1-3. The NonStop NET/MASTER MS Primary Menu is at the top; options you can select from the Primary Menu are at the second level; options you can select from the second level are at the third level; and so on.Figure 1-3 shows the menu hierarchy for a user who performs functions generally regarded as the responsibility of an operator, and whose site has a User Services option configured. Additionally, it is assumed that access to the User ID Management Services (UMS) is limited to a subset of the entire set of available UMS options. Section 2, “User ID Management Services (UMS),” describes UMS.
The Menu Hierarchy
106379 Tandem Computers Incorporated 1–11
Figure 1-3. The NonStop NET/MASTER MS Menu Hierarchy
004
2 - Operator Control Services 8 - Edit Services
E - Console Extras
M - User ID Management Services S - System Support Services X - Terminate Window.Exit
NonStop NET/MASTER MS
Logon Screen
NonStop NET/MASTER MS : Primary Menu
List User Definitions Password Change for your User Maintain Console Extras Utilities Operator Control Services 2 Console Extras : Utility List E User Services U L P V Activity Log Browse Facility Command Entry Facility Display/ Update SYSPARMS Settings 3 6 S Site Specific Edit Service : Selection List 8
UMS : User Details UMS : User Attributes UMS : Access Authorities
UMS : User Installation Attributes UMS : OCS Details
B
M
S
Browse User Definition
User ID Management Services : Primary Menu B - Browse User Definition
L - List User Definitions
P - Password Change for your User V - Maintain Console Extras Utilities X - Exit
System Support Services : Primary Menu
3 - Activity Log Browse Facuility 6 - Command Entry Facility
S - Display/Update SYSPARMS Settings X - Exit
Navigating Through the Menu Hierarchy
Navigating Through
the Menu Hierarchy
There are two ways of moving through the menu hierarchy:
Move down the hierarchy by selecting intermediate menu options, and move back up the hierarchy by pressing the RETURN (F4/PF04) or EXIT (F3/PF03) key. Directly access any menu option by explicitly entering its location within the menu hierarchy. This method is called panel skipping.
Selecting an Option From a Menu
To select an option from a menu, enter the option number or letter in the Select Option field and press the ENTER key. For example, selecting option M from the NonStop NET/MASTER MS Primary Menu takes you to User ID Management Services. Continue selecting options from the submenus until you reach your desired panel.
Directly Accessing Menu Options—Panel Skipping
Panel skipping provides a fast path through the menu hierarchy. If you know the hierarchical position of the desired function in relation to the NonStop NET/MASTER MS Primary Menu (see Figure 1-3), you can bypass the intermediate menus and go directly to the desired function by explicitly entering its path.
For example, to select User ID Management Services option L (List User Definitions) from the NonStop NET/MASTER MS Primary Menu, enter the following in the Select Option field and press the ENTER key:
M.L
To select an option from any panel other than the NonStop NET/MASTER MS Primary Menu, precede the entry with an equal sign (=). This action brings you back to the Primary Menu (not displayed) and then proceeds to the indicated option. For example, to select the System Support Services Display/Update SYSPARMS option from the OCS screen, enter the following on the OCS command line and press the ENTER key:
=S.S Returning to the Previous
Panel—EXIT Key
From most panels, pressing the EXIT (F3/PF03) key returns you to the panel from which the current panel was invoked.
Returning to the Previous Menu—RETURN Key
From most panels, pressing the RETURN (F4/PF04) key returns you to the menu from which the current option was invoked (exceptions are noted in discussions about particular NonStop NET/MASTER MS options).
Using the NonStop NET/MASTER MS Help Facility
106379 Tandem Computers Incorporated 1–13
Using the NonStop
NET/MASTER MS Help
Facility
NonStop NET/MASTER MS provides an extensive help facility. By default, the F1 (PF01) function key is the HELP function key, which is used to access online help. Three types of help are available:
Help for a service, facility, or panel Help for a message
Help for a command
Help for a Service, Facility, or Panel
To display help text describing the function of a particular service, facility, or panel, press the HELP function key from a panel that indicates help information is available. For example, if you press the HELP function key from the Edit Services Selection List panel, several pages of information describing the Edit Services facility are displayed. You can scroll forward and backward through the help panels by pressing the F8 (PF08) and F7 (PF07) function keys, respectively. To exit from the help facility, press the F3 (PF03) function key.
See later sections in this manual, and refer to the NonStop NET/MASTER MS System
Management Guide, for more information about services, facilities, and panels. Help for a Message NonStop NET/MASTER MS displays many messages, which report events, indicate
the results of a command, and so on. There are two methods you can use to obtain online help about a message displayed on the screen. The following table displays the locations from which you can use each method:
Method OCS Command Entry Activity Log
1 Yes Yes Yes
2 Yes Yes No
Method 1 is to position the cursor on a line on which the message is displayed (next to the message number) and press the HELP function key. Method 2 is to type the message number in the OCS command input line or the Command Entry facility COMMAND field, and to press the HELP function key.
The panel that appears depends on the message about which you are obtaining help. If the message begins with NNM, it is a NonStop NET/MASTER MS message. Help information about the message is in the NonStop NET/MASTER MS message help database (and also in the NonStop NET/MASTER Messages Manual).
If NonStop NET/MASTER MS recognizes a message beginning with NNM, the Browse NonStop NET/MASTER Messages panel appears with detailed help
information for the message: otherwise, NonStop NET/MASTER MS displays help for the next sequential message.
Using the NonStop NET/MASTER MS Help Facility
If the message begins with characters other than NNM, the message is not a NonStop NET/MASTER MS message. Rather, the message is from a Tandem or user-written subsystem, sent to NonStop NET/MASTER MS from an EMS distributor. Help information about the message is in the event detail database, in either the EVENTTD or EVENTCX file (see the NonStop NET/MASTER MS System Management Guide for more information about these files).
Note If the NonStop NET/MASTER MS Event Detail Help panel displays F10=PrevMsg and F11=NextMsg on the bottom line, the information is from the EVENTCX file: otherwise, the information is from the EVENTTD file.
If NonStop NET/MASTER MS recognizes a message beginning with other than NNM, the NonStop NET/MASTER MS Event Detail Help panel appears with detailed help information for the message: otherwise, NonStop NET/MASTER MS displays message NNM0976 to indicate that no help is available.
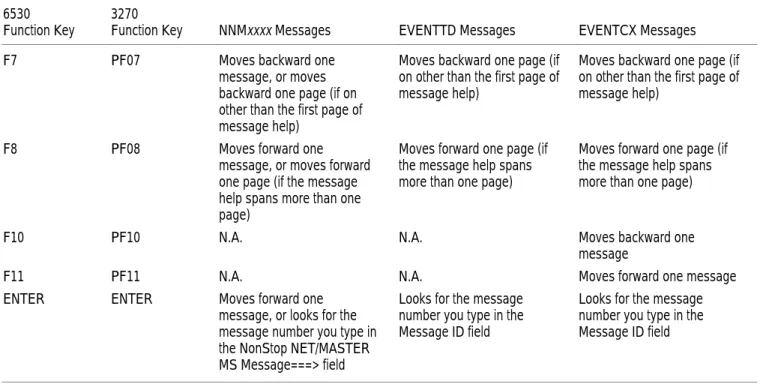
Table 1-1 shows the function keys used to scroll through messages in the NonStop NET/MASTER MS message help database, the EVENTTD file, and the EVENTCX file. Press the F3 (PF03) or F4 (PF04) function key to return to the location from which you requested help.
Table 1-1. Moving Through Message Help Databases
6530 Function Key
3270
Function Key NNMxxxx Messages EVENTTD Messages EVENTCX Messages
F7 PF07 Moves backward one
message, or moves backward one page (if on other than the first page of message help)
Moves backward one page (if on other than the first page of message help)
Moves backward one page (if on other than the first page of message help)
F8 PF08 Moves forward one
message, or moves forward one page (if the message help spans more than one page)
Moves forward one page (if the message help spans more than one page)
Moves forward one page (if the message help spans more than one page)
F10 PF10 N.A. N.A. Moves backward one
message
F11 PF11 N.A. N.A. Moves forward one message
ENTER ENTER Moves forward one
message, or looks for the message number you type in the NonStop NET/MASTER MS Message===> field
Looks for the message number you type in the Message ID field
Looks for the message number you type in the Message ID field
Using the NonStop NET/MASTER MS Help Facility
106379 Tandem Computers Incorporated 1–15
Refer to the NonStop NET/MASTER Messages Manual for more information about messages.
Customized Message Help Information
A programmer or system manager can customize message help information. Refer to the NonStop NET/MASTER MS System Management Guide for more information.
Help for a Command You can use many commands from NonStop NET/MASTER MS. There are four methods you can use to obtain online help about a NonStop NET/MASTER MS command. The following table displays the locations from which you can use each method:
Method OCS Command Entry Activity Log
1 Yes Yes Yes
2 Yes Yes No
3 Yes Yes No
4 Yes No No
Method 1 is to position the cursor on a line on which the command is displayed (next to the command) and press the HELP function key. Method 2 is to type the name of a command in the OCS command input line or the Command Entry facility
COMMAND field, and to press the HELP function key.
For both Method 1 and Method 2, if NonStop NET/MASTER MS recognizes the command, detailed help information for the command is displayed. Press the F3 (PF03) or F4 (PF04) function key to return to the location from which you requested help.
For both Method 1 and Method 2, if NonStop NET/MASTER MS does not recognize the command (perhaps you mistyped the command or the command was ambiguous), NonStop NET/MASTER MS displays the NonStop NET/MASTER Command Tutorial Selection List panel. See “Scrolling Through the Command Tutorial Selection List,” later in this section, for how to continue.
Method 3 is to type HELP in the OCS command input line or the Command Entry facility COMMAND field, and to press the ENTER key. Method 4 is to leave the OCS command input line blank and press the HELP function key.
For both Method 3 and Method 4, the NonStop NET/MASTER Command Tutorial panel appears. To continue, do one of the following:
Press the ENTER key.
The NonStop NET/MASTER Command Tutorial Selection List panel appears. See “Scrolling Through the Command Tutorial Selection List,” later in this section, for how to continue.
Using the NonStop NET/MASTER MS Help Facility
Type the name of a command in the HELP FOR COMMAND ==> field and press the ENTER key.
Detailed help for the command is displayed. Press the F3 (PF03) function key to return to the NonStop NET/MASTER Command Tutorial panel or the F4 (PF04) function key to return to OCS.
Refer to the NonStop NET/MASTER MS Command Reference Manual for detailed information about commands.
Scrolling Through the Command Tutorial Selection List
The Command Tutorial Selection List is a list of NonStop NET/MASTER MS and SOLVE management services commands. When the selection list appears, the cursor is positioned next to the command that is alphabetically the closest to the string you typed.
To scroll through the Command Tutorial Selection List, enter a value in the Scroll field to control the amount of scrolling. Then press the F7 (PF07) or F8 (PF08) function key to determine the type of scrolling (backward or forward), as described in Table 1-2. This table also lists the values that you can enter in the Scroll field.
Table 1-2. Scrolling Through the Command Tutorial Selection List
Scroll Field Value 6530 Function Key 3270 Function
Key Amount and Type of Scrolling C[SR]
(default)
F7 PF07 Scrolls backward one page, based on the current position of the cursor. The line on which the cursor is positioned becomes the last line of the new screen.
F8 PF08 Scrolls forward one page, based on the current position of the cursor. The line on which the cursor is positioned becomes the first line of the new screen.
P[AGE] F7 PF07 Scrolls backward one page.
F8 PF08 Scrolls forward one page.
H[ALF] F7 PF07 Scrolls backward one half page.
F8 PF08 Scrolls forward one half page.
nnn F7 PF07 Scrolls backward nnn lines.
F8 PF08 Scrolls forward nnn lines.
M[AX] F7 PF07 Scrolls backward to the first page of the command tutorial selection list.
F8 PF08 Scrolls forward to the last page of the command tutorial selection list.
The Function Keys
106379 Tandem Computers Incorporated 1–17
When you find the command you are interested in: 1. Position your cursor to the left of the command. 2. Type an S.
3. Press the ENTER key to display detailed help for the selected command.
Customized Command Help Information
A programmer or system manager can customize command help information using the Help Maintenance facility and Edit Services, or the HLPMAINT command and Edit Services.
Refer to the NonStop NET/MASTER MS System Management Guide for information on the Help Maintenance facility. Refer to the NonStop NET/MASTER MS Command
Reference Manual for information about the HLPMAINT command. See Section 9,
“Using Edit Services,” for information on Edit Services.
The Function Keys
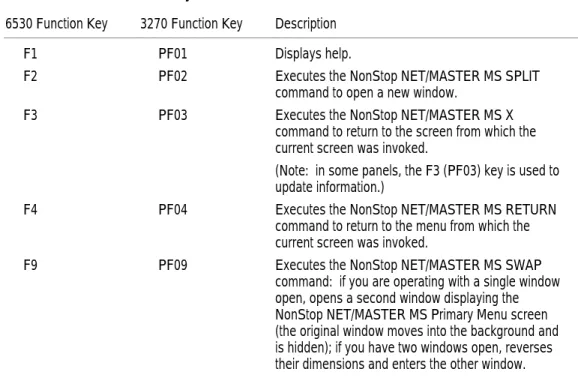
The function keys on your keyboard are assigned default definitions (listed in Table 1-3), which are generally consistent throughout NonStop NET/MASTER MS. In addition, each NonStop NET/MASTER MS facility has its own specialized function key definitions, which are described in the appropriate sections throughout the rest of this manual.Table 1-3. Default Function Key Definitions
6530 Function Key 3270 Function Key Description
F1 PF01 Displays help.
F2 PF02 Executes the NonStop NET/MASTER MS SPLIT
command to open a new window.
F3 PF03 Executes the NonStop NET/MASTER MS X
command to return to the screen from which the current screen was invoked.
(Note: in some panels, the F3 (PF03) key is used to update information.)
F4 PF04 Executes the NonStop NET/MASTER MS RETURN
command to return to the menu from which the current screen was invoked.
F9 PF09 Executes the NonStop NET/MASTER MS SWAP
command: if you are operating with a single window open, opens a second window displaying the NonStop NET/MASTER MS Primary Menu screen (the original window moves into the background and is hidden); if you have two windows open, reverses their dimensions and enters the other window.
Note In OCS only, you can redefine any or all of the default function key definitions. See "Customizing Function Keys," in Section 4, “Operator Control Services (OCS),” for more information.
Working With Two Windows
Working With Two
Windows
In NonStop NET/MASTER MS, you can divide your display screen into two windows. Each window operates independently of the other.
You can open a second window anywhere in NonStop NET/MASTER MS by using the SPLIT or SWAP function.
Note You cannot run a block-mode application from one window and simultaneously retain a view of NonStop NET/MASTER MS in the other window.
Splitting Windows The SPLIT function, by default assigned to the F2 (PF02) function key, lets you:
Split your window vertically, so that you have two windows side by side, as in the following example, where OCS is active in the left window and the Command Entry facility is active in the right window:
(11:06) --- OPERATOR CONTROL SERVICES --- ________________________________________________ COMMAND :
:
SYSTEM : SYS1 ASYN UTILITY : SCROL
-- ---- NonStop NET/MASTER D30 - M=>
Working With Two Windows
106379 Tandem Computers Incorporated 1–19
Split your window horizontally, so that you have one window above the other, as in the following example, where the limited UMS facility is active in the top window, and the Edit Services facility is active in the bottom window:
SYS1--- User ID Management Services : Primary Menu ---ZUMSMN2P Select Option ===>
B - Browse User Definition Userid OPER3 L - List User Definitions Term #0258221 P - Password Change for your User Time 08:35:22 V - Maintain Console Extras Utilities FRI 11-NOV-1994 X - Exit
--- Edit Services : Selection List ---ZEDSPN1P File Spec:
Subvolume: $DATA.ZNCLPGN Page Down for more files
T=Test a panel S/B=Browse C=Compile D=Delete E=Edit Filename Code EOF Last Modification Owner RWEP
AAREADME 101 10446 10-NOV-1994 14:23:47 100,21 NCNC BUILTIN1 101 2150 10-NOV-1994 14:23:48 100,21 NCNC BUILTIN2 101 2406 10-NOV-1994 14:23:49 100,21 NCNC HELLO1 101 2134 10-NOV-1994 14:23:52 100,21 NCNC HELLO2 101 2252 10-NOV-1994 14:23:53 100,21 NCNC
F1=Help F3=Exit F4=Return F7=Prev F8=Next F11=Error List
The SPLIT function is handled differently on 6530 and 3270 terminals. It is also handled differently when you invoke it by pressing the SPLIT function key or when you explicitly issue a SPLIT command. For example:
If you issue a SPLIT command with no operands, your screen is split horizontally at row 12.
If you press the SPLIT function key on a Tandem 6530 or compatible terminal, you are presented with a SPLIT grid that requires you to position your cursor on a horizontal or vertical grid line to specify the window dimensions, and then press the ENTER key to execute the split. By default (if you simply press the ENTER key without moving the cursor), your screen is split horizontally at row 12. You can cancel the SPLIT function by pressing the F3 function key.
On an IBM 3270 or compatible terminal, NonStop NET/MASTER MS does not present a SPLIT grid. Instead, the bottom row and the left column of the screen serve as the SPLIT grid. Position your cursor on the grid before you press the SPLIT function key.
See the description of the SPLIT command in the NonStop NET/MASTER MS Command
Working With Two Windows
Swapping Windows The SWAP function, by default assigned to the F9 (PF09) function key, lets you: Open a second full-screen window if you are currently operating with a single window open.
In this case, the SWAP function automatically opens a second window displaying the NonStop NET/MASTER MS Primary Menu screen. The second window occupies the entire screen. The original window moves into the background and is hidden.
Press the F9 (PF09) function key again to toggle back and forth between the two windows.
Reverse the dimensions of the two current windows (if you have two windows open and both are visible on the screen), and toggle back and forth between them. If each window takes up the whole screen, the SWAP function toggles between both windows.
Refer to the description of the SWAP command in the NonStop NET/MASTER MS