Advanced Inventory
Management (AIM)
78-0628C MFG/PRO Versions eB, eB2, eB2.1 AIM Versions 2.3 and 2.3 SSD, Progress Database November 2005
subject to change without notice.
QAD Inc. provides this material as is and makes no warranty of any kind, expressed or implied, including, but not limited to, the implied warranties of merchantability and fitness for a particular purpose. QAD Inc. shall not be liable for errors contained herein or for incidental or consequential damages (including lost profits) in connection with the furnishing, performance, or use of this material whether based on warranty, contract, or other legal theory.
QAD and MFG/PRO are registered trademarks of QAD Inc. The QAD logo is a trademark of QAD Inc.
Designations used by other companies to distinguish their products are often claimed as trademarks. In this document, the product names appear in initial capital or all capital letters. Contact the appropriate companies for more information regarding trademarks and
registration.
Copyright © 2005 by QAD Inc. QAD Inc. 6450 Via Real Carpinteria, California 93013 Phone (805) 684-6614 Fax (805) 684-1890 http://www.qad.com
About This Guide . . . 1
About AIM . . . 2
Other AIM Documentation . . . 2
QAD Web Site . . . 2
Conventions . . . 3
Chapter 1
Installing AIM . . . 5
Overview . . . 6
Installation Requirements . . . 6
AIM Deployment . . . 6
Languages . . . 8
Radio Frequency Terminal Implementation . . . 8
Installation Steps . . . 8
Install the AIM Media . . . 9
Install AIM Files . . . 9
Create the AIM Empty Database . . . 11
Load Database Schema . . . 12
Create Empty Databases for Additional Languages . . . 13
Build the AIM Production Database . . . 13
Load AIM Data . . . 14
Compiling AIM: UNIX . . . 16
Create UNIX Compile Script . . . 16
Fix qad.wrk Errors . . . 17
Compiling AIM: Windows . . . 19
Modify Windows .ini and .pf Files . . . 20
Compile Under Windows . . . 21
Creating a Launch Script . . . 23
Updating Help . . . 24
Load Online Help . . . 25
Access Revised Character Help Information . . . 26
Starting AIM . . . 26
Chapter 2
Upgrading AIM . . . 29
Overview . . . 30
Updating the MFG/PRO Service Pack Level . . . 30
Upgrading the AIM Version . . . 31
Prior to Starting . . . 31
Install New AIM Media . . . 31
Update Existing aimempty . . . 31
Compile Upgraded AIM Version . . . 32
Update the AIM Production Database . . . 34
Updating Help . . . 36
Load Online Help . . . 36
Access Revised Character Help Information . . . 37
About AIM 2
Other AIM Documentation 2
QAD Web Site 2
About AIM
Advanced Inventory Management (AIM) is a module designed to work with QAD’s MFG/PRO. AIM provides powerful but flexible stock control facilities. AIM enables you to control the receipt, stocking, storage, picking, and shipping of inventory using warehouses that exist within the MFG/PRO environment. AIM provides a suite of programs and parameters that let you set up the way that your inventory
management processes operate, and a range of control, inquiry and reporting functions that let you run the system efficiently on a day-to-day basis.
Currently AIM is not supported in Oracle environments.
Other AIM Documentation
This guide provides detailed information on how to install the AIM system.
For details on how to implement the AIM system and how to use AIM in day-to-day operations, see User Guide: Advanced Inventory
Management. For additional information on enhanced functionality in the AIM product, see the Advanced Inventory Management Release Notes. These instructions are intended for the system administrator who is installing the database and is familiar with the UNIX operating system, the Microsoft Windows operating system, Progress software, and networking.
QAD Web Site
The QAD Web site provides a wide variety of information about the company and its products. You can access the Web site at:
http://www.qad.com
For users with a QAD Web account, product documentation is available for viewing or downloading at:
You can register for a QAD Web account by accessing the Web site and clicking the Accounts link at the top of the screen. Your customer ID number is required. Access to certain areas is dependent on the type of agreement you have with QAD.
Most user documentation is available in two formats:
• Portable document format (PDF). PDF files can be downloaded from the QAD Web site to your computer. You can view them with the free Adobe Acrobat Reader. A link for downloading this program is also available on the QAD Web site.
• HTML. You can view user documentation through your Web browser. The documents include search tools for easily locating topics of interest.
Features also include an online solution database to help users answer questions about setting up and using the product. Additionally, the QAD Web site has information about training classes and other services that can help you learn about AIM.
Important Before you start the installation, check the Web site to make sure you have the most recent version of this document.
Conventions
This document supports the installation of AIM on both UNIX and Windows platforms. The instructions use character screens and Windows file and path conventions. In the few places where the two sets of
instructions diverge, the headings and text explicitly declare which operating system is the focus of the current set of instructions.
This document uses the text or typographic conventions listed in the following table.
If you see: It means:
monospaced text A command or file name. italicized
monospaced text
A variable name for a value you enter as part of an operating system command; for example, YourCDROMDir.
indented command line
A long command that you enter as one line, although it appears in the text as two lines.
Note Alerts the reader to exceptions or special conditions. Important Alerts the reader to critical information.
Warning Used in situations where you can overwrite or corrupt data, unless you follow the instructions.
Installing AIM
This chapter provides information on installing AIM. Overview 6
Installation Steps 8
Compiling AIM: UNIX 16
Compiling AIM: Windows 19
Creating a Launch Script 23
Updating Help 24
Overview
This chapter provides instructions for installing the QAD Advanced Inventory Management (AIM) product in your MFG/PRO environments. The AIM installation requires the following steps:
• Install AIM media to your server.
• Build the AIM database.
• Load translated labels.
• Load default data to AIM database.
• Load data to MFG/PRO database.
• Modify startup files.
• Compile AIM application with MFG/PRO.
• Load character help in MFG/PRO.
QAD recommends you complete the AIM installation in a test environment first.
If you are performing an upgrade of an existing AIM system, see “Upgrading AIM” on page 29.
Installation Requirements
AIM 2.3 can be installed with the following MFG/PRO versions on a Progress database; Oracle is not currently supported:
• MFG/PRO eB, through Service Pack 5
• MFG/PRO eB2, through Service Pack 5; Service Packs 7 through 9 AIM 2.3 SSD (Shared Services Domain) can be installed with:
• MFG/PRO eB2.1, Service Packs 2 and 3
AIM Deployment
The recommended deployment of AIM on your server is to place the AIM directory structure (AIMInstallDir) parallel to the directory where you installed MFG/PRO (MFGPROInstallDir). On eB2 on Windows, for example, if the MFGPROInstallDir is /dr01/mfgpro/eb2sp5, the AIMInstallDir would be /dr01/mfgpro/aim23c.
You can install AIM in a different directory structure or on a different drive. If you do so, make sure your PROPATH is updated to run AIM programs prior to baseline MFG/PRO code.
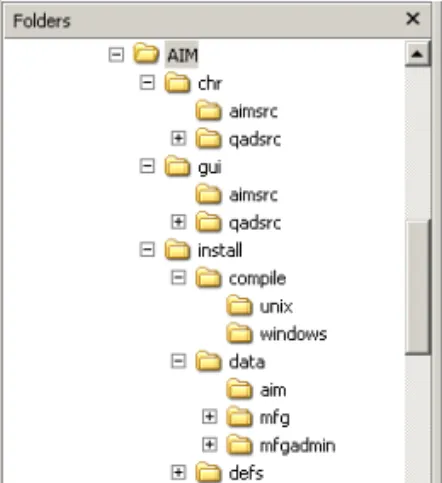
Fig. 1.1 CD Directories
The CD source directories are listed in Table 1.1.
Table 1.1
AIM CD Directory Structure
:
Directory Description
chr/aimsrc AIM character source code.
chr/qadsrc/... Source code for modified MFG/PRO programs required for the AIM application, sorted in subdirectories by MFG/PRO version and service pack level. (IR is initial release.) Each service-pack directory contains a list of MFG/PRO (qad.wrk) and AIM (aim.wrk) programs to compile.
gui/aimsrc AIM GUI source code.
gui/qadsrc/... Source code for modified MFG/PRO programs required for the AIM application, sorted in subdirectories by MFG/PRO version and service pack level. (IR is initial release.)
install/compile Contains a UNIX and Windows directory with operating system-specific versions of the AIM compile utility
whcomp.p and its subprogram whcomp1.p.
install/data/... Data (.d) files. Those under /mfg and /mfgadmin contain language-specific data directories. The character-client field help file is located under /mfg/us. Data for AIM-specific tables is in the /aim directory.
install/defs Schema or data definition files (.df) for US English. Additional schema definition files containing translated labels are located beneath this directory in language directories.
If compiled source code is required, the structure of the compile destination directory is copied into a compiled source code directory named /xcode.
Languages
AIM supports the English (US), Dutch (DU), French (FR), German (GE), Castilian Spanish (CS), Portugese (PO), Italian (IT), and Polish (PL) languages. To create a US English-only install, no special steps are required. To create a single-language install that is not US English, you must load a set of translated schema definitions and set your compile destination directory to reflect the language code.
To support multiple languages, you create an empty AIM database for each language (aimUSempty, aimFRempty, and so on) and load the appropriate language-specific schema definition (aimusV9.df, aimfrV9.df, and so on) into each. You then compile each language separately, setting the compile destination directory to reflect the language code.
Later, after you create a production AIM database from an empty
database, you load the language-specific AIM data files for each language you are implementing into the MFG/PRO production and admin
databases.
Radio Frequency Terminal Implementation
Because AIM uses a radio frequency terminal (RF) and RF
implementation requires a character client, if your MFG/PRO and AIM clients are GUI-only under Windows, you must also install MFG/PRO and AIM character clients to support an RF implementation. The database server can be either UNIX or Windows.
Installation Steps
AIM ships on a single CD that contains all AIM programs, modified MFG/PRO programs by version, and all available languages.
Install the AIM Media
¶For Windows servers, insert the CD and go to “Install AIM Files” on page 9.
In this set of steps, you mount the AIM media and copy the required files to the server.
Mount the CD-ROM (UNIX Only) 1 Log on as mfg.
2 Mount the CD-ROM. Example commands are listed in Table 1.2.
Table 1.2 UNIX CD Drive Mount Commands
Install AIM Files
Complete this section to install the AIM files on your server. The
instructions provide first the UNIX method, then the Windows method if necessary. In most cases, these steps can be completed in the Windows Explorer.
1 In UNIX, log on as user mfg under the group qad. For Windows, log
in as a user with administrator privileges.
2 Create an AIM directory parallel to MFGPROInstallDir; for example, if MFGPROInstallDir is /dr01/mfgpro/eb2sp5, then install AIM to /dr01/mfgpro/aim23c. This is the
AIMInstallDir.
Hardware Mount Command Sun volcheck cdrom
HP /etc/mount -F cdfs /dev/dsk/YourCDDevice /cdrom
Digital mount -r -o noversion -t cdfs /dev/YourCDDevice /cdrom
AIX smitty mountfs
Then select file system, directory, and file system type (cdrfs). Linux mount /dev/hdb /mnt/cdrom
Where /hdb could be hdc or hdd among other possibilities. All others Refer to your operating system documentation or vendor for
requirements to mount a CD-ROM. You may be able to type man mount to determine the correct command.
3 Create the following directories within the AIMInstallDir: • AIMInstallDir/triggers
• AIMInstallDir/us
• AIMInstallDir/us/src
• AIMInstallDir/us/spX
The /spX directory refers to your MFG/PRO service-pack level. For eB2 service pack 5, this directory would be /sp5.
4 Copy the contents of /install/data and /install/defs from the CD to the AIMInstallDir. You should end up with:
• AIMInstallDir/data
• AIMInstallDir/defs
Note If you choose, you can limit the number of files you copy. Both the /data and /defs directories contain directories for each
supported language. You can copy only the directories for the languages you are implementing.
5 Copy whcomp.p and whcomp1.p from /install/compile/
os type, where os type is either /unix or /windows, to
AIMInstallDir/us.
6 Copy the contents of the /chr/aimsrc directory from the CD to
AIMInstallDir/us/src.
7 Copy the specific directory for your MFG/PRO version and service pack from the /chr/qadsrc directory from the CD to
AIMInstallDir/us/spX. For example, if you are running MFG/PRO eB2 Service Pack 5, you would end up with: AIMInstallDir/us/sp5
8 To implement GUI clients for AIM, repeat steps 2 through 7, creating a complete AIM GUI installation parallel to MFGPROInstallDir. The only difference is the CD-ROM directories for steps 6 and 7 are
/gui instead of /chr.
Important If you are installing Windows clients and want to run against UNIX databases, you must also have complete UNIX character interface AIM and MFG/PRO installations to support the database.
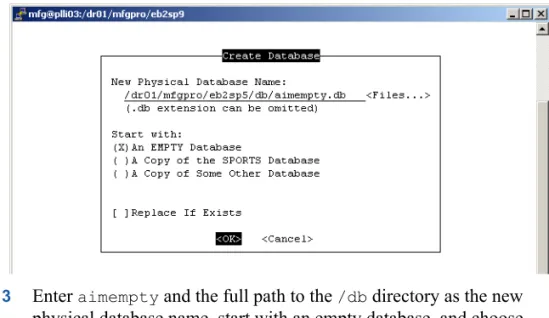
Create the AIM Empty Database
The aimempty database is used to compile additional languages and to
create the production AIM database. If you are implementing multiple languages, you must create an empty AIM database for each language in order to compile the code for that language. If this is the case, name the empty databases accordingly: aimUSempty, aimFRempty, and so on.
The following steps use MFG/UTIL. This utility is installed with your MFG/PRO application.
1 Launch MFG/UTIL from your MFGPROInstallDir. For UNIX, run the command ./mfgutil.
For Windows, select MFG/UTIL (Character) from your MFG/PRO database server icon in the Start menu.
2 Select Database|Create Database.
Fig. 1.2 Create the AIM Empty Database
3 Enter aimempty and the full path to the /db directory as the new physical database name, start with an empty database, and choose OK. The new database is created.
Load Database Schema
The database schema files (.df) loaded in these steps contain the table,
field, and index definitions for your AIM database.
1 In MFG/UTIL, select Database|Load Database Schema (.df) File.
2 Connect to the aimempty.db and choose OK.
Fig. 1.3
Connect to the AIM Database
3 The Data Definition File to Load screen displays. Enter the correct data definition file and path:
• For US English, choose AIMInstallDir/defs/aimusv9.df.
• For a language other than US English, choose AIMInstallDir/ defs/xx/aimxxv9.df where xx is the language code.
Fig. 1.4
Load the AIM Data Definitions
4 A load window displays. When the load is complete, choose Close to exit the load. You return to the data definition file load screen. Choose Close to exit.
Create Empty Databases for Additional Languages
To create a US English-only install, skip this section. To create a single-language and non-US English single-language install, you can also skip this section.
1 Repeat the steps in “Create the AIM Empty Database” on page 11 for another empty database; for example, aimFRempty.db.
2 Repeat the steps in “Load Database Schema” on page 12 for the new empty database.
Repeat these three steps as often as needed to supply yourself with a new empty database for each language you are implementing.
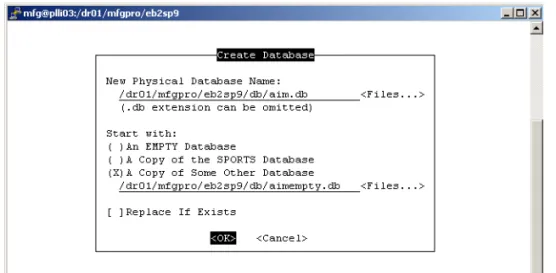
Build the AIM Production Database
These steps create a production database. Only one production AIM database is required; all implemented languages are supported by the one database.
1 In MFG/UTIL select Database|Create Database.
Fig. 1.5 Create the AIM Database
2 Enter aim and the full path to the /db directory as the new physical database name. Under Start With, select A Copy of Some Other Database. Use the Files button to browse for the correct language-specific empty AIM database. For US English, this would be
3 The new database is created.
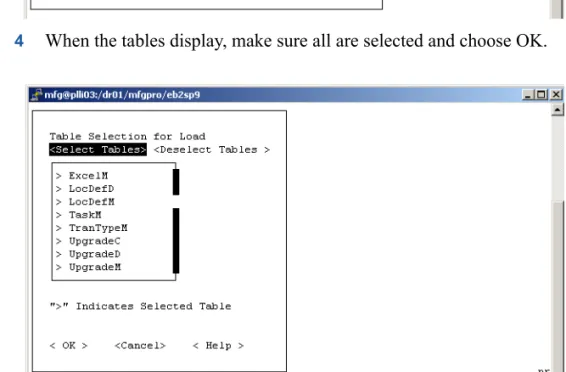
Load AIM Data
Data must be loaded into MFG/PRO and AIM databases through MFG/UTIL including aim.db, mfgprod.db, and admprod.db. The following steps walk you through the first connection and load. Table 1.3 on page 15 lists the other loads required and the source directories. Repeat these steps for each required load.
1 Choose Database|Load Data into Database.
2 Connect to aim.db and choose OK.
3 Enter the correct input directory: AIMInstallDir/data/aim
Fig. 1.6 Load the AIM Default Data
4 When the tables display, make sure all are selected and choose OK.
Fig. 1.7
Select All Tables for Load
5 When the load is complete, press spacebar to close the window.
Fig. 1.8 Data Load Completion Screen
6 Repeat steps 1 through 5 to connect to the databases listed in Table 1.3 and to load data from the associated directories.
In the input directory names, replace /xx with the language code being loaded; for example /fr.
Important For additional languages, repeat the loads from the /xx
directories for each language you are implementing, including /us.
Table 1.3 AIM Data Loads and Directories
Note You may get record already exists errors. These can safely be ignored.
Database Description Input Directory mfgprod MFG/PRO production
database AIMInstallDir/data/mfgAIMInstallDir/data/mfg/xx admprod MFG/PRO admin database AIMInstallDir/data/mfgadmin
Compiling AIM: UNIX
For Windows compiles, go to “Compiling AIM: Windows” on page 19. Prior to running AIM under MFG/PRO, you must compile the AIM code and several modified MFG/PRO programs specific to your release and service pack. Appropriate compile list files (aim.wrk and qad.wrk) are
located in the MFG/PRO version and service-pack specific directories. To compile for a language other than US, add the language directory,
/XX, in your PROPATH where XX is the language code. Before compiling, a compile script must be created.
Create UNIX Compile Script
Compiling under UNIX requires a script to launch Progress, connect to the required databases, and start the compile program. The example is called aimcomp.sh and resides in MFGPROInstallDir.
MFGDIR=/dr01/mfgpro/eb2sp9;export MFGDIR AIMDIR=/dr01/mfgpro/aim23c;export AIMDIR stty intr '^c' DLC=/dr01/progress/dlc91e;export DLC PATH=$PATH,$DLC;export PATH PROMSGS=$DLC/promsgs;export PROMSGS PROTERMCAP=$DLC/protermcap;export PROTERMCAP PROPATH=.:$AIMDIR:$AIMDIR/us:$AIMDIR/us/src:$AIMDIR/us/ sp5:$MFGDIR:$MFGDIR/us:$MFGDIR/xrc;export PROPATH cd $AIMDIR
exec $DLC/bin/_progres -pf aim.pf;
Include the following directories in the PROPATH in the sequence shown:
AIMInstallDir AIMInstallDir/us AIMInstallDir/us/src AIMInstallDir/us/SPlevel MFGPROInstallDir
MFGPROInstallDir/us MFGPROInstallDir/xrc
The -pf file lists the databases the script connects to; it must include the aim database. It also includes several connection parameters.
Create aim.pf in AIMInstallDir.
-db mfgprod -ld qaddb -H plli03 -S eb2sp9prod-srv -trig triggers -db aim -ld aimdb -H plli03 -S eb2sp9aim-srv -trig triggers -db admprod -ld qadadm -H plli03 -S eb2sp9adm-srv -trig triggers -db hlpprod -ld qadhelp -H plli03 -S eb2sp9hlp-srv
-cpstream ibm850 -cpinternal iso8859-1 -cprcodein iso8859-1 -cpcoll basic -inp 32000 -Bt 350 -c 30 -D 100 -mmax 3000 -nb 200 -s 96 -q -T /dr01/tmp -h 7
The logical database name for aim.db must be aimdb. The -inp
parameter is required to increase the size allowed for individual lines of source code.
Important For additional language compiles, change the .pf file name to reflect the language you are compiling. The language-specific .pf file
must reference the empty database loaded with the language-specific schema.
Fix qad.wrk Errors
There are two errors in the qad.wrk compile list. Following two of the
file names, the letters chr appear.
1 Open AIMInstallDir/us/qad.wrk in a text editor.
2 Delete the two instances of chr.
3 Save and exit the file.
Compile Under UNIX
You run through a portion of these steps twice to compile both AIM and modified MFG/PRO code.
1 In a UNIX session, navigate to MFGPROInstallDir. 2 Launch the script:
./aimcomp.sh
3 The Progress Editor displays.
5 Make the following changes:
wk_home. Enter the destination where the compiled code is saved. The slash at the end of the directory name is required. This should be AIMInstallDir.
wk_log. The name and location of the log file from the compile; for example, AIMInstallDir/us/aimchr.001.
wk_list. The name and location of the compile list. The files—
aim.wrk and qad.wrk—are located in AIMInstallDir/us. A portion of the file appears with sample changes in bold below. /**SET DISPLAY TYPE**/
if session:display-type = "TTY" then assign wk_home = "/dr01/mfgpro/aim23c/"
wk_log = "/dr01/mfgpro/aim23c/us/aimchr.001". else
assign wk_home = "../obj.p8/90a/gui/"
wk_log = "../admin/install/compile/aimgui.res". /**SET LANGUAGE**/
&IF index(propath,"LANG=fr") <> 0 &THEN wk_lang = "fr/".
&ELSEIF index(propath,"LANG=du") <> 0 &THEN wk_lang = "du/".
&ELSE
wk_lang = "us/". &ENDIF
assign wk_list = "/dr01/mfgpro/aim23c/us/aim.wrk". 6 Save your changes.
7 Select Compile|Run from the Progress Editor menu. The AIM compile screen displays. On the first pass, the values should be correct from your edit of the file in the previous steps. On the second pass, change aim.wrk to qad.wrk.
Fig. 1.9 AIM Compiler
8 Press Go to launch the compile. A report window displays showing compile progress and error status.
Fig. 1.10 Compile Status Screen
9 When the compile is complete, press the spacebar to close the report window. The Progress session ends.
10 Repeat steps 2 through 9 for the qad.wrk compile list. Make sure to change aim.wrk to qad.wrk in List to Compile From in the Compile Source screen.
11 Repeat steps 2 through 9 for additional languages, making sure to edit the launch command in step 2 and the paths in step 7 to include the language-specific .pf file and paths.
12 Press the spacebar to end the session following the final compile.
Compiling AIM: Windows
See “Compiling AIM: UNIX” on page 16 for UNIX systems.
Prior to running AIM under MFG/PRO, you must compile the AIM code and several modified MFG/PRO programs specific to your release and service pack. Appropriate compile list files (aim.wrk and qad.wrk) are located in the MFG/PRO version and service-pack specific directories.
To compile for a language other than US, add the language directory,
\XX, in your PROPATH where XX is the language code.
Before compiling, initialization files and scripts must be created or modified.
Modify Windows .ini and .pf Files
1 In MFGPROInstallDir, create a copy of Production.ini named
aimcomp.ini.
2 Create a copy of Production.pf named aimcomp.pf.
3 Open aimcomp.ini in a text editor. Insert the following entries at
the beginning of the PROPATH as a comma-separated list in the order shown: \AIMInstallDir, \AIMInstallDir\us, \AIMInstallDir\us\src, \AIMInstallDir\us\sp5, \MFGPROInstallDir, \MFGPROInstallDir\us \MFGPROInstallDir\xrc
For Windows, update both the [Startup] and [WincharStartup] section PROPATH.
4 Save your changes.
5 If you are planning to compile additional languages, edit each .ini
file PROPATH as described in steps 3 and 4; for example,
aimFRcomp.ini.
6 Open aimcomp.pf in a text editor. Add the aim database as shown.
-db e:\mfgpro\eb2sp5\db\mfgprod -ld qaddb -trig triggers -db e:\mfgpro\eb2sp5\db\admprod -ld qadadm -trig triggers -db e:\mfgpro\eb2sp5\db\hlpprod -ld qadhelp
-db e:\mfgpro\eb2sp5\db\aim.db -ld aimdb -trig triggers
Compile Under Windows
1 Launch a command session and navigate to AIMInstallDir\us.
2 Run the following command: %DLC%\bin\_progres.exe -inp 32000 -pf MFGPROInstallDir\aimcomp.pf -ininame MFGPROInstallDir\aimcomp.ini The command contents are:
%DLC%\bin\_progres.exe. The Progress executable that launches the Progress session.
-inp 32000. A parameter to increase the size allowed for individual lines of code.
-pf MFGPROInstallDir\aimcomp.pf. The set of databases started and connected during this Progress session.
-ininame MFGPROInstallDir\aimcomp.ini. The initialization file for the Progress session, including screen colors, PROPATH, and so on. Important For additional language compiles, change the .pf and .ini
file names to those you created for the language you are compiling. The
.pf file must reference the empty database loaded with the
language-specific schema.
3 The Progress Editor displays.
4 Use File|Open to locate and open AIMInstallDir/us/whcomp.p.
5 Make the following changes:
wk_home. This is the compile destination where the r-code is saved. The slash at the end of the directory name is required. This should be AIMInstallDir.
wk_log. The name and location of the log file from the compile; for example, AIMInstallDir/us/aimchr.001.
wk_list. The name and location of the compile list. The files—
A portion of the file appears with sample changes in bold below. /**SET DISPLAY TYPE**/
if session:display-type = "TTY" then assign wk_home = "c:\mfgpro\aim23c\"
wk_log = "c:\mfgpro\aim23c\us\aimchr.001". else
assign wk_home = "../obj.p8/90a/gui/"
wk_log = "../admin/install/compile/aimgui.res". /**SET LANGUAGE**/
&IF index(propath,"LANG=fr") <> 0 &THEN wk_lang = "fr/".
&ELSEIF index(propath,"LANG=du") <> 0 &THEN wk_lang = "du/".
&ELSE
wk_lang = "us/". &ENDIF
assign wk_list = "c:\mfgpro\aim23c\us\aim.wrk". 6 Save your changes.
7 Select Compile|Run from the Progress Editor menu. The AIM compile screen displays. On the first pass, the values should be correct from your edit of the file in the previous steps. On the second pass, change aim.wrk to qad.wrk.
Fig. 1.11 AIM Compiler
8 Press Go to launch the compile. A report window displays showing compile progress and error status.
Fig. 1.12 Compile Status Screen
9 When the compile is complete, press the spacebar to close the report window. The AIM Compiler redisplays.
10 Repeat steps 7 through 9 for qad.wrk.
11 Repeat steps 2 through 9 for additional languages, making sure to edit the launch command in step 2 to include the language-specific .pf
and .ini files.
12 Press Exit to exit the compiler. You enter the Progress Editor. Access the menus and choose File|Exit to close the editor.
Creating a Launch Script
After the compile, copy client.Production for UNIX, or
ClientProduction.bat for Windows, and modify them to enable the
scripts to launch AIM. Alternately, for UNIX, you can copy or modify
aimcomp.sh.
1 Copy the appropriate script for your operating system:
OS File Name Copy to:
UNIX client.Production client.AIM
2 Open the new copy in a text editor.
3 Locate the -p argument, and change the run program from mf.p to
cpdmf.p.
4 Modify the -pf argument to call aimcomp.pf.
¶See “RDF Technical Setup” in the Radio Data Terminals chapter in User Guide: Advanced Inventory Management.
5 Radio Data Terminals (RDTs) are supported on character clients. In addition, to run an RF session, the following lines must be added to the -ini file for Windows and set as variables in UNIX.
AIMSystemCode=RF;export AIMSystemCode AIMShortMsg=YES;export AIMShortMsg AIMSelectType=B;export AIMSelectType For example, in the UNIX script:
MFGDIR=/dr01/mfgpro/eb2sp9;export MFGDIR AIMDIR=/dr01/mfgpro/aim23c;export MFGDIR AIMSystemCode=RF;export AIMSystemCode AIMShortMsg=YES;export AIMShortMsg AIMSelectType=B;export AIMSelectType stty intr '^c' DLC=/dr01/progress/dlc91e;export DLC PATH=$PATH,$DLC;export PATH PROMSGS=$DLC/promsgs;export PROMSGS PROTERMCAP=$DLC/protermcap;export PROTERMCAP PROPATH=.:$AIMDIR:$AIMDIR/us:$AIMDIR/us/src:$AIMDIR/us/ sp5:$MFGDIR:$MFGDIR/us:$MFGDIR/xrc;export PROPATH
$DLC/bin/_progres -c 30 -d mdy -yy 1920 -Bt 350 -D 100 -mmax 3000 -nb 200 -s 63 -noshvarfix -p cpdmf.p -pf /dr01/mfgpro/eb2sp9/
aimcomp.pf
6 Save the file.
Updating Help
Important Updates to AIM help exist only in the character-client help. To make these changes available in a GUI environment, follow the steps outlined in “Access Revised Character Help Information” on page 26.
Load Online Help
The online help database is character only. You can load online help data at any time after you create your databases.
1 Launch MFG/PRO.
2 From the Main Menu, open Field Help Load (36.4.19).
3 In the Language field, enter the code of the language that you are loading help for and press Enter.
Note AIM ships only English help. The language code is us.
4 Skip to Field Help Load File, leaving all other fields blank, and enter the two-letter language code directory followed by the name of the help file, which is always fieldhlp.fhd. In the AIM installation, the file is located in:
AIMInstallDir/data/mfg/us/fieldhlp.fhd
Fig. 1.13
Field Help Load in MFG/PRO
5 Accept the default values in all other fields and press Go to begin the load process.
As the load proceeds, the number of records that have been read and loaded displays at the bottom of the screen. On completion, the screen should look like Figure 1.14.
Fig. 1.14 Field Help Load Completion Screen
Access Revised Character Help Information
Updated help is available in character mode only. If your configuration includes Windows GUI clients, perform these additional steps to make the character-based help viewable from those clients:
1 Open User Maintenance (36.3.18).
2 For each user accessing the new functions, set WinHelp to No.
3 Press Go to save the changes.
Starting AIM
Start AIM by launching the modified .bat or .sh file created under
“Creating a Launch Script” on page 23.
Once MFG/PRO starts, enter menu 80 in the character client, or locate AIM on the Custom menu in GUI.
Fig. 1.15 AIM Main Menu
4 Navigate to Installed Products, CPD Control File Maintenance (80.24.21.19).
Fig. 1.16
CPD Control File Maintenance
5 Set AIM to yes.
See User Guide: Advanced Inventory Management for additional information on starting and using AIM.
Upgrading AIM
This chapter provides information on upgrading an earlier version of AIM to the current version.
Overview 30
Updating the MFG/PRO Service Pack Level 30
Upgrading the AIM Version 31
Overview
This upgrade chapter supports the conversion of all previously released versions of AIM to the current version, AIM 2.3c. The previously released versions are AIM 2.0, 2.1b, 2.1c, 2.2a, 2.3a, and 2.3b. The only database changes in this sequence occurred between 2.2a and 2.3a. There were no database changes between AIM 2.3a and 2.3c.
A delta .df file containing the database changes is provided for upgrades
for versions 2.0, 2.1b, 2.1c, and 2.2a to version 2.3c.
In addition, this chapter includes instructions for updating your AIM installation when you upgrade your MFG/PRO service pack level.
Updating the MFG/PRO Service Pack Level
If you upgrade your MFG/PRO service pack level, you must also upgrade your AIM installation. The examples in this section will assume you are upgrading from eB2 service pack 5 to eB2 service pack 9.
1 If your existing AIM media does not contain the MFG/PRO version and service pack level in AIM/chr/qadsrc, then contact QAD to
obtain AIM media that includes the MFG/PRO version and service pack level.
2 Create a service pack directory in AIMInstallDir/us:
AIMInstallDir/us/sp9
3 Copy the specific directory for your MFG/PRO version and service pack from the /chr/qadsrc directory from the CD to
AIMInstallDir/us/sp9.
4 Copy the new qad.wrk for your MFG/PRO version and service pack
from the /chr/qadsrc directory from the CD to AIMInstallDir/ us.
5 Modify MFGPROInstallDir/aimcomp.sh to reflect the new PROPATH.
AIMDIR=/dr01/mfgpro/aim23c;export AIMDIR
PROPATH=.:$AIMDIR:$AIMDIR/us:$AIMDIR/us/src:$AIMDIR/us/ sp9:$MFGDIR:$MFGDIR/us:$MFGDIR/xrc;export PROPATH
6 Compile only the new qad.wrk using the instructions in “Compile
Under UNIX” on page 17 or “Compile Under Windows” on page 21.
7 This completes the AIM update. No database changes are required.
Upgrading the AIM Version
Prior to Starting
Before starting the upgrade, complete the following steps:
• Shut down your AIM production system.
• Back up your existing AIM database.
Install New AIM Media
Follow the instructions in “Install AIM Files” on page 9. Make sure your new AIMInstallDir is parallel to both MFGPROInstallDir and your existing AIMInstallDir.
Fig. 2.1 New AIM Directory for aim23c
Update Existing aimempty
The aimempty database from your prior release should already exist in your AIM environment. For all versions prior to AIM 2.3a, you must load the language-specific delta .df file.
Note If you are supporting multiple languages, you must repeat these steps for each language-specific empty database.
Load Schema Updates
Complete these steps for all versions prior to AIM 2.3a.
1 In MFG/UTIL, select Load Database Schema (.df) File from the Database menu.
2 In the Connect Database screen, enter the empty database name and location. Choose OK.
3 In the Enter Data Definition File to Load screen, use the Browse button to navigate to the appropriate delta schema definition file.
• For US English choose AIMInstallDir/defs/ deltaaimusv9.df.
• For a language other than US English choose AIMInstallDir/ defs/xx/deltaaimxxv9.df where xx is the language code. 4 Choose OK.
5 A log window displays and shows load progress. When the load completes, choose OK to close the window.
6 Repeat these steps for each empty language-specific AIM database.
Compile Upgraded AIM Version
For a more detailed set of compile steps, see the section “Compiling AIM: UNIX” on page 16 or “Compiling AIM: Windows” on page 19.
Compile New Code
For additional language compiles, change the .pf file name to one you created for the language you are compiling. This .pf file must reference
the empty database loaded with the language-specific schema.
1 Open your aimcomp.sh (UNIX) or aimcomp.ini (Windows) file
and modify the paths in the file to reflect the new AIM installation path.
AIMDIR=/dr01/mfgpro/aim23c;export AIMDIR
PROPATH=.:$AIMDIR:$AIMDIR/us:$AIMDIR/us/src:$AIMDIR/us/ sp9:$MFGDIR:$MFGDIR/us:$MFGDIR/xrc;export PROPATH
2 Create the target /triggers directory for the compile:
AIMInstallDir/triggers
3 Launch a command session and for UNIX navigate to MFGPROInstallDir and run aimcomp.sh:
./aimcomp.sh
For Windows, navigate to MFGPROInstallDir and run: %DLC%\bin\_progres.exe -inp 32000 -pf aimcomp.pf -ininame aimcomp.ini
4 The Progress Editor displays.
5 Use File|Open to locate and open AIMInstallDir/us/whcomp.p.
6 Select Compile|Run from the Progress Editor menu. The AIM compile screen displays. Modify the paths as necessary. Make sure the List to Compile From references AIMInstallDir/us/ qad.wrk.
Fig. 2.2 AIM Compiler
7 Press Go to launch the compile. A report window displays showing compile progress and error status.
Fig. 2.3 Compile Status Screen
8 When the compile is complete, press the spacebar to close the report window. The Progress session ends.
9 Repeat steps 3 through 8 for additional languages, making sure to edit the launch command in step 3 to include the language-specific .pf
and .ini files.
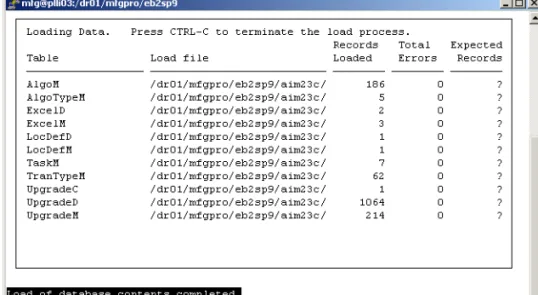
Update the AIM Production Database
Though you have loaded the schema changes into the empty databases, you must load them into the production database as well. You will also need to load new administrative data such as new messages and field values into the AIM database, as well as into mfgprod and mfgadmin.
Load Schema Updates
Complete these steps for all versions prior to AIM 2.3a.
1 In MFG/UTIL, select Load Database Schema (.df) File from the Database menu.
2 In the Connect Database screen, enter the production database name and location. Choose OK.
3 In the Enter Data Definition File to Load screen, use the Browse button to navigate to the appropriate delta schema definition file.
• For a US English production database choose AIMInstallDir\ defs\deltaaimusv9.df.
• For a production database with a language other than US English choose AIMInstallDir\defs\xx\deltaaimxxv9.df where xx is the language code.
4 Choose OK.
5 A log window displays and shows load progress. When the load completes, choose OK to close the window.
Load Data Updates
Complete these steps for all previous versions.
1 In MFG/UTIL, select Load System Data into Database from the Database menu.
2 In the Connect Database screen, enter the AIM production database name and location. Choose OK.
3 A log window displays to confirm the connection. Choose Close.
4 In the Load Data Contents screen, use the Browse button to navigate to AIMInstallDir\data\aim. Select any file in the directory and
choose Open. Then choose OK in the Load Data Contents screen. The mfgprod data files are in AIMInstallDir\data\mfg and in
AIMInstallDir\data\mfg\us.
For admprod, go to AIMInstallDir\data\mfgadmin and in
AIMInstallDir\data\mfgadmin\us.
5 A list of tables in the directory is built and all tables with data updates are selected by default. Choose OK to start the load.
6 A log window displays to show progress. When the load completes, choose Close.
Note When performing an upgrade, the data files contain all data, not just deltas. Error files are generated for the data records that already exist in the database. These can be safely ignored.
7 Repeat steps 1 through 6 for your mfgprod and admprod databases,
using the paths identified in step 4.
8 Repeat steps 1 through 6 for each additional language as well, loading only the language-specific data for mfgprod and admprod in step 4.
Updating Help
Help files have been updated for AIM 2.3. Updates to AIM help exist only in the character-client help. To make these changes available in a GUI environment, follow the steps outlined in “Access Revised Character Help Information” on page 37.
Load Online Help
The online help database is character only. You can load online help data at any time after you create your databases.
1 Launch MFG/PRO.
2 From the Main Menu, open Field Help Load (36.4.19).
3 In the Language field, enter the code of the language that you are loading help for and press Enter.
Note AIM ships only English help. The language code is us.
4 Skip to Field Help Load File, leaving all other fields blank, and enter the two-letter language code directory followed by the name of the help file, which is always fieldhlp.fhd. In the AIM installation,
the file is located in:
AIMInstallDir/data/mfg/us/fieldhlp.fhd
5 Accept the default values in all other fields and press Go to begin the load process.
As the load proceeds, the number of records that have been read and loaded displays at the bottom of the screen.
Access Revised Character Help Information
Updated help is available in character mode only. If your configuration includes Windows GUI clients, perform these additional steps to make the character-based help viewable from those clients:
1 Open User Maintenance (36.3.18).
2 For each user accessing the new functions, set WinHelp to No.
A admprod 35 admprod.db 14 AIM Introduction to 5, 29 aim.db 13, 14 aim.wrk 7 aimempty 31 aimempty.db 11 aimFRempty 11 AIMInstallDir 6 aimUSempty 11 C CD installing 9 D database create 11 load data 14
load data definitions 12 directories compile 7 data 7 E empty databases multiple languages 11 F
Field Help Load 25, 36 fieldhlp.fhd 25, 36 H help language 25, 36 loading 25, 36 I installation CD media 9 L languages compiles 16, 20
empty database requirements 11 help 25, 36 M MFG/UTIL 11 starting 9 mfgprod 35 mfgprod.db 14 mount commands 9 P PROPATH 7 languages 16, 20 Q qad.wrk 7 S scripts MFG/UTIL 9 U upgrades compiling 32 overview 30 schema updates 32 versions supported 30