Windows Server 2003
Security Guide
Microsoft Solutions for
Security
Information in this document, including URL and other Internet Web site references, is subject to change without notice. Unless otherwise noted, the example companies, organizations, products, domain names, e – mail addresses, logos, people, places and events depicted herein are fictitious, and no association with any real company, organization, product, domain name, e – mail address, logo, person, place or event is intended or should be inferred. Complying with all applicable copyright laws is the responsibility of the user. Without limiting the rights under copyright, no part of this document may be reproduced, stored in or introduced into a retrieval system, or transmitted in any form or by any means (electronic, mechanical, photocopying, recording, or otherwise), or for any purpose, without the express written permission of Microsoft Corporation.
Microsoft may have patents, patent applications, trademarks, copyrights, or other intellectual property rights covering subject matter in this document. Except as expressly provided in any written license agreement from Microsoft, the furnishing of this document does not give you any license to these patents, trademarks, copyrights, or other intellectual property.
© 2003 Microsoft Corporation. All rights reserved.
Microsoft and Visual Basic are either registered trademarks or trademarks of Microsoft Corporation in the United States and/or other countries.
Acknowledgements
The Microsoft Solutions for Security group (MSS) would like to acknowledge and thank
the team that produced the Windows Server 2003 Security Guide. The following people
were either directly responsible, or made a substantial contribution to the writing, development, and testing of this solution.
Authors
Kurt Dillard José Maldonado Brad WarrenderContent Contributors
William Dixon Eric Fitzgerald Stirling Goetz Ian Hellen Jesper Johansson Kirk SolukTesters
Gaurav Singh Bora Kenon Bliss Paresh Gujar Vince Humphreys Ashish Java
Editors
Reid Bannecker Wendy Cleary John Cobb Kelly McMahon Jon TobeyProgram Manager
Chase CarpenterReviewers
Rich Benack Rob Cooper Duane Crider Mike Greer Robert Hensing Chad Hilton Andrew Mason Joe Porter Joel Scambray Ben Smith Jeff WilliamsContributors
Ignacio Avellaneda Ganesh Balakrishnan Shelly Bird Derick Campbell Sean Finnegan Joanne Kennedy Jeff Newfeld Rob Oikawa Vishnu Patankar Keith Proctor Bill Reid Sandeep Sinha Bomani Siwatu Graham WhiteleyAt the request of Microsoft, The Center for Internet Security (CIS) and the United States Department of Commerce National Institute of Standards and Technology (NIST) participated in the final review of these Microsoft documents and provided comments, which were incorporated into the published versions.
Microsoft would also like to thank the Siemens Workplace Architecture Team as well as National Broadband LLC for their invaluable input and participation in the Early Adopter Program for this guide.
Table of Contents
Introduction to the Windows Server 2003 Security Guide ... 1
Overview... 1
Executive Summary ... 2
Who Should Read This Guide... 3
Get Secure Stay Secure... 4
Scope of this Guide ... 5
Content Overview... 6
Skills and Readiness ... 10
Requirements ... 11
Style Conventions ... 12
Summary ... 13
Configuring the Domain Infrastructure... 15
Overview... 15
Domain Policy ... 31
Account Policies ... 32
Password Policy ... 33
Account Lockout Policy ... 38
Kerberos Policy ... 41
Security Options ... 42
Summary ... 44
Creating a Member Server Baseline... 47
Overview... 47
Windows Server 2003 Baseline Policy... 51
Audit Policy... 52
User Rights Assignments ... 64
Security Options ... 76
Event Log ... 100
System Services... 103
Additional Registry Settings ... 139
Additional Security Settings... 144
Summary ... 149
Hardening Domain Controllers... 151
Overview... 151
Audit Policy Settings... 153
User Rights Assignments ... 154
Security Options ... 159
Event Log Settings ... 160
System Services... 161
Additional Security Settings... 164
Hardening Infrastructure Servers... 177
Overview... 177
Audit Policy Settings... 178
User Rights Assignments ... 179
Security Options ... 180
Event Log Settings ... 181
System Services... 182
Additional Security Settings... 183
Summary ... 189
Hardening File Servers ... 191
Overview... 191
Audit Policy Settings... 192
User Rights Assignments ... 193
Security Options ... 194
Event Log Settings ... 195
System Services... 196
Additional Security Settings... 198
Summary ... 201
Hardening Print Servers... 203
Overview... 203
Audit Policy Settings... 204
User Rights Assignments ... 205
Security Options ... 206
Event Log Settings ... 207
System Services... 208
Additional Security Settings... 209
Summary ... 212
Hardening IIS Servers... 213
Overview... 213
Audit Policy Settings... 214
User Rights Assignments ... 215
Security Options ... 216
Event Log Settings ... 217
System Services... 218
Additional Security Settings... 220
Summary ... 237
Hardening IAS Servers ... 239
Overview... 239
Audit Policy... 240
User Rights Assignments ... 241
Security Options ... 242
Event Log ... 243
System Services... 244
Additional Security Settings... 245
Hardening Certificate Services Servers... 247
Overview... 247
Audit Policy Settings... 249
User Rights Assignments ... 250
Security Options ... 251
Event Log Settings ... 254
System Services... 255
Additional Registry Settings ... 257
Additional Security Settings... 258
Summary ... 261
Hardening Bastion Hosts ... 263
Overview... 263
Audit Policy Settings... 265
User Rights Assignments ... 266
Security Options ... 268
Event Log Settings ... 269
System Services... 270
Additional Security Settings... 278
Summary ... 282
1
1
Introduction to the Windows
Server 2003 Security Guide
Overview
Welcome to the Microsoft Windows Server 2003 Security Guide. This guide is designed
to provide you with the best information available to assess and counter security risks specific to Microsoft® Windows Server™ 2003 in your environment. The chapters in this guide provide detailed guidance on enhancing security setting configurations and features wherever possible in Windows Server 2003 to address threats identified in your environment. If you are a consultant, designer, or systems engineer involved in a Windows Server 2003 environment, this guide has been designed with you in mind. The guidance has been reviewed and approved by Microsoft engineering teams, consultants, support engineers, as well as customers and partners to make it:
● Proven — Based on field experience
● Authoritative — Offers the best advice available
● Accurate — Technically validated and tested
● Actionable — Provides the steps to success
● Relevant — Addresses real – world security concerns
Working with consultants and systems engineers who have implemented Windows Server 2003, Windows® XP, and Windows® 2000 in a variety of environments has helped establish the latest best practices to secure these servers and clients. This information is provided in detail in this guide.
The companion guide, Threats and Countermeasures: Security Settings in Windows
Server 2003 and Windows XP, provides a comprehensive look at all of the major security settings present in Windows Server 2003 and Windows XP. Chapters 2 through 11 of this guide include step – by – step security prescriptions, procedures, and recommendations to provide you with task lists to transform the security state of computers running Windows Server 2003 in your organization to a higher level of security. If you want more in – depth discussion of the concepts behind this material, refer to resources such as the Microsoft Windows 2003 Server Resource Kit, the Microsoft Windows XP Resource Kit, the
2
Executive Summary
Whatever your environment, you are strongly advised to take security seriously. Many organizations make the mistake of underestimating the value of their information
technology (IT) environment, generally because they exclude substantial indirect costs. If an attack on the servers in your environment is severe enough, it could greatly damage the entire organization. For example, an attack in which your corporate Web site is brought down that causes a major loss of revenue or customer confidence might lead to the collapse of your corporation’s profitability. When evaluating security costs, you should include the indirect costs associated with any attack, as well as the costs of lost IT functionality.
Vulnerability, risk, and exposure analysis with regard to security informs you of the tradeoffs between security and usability that all computer systems are subject to in a networked environment. This guide documents the major security countermeasures available in Windows Server 2003 and Windows XP, the vulnerabilities that they address, and the potential negative consequences of implementing each.
The guide then provides specific recommendations for hardening these systems in three common enterprise environments: one in which older operating systems such as
Windows 98 must be supported; one consisting of only Windows 2000 and later operating systems; and one in which concern about security is so high that significant loss of functionality and manageability is considered an acceptable tradeoff to achieve the highest level of security. These environments are referred to respectively as the Legacy Client, Enterprise Client, and High Security throughout this guide. Every effort has been made to make this information well organized and easily accessible so that you can quickly find and determine which settings are suitable for the computers in your organization. Although this guide is targeted at the enterprise customer, much of it is appropriate for organizations of any size.
To get the most value out of the material, you will need to read the entire guide. You can
also refer to the companion guide, Threats and Countermeasures: Security Settings in
Windows Server 2003 and Windows XP, which is available for download at
http://go.microsoft.com/fwlink/?LinkId=15159. The team that produced this guide hopes that you will find the material covered in it useful, informative, and interesting.
3
Who Should Read This Guide
This guide is primarily intended for consultants, security specialists, systems architects, and IT professionals who are responsible for the planning stages of application or infrastructure development, and the deployment of Windows Server 2003. These roles include the following common job descriptions:
● Architects and planners responsible for driving the architecture efforts for the clients in their organizations.
● IT security specialists focused purely on providing security across the platforms within their organizations.
● Business analysts and business decision – makers (BDMs) with critical business
objectives and requirements that depend on client support.
● Consultants from both Microsoft Services and partners who need detailed
resources of relevant and useful information for enterprise customers and partners.
4
Get Secure Stay Secure
In October 2001, Microsoft launched an initiative known as the Strategic Technology Protection Program (STPP). The aim of this program is to integrate Microsoft products, services, and support that focus on security. Microsoft views the process of maintaining a secure environment as two related phases. Get Secure and Stay Secure.
Get Secure
The first phase is called Get Secure. To help your organization achieve an appropriate level of security, the advice in this guide is designed to help you secure your current and future computer systems.
Stay Secure
The second phase is known as Stay Secure. It is one thing to create an environment that is initially secure. However, once your environment is up and running, it is entirely another to keep the environment secure over time, take preventative action against threats, and then respond to them effectively when they do occur.
5
Scope of this Guide
This guide is focused on how to create and maintain a secure environment for computers running Windows Server 2003 in your organization. The material explains the different stages of how to secure the three environments defined in the guide, and what each prescribed server setting addresses in terms of client dependencies. The three
environments considered are labeled Legacy Client, Enterprise Client, and High Security.
● The Legacy Client settings are designed to work in a Microsoft Active Directory®
domain with member servers and domain controllers running Windows Server 2003, and clients running Microsoft Windows® 98, Windows NT 4.0 and later.
● The Enterprise Client settings are designed to work in an Active Directory domain
with member servers and domain controllers running Windows Server 2003, and clients running Windows 2000, Windows XP, and later.
● The High Security settings are also designed to work in an Active Directory domain
with member servers and domain controllers running Windows Server 2003, and clients running Windows 2000, Windows XP, and later. However, the High Security settings are so restrictive that many applications may not function. For this reason, the servers may encounter some impact on performance, and managing the servers will be more challenging.
Hardening guidance is provided for a group of distinct server roles. The countermeasures described and the tools provided assume that each server will have a single role, if you need to combine roles for some of the servers in your environment then you can customize the security templates included with this guide so that the appropriate combination of services and security options are configured for the servers with multiple roles. The roles covered by this guide include:
● Domain controllers
● Infrastructure servers
● File servers
● Print servers
● Internet Information Services (IIS) servers
● Internet Authentication Services (IAS) servers
● Certificate Services servers
● Bastion hosts
The settings recommended in this guide were tested thoroughly in lab environments depicting those described above: Legacy Client, Enterprise Client, and High Security. These settings were proven to work in the lab, but it is important that your organization test these settings in your own lab that accurately represents your production
environment. It is likely that you will need to make some changes to the security templates and the manual procedures documented within this guide so that all of your business applications continue to function as expected. The detailed information provided in the companion guide, Threats and Countermeasures: Security Settings in Windows Server 2003 and Windows XP, which is available for download at
http://go.microsoft.com/fwlink/?LinkId=15159, gives you the information you need to assess each specific countermeasure and to decide which of them are appropriate for your organization's unique environment and business requirements.
6
Content Overview
The Windows Server 2003 Security Guide consists of 12 chapters. Each chapter builds on the end – to – end solution process required to implement and secure Windows Server 2003 in your environment. The first few chapters describe building the foundation for hardening the servers in your organization, while the remaining chapters document the procedures unique to each server role.
Chapter 1: Introduction to the Windows Server 2003
Security Guide
This chapter introduces the Windows Server 2003 Security Guide, and includes a brief
overview of each chapter.
Chapter 2: Configuring the Domain Infrastructure
This chapter explains how the domain environment will be constructed as a baseline in order to provide guidance to secure a Windows Server 2003 infrastructure. The chapter first focuses on domain – level security settings and countermeasures. High level
descriptions of the Microsoft Active Directory service design, the organizational unit (OU) design, and domain policy are included.
The Legacy Client, Enterprise Client, and High Security environments mentioned in Chapter 1 are then explained in terms of securing a domain environment. This provides a vision of the evolution your organization can make toward a more secure environment within a domain infrastructure that is appropriate for each of these environments.
Chapter 3: Creating a Member Server Baseline
This chapter explains security template settings and additional countermeasures for the server roles covered in the three environments defined in the guide. The chapter largely focuses on establishing a Member Server Baseline Policy (MSBP) for the server role hardening recommendations discussed later in the guide.
The recommendations in this chapter are chosen to safely allow corporations to deploy strongly recommended setting configurations for Windows Server 2003 systems which suit both existing and newly – built systems. The default security configurations within Windows Server 20003 have been researched and tested. The recommendations specified in this chapter were determined to provide greater security than the default operating system settings. In some cases to provide support for legacy clients, a less restrictive setting configuration is suggested than that present in the default installation of Windows Server 2003.
7
Chapter 4: Hardening Domain Controllers
The domain controller server role is one of the most important roles to secure in any Active Directory environment with computers running Windows Server 2003. Any loss or compromise of a domain controller could prove devastating to clients, servers, and applications that rely on domain controllers for authentication, Group Policy, and a central lightweight directory access protocol (LDAP) directory.
This chapter outlines the need to always store domain controllers in physically secure locations that are accessible only to qualified administrative staff. The hazards of storing domain controllers in unsecured locations, branch offices for example, are addressed and a significant portion of the chapter is devoted to explaining the security considerations behind the recommended Domain Controller Group Policy.
Chapter 5: Hardening Infrastructure Servers
In this chapter, the Infrastructure server role is defined as either a Dynamic Host Control Protocol (DHCP) server or a Windows Internet Name Service (WINS) server. Details are provided on the areas in which the infrastructure servers in your environment can benefit from security settings that are not applied by the Member Server Baseline Policy (MSBP).
Chapter 6: Hardening File Servers
This chapter focuses on the File server role and the difficulties related to hardening servers designated for it. The most essential services for these servers require the Windows network basic input/output system (NetBIOS) – related protocols. The Server Message Block (SMB) and Common Internet File System (CIFS) protocols are also used to provide rich information to unauthenticated users, and yet these are often
recommended to be disabled in high – security Windows® environments. This chapter details any areas in which File servers can benefit from security settings not applied by the MSBP.
Chapter 7: Hardening Print Servers
Print servers are the focus of this chapter. Again, the most essential services for these servers require use of Windows NetBIOS – related protocols. The protocols for SMB and CIFS can also provide rich information to unauthenticated users for this server role, but these are also often recommended to be disabled in high – security Windows
environments. This chapter details the areas in which Print server security settings can be strengthened in ways that are not applied by the MSBP.
Chapter 8: Hardening IIS Servers
This chapter outlines how comprehensive security for Web sites and applications depends on an entire IIS server (including each Web site and application running on the IIS server) to be protected from client computers in your environment. Web sites and applications also must be protected from other Web sites and applications running on the same IIS server. Practices to ensure this distinction is achieved between the IIS servers in your environment are described in detail in this chapter.
8
IIS is not installed on members of the Microsoft Windows Server System™ family by default. When IIS is initially installed, it is installed in a highly secure, "locked" mode. For example, IIS by default serves only static content. Features such as Active Server Pages (ASP), ASP.NET, Server – Side Includes, WebDAV publishing, and Microsoft FrontPage® Server Extensions must now be enabled by the administrator through the Web Service Extensions node in Internet Information Services Manger (IIS Manager).
Sections in this chapter provide the detail on a variety of security hardening settings that should be implemented to enhance the security of IIS servers in your environment. The importance of security monitoring, detection, and response is emphasized to ensure the servers stay secure.
Chapter 9: Hardening IAS Servers
Internet Authentication Servers (IAS) provide RADIUS services, a standards – based authentication protocol designed for verifying identity of clients accessing networks remotely. This chapter details any areas in which IAS Servers can benefit from security settings not applied by the MSBP.
Chapter 10: Hardening Certificate Services Servers
Certificate Services provide the cryptographic and certificate management services needed to build a public key infrastructure (PKI) in your server environment. This chapter details any areas in which Certificate Services servers will benefit from security settings not applied by the MSBP.
Chapter 11: Hardening Bastion Hosts
Bastion hosts servers are accessible to clients from the Internet. In this chapter, it is explained how these systems exposed to the public are susceptible to attack from a much larger number of users who can remain completely anonymous in many cases if they wish. Many organizations do not extend their domain – infrastructure to public portions of this network. For this reason, this chapter content focuses on hardening recommendations for stand – alone computers. Details are provided on any areas in which bastion hosts can benefit from security settings not applied by the MSBP, or the methods used to apply those settings in an Active Directory – based domain environment.
Chapter 12: Conclusion
The concluding chapter of this guide recaps the important points of the material discussed in the previous chapters.
9
Tools and Templates
A collection of security templates, scripts, and additional tools are included with this guide to make it easier for your organization to evaluate, test, and implement the
countermeasures recommended in this guide. The security templates are text files that can be imported into domain – based group policies, or applied locally using the Security Configuration and Analysis snap – in. These procedures are detailed in Chapter 2, "Configuring the Domain Infrastructure." The scripts included with this guide implement IPSec packet filters using the NETSH command line tool and test scripts used in testing the recommended countermeasures. This guide also includes a Microsoft Excel
workbook called Windows Server 2003 Security Guide Settings that documents the settings included in each of the security templates. These tools and templates are included in the self-extracting WinZip archive that contains this guide. When you
extracted the files from this archive the following folder structure is created in the location you specified:
● \Windows Server 2003 Security Guide — contains the Portable Document Format
(PDF) file document that you are currently reading, as well as the Test Guide, Delivery Guide, and Support Guide associated with this material.
● \Windows Server 2003 Security Guide\Tools and Templates — contains
subdirectories for any items that may accompany this guide.
● \Windows Server 2003 Security Guide\Tools and Templates\Security
Guide\Security Templates — contains all security templates that are discussed in the guide.
● \Windows Server 2003 Security Guide\Tools and Templates\Security
Guide\Sample Scripts — contains all sample IPSec filter scripts and an Excel workbook containing all traffic maps discussed in the guide.
● \Windows Server 2003 Security Guide\Tools and Templates\Security
Guide\Checklists — contains checklists specific to each server role.
● \Windows Server 2003 Security Guide\Tools and Templates\Test Guide— contains
tools related to the test guide.
● \Windows Server 2003 Security Guide\Tools and Templates\Delivery Guide—
contains tools related to the delivery guide.
10
Skills and Readiness
The following knowledge and skills are prerequisite for administrators or architects charged with developing, deploying, and securing installations of Windows Server 2003 and Windows XP in an enterprise:
● MCSE 2000 certification with more than 2 years of security – related experience.
● In – depth knowledge of corporate domain and Active Directory environments.
● Use of management tools, including Microsoft Management Console (MMC),
secedit, gpupdate, and gpresult.
● Experience administering Group Policy.
● Experience deploying applications and workstations in enterprise environments.
11
Requirements
The software requirements for utilizing the tools and templates documented in this guide are:
● Windows Server 2003 Standard Edition; Windows Server 2003 Enterprise Edition;
or Windows Server 2003 Datacenter Edition.
● A Windows Server 2003 – based Active Directory domain.
● Microsoft Excel 2000 or later.
12
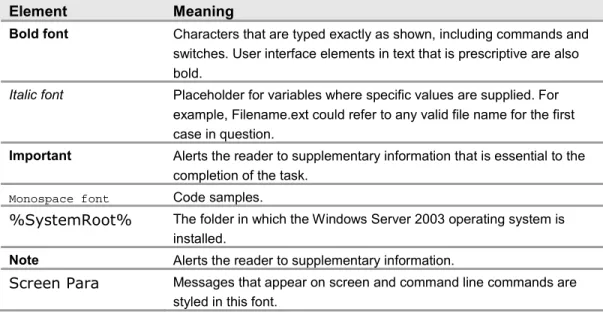
Style Conventions
This guide uses the following style conventions and terminology. Table 1.1: Style Conventions
Element Meaning
Bold font Characters that are typed exactly as shown, including commands and switches. User interface elements in text that is prescriptive are also bold.
Italic font Placeholder for variables where specific values are supplied. For example, Filename.ext could refer to any valid file name for the first case in question.
Important Alerts the reader to supplementary information that is essential to the completion of the task.
Monospace font Code samples.
%SystemRoot% The folder in which the Windows Server 2003 operating system is installed.
Note Alerts the reader to supplementary information.
Screen Para Messages that appear on screen and command line commands are styled in this font.
13
Summary
This chapter provided an overview of the primary factors involved in securing Windows Server 2003 which are considered in greater depth in the rest of the guide. Now that you have an understanding of how this guide is organized, you can decide whether to read it from beginning to end, or to select only those sections of most interest to you.
However, it is important to remember that effective, successful, security operations require making improvements in all of the areas covered in this guide, not just a few. For this reason, it is highly recommended to read the entire guide to take advantage of all the information that can be used to secure Windows Server 2003 in your organization that the guide has to offer.
More Information
The following information sources were the latest available on topics closely related to securing Windows Server 2003 at the time this guide and product were released to the pubic.
For more information on Security at Microsoft, see: http://www.microsoft.com/security. For more detail on how MOF can assist in your enterprise, see:
http://www.microsoft.com/business/services/mcsmof.asp.
For information on the Microsoft Strategic Technology Protection Program Web site, see: http://microsoft.com/security/mstpp.asp.
For information on the Microsoft Security Notification Service, see:
http://www.microsoft.com/technet/treeview/default.asp?url=/technet/security/bulletin/ notify.asp.
15
2
Configuring the Domain
Infrastructure
Overview
This chapter uses the construction of a domain environment to demonstrate how to secure an infrastructure for Microsoft® Windows Server™ 2003.
The chapter first focuses on security settings and countermeasures at the domain level. This includes a high level description of the Microsoft Active Directory® design, the organizational unit (OU) design, Group Policy design, and administrative group design. This chapter also explains how to secure a Windows Server 2003 domain environment for the Legacy, Enterprise, and High Security environments outlined in Chapter 1, "Introduction to Securing Windows Server 2003." This information lays the groundwork and provides a vision for evolving from a Legacy environment toward a High Security environment within a domain infrastructure.
Windows Server 2003 ships with default setting values set to a secure state. To improve the usability of this material, this chapter only discusses those settings that have been modified from the default values. For information on all default settings, see the
companion guide, "Threats and Countermeasures: Security Settings in Windows Server
2003 and Windows XP.”
Active Directory Design
Detailed information on designing an Active Directory structure could fill an entire book by itself. Active Directory enables applications to find, use, and manage directory resources in a distributed computing environment. This section briefly discusses these concepts to establish a frame of reference for the rest of the chapter.
When creating an Active Directory architecture you must carefully consider the environment's security boundaries. Adequately planning an organization's security delegation and implementation schedule will result in a much more secure Active
Directory design for the organization. Then, only major changes to the environment, such as an acquisition or organizational restructuring will require restructuring.
If your organization already has an Active Directory design, this chapter may provide insight into some of its benefits or potential issues from a security perspective.
16
Establishing Windows Server 2003 Directory Boundaries
There are several different types of boundaries within Active Directory. These boundaries define the forest, the domain, the site topology, and permission delegation.
These boundaries are automatically established during Active Directory installation, but you must ensure that permission boundaries incorporate organizational requirements and policies. Administrative permissions delegation can be quite flexible depending on an organization's requirements. For instance, to maintain a proper balance between security and administrative functionality, you can break the permission delegation boundaries down further into security boundaries and administrative boundaries.
Security Boundaries
Security boundaries help define the autonomy or isolation of different groups within an organization. It is difficult to balance the tradeoffs between ensuring adequate security — based on how the corporation's business boundaries are established — and the need to continue providing a solid level of base functionality.
To successfully achieve this balance, you must weigh the threats to your organization against the security implications of delegating administration permissions and other choices regarding your environment's network architecture.
Forest vs. Domain Security Boundaries
The forest is the true security boundary. This guide recommends creating separate forests to keep your environment secure from rogue administrators as opposed to creating separate domains to provide security and isolation from rogue administrators and other potential threats.
A domain is the management boundary of Active Directory. With an organization of well – meaning individuals, the domain boundary will provide autonomous management of services and data within each domain of the organization.
Unfortunately, when discussing security, this is not so simple to achieve. A domain, for example, will not completely isolate an attack from a rogue domain administrator. This level of separation can only be achieved at the forest level.
Because of this, your organization may need to consider dividing the administrative control of services and data within the current Active Directory design. Active Directory design requires fully understanding your organization's requirements for service autonomy and service isolation, as well as for data autonomy and data isolation.
Administrative Boundaries
Because of the potential need to segment services and data, you must define the different administration levels required. In addition to administrators who may perform unique services for your organization, the following types of administrators are recommended.
Service Administrators
Active Directory service administrators are responsible for the configuring and delivering the directory service. For example, service administrators maintain domain controller servers, control directory – wide configuration settings, and are responsible for ensuring service availability. The Active Directory administrators in your organization should be considered your service administrators.
17 In many cases, the Active Directory service configuration is determined by attribute
values. These attribute values correspond to settings for their respective objects stored in the directory. Consequently, service administrators in Active Directory are also data administrators. Depending on your organizational needs, here are some other service administrator groups you may need to include in your Active Directory service design:
● A domain administration group that is primarily responsible for directory services. The forest administrator is responsible for choosing the group to administer each domain. Because of the high–level access granted to the administrator for each domain, these administrators should be highly trusted individuals. The group performing domain administration controls the domains through the Domain Admins group and other built–in groups.
● Groups of administrators who are responsible for Domain Name System (DNS)
management.
The DNS administrator group is responsible for completing the DNS design and managing the DNS infrastructure. The DNS administrator manages the DNS infrastructure through the DNS Admins group.
● Groups of administrators that are responsible for OU management.
The OU administrator designates a group or individual as a manager for each OU. Each OU administrator is responsible for managing the data stored within the assigned Active Directory OU. These groups can control how administration is delegated, and how policy is applied to objects within their OUs. In addition, OU administrators can also create new subtrees and delegate administration of the OUs they are responsible for.
● Groups of administrators that are responsible for infrastructure server management.
The group responsible for infrastructure server administration is responsible for managing the Microsoft Windows® Internet Name Service (WINS), Dynamic Host Configuration Protocol (DHCP), and potentially the DNS infrastructure. In some cases, the group handling domain management will manage the DNS infrastructure because Active Directory is integrated with DNS and is stored and managed on the domain controllers.
Data Administrators
Active Directory data administrators are responsible for managing data stored in Active Directory or on computers joined to Active Directory. These administrators have no control over the configuration or delivery of the directory service. Data administrators are members of a security group created by your organization. Sometimes the default security groups in Windows do not make sense for all situations in the organization. Therefore, organizations can develop their own security group naming standards and meanings to best fit their environment. Some of the data administrators' daily tasks include:
● Controlling a subset of objects in the directory. Through inheritable attribute – level access control, data administrators can be granted control of very specific sections of the directory, but have no control over the configuration of the service itself.
● Managing member computers in the directory and the data that is on those
computers.
Note: In many cases, attribute values for objects stored in the directory determine the directory's service configuration.
18
To summarize, allowing the owners of Active Directory service and directory structures to join a forest or domain infrastructure requires that the organization must trust all service administrators in the forest and all domains. In addition, enterprise security programs must develop standard policies and procedures which provide proper background screening for the administrators. In the context of this security guide, to trust service administrators means to:
● Reasonably believe that service administrators will look out for the organization's best interests. Organizations should not elect to join a forest or domain if the owners of the forest or domain might have legitimate reasons to act maliciously against the organization.
● Reasonably believe that service administrators will follow best practices and restrict physical access to the domain controllers.
● Understand and accept the risks to the organization that include the possibility for:
● Rogue administrators —Trusted administrators might become rogue
administrators, and thus abuse the power they have with the system. If you have a rogue administrator within a forest, it would be easy for that
administrator to look up the security identifier (SID) for another administrator from another domain. The rogue administrator could then use an application programming interface (API) tool, disk editor, or debugger to add the stolen SID to the SID History list of an account within his own domain. With the stolen SID added to the user's SID History, along with his own domain the rogue administrator would have administrative privileges in the stolen SID's domain.
● Coerced administrators — A trusted administrator might be coerced or
compelled to perform operations that breach the security of the system. A user or administrator may use social engineering techniques on legitimate
administrators of a computer system in order to gain the usernames and passwords he needs to gain access to the system.
Some organizations might accept the risk of a security breach by a rogue or a coerced service administrator from another part of the organization. Such organizations might determine that the collaborative and cost – saving benefit of participating in a shared infrastructure outweighs this risk. However, other organizations might not accept the risk because the potential consequences of a security breach are too severe.
OU Structure to Facilitate Group Policy Management and Delegation
While this guide is not about Active Directory design, some design information is necessary to provide insight into the using Group Policy to securely administer your organization's domains, domain controllers, and specific server roles.
While OUs offer an easy way to group users and other security principals, they also provide an effective mechanism to segment administrative boundaries.
In addition, using OUs to provide different Group Policy objects (GPOs) based on server role is an integral piece of the overall security architecture for the organization.
Delegating Administration and Applying Group Policy
An OU is simply a container within a domain. You can delegate control over an OU to a group or individual by setting specific access control lists (ACLs) on each of these containers.
19 Often, you can use an OU to provide administrative capabilities similar to those in
Microsoft Windows NT® 4.0 resource domains. You can also create an OU to contain a group of resource servers to be administered by other users. This gives this group of other users autonomous control over a particular OU, without isolating them from the remainder of the domain.
Administrators that delegate control over specific OUs are likely to be service
administrators. At a lower level of authority, users that control the OUs are usually data administrators.
Administrative Groups
Creating administrative groups gives administrators a way to segment clusters of users, security groups, or servers into containers for autonomous administration.
For example, consider the infrastructure servers that reside in a domain. Infrastructure servers include all of the nondomain controllers that are running basic network services, including servers running WINS and DHCP services. All DNS servers are running on domain controllers, which are in the Domain Controllers OU. DNS servers in this example are not considered as Infrastructure servers.
Often, an operations group or an infrastructure administration group maintains these servers. Using an OU can easily provide administrative capabilities to these servers.
X To create an OU for administration
1. Create an OU called Member Servers. 2. Create an OU called Infrastructure.
3. Move all WINS and DHCP servers into the Infrastructure OU.
4. Create a global security group called Infrastructure Admins with the appropriate domain accounts added to it.
5. Run the Delegation of Control Wizard to give the Infrastructure Admins group the
setting Full Control of the OU.
The following illustration provides a high level view of such an OU.
Figure 2.1
20
This is only one of many ways of using OUs to provide administrative segmentation. For more complex organizations, see the "More Information" section at the end of this chapter.
After following this procedure, the Infrastructure Admin group should have full control over the Infrastructure OU, and all servers and objects within this OU. This prepares them for the next phase, securing the server roles with Group Policy.
Group Policy Application
Use Group Policy and delegate administration to apply specific settings, rights, and behavior to all servers within an OU. By using Group Policy rather than manual steps, it is simple to update a number of servers with any additional changes required in the future. Group policies are accumulated and applied in the order shown in the illustration below.
Figure 2.2
GPO application hierarchy
As seen above, policies are applied first from the local machine policy level of the
computer. After that, any GPOs are applied at the site level, and then at the domain level. If the server is nested in several OUs, GPOs existing at the highest level OU are applied first. The process of applying GPOs continues down the OU hierarchy. The final GPO to be applied is at the child OU level containing the server object. The order of precedence for processing Group Policy extends from the highest OU (farthest from the user or computer account) to the lowest OU (that actually contains the user or computer account).
Keep the following in mind when applying Group Policy:
● You must set the GPO application order for group policy levels with multiple GPOs.
If multiple policies specify the same option, the last one applied will take precedence.
● Configuring a Group Policy with the No Override option prevents other GPOs from
overriding it.
21
Security Templates
Security templates are text based files. You can change these files using the Security Templates snap – in to the Microsoft Management Console (MMC) or by using a text editor such as Notepad. Some sections of the template files contain specific ACLs written in the Security Descriptor Definition Language (SDDL). You can find more information on editing security templates and SDDL on Microsoft MSDN®.
Template Management
By default, authenticated users have the right to read all settings contained in a Group Policy object. Therefore, it is very important to store security templates used for a production environment in a secure location that only administrators responsible for implementing Group Policy can access. The purpose is not to prevent the viewing of *.inf files, but rather to prevent unauthorized changes to the source security templates. To accommodate this, all computers running Windows Server 2003 store security templates in the %SystemRoot%\security\templates folder.
However, this folder is not replicated across multiple domain controllers. Therefore, you will need to designate one domain controller to hold the master copy of the security templates so that you do not encounter version control problems with the templates. This will ensure that you always are modifying the same copy of the templates.
Managing Group Policy and Importing Security Templates
The following procedure imports the security templates included with this guide into the OU structure suggested in this chapter. Before implementing the following procedure on a domain controller, the specific policy (.inf) files must be located on a Windows Server 2003 system in the environment.
Warning: The security templates in this guide are designed to increase security in your environment. It is quite possible that by installing the templates included with this guide, some functionality in the environment of your organization may be lost. This could include the failure of mission critical applications.
It is essential to thoroughly test these templates before deployed them in a production environment. Back up each domain controller and server in your environment before applying any new security settings. Ensure the system state is included in the backup to enable registry settings or Active Directory objects to be restored.
X To import the Domain Policy security templates
1. In Active Directory Users and Computers, right – click the Domain, and then select Properties.
2. On the Group Policy tab, click New to add a new GPO.
3. Type Enterprise Client - Domain Policy, and then press Enter.
4. Right – click Enterprise Client - Domain Policy, and then select No Override. 5. Select Enterprise Client - Domain Policy, and then click Edit.
6. In the Group Policy window, click Computer Configuration\Windows Settings. Right – click Security Settings, and then select Import Policy.
7. In the Import Policy From dialog box, navigate to \Security Guide\Job Aids, and
then double – click Enterprise Client - Domain.inf. 8. Close the Group Policy that has been modified. 9. Close the Domain Properties window.
22
10. Force replication between the domain controllers so that all have the policy applied to them by doing the following:
● Open a command prompt and use the gpupdate.exe command line tool to
force the domain controller to refresh the domain policy with the command:
gpupdate /Force.
11. Verify in the Event Log that the Group Policy downloaded successfully and that the server can communicate with the other domain controllers in the domain. Warning: When you create the Enterprise Client – Domain Policy, ensure that the No Override option is enabled to enforce this policy throughout the domain. This is the only Group Policy in this guide in which the No Override option must be enabled. Do not enable this option in any of the other group policies specified in this guide. Also, do not modify the Windows Server 2003 Default Domain Policy, in case you need to return to its default settings.
To ensure that this new policy has precedence over the default policy, position it to have the highest priority among the GPO links.
You can modify the default policy directly to create a new security configuration, however, there is an advantage to creating a new Group Policy because if there are problems with it, the new one can be easily disabled, leaving the Default Domain Policy in place to resume control.
Gpupdate.exe is a command – line tool that when called from a batch file or automatic task scheduler, can be used to automatically apply templates and analyze system security. It can also be run dynamically from a command line.
Important: This policy should be imported into any additional domains in the
organization. However, it is not uncommon to find environments where the root domain password policy is much stricter than any of the other domains. Care should also be taken to ensure that any other domains that will use this same policy have the same business requirements. Because the password policy can only be set at the domain level, there may be business or legal requirements that segment some users into a separate domain simply to enforce the use of a stricter password policy on that group. In the three environments defined in this guide, the same policy for their root and child domains was used, along with the associated security template for each one. For example, Legacy Client – Domain.inf, Enterprise Client – Domain.inf, and High Security – Domain.inf files were used for each respective level. Procedures similar to those above should be used to apply any of the subsequent templates for the baseline policy and the incremental policies.
23
Successful GPO Application Events
Aside from manually checking all of the settings to ensure that they have been
appropriately applied to the servers in your organization, an event should also appear in the Event Log to inform the administrator that the domain policy has downloaded successfully to each of the servers. The following event information should appear in the Application Log with its own unique Event ID number:
Type: Information Source ID: SceCli Event ID: 1704
Description: Security policy in the Group policy objects has been applied successfully.
For more information, see Help and Support Center at http://go.microsoft.com/fwlink/events.asp.
If this message does not appear within a few minutes after applying the domain policy, rerun the Gpupdate.exe command – line tool to apply the domain policy, and then restart the server to force the domain policy download.
By default, the security settings are refreshed every 90 minutes on a workstation or server and every 5 minutes on a domain controller. You will see this event if any changes have occurred during these intervals. In addition, the settings are also refreshed every 16 hours, regardless of new changes or not.
Time Configuration
You should ensure that system time is accurate and that all servers in your organization are using the same time source. The Windows Server 2003 W32Time service provides time synchronization for Windows Server 2003 and Microsoft Windows XP – based computers running in an Active Directory domain.
The W32Time service synchronizes the client clocks of Windows Server 2003 – based computers with the domain controllers in a domain. This is necessary for the Kerberos version 5 authentication protocol to work properly, as well as NTLMv2. To function correctly, a number of Windows Server™ family components rely on accurate and synchronized time. If the clocks are not synchronized on the clients, the Kerberos v5 authentication protocol might falsely interpret logon requests as intrusion attempts and deny access to users.
Another important benefit time synchronization provides is event correlation on all of the clients in your enterprise. Synchronized clocks on the clients in your environment ensures that you can correctly analyze events that take place in uniform sequence on the clients for success or failure across the enterprise.
Kerberos is a network authentication protocol developed by Massachusetts Institute of Technology (MIT). The protocol authenticates the identity of users attempting to log on to a network and encrypts their communications through secret – key cryptography.
24
The W32Time service synchronizes clocks using the Network Time Protocol (NTP). In a Windows Server 2003 forest, time is synchronized in the following manner:
● The primary domain controller (PDC) emulator operations master in the forest root
domain is the authoritative time source for the organization.
● All PDC operation masters in other domains in the forest follow the hierarchy of domains when selecting a PDC emulator to synchronize their time.
● All domain controllers in a domain synchronize their time with the PDC emulator
operations master in their domain as their inbound time partner.
● All member servers and client desktop computers use the authenticating domain
controller as their inbound time partner.
To ensure that the time is accurate, the PDC emulator in the forest root domain can be synchronized to an external NTP time server. However, doing so may result in a requirement to open ports on the firewall. NTP uses UDP port 123. Before doing this, weigh the benefits against the potential security risk of making these configuration changes.
XTo synchronize an internal time source with an external time source
1. Open a Command Prompt.
2. Type the following, where PeerList is a comma – separated list of DNS names or Internet protocol (IP) addresses for the desired time sources:
w32tm /config /syncfromflags:manual /manualpeerlist:PeerList
3. To update type:
w32tm /config /update.
4. Check the Event Log. If the computer cannot reach the servers, the procedure
fails and an entry is written to the Event Log.
The most common use of this procedure is to synchronize the internal network's authoritative time source with a very precise external time source. However, this procedure can be run on any computer running Windows XP or a member of the Windows Server 2003 family.
In many cases, it may not be necessary to have all servers times synchronized with an external source, as long as they are synchronized with the same internal source. If the computers on your network are running Windows 98 or Windows NT 4.0 operating systems, then synchronize the clocks on those machines using the following command in a logon script where <timecomputer> is a domain controller on the network:
net time \\<timecomputer> /set /yes
Running this command will synchronize the time clocks in these computers with the time clocks in the other computers throughout the domain.
Note: For accurate log analysis, network computers running operating systems other than Windows should also synchronize their clocks to the Windows Server 2003 PDC emulator.
25
Baseline Sever Role Organizational Units
The previous example for managing an organization's infrastructure servers can be extended to encompass other servers and services in a corporate infrastructure. The goal is to create a seamless Group Policy that covers all servers, while ensuring that the servers residing within Active Directory meet the security standards for your environment. This type of Group Policy covering all servers in your environment forms a consistent baseline for standard settings across all of the servers in your enterprise. In addition, the OU structure and the application of Group Policies must provide a granular design to provide security settings for specific types of servers in an organization. For example, Internet Information Server (IIS), File, Print, Internet Authentication Server (IAS), and Certificate Services, illustrate a few of the server roles in an organization that may require unique group policies.
Member Server Baseline Policy
The first step in establishing server role OUs is to create a baseline policy. To do this, create a baseline security template and imported it into the Group Policy. The Enterprise Client – Member Server Baseline.inf files are included with this security guide to provide this functionality and guidance. The Enterprise Client is a reference to the different middle level of security based on the organization's compatibility requirements discussed in Chapter 1,"Introduction to the Windows Server 2003 Security Guide."
Link this GPO security template to the Member Servers OU. The Enterprise Client – Member Server Baseline.inf security template will apply the settings of the baseline Group Policy to any servers in the Member Servers OU, as well as any servers in child OUs. For simplicity, the remaining examples in this chapter use the Enterprise Client security level. The Member Server Baseline Policy is discussed in Chapter 3, "Creating a Member Server Baseline."
The baseline Group Policy should define the desired settings for all servers across an organization. Make the baseline Group Policy as restrictive as possible, and segment any servers that need to differ from this policy into separate server – specific OUs.
Server Role Types and Organizational Units
Continuing the example above, create a separate policy for the incremental changes to the infrastructure server policies. Put the necessary setting into a security template called Enterprise Client – Infrastructure Server.inf, to ensure that the infrastructure services function and are accessible over the network.
26
Link this GPO infrastructure template to the Infrastructure OU. Finally, use the Restricted Groups setting to add the following three groups to the Local Administrators group in the "Enterprise Client: Infrastructure Server Policy": Domain Administrators, Enterprise Administrators, and Infrastructure Administrators.
This process is shown in the illustration below.
Figure 2.3
Configuring incremental group policies
As mentioned before, this is only one of many possible ways to create an OU structure for deploying GPOs. For more information on creating OUs for Group Policy
implementation, see the Microsoft TechNet article, "How to Deploy Active Directory" at: http://www.microsoft.com/technet/treeview/default.asp?url=/technet/prodtechnol/AD/ windows2000/deploy/depovg/add.asp.
This security guide defines several server roles. The following table contains templates created to increase security for these roles when following the above process.
27 Table 2.1: Windows Server 2003 Roles
Server Role Description Security Template
Windows Server 2003 Domain Controllers
A group containing Active Directory domain controllers.
Enterprise Client – Domain Controller.inf
Windows Server 2003 Member servers
All servers that are members of the domain and reside in or below the member server OU.
Enterprise Client – Member Server Baseline.inf
Windows Server 2003 File servers
A group containing locked down file servers.
Enterprise Client – File Server.inf
Windows Server 2003 Print servers
A group containing locked down print servers.
Enterprise Client – Print Server.inf
Windows Server 2003 Infrastructure servers
A group containing locked down DNS, WINS, and DHCP servers.
Enterprise Client – Infrastructure Server.inf Windows Server 2003 IAS
servers
A group containing locked down IAS Servers.
Enterprise Client – IAS Server.inf
Windows Server 2003 Certificate Services servers
A group containing locked down Certificate Authority (CA) Servers.
Enterprise Client – CA Server.inf
Windows Server 2003 Bastion Hosts
A group containing Internet facing servers.
High Security– Bastion Host.inf
Windows Server 2003 IIS servers
A group containing locked down IIS Servers.
Enterprise Client – IIS Server.inf
All incremental template files are expected to be applied to OUs below the member servers OU. For this reason, each of these lower level OUs require that you apply both the Enterprise Client – Member Server Baseline.inf file and the specific incremental file to them to define the role each will fulfill in the organization.
The security requirements for each of these server roles are different. Appropriate security settings for each role are discussed in detail in later chapters.
Important: This guide assumes that computers running Windows Server 2003 will perform specifically defined roles. If the servers in your organization do not match these roles, or you have multipurpose servers, use the settings defined here as guidelines for creating your own security templates. However, bear in mind that the more functions each of your servers perform, the more vulnerable they are to attack.
28
The final OU design to support these defined server roles is shown in the illustration below.
Figure 2.4
29
OU, GPO, and Administrative Group Design
The recommended OUs and group policies discussed above create a baseline or new environment to restructure a company's existing OU structure for computers running Windows Server 2003. In addition, the administrators use their predefined administration boundaries to create their respective administrative groups. The correlation of these groups to the OUs they manage is shown in the following table.
Table 2.2: OUs and Administrative Groups
OU Name Administrative Group
Domain Controllers Domain Engineering Member Servers Domain Engineering
Infrastructure Operations
File Operations Print Operations
IAS Domain Engineering CA Enterprise Admins Web Web Services
Each administrative group has been created within the environment as a Global Group within the child domain.
Domain Engineering has added each of these administrative groups to the appropriate restricted group by using the corresponding GPO. The administrative groups created above will only be members of the Local Administrators group for the computers located in the OUs that specifically contain computers related to their job functions.
Finally, the domain engineers set permissions on each GPO so that only administrators in the domain engineering group are able to edit them.
By default, the new OU structure inherits many security settings from its parent container. For each OU, clear the check box for Allow inheritable permissions from parent to propagate to this object and all child objects.
X To clear the Allow Inheritable Permissions option
1. Open Active Directory Users and Computers.
2. Select the Advanced view by clicking View, and then clicking Advanced
Features.
3. Right – click the appropriate OU, and then click Properties. 4. Click the Security tab, and then click Advanced.
5. Clear the Allow inheritable permissions from parent to propagate to this
object and all child objects. Include these with entries specifically defined here checkbox.
Remove any unnecessary groups previously added by administrators, and add the domain group that corresponds to each server role OU. Retain the Full Control setting for the Domain Administrators group.
30
You do not have to perform the tasks to establish these OUs in a particular order, but there are some obvious dependencies. For example, the domain groups must exist before you can delegate control of different OUs to them. The following list defines a suggested order for implementing these tasks:
1. Create the OU structure.
2. Move the computers to the appropriate OUs. 3. Create the administrative groups.
4. Add the appropriate domain accounts to the administrative groups. 5. Delegate administration for each OU to the appropriate domain groups. 6. Create the group policies in the OU where they will be applied.
7. Link each Group Policy to any additional OUs as necessary. 8. Import the appropriate security template to each GPO.
9. Set permissions on each GPO so that the appropriate domain groups have control over them.
10. Add the appropriate domain groups to Restricted Groups for each GPO. 11. Test and refine the group policies.
31
Domain Policy
You can apply Group Policy security settings at several different levels in an organization. The baseline environment discussed above used Group Policy to apply settings at the following three hierarchy levels in the domain infrastructure:
● Domain Level — To address common security requirements, such as account and
password policies that must be enforced for all servers in the domain.
● Baseline Level — To address specific server security requirements that are
common to all servers in the domain infrastructure.
● Role Specific Level — To address security requirements for specific server roles.
For example, the security requirements for infrastructure servers differ from those for servers running Microsoft Internet Information Services (IIS).
The following sections of this chapter will only discuss the Domain Level policy in detail. Most of the domain security settings addressed are for user accounts and passwords. Keep in mind while reviewing these settings and recommendations that all settings apply to every user in the domain boundary.
Domain Policy Overview
Group Policy is extremely powerful because it allows an administrator to configure a standard network computer. By allowing administrators to make security changes simultaneously on all computers in the domain, or subsets of the domain, GPOs can provide a significant portion of a configuration management solution for any enterprise. This section provides detailed documentation on the security settings you can use to enhance the security of Windows Server 2003. Tables are provided that describe the security objective of each setting and the configuration necessary to achieve each objective. The settings are divided into categories that correspond to their presentation in the Windows Server 2003 Security Configuration Editor (SCE) user interface.
The types of security changes you can simultaneously apply via Group Policy include:
● Modifying permissions on the file system.
● Modifying permissions on registry objects.
● Changing settings in the registry.
● Changing user rights assignments.
● Configuring system services.
● Configuring auditing and event logs.
● Setting account and password policies.
32
Account Policies
Account policies, which include Password Policy, Account Lockout Policy, and Kerberos Policy security settings, are only relevant in the Domain Policy for all three environments detailed in this guide. Password Policy provides a vehicle to set complexity and change schedules for highly secured environment passwords. Account Lockout Policy allows tracking of unsuccessful password logon attempts to initiate account lockouts if necessary. Kerberos policies are used for domain user accounts. They determine Kerberos – related settings, such as ticket lifetimes and enforcement.