INSTRUCTIONS
FOR USE
SIMPONI
®(SIM-po-nee)
(golimumab)
SmartJect
®autoinjector
If your doctor decides that you or a caregiver may be able to give your injections of SIMPONI at home, you should receive training on the right way to prepare and inject SIMPONI.
Do not try to inject SIMPONI yourself until you have been shown the right way to give the injections by your doctor or nurse.
It is important to read, understand, and follow these instructions before using the SIMPONI SmartJect autoinjector so you inject the right way. Call your doctor if you or your caregiver has any questions about the right way to inject SIMPONI.
Read this information before you start
Important things to know about your
SmartJect autoinjector
When you are ready to inject SIMPONI, position the autoinjector straight onto your skin (90 degrees), then push firmly. Do not press the button until you have pushed the autoinjector firmly against your skin, allowing the green safety sleeve to slide into the clear cover.
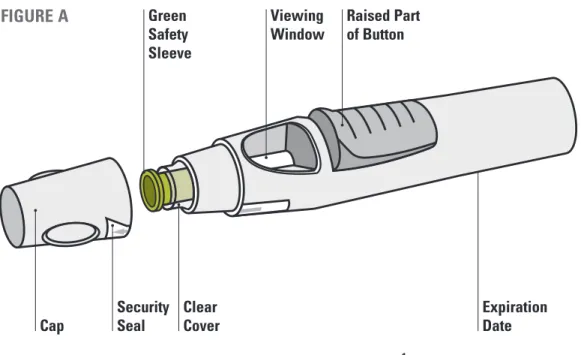
The green safety sleeve (see Figure A) helps prevent accidental injections. The sleeve must slide into the clear cover before you will be able to press the button.
When the button is pressed you will hear a loud first ‘click’ sound. Do not lift the autoinjector away from your skin. Hold and wait for the second ‘click.’ It is very important to practice injecting SIMPONI with your doctor or nurse so you become comfortable with this ‘click’ sound.
Keep holding the autoinjector firmly against your skin until you hear a second ‘click’sound (may take 3-15 seconds), then lift the autoinjector.The injection is complete when you hear the second ‘click’. If you lift the autoinjector before hearing the second ‘click,’ you may not get the full dose of medicine.
Important things to remember
• Do not remove the cap until you get to Step 3.1. • Do not press the button until you get to Step 3.3. • Do not shake the SmartJect autoinjector at any time.
Read all instructions below before using
SmartJect autoinjector
Figure A below shows what the SmartJect autoinjector looks like.
Expiration Date Cap Security Seal Clear Cover
Raised Part of Button Viewing
Window Green
Safety Sleeve
2
STEP 1. Gather and inspect the supplies for your injection
You will need these supplies for an injection of SIMPONI. See Figure B.• 1 alcohol swab • 1 cotton ball or gauze
• 1 SIMPONI prefilled SmartJect autoinjector from the refrigerator (stored at 36ºF to 46ºF (2ºC to 8ºC))
• 1 sharps disposal container for throwing away the used SmartJect autoinjector. See Step 4.2 for disposal instructions.
BIOHAZARD
1 alcohol
swab 1 cotton ball or gauze SmartJect autoinjector1 SIMPONI single use autoinjector disposalSharps container for
FIGURE B
1.1 Check expiration date
• Check the expiration date (“EXP”) on the SmartJect autoinjector.
• You can also check the expiration date printed on the back panel of the SIMPONI carton, to the left of the SIMPONI logo.
• If the expiration date has passed, do not use the SmartJect autoinjector. Call your doctor or pharmacist, or call 1-800-JANSSEN (1-800-526-7736) for help.
1.2 Check security seal
• Check the security seal around the cap of the SmartJect autoinjector. If the security seal is broken,
do not use the SmartJect autoinjector.
1.3 Wait 30 minutes
• To ensure proper injection, allow the autoinjector to sit at room temperature outside the carton for 30 minutes and out of the reach of children.
• Do not warm the SmartJect autoinjector in any other way (for example, do not warm it in a microwave or in hot water).
• Do not remove the SmartJect autoinjector cap while allowing it to reach room temperature.
1.4 Check the liquid in the SmartJect autoinjector
• Look through theviewing window of the SmartJect autoinjector. See Figure C.
• Make sure that the liquid in the prefilled syringe is clear and colorless to slightly yellow in color. You
may see a small amount of tiny particles that are white, or that you can see through.
• Do not inject the liquid if it is cloudy or discolored, or has large particles in it.
• You may also notice an air bubble. This is normal. See Figure C.
FIGURE C
Viewing window Air bubble Liquid
WAIT 30 MINUTES
STEP 2. Choose and prepare the injection site
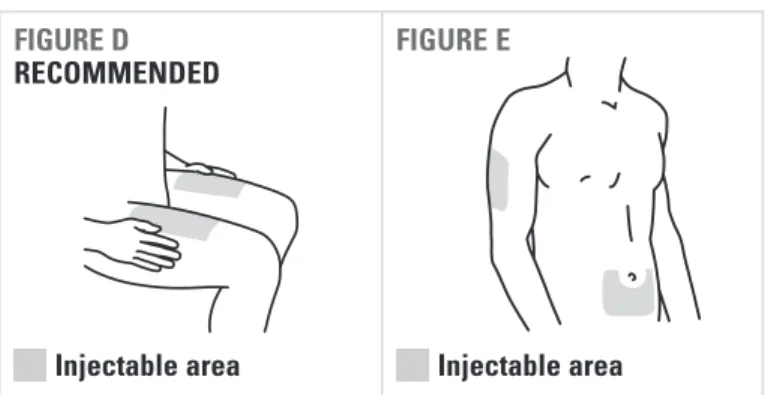
2.1 Choose the injection site
• The recommended injection site is the front of your middle thighs. See Figure D.
• You can also use the lower part of the abdomen below the navel (belly button), except for the two-inch area directly around the navel. See Figure E.
• If a caregiver is giving you the injection, the outer area of the upper arms may also be used. See Figure E.
Injectable area Injectable area
FIGURE E FIGURE D
RECOMMENDED
• If more than one injection is needed for a dose of SIMPONI, each injection should be given at different sites on the body.
• Choose a different injection site each time you give your injection. See Figures D and E.
• Do not inject into areas where the skin is tender, bruised, red, scaly, or hard. Avoid areas with scars or stretch marks.
2.2 Prepare the injection site
• Wash your hands well with soap and warm water. • Wipe the injection site with an alcohol swab.
• Do not touch this area again before giving the injection. Allow the skin to dry before injecting.
4
• Do not remove the cap until you are ready to inject SIMPONI. Inject SIMPONI within 5 minutes after the cap has been removed.
• When you are ready to inject, twist the cap slightly to break the security seal. See Figure F.
• Pull the cap off and throw it in the trash right away. See Figure G.
• Do not put the cap back on because it may damage the needle inside the SmartJect autoinjector. • Do not use your SmartJect autoinjector if it is
dropped without the cap in place.
3.2 Push autoinjector firmly against skin
3.1 Remove cap
• Hold the SmartJect autoinjector comfortably in your hand. DO NOT PRESS THE BUTTON AT THIS TIME.
• Choose from 2 injection methods:
° You should inject the medicine without pinching the skin. See Figure H.
° If you prefer, you may pinch the skin to create a firmer surface for your injection. See Figure I.
• Position the open end of the SmartJect autoinjector straight onto your skin (90 degrees) and push firmly until the green safety sleeve slides into the clear cover. See Figure J.
FIGURE G
FIGURE H
INJECTION WITHOUT PINCHING RECOMMENDED
FIGURE I
Injection with pinching FIGURE F
Position the autoinjector straight onto your skin (90 degrees), then push firmly.
FIGURE J
90
˚
3.3 Press button to inject. Hold and wait!
3.4 Wait for second ‘click’ (3-15 seconds)
• Continue to hold the SmartJect autoinjector firmly against the skin, and press the raised part of the button with your fingers or thumb. See Figure K.
NOTE:You will not be able to press the button unless the autoinjector is pushed firmly against your skin and the green safety sleeve slides into the clear cover.
• After the button is pressed, it will stay pressed in so you do not need to keep pressure on it.
• You will hear a loud first ‘click’ sound, do not be alarmed.This is normal. This ‘click’ means that the needle has been inserted and the injection has started. You may or may not feel a needle prick at this time. See Figure L.
• Do not lift the SmartJect autoinjector away from your skin until you hear the second loud ‘click’. If you lift the autoinjector before the second ‘click’, you may not get your full dose of medicine.
See Figure M.
• Keep holding the SmartJect autoinjector against your skin until you hear the second ‘click’ sound. It usually takes about 3 to 6 seconds, but may take up to 15 seconds before you hear the second ‘click’ sound. See Figure M.
• The second ‘click’ sound means that the injection is finished and the needle has pulled back (retracted) into the SmartJect autoinjector.
• Lift the SmartJect autoinjector from the injection site. See Figure N.
• If you have a problem hearing the ‘clicks’, count for 15 seconds from the time you pressed the button and then lift the SmartJect autoinjector from the injection site.
PRESS WITH THUMB PRESS WITH
FINGERS
Press button here
OR
FIGURE K
FIGURE M
FIGURE L FIGURE N
PRESS BUTTON
FOR 1st ‘CLICK’ FOR 2nd ‘CLICK’HOLD. WAIT LIFT
(continued from previous page)
6
STEP 4. After the injection
4.1 Check the viewing window
• After you finish injecting, check the viewing window to see the yellow indicator. See Figure O. This means the SmartJect autoinjector has worked the right way. • The yellow indicator will fill
about half of the viewing window. This is normal. • If you do not think you
received your injection, check the yellow indicator
again to confirm that the dose was delivered. • If you do not see the yellow indicator in the
viewing window, call 1-800-JANSSEN (1-800-526-7736) for help. Do not administer a second dose without speaking to your doctor.
4.2 Dispose of the used SmartJect autoinjector
• Put your used SmartJectautoinjector in a FDA-cleared sharps disposal container right away after use. Do not throw away (dispose of) the SmartJect Autoinjector in your household trash. See Figure P. • If you do not have a
FDA-cleared sharps disposal container, you may use a household container that is: ° made of a heavy-duty plastic, ° can be closed with a
tight-fitting, puncture-resistant lid, without sharps being able to come out,
° upright and stable during use, ° leak-resistant, and
° properly labeled to warn of hazardous waste inside the container.
• When your sharps disposal container is almost full, you will need to follow your community guidelines for the right way to dispose of your sharps disposal container. There may be state or local laws about how you should throw away used needles and syringes. For more information about safe sharps disposal, and for specific information about sharps disposal in the state that you live in, go to the FDA’s website at: http://www.fda.gov/safesharpsdisposal.
• Do not dispose of your used sharps disposal container in your household trash unless your community guidelines permit this.
• Do not recycle your used sharps disposal container.
4.3 Use cotton ball or gauze
• There may be a small amount of blood or liquid at the injection site, which is normal.
• You can press a cotton ball or gauze over the injection site for 10 seconds. Do not rub the injection site. • You may cover the injection site with a small adhesive
bandage, if needed.
BIOHAZARD
FIGURE P FIGURE O
Yellow indicator
If you’re having difficulty injecting:
• Make sure you removed and disposed of the cap. • Make sure you do not press the button
while positioning and pushing the autoinjector firmly against your skin.
• Try pushing the autoinjector against your skin more firmly.
• Try using two hands to inject. Use your other hand to steady the autoinjector.
• Make sure you press the raised part of the button. See Figure K.
• Try pressing the button with a little more force. • Make sure your injection site is flat. If you are using
the “pinching technique,” try pinching less skin. • Try a different injection site. See Figures D and E.
Quick Reminders
Do not
press the button until you are
ready to inject SIMPONI.
Position
the autoinjector straight onto
your skin (90 degrees), then
push
firmly
.
Press
the raised part of the button to start
the injection and listen for the
first ‘click’
.
Do not
lift the SmartJect autoinjector away
from your skin yet.
Keep holding
the autoinjector firmly against
your skin until you hear the
second ‘click’
,
or you can count to 15 after pressing the button.
Lift and check
the viewing window to
confirm that you see the yellow indicator.
For additional questions or assistance, or to share your feedback, call 1-800-JANSSEN (1-800-526-7736).
This Instructions for Use has been approved by the U.S. Food and Drug Administration. Manufactured by:
Janssen Biotech, Inc. Horsham, PA 19044 US License No. 1864 Revised: 01/2014
8
PATIENT INSTRUCTIONS
FOR USE
SIMPONI
®(SIM-po-nee)
(golimumab)
Prefilled Syringe
If your doctor decides that you or a caregiver may be able to give your injections of SIMPONI at home, you should receive training on the right way to prepare and inject SIMPONI. Do not try to inject SIMPONI yourself until you have been shown the right way to give the injections by your doctor or nurse.
It is important to read, understand, and follow these instructions so that you inject SIMPONI the right way. Call your doctor if you or your caregiver has any questions about the right way to inject SIMPONI.
Important information about your prefilled syringe:
• Always hold the prefilled syringe by the body of the syringe (see Figure B).
Do not:
• pull back on the plunger at any time.
• shake the SIMPONI prefilled syringe. This may damage the medicine.
• remove the needle cover from the prefilled syringe until you get to that step.
• touch the needle guard activation clips to prevent covering the needle with the needle guard too soon (See Figure B).
• use SIMPONI if it has been frozen or if it has not been stored in the refrigerator. See the Medication Guide section: “how should I store SIMPONI?”
• use your SIMPONI prefilled syringe if it looks damaged.
Step 1: Gather and inspect the supplies for your injection
You will need these supplies for an injection of SIMPONI. See Figure A.
• 1 alcohol swab • 1 cotton ball or gauze
• 1 SIMPONI prefilled syringe from the refrigerator (stored at 36ºF to 46ºF (2ºC to 8ºC))
• 1 sharps disposal container for throwing away the used prefilled syringe. See “5.1 Disposal of the used prefilled syringe” at the end of these instructions.
Figure A
like. See Figure B.
Figure B
Step 2: Get ready to use your prefilled syringe 2.1 Check Expiration Date
• Look for the expiration date printed on the back panel of the SIMPONI carton, to the left of the SIMPONI logo. • If the expiration date has passed, do not use the
prefilled syringe. Call your doctor or pharmacist, or call 1-800-JANSSEN (1-800-526-7736) for help.
2.2 Wait 30 minutes
• To ensure proper injection, allow the prefilled syringe to sit at room temperature outside the carton for 30 minutes and out of the reach of children.
• Do not warm the prefilled syringe in any other way (for example, do not warm it in a microwave or in hot water).
• Do not remove the prefilled syringe needle cover while allowing it to reach room temperature.
2.3 Check the Liquid in the Prefilled Syringe
• Hold your SIMPONI prefilled syringe by the body with the covered needle pointing down. See Figure C.
Figure C
• Look at the liquid through the viewing window of the prefilled syringe. See Figure C. Make sure that the liquid in the prefilled syringe is clear and colorless to slightly yellow in color. You may see a small amount of tiny particles that are white, or that you can see through. Do not inject the liquid if it is cloudy or discolored, or has large particles in it.
3.1 Choose the Injection Site
• The recommended injection site is the front of your middle thighs. See Figure D.
Figure D
Injectable area
• You can also use the lower part of the abdomen below the navel (belly button), except for the two-inch area directly around the navel. See Figure E.
• If a caregiver is giving you the injection, the outer area of the upper arms may also be used. See Figure E. • If more than one injection is needed for a dose of
SIMPONI, each injection should be given at different sites on the body.
Figure E
Injectable area
• Do not inject into areas where the skin is tender, bruised, red, scaly, or hard. Avoid areas with scars or stretch marks.
3.2 Prepare the Injection Site
• Wash your hands well with soap and warm water. • Wipe the injection site with an alcohol swab.
• Do not touch this area again before giving the injection. Let your skin dry before injecting.
• Do not fan or blow on the clean area.
Step 4: Inject SIMPONI using the Prefilled Syringe 4.1 Remove the Needle Cover
• Do not remove the needle cover until you are ready to inject SIMPONI. Inject SIMPONI within 5 minutes after you remove the needle cover.
• Do not touch the plunger while removing the needle cover.
prefilled syringe with one hand, and pull the needle cover straight off. See Figure F.
Figure F
• Put the needle cover in the trash.
• You may see an air bubble in the prefilled syringe. This is normal.
• You may also see a drop of liquid at the end of the needle. This is normal.
• Do not touch the needle or let it touch any surface. • Do not use the prefilled syringe if it is dropped without
the needle cover in place.
4.2 Position the prefilled syringe and inject SIMPONI
• Hold the body of the prefilled syringe in one hand between the thumb and index fingers. See Figure G.
Figure G
• Do not pull back on the plunger at any time.
• Use the other hand to gently pinch the area of skin that you previously cleaned. Hold firmly.
• Use a quick, dart-like motion to insert the needle into the pinched skin at about a 45-degree angle. See Figure H.
10
the plunger until the plunger head is completely between the needle guard wings. See Figure I.
Figure I
• When the plunger is pushed as far as it will go, keep pressure on the plunger head. Take the needle out of the skin and let go of the skin.
• Slowly take your thumb off the plunger head. This will let the empty syringe move up until the entire needle is covered by the needle guard. See Figure J.
Figure J
Step 5: After the injection
5.1 Disposal of the used prefilled syringe
• Put your used prefilled syringe in a FDA-cleared sharps disposal container right away after use. Do not throw away (dispose of) the prefilled syringe in your household trash. See Figure K.
• If you do not have a FDA-cleared sharps disposal container, you may use a household container that is:
o made of a heavy-duty plastic,
o can be closed with a tight-fitting, puncture-resistant lid, without sharps being able to come out, o upright and stable during use,
o leak-resistant, and
o properly labeled to warn of hazardous waste inside the container.
will need to follow your community guidelines for the right way to dispose of your sharps disposal container. There may be state or local laws about how you should throw away used needles and syringes. For more information about safe sharps disposal, and for specific information about sharps disposal in the state that you live in, go to the FDA’s website at: http://www.fda.gov/safesharpsdisposal.
• Do not dispose of your used sharps disposal container in your household trash unless your community guidelines permit this. Do not recycle your used sharps disposal container.
Figure K
5.2 Use Cotton Ball or Gauze
• There may be a small amount of blood or liquid at the injection site, which is normal.
• You can press a cotton ball or gauze over the injection site and hold for 10 seconds. Do not rub the injection site.
• You may cover the injection site with a small adhesive bandage, if needed.
This Instructions for Use has been approved by the U.S. Food and Drug Administration.
Manufactured by: Janssen Biotech, Inc. Horsham, PA 19044 US License No. 1864 Revised: 05/2013 027004-141229