USB CDC/ECM Class Driver
For Windows XP, Vista, 7, 8 and 8.1
Disclaimer
Information in this document is subject to change without notice. No part of this manual may be reproduced, stored in a retrieval system or transmitted in any form or by any means, electronic or mechanical, including photocopying and recording for any purpose other than the purchaser’s per-sonal use, without prior written permission from Thesycon Systemsoftware & Consulting GmbH. The software described in this document is furnished under the software license agreement dis-tributed with the product. The software may be used or copied only in accordance with the terms of license.
Contents
Table of Contents 7 1 Introduction 9 2 Overview 11 2.1 Platforms . . . 11 2.2 Features . . . 12 2.3 USB 2.0 support. . . 14 2.4 USB 3.0 Support . . . 14 2.5 Known Issues . . . 142.5.1 Driver is not loaded after disconnect . . . 14
3 Architecture 17 3.1 Special Properties of the Driver. . . 18
3.1.1 NDIS Model . . . 18
3.1.2 Surprise Removal Dialog. . . 18
3.1.3 Power Management . . . 18
3.1.4 Remote Wakeup . . . 18
3.1.5 VLAN . . . 18
3.1.6 MAC Address . . . 18
3.1.7 Statistic Counters . . . 19
3.1.8 Multiple interfaces on one device . . . 19
4 Driver Customization 21 4.1 Overview . . . 21
4.2 Reason for Driver Customization . . . 21
Contents
4.5.2 Build your Driver Package . . . 26
4.6 Customization Parameter Reference . . . 27
4.6.1 VENDOR_NAME . . . 27
4.6.2 PRODUCT_NAME . . . 27
4.6.3 DRIVER_NAME_BASE. . . 27
4.6.4 INF_VID_PID_[01..16] . . . 27
4.6.5 INF_VID_PID_[01..16]_DESCRIPTION . . . 28
4.7 Customization Default Driver Settings . . . 28
4.7.1 RxBuffers. . . 28 4.7.2 RxBuffersSubmitted . . . 28 4.7.3 TxBuffers . . . 28 4.7.4 DefaultMediaState . . . 28 4.7.5 MediaStateAfterPowerDown . . . 29 4.7.6 DefaultXmitLinkSpeed. . . 29 4.7.7 DefaultRcvLinkSpeed . . . 29 4.7.8 MaxXmitLinkSpeed . . . 29 4.7.9 MaxRcvLinkSpeed . . . 29 4.7.10 OneByteTermination . . . 29 4.7.11 ConfigurationIndex . . . 29 4.7.12 SendClearEpHaltOnStart . . . 29 4.7.13 StatisticsUpdateInterval . . . 30 4.7.14 VendorDescription . . . 30 4.7.15 TxTimeout . . . 30 4.7.16 CapWakeOnMagicPacket . . . 30 4.7.17 CapWakeOnLinkUp . . . 30
4.8 Advanced Dialog Parameters . . . 31
4.8.1 VLAN ID . . . 31
4.8.2 PriorityVLANTag . . . 31
4.8.3 WakeOnMagicPacket. . . 31
4.8.4 WakeOnLinkUp . . . 32
5 Driver Installation and Uninstallation 33 5.1 Driver Installation for Developers . . . 33
5.1.1 Installing CDC/ECM Driver Manually. . . 33
5.1.2 Uninstalling CDC/ECM manually . . . 34
5.2 Installing CDC/ECM driver for End Users . . . 35
5.2.1 Installing CDC/ECM driver with the PnP Driver Installer . . . 35
6 Debug Support 37 6.1 Event Log Entries . . . 37
6.1.1 Clear Feature Endpoint Halt . . . 37
6.1.2 Demo is Expired . . . 37
6.2 Enable Debug Traces . . . 37
1
Introduction
The CDC/ECM driver is a generic device driver for Windows that creates a Network Interface. On the USB layer, it expects a device with a Communication Device Class (CDC) Ethernet Control Model (ECM) compliant interface.
This document describes the architecture and the features of the CDC/ECM device driver. Fur-thermore, it includes instructions for installing and using the device driver.
The reader of this document is assumed to be familiar with the specification of the Universal Serial Bus Version 2.0 and 3.0 and the CDC/ECM specification.
2
Overview
2.1 Platforms
The CDC/ECM driver package contains 32 bit and 64 bit versions. The driver supports the fol-lowing operating system platforms:
• Windows 8.1
• Windows 8
• Windows 7
• Windows Vista
• Windows XP
• Windows Embedded 8 Standard
• Windows Embedded Standard 7 (WES7)
• Windows Embedded Enterprise
• Windows Embedded POSReady
• Windows Embedded Server
• Windows XP embedded
• Windows Server 2012 R2
• Windows Server 2012
• Windows Home Server 2011
• Windows Server 2008 R2
• Windows Server 2008
• Windows Server 2003
2 Overview
2.2 Features
The CDC/ECM driver provides the following features:
• USB Support. The CDC/ECM driver supports USB 3.0, USB 2.0 and USB 1.1. It supports low, full, high and super speed mode. For USB 3.0 controllers Microsoft has released the bus driver with Windows 8. Different USB 3.0 host controllers, often with their own bus drivers, are available on the market. Thesycon does not guarantee that the CDC/ECM runs with all solutions.
• NDIS Support. Exposes a network adapter interface according to the NDIS 5.1 model for Windows XP and Vista and the NDIS 6.2 model for Windows 7 and 8. Windows 2000 requires the NDIS 5.0 model and is no longer supported in this version. For support, ask Thesycon.
• Plug&Play. The CDC/ECM driver fully supports hot plug and play.
• Power Management. The driver supports the Windows power management model. The network adapter does not stop when the PC enters standby, sleep or hibernate. A device with Auto-IP address negotiation is not required to restart the negotiation after resuming from a power down state.
• Remote Wake-up Support. When the device indicates the remote wake-up feature in its USB configuration descriptor and when the USB port to which the device is connected supports remote wake-up the device can wake up the PC. The driver supports wake-up on magic packet and wake-up on network cable connect. The user can modify the behavior of the network adapter with the Power Management tab in the properties dialog of the driver.
• VLAN Support. The driver supports Virtual LAN’s. In the advanced property dialog page the user can select a VLAN number. The VLAN number 0 means the feature is turned off and the driver will send untagged packets and accept all packets. If a VLAN number greater than 0 is selected, the driver will accept packets with the correct VLAN tag or no VLAN tag. It will send packets with the correct VLAN tag.
• MAC Address. By default, the driver uses the MAC address reported by the device. If the device cannot provide a MAC address, the driver can use a MAC address defined in the INF file. The user can assign the current MAC address in the advanced property page dialog.
• IP Address. The IP address of the adapter can be assigned via DHCP, Auto-IP or manually.
• Multiple USB Interfaces. The ECM class driver can be used with devices that implement multiple USB interfaces. A separate network adapter instance will be created for each ECM interface. Thesycon offers a multi-interface driver that can be used to build an individual device node for each interface. For more information, check out http://www.thesycon.de USB Multi Interface Driver.
• Multiple USB Devices. Multiple USB devices can be controlled by the driver at the same time.
• Customizing. The CDC/ECM allows vendor- and product-specific adaptations.
• Installation/Uninstallation. For customized driver installations Thesycon offers the PnP Driver Installer. Additional information are available at
http://www.thesycon.de/pnpinstaller.
• WHQL Certification. The driver conforms to Microsoft’s Windows Driver Model (WDM) and NDIS, and it can be certified by Windows Hardware Quality Labs (WHQL) for all current 32-bit and 64-bit operating systems. The WHQL test requires a lot of features inside the device. Please check the most current requirements list from Microsoft. The HCK tests expect that the device implements a physical Ethernet connection to a service PC that allows the exchange of network packets. If your device has a different purpose or architecture, you must discuss with Microsoft whether a WHQL certification is possible.
The CDC/ECM driver uses a protocol extension to be compatible with WHQL testing. This protocol extension implements a SetAddress and a GetAddress command to change the MAC address of the device. The used extension is compatible to the CDC/NCM specifica-tion. The device firmware must implement this extension to use it. When the MAC address is not set in the registry the driver does not send these requests.
The NDIS layer on Vista SP2 has a bug that requires a manual exception from Microsoft to ignore the failure of the PnP test.
2 Overview
2.3 USB 2.0 support
The CDC/ECM device driver supports USB 2.0 and the Enhanced Host Controller on Windows XP, Windows Vista, Windows 7 and Windows 8. However, CDC/ECM must be used on top of the driver stack that is provided by Microsoft. Thesycon does not guarantee that the CDC/ECM driver works in conjunction with USB driver stacks provided by third parties.
Third-party drivers are available for USB 2.0 host controllers from NEC, INTEL or VIA. Be-cause the Enhanced Host Controller hardware interface is standardized to the EHCI specification, the USB 2.0 drivers provided by Microsoft can be used with host controllers from any vendor. However, the user must ensure that these drivers are installed.
2.4 USB 3.0 Support
Currently, more and more computers with Extended (USB 3.0) Host Controllers (xHC) are coming onto the market. The xHC handles full and high speed data traffic. If a customer connects your CDC/ECM device to a USB 3.0 host controller connector, it will run with an xHC and the installed bus driver stack.
Microsoft has released the USB 3.0 bus driver for xHCs with Windows 8. Other vendors of USB 3.0 controllers provide their own driver stacks for older operating systems. It is nearly impossible to test all of these controllers and versions of USB driver stacks.
Thesycon tests using the Renesas and Intel controllers with the vendor-provided driver stacks on Windows 7 and the Microsoft-provided driver stack on Windows 8. The CDC/ECM driver can also work with USB 3.0 controllers from other vendors, but Thesycon cannot give a warranty that this will work without problems.
Today, most devices with a USB 3.0 super speed interface are mass storage devices. They use system-provided drivers. On the market other devices with a USB 3.0 interface are rare. For that reason it is difficult to make comprehensive tests with USB 3.0 devices at this moment in time. The CDC/ECM driver is designed to support USB 3.0 devices with super speed, however because of the test situation, Thesycon cannot give warranty that it works in every case. If you intend to plan a project using a USB 3.0 device, please contact Thesycon (www.thesycon.de).
2.5 Known Issues
2.5.1 Driver is not loaded after disconnect
This problem occurs on Windows 7, Windows Vista and Windows XP 32/64 bit. When the device is disconnected from the USB bus and reconnected after a short time period, the driver is not loaded by the system. In the device manager, the device node is marked with error code 31 and the network interface is not available. Debug output from the driver shows clearly that the driver is stopped and unloaded when the device is removed. However, it is not loaded when the device is re-connected in the problem situation.
This seems to be a problem in the Microsoft NDIS driver framework that it is not able to handle a device add event correctly when the device remove operation is not yet completed.
A workaround for this problem is to delay the soft connect in the device for some seconds. Nor-mally the device connects to the USB bus by turning on the connect resistor as soon as it is ready
to handle USB requests. The workaround means that the device delays this connect operation. It is difficult to determine exactly how long the device must be disconnected to avoid the problem. The time period depends on the host hardware and on the load situation when the device is removed, as well as on the software that is installed on the PC. The error is also resolved when the device is removed and re-connected to the PC a second time.
3
Architecture
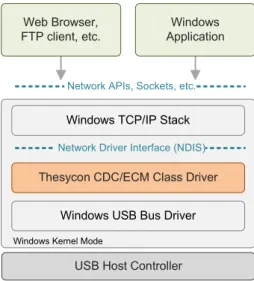
Figure1shows the USB driver stack that is part of the Windows operating system. All drivers are embedded within the WDM layered architecture.
! "## $ % & %" $ % & % $ ' (& $ ) *
Figure 1: USB CDC/ECM Driver Stack The following modules are shown in Figure1:
• USB Host Controller is the hardware component that controls the Universal Serial Bus. It also contains the USB Root Hub. Depending on your PC, the device can be connected to an Open Host Controller (OHC), a Universal Host Controller (UHC), an Enhanced Host Controller (EHC) or an eXtensible Host Controller (xHC).
• Windows USB Bus Driver consists of USB Bus Driver, USB Hub driver and the USB Host Controller driver. These are Windows Kernel Mode drivers. The drivers are provided by Microsoft or the vendor of the USB host controller.
• Thesycon CDC/ECM Class Driver is also a Windows Kernel Mode driver developed by Thesycon GmbH. This driver implements the USB CDC/ECM protocol and establishes a network interface.
• The interface between the Thesycon CDC/ECM Class Driver and the Windows TCP/IP Stack is described by the Network Driver Interface (NDIS).
3 Architecture
The driver stack that arises on a given PC depends on the available host controllers and the way the device is connected to the PC. Each different driver stack can behave different related to the timing of the data packets.
3.1 Special Properties of the Driver
3.1.1 NDIS Model
Microsoft supports different versions of the NDIS model. We provide a driver for the NDIS 5.1 model that is used on Windows XP and Vista, and a driver that works with the NDIS 6.2 model used with Windows 7 and later. The INF file is designed in such a way that the correct driver for an operating system is always installed. The driver that implements the NDIS 5.1 model has the marker "51" in the name. The driver for the NDIS 6.2 model uses "62".
3.1.2 Surprise Removal Dialog
Windows can show plug and play devices on the PnP card in the Systray, and can complain if such devices are removed from the system without being stopped. The driver suppresses this entry in the Systray. The device can be removed from the PC without any preparation.
3.1.3 Power Management
The driver supports the requests for power management. For this reason the adapter is not stopped if the PC enters standby, sleep or hibernate. An advantage of this is that a device with AutoIP address negotiation must not restart the negotiation after the power down state of the PC. It is not recommended to use AutoIP because it takes a long time before Windows can assign a valid IP address.
3.1.4 Remote Wakeup
The driver supports remote wake-up on "Magic Packet" and on "Link Up". The features must be enabled in the INF file and must be supported by the device.
3.1.5 VLAN
The driver supports VLAN. The adapter can be configured to add one VLAN ID to the network traffic. The driver does not support multiplexing between different VLAN networks. The feature can be enabled with INF file parameters.
3.1.6 MAC Address
The driver determines the valid network address (MAC Address) in the following way: 1. The driver reads the network address from the device. If this fails
2. The driver reads the network address from the registry. If this fails
3. The driver has a built-in MAC address with the value AE:DE:48:02:01:00. This address has set the local bit and is not neccesarily unique.
3.1.7 Statistic Counters
The driver requests the statistic counters from the device when the device supports it. To save bandwidth, the request period can be defined in the INF file. Between the statistic requests, the driver reports cached values.
3.1.8 Multiple interfaces on one device
The CDC/ECM driver can be used with devices that implement multiple USB interfaces. In this case, a multi-interface driver is required. This driver splits the interfaces to separate device nodes. A new driver stack can then be installed on each device node.
The system-provided multi-interface driver used before Windows XP SP3 cannot be used together with the CDC/ECM driver. The reason is that this CDC/ECM interface consists of two USB interfaces, and these two interfaces must be mapped to one device node. The system-supplied multi-interface driver is not able to detect USB interfaces that belong together. Later versions of the system-provided MI driver can handle the IAD. It is recommended that you add an IAD to your configuration descriptor.
Thesycon provides a special multi-interface driver that can handle this problem in a correct way. This driver is required if you have to support systems before Windows XP SP3. This driver can be licensed separately.
4
Driver Customization
4.1 Overview
The CDC/ECM driver supports numerous features that enable a licensee to create a customized device driver package. A driver package which is shipped to end users must be customized. This is required in order to avoid potential conflicts with other products from other vendors that are also using this driver. See also section4.2 for a discussion of the reasons why a full driver customization is absolutely required.
Customization includes:
• Modification of file names of all driver executables,
• Modification of text strings shown in the Windows user interface,
• Definition of unique software interface identifiers and
• Adaptation of driver behavior for a specific device.
4.2 Reason for Driver Customization
Thesycon’s CDC/ECM driver is generic with respect to concrete products. The driver can be used (and shipped together) with many different products from various vendors. All generic drivers must be customized. Customization includes modification of device identifiers, choice of unique file names, assignment of unique identifiers (GUIDs) and modification of display names.
If customization is not properly completed, the following situation can occur in the field: 1. User buys product A and installs it. Product A works.
2. Same user buys product B (from another vendor) and installs it. B ships with the same (non-customized) driver as A.
This situation results in a couple of potential problems:
• B driver .sys files overwrite A driver .sys files which reside in the Windows drivers directory. This can cause product A to stop working e.g. because a different driver version is now loaded.
4 Driver Customization
4.3 Digital Signature for Windows Vista, Windows 7, Windows 8 and Windows 8.1
Windows Vista and later Windows versions have a new feature to verify a vendor of a software component. The vendor can add a digital signature to a software component to identify itself. This signature grants that the software was signed by the vendor and that the software was not modified after it was signed. Please note that it is not possible to install a driver without a digital signature on the 64-bit version of Windows Vista or higher. For background information about code signing, please refer to the document "Kernel-Mode Code Signing Walkthrough" available on the Microsoft web site.
To add a digital signature to a software component, the vendor must own a certificate that supports the Microsoft Authenticode technology (sometimes called Microsoft Authenticode Digital ID). Such a certificate can be purchased from several certification authorities (CA), including Symantec (formerly Verisign). For details you may refer to
http://www.symantec.com/verisign/code-signing/microsoft-authenticode
Alternatively, search the Web for for
"VeriSign Code Signing Certificates for Microsoft Authenticode".
4.3.1 Using the Driver without Code Signing Certificate
If you don’t own a code signing certificate you can still create a customized driver package as described in sections4.4and4.5below. However, during driver installation on the target system, Windows will show a warning message stating that the vendor of the driver software cannot be verified, see Figure 2. The user needs to confirm this warning in order to continue with driver installation. Windows shows this warning because the .cat files in the driver package are not digitally signed.
Figure 2: Windows security warning shown if .cat files are not digitally signed
The .sys files included in the driver package are signed with Thesycon’s certificate. If a user inspects the file properties of the .sys file (or driver details in Device Manager) then he/she will find out that the driver is provided by Thesycon.
For instructions on how to proceed without a code signing certificate, refer to specific comments given in the subsequent sections.
Drivers that does not have a digital signature cannot be loaded on the 64-bit variants of Windows 7 and Windows 8. Windows 7 will load the driver if the .sys file has a digital signature, while Windows 8 requires a valid digital signature on the .cat file.
On both systems, an unsigned driver can be loaded if the "Driver Signature Enforcement" is dis-abled in the "Advanced Boot Options". On Windows 7, these boot options can be accessed by pressing F8 during the boot process. On Windows 8, a special boot menu can be started with the command line "Shutdown.exe /r /o" or by holding the Shift Key while pressing Restart. For more details see the Windows documentation.
Note: The driver signing enforcement is turned off only for one boot process. This method should be used only on development PCs.
4.4 Preparing Driver Package Builder
Thesycon provides a set of batch scripts and tools that generate driver packages and all required customization files automatically. This tool set is called the Driver Package Builder.
Before the scripts can be used, the steps described in the following subsections must be executed on the machine on which the Driver Package Builder will run.
4.4.1 Install SignTools
The following Microsoft tools are required:
• signtools.exe (part of WDK)
• inf2cat.exe (part of WDK)
• INF checker (part of WDK)
For your convenience, Thesycon has collected the required tools in a SignTools package installer. This driver package requires SignTools version 1.5.0. To get a free copy of this SignTools installer, contact Thesycon.
To install the SignTools package, runSignTools_v1.5.0.exe.
NOTE: If you don’t own a code signing certificate (see4.3.1above) then you still need to execute this step. The SignTools package is required to create the .cat files.
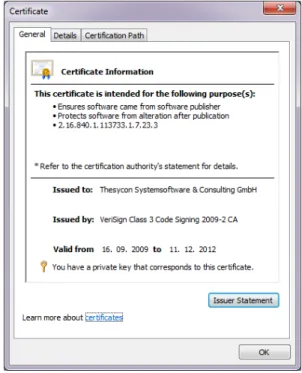
4.4.2 Check your Code Signing Certificate
4 Driver Customization
Figure 3: Certificates Microsoft Management Console
the key icon at the bottom of the General page and the statement "You have a private key that corresponds to this certificate." If the key icon is missing, only the public key of the certificate is installed and code signing will not be possible.
Figure 4: Certificate Information
4.4.3 Configure Certificate Variables
NOTE: If you don’t own a code signing certificate (see4.3.1above) then you can skip this step. If no certificate is available,VENDOR_CERTIFICATE,VENDOR_CROSS_CERTIFICATEand
SIGNTOOL_TIMESTAMP_URLmust not be defined, this is the default in
set_vendor_certificate.cmd.
If you own a code signing certificate, edit theset_vendor_certificate.cmdscript con-tained in thesigningsubdirectory of the install folder. This script must refer to your certificate
in the certificate store described in the previous step. Inset_vendor_certificate.cmd, set the variables described below according to your certificate. See also the comments and instruc-tions given within the script itself. Note that alternatively you can add the variables to your build machine’s environment.
• VENDOR_CERTIFICATE
This variable needs to be set to your certificate’s name exactly as shown incertmgr.msc. Do not surround the string with quotation marks. If your certificate name includes special chars, precede each of them with an escape character (^).
Example:
set VENDOR_CERTIFICATE=MyCompany Ltd.
• VENDOR_CROSS_CERTIFICATE
This variable specifies the cross certificate that should be used. The cross certificate estab-lishes a trust relationship between Microsoft and your certificate issuer. For latest informa-tion on cross certificates, see the article "Cross-Certificates for Kernel Mode Code Signing" in the MSDN library:
http://msdn.microsoft.com/
en-us/library/windows/hardware/gg487315.aspx
Alternatively, ask your certificate provider which cross certificate is to be used. Example:
set VENDOR_CROSS_CERTIFICATE=c:\MyProject\Signing\
VeriSign-Class-3-Public-Primary-Certification-Authority-G5.cer
• SIGNTOOL_TIMESTAMP_URL
This variable specifies a trusted time stamp server to be used when the signature is cre-ated. Note that a signature should always be timestamped. In case of Symantec (formerly VeriSign), you can keep the default shown in set_vendor_certificate.cmd. If you are using a different certificate provider, refer to the documentation published by this provider.
Example:
set SIGNTOOL_TIMESTAMP_URL=http://timestamp.verisign.com/ scripts/timestamp.dll
4 Driver Customization
4.5 Using Driver Package Builder
The Driver Package Builder batch scripts are located in theDriverPackageBuilder subdi-rectory of the driver kit. To create your own customized driver package, please follow the steps described in the following subsections.
NOTE: These steps are mandatory and must be executed to avoid problems in the field.
4.5.1 Customize your Driver Package
The driver package is configured by means of a set of variables defined insetvars.cmd. To configure your driver package, edit this file.
The following step-by-step procedure includes the major customizations steps. Make sure that you check the value of each variable contained insetvars.cmd. For a detailed description of each variable, refer to section4.6.
1. Set vendor and product strings
Adapt the following strings to match your company and product:
VENDOR_NAME= PRODUCT_NAME= DRIVER_NAME_BASE=
2. Adapt USB VIDs and PIDs
Each product (device model) is unambiguously identified by its USB vendor ID (VID) and USB product ID (PID). Thesetvars.cmdscript allows you to define up to 16 de-vices which will all be supported by the same driver package. Set one or more of the
INF_VID_PID_xxvariables to match with your device’s VID(s) and PID(s). Be careful to get the special format of theINF_VID_PID_xxstring right. See also the comments and examples withinsetvars.cmd.
Set INF_VID_PID_xx_DESCRIPTION to your product’s name. This string will be shown in Device Manager as a product description.
Clear all unusedINF_VID_PID_xxvariables, e.g.:
set INF_VID_PID_05=
set INF_VID_PID_05_DESCRIPTION=
3. Driver Parameter Configuration
The filedriver_parameters.inccontains the driver parameters. You can modify the parameters to fit the driver behavior to your device. See section4.7for details.
4.5.2 Build your Driver Package
Open a Windows console window (cmd.exe) in theDriverPackageBuilderdirectory. From the command line, run the create_drvpackages.cmdscript. Make sure your PC is con-nected to the Internet to get the certified time stamp from your certificate provider. This ensures that your digitally signed driver package is still valid after your signing key has been expired.
Your customized driver package will be created under thedriver_packagesubdirectory. NOTE: If you don’t own a code signing certificate, the .sys files will be signed with Thesycon’s certificate and the .cat files will not be digitally signed. This leads to a different behavior during driver installation. See4.3.1for more details. The unsigned driver package will be created under thedriver_package_unsignedsubdirectory.
It is strongly recommended to check the .inf files of the created driver package using the script check_inf_files.cmd. The script opens a .html file with the results of the check.
To create different packages, make a copy of the folderDriverPackageBuilderand config-ure the second driver package in the copied folder.
Modifications to the driver package make the digital signature invalid. When manual changes to the INF file are required the digital signature can be updated with the script
update_signature.cmd. Keep in mind that the script
create_driverpackages.cmdoverwrites the modified driver package without warning. The scriptscreate_driverpackages.cmdandupdate_signature.cmdcan be called with the command line parameter no_sys_signing. When this parameter is used, the .sys files are not digitally signed. This can be helpful when the driver package should be used for the WHQL testing.
4.6 Customization Parameter Reference
4.6.1 VENDOR_NAME
The vendor of the driver package. This string is used as provider and manufacturer string in (.inf file).
4.6.2 PRODUCT_NAME
The name of the product that uses the driver package. It is used to generate theDisk Namestring in the INF file.
4.6.3 DRIVER_NAME_BASE
The common part of the name of the driver package files. This name should be globally unique. You should add an abbreviation of your company name to the driver base name. This string must
4 Driver Customization
4.6.5 INF_VID_PID_[01..16]_DESCRIPTION
Display name of the respective device model. This name is displayed in Windows Device Man-ager. A display name can be specified for each VID/PID pair.
4.7 Customization Default Driver Settings
The INF file specifies some settings that define the default behavior of the driver. The settings can be modified in the filedriver_parameters.inc. These settings are defined in the following section. HKR,,RxBuffers,%REG_DWORD%, 40 HKR,,RxBuffersSubmitted,%REG_DWORD%, 10 HKR,,TxBuffers,%REG_DWORD%, 16 HKR,,DefaultMediaState,%REG_DWORD%, 0 HKR,,MediaStateAfterPowerDown,%REG_DWORD%, 1 HKR,,DefaultXmitLinkSpeed,%REG_DWORD%,100000000 HKR,,DefaultRcvLinkSpeed,%REG_DWORD%,100000000 HKR,,MaxXmitLinkSpeed,%REG_DWORD%,100000000 HKR,,MaxRcvLinkSpeed,%REG_DWORD%,100000000 HKR,,OneByteTermination,%REG_DWORD%, 0 HKR,,ConfigurationIndex,%REG_DWORD%, 0 HKR,,SendClearEpHaltOnStart,%REG_DWORD%, 0 HKR,,StatisticsUpdateInterval,%REG_DWORD%, 5000 HKR,,VendorDescription,%REG_SZ%, %S_VendorDescription% HKR,,TxTimeout,%REG_DWORD%, 2000 HKR,,CapWakeOnMagicPacket,%REG_DWORD%, 0 HKR,,CapWakeOnLinkUp,%REG_DWORD%, 0 4.7.1 RxBuffers
This parameter defines number of read buffers. Some of the read buffers are submitted to the host controller. The other buffers can hold received data while these data are processed by the protocol drivers. The default value is 40.
4.7.2 RxBuffersSubmitted
This parameter describes the number of buffers that are submitted to the bus driver. The default value is 10. It can cause a high CPU load if a lot of Rx buffers are submitted to the host controller.
4.7.3 TxBuffers
This parameter defines number of write buffers. The default value is 16. All these buffers can be submitted to the host controller. The driver can store additional Tx data in a queue that maintains NDIS data structures.
4.7.4 DefaultMediaState
If this parameter is 1, the driver reports the media state as connected. The PC can send immediate requests to the device. If this parameter is set to 0, the driver waits on a notification from the device that the media state is changed to connected. Default is 0.
4.7.5 MediaStateAfterPowerDown
This parameter defines the media connection state after power down. When the device reports the media state after each power down operation the value can be set to 0. In this case the driver does not report the media state to the NDIS layer. When the parameter is set to 1, the driver reports the media state as connected when the power state is switched to working. When the parameter is set to 2, the driver reports the media state as disconnected to the NDIS layer. If the media state is not reported correctly to the NDIS layer after power down, the adapter is not working.
4.7.6 DefaultXmitLinkSpeed
This parameter can be used to provide a default transmit link speed. It seems that some protocol drivers, for example the PPPoE, request the link speed even if the adapter is not connected. The value is measured in bits per second.
4.7.7 DefaultRcvLinkSpeed
This parameter can be used to provide a default receive link speed. It seems that some protocol drivers, for example the PPPoE, request the link speed even if the adapter is not connected. The value is measured in bits per second.
4.7.8 MaxXmitLinkSpeed
This parameter defines the maximum transmit link speed. The value is measured in bits per second.
4.7.9 MaxRcvLinkSpeed
This parameter defines the maximum receive link speed. The value is measured in bits per second.
4.7.10 OneByteTermination
If this parameter is 1, the PC driver terminates a packet that can be divided by the FIFO size without rest with an additional byte. If this parameter is zero, the driver terminates such a packet with a zero length packet. Set this parameter to 1 if your hardware cannot handle zero length packets. The default value is 0. Note: Linux use the same algorithm.
4 Driver Customization
4.7.13 StatisticsUpdateInterval
This value is used to update Ethernet statistics if the device supports it. To save bandwidth, the driver requests only the parameters that are requested by the PC.
4.7.14 VendorDescription
This is the vendor description reported to the NDIS layer.
4.7.15 TxTimeout
TxTimeout is the period in milliseconds in which the driver expects that at least one TX packet has been transferred to the adapter. When the timeout expires the NDIS layer forces an adapter reset.
4.7.16 CapWakeOnMagicPacket
Set this parameter to 1 if the device can wake the system when the adapter receives a Magic Packet. The USB interface has to support remote wakeup to use this feature.
4.7.17 CapWakeOnLinkUp
Set this parameter to 1 if the device can wake the system when the network link comes up. This happens when the network cable is plugged in or when the router is turned on. The USB interface has to support remote wakeup to use this feature. The adapter must also support Wake on Magic Packet.
4.8 Advanced Dialog Parameters
The following parameter blocks can be used to allow the user the modification of configuration parameters. These parameters are shown in the advanced dialog of the driver property dialog.
; VLAN ID
HKR, Ndi\params\VlanID, ParamDesc, 0, "VLAN ID" HKR, Ndi\params\VlanID, default, 0, "0" HKR, Ndi\params\VlanID, type, 0, "long" HKR, Ndi\params\VlanID, min, 0, "0" HKR, Ndi\params\VlanID, max, 0, "4094" HKR, Ndi\params\VlanID, step, 0, "1" HKR, Ndi\params\VlanID, base, 0, "10" ;PriorityVLANTag
HKR, Ndi\params\*PriorityVLANTag, ParamDesc, 0, "Priority and Vlan" HKR, Ndi\params\*PriorityVLANTag, default, 0, "0"
HKR, Ndi\params\*PriorityVLANTag, type, 0, "enum" HKR, Ndi\params\*PriorityVLANTag\enum, "0", 0, "Disabled"
HKR, Ndi\params\*PriorityVLANTag\enum, "1", 0, "Packet priority enabled" HKR, Ndi\params\*PriorityVLANTag\enum, "2", 0, "VLAN Enabled"
HKR, Ndi\params\*PriorityVLANTag\enum, "3", 0, "Packet priority and VLAN enabled" ; this block is not used when CapWakeOnMagicPacket is 0
;HKR, Ndi\params\*WakeOnMagicPacket, ParamDesc,0, "Wake on Magic Packet" ;HKR, Ndi\params\*WakeOnMagicPacket, default, 0, "1"
;HKR, Ndi\params\*WakeOnMagicPacket, type, 0, "enum" ;HKR, Ndi\params\*WakeOnMagicPacket\enum,"0", 0, "Disabled" ;HKR, Ndi\params\*WakeOnMagicPacket\enum,"1", 0, "Enabled" ; this block is not used when CapWakeOnLinkUp is 0
;HKR, Ndi\params\WakeOnLinkUp, ParamDesc,0, "Wake on Link Up" ;HKR, Ndi\params\WakeOnLinkUp, default, 0, "1"
;HKR, Ndi\params\WakeOnLinkUp, type, 0, "enum" ;HKR, Ndi\params\WakeOnLinkUp\enum, "0", 0, "Disabled" ;HKR, Ndi\params\WakeOnLinkUp\enum, "1", 0, "Enabled"
4.8.1 VLAN ID
If this parameter block is enabled, the user can set a VLAN ID for the adapter. The VLAN ID identifies a virtual network on the LAN. The VLAN ID is added to the MAC header and changes the layout of the Ethernet frames. This parameter is used when the settingPriorityVLANTag
enables VLAN. Remove this block if not supported by the device.
4 Driver Customization
4.8.4 WakeOnLinkUp
This parameter can be used to disable the Wake on Link Up feature when supported by the device. If this feature is not supported, remove this block.
5
Driver Installation and Uninstallation
This section discusses topics relating to the installation and uninstallation of the CDC/ECM device driver.
5.1 Driver Installation for Developers
This section describes some methods of how developers can install and un-install the CDC/ECM driver on a PC.
5.1.1 Installing CDC/ECM Driver Manually Only developers should install the driver manually.
In order to install the CDC/ECM driver manually you must prepare an INF file that matches your device (see chapter4).
The steps required to install the driver are described below.
• Copy the .inf, .sys and .cat files that are required for the operating system in use to the hard disk. Use a folder like
c:\program files\<Vendor>\<Product>\<Version>\drivers. Do not copy the files into system folders.
If you install the driver files directly from a removable medium, Windows XP will ask you to insert the medium again on the next installation process.
• Connect your USB device to the system. After the device has been plugged in, Windows launches the New Hardware Wizard and prompts you for a device driver. On Windows Vista and later, the system will show you a small notification to say that the driver was not installed correctly. In this case, you have to open the device manager manually and update the driver for your device.
Provide the New Hardware Wizard with the path of your installation files (e.g. cdcecm.inf and cdcecm.sys). Complete the wizard by following the instructions shown on screen. If the INF file matches your device, the driver should be installed successfully.
• If the operating system contains a driver that is suitable for your device, the system will not launch the New Hardware Wizard when the device is plugged in. Instead of that, a
system-5 Driver Installation and Uninstallation
• After the driver installation has been successfully completed, your device should be shown in the Device Manager in the section Network Adapters. You may use the Properties dialog box of that entry to verify the driver is installed and running.
• To verify that the driver is working properly with your device, you can check the adapter with the command line toolipconfig. Depending on the device capabilities, the adapter gets an IP address from DHCP or Auto IP. You can assign a static IP address in the network dialog. You can try to use the command line tool ping to get contact to your device. Consider fire wall settings on the PC.
5.1.2 Uninstalling CDC/ECM manually
Only developers should uninstall the driver manually. If an important system driver is removed, the system can become unusable.
To uninstall the device driver for a given device, use the Device Manager. The Device Manager can be accessed by right-clicking the "My Computer" icon on the desktop, choosing "Properties" from the context menu and then opening the Device Manager window. In the Device Manager window, double-click on the entry for the device and choose the property page labeled "Driver". There are two options to uninstall the device driver:
• Remove the selected device from the system by clicking the button "Uninstall". The oper-ating system will re-install a driver the next time the device is connected or the system is rebooted.
• Install a new driver for the selected device by clicking the button "Update Driver". The operating system launches the Upgrade Device Driver Wizard which searches for driver files or lets you select a driver.
In order to avoid automatic and silent re-installation of the driver by the operating system, it is necessary to remove the driver installation from the system.
On Windows Vista and higher, the complete driver package, with .sys, .inf and .cat files, is stored in the driver store. To remove it from the driver store, the dialog that is shown during the uninstal-lation allows the deletion of drivers in the store. On Windows XP, the .inf file must be removed manually.
During driver installation, Windows XP stores a copy of the INF file in its internal INF file data base located in%WINDIR%\INF\. The name of the INF file is changed before it is stored in the database. On Windows XP, the INF file is stored asoemX.inf, where X is a decimal number. The best way to find the correct INF file is to do a search for some significant string in all the INF files in the directory%WINDIR%\INF\and its subdirectories. Note that on Windows XP, the%WINDIR%\INF\directory has the Hidden attribute by default. Therefore, by default, the directory is not shown in Windows Explorer.
On Windows Vista and higher, the .cat file is stored in an additional place. If you install the same driver a second time, the system behavior may be different, because the system knows the driver and does not warn the user for a non-certified driver. Furthermore, the digital signature can be stored in the certificate manager under Trusted Publishers. This happens if the user selects
"always trust this vendor" during the installation process. If the certificate is stored there, all digitally signed drivers can be installed in the same way as with a WHQL signature.
Once you have located the INF file, delete it. This will prevent Windows from reinstalling the driver. Instead, the New Hardware Wizard will be launched and you will be asked for a driver.
5.2 Installing CDC/ECM driver for End Users
This section describes how the driver should be installed on a PC by the end user of the product.
5.2.1 Installing CDC/ECM driver with the PnP Driver Installer
Thesycon provides a PnP Driver Installer Package that can be used to install kernel mode drivers in a convenient and reliable way. This installer is not part of this package. It can be downloaded separately under the following link: http://www.thesycon.de/pnpinstaller.
The installation program can be run in an interactive mode with a graphical user interface or can be run in a command line mode. The command line mode is designed to integrate the driver installer into other installation programs. The GUI mode guides the user through the installation. It supports different languages.
The driver installer package can be customized. A detailed description of the customization op-tions is part of the reference documentation.
The PnP Driver Installer Package can handle the driver installation and uninstallation in different situations:
• During first time installation the driver is pre-installed in the system. In this step, the user needs administrator privileges. If the driver is certified, the pre-installation of the driver is performed silently. This means the hardware wizard is not launched and the system does not show a warning box for non-certified software. If the device is connected to the PC during installation, the correct driver software is installed immediately. If a device is connected to the PC later, the certified driver is installed silently. At the point of time where the device is connected to the PC, no administrator privileges are required.
• The installer can perform a driver update. Old drivers and driver instances are removed from the system regardless of whether the devices are connected or not. The exact driver version from the installer package is installed. Updating drivers in this way enables the upgrade to higher driver versions as well as allowing the installation of older versions. The driver
5 Driver Installation and Uninstallation
The PnP Driver Installer Package supports all current Windows systems including 32 and 64 bit versions. The Thesycon team provides support and warranty for the product. A comprehensive documentation is part of the demo package available at http://www.thesycon.de/pnpinstaller.
6
Debug Support
6.1 Event Log Entries
If the driver detects a major problem during the startup process, it creates an entry in the event log of the system. The event log can be opened with the context menu on ’My Computer’ -> Manage -> Event Viewer -> System. The entries are created in the category error.
Common problems are:
6.1.1 Clear Feature Endpoint Halt
The device cannot handle this request. Solution: Set the flagSendClearEpHaltOnStartto 0.
6.1.2 Demo is Expired
The demo version has an internal clock. If the demo period has expired, the driver fails all opera-tions. To re-enable the driver, reboot the PC. This does not occur with the licensed version.
6.2 Enable Debug Traces
The licensed version of the driver package contains the debug version of the driver. The debug version of the driver can generate text messages on a kernel debugger or a similar application. These messages can help to analyze problems.
To enable the debug traces follow these steps.
• Install the drivers created in the folder driver_package\debug created by
create_drvpackages.cmd.
• Open the registry editor with the path:
\HKEY_LOCAL_MACHINE\System\CurrentControlSet\services\
YOUR_SERVICE_NAME\.
YOUR_SERVICE_NAME is the base name used during customization.
6 Debug Support
• Start a kernel debugger like WinDbg or an application like DebugView to receive the kernel traces. DebugView is a free software that can be downloaded on the Microsoft web page. Connect your device.
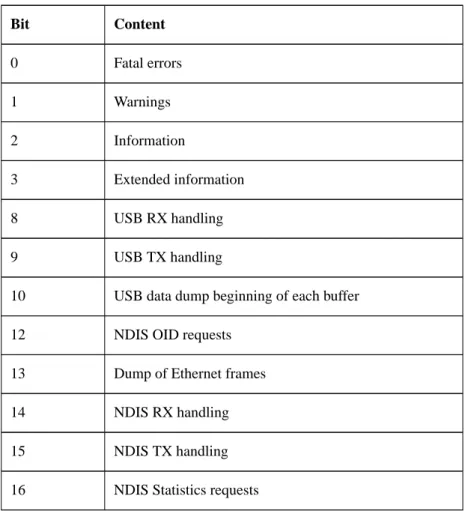
• If your problem ends up in a blue screen of death or you see an unexpected re-boot of the PC, please change the following settings: System Properties -> Advanced -> Startup and Recovery -> Settings -> Write Debugging Information to "Kernel Memory Dump". Set the registry key TraceLogSizeKBin the same location as the TraceMask to 128. This includes the last 128kb traces to the memory dump. Reproduce the BSOD again. Transfer the memory dump (typically%SystemRoot%\MEMORY.DMP) to Thesycon for analysis. The following table summarizes the meaning of the debug bits.
Table 1: Trace Mask Bit Content
Bit Content 0 Fatal errors 1 Warnings 2 Information 3 Extended information 8 USB RX handling 9 USB TX handling
10 USB data dump beginning of each buffer
12 NDIS OID requests
13 Dump of Ethernet frames
14 NDIS RX handling
15 NDIS TX handling
16 NDIS Statistics requests
If you submit a problem description to Thesycon please include the following:
• operating system and Service Pack
• USB host controller (XHC, EHC, UHC, OHC) and usage of external USB hubs
• Driver version and vendor of the host controller driver
• Driver version and driver build (release/debug/demo) that has been used
• used TraceMask if kernel Traces have been recorded
• The actions you have performed to cause the problem
7
Related Documents
References
[1] Universal Serial Bus Specification 1.1, http://www.usb.org
[2] Universal Serial Bus Specification 2.0, http://www.usb.org
[3] Universal Serial Bus Specification 3.0, http://www.usb.org
[4] USB device class specifications (CDC, ECM etc.), http://www.usb.org
[5] Microsoft Developer Network (MSDN) Library, http://msdn.microsoft.com/library/
[6] Windows Driver Development Kit, http://msdn.microsoft.com/library/ [7] Windows Platform SDK,