C H A P T E R
71
Configuring Clientless SSL VPN
This chapter describes:
• Getting Started, page 71-1
• Creating and Applying Clientless SSL VPN Policies for Accessing Resources, page 71-24 • Configuring Connection Profile Attributes for Clientless SSL VPN, page 71-25
• Configuring Group Policy and User Attributes for Clientless SSL VPN, page 71-26 • Configuring Browser Access to Plug-ins, page 71-27
• Configuring Application Access, page 71-33 • Configuring File Access, page 71-50
• Using Clientless SSL VPN with PDAs, page 71-52 • Using E-Mail over Clientless SSL VPN, page 71-53 • Configuring Portal Access Rules, page 71-55
• Optimizing Clientless SSL VPN Performance, page 71-55 • Clientless SSL VPN End User Setup, page 71-61
• Capturing Data, page 71-88
Getting Started
Note When the ASA is configured for Clientless SSL VPN, you cannot enable security contexts (also called firewall multimode) or Active/Active stateful failover. Therefore, these features become unavailable.
Clientless SSL VPN lets users establish a secure, remote-access VPN tunnel to a ASA using a web browser. Users do not need a software or hardware client.
Clientless SSL VPN provides secure and easy access to a broad range of web resources and web-enabled applications from almost any computer on the Internet. They include:
• Internal websites
• Web-enabled applications
• NT/Active Directory file shares
Chapter 71 Configuring Clientless SSL VPN Getting Started
• MS Outlook Web Access
• Application Access (that is, smart tunnel or port forwarding access to other TCP-based applications)
Note The security appliance does not support the Microsoft Outlook Exchange (MAPI) proxy. Neither the smart tunnel feature nor port forwarding supports MAPI. For Microsoft Outlook Exchange
communication using the MAPI protocol, remote users must use AnyConnect.
Clientless SSL VPN uses Secure Sockets Layer Protocol and its successor, Transport Layer Security to provide the secure connection between remote users and specific, supported internal resources that you configure at a central site. The ASA recognizes connections that need to be proxied, and the HTTP server interacts with the authentication subsystem to authenticate users.
The network administrator provides access to resources by users of clientless SSL VPN sessions on a group basis. Users have no direct access to resources on the internal network.
The following sections address getting started with the configuration of clientless SSL VPN access:
• Observing Clientless SSL VPN Security Precautions • Understanding Clientless SSL VPN System Requirements • Understanding Features Not Supported in Clientless SSL VPN • Using SSL to Access the Central Site
• Authenticating with Digital Certificates
• Enabling Cookies on Browsers for Clientless SSL VPN
• Managing Passwords
• Using Single Sign-on with Clientless SSL VPN • Configuring SSO with Macro Substitution
Observing Clientless SSL VPN Security Precautions
Clientless SSL VPN connections on the ASA differ from remote access IPSec connections, particularly with respect to how they interact with SSL-enabled servers, and precautions to follow to reduce security risks.
In a clientless SSL VPN connection, the ASA acts as a proxy between the end user web browser and target web servers. When a user connects to an SSL-enabled web server, the ASA establishes a secure connection and validates the server SSL certificate. The browser never receives the presented certificate, so it cannot examine and validate the certificate.
The current implementation of clientless SSL VPN on the ASA does not permit communication with sites that present expired certificates. Nor does the ASA perform trusted CA certificate validation to those SSL-enabled sites. Therefore, users do not benefit from certificate validation of pages delivered from an SSL-enabled web server before they use a web-enabled service.
Caution By default, the ASA permits all portal traffic to all web resources (e.g., HTTPS, CIFS, RDP, and plug-ins). The ASA clientless service rewrites each URL to one that is meaningful only to itself; the user cannot use the rewritten URL displayed on the page accessed to confirm that they are on the site they requested. To avoid placing users at risk, please assign a web ACL to the policies configured for clientless access – group-policies, dynamic access policies, or both – to control traffic flows from the portal. For example, without such an ACL, users could receive an authentication request from an outside
Chapter 71 Configuring Clientless SSL VPN
Getting Started
fraudulent banking or commerce site. Also, we recommend disabling URL Entry on these policies to prevent user confusion over what is accessible. We recommend that you do the following to minimize risks posed by clientless SSL VPN access:
Step 1 Configure a group policy for all users who need clientless SSL VPN access, and enable clientless SSL VPN only for that group policy.
Step 2 Create a web ACL to do one of the following: permit access only to specific targets within the private network, permit access only to the private network, deny Internet access, or permit access only to reputable sites. For instructions, see “Configuring Clientless SSL VPN.” Assign the web ACL to any policies (group policies, dynamic access policies, or both) that you have configured for clientless access. To do so on a DAP, open an ASDM session with the ASA and select the web ACL on the Network ACL Filters tab.
Step 3 Disable URL entry on the portal page, the page that opens when the user establishes a browser-based connection. To disable URL entry on a group policy, enter the url-entry disable command in
group-policy webvpn configuration mode. To disable URL entry on a DAP, use ASDM to edit the DAP record, click the Functions tab, and check Disable next to URL Entry.
Step 4 Instruct users to enter external URLs in the native browser address field above the portal page or open a separate browser window to visit external sites.
Understanding Clientless SSL VPN System Requirements
Clientless SSL VPN supports access from the following OSs and browsers.
OSs1 Browser and Java Versions Feature Notes2
Windows Vista SP2
Vista SP1 with KB952876 or later.
Microsoft Internet Explorer 7 Firefox 2.0 or later.
Windows Vista does not support Windows Shares (CIFS) Web Folders.
Additional requirements and limitations apply to smart tunnel and port forwarding.
Windows XP SP2 or later. Microsoft Internet Explorer 7 and 6 Firefox 2.0 or later.
Windows XP SP2 or later requires Microsoft KB892211 hotfix to support Web Folders. Additional requirements and limitations apply to smart tunnel and port forwarding.
Windows 2000 SP4. Microsoft Internet Explorer 7 and 6 Firefox 2.0 or later.
Windows Vista does not support Windows Shares (CIFS) Web Folders.
Windows 2000 SP4 requires Microsoft KB892211 hotfix to support Web Folders.
Additional requirements and limitations apply to smart tunnel and port forwarding.
Chapter 71 Configuring Clientless SSL VPN Getting Started
ActiveX pages require that you use the ActiveX Relay default setting (Enable) on the associated group policy. If you do so or assign a smart tunnel list to the policy, and the browser proxy exception list on the endpoint specifies a proxy, the user must add a “shutdown.webvpn.relay.” entry to that list.
Clientless SSL VPN access does not support Windows Shares (CIFS) Web Folders on Windows 7, Vista, Internet Explorer 8, Mac OS, and Linux. Windows XP SP2 requires a Microsoft hotfix to support Web Folders.
See the following sections for the platforms supported by the clientless applications named:
• Port Forwarding Requirements and Restrictions, page 71-42
• Smart Tunnel Requirements, Restrictions, and Limitations, page 71-34 • Plug-in Requirements and Restrictions, page 71-28
Understanding Features Not Supported in Clientless SSL VPN
The ASA does not support the following features for clientless SSL VPN connections:
• DSA certificates; The ASA does support RSA certificates.
• Remote HTTPS certificates.
• Requirements of some domain-based security products. Because the adaptive security appliance encodes the URL, requests actually originate from the ASA, which in some cases do not satisfy the requirements of domain-based security products.
• Inspection features under the Modular Policy Framework, inspecting configuration control.
• Functionality the filter configuration commands provide, including the vpn-filter command.
• VPN connections from hosts with IPv6 addresses. Hosts must use IPv4 addresses to establish Clientless SSL VPN or AnyConnect sessions. However, beginning with ASA 8.0(2), users can use these sessions to access internal IPv6-enabled resources.
• NAT, reducing the need for globally unique IP addresses.
• PAT, permitting multiple outbound sessions appear to originate from a single IP address.
• QoS, rate limiting using the police command and priority-queue command.
• Connection limits, checking either via the static or the Modular Policy Framework set connection
command.
Apple: Mac OS X 10.4 and 10.5 Safari 2.0 or later, or Firefox 2.0 or later.
Certificate authentication, including the DoD Common Access Card and SmartCard, works with the Safari keychain only.
Web folders do not support Mac OS.
Additional requirements and limitations apply to smart tunnel and port forwarding.
Linux Firefox 2.0 or later. Web folders and smart tunnel do not support Linux. Additional requirements apply to port forwarding.
1. Although Release 8.2 does not support Windows 7 with clientless SSL features, Release 8.2 does support the installation of HostScan and AnyConnect using WebLaunch over a clientless SSL connection established with Internet Explorer 8.0 on Windows 7. Following the initial installation of AnyConnect, users can start the AnyConnect application to establish a VPN session.
2. For Microsoft Outlook Exchange communication using the MAPI protocol, remote users must use AnyConnect.
Chapter 71 Configuring Clientless SSL VPN
Getting Started
• The established command, allowing return connections from a lower security host to a higher security host if there is already an established connection from the higher level host to the lower level host.
Using SSL to Access the Central Site
Clientless SSL VPN uses SSL and its successor, TLS1 to provide a secure connection between remote users and specific, supported internal resources at a central site. This section includes the following topics:
• Using HTTPS for Clientless SSL VPN Sessions • Configuring Clientless SSL VPN and ASDM Ports • Configuring Support for Proxy Servers
• Configuring SSL/TLS Encryption Protocols
Using HTTPS for Clientless SSL VPN Sessions
Establishing clientless SSL VPN sessions requires the following:
• Enabling clientless SSL VPN sessions on the ASA interface that users connect to.
• Using HTTPS to access the ASA or load balancing cluster. In a web browser, users enter the ASA IP address in the format https:// address where address is the IP address or DNS hostname of the ASA interface.
To permit clientless SSL VPN sessions on an interface, perform the following steps:
Step 1 In global configuration mode, enter the webvpn command to enter webvpn mode.
Step 2 Enter the enable command with the name of the interface that you want to use for clientless SSL VPN sessions.
For example, to enable clientless SSL VPN sessions on the interface called outside, enter the following:
hostname(config)# webvpn
hostname(config-webvpn)# enable outside
Configuring Clientless SSL VPN and ASDM Ports
Beginning with Version 8.0(2), the ASA supports both clientless SSL VPN sessions and ASDM administrative sessions simultaneously on Port 443 of the outside interface. You do, however, have the option to configure these applications on different interfaces.
To change the SSL listening port for clientless SSL VPN, use the portport_number command in webvpn mode. The following example enables clientless SSL VPN on port 444 of the outside interface. HTTPS for ASDM is also configured on the outside interface and uses the default port (443). With this configuration, remote users initiating clientless SSL VPN sessions enter https://<outside_ip>:444 in the browser.
hostname(config)# http server enable
hostname(config)# http 192.168.3.0 255.255.255.0 outside
hostname(config)# webvpn
Chapter 71 Configuring Clientless SSL VPN Getting Started
hostname(config-webvpn)# enable outside
To change the listening port for ASDM, use the port argument of the http server enable command in privileged EXEC mode. The following example specifies that HTTPS ASDM sessions use port 444 on the outside interface. Clientless SSL VPN is also enabled on the outside interface and uses the default port (443). With this configuration, remote users initiate ASDM sessions by entering
https://<outside_ip>:444 in the browser.
hostname(config)# http server enable 444
hostname(config)# http 192.168.3.0 255.255.255.0 outside
hostname(config)# webvpn
hostname(config-webvpn)# enable outside
Configuring Support for Proxy Servers
The ASA can terminate HTTPS connections and forward HTTP and HTTPS requests to proxy servers. These servers act as intermediaries between users and the Internet. Requiring Internet access via a server that the organization controls provides another opportunity for filtering to assure secure Internet access and administrative control.
When configuring support for HTTP and HTTPS proxy services, you can assign preset credentials to send with each request for basic authentication. You can also specify URLs to exclude from HTTP and HTTPS requests.
You can specify a proxy autoconfiguration (PAC) file to download from an HTTP proxy server, however, you may not use proxy authentication when specifying the PAC file.
To configure the ASA to use an external proxy server to handle HTTP and HTTPS requests, use the
http-proxy and https-proxy commands in webvpn mode.
• http-proxy host [port] [excludeurl] [usernameusername {passwordpassword}] • https-proxy host [port] [excludeurl] [usernameusername {passwordpassword}] • http-proxy pac url
exclude—(Optional) Enter this keyword to exclude URLs from those that can be sent to the proxy server.
host—Enter the hostname or IP address for the external proxy server.
pac—Proxy autoconfiguration file to download to the browser. Once downloaded, the PAC file uses a JavaScript function to identify a proxy for each URL.
password—(Optional, and available only if you specify a username) Enter this keyword to accompany each proxy request with a password to provide basic, proxy authentication.
password—Enter the password to send to the proxy server with each HTTP or HTTPS request.
port—(Optional) Enter the port number used by the proxy server. The default HTTP port is 80. The default HTTPS port is 443. The ASA uses each of these ports if you do not specify an alternative value. The range is 1-65535.
url—If you entered exclude, enter a URL or a comma-delimited list of several URLs to exclude from
those that can be sent to the proxy server. The string does not have a character limit, but the entire command cannot exceed 512 characters. You can specify literal URLs or use the following wildcards:
• * to match any string, including slashes (/) and periods (.). You must accompany this wildcard with an alphanumeric string.
Chapter 71 Configuring Clientless SSL VPN
Getting Started
• [x-y] to match any single character in the range of x and y, where x represents one character and y
represents another character in the ANSI character set.
• [!x-y] to match any single character that is not in the range.
If you entered http-proxy pac, follow it with http:// and type the URL of the proxy autoconfiguration file. If you omit the http:// portion, the CLI ignores the command.
username—(Optional) Enter this keyword to accompany each HTTP proxy request with a username for basic, proxy authentication. Only the http-proxyhost command supports this keyword.
username—Enter the username the password to send to the proxy server with each HTTP or HTTPS request.
The ASA clientless SSL VPN configuration supports only one http-proxy and one http-proxy
command each. For example, if one instance of the http-proxy command is already present in the running configuration and you enter another, the CLI overwrites the previous instance.
The following example shows how to configure use of an HTTP proxy server with an IP address of
209.165. 201.1 using the default port, send a username and password with each HTTP request:
hostname(config-webvpn)# http-proxy 209.165.201.1 jsmith password user mysecretdonttell
hostname(config-webvpn)
The following example shows the same command, except when the ASA receives the specific URL www.example.com in an HTTP request, it resolves the request instead of passing it on to the proxy server:
hostname(config-webvpn)# http-proxy 209.165.201.1 exclude www.example.com username jsmith password mysecretdonttell
hostname(config-webvpn)
The following example shows how to specify a URL to serve a proxy autoconfiguration file to the browser:
hostname(config-webvpn)# http-proxy pac http://www.example.com/pac
hostname(config-webvpn)
Configuring SSL/TLS Encryption Protocols
When you set SSL/TLS encryption protocols, be aware of the following:
• Make sure that the ASA and the browser you use allow the same SSL/TLS encryption protocols.
• If you configure e-mail proxy, do not set the ASA SSL version to TLSv1 Only. Microsoft Outlook and Microsoft Outlook Express do not support TLS.
• TCP Port Forwarding requires Sun Microsystems Java Runtime Environment (JRE) version 1.4.x and 1.5.x. Port forwarding does not work when a user of clientless SSL VPN connects with some SSL versions, as follows:
Negotiate SSLv3 Java downloads Negotiate SSLv3/TLSv1 Java downloads
Negotiate TLSv1 Java does NOT download TLSv1Only Java does NOT download SSLv3Only Java does NOT download
Chapter 71 Configuring Clientless SSL VPN Getting Started
Authenticating with Digital Certificates
SSL uses digital certificates for authentication. The ASA creates a self-signed SSL server certificate when it boots; or you can install in the ASA an SSL certificate that has been issued in a PKI context. For HTTPS, this certificate must then be installed on the client. You need to install the certificate from a given ASA only once.
Because E-mail clients such as MS Outlook, MS Outlook Express, and Eudora lack the ability to access the certificate store, you may want to restrict these users from authenticating with digital certificates. For more information on authentication and authorization using digital certificates, see “Using Certificates and User Login Credentials” in the “Configuring AAA Servers and the Local Database” chapter.
Enabling Cookies on Browsers for Clientless SSL VPN
Browser cookies are required for the proper operation of clientless SSL VPN. When cookies are disabled on the web browser, the links from the web portal home page open a new window prompting the user to log in once more.
Managing Passwords
Optionally, you can configure the ASA to warn end users when their passwords are about to expire. To do this, you specify the password-management command in tunnel-group general-attributes mode or enable the feature using ASDM at Configuration > Remote Access VPN > Clientless SSL VPN Access > Connection Profiles > Add or Edit > Advanced > General > Password Management.
The ASA supports password management for the RADIUS and LDAP protocols. It supports the “password-expire-in-days” option for LDAP only.
You can configure password management for IPSec remote access and SSL VPN tunnel-groups. When you configure password management, the ASA notifies the remote user at login that the user’s current password is about to expire or has expired. The ASA then offers the user the opportunity to change the password. If the current password has not yet expired, the user can still log in using that password.
This command is valid for AAA servers that support such notification. The ASA ignores this command if RADIUS or LDAP authentication has not been configured.
Note Some RADIUS servers that support MSCHAP currently do not support MSCHAPv2. This command requires MSCHAPv2 so please check with your vendor.
The ASA, releases 7.1 and later, generally supports password management for the following connection types when authenticating with LDAP or with any RADIUS configuration that supports MS-CHAPv2:
• AnyConnect VPN Client
• IPSec VPN Client
• Clientless SSL VPN
Password management is not supported for any of these connection types for Kerberos/Active Directory (Windows password) or NT 4.0 Domain.
Chapter 71 Configuring Clientless SSL VPN
Getting Started
The RADIUS server (for example, Cisco ACS) could proxy the authentication request to another authentication server. However, from the ASA perspective, it is talking only to a RADIUS server.
Note For LDAP, the method to change a password is proprietary for the different LDAP servers on the market. Currently, the ASA implements the proprietary password management logic only for Microsoft Active Directory and Sun LDAP servers.
Native LDAP requires an SSL connection. You must enable LDAP over SSL before attempting to do password management for LDAP. By default, LDAP uses port 636.
Note If you are using an LDAP directory server for authentication, password management is supported with the Sun Microsystems JAVA System Directory Server (formerly named the Sun ONE Directory Server) and the Microsoft Active Directory.
Sun—The DN configured on the ASA to access a Sun directory server must be able to access the default password policy on that server. We recommend using the directory administrator, or a user with directory administrator privileges, as the DN. Alternatively, you can place an ACI on the default password policy.
Microsoft—You must configure LDAP over SSL to enable password management with Microsoft Active Directory.
Note that this command does not change the number of days before the password expires, but rather, the number of days ahead of expiration that the ASA starts warning the user that the password is about to expire.
If you do specify the password-expire-in-days keyword, you must also specify the number of days. Specifying this command with the number of days set to 0 disables this command. The ASA does not notify the user of the pending expiration, but the user can change the password after it expires.
The following example sets the days before password expiration to begin warning the user of the pending expiration to 90 for the connection profile “testgroup”:
hostname(config)# tunnel-group testgroup type webvpn
hostname(config)# tunnel-group testgroup general-attributes
hostname(config-general)# password-management password-expire-in-days 90
Using Single Sign-on with Clientless SSL VPN
Single sign-on support lets users of clientless SSL VPN enter a username and password only once to access multiple protected services and web servers. In general, the SSO mechanism either starts as part of the AAA process or just after successful user authentication to a AAA server. The clientless SSL VPN server running on the ASA acts as a proxy for the user to the authenticating server. When a user logs in, the clientless SSL VPN server sends an SSO authentication request, including username and password, to the authenticating server using HTTPS. If the server approves the authentication request, it returns an SSO authentication cookie to the clientless SSL VPN server. The ASA keeps this cookie on behalf of the user and uses it to authenticate the user to secure websites within the domain protected by the SSO server.
Chapter 71 Configuring Clientless SSL VPN Getting Started
This section describes the three SSO authentication methods supported by clientless SSL VPN: HTTP Basic and NTLMv1 (NT LAN Manager) authentication, the Computer Associates eTrust SiteMinder SSO server (formerly Netegrity SiteMinder), and Version 1.1 of Security Assertion Markup Language (SAML), the POST-type SSO server authentication.
This section includes:
• Configuring SSO with HTTP Basic or NTLM Authentication • Configuring SSO Authentication Using SiteMinder
• Configuring SSO Authentication Using SAML Browser Post Profile • Configuring SSO with the HTTP Form Protocol
• Configuring SSO for Plug-ins
• Configuring SSO with Macro Substitution
Configuring SSO with HTTP Basic or NTLM Authentication
This section describes single sign-on with HTTP Basic or NTLM authentication. You can configure the ASA to implement SSO using either or both of these methods. The auto-signon command configures the ASA to automatically pass clientless SSL VPN user login credentials (username and password) on to internal servers. You can enter multiple auto-signon commands. The ASA processes them according to the input order (early commands take precedence). You specify the servers to receive the login credentials using either IP address and IP mask, or URI mask.
Use the auto-signon command in any of three modes: webvpn configuration, webvpn group-policy mode, or webvpn username mode. Username supersedes group, and group supersedes global. The mode you choose depends upon scope of authentication you want:
The following example commands present various possible combinations of modes and arguments.
All Users, IP Address Range, NTLM
To configure auto-signon for all users of clientless SSL VPN to servers with IP addresses ranging from 10.1.1.0 to 10.1.1.255 using NTLM authentication, for example, enter the following commands:
hostname(config)# webvpn
hostname(config-webvpn)# auto-signon allow ip 10.1.1.1 255.255.255.0 auth-type ntlm
All Users, URI Range, HTTP Basic
To configure auto-signon for all users of clientless SSL VPN, using basic HTTP authentication, to servers defined by the URI mask https://*.example.com/*, for example, enter the following commands:
hostname(config)# webvpn
hostname(config-webvpn)# auto-signon allow uri https://*.example.com/* auth-type basic
Mode Scope
webvpn configuration All clientless SSL VPN users globally webvpn group-policy
configuration
A subset of clientless SSL VPN users defined by a group policy
Chapter 71 Configuring Clientless SSL VPN
Getting Started
Group, URI Range, HTTP Basic and NTLM
To configure auto-signon for clientless SSL VPN sessions associated with the ExamplePolicy group policy, using either basic or NTLM authentication, to servers defined by the URI mask
https://*.example.com/*, for example, enter the following commands:
hostname(config)# group-policy ExamplePolicy attributes
hostname(config-group-policy)# webvpn
hostname(config-group-webvpn)# auto-signon allow uri https://*.example.com/* auth-type all
Specific User, IP Address Range, HTTP Basic
To configure auto-signon for a user named Anyuser to servers with IP addresses ranging from 10.1.1.0 to 10.1.1.255 using HTTP Basic authentication, for example, enter the following commands:
hostname(config)# username Anyuser attributes
hostname(config-username)# webvpn
hostname(config-username-webvpn)# auto-signon allow ip 10.1.1.1 255.255.255.0 auth-type basic
Configuring SSO Authentication Using SiteMinder
This section describes configuring the ASA to support SSO with SiteMinder. You would typically choose to implement SSO with SiteMinder if your website security infrastucture already incorporates SiteMinder. With this method, SSO authentication is separate from AAA and happens once the AAA process completes. If you want to configure SSO for a user or group for clientless SSL VPN access, you must first configure a AAA server, such as a RADIUS or LDAP server. You can then set up SSO support for clientless SSL VPN. This section includes:
• Task Overview: Configuring SSO with SiteMinder • Detailed Tasks: Configuring SSO with SiteMinder • Adding the Cisco Authentication Scheme to SiteMinder Task Overview: Configuring SSO with SiteMinder
This section presents an overview of the tasks necessary to configure SSO with SiteMinder SSO. These tasks are:
• Specifying the SSO server.
• Specifying the URL of the SSO server to which the ASA makes SSO authentication requests.
• Specifying a secret key to secure the communication between the ASA and the SSO server. This key is similar to a password: you create it, save it, and enter it on both the ASA and the SiteMinder Policy Server using the Cisco Java plug-in authentication scheme.
Optionally, you can do the following configuration tasks in addition to the required tasks:
• Configuring the authentication request timeout.
• Configuring the number of authentication request retries.
Chapter 71 Configuring Clientless SSL VPN Getting Started
Detailed Tasks: Configuring SSO with SiteMinder
This section presents specific steps for configuring the ASA to support SSO authentication with CA SiteMinder. To configure SSO with SiteMinder, perform the following steps:
Step 1 In webvpn configuration mode, enter the sso-server command with the type option to create an SSO server. For example, to create an SSO server named Example of type siteminder, enter the following:
hostname(config)# webvpn
hostname(config-webvpn)# sso-server Example type siteminder
hostname(config-webvpn-sso-siteminder)#
Step 2 Enter the web-agent-url command in webvpn-sso-siteminder configuration mode to specify the authentication URL of the SSO server. For example, to send authentication requests to the URL http://www.Example.com/webvpn, enter the following:
hostname(config-webvpn-sso-siteminder)# web-agent-url http://www.Example.com/webvpn
hostname(config-webvpn-sso-siteminder)#
Step 3 Specify a secret key to secure the authentication communications between the ASA and SiteMinder using the policy-server-secret command in webvpn-sso-siteminder configuration mode. You can create a key of any length using any regular or shifted alphanumeric character, but you must enter the same key on both the ASA and the SSO server.
For example, to create the secret key AtaL8rD8!, enter the following:
hostname(config-webvpn-sso-siteminder)# policy-server-secret AtaL8rD8!
hostname(config-webvpn-sso-siteminder)#
Step 4 Optionally, you can configure the number of seconds before a failed SSO authentication attempt times out using the request-timeout command in webvpn-sso-siteminder configuration mode. The default number of seconds is 5 seconds and the possible range is 1 to 30 seconds. To change the number of seconds before a request times out to 8, for example, enter the following:
hostname(config-webvpn-sso-siteminder)# request-timeout 8
hostname(config-webvpn-sso-siteminder)#
Step 5 Optionally, you can configure the number of times the ASA retries a failed SSO authentication attempt before the authentication times-out using the max-retry-attempts command in webvpn-sso-siteminder configuration mode. The default is 3 retry attempts and the possible range is 1 to 5 attempts. To configure the number of retries to be 4, for example, enter the following:
hostname(config-webvpn-sso-siteminder)# max-retry-attempts 4
hostname(config-webvpn-sso-siteminder)#
Step 6 After you configure the SSO server, you must specify SSO authentication for either a group or user. To specify SSO for a group, assign an SSO server to a group policy using the sso-server value command in group-policy-webvpn configuration mode. To specify SSO for a user, assign an SSO server to a user policy using the same command, sso-server value, but in username-webvpn configuration mode. For example, to assign the SSO server named Example to the user named Anyuser, enter the following:
hostname(config)# username Anyuser attributes
hostname(config-username)# webvpn
hostname(config-username-webvpn)# sso-server value Example
hostname(config-username-webvpn)#
Step 7 Finally, you can test the SSO server configuration using the test sso-server command in privileged EXEC mode. For example, to test the SSO server named Example using the username Anyuser, enter the following:
Chapter 71 Configuring Clientless SSL VPN
Getting Started
INFO: Attempting authentication request to sso-server Example for user Anyuser INFO: STATUS: Success
hostname#
Adding the Cisco Authentication Scheme to SiteMinder
In addition to configuring the ASA for SSO with SiteMinder, you must also configure your CA SiteMinder Policy Server with the Cisco authentication scheme, a Java plug-in you download from the Cisco web site.
Note Configuring the SiteMinder Policy Server requires experience with SiteMinder. This section presents general tasks, not a complete procedure.
To configure the Cisco authentication scheme on your SiteMinder Policy Server, perform the following tasks:
Step 1 With the SiteMinder Administration utility, create a custom authentication scheme, being sure to use the following specific arguments:
• In the Library field, enter smjavaapi.
• In the Secret field, enter the same secret configured on the ASA.
You configure the secret on the ASA using the policy-server-secret command at the command line interface.
• In the Parameter field, enter CiscoAuthApi.
Step 2 Using your Cisco.com login, download the file cisco_vpn_auth.jar from
http://www.cisco.com/cisco/software/navigator.html and copy it to the default library directory for the SiteMinder server. This .jar file is also available on the Cisco ASA CD.
Configuring SSO Authentication Using SAML Browser Post Profile
This section describes configuring the ASA to support Security Assertion Markup Language (SAML), Version 1.1 POST profile Single Sign-On (SSO) for authorized users. SAML SSO is supported only for clientless SSL VPN sessions. This section includes:
• Task Overview: Configuring SSO with SAML Post Profile • Detailed Tasks: Configuring SSO with SAML Post Profile • SSO Server Configuration
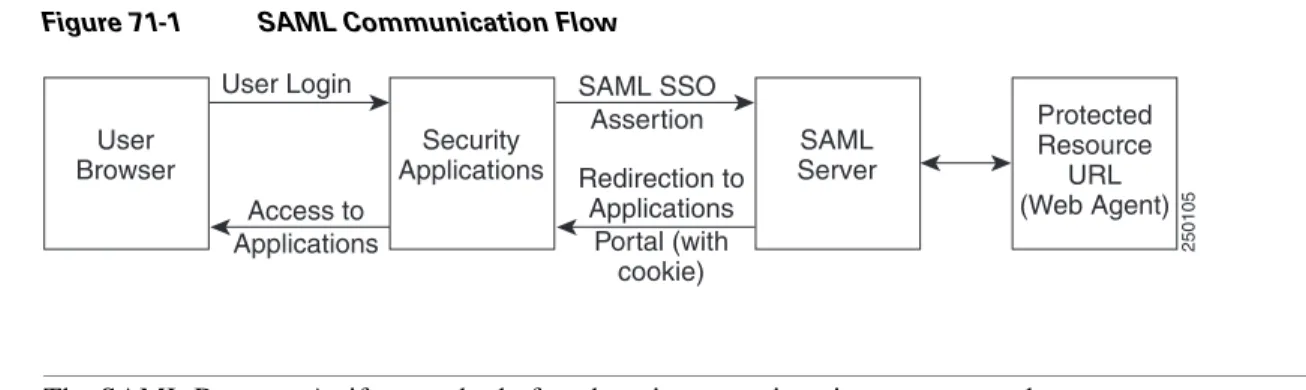
After a session is initiated, the ASA authenticates the user against a configured AAA method. Next, the ASA (the asserting party) generates an assertion to the relying party, the consumer URL service provided by the SAML server. If the SAML exchange succeeds, the user is allowed access to the protected resource. Figure 71-1 shows the communication flow:
Chapter 71 Configuring Clientless SSL VPN Getting Started
Figure 71-1 SAML Communication Flow
Note The SAML Browser Artifact method of exchanging assertions is not supported.
Task Overview: Configuring SSO with SAML Post Profile
This section presents an overview of the tasks necessary to configure SSO with SAML Browser Post Profile. These tasks are:
• Specify the SSO server with the sso-server command.
• Specify the URL of the SSO server for authentication requests (the assertion-consumer-url
command)
• Specify the ASA hostname as the component issuing the authentication request (the issuer
command)
• Specify the trustpoint certificates use for signing SAML Post Profile assertions (the trustpoint
command)
Optionally, in addition to these required tasks, you can do the following configuration tasks:
• Configure the authentication request timeout (the request-timeout command)
• Configure the number of authentication request retries (the max-retry-attempts command) After completing the configuration tasks, you assign an SSO server to a user or group policy.
Detailed Tasks: Configuring SSO with SAML Post Profile
This section presents specific steps for configuring the ASA to support SSO authentication with SAML Post Profile. To configure SSO with SAML-V1.1-POST, perform the following steps:
Step 1 In webvpn configuration mode, enter the sso-server command with the type option to create an SSO server. For example, to create an SSO server named Sample of type SAML-V1.1-POST, enter the following:
hostname(config)# webvpn
hostname(config-webvpn)# sso-server sample type SAML-V1.1-post
hostname(config-webvpn-sso-saml)#
Note The ASA currently supports only the Browser Post Profile type of SAML SSO Server.
Step 2 Enter the assertion-consumer-url command in webvpn-sso-saml configuration mode to specify the authentication URL of the SSO server. For example, to send authentication requests to the URL http://www.Example.com/webvpn, enter the following:
hostname(config-webvpn-sso-saml)# assertion-consumer-url http://www.sample.com/webvpn
hostname(config-webvpn-sso-saml)#
250105
User Browser
User Login
Access to Applications
Security Applications
SAML SSO Assertion Redirection to
Applications Portal (with
cookie)
SAML Server
Protected Resource
URL (Web Agent)
Chapter 71 Configuring Clientless SSL VPN
Getting Started
Step 3 Specify a unique string that identifies the ASA itself when it generates assertions. Typically, this issuer name is the hostname for the ASA as follows:
hostname(config-webvpn-sso-saml)# issuer myasa
hostname(config-webvpn-sso-saml)#
Step 4 Specify the identification certificate for signing the assertion with the trust-point command. An example follows:
hostname(config)# tunnel-group 209.165.200.225 type IPSec_L2L
hostname(config)# tunnel-group 209.165.200.225 ipsec-attributes
hostname(config-tunnel-ipsec)# trust-point mytrustpoint
Optionally, you can configure the number of seconds before a failed SSO authentication attempt times out using the request-timeout command in webvpn-sso-saml configuration mode. The default number of seconds is 5 seconds and the possible range is 1 to 30 seconds. To change the number of seconds before a request times out to 8, for example, enter the following:
hostname(config-webvpn-sso-saml)# request-timeout 8
hostname(config-webvpn-sso-saml)#
Step 5 Optionally, you can configure the number of times the ASA retries a failed SSO authentication attempt before the authentication times-out using the max-retry-attempts command in webvpn-sso-saml configuration mode. The default is 3 retry attempts and the possible range is 1 to 5 attempts. To configure the number of retries to be 4, for example, enter the following:
hostname(config-webvpn-sso-saml)# max-retry-attempts 4
hostname(config-webvpn-sso-saml)#
Step 6 After you configure the SSO server, you must specify SSO authentication for either a group or user. To specify SSO for a group, assign an SSO server to a group policy using the sso-server value command in group-policy-webvpn configuration mode. To specify SSO for a user, assign an SSO server to a user policy using the same command, sso-server value, but in username-webvpn configuration mode. For example, to assign the SSO server named Example to the user named Anyuser, enter the following:
hostname(config)# username Anyuser attributes
hostname(config-username)# webvpn
hostname(config-username-webvpn)# sso-server value sample
hostname(config-username-webvpn)#
Step 7 Finally, you can test the SSO server configuration using the test sso-server command in privileged EXEC mode. For example, to test the SSO server, Example using the username Anyuser, enter:
hostname# test sso-server Example username Anyuser
INFO: Attempting authentication request to sso-server sample for user Anyuser INFO: STATUS: Success
SSO Server Configuration
Use the SAML server documentation provided by the server software vendor to configure the SAML server in Relying Party mode.The following steps list the specific parameters required to configure the SAML Server for Browser Post Profile:
Step 1 Configure the SAML server parameters to represent the asserting party (the ASA):
• Recipient consumer url (same as the assertion consumer url configured on the ASA)
Chapter 71 Configuring Clientless SSL VPN Getting Started
• Profile type -Browser Post Profile
Step 2 Configure certificates.
Step 3 Specify that asserting party assertions must be signed.
Step 4 Select how the SAML server identifies the user:
• Subject Name Type is DN
• Subject Name format is uid=<user>
Configuring SSO with the HTTP Form Protocol
Note To configure SSO with the HTTP protocol correctly, you must have a thorough working knowledge of authentication and HTTP protocol exchanges.
This section describes using the HTTP Form protocol for SSO. HTTP Form protocol is a common approach to SSO authentication that can also qualify as a AAA method. It provides a secure method for exchanging authentication information between users of clientless SSL VPN and authenticating web servers. As a common protocol, it is highly compatible with web servers and web-based SSO products, and you can use it in conjunction with other AAA servers such as RADIUS or LDAP servers.
Note It is important to remember that HTTP Form authentication can be used in conjunction with RADIUS or LDAP authorization, but not with RADIUS or LDAP authentication.
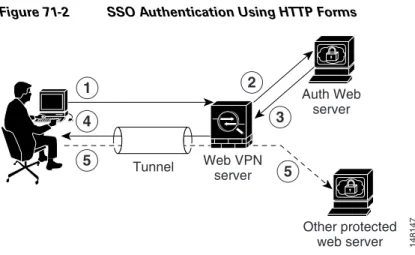
The ASA again serves as a proxy for users of clientless SSL VPN to an authenticating web server but, in this case, it uses HTTP Form protocol and the POST method for requests. You must configure the ASA to send and receive form data. Figure 71-2 illustrates the following SSO authentication steps:
1. A user of clientless SSL VPN first enters a username and password to log into the clientless SSL VPN server on the ASA.
2. The clientless SSL VPN server acts as a proxy for the user and forwards the form data (username and password) to an authenticating web server using a POST authentication request.
3. If the authenticating web server approves the user data, it returns an authentication cookie to the clientless SSL VPN server where it is stored on behalf of the user.
4. The clientless SSL VPN server establishes a tunnel to the user.
5. The user can now access other websites within the protected SSO environment without reentering a username and password.
Chapter 71 Configuring Clientless SSL VPN
Getting Started
Figure 71-2 SSO Authentication Using HTTP Forms
While you would expect to configure form parameters that let the ASA include POST data such as the username and password, you initially might not be aware of additional hidden parameters that the web server requires. Some authentication applications expect hidden data which is neither visible to nor entered by the user. You can, however, discover hidden parameters the authenticating web server expects by making a direct authentication request to the web server from your browser without the ASA in the middle acting as a proxy. Analyzing the web server response using an HTTP header analyzer reveals hidden parameters in a format similar to the following:
<param name>=<URL encoded value>&<param name>=<URL encoded>
Some hidden parameters are mandatory and some are optional. If the web server requires data for a hidden parameter, it rejects any authentication POST request that omits that data. Because a header analyzer does not tell you if a hidden parameter is mandatory or not, we recommend that you include all hidden parameters until you determine which are mandatory.
This section describes:
• Gathering HTTP Form Data
• Task Overview: Configuring SSO with HTTP Form Protocol • Detailed Tasks: Configuring SSO with HTTP Form Protocol Gathering HTTP Form Data
This section presents the steps for discovering and gathering necessary HTTP Form data. If you do not know what parameters the authenticating web server requires, you can gather parameter data by analyzing an authentication exchange using the following steps:
Note These steps require a browser and an HTTP header analyzer.
Step 1 Start your browser and HTTP header analyzer, and connect directly to the web server login page without going through the ASA.
Step 2 After the web server login page has loaded in your browser, examine the login sequence to determine if a cookie is being set during the exchange. If the web server has loaded a cookie with the login page, configure this login page URL as the start-URL.
Step 3 Enter the username and password to log in to the web server, and press Enter. This action generates the authentication POST request that you examine using the HTTP header analyzer.
148147
Web VPN server
1 4
5 5
3 2
Auth Web server
Other protected web server Tunnel
Chapter 71 Configuring Clientless SSL VPN Getting Started
An example POST request—with host HTTP header and body—follows:
POST
/emco/myemco/authc/forms/MCOlogin.fcc?TYPE=33554433&REALMOID=06-000430e1-7443-125c-ac05 -83846dc90034&GUID=&SMAUTHREASON=0&METHOD=GET&SMAGENTNAME=$SM$5FZmjnk3DRNwNjk2KcqVCFbIr NT9%2bJ0H0KPshFtg6rB1UV2PxkHqLw%3d%3d&TARGET=https%3A%2F%2Fwww.example.com%2Femco%2Fmye mco%2FHTTP/1.1
Host: www.example.com
(BODY)
SMENC=ISO-8859-1&SMLOCALE=US-EN&USERID=Anyuser&USER_PASSWORD=XXXXXX&target=https%3A%2F% 2Fwww.example.com%2Femco%2Fmyemco%2F&smauthreason=0
Step 4 Examine the POST request and copy the protocol, host, and the complete URL to configure the action-uri parameter.
Step 5 Examine the POST request body and copy the following:
a. Username parameter. In the preceding example, this parameter is USERID, not the value anyuser.
b. Password parameter. In the preceding example, this parameter is USER_PASSWORD.
c. Hidden parameter. This parameter is everything in the POST body except the username and password parameters. In the preceding example, the hidden parameter is:
SMENC=ISO-8859-1&SMLOCALE=US-EN&target=https%3A%2F%2Fwww.example.com%2Fe mco%2Fmyemco%2F&smauthreason=0
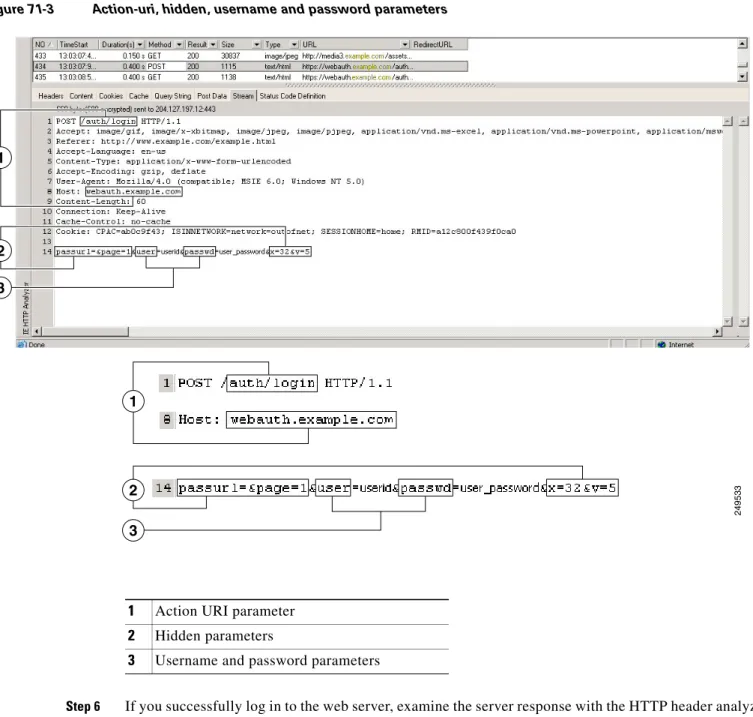
Figure 71-3 highlights the action URI, hidden, username and password parameters within sample output from an HTTP analyzer. This is only an example; output varies widely across different websites.
Chapter 71 Configuring Clientless SSL VPN
Getting Started
Figure 71-3 Action-uri, hidden, username and password parameters
Step 6 If you successfully log in to the web server, examine the server response with the HTTP header analyzer to locate the name of the session cookie set by the server in your browser. This is the auth-cookie-name
parameter.
In the following server response header, the name of the session cookie is SMSESSION. You just need the name, not the value.
1 Action URI parameter
2 Hidden parameters
3 Username and password parameters
249533
1
2
1
2 3
Chapter 71 Configuring Clientless SSL VPN Getting Started
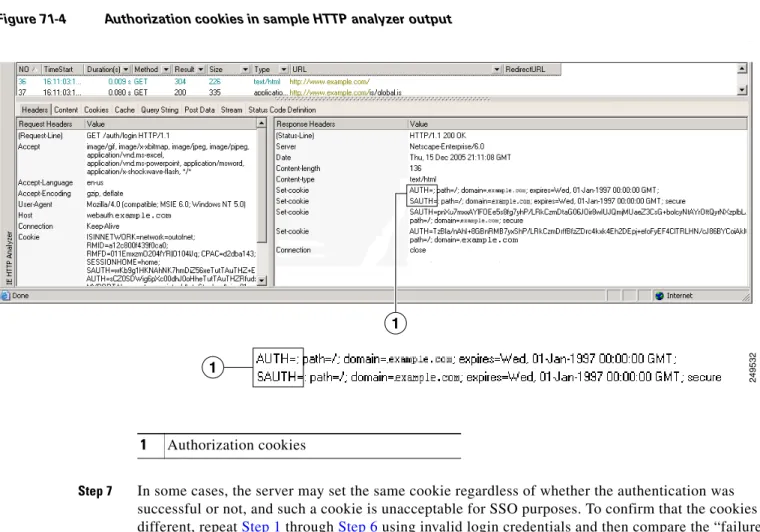
Figure 71-4 shows an example of authorization cookies in HTTP analyzer output. This is only an example; output varies widely across different websites.
Figure 71-4 Authorization cookies in sample HTTP analyzer output
Step 7 In some cases, the server may set the same cookie regardless of whether the authentication was successful or not, and such a cookie is unacceptable for SSO purposes. To confirm that the cookies are different, repeat Step 1 through Step 6 using invalid login credentials and then compare the “failure” cookie with the “success” cookie.
You now have the necessary parameter data to configure the ASA for SSO with HTTP Form protocol.
Set-Cookie:
SMSESSION=yN4Yp5hHVNDgs4FT8dn7+Rwev41hsE49XlKc+1twie0gqnjbhkTkUnR8XWP3hvDH6PZP bHIHtWLDKTa8ngDB/lbYTjIxrbDx8WPWwaG3CxVa3adOxHFR8yjD55GevK3ZF4ujgU1lhO6fta0dSS OSepWvnsCb7IFxCw+MGiw0o88uHa2t4l+SillqfJvcpuXfiIAO06D/gtDF40Ow5YKHEl2KhDEvv+yQ zxwfEz2cl7Ef5iMr8LgGcDK7qvMcvrgUqx68JQOK2+RSwtHQ15bCZmsDU5vQVCvSQWC8OMHNGwpS25 3XwRLvd/h6S/tM0k98QMv+i3N8oOdj1V7flBqecH7+kVrU01F6oFzr0zM1kMyLr5HhlVDh7B0k9wp0 dUFZiAzaf43jupD5f6CEkuLeudYW1xgNzsR8eqtPK6t1gFJyOn0s7QdNQ7q9knsPJsekRAH9hrLBhW BLTU/3B1QS94wEGD2YTuiW36TiP14hYwOlCAYRj2/bY3+lYzVu7EmzMQ+UefYxh4cF2gYD8RZL2Rwm P9JV5l48I3XBFPNUw/3V5jf7nRuLr/CdfK3OO8+Pa3V6/nNhokErSgyxjzMd88DVzM41LxxaUDhbcm koHT9ImzBvKzJX0J+o7FoUDFOxEdIqlAN4GNqk49cpi2sXDbIarALp6Bl3+tbB4MlHGH+0CPscZXqo i/kon9YmGauHyRs+0m6wthdlAmCnvlJCDfDoXtn8DpabgiW6VDTrvl3SGPyQtUv7Wdahuq5SxbUzjY 2JxQnrUtwB977NCzYu2sOtN+dsEReWJ6ueyJBbMzKyzUB4L3i5uSYN50B4PCv1w5KdRKa5p3N0Nfq6 RM6dfipMEJw0Ny1sZ7ohz3fbvQ/YZ7lw/k7ods/8VbaR15ivkE8dSCzuf/AInHtCzuQ6wApzEp9CUo G8/dapWriHjNoi4llJOgCst33wEhxFxcWy2UWxs4EZSjsI5GyBnefSQTPVfma5dc/emWor9vWr0HnT QaHP5rg5dTNqunkDEdMIHfbeP3F90cZejVzihM6igiS6P/CEJAjE;Domain=.example.com;Path= /
1 Authorization cookies
1
249532
Chapter 71 Configuring Clientless SSL VPN
Getting Started
Task Overview: Configuring SSO with HTTP Form Protocol
This section presents an overview of configuring SSO with the HTTP Form protocol.To enable SSO using HTTP Forms, perform the following tasks:
• Configure the uniform resource identifier on the authenticating web server to receive and process the form data (action-uri).
• Configure the username parameter (user-parameter).
• Configure the user password parameter (password-parameter).
You might also need to do the following tasks depending upon the requirements of authenticating web server:
• Configure a starting URL if the authenticating web server requires a pre-login cookie exchange (start-url).
• Configure any hidden authentication parameters required by the authenticating web server (hidden-parameter).
• Configure the name of an authentication cookie set by the authenticating web server (auth-cookie-name).
Detailed Tasks: Configuring SSO with HTTP Form Protocol
This section presents the detailed tasks required to configure SSO with the HTTP Form protocol. Perform the following steps to configure the ASA to use HTTP Form protocol for SSO:
Step 1 If the authenticating web server requires it, enter the start-url command in aaa-server-host configuration mode to specify the URL from which to retrieve a pre-login cookie from the authenticating web server. For example, to specify the authenticating web server URL http://example.com/east/Area.do?Page-Grp1 in the testgrp1 server group with an IP address of 10.0.0.2, enter the following:
hostname(config)# aaa-server testgrp1 host 10.0.0.2
hostname(config-aaa-server-host)# start-url http://example.com/east/Area.do?Page-Grp1
hostname(config-aaa-server-host)#
Step 2 To specify a URI for an authentication program on the authenticating web server, enter the action-uri
command in aaa-server- host configuration mode. A URI can be entered on multiple, sequential lines. The maximum number of characters per line is 255. The maximum number of characters for a complete URI is 2048. An example action URI follows:
http://www.example.com/auth/index.html/appdir/authc/forms/MCOlogin.fcc?TYPE=33554433&RE ALMOID=06-000a1311-a828-1185-ab41-8333b16a0008&GUID=&SMAUTHREASON=0&METHOD=GET&SMAGENTN AME=$SM$5FZmjnk3DRNwNjk2KcqVCFbIrNT9%2bJ0H0KPshFtg6rB1UV2PxkHqLw%3d%3d&TARGET=https%3A% 2F%2Fauth.example.com
To specify this action URI, enter the following commands:
hostname(config-aaa-server-host)# action-uri http://www.example.com/auth/index.htm
hostname(config-aaa-server-host)# action-uri l/appdir/authc/forms/MCOlogin.fcc?TYP
hostname(config-aaa-server-host)# action-uri 554433&REALMOID=06-000a1311-a828-1185
hostname(config-aaa-server-host)# action-uri -ab41-8333b16a0008&GUID=&SMAUTHREASON
hostname(config-aaa-server-host)# action-uri =0&METHOD=GET&SMAGENTNAME=$SM$5FZmjnk
hostname(config-aaa-server-host)# action-uri 3DRNwNjk2KcqVCFbIrNT9%2bJ0H0KPshFtg6r
hostname(config-aaa-server-host)# action-uri B1UV2PxkHqLw%3d%3d&TARGET=https%3A%2F
hostname(config-aaa-server-host)# action-uri %2Fauth.example.com
Chapter 71 Configuring Clientless SSL VPN Getting Started
Note You must include the hostname and protocol in the action URI. In the preceding example, these appear at the start of the URI in http://www.example.com.
Step 3 To configure a username parameter for the HTTP POST request, enter the user-parameter command in aaa-server-host configuration mode. For example, the following command configures the username parameter userid:
hostname(config-aaa-server-host)# user-parameter userid
hostname(config-aaa-server-host)#
Step 4 To configure a user password parameter for the HTTP POST request, use the password-parameter
command in aaa-server-host configuration mode. For example, the following command configures a user password parameter named user_password:
hostname(config-aaa-server-host)# password-parameter user_password
hostname(config-aaa-server-host)#
Step 5 To specify hidden parameters for exchange with the authenticating web server, use the
hidden-parameter command in aaa-server-host configuration mode. An example hidden parameter excerpted from a POST request follows:
SMENC=ISO-8859-1&SMLOCALE=US-EN&target=https%3A%2F%2Fwww.example.com%2Femco %2Fappdir%2FAreaRoot.do%3FEMCOPageCode%3DENG&smauthreason=0
This hidden parameter includes four form entries and their values, separated by &. The four entries and their values are:
• SMENC with a value of ISO-8859-1
• SMLOCALE with a value of US-EN
• target with a value of https%3A%2F%2Fwww.example.com%2Femco%2Fappdir%2FAreaRoot.do
• %3FEMCOPageCode%3DENG
• smauthreason with a value of 0
To specify this hidden parameter, enter the following commands:
hostname(config)# aaa-server testgrp1 host example.com
hostname(config-aaa-server-host)# hidden-parameter SMENC=ISO-8859-1&SMLOCALE=US-EN&targe
hostname(config-aaa-server-host)# hidden-parameter t=https%3A%2F%2Fwww.example.com%2Femc
hostname(config-aaa-server-host)# hidden-parameter o%2Fappdir%2FAreaRoot.do%3FEMCOPageCo
hostname(config-aaa-server-host)# hidden-parameter de%3DENG&smauthreason=0
hostname(config-aaa-server-host)#
Step 6 To specify the name for the authentication cookie, enter the auth-cookie-name command in
aaa-server-host configuration mode. This command is optional. The following example specifies the authentication cookie name of SsoAuthCookie:
hostname(config-aaa-server-host)# auth-cookie-name SsoAuthCookie
Chapter 71 Configuring Clientless SSL VPN
Getting Started
Configuring SSO for Plug-ins
Plug-ins support single sign-on (SSO). They use the same credentials (username and password) entered to authenticate the clientless SSL VPN session. Because the plug-ins do not support marcro substitution, you do not have the options to perform SSO on different fields such as the internal domain password or on an attribute on a Radius or LDAP server.
To configure SSO support for a plug-in, you install the plug-in and add a bookmark entry to display a link to the server, specifying SSO support using the csco_sso=1 parameter. The following examples show plug-in bookmarks enabled for SSO:
ssh://ssh-server/?cisco_sso=1
rdp://rdp-server/?Parameter1=value&Parameter2=value&csco_sso=1
Configuring SSO with Macro Substitution
This section describes using macro substitution for SSO. Configuring SSO with macro substitution allows for you to inject certain variables into bookmarks to substitute for dynamic values.
Note Smart tunnel bookmarks support auto-signon but not variable substitution. For example, a Sharepoint bookmark configured for smart tunnel uses the same username and password credentials to log into the application as the credentials used to log into clientless SSL VPN. You can use variable substitutions and auto signon simultaneously or separetely.
The following variables (or macros) allow for substitutions in bookmarks and forms-based HTTP POST operations:
• CSCO_WEBVPN_USERNAME — user login ID
• CSCO_WEBVPN_PASSWORD — user login password
• CSCO_WEBVPN_INTERNAL_PASSWORD — user internal (or domain) password. This cached credential is not authenticated against a AAA server. When you enter this value, the security appliance uses it as the password for auto signon, instead of the password/primary password value.
Note You cannot use any of these three variables in GET-based http(s) bookmarks. Only POST-based http(s) and cifs bookmarks can use these variables.
• CSCO_WEBVPN_CONNECTION_PROFILE —user login group drop-down (connection profile alias)
• CSCO_WEBVPN_MACRO1 — set with the RADIUS-LDAP Vendor Specific Attribute (VSA). If you are mapping from LDAP with an ldap-attribute-map command, use the
WebVPN-Macro-Substitution-Value1 Cisco attribute for this macro. See the Active Directory ldap-attribute-mapping examples at
http://www.cisco.com/en/US/docs/security/asa/asa82/configuration/guide/ref_extserver.html#wp1572118.
The CSCO_WEBVPN_MACRO1 macro substitution with RADIUS is performed by VSA#223 (see
Table 71-1).
Table 71-1 VSA#223
WebVPN-Macro-Value1 Y 223 String Single Unbounded WebVPN-Macro-Value2 Y 224 String Single Unbounded
Chapter 71 Configuring Clientless SSL VPN Creating and Applying Clientless SSL VPN Policies for Accessing Resources
A value such as www.cisco.com/email dynamically populates a bookmark on the Clientless SSL VPN portal, such as https://CSCO_WEBVPN_MACRO1 or https://CSCO_WEBVPN_MACRO2 for the particular DAP or group policy.
• CSCO_WEBVPN_MACRO2 —Set with RADIUS-LDAP Vendor Specific Attribute (VSA). If you are mapping from LDAP with an ldap-attribute-map command, use the
WebVPN-Macro-Substitution-Value2 Cisco attribute for this macro. See the Active Directory ldap-attribute-mapping examples at
http://www.cisco.com/en/US/docs/security/asa/asa82/configuration/guide/ref_extserver.html#wp1572118.
The CSCO_WEBVPN_MACRO2 macro substitution with RADIUS is performed by VSA#224 (see
Table 71-1).
Each time clientless SSL VPN recognizes one of these six strings in an end-user request (in the form of a bookmark or Post Form), it replaces the string with the user-specified value and then passes the request to a remote server.
Authenticating with Digital Certificates
Clientless SSL VPN users that authenticate using digital certificates do not use global authentication and authorization settings. Instead, they use an authorization server to authenticate once the certificate validation occurs. For more information on authentication and authorization using digital certificates, see “Using Certificates and User Login Credentials” in the “Configuring AAA Servers and the Local Database” chapter.
Creating and Applying Clientless SSL VPN Policies for
Accessing Resources
Creating and applying policies for clientless SSL VPN that govern access to resources at the central site includes the following task:
• Assigning Users to Group Policies
Chapter 64, “Configuring Connection Profiles, Group Policies, and Users” includes step-by-step instructions for all of these tasks.
Assigning Users to Group Policies
Assigning users to group policies simplifies the configuration by letting you apply policies to many users. You can use an internal authentication server or a RADIUS server to assign users to group policies. See Chapter 64, “Configuring Connection Profiles, Group Policies, and Users”for a thorough
explanation of ways to simplify configuration with group policies.
Using the Security Appliance Authentication Server
You can configure users to authenticate to the ASA internal authentication server, and assign these users to a group policy on the ASA.
Chapter 71 Configuring Clientless SSL VPN
Configuring Connection Profile Attributes for Clientless SSL VPN
Using a RADIUS Server
Using a RADIUS server to authenticate users, assign users to group policies by following these steps:
Step 1 Authenticate the user with RADIUS and use the Class attribute to assign that user to a particular group policy.
Step 2 Set the class attribute to the group policy name in the format OU=group_name
For example, to assign a user of clientless SSL VPN to the SSL_VPN group, set the RADIUS Class Attribute to a value of OU=SSL_VPN; (Do not omit the semicolon.)
Configuring Connection Profile Attributes for Clientless SSL
VPN
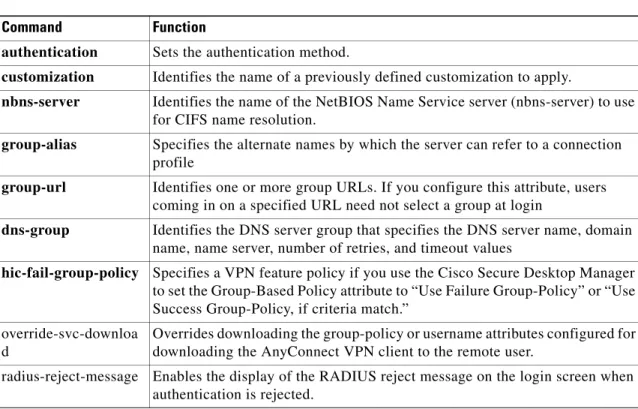
Table 71-2 provides a list of connection profile attributes that are specific to clientless SSL VPN. In addition to these attributes, you configure general connection profile attributes common to all VPN connections. For step-by-step information on configuring connection profiles, see “Configuring Connection Profiles for Clientless SSL VPN Sessions” in Chapter 64, “Configuring Connection Profiles, Group Policies, and Users.”
Note In earlier releases, “connection profiles” were known as “tunnel groups.” You configure a connection profile with tunnel-group commands. This chapter often uses these terms interchangeably.
Table 71-2 Connection Profile Attributes for Clientless SSL VPN
Command Function
authentication Sets the authentication method.
customization Identifies the name of a previously defined customization to apply.
nbns-server Identifies the name of the NetBIOS Name Service server (nbns-server) to use for CIFS name resolution.
group-alias Specifies the alternate names by which the server can refer to a connection profile
group-url Identifies one or more group URLs. If you configure this attribute, users coming in on a specified URL need not select a group at login
dns-group Identifies the DNS server group that specifies the DNS server name, domain name, name server, number of retries, and timeout values
hic-fail-group-policy Specifies a VPN feature policy if you use the Cisco Secure Desktop Manager to set the Group-Based Policy attribute to “Use Failure Group-Policy” or “Use Success Group-Policy, if criteria match.”
override-svc-downloa d
Overrides downloading the group-policy or username attributes configured for downloading the AnyConnect VPN client to the remote user.
radius-reject-message Enables the display of the RADIUS reject message on the login screen when authentication is rejected.
Chapter 71 Configuring Clientless SSL VPN Configuring Group Policy and User Attributes for Clientless SSL VPN
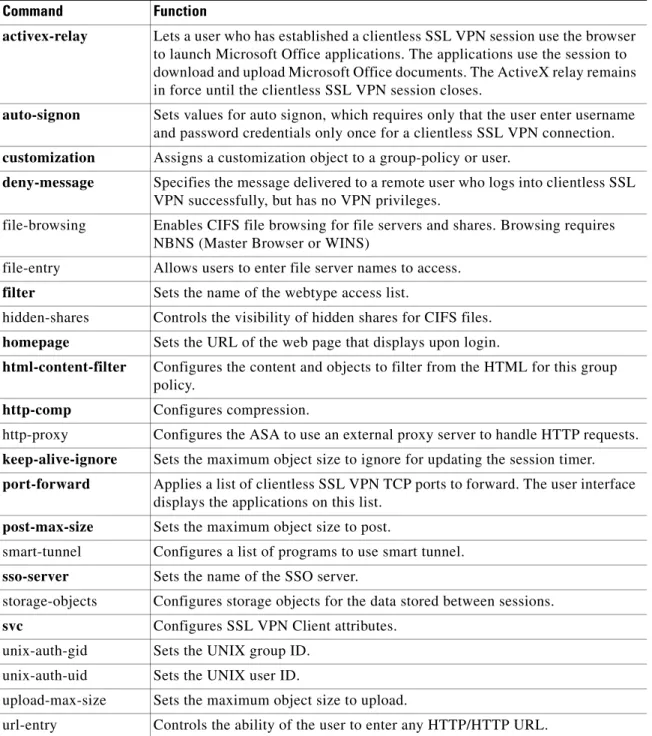
Configuring Group Policy and User Attributes for Clientless SSL
VPN
Table 71-3 provides a list of group policy and user attributes for clientless SSL VPN. For step-by-step instructions on configuring group policy and user attributes, see “Configuring Group Policies” and
“Configuring Attributes for Specific Users” in Chapter 64, “Configuring Connection Profiles, Group Policies, and Users.”
.
Table 71-3 Group Policy and User Attributes for Clientless SSL VPN
Command Function
activex-relay Lets a user who has established a clientless SSL VPN session use the browser to launch Microsoft Office applications. The applications use the session to download and upload Microsoft Office documents. The ActiveX relay remains in force until the clientless SSL VPN session closes.
auto-signon Sets values for auto signon, which requires only that the user enter username and password credentials only once for a clientless SSL VPN connection.
customization Assigns a customization object to a group-policy or user.
deny-message Specifies the message delivered to a remote user who logs into clientless SSL VPN successfully, but has no VPN privileges.
file-browsing Enables CIFS file browsing for file servers and shares. Browsing requires NBNS (Master Browser or WINS)
file-entry Allows users to enter file server names to access.
filter Sets the name of the webtype access list.
hidden-shares Controls the visibility of hidden shares for CIFS files.
homepage Sets the URL of the web page that displays upon login.
html-content-filter Configures the content and objects to filter from the HTML for this group policy.
http-comp Configures compression.
http-proxy Configures the ASA to use an external proxy server to handle HTTP requests.
keep-alive-ignore Sets the maximum object size to ignore for updating the session timer.
port-forward Applies a list of clientless SSL VPN TCP ports to forward. The user interface displays the applications on this list.
post-max-size Sets the maximum object size to post.
smart-tunnel Configures a list of programs to use smart tunnel.
sso-server Sets the name of the SSO server.
storage-objects Configures storage objects for the data stored between sessions.
svc Configures SSL VPN Client attributes. unix-auth-gid Sets the UNIX group ID.
unix-auth-uid Sets the UNIX user ID.
upload-max-size Sets the maximum object size to upload.
Chapter 71 Configuring Clientless SSL VPN
Configuring Browser Access to Plug-ins
Configuring Browser Access to Plug-ins
The following sections describe the integration of browser plug-ins for clientless SSL VPN browser access:
• Introduction to Browser Plug-Ins, page 71-27 • Plug-in Requirements and Restrictions, page 71-28 • Preparing the Security Appliance for a Plug-in, page 71-28 • Installing Plug-ins Redistributed by Cisco, page 71-29 • Providing Access to Third-Party Plug-ins, page 71-31
• Viewing the Plug-ins Installed on the Security Appliance, page 71-32
Introduction to Browser Plug-Ins
A browser plug-in is a separate program that a web browser invokes to perform a dedicated function, such as connect a client to a server within the browser window. The ASA lets you import plug-ins for download to remote browsers in clientless SSL VPN sessions. Of course, Cisco tests the plug-ins it redistributes, and in some cases, tests the connectivity of plug-ins we cannot redistribute. However, we do not recommend importing plug-ins that support streaming media at this time.
Note Per the GNU General Public License (GPL), Cisco redistributes plug-ins without having made any changes to them. Per the GPL, Cisco cannot directly enhance these plug-ins.
The ASA does the following when you install a plug-in onto the flash device:
• (Cisco-distributed plug-ins only) Unpacks the jar file specified in the URL.
• Writes the file to the csco-config/97/plugin directory on the ASA file system. • Populates the drop-down menu next to the URL attributes in ASDM.
• Enables the plug-in for all future clientless SSL VPN sessions, and adds a main menu option and an option to the drop-down menu next to the Address field of the portal page.
Table 71-4 shows the changes to the main menu and address field of the portal page when you add the plug-ins described in the following sections.
url-list Applies a list of servers and URLs that Clientless SSL VPN portal page displays for end user access.
user-storage Configures a location for storing user data between sessions.
Table 71-3 Group Policy and User Attributes for Clientless SSL VPN
Command Function
Table 71-4 Effects of Plug-ins on the Clientless SSL VPN Portal Page
Plug-in Main Menu Option Added to Portal Page Address Field Option Added to Portal Page
ica Citrix Client ica://