Using Microsoft Access
Relational Databases
In all of the previous exercises you have worked on a simple database that only had one table. In many cases, a database will be too complex to be able to work well with only one table. Consider the following document.
EGBST INVOICE
NO
I39324 Invisible Road
Kalgoorlie 6430
Joondalup Jewellers 402 W alter R oad M orley W A 6059 93752845 Date 9th A pril 2004QTY Description
Price
Cost
2 ounces 20 G old R ings $800 $110 $1600 $2200
Total
$3800Suppose a business manually completes an invoice like this every time one of their customers makes a purchase. If the business decides that they want all of this information to be recorded in a database so a neat invoice can be printed, would one table be sufficient to store all of that information?
If we listed all of the fields that might be required to store this information, the fields might include:
• Invoice number
• Customer name
• Customer address
• Customer state
• Customer postcode
• Customer phone number
• Date • Quantity • Description • Price • Cost • Total
Invoice Customer Name Customer Address Customer state Customer postcode Customer phone
Date Quantity Description Price Cost Total
I393 Joondalup Jewellers 402 Walter Rd Morley WA 6059 93752845 9 Apr 2 Gold $800 $1600 $3800 I393 Joondalup Jewellers 402 Walter Rd Morley WA 6059 93752845 9 Apr 20 Rings $110 $3800 $3800 I394 Hourglass Jewellers 230 Light St Morley WA 6059 93751920 11 Apr 4 Gold $800 $2400 $2710 I394 Hourglass Jewellers 230 Light St Morley WA 6059 93751920 11 Apr 5 Watches $50 $250 $2710 I394 Hourglass Jewellers 230 Light St Morley WA 6059 93751920 11 Apr 3 Bracelets $20 $60 $2710 I395 Balcatta Bracelets 45 Russel St Morley WA 6059 92769385 14 Apr 12 Rings $110 $1320 $1480 I395 Balcatta Bracelets 45 Russel St Morley WA 6059 92769385 14 Apr 8 Bracelets $20 $160 $1480
In this example we can see some problems:
• Every time a sales transaction is being entered for an invoice, the entire invoice details (such as invoice number, date and customer details) are being repeated.
• Every time an invoice is prepared for a customer, all of that customer’s details are being repeated.
• Some information, such as totals, may not need to be entered if it can be generated by the database.
This duplication shows evidence of redundancy in the design and can lead to several problems:
• The database will take up more room on the computer because the same information is being stored several times. This takes up more disk space and makes the database run slower.
• The more times information is added, the more chance there is of making an error in entry.
• If the same information was entered differently, it may be treated as different information. This redundancy can be eliminated by designing the database more efficiently using more than one related table. A database designed using multiple tables that are related to each other is referred to as a Relational Database.
Planning what tables will be needed in a database is usually done using a process known as
Normalisation. This is a step-by-step process for identifying and eliminating redundancies in a database. The final result is a plan for an efficient database using multiple related tables. This plan is often prepared with the aid of an Entity Relationship Diagram (ERD). These exercises will only provide a brief explanation of Normalisation. If you need more help on normalising databases, there are plenty of textbooks which cover the topic in detail.
Normalisation rmalisation
Normalisation usually involves three stages (additional stages are used by some database developers). Each of these stages is referred to as a Normal Form.
Normalisation usually involves three stages (additional stages are used by some database developers). Each of these stages is referred to as a
First Normal Form (1NF) First Normal Form (1NF)
First normal form involves eliminating repeating groups. In the previous example, every time transactions from an invoice are entered, the details for the invoice would also need to be repeated. This problem can be eliminated by having a table for Invoice details and another table for Transaction details. The Transaction details table could include the Invoice number to identify which invoice the transaction belongs to. This would mean that Invoice number would be the link, or
Relationship, between the two tables as illustrated below.
In the above example, the primary key in each table is indicated using bold formatting. Transaction number has been added to the Transactions table as a primary key.
In the above example, the primary key in each table is indicated using bold formatting. Transaction number has been added to the Transactions table as a primary key.
Now once the invoice details are entered in the invoices table, whenever a transaction is entered in the Transactions table only the Invoice number will need to be entered. The invoice number will be related to the rest of the invoice details in the Invoice Table. This database is now in First Normal Form
or 1NF.
Now once the invoice details are entered in the invoices table, whenever a transaction is entered in the Transactions table only the Invoice number will need to be entered. The invoice number will be related to the rest of the invoice details in the Invoice Table. This database is now in First Normal Form
or 1NF. Normal Form. Invoices Invoice number Customer name Customer address Customer state Customer postcode Customer phone Date Total Transactions Transaction Number Invoice number Quantity Description Price Cost
Second Normal Form (2NF)
When a database is in 2NF, all of the fields in each table will depend directly on the primary key. If we look at the Invoices table in its current form, we can see that this is not the case. The invoice date and invoice total are dependant on the invoice number, but the rest of the fields are not. Since there may be more than on invoice for the same customer, the fields that provide information about the customer will most likely appear on many invoices. At the moment, they will be repeated for each invoice. This problem can be eliminated by creating a separate table to store the customer details. The same problem is evident in the Transactions table. The quantity and cost is unique to each transaction and therefore dependent on the transaction number. The price and description, however, are not directly dependant on the primary key. Every time there is a transaction for a certain item, the price and description for that item are being repeated. This can be fixed by creating a separate table for the Items that can be sold. The following diagram illustrates the new relational design.
Primary keys have been created for both the Customers table and the Items table. The lines between each table indicate which fields will be linked. In database terminology these lines are the
Relationships. There are different types of relationships in databases (one to many, one to one, many to many) but for the purpose of these exercises, it will be enough to know that the tables need to be related to each other via linked fields.
This database design is now in Second Normal Form or 2NF. Invoices Invoice number Customer ID Date Total Transactions Transaction Number Invoice number Quantity Item Number Cost Customers Customer ID Customer name Customer address Customer state Customer postcode Customer phone Items Item Number Description Price
Third Normal Form (3NF)
In 3NF, the database design will not include any redundant fields, such as fields that can be automatically calculated by the database. In the example below, we have eliminated Cost from the Transactions table since that can be calculated automatically by multiplying Quantity sold by the Price of the item. We have also eliminated the invoice Total, since that can be calculated by adding up the transactions on the invoice.
This database design is now in Third Normal Form or 3NF. Invoices Invoice number Customer ID Date Total Transactions Transaction Number Invoice number Quantity Item Number Cost Customers Customer ID Customer name Customer address Customer state Customer postcode Customer phone Items Item Number Description Price
Exercise 1. Creating a Relational Database
In the remaining exercises we will create a relational database that will be used to keep track of a music collection.
1) Open Microsoft Access
2) Create a new Database file with the filename Music Collection.mdb. You should now be at the Database Window.
We will assume that our database has already been planned and normalised, to come up with the following table layout.
CD Types CD Type CDs CD# CD Title CD Type Label Released Purchased Cost Cover Description Songs Song # Song Title Artist Genre Duration Track # CD# Genres Genre
The CD Types table and Genres tables have been added to assist in the creation of lookup fields as you will see later.
Exercise 2. Creating the Tables
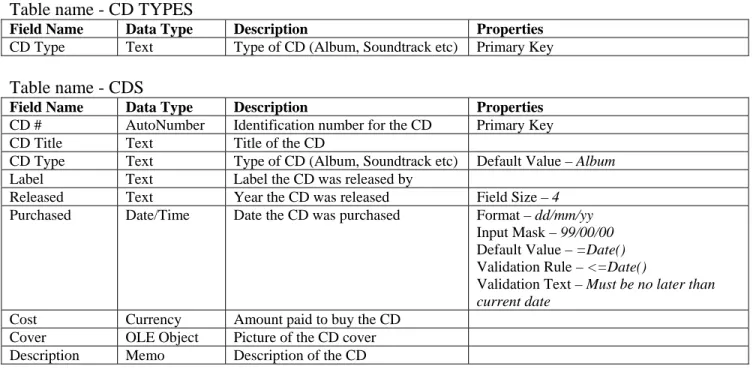
1) Create and save each of the four tables for the database. Refer to the previous exercises if you can’t remember how this is done. The field names, data types and relevant properties for each table are shown below. Remember to specify the primary key before you save a table.
Table name - CD TYPES
Field Name Data Type Description Properties
CD Type Text Type of CD (Album, Soundtrack etc) Primary Key Table name - CDS
Field Name Data Type Description Properties
CD # AutoNumber Identification number for the CD Primary Key CD Title Text Title of the CD
CD Type Text Type of CD (Album, Soundtrack etc) Default Value – Album
Label Text Label the CD was released by
Released Text Year the CD was released Field Size – 4
Purchased Date/Time Date the CD was purchased Format – dd/mm/yy
Input Mask – 99/00/00
Default Value – =Date()
Validation Rule – <=Date()
Validation Text – Must be no later than current date
Cost Currency Amount paid to buy the CD Cover OLE Object Picture of the CD cover Description Memo Description of the CD Table name - SONGS
Field Name Data Type Description Properties
Song # AutoNumber Identification number for the CD Primary Key Song Title Text Title of the song
Artist Text Artist the song is performed by Genre Text Type of song (rock, rap, techno etc.)
Duration Text Length of the song (minutes:seconds) Field Size – 5
Input Mask – 99\:00;0;_ Track # Text Position of the song on the CD Field Size – 2
CD # Number Number of the CD that the song is on Table Name - GENRES
Field Name Data Type Description Properties
The table designs should look similar to the ones shown below.
Exercise 3. Creating Relationships
Relationships between tables can be created and managed manually using the Relationships window. Relationships can also be created automatically in some instances, such as when the lookup wizard is used. In this exercise we will manually create a relationship between the CDS table and the SONGS table.
1) Click the Relationships icon on the toolbar or select Relationships from the Tools menu. 2) A Show Table dialog similar to the one for designing queries will appear.
3) Double-click on the CDS table and Double-click on the SONGS table to add them both to the relationships window.
4) Move your mouse to the bottom edge of the SONGS table until it changes to a re-sizing arrow as shown above. Drag downwards until you can see all of the fields in the table listed. Do the same with the CDS table.
5) Click on CD# in the CDS table and drag it on to CD# in the SONGS table. The
6) Make sure CD# is selected in both tables as shown above. 7) Click the Create button to create the relationship.
A line will appear to indicate the relationship.
8) Close the relationships window. When you are prompted to save the changes, click Yes. Later on you will see several ways that this relationship can be used in the database.
Note Fields that are related to each other need to be a similar data type, otherwise there may be problems. E.g. an AutoNumber field can be linked to a Number field but an AutoNumber field shouldn’t be linked to a Text field.
Exercise 4. Entering Records in Related Tables 1) Double-click the CDS table to open it.
2) Enter the following record in the CDS table (The CD# will be filled in by the AutoNumber). CD # CD Title CD Type Label Released Purchased Cost Cover Description
1 Innocent Eyes Album Sony 2003 22/09/03 $25.95
When you finish entering the record, a + sign will appear to the left of the record. This occurs when there is a related table. In this case, the relationship may be used to enter records for songs that are on the album.
3) Click on the + sign to display a blank record from the related SONGS table.
4) Use that space to add the song records shown below. In fields like the Artist and Genre field where the information is the same for each song, remember that you can use the [Ctrl][‘] (single quotation mark) shortcut to repeat information from the previous record.
SONGS
Song # Song Title Artist Genre Duration Track #
1 Born To Try Delta Goodrem Pop 1 2 Innocent Eyes Delta Goodrem Pop 2 3 Not Me, Not I Delta Goodrem Pop 3 4 Throw It Away Delta Goodrem Pop 4 5 Lost Without You Delta Goodrem Pop 5 6 Predictable Delta Goodrem Pop 6 7 Butterfly Delta Goodrem Pop 7 8 In My Own Time Delta Goodrem Pop 8 9 My Big Mistake Delta Goodrem Pop 9
Exercise 5. Entering Information for Lookup Fields
The CD TYPES table and the GENRES table will both be used for lookup fields soon, so we will enter some information in to those fields.
1) Open the CD TYPES field.
2) Enter the following music Genres.
• Album
• Soundtrack
• Compilation
• CD Single
• Other
3) Click the Sort Ascending icon to sort them in alphabetical order. 4) Close the table and save the changes when prompted.
5) Open the GENRES table and enter the following records.
• Rap • Rock • Pop • Kids • Top 40 Dance • R&B • Club
Exercise 6. Creating Lookup Lists
A lookup field is a field with a combo box (sometimes referred to as a drop-down list). This allows the user of the database to select information from a list rather than having to type information in a field. The CD TYPES table and the GENRES table used in the previous exercise will now be used to create lookup fields for the other two tables.
1) Open the CDS table in design view. 2) Select the CD Type field.
3) From the list of field data types, choose Lookup Wizard as shown to the right. The Lookup Wizard will start.
We want the options in the drop-down list to come from the CD TYPES table we have created.
6) Select the CD Type field and either double-click it or click on the button to move it in to the
Selected Fields: list. Click Next when it appears as the example above.
7) Here you can choose to have the CD Types sorted in alphabetical order as shown above. Click
9) Leave the field name as CD Type and click Finish.
10)Click Yes to save the changes to the table design and to create a relationship between the CDS & CD TYPES tables.
11)The wizard has made several changes to the field properties. To see these changes, make sure the CD Types field is still selected and click on the Lookup tab in the properties section below.
When you become familiar with the properties shown here, you can skip the wizard and quickly create lookup fields by modifying these properties directly.
12)Close the table. The wizard should have already saved any necessary changes. 13)Open the SONGS table in design view.
Exercise 7. Checking Lookup Relationships
The lookup wizard would have created table relationships for both lookup fields. We can check this by looking in the relationships window.
1) Click the Relationships icon on the toolbar or select Relationships from the Tools menu.
You will see the two tables that we created a relationship for earlier. The other relationships that have been created aren’t currently visible.
2) Select the Relationships menu or right-click on a blank part of the relationships window. Click the Show All option. You can also click the icon on the toolbar. The hidden tables and relationships will appear.
3) Move the tables around so that it is easier to see the relationships between each table. A suggested layout is shown below.
4) Press [Ctrl][S] or click the Save icon to save the relationship layout changes. 5) Close the relationships window.
Exercise 8. Testing the Lookup Fields 1) Double-click the CDS table to open it.
2) Click in the CD Title field below Innocent Eyes. 3) Enter Satisfaction for the new CD Title.
4) In the CD Type field there will now be a combo box (drop-down list). Use the list to select CD Single for the CD type.
5) Complete the rest of the information as follows: CDS
CD # CD Title CD Type Label Released Purchased Cost CoverDescription
2 Satisfaction CD Single EMI 2003 11/05/03 $6.95 6) Click the + to the left of the new record to view the fields from the SONGS table. 7) Enter Satisfaction in the Song Title field.
8) Enter Benny Bennassi in the Artist field.
9) Use the combo box to select Club in the Genre field. 10)Enter 1 in the Track # field.
11)Close the table when the CD and Song information is entered as shown.
Note If you want to add or edit the information that appears in the lookup lists, all you need to do is open the tables and make the necessary changes/additions to the records in those tables.