Intellex
®Digital Video
Management System
Adding Hard Drives
to an Intellex Unit
Notice
The information in this manual was current when published. The manufacturer reserves the right to revise and improve its products. All specifications are therefore subject to change without notice.Copyright
Under copyright laws, the contents of this manual may not be copied, photocopied, reproduced, translated or reduced to any electronic medium or machine-readable form, in whole or in part, without prior written consent of Sensormatic Electronics Corporation.© Copyright 2002
Sensormatic Electronics Corporation Video Systems Division
6795 Flanders Drive
San Diego, CA 92121-2903 U.S.A.
Trademarks
Intellex® is a registered trademark and IntelleCord™ is a trademark ofSensormatic Electronics Corporation. Windows® is a registered
trademark of Microsoft Corporation.
Trademarked names are used throughout this manual. Rather than place a symbol at each occurrence, trademarked names are designated with initial capitalization. Inclusion or exclusion is not a judgment on the validity or legal status of the term.
Adding Hard Drives to Intellex 3
ADDING HARD DRIVES
TO AN INTELLEX UNIT
NOTE: The product ID sticker provided in the plastic bag of parts with this upgrade kit should be applied to the bottom of the unit for future reference.
NOTE: Installers should make note of any upgrades or repairs performed or new equipment installed in the unit on the Service Record and attach it to the inside of the case. New or replacement Service Records are available from your dealer or from Sensormatic (part no. 2402-1587-01 A).
NOTE: Due to thermal constraints, Intellex 2.x can support a maximum of three internal hard drives.
NOTE: 60GB and larger drives require a 40-pin 80-conductor Ultra ATA 66 (or Ultra ATA 100) IDE cable, part number 6003-0168-01. Failure to use the proper cable may result in decreased performance or data loss
Please refer to the latest parts list for part numbers of drives with Intellex software loaded for system drives or blank drives for data drives.
1. Turn off the Intellex unit and disconnect it from the power source.
2. Open the case.
3. Unscrew and remove the hard drive cage.
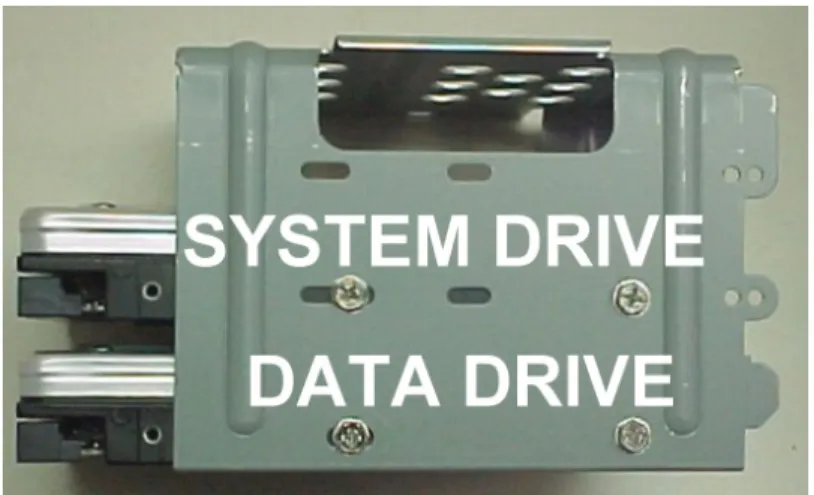
4. There are four possible hard drive locations: three in the drive cage and one upside-down below the drive cage bay. The following configurations are recommended for one, two and three hard drives:
a. Single drive only: In the middle of the drive cage. b. Two drives: In the middle and bottom positions of
the drive cage.
c. Three drives: Third drive (second data drive) upside-down below the drive cage bay, the first two in the middle and bottom positions of the drive cage.
Figure 2 — Second Data Drive (third physical drive) below the drive cage bay
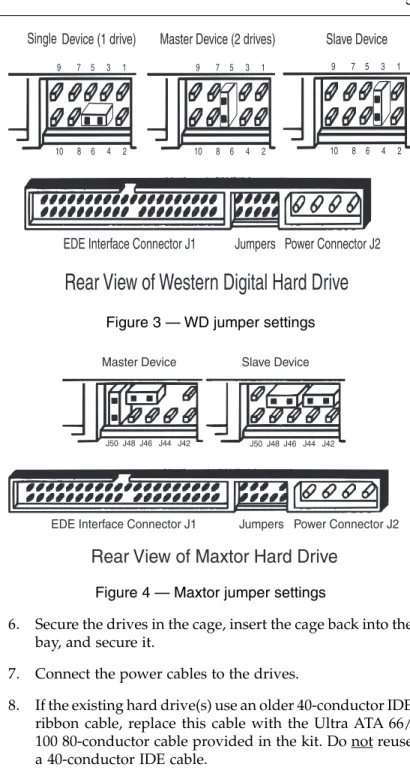
5. The following jumper settings are recommended: a. Single drive only: Set the one drive as Single (WD) or
Master (Maxtor). See Figures 3 and 4.
b. Two drives: Set the system drive as Master and the data drive as Slave. See Figures 3 and 4.
c. Three drives: Set the system drive as Master. Set the first data drive as Slave, and the second data drive as Single (WD) or Master (Maxtor). See Figures 3 and 4.
Adding Hard Drives to Intellex 5
Figure 3 — WD jumper settings
Figure 4 — Maxtor jumper settings
6. Secure the drives in the cage, insert the cage back into the bay, and secure it.
7. Connect the power cables to the drives.
8. If the existing hard drive(s) use an older 40-conductor IDE ribbon cable, replace this cable with the Ultra ATA 66/ 100 80-conductor cable provided in the kit. Do not reuse a 40-conductor IDE cable.
9. Connect the data ribbon cables as follows:
NOTE: When only one drive is connected to a cable, it must use the connector at the end of ribbon cable.
NOTE: The Ultra ATA 66/100 40-pin 80-conductor IDE cables are color-coded. Connect the blue connector to the IDE controller on the motherboard. Connect the black connector to the primary hard drive on this cable. Connect the gray connector (in the middle) to the secondary hard drive on this cable.
a. Single drive only: Connect the ribbon cable from the one drive to the Primary IDE Controller on the motherboard.
b. Two drives: Connect one ribbon cable from the two drives to the Primary IDE Controller on the motherboard.
c. Three drives: Connect the first ribbon cable from the system drive and the first data drive to the Primary IDE Controller on the motherboard. Connect the second ribbon cable from the secondary data drive (third physical drive, see Figure 2) to the Secondary IDE Controller on the motherboard.
10. Close the case.
11. Reconnect the unit to electrical power and power up the unit.
12. After Intellex starts, exit to the Windows Desktop by click-ing on Utility, Exit and entering the exit PIN code. 13. Double-click on the My Computer icon and verify that
the correct number of drives are present.
14. Double-click on C: and then on the DriveConfig folder. 15. Double-click on the DriveConfig icon to configure the new
drives.
NOTE: All data will be lost when the drives are configured.
16. All your new data drives should now appear in the list of drives found.
Adding Hard Drives to Intellex 7
17. Start Intellex to reinitialize the database and begin recording.
Sensormatic Video Systems Division
6795 Flanders Drive
San Diego, California 92121-2903 TEL: 858-642-2400
800-854-2057 FAX: 858-642-2440