MACHINE BASED ROOTKIT-IN-THE-MIDDLE ATTACK
by
Joseph Anthony Connelly
A thesis
submitted in partial fulfillment of the requirements for the degree of Master of Science in Computer Science
Boise State University
DEFENSE COMMITTEE AND FINAL READING APPROVALS
of the thesis submitted by
Joseph Anthony Connelly
Thesis Title: CloudSkulk: Design of a Nested Virtual Machine Based Rootkit-in-the-Middle Attack
Date of Final Oral Examination: 23 August 2017
The following individuals read and discussed the thesis submitted by student Joseph Anthony Connelly, and they evaluated the presentation and response to questions during the final oral examination. They found that the student passed the final oral examination.
Jidong Xiao, Ph.D. Chair, Supervisory Committee Catherine Olschanowsky, Ph.D. Member, Supervisory Committee
Amit Jain, Ph.D. Member, Supervisory Committee
dedicated to my mother, Terryl Lynn Connelly
Virtualized cloud computing services are a crucial facet in the software industry today, with clear evidence of its usage quickly accelerating. Market research forecasts an increase in cloud workloads by more than triple, 3.3-fold, from 2014 to 2019 [33]. Integrating system security is then an intrinsic concern of cloud platform system administrators that with the growth of cloud usage, is becoming increasingly relevant. People working in the cloud demand security more than ever. In this paper, we take an offensive, malicious approach at targeting such cloud environments as we hope both cloud platform system administrators and software developers of these infrastructures can advance their system securities.
A vulnerability could exist in any layer of a computer system. It is commonly believed in the security community that the battle between attackers and defenders is determined by which side can exploit these vulnerabilities and then gain control at the lower layer of a system [22]. Because of this perception, kernel level defense is proposed to defend against user-level malware [25], hypervisor-level defense is proposed to detect kernel-level malware or rootkits [36, 47, 41], hardware-level defense is proposed to defend or protect hypervisors [4, 51, 45].
Once attackers find a way to exploit a particular vulnerability and obtain a certain level of control over the victim system, retaining that control and avoiding detection becomes their top priority. To achieve this goal, various rootkits have been developed. However, existing rootkits have a common weakness: they are still
system level, the hypervisor level, or the hardware level. In this paper, we present a new type of rootkit called CloudSkulk, which is a nested virtual machine (VM) based rootkit. While nested virtualization has attracted sufficient attention from the security and cloud community, to the best of our knowledge, we are the first to reveal and demonstrate nested virtualization can be used by attackers for developing malicious rootkits. By impersonating the original hypervisor to communicate with the original guest operating system (OS) and impersonating the original guest OS to communicate with the hypervisor, CloudSkulk is hard to detect, regardless of whether defenders are at the lower-level (e.g., in the original hypervisor) or at the higher-level (e.g., in the original guest OS).
We perform a variety of performance experiments to evaluate how stealthy the proposed rootkit is at remaining unnoticed as introducing one more layer of virtualiza-tion inevitably incurs extra overhead. Our performance characterizavirtualiza-tion data shows that an installation of our novel rootkit on a targeted nested virtualization environ-ment is likely to remain undetected unless the guest user performs IO intensive-type workloads.
DEDICATION . . . iv
ABSTRACT . . . v
LIST OF TABLES . . . x
LIST OF FIGURES . . . xi
LIST OF ABBREVIATIONS . . . xiii
1 Introduction . . . 1
1.1 Problem Context . . . 1
1.2 Thesis Statement . . . 3
1.3 Contributions . . . 3
1.4 Thesis Organization . . . 4
2 Background . . . 5
2.1 Cloud Environments . . . 5
2.1.1 Cloud Services . . . 8
2.1.2 Nested Virtualization . . . 12
2.2 KVM/QEMU Virtualization . . . 14
2.2.1 Live Migration . . . 16
2.2.2 Software Security . . . 19
3 Related Work . . . 27
3.1 SubVirt . . . 27
3.2 Blue Pill . . . 29
4 Methodology . . . 33
4.1 Design . . . 33
4.1.1 Advantage of CloudSkulk . . . 40
4.2 Implementation . . . 41
4.2.1 Demonstration . . . 48
5 Evaluation . . . 49
5.1 Performance Characterization . . . 49
5.1.1 Macro Benchmarks . . . 54
5.1.2 Micro Benchmarks . . . 66
5.2 Defending against CloudSkulk . . . 67
5.2.1 Performance Detectors . . . 68
5.2.2 Restricting Commands . . . 69
5.2.3 Memory Analysis Tools . . . 70
6 Conclusions . . . 72
References . . . 75
A Filebench Macros . . . 80
A.1 File Server macro: fileserver.f . . . 81
A.2 Mail Server macro: varmail.f . . . 82
B Bash Shell Scripts . . . 85
B.1 IO Testing - Filebench . . . 86
B.2 CPU/Memory Testing - Kernel Compile . . . 89
B.3 Network Testing - Netperf . . . 92
5.1 Filebench Macro Parameters . . . 56 5.2 lmbench: Arithmetic operations - times in nanoseconds . . . 66 5.3 lmbench: Processes - times in microseconds . . . 66 5.4 lmbench: File system latency files creations/deletions per second
-times in microseconds . . . 67 5.5 lmbench: Context switch - times in microseconds . . . 67
2.1 CPU Instruction Set Execution Privileges . . . 6
2.2 Para- vs. Full-Virtualization [18] . . . 8
2.3 Google Cloud Scalability Response to PokemonGO . . . 11
2.4 User vs. Cloud Resource Responsibility in the Cloud . . . 12
2.5 Hypervisor Levels of Virtualization . . . 13
2.6 Pre-copy Live Migration Algorithm [40] . . . 17
2.7 Host Intrusion Thread Mode 1 - Virtual Machine Escape . . . 20
2.8 Host Intrusion Thread Mode 2 - Network Vulnerability . . . 21
2.9 MITM Software Security Attack Model . . . 22
2.10 KVM/QEMU Virtualization Architecture . . . 23
2.11 KVM/QEMU Nested Virtualization Architecture . . . 24
3.1 SubVirt VMBR Attack Methodology . . . 28
3.2 Blue Pill, Heart of SVM: VMRUN Instruction [39] . . . 30
3.3 Blue Pill Attack Methodology [39] . . . 31
4.1 Cloud Environment Guest-Host Pair Identification . . . 35
4.2 Abstraction of Virtual Machine Breakout . . . 36
4.3 Rootkit Creation on Host . . . 37
4.4 Nested VM Creation within Rootkit . . . 38
4.5 VM Live Migration to Nested VM . . . 39
5.1 QEMU/KVM Host Cache Control Mode - “writeback” . . . 51
5.2 QEMU/KVM Host Cache Control Mode - “writethrough” . . . 52
5.3 QEMU/KVM Host Cache Control Mode - “none” . . . 53
5.4 Filebench - I/O intensive workload latency analysis . . . 57
5.5 Filebench - I/O intensive workload throughput analysis . . . 58
5.6 Kernel Compile - CPU/Memory intensive workload analysis . . . 60
5.7 Kernel Decompression - CPU/Memory intensive workload analysis . . . . 61
5.8 Netperf - Network intensive workload throughput analysis . . . 62
5.9 Live Migration - end-to-end timing analysis . . . 63
MITM – Man-in-the-Middle
RITM – Rootkit-in-the-Middle
OS – Operating System
VM – Virtual Machine
VMM– Virtual Machine Monitor
SVM– Secure Virtual Machine
AMD – Advanced Micro Devices
VT – Virtualization Technology
EFER – Extended Feature Enable Register
MSR – Machine Specific Register
VMBR – Virtual Machine-based Rootkit
VMCS – Virtual Machine Control Structure
API– Application Program Interface
KVM – Kernel-based Virtual Machine
QEMU – Quick Emulator
IT– Information Technology
AWS – Amazon Web Services
CVE – Common Vulnerability and Exposure
IDS – Intrusion Detection System
VMI – Virtual Machine Introspection
NIST– National Institute of Standards and Technology
SaaS – Cloud Software as a Service
PaaS – Cloud Platform as a Service
IaaS – Cloud Infrastructure as a Service
L0 – Level 0
L1 – Level 1
L2 – Level 2
BIOS – Basic Input/Output System
CFQ – Complete Fair Queuing
VGA – Video Graphics Array
DIMM – Dual In-line Memory Module
HW – Hardware
Chapter 1
INTRODUCTION
1.1
Problem Context
The benefits of cloud computing are well established for businesses, organizations, and end-users. Despite the overwhelming advantages of cloud computing, one of the most significant problems with this fast growing computing model is security. While both researchers and cloud defenders continue to develop innovative advancements that improve cloud security, these platforms remain vulnerable to inevitable, unidentified weaknesses. It is the goal of our research to then help identify one such vulnerability before malicious attackers can take advantage of these systems.
software infrastructure and physical hardware responsible for hosting cloud services are shared by all of its users; making user data isolation, loss, and integrity against malicious entities difficult. According to a market survey in 2016, “general security concerns” with cloud services were the number one barrier for cloud adoption by businesses with 53% of these organizations sharing this concern [9]. Although difficult to quantify, cloud security incidents are reported to government authorities and the public every year, validating these concerns. Even the leading cloud computing vendors in 2016 — Amazon holding 45% market share, Windows Azure with 39%, and Google with 18% [9] — are subject to the fact that these platforms are not perfectly secure.
1.2
Thesis Statement
In this thesis we present a new type of software security attack methodology related to the well-known Man-in-the-Middle (MITM) type attacks. Our methodology uses a nested QEMU/KVM Virtual Machine (VM) based strategy we call CloudSkulk. Our claim is that a VM, controlled by a malicious source, can represent a rootkit that can unnoticeably eavesdrop on data communication between QEMU/KVM guest-host pairs on a GNU/Linux cloud platform providing IaaS cloud services. Through our attack, we can gain 100% visibility of the data and live interactions of a targeted guest running in one of these virtualized environments. One of the defining features of our new type of attack is that it can allow an attacker to remain undetected for long periods of time. Our intention is not to increase cloud security concerns, but rather to raise awareness and identification for cloud service vendors and developers of their system’s vulnerabilities in the hopes that they strengthen their security.
1.3
Contributions
The major contributions of our work are summarized as following:
1. We present the design and implementation of a new type of rootkit, nested virtualization based rootkits. To the best of our knowledge, we are the first to demonstrate how nested virtualization can be used by attackers for developing rootkits.
3. We provide a sample demonstration of our rootkit installation on a GNU/Linux based machine supporting the QEMU/KVM virtualization infrastructure.
1.4
Thesis Organization
Chapter 2
BACKGROUND
2.1
Cloud Environments
Modern data centers are facilities containing tens of thousands of computers with significant network bandwidth capabilities. They maintain large sets of Information Technology (IT) equipment that is used for providing both hardware and software services for third party users, connected through a telecommunication network [42]. Modern cloud computing differs from traditional data centers in that the services provided by the cloud are given to the user through a virtualized environment called a Virtual Machine (VM). We will use a standard terminology throughout this paper to refer to a “host” as a physical cloud computing machine responsible for enabling virtualization for its third party “guest” users.
Virtualization is the foundation of cloud computing. Virtualization refers to the creation of a virtual version of some physical resources, such as an OS, a server, or a device. Programs running from within a guest VM typically execute on a host with the same level of control as other user applications in what is known as the “lowest of privileges.”
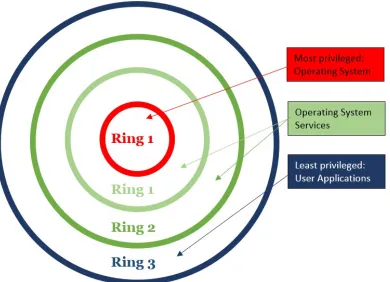
rings. The execution privileges range from the highest amount of control in the most privileged ring 0, to the least control in the lowest privilege level rings 3. Figure 2.1 illustrates this privilege concept.
Figure 2.1: CPU Instruction Set Execution Privileges
types of virtualization they grant: partial, para-, and full-virtualization to name a few. A hypervisor is essentially low-level, high privileged software that controls the execution of one or more guest OSs on a single machine. Fundamentally, hypervisors function by intercepting and emulating sensitive operations originating from within the guest environment (such as changing page tables, which could give a guest access to host memory it is not allowed to access) [2].
When a privileged command, OS instruction, or non-virtualizable instruction is requested by a para-virtualized guest process, it is delivered to the hypervisor through a HyperCall, similar to Linux system calls. The hypervisor receives these HyperCalls, accesses the hardware, then returns the result. This type of virtualization however requires that the guest OS be modified to properly use the HyperCall API.
A guest created through full-virtualization is provided a complete simulation of the underlying hardware, allowing the execution of an unmodified guest OS to run with privileged, ring 1, control on the host. Full-virtualization can be thought of as using an entire computer, with complete control, encapsulated and running inside a VM. Full-virtualization is slower than other types of virtualization [3] like para-, because machine language code from the running guest OS must, at run-time, be converted to the machine language of the host inside the host hypervisor. This can be accomplished through a process called binary translation if the host CPU supports Virtualization Technology (VT).
user level processes (running with ring 3 privileges), are directly executed on the host CPU for high performance. Modern Intel and AMD CPUs provide this support through assembly language set extensions known as Intel VT-x for the x86-based Intel CPUs, and AMD-v for the AMD type of CPUs. These extended commands allow for a CPU to provide hardware based virtualization. Figure 2.2 illustrates these main functional differences between types of virtualization.
Figure 2.2: Para- vs. Full-Virtualization [18]
2.1.1 Cloud Services
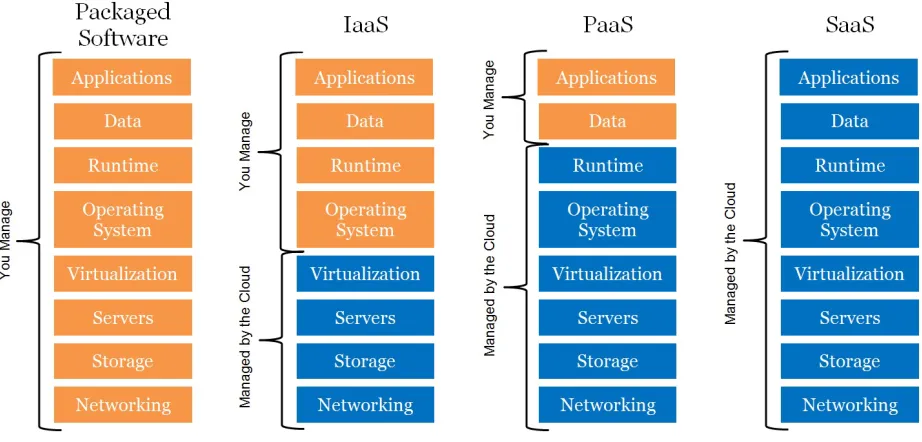
As defined by the National Institute of Standards and Technology (NIST), cloud computing is composed of three fundamental service models: Cloud Software as a Service (SaaS), Cloud Infrastructure as a Service (IaaS), and Cloud Platform as a Service (PaaS) [32].
requires strict and expensive software licenses which are conveniently bypassed by guests who rent the software from the cloud as a SaaS service. As an example, the Microsoft Azure cloud platform provides a popular office suite application called Microsoft Office 365 to users as a SaaS service.
The process of connecting to, and using the services of the Azure cloud is nearly a ubiquitous form of guest-host interaction for cloud platforms. Therefore, examining this process illustrates how cloud services are typically provided to guests in nearly any cloud environment today. An Azure guest first selects a price per hour plan on the Microsoft website based on a set of desired configurations and requested services. The guest then connects to Microsoft’s cloud through a local Azure portal application on their local machine in which they can then use Microsoft Office 365, Dynamics 365, or any other requested application from within a VM environment. The Azure guest VM environment is likely to be created and initially maintained within a single process physically running on a cloud machine at Microsoft. The performance of the running application in the cloud is then predominantly dependent upon the hardware and software of the cloud machine. It is important to emphasize that this is one such prevailing benefit of the cloud; that a rented application running on the cloud is likely to run faster than if ran locally. If an expensive CAD application requiring significant CPU processing power can experience performance increases while running in the cloud, CAD users might be persuaded by this cloud attribute.
more towards effectively and efficiently hosting customized applications for its guest user who are typically themselves businesses or organizations. These businesses or organizations using PaaS services on the cloud then typically deploy their application for other end users of their product. In regards to SaaS cloud based platforms, their guest users are generally just single end users.
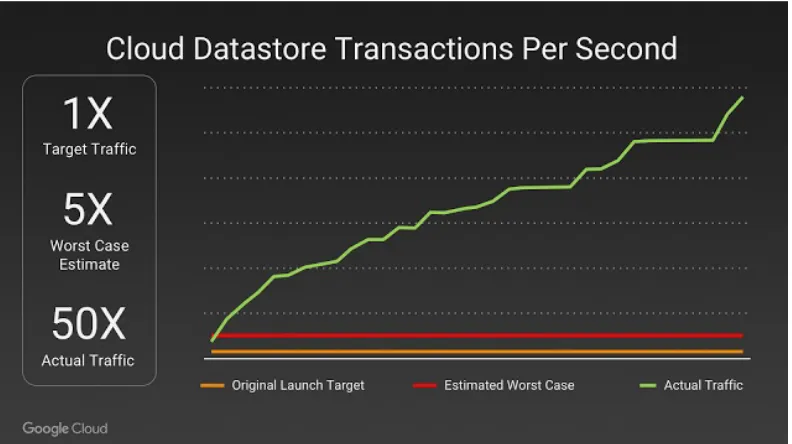
The Google App Engine is a cloud platform that serves as a good example of a cloud providing PaaS services. The Google App Engine provides its guests scalable web application services and mobile backends with a framework that includes tools such as: NoSQL datastores, memcache, and a user authentication API. A mobile gaming application company, Pocket Gems, is one such guest using PaaS services to create and deploy its games for other end users. The Google Cloud hosts these services, runs Pocket Gem’s games, and provides the infrastructure for a dynamic number of end users. In fact, one of the significant benefits of PaaS services is that hosted applications can be automatically scaled in response to large demands of computation and network traffic. Take another company Niantic, running on Google’s cloud, released a mobile application in 2016 called PokemonGO. Google reports that, “Within 15 minutes of launching in Australia and New Zealand, player traffic surged well past Niantic’s expectations.” [28] A clear illustration of the unexpected levels of PokemonGo player traffic and the dynamic power of the cloud computing model can be seen in Figure 2.3.
Figure 2.3: Google Cloud Scalability Response to PokemonGO
based cloud platforms.
IaaS cloud platforms provide their guests a special kind of virtualized environment known as a full-virtualization1. IaaS based cloud service providers give users an entire computer — user space applications, OS, and hardware — virtualized and accessed through the cloud. Like guest users of PaaS services, guests of IaaS services are typ-ically, although not strictly limited to, themselves being businesses or organizations. As an example, Amazon Web Services (AWS) provides IaaS full-virtualization services for a notable guest that is a world leader in providing online streaming media and video-on-demand content, Netflix. Netflix is an entertainment business that uses IaaS services on AWS to host online content to a reported 98.75 million end users as of April of 2017 [46]. Figure 2.4 illustrates a guest user vs. cloud platform perspective [18] of the services each control and manage with respect to the types of cloud computing
models described in this section.
Figure 2.4: User vs. Cloud Resource Responsibility in the Cloud
2.1.2 Nested Virtualization
Although virtualization began in the 1960s, it wasn’t until 2010 that researchers from IBM presented the concept of nested virtualization, for the first time, on x86 architectures in their Turtles project [6]. They implemented nested virtualization in the Linux KVM hypervisor 2. Later on, nested virtualization had been adopted and implemented in Xen (starting from Xen 4.4).
The concept of nested virtualization is straightforward: running a hypervisor inside a VM. Traditional virtualization involves multiple OSs are running on top of the same hypervisor simultaneously. Nested virtualization differs from this model by allowing multiple hypervisors to run on top of the same hypervisor simultaneously. In
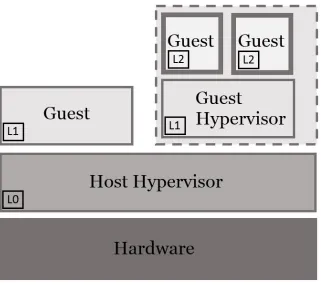
the Turtles project [6], the group of researchers introduced the virtualization concept of Level0 (L0), Level1 (L1), and Level2 (L2) that we will be using in this paper. Level0 represents the hypervisor that runs on top of the real hardware, Level1 represents the hypervisor that runs on top of Level0, as a guest, and Level2 represents the hypervisor that runs on top of the Level1 as a nested guest. Figure 2.5 illustrates these levels of hypervisor virtualization.
Figure 2.5: Hypervisor Levels of Virtualization
Shadowing (VMCS Shadowing) feature in its Haswell processors. This feature extends the capabilities of Intel-VT, with the particular emphasis of eliminating VM-Exits caused by VMREAD and VMWRITE instructions executed by the Level1 hypervisor. Because of these VMCS Shadowing improvements, the frequency of context switches between Level1 and Level0 hypervisors can be considerably reduced, increasing the performance of nested virtualization.
One of the two main design restrictions imposed on a CloudSkulk rootkit 3 is that a guest VM environment is provided with nested virtualization capabilities. In this paper, we target IaaS cloud based platforms as it is these types of cloud services that conventionally offer guests full-virtualization, and therefore by virtue nested virtualization services. It is this nested virtualization feature, as we will see in the following sections, that we can exploit to use for a malicious attack against IaaS based cloud platforms using our unique type of rootkit.
2.2
KVM/QEMU Virtualization
We target the widely adopted Linux hypervisor Kernel-based Virtual Machine (KVM) and its user-space application Quick EMUlator (QEMU). Many leading businesses in the IaaS cloud computing software industry currently employ KVM/QEMU to host their cloud platform services. Google Compute Engine (GCE), Amazon Web Services (AWS), and IBM SmartCloud Enterprise are a few such popular cloud platforms worth identifying.
KVM is a mainstream Linux hypervisor that establishes the software foundational support to enable user-space applications to utilize a computers physical hardware
3The entire set of restrictions that were discovered and design decisions that were made for a
without allowing user-space applications the ability to interface directly with physical devices. KVM is a type of hypervisor that is called a user-space device emulation architecture [20], meaning it provides only the support for device emulation not the actual creation and execution of such devices. KVM is installed in the Linux operating system by default as a kernel module in versions 2.6.20 and greater.
QEMU is a user-space software application that is responsible for creating in-stances of virtualized devices as well as the environment in which a guest OS runs on top of. QEMU creates a Linux process for each VM instance, with each process encap-sulating the entire VM environment. Virtualized environments using KVM/QEMU can experience near-native performance for typical workloads as demonstrated by Virtual Open Systems [43]. For brevity, we may refer to the KVM/QEMU paradigm as only QEMU for the remainder of this paper. The list below details some the key attributes of these two software tools that apply to our rootkit.
QEMU:
• Modifiable guest OS allowing for nested hypervisors
• Modifiable guest OS (full-virtualization) provides rich set of resources for an at-tacker to decrease security signatures and anomalies that may lead to detection
• Guest OS is encapsulated from host machine in VM environment
• Nested Guest OS(s) are encapsulated from host machine in VM environment
• Guest VM is created and maintained within a single host Linux process
• Para-virtualized hardware can be created to increase performance of guest OS
• Supports user-space live migration utility 4
• Industry standard Virtualization software for IaaS based cloud platforms
KVM:
• Contains implementation of host hardware devices for full-virtualization
• Exposes device emulation to user-space programs through KVM API
• Industry standard hypervisor for IaaS based cloud platforms
2.2.1 Live Migration
In their pioneering work, Clark et al. [8] proposed and implemented VM live mi-gration. They defined VM live migration as a procedure of migrating an entire OS and all of its applications as one unit from one host machine to another host machine. The benefits of VM live migration mainly lie in two aspects: (1) allowing a clean separation between hardware and software and (2) facilitating fault tolerance, workload balance, and low-level system maintenance. They implemented a pre-copy live migration solution in a Xen based virtualization environment, and they argued that the two most critical metrics are: total migration time and service downtime. The former, also known as end-to-end time, refers to the total time taken between the initiation and the completion of a migration, while the latter indicates the duration
when the VM is suspended and the service is not available. Figure 2.6 provides a graphical representation of pre-copy VM live migration.
Figure 2.6: Pre-copy Live Migration Algorithm [40]
Since the introduction of VM live migration in 2005, migration has attracted considerable interests from the virtualization and cloud computing communities, and has become a critical feature in mainstream hypervisors, including Xen, Qemu/KVM, VMware, and Hyper-V. Typically, a pre-copy based VM live migration involves four steps, as detailed below.
STEP 2: ITERATIVE COPY. Once the TCP connection is established, the memory (and/or disk) of the VM will be copied in an iterative fashion. In the first iteration, all the pages will be transferred from the source side to the destination side. After that, all the pages that get dirtied during the first iteration, will be then copied to the destination, and such a procedure will be repeated iteratively. Such an iterative copying may affect the system performance as it consumes CPU cycles, memory, and network bandwidth.
STEP 3: STOP-AND-COPY If the guest’s interactions cause frequent and intensive memory and disk image changes, the VM first needs to be stopped on the source side, then the remaining dirty sections of memory and disk image can be fully copied. This step is where the service downtime comes from. If this remaining part is large enough, the service downtime might be significant.
STEP 4: ACTIVATION Once the copy operation is done, the VM on the destination side will be activated. On the source side, the VM will be paused, and the source host machine can discard the VM.
be used by a host to make dynamic adjustments to guest virtualized devices during run-time. A guest VM with 4G of virtual DIMM memory can be live migrated to a new guest VM with 8G of appended virtual DIMM memory. In this work, including our design, implementation, and evaluation, we only need one physical machine to launch a nested VM based rootkit. In other words, two physical machines are not required in the development of CloudSkulk.
2.2.2 Software Security
On a typical Linux cloud computing machine hosting QEMU virtualized services, KVM runs with privileged super-user permissions, and QEMU runs with less priv-ileged user-space permissions. Guests inscribed within QEMU processes have no permissions on, or access in the host machine unless explicitly initialized as such when the QEMU process is created on the host. However, if a guest process identifies a bug and can exploit it, such as the virtunoid: breaking out of KVM exploit in 2011 [13], the guest can gain partial or even full control over the host machine. Although difficult to quantify, cloud security incidents are reported to government authorities or the public every year. In fact, publicly reported QEMU bugs are reported in Common Vulnerability and Exposure (CVE) bug reports on CVEDetails.com [34]. VM and VMM software bugs vary in degree of severity and are expressed throughout the software security research community [13, 11, 50, 23, 34, 49]. These independent groups were each able to create what are known as Virtual Machine Escapes, allowing full control of their target host OS.
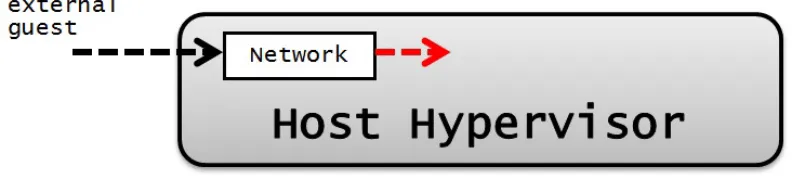
combinations of security conditions and low-level vulnerabilities can, and do, lead to host control. The most common form of security attack that threatens possible host control through network vulnerably is buffer overflows [10]. This can also be illustrated by the array of ongoing research that seeks to detect and prevent these types of network attacks [7, 37, 44, 35, 27]. Figure 2.7 and Figure 2.8 depict visual representations of two typical types of attacks that gain host control, as described above: Virtual Machine Escape attacks, and host network vulnerability type attacks. In both figures, dotted black arrows represent normal communication paths - dotted red lines represent an extension from this normal use, depicting a threat mode.
Figure 2.7: Host Intrusion Thread Mode 1 - Virtual Machine Escape
Figure 2.8: Host Intrusion Thread Mode 2 - Network Vulnerability
that any valid attack that gains host control will allow our attack to be implemented. A guest who has gained Virtual Machine Escape can not only invoke commands from within the host, but also attempt to protect own internal VM data by attacking the host hypervisor and/or host Intrusion Detection System (IDS) tools [15].
The characteristics of a compromised host machine provide a powerful software infrastructure for implementing a well-known paradigm of isolated, hard to detect, and potentially malicious programs known as Rootkits. Although not all rootkits are malicious, they can be defined as a small set of programs that allow for a consistent, prolonged, and undetectable privileged access on a computer. The common strategy for maintaining privileged access is through stealth. Rootkits aim to hide code and/or data on a computer system in attempt to remain undetected. It is this crucial characteristic of stealth that we can then relate a virtual machine as conceptually equivalent to a rootkit. This is a fundamental association that we use — that a VM can act as a rootkit — and a key conceptual attribute of our unique type of rootkit.
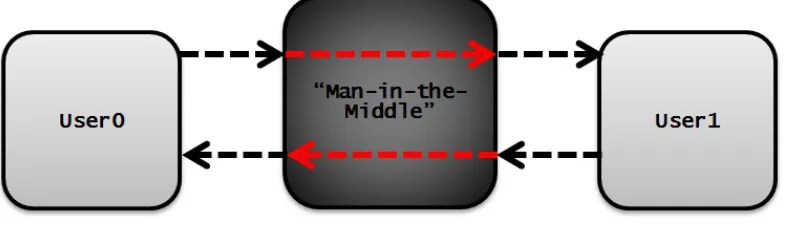
by a malicious party whom - in addition to eavesdropping - modifies messages sent between one or more user pairs [21]. Figure 2.9 is a visual representation of an MITM type of malicious attack, with dotted black arrows representing normal communica-tion paths and dotted red lines representing an un-permitted path of communicacommunica-tion controlled either passively or actively by a third party “Man”.
Figure 2.9: MITM Software Security Attack Model
internal VM software and/or data. Figure 2.10 is an abstraction that depicts a typical virtualization software/hardware set-up for network and virtualization communica-tion flow between a guest-host QEMU/KVM pair. In the figure dotted black arrows represent a guest user’s data communication flow of network packets.
Figure 2.10: KVM/QEMU Virtualization Architecture
Guest0 can represent a malicious “Man” in the middle between the host and Guest1. The full design and implementation details for this type of attack will be provided in Chapter 4, as this is simply an introduction into the conceptual foundation of CloudSkulk.
Figure 2.11: KVM/QEMU Nested Virtualization Architecture
2.2.3 Threat Model
assumption that attackers have already compromised a victim cloud system and that our rootkit provides a stealthy environment in which the attacker can retain control of a victim guest VM owner, undetected, until the guest VM owner disconnects from the cloud.
To be clear, although compromising a cloud system is pragmatically difficult to achieve, it is possible. Gaining host privileges can be achieved by penetrating into the cloud network and exploiting certain vulnerabilities of the host machine/OS, or as we have previously provided evidence for in Section 2.2.2, VM breakout and other techniques have been demonstrated in both real world attacks and throughout the software security research community [13, 11, 50, 23, 34, 49]. The level of host privileges required after compromising the cloud system will be defined in length in Section 4.2. Under our strong assumption, attackers can create their own VMs, initiate VM live migration, and thereafter create nested VMs inside their VMs.
If an attacker’s goal is to retain control of a compromised system for long periods of time, the attacker needs to hide themselves and access the system resources in an unnoticed manner. To this end, attackers usually install rootkits on the compromised system. These rootkits can help attackers to hide their malicious processes, malicious files, and malicious socket connections. Our unique type of rootkit does not seek to control or maintain the system resources of the cloud platform, instead, our goal is to gain control of the virtualized machine and services of its victim guest VM owner running on the cloud.
Chapter 3
RELATED WORK
The foundation of our new type of software security attack is in part due to the work of many other groups of researchers. The two most influential and relevant works are two projects from 2006: SubVirt [22], then followed later that year by BluePill [39, 38]. Both detail software security attacks against a target hypervisor using a rootkit, that is represented by a VM, to maintain full control over the targeted machine. Our idea borrows from this conceptual association of a rootkit represented by a VM, but extends these concepts by adding an additional association: by exploiting live migration and nested virtualization within a cloud environment, a VM can act as the “Man” in the well known MITM type attack.
3.1
SubVirt
kernel such that a VM is loaded before the target OS and applications. This was the key component of their attack, as they then prove that such a VM could then “hoist” the original OS into the VM - thus gaining full control over the target machine while remaining hard to remove and hard to detect. After installation of a VMBR the target system’s disk space was fully contained within a virtual disk. However, the VMM could not translate the target’s virtual disk accesses to the corresponding location on the physical disk without rebooting [22]. In other words, the target system had to be rebooted at some point to successfully install their rootkit. Figure 3.1 provides a visual representation of the SubVirt attack, showing how an original target system can be moved to run inside a VM provided by a maliciously owned and controlled VMM.
Figure 3.1: SubVirt VMBR Attack Methodology
the perspective of the target OS at the time because the attack OS’s complete set of states and events were fully encapsulated within the attack OS and not visible from the target OS. This provides malware deployed from within the attack OS an abundant set of functionality and implementation flexibility from access to any code library, framework, OS level resource, and programming language. One exception to this was malware that executed with user-mode privileges could be detected by the target OS.
Like SubVirt, a successful installation of a CloudSkulk rootkit provides malicious attackers a powerful platform for malware. A CloudSkulk nested VM based RITM provides a malicious guest cloud user an encapsulated VM environment with many of the same benefits associated with SubVirt’s VMBRs. Malware developed and deployed from within a CloudSkulk rootkit avoid detection by a host cloud platform by hiding malicious processes, malicious files, and malicious socket connections by invoking guest OS code to disallow external I/O, and protecting guest data from external introspection or modifications by checkpointing internal VM data states before and rolling the guest back later [22].
3.2
Blue Pill
swallows the Blue Pill and it awakes inside the Matrix controlled by the ultra thin Blue Pill hypervisor.”, project lead Rutkowska, J. [38].
The BP attack exploited AMD64 Secure Virtual Machine (SVM) assembly lan-guage extensions to move a target OS into a VM “on-the-fly”. Figure 3.2 provides a visual representation of the SVM control flow for the VMRUN instruction.
The SVM instruction set contained a MSR EFER register; bit 12 of this register, the SVME bit, defined the instruction set SVM mode for the processor: 1 = enabled, or 0 = disabled. The EFER.SVME bit was required to be set high before any SVM instruction could be executed [2]. From within a host hypervisor, if the EFER.SVME bit was set to high, the VMRUN instruction could begin instruction flow from within the guest. The BP exploitation was then to modify the EFER.SVME bit during native OS execution so that a failed VMCB.exitcode check prevented the host from returning from guest mode. This SVM exploitation forced native OS execution to continue inside a VM that was fully controlled by Blue Pill. A simplified control flow diagram in Figure 3.3 depicts the Blue Pill attack.
Chapter 4
METHODOLOGY
4.1
Design
The design of CloudSkulk is based on the Linux kernel-based virtual machine (KVM) hypervisor. In a Linux system, the KVM hypervisor is implemented as two kernel modules: one architecture independent (i.e., kvm.ko), and one architecture dependent (i.e., kvm-intel.ko or kvm-amd.ko). KVM uses hardware-level support found in modern CPU virtualization extensions, Intel VT and AMD-v, to virtualize a guest VM architecture. Each VM is then treated as a normal process, and is scheduled by the default Linux process scheduler. To create and launch VMs, users most typically employ a user-level tool called Quick Emulator (QEMU). QEMU software utilizes KVM’s virtualization features to emulate an unmodified guest VM’s OS, its para-virtualized and/or full-virtualized devices, and all its applications.
A CloudSkulk rootkit must be implemented in a cloud environment that provides live migration. Live migration is a common activity in the cloud; it is used to provide nearly uninterrupted service to a user while the actual server hosting services for that user can change. This activity is fundamental for cloud platforms to maintain load balance between servers, or for instances when a server requires downtime for updates or physical maintenance. Live migration does not always involve the transfer of a guest user across independent machines though, it is also used to dynamically adjust virtualized devices and VM configurations of a live user while transferring the guest on top of the same hypervisor. Our rootkit is designed to invoke live migration within a single hypervisor during its installation; we will refer to this as the VM live migration technique.
A CloudSkulk rootkit must be implemented in a virtualized environment that allows users to create nested VMs, each with their own hypervisor. This type of VM is most commonly provided, but not limited to, IaaS based cloud platforms. IaaS service providers offer users comprehensive computing resources, including user space applications, hardware, and OS, virtualized and accessed through the cloud. The design of our unique type of rootkit requires such a virtualized environment because it allows us (a malicious guest user in the cloud) to impersonate the host by running the same KVM hypervisor and QEMU VM emulator as the host. In this scenario we can then appear to mimic the host to nested guest VMs of our own; we can refer to this scenario as our nested virtualization technique. Our rootkit is called a nested VM-based Rootkit-in-the-Middle (RITM) type of attack because we can relay communication between the original host hypervisor and our nested guest hypervisor in a Man-in-the-Middle (MITM) fashion.
procedures. The following procedures define the design our attack methodology:
• Step 1: Typically in a cloud environment, an attacker, just like normal cloud customers, can rent a VM in the cloud environment. There could be many VMs co-existing on the same host machine as the attacker’s VM, and one of them, would be the target for attack. In Figure 4.1, we consider GuestM to be the VM owned by the attacker, and Guest0 to be the target VM1.
Figure 4.1: Cloud Environment Guest-Host Pair Identification
A precise definition of this step is defined as follows: There exists a set S on a GNU/Linux based host hypervisor of N number of QEMU/KVM guest-host pairs, where|S| =N≥ 2. In this scenario we will denote a single target of our attack as Guest0 (t), where t∈S, and a single attacker as GuestM (m), where m∈S.
1Figures 4.1, 4.2, 4.3, 4.4, 4.5 contain solid black arrows that denote multi-guest communication
• Step 2: We assume that by taking advantage of existing vulnerabilities in the hypervisor, the attacker is able to break out of its VM and gain some certain control on the host 2. This is feasible in reality as demonstrated in previous research [13, 23]. Note that the attacker does not necessarily need the system administrator privilege on the host, as a QEMU process can be launched by any normal user in a Linux system. Figure 4.2 displays a red dotted arrow that is simply an abstract representation of gaining host privileges.
Figure 4.2: Abstraction of Virtual Machine Breakout
• Step 3: Once the attacker has some certain control on the host 2 the attacker can launch a new VM, GuestX. For the host, this VM will appear as a live migration destination of Guest0, as it will be created with all Guest0 original QEMU configurations. GuestX will functionally represent our RITM.
Figure 4.3: Rootkit Creation on Host
A precise definition of this step is defined as follows: An attacker, GuestM, must obtain sufficient host privileges such that the complete set of Guest0 QEMU configurations C0 can be obtained3. The attacker then invokes commands on the host to create a new guest-host pair GuestX (x) with C1 configurations, such thatC0⊆C1and wherex∪S, therefore|S|=N+ 1≥2 andx∈Sare both true after this event. IfC0 was not initialized with an explicit port connection, say parameter c’, during its original creation, then c’∪C1 must occur during this step for later live migration purposes. It is important to note that while the minimum restrictionC0⊆C1must be true, a CloudSkulk rootkit can maintain its highest level of evasion from the host if C0⊆C1 and C1−C0={c’}.
• Step 4: Utilizing the nested virtualization technique, the attacker can then launch a VM inside GuestX. This nested VM will be created with all Guest0 original QEMU configurations.
3The details of how this can be accomplished by an attacker, including specific commands that
Figure 4.4: Nested VM Creation within Rootkit
A precise definition of this step is defined as follows: The attacker, GuestM, invokes commands within GuestX to create a new QEMU process4, pidN, that is initialized in a paused state so that it contains no active user. The complete set of pidN’s QEMU configurations C2 must be intialized such that C0⊆ C2 and C2− C0 = {c”}, where c” is an appended QEMU configuration that enables pidN to continuingly listen for migration data via some specified QEMU parameter5. The new process, pidN, is fully encapsulated within GuestX and is not visible to the host; therefore |S| does not change after this event.
• Step 5: Utilizing the VM live migration technique, the attacker can migrate the target VM (Guest0) to the nested VM.
Figure 4.5: VM Live Migration to Nested VM
A precise definition of this step is defined as follows: The attacker, GuestM, invokes QEMU Monitor Console commands on the host6 to begin live migration. The attacker can choose to migrate Guest0’s active memory or disk, which when chosen is port forwarded through GuestX-host active port connection c’. The destination of this live migration data is then immediately sent to the nested QEMU paused process, pidN. After this step the target VM, Guest0, will be running inside GuestX as a nested VM. GuestX, our RITM, now serves as a medium that can eavesdrop on Guest0 activity and communication between the host hypervisor and Guest0 hypervisor. Figure 4.5 depicts this event, where the bold red line represents live migration of Guest0 from host’s pid0 to GuestX’s pidN.
At this moment, the process pid0 (the source side of the migration) will remain on the host, but in a paused, post-migrated state with no active user. This is typical with live migration within the Cloud as a final clean-up step is required to kill the stale process. Therefore, the original condition|S|=N≥2 will apply to the host after this final event. For our installation, after an attacker has removed pid0, a nested VM-based RITM called CloudSkulk will be installed on the host.
4.1.1 Advantage of CloudSkulk
The major advantage of a CloudSkulk rootkit lies in its stealth. It is hard for both the VM owner (i.e., the victim) and the cloud system administrator to detect the existence of such a rootkit.
change due to the additional layer of virtualization. This performance change will be characterized in Chapter 5.
From the system administrator’s perspective, GuestX will now be considered as Guest0. The attacker can ensure that GuestX and Guest0 are using the same virtualized devices, the same guest OS, and run the same programs; meanwhile, with the complete control inside GuestX, the attacker has sufficient power to manipulate various Virtual Machine Introspection (VMI) techniques. This has been well docu-mented and studied before [5]. VMI tools commonly rely on some prior knowledge of the target OS, in particular kernel-level knowledge, but when attackers are in control of the guest kernel, by manipulating various kernel data structures, attackers are able to subvert existing VMI tools. The consequence of subverting VMI tools is that attackers will be able to hide their activities or any anomaly from within the guest OS.
4.2
Implementation
Cloud environments are highly dynamic. The characteristics of a potential VM target may be configured in an assortment of QEMU image and system emulation features. In addition, specific VM parameters crucial to VM securities in cloud environments are unknown to the public. For these reasons, an attacker installing a CloudSkulk rootkit must leverage some system-level history utilities and/or VM inspection tools to expose a targeted VM configurations.
tools needed to obtain the target VM configuration parameters, live migration, and initializing a destination VM with matching network configurations as the source VM. The level of host control will then vary depending on these restrictions.
The most straightforward solution for finding a target VM’s configurations would be to investigate the command line history ([host@cloud˜]$history), or report running process statuses ([host@cloud˜]$ ps -ef) to determine the original QEMU command used. If for whatever reason these system-level utilities are not available on the host, one powerful user-space tool, the QEMU Monitor, can be used. The QEMU Monitor is implemented alongside the QEMU source code, and is downloaded with QEMU by default. Therefore, a weak assumption can be made that this user-space utility is a common, viable solution for cloud platforms hosting QEMU/KVM. For instance, an attacker can issue a QEMU Monitor command on a running target VM to determine what block devices are emulated by QEMU ([qemu-monitor˜]$ info qtree, [qemu-monitor˜]$info blockstats), or determine the size and state of the active VM memory ([qemu-monitor˜]$ info mtree, [qemu-monitor˜]$ info mem), or even determine the network device type, model, and state from ([qemu-monitor˜]$ info network). QEMU Monitor commands can also be used with other user-space utilities like qemu-img to determine the disk size of a running VM ([qemu-monitor˜]$ info block for the disk location, and[host@cloud˜]$ qemu-img info to obtain the size and type of the image file).
as the source VM.
A CloudSkulk implementation then begins by first selecting a target VM running on the host, and obtaining its QEMU configuration parameters. An example solution to this first step is below:
[host@yellowstone ~]$ ps -eq | grep -i qemu
... ...
... qemu-system-x86_64 -machine type=pc-i440fx-2.3..
... ...
A rootkit can then be created on the host side. The rootkit is a QEMU process that matches the target QEMU parameters. Note that during testing, a destination VM could be virtualized with more devices and CPU flags than the source VM while successfully retaining attack viability. If the target VM is not originally created with a host port forwarding network configuration, we must either add this using a QEMU Monitor command ([qemu-monitor˜]$ hostfwd add [tcp |udp]:[hostaddr]:hostport-[guestaddr]:guestport), or we can make this during the creation of the rootkit. A continued example solution to this step is described as follows, in which we append the host port forwarding option in the creation of our rootkit:
qemu-system-x86_64 \
-machine type=pc-i440fx-2.3 \
-cpu Nehalem,+vmx \
-m size=512M,slots=1,maxmem=1024M \
-boot order=c \
-drive file=disk-RAW60G.img,media=disk,format=raw,
-enable-kvm \
-vga std \
-show-cursor \
-device virtio-net-pci,netdev=net0 \
-netdev user,id=net0,hostfwd=tcp:0:4446-:5556 &
The guest VM environment within the rootkit is provided with its own hypervisor and the ability to nest VMs/hypervisors. Therefore, the OS within the rootkit can be modified, if needed, to enable the QEMU/KVM software infrastructure. The following provides step-by-step details for this, but is not intended as an exhaustive solution, rather a viable solution that we verify and used during implementation:
• (1.) Verify GNU/Linux x86 64 bit current OS and architecture.
(1a.) If not, download, install, and reboot into Fedora Live Workstation x86 64 version 22.3. Then download and install the Linux Kernel version 4.4 with default configurations. Reboot and verify kvm module is enabled with new installation ([host@cloud˜]$ lsmod |grep -i kvm).
• (2.) Verify QEMU x86 64 bit version 2.9 is available on current machine.
(2a.) If not, download QEMU x86 64 bit stable version 2.9, then configure and install the build with the minimum following options: –target-list=x86 64-softmmu, –enable-curses, –enable-kvm. Verify the correct version of qemu is enabled ([host@cloud˜]$ qemu-system-x86 64 -version).
(3a.) If not, temporarily unload the kvm intel module ([host@cloud˜]$
modprobe -r kvm intel). Then modify the kernel module nesting parameter for kvm intel ([host@cloud˜]$ sudo vi /etc/modprobe.d/dist.conf, then uncomment the lineoptions kvm intel nested=y, save and exit config file). Reboot and verify
kernel changes are persistent ([host@cloud˜]$
cat /sys/module/kvm intel/parameters/nested).
• (4.) Verify CPU virtualization extensions, Intel VT |AMD-v, are enabled with type = full ([host@cloud˜]$ lscpu |grep Virtualization).
(4a.) If not, make sure original QEMU command appends the guest’s CPU extensions during creation ([host@cloud˜]$ qemu... -cpu model,+vmx |+amd)
After enabling the QEMU/KVM software infrastructure within the guest, the next step in implementing a CloudSkulk rootkit is the creation of the nested VM. The nested VM is the live migration destination VM with QEMU configuration parameters that match the target VM on the host side. One requirement of live migration is that the destination VM parameters be appended such that it is paused in an incoming state, and therefore it will be listening for migration data via some specified parameter. We mentioned before a complete list of possible live migration parameters would be detailed in this section; the following is that complete list as restricted by the QEMU PC system emulator options:
-incoming tcp:[host]:port[,to=maxport][,ipv4][,ipv6]
-incoming rdma:host:port[,ipv4][,ipv6]
-incoming unix:socketpath
Accept migration using host unix socket.
-incoming fd:fd
Accept migration using host file descriptor.
-incoming exec:cmdline
Accept migration using output specified from external command.
-incoming defer
Accept migration using a later specified URI via QEMU monitor
command migration_incoming.
-device ivshmem-plan,memdev=mySharedMem
Accept migration using shared memory backend file on host.
The creation of the nested VM, using one of the viable QEMU live migration parameters above, is then as follows:
qemu-system-x86_64 \
-machine type=pc-i440fx-2.3 \
-cpu Nehalem,+vmx \
-m size=512M,slots=1,maxmem=1024M \
-boot order=c \
-drive file=copy-RAW60G.img,media=disk,format=raw,
cache=writeback,aio=threads,if=virtio \
-enable-kvm \
-vga std \
-show-cursor \
-netdev user,id=net0 \
-incoming tcp:0:5556 &
Except for a minor clean-up, the final step in implementing our rootkit is to invoke the live migration utility via the QEMU Monitor. Depending on how the target VM’s monitor is emulated on the host side, its QEMU Monitor can be opened in several ways. For instance, if the target VM’s QEMU monitor is multiplexed onto another serial port, such as a telnet server listening on port 5555 ([host@cloud˜]$
qemu-... -serial mon:telnet:0:5555,server,nowait), then telnet on the host side could be invoked to open the VM’s QEMU Monitor ([host@cloud˜]$ telnet 0 5555). In our continued example, since a virtualized VGA card for the VM has been created (-vga std), we opened the QEMU Monitor for the target VM simply with the control keystroke Ctrl+Alt+Shift+2 once the host cursor had selected the target VM. Once the QEMU Monitor is opened, the following command can be issued inside the monitor environment to invoke live migration:
migrate -d tcp:0:4446
Figure 4.6: Nested Virtualization Technique Port Transaction
A minor clean-up is required after the live migration has completed. This can be accomplished by terminating the Linux process responsible for the post-migrated, paused target VM on the host side, or simply through a QEMU Monitor command still open on the post-migrated VM ([qemu-monitor˜]$quit), or host-side ([host@cloud˜]$
kill -KILL hprocess idi). This step completes the implementation of a CloudSkulk rootkit.
4.2.1 Demonstration
Chapter 5
EVALUATION
There is no fixed threshold that defines levels of remaining unnoticed, nor is there a threshold that defines a maximum duration of installation time we are required to achieve to remain unnoticed. So instead we focus on quantitatively expressing our rootkit’s ability to remain unnoticed by a target guest VM user, and the host cloud platform that our attack targets. We achieve this by characterizing both the performance degradation caused by our unique type of RITM, and its installation timing. Our goal is that this data can then be applied on a case-by-case basis to specific virtualized environments to assess the validity of our rootkit.
5.1
Performance Characterization
Note that QEMU offers plenty of parameters for its virtualized machines, setting different values of these parameters might affect workload performance in the VM considerably. During our experiments, we followed the QEMU/KVM best practices described by [17]. In particular, our setup has the following attributes:
• We used virtio drivers. Virtio was originally an I/O virtualization framework for Linux, but now it has also been adopted in Windows. Basically, virtio embraces the idea of para-virtualization. On the one hand, the guest OS is aware of its virtualization environment, and includes drivers that act as the front-end (these drivers need to be enabled when compiling the guest kernel); on the other hand, the hypervisor implements the back-end drivers whose major tasks are to emulate specific devices. In QEMU, when we start the VM, we need to append “-drive if=virtio” and “-device virtio-net-pci” to the QEMU command line, so as to enable the back-end disk driver and the network interface driver, respectively.
• We used block devices for VM image storage. Typically, a VM image is stored in a file on the host file system, however one can assign a device or a disk partition to the VM. In our experiments, we noticed that a block device backed VM image performs significantly better than a file backed VM. For example, for kernel compilation, the difference was as large as between 20% and 30%.
In addition, we have also experimented with different QEMU configurations. Our final results use the best case performance observed with the following parameters:
performance and final choice was the raw image format. Our observations coincide with [17], in which raw image offers better performance than qcow2.
• Guest memory size. The start-up virtual RAM size for a guest is allocated based on this parameter. Our observations for -m size=512M, 1G, 4G, 16G, revealed 1G to be our best case performance setting.
• Guest cache mode. The three most common cache modes used in QEMU: “cache=writeback”, “cache=writethrough”, and “cache=none”.
The first mode, seen in Figure 5.1 is the default, which enables both the host OS page cache and the physical disk write cache. This caching policy will report data writes as completed as soon as the data is present in the host page cache.
Figure 5.2: QEMU/KVM Host Cache Control Mode - “writethrough”
The last mode, seen in Figure 5.3, disables the host OS page cache and enables the physical disk write cache. In our experiments this caching policy performed the best, slightly better than “writethrough”. Our choice was cache=none.
Figure 5.3: QEMU/KVM Host Cache Control Mode - “none”
offer better performance, but we did not notice a significant performance benefit during our experiments when we switched from the CFQ scheduler to the deadline scheduler.
5.1.1 Macro Benchmarks
The performance and live migration timing of a virtual machine running in the cloud is affected by a diverse set of variables, some of which are interdependent. It is then unreasonable to exhaustively characterize these, so we follow the QEMU/KVM best practices described by [17]. For our testing strategy we choose to assume a common cloud guest user, following these above best practices, with only a single set of QEMU configuration parameters. We also know that a guest user’s workload within their environment is one such variable that will play a significant role in performance and migration timing. Therefore, using an assumed cloud guest user, with static configuration parameters, we can characterize both the performance degradation and live migration timing affected by three types of workloads that summarize the gener-alized activity the user could be performing: IO intensive workloads, CPU/Memory intensive workloads, and Network intensive workloads.
The assumed cloud guest user’s QEMU configuration parameters held constant throughout all the tests are given as follows:
Level 1 VM:
sudo qemu-system-x86_64 \
-name level1 \
-m size=1G,slots=1,maxmem=2G \
-boot c \
cache=none,if=virtio \
-drive file=/dev/sda7,index=1,media=disk,format=raw,
cache=none,if=virtio \
-cpu qemu64,+x2apic,+vmx \
-machine accel=kvm \
-smp 8 \
-curses \
-serial stdio \
-device virtio-net-pci,netdev=netLevel1 \
-netdev user,id=netLevel1,hostfwd=tcp::5022-:22
Level 2 VM:
sudo qemu-system-x86_64 \
-name level2 \
-m size=1G,slots=1,maxmem=2G \
-boot c \
-drive file=/dev/vdb,index=0,media=disk,format=raw,
cache=none,if=virtio \
-cpu qemu64,+x2apic,+vmx \
-machine accel=kvm \
-smp 8 \
-curses \
-serial stdio \
-device virtio-net-pci,netdev=netLevel2 \
Again, as mentioned in the previous section, we used block devices for VM image storage. For testing purposes this forced us to run QEMU with super-user privileges so that we could access the host machine’s block device /dev/sda6.
To evaluate I/O intensive workloads, we chose a widely used, open source bench-mark called Filebench [1]. Filebench is a file level application measurement frame-work, written in C, which contains a set of pre-defined and configurable high-level macros. We have chosen three types of macros that we believe are the most closely associated with what I/O workloads a generalized guest user would perform: file server workloads, web server workloads, and mail server workloads.
• The File Server macro: consists of a combination ofcreatefile,writewholefile, closefile, openfile, appendfilerand, readwholefile, deletefile, and statfile opera-tions. Of all macros used, the File Server macro uniquely calls write operaopera-tions.
• The Web Server macro: is uniquely dominated by read operations, with a combination of openfile, readwholefile, closefile, and appendfilerand operations.
• The Mail Server macro: uniquely calls fsync operations; the macro consists of a combination ofdeletefile,createfile,appendfilerand,fysnc,closefile,openfile, and readwholefile operations.
Table 5.1: Filebench Macro Parameters
macro testdir filesize nfiles meandirwidth nthreads nfilereadinstances iosize meanappendsize
These three macros were configured statically with the parameters found in Ta-ble 5.1. A full code base of all custom .f files written for this testing can be found in Appendix A.1, Appendix A.2, and Appendix A.3.
Figure 5.4: Filebench - I/O intensive workload latency analysis
series. The y-axis in both figures displays the filebench results in log base 10 scale. The data labels 1 in Figure 5.4 show the percentage increase in latency with respect to the layer below it. The data labels in Figure 5.5 show the percentage decrease in throughput with respect to the layer below it. Each data series displays its relative standard deviation in a bar centered on the top of each column.
Figure 5.5: Filebench - I/O intensive workload throughput analysis
By evaluating the percent difference of the latency and throughput between L1 and L2 in Figure 5.4 and Figure 5.5 we can quantitatively express what a guest user’s perspective is before and after the installation of a CloudSkulk rootkit for IO intensive workloads. After our rootkit is installation, a targeted guest user will
1Figure 5.4 - Figure 5.8 display L1 data labels that are centered in each L1 data series bar. L2
experience a 51.86% decrease in speed and 33.08% decrease in throughput for Mail Server type workloads, ∼3.18x slower speeds and 99.67% decrease in throughput for File Server type IO workloads, and ∼7.01x slower speeds and 78.21% decrease in throughput for Web Server type IO workloads. Nested KVM results in literature showed a ∼46% best case and ∼67% worst case throughput decrease for similar Filebench IO intensive testing [26]. While our IO throughput decrease results coincide with others, our results collectively are still poor. Most importantly, of all our test data shared in this paper our poor IO latency results do not correlate with literature results; whereas similar nested KVM literature data showed a best case of ∼10:30% increase in IO latency [26], our results show that a CloudSkulk compromised guest user of the cloud will almost certainly be aware of the heavy performance degradation if they are actively performing IO intensive workloads. This drawback makes the current version of our rootkit prone to cloud security detection systems.
Figure 5.6: Kernel Compile - CPU/Memory intensive workload analysis
value of 92.388% not displayed in the figure). This was due to the first run being∼3x slower than its last 4 consecutive runs. This kernel compile data point was repeatable.
Figure 5.7: Kernel Decompression - CPU/Memory intensive workload analysis
can be seen in Figure 5.8. The data labels in this figure show the percentage decrease in latency with respect to the layer below it. The x-axis in this figure displays three data series, one for each L0:L2 execution environment. The y-axis in this figure displays the throughput results in log base 10 scale. Each data series displays its relative standard deviation in a bar centered on the top of each column.
Figure 5.8: Netperf - Network intensive workload throughput analysis
averages show a 8.95% increase in throughput for the TCP bulk data transfer type of network workloads after our rootkit installation, with standard deviations (explicit values not shown in figure) for L0:L2 being 1.11%, 10.32%, and 3.96%, respectively. With standard deviations higher than the percentage differences in throughput, we can conclude that this performance was nearly the same across all execution envi-ronments. These results demonstrate that a CloudSkulk compromised guest user of the cloud will be unable to detect a performance decrease while performing network intensive workloads.
Figure 5.9: Live Migration - end-to-end timing analysis
An idle workload is represented by a guest user that is not executing any workload - this can be thought of a user connected to the cloud, but away from their device or inactive. For this testing, we chose two levels of live migrations to characterize: L0-L0, and L0-L1. This live migration characterization data can be seen in Figure 5.9. The L0-L0 data series in Figure 5.9 depict a typical invocation of live migration in the cloud, except that there is no network traffic generated during the migration2, because both the source and destination VMs coexist on a single, commonly shared environment. The L0-L1 data series in Figure 5.9 depict our unique nested VM-based technique used to implement CloudSkulk. This type of migration involves a L1 VM running on the host side to be live migrated into an L2 nested VM that is encapsulated within our L1 rootkit VM (VM-based RITM). The common metric for live migration is the total migration time (end-to-end time). Each data point in Figure 5.9 is the average end-to-end time for 5 consecutive runs with their corresponding relative standard deviation displayed in bars centered above each column.
One important note to make was that L1 and L2 VM configurations for live migration testing was slightly different than the other characterization data discussed above. For consistency, the following details the difference from previous parameters to live migration parameters:
VM Live Migration Config. Differences:
from: -m size=1G,slots=1,maxmem=2G \
to: -m size=512M,slots=1,maxmem=1024M \
2This means in a real cloud environment, the live migration time could be considerably longer
from: -drive file=/dev/<disk>,index=0,media=disk,
format=raw,cache=none,if=virtio \
to: -drive file=/tmp/guest-imgs/copyRAW60G.img,
media=disk,format=raw,cache=writeback,aio=threads,if=virtio \
from: -cpu qemu64,+x2apic,+vmx \
to: -cpu Nehalem \
from: -machine accel=kvm \
to: -enable-kvm \
new: -machine type=pc-i440fx-2.3 \
CPU/Memory intensive workloads, the time is ∼820 seconds. The top-most set of data in Figure 5.9 is less relevant, but still important to note. This data labels show us how much extra time will be added to our live migration end-to-end time with respect to the nominal L0-L0 type migrations.
A final important note to make is that the live migration downtime was recorded for each data point. However, this data was not displayed for two main reasons: across all execution environments, the standard deviation was high (∼50-60%), and no single downtime was above 103ms, which would arguably be unnoticeable by a guest user.
5.1.2 Micro Benchmarks
To more precisely measure the overheads, we performed a number of microbenchmark tests. We chose lmbench version 3.0-a9 as our microbenchmark [31]. Our experimental results are presented in Table 5.2, Table 5.3, Table 5.4, and Table 5.5.
Table 5.2: lmbench: Arithmetic operations - times in nanoseconds
Config integer bit integer add integer div integer mod float add float mul float div double add double mul double div Level0 0.26 0.13 5.94 6.37 0.75 1.25 3.31 0.75 1.25 5.06 Level1 0.25 0.13 5.96 6.39 0.75 1.26 3.32 0.75 1.26 5.07 Level2 0.26 0.13 6.14 6.59 0.78 1.30 3.43 0.78 1.30 5.23
Table 5.3: lmbench: Processes - times in microseconds
Config signal handler installation signal handler overhead protection fault pipe latency AF UNIX
![Figure 2.2: Para- vs. Full-Virtualization [18]](https://thumb-us.123doks.com/thumbv2/123dok_us/8919549.1840843/22.612.107.567.273.448/figure-para-vs-full-virtualization.webp)
![Figure 2.6: Pre-copy Live Migration Algorithm [40]](https://thumb-us.123doks.com/thumbv2/123dok_us/8919549.1840843/31.612.125.525.189.297/figure-pre-copy-live-migration-algorithm.webp)