Tail-f Network Control System 3.3 Getting Started Guide
First Published: November 13, 2014 Last Modified: November , 2014
Americas Headquarters
Cisco Systems, Inc. 170 West Tasman Drive San Jose, CA 95134-1706 USA http://www.cisco.com Tel: 408 526-4000 800 553-NETS (6387) Fax: 408 527-0883
THE SPECIFICATIONS AND INFORMATION REGARDING THE PRODUCTS IN THIS MANUAL ARE SUBJECT TO CHANGE WITHOUT NOTICE. ALL STATEMENTS, INFORMATION, AND RECOMMENDATIONS IN THIS MANUAL ARE BELIEVED TO BE ACCURATE BUT ARE PRESENTED WITHOUT WARRANTY OF ANY KIND, EXPRESS OR IMPLIED. USERS MUST TAKE FULL RESPONSIBILITY FOR THEIR APPLICATION OF ANY PRODUCTS.
THE SOFTWARE LICENSE AND LIMITED WARRANTY FOR THE ACCOMPANYING PRODUCT ARE SET FORTH IN THE INFORMATION PACKET THAT SHIPPED WITH THE PRODUCT AND ARE INCORPORATED HEREIN BY THIS REFERENCE. IF YOU ARE UNABLE TO LOCATE THE SOFTWARE LICENSE OR LIMITED WARRANTY, CONTACT YOUR CISCO REPRESENTATIVE FOR A COPY.
The Cisco implementation of TCP header compression is an adaptation of a program developed by the University of California, Berkeley (UCB) as part of UCB's public domain version of the UNIX operating system. All rights reserved. Copyright©1981, Regents of the University of California.
NOTWITHSTANDING ANY OTHER WARRANTY HEREIN, ALL DOCUMENT FILES AND SOFTWARE OF THESE SUPPLIERS ARE PROVIDED“AS IS" WITH ALL FAULTS. CISCO AND THE ABOVE-NAMED SUPPLIERS DISCLAIM ALL WARRANTIES, EXPRESSED OR IMPLIED, INCLUDING, WITHOUT LIMITATION, THOSE OF
MERCHANTABILITY, FITNESS FOR A PARTICULAR PURPOSE AND NONINFRINGEMENT OR ARISING FROM A COURSE OF DEALING, USAGE, OR TRADE PRACTICE. IN NO EVENT SHALL CISCO OR ITS SUPPLIERS BE LIABLE FOR ANY INDIRECT, SPECIAL, CONSEQUENTIAL, OR INCIDENTAL DAMAGES, INCLUDING, WITHOUT LIMITATION, LOST PROFITS OR LOSS OR DAMAGE TO DATA ARISING OUT OF THE USE OR INABILITY TO USE THIS MANUAL, EVEN IF CISCO OR ITS SUPPLIERS HAVE BEEN ADVISED OF THE POSSIBILITY OF SUCH DAMAGES.
Any Internet Protocol (IP) addresses and phone numbers used in this document are not intended to be actual addresses and phone numbers. Any examples, command display output, network topology diagrams, and other figures included in the document are shown for illustrative purposes only. Any use of actual IP addresses or phone numbers in illustrative content is unintentional and coincidental.
Cisco and the Cisco logo are trademarks or registered trademarks of Cisco and/or its affiliates in the U.S. and other countries. To view a list of Cisco trademarks, go to this URL:http:// www.cisco.com/go/trademarks. Third-party trademarks mentioned are the property of their respective owners. The use of the word partner does not imply a partnership relationship between Cisco and any other company. (1110R)
C O N T E N T S
C H A P T E R 1 Purpose of the Document 1
Product Overview 1
Main Features 2
Architecture Overview 3
Typographical Convention 4
C H A P T E R 2 Running NCS Examples 5
Instructions to Run NCS Examples 5
Common Mistakes 6
C H A P T E R 3 NCS Basics 9
Starting the Simulator 10
Starting NCS and Reading Device Configuration 11
Reading Device Configuration into NCS 11
Writing Device Configuration 14
More on Device Management 16
Creating Device Groups 17
Device Templates 17
Defining Multi-vendor Templates 18
Policies 21
Out-of-Band Changes 23
Resolving Conflicts 24
Conflict Resolution 28
C H A P T E R 4 Network Element Drivers and Adding Devices 31
Device Authentication 32
Connecting Devices for Different NED Types 33
NETCONF NED for JunOS 33
SNMP NEDs 33
Generic NEDs 35
Multi-NED Devices 35
Administrative State for Devices 35
Trouble-shooting NEDs 36
C H A P T E R 5 Managing Network Services 39
A Service Example 40
Running the Example 42
Service-Life Cycle Management 44
Service Changes 44
Service Impacting Out-of-Band Changes 45
Service Deletion 47
Viewing Service Configurations 47
Defining Your Own Services 49
Defining the Service Model 50
Defining the Mapping 53
Reactive FASTMAP 59
Reconciling Existing Services 59
Brown-field Networks 60
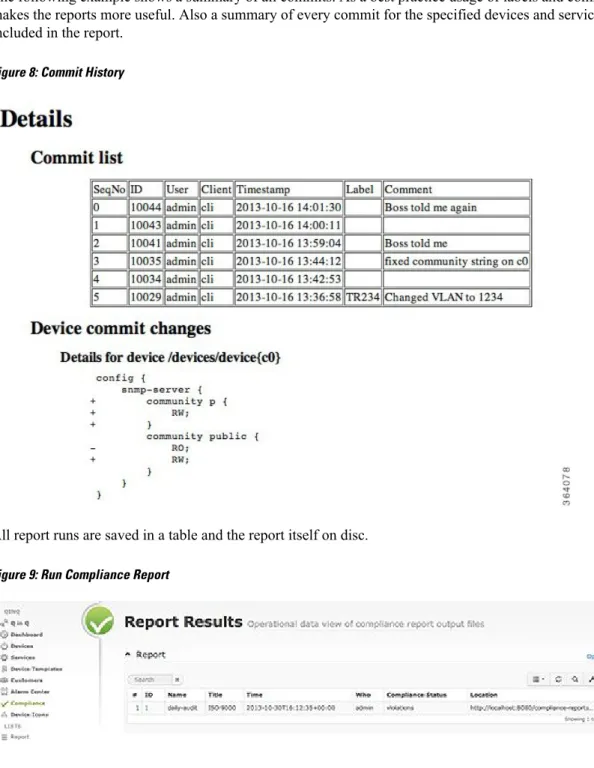
C H A P T E R 6 Compliance Reporting 61
Creating Compliance Report Definitions 62
Running Reports 62
Understanding Reports 63
C H A P T E R 7 Scripting 67
NCS CLI Scripts 68
NCS REST Scripts 68
Python MAAPI Scripts 69
NCS NETCONF Scripts 70
Plug and Play Scripts 71
Example Command Script 72
C H A P T E R 8 The NCS Web User Interface 73
Using the Web UI 74
Saving Transactions 75
C H A P T E R 9 Developing Service Applications 77
NCS Java VM and APIs 77
Developing a Service 78
Setting Up the Environment 78
Creating a Service Package 80
Creating a Service Model 82
Managing the NCS Java VM 83
A First Look at Java Development 84
Using Eclipse 85
Writing the Service Code 93
Fetching the Service Attributes 93
Mapping Service Attributes to Device Configuration 94
Combining Java and Templates 98
VLAN Feature Template 99
VLAN Java Logic 101
Building a Java and Template Solution 102
C H A P T E R 1 0 Administration 103
Installing NCS 103
Uninstalling NCS 104
Running NCS 105
Starting and Stopping NCS 105
NCS User Management 106
Adding a New User 106
Packages 107
Adding and Upgrading a Package 108
Simulating the New Device 109
Adding New Devices to NCS 109
Configuring NCS 109
Run-time Configuration 112
Monitoring NCS 113
Backup and Restore 113
Backup 113
Restore 113
C H A P T E R
1
Purpose of the Document
The purpose of this User Guide is two-fold:
•To get an understanding of NCS as a service orchestration and network configuration tool.
•To be used as a tool to get started using NCS.
This document only covers the most essential parts of using NCS to manage a network. It also gives a short introduction to programming aspects at the end. Furthermore, the features are only covered at an introductory level. For the detailed instructions, see the NCS User Guide.
This chapter contains the following sections:
• Product Overview, page 1 • Architecture Overview, page 3 • Typographical Convention, page 4
Product Overview
Creating and configuring network services is a complex task that often requires multiple integrated configuration changes to every device in the service chain. Additionally changes need to be made concurrently across all devices with service implementation being either completely successful or completely removed from the network. All configurations need to be maintained completely synchronized and up to date. Tail-f NCS solves these problems by acting as interface between the configurators (network operators and automated systems) and the underlying devices in the network.
NCS does this by providing the following key functions:
1 Representation of the services.
2 Multi-vendor device configuration modification in the native language of the network devices.
3 Configuration Database (CDB) with current synchronized configurations for all devices and services in the network domain.
4 Northbound interfaces that can be accessed via Network CLI, WebUI or with automated systems using REST, Python, NETCONF, Java or other tools.
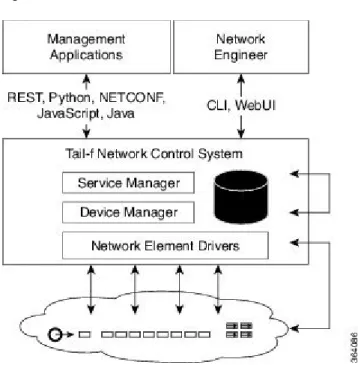
Figure 1: Tail-f NCS
Network engineers use Tail-f NCS as a central point of management for the entire network, using a "network CLI" or a web-based user interface. While this guide will illustrate the use cases with the CLI it is important to realize that any northbound interface can be used to achieve the same functionality.
All devices and services in the network can be accessed and configured using this CLI, making it a powerful tool for network engineers. It is also easy to define roles limiting the authority of engineers to the devices under their control. Policies and integrity constraints can also be defined making sure the configuration adhere to site standards.
The typical workflow when using the network CLI in NCS is as follows:
1 All changes are initially made to a (logical) copy of the NCS database of configurations.
2 Changes can be viewed and verified by the network operator prior to committing them.
3 The changes are committed, meaning that the changes are copied to the NCS database and pushed out to the network. Changes that violate integrity constraints or network policies will not be committed. The changes to the devices are done in a holistic distributed atomic transaction, across all devices in parallel.
4 Changes either succeed and remain committed or fail and are rolled back as a whole returning the entire network to the uncommitted state.
Main Features
The main features of NCS are:
•Intuitive to the methods currently used for configuring network services using either Web UI or network CLI.
Purpose of the Document Main Features
•Device changes are whole and either completely succeed or are completed discarded, no partial configurations are left.
•Fine-grained deep control of all elements in the service.
•Centralized configuration database that is synchronized with the network. Reconciliation can be done in any direction: to network, from network.
•Rich set of user interfaces (WebUI, CLI) and scripting interfaces (REST, Python, NETCONF, JavaScript).
Architecture Overview
This section provides a broad overview of the NCS architecture and functionality.
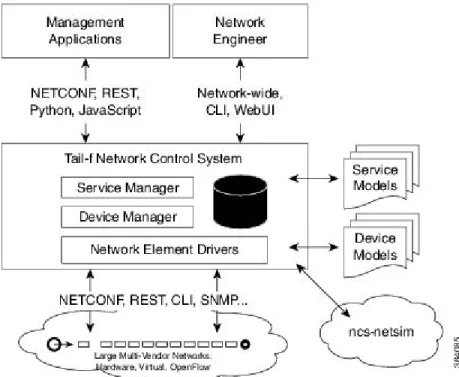
Figure 2: NCS Architecture
NCS has two main layers: the Device Manager and the Service Manager. They serve different purposes but are tightly integrated into one transactional engine and database.
The purpose of the Device Manager is to manage device configurations in a transactional manner. It supports features likes;; bidirectional device configuration synchronization, device groups and templates, and fine-grained real-time changes to devices.
The Service Manager makes it possible for an operator to manage high-level aspects of the network that are not supported by the devices directly, or is supported in a cumbersome way. With the appropriate service definition running in the Service Manager, an operator could for example configure the VLANs that should exist in the network in a single place, and the Service Manager compute the specific configuration changes required for each device in the network and push them out. This covers the whole life-cycle for a service: creation, modification and deletion. NCS has an intelligent easy to use mapping layer so that network engineers can define how a service should be deployed in the network.
Purpose of the Document
NCS uses a dedicated built-in storage Configuration Database (CDB) for all configuration data. NCS keeps the CDB in sync with the real network device configurations. Audit, to ensure configuration consistency, and reconciliation, to synchronize configuration with the devices, functions are supported. It also maintains the runtime relationships between service instances and the corresponding device configurations.
NCS comes with Network Element Drivers, NEDs, that communicates with the devices. NEDs are not closed hard-coded adapters. Rather, the device interface is modeled in a data-model using YANG (RFC 6020). NCS can render the underlying commands from this model, including for example a Cisco IOS CLI. This means that the NEDs can easily be updated to support new commands just by adding these to the data-models. NCS in combination with the NEDs will apply device configuration changes as atomic change sets.
NCS netsim is used to simulate devices. Netsim can simulate management interfaces like Cisco CLI and NETCONF. It does not simulate the network behavior.
NCS supports a rich variety of APIs and User Interfaces. Independent of the device types NCS will render a northbound Juniper-Style and Cisco XR style network wide CLI. This will support all devices and services. The same is true for the NCS WebUI.
Scripts can be written using Python, REST, and NCS CLI or other tools to automate network activities.
Typographical Convention
The following table describes the typographical convention used in the CLI snippets throughout this guide.
Example Prompt
$ pwd
Unix prompt
admin@ncs# show running-config
NCS CLI Operational mode
admin@ncs(config)# show configuration
NCS CLI Configuration mode
admin@ncs(config)# devices device c0 config ios:interface \ FastEthernet 1/0 switchport mode trunk
A (\) at the end of a command indicates that the input continues on the next line
Commands and user-entered text appear inboldfont;; for example,$ncs --stop. Terminal sessions and
information the system displays appear incourierfont;; for example,Entering configuration mode terminal.
Purpose of the Document Typographical Convention
C H A P T E R
2
Running NCS Examples
Throughout this guide we will refer to examples included with the product. If you have a NCS system installed it is recommended to run the examples.
The high-level procedure is as follows:
1 Make sure yousourcethencsrcfile in the NCS installation directory.
2 cdto the example home directory.
3 Prepare the simulated network using thenetsimtools.
4 Prepare the NCS example configuration.
5 Startnetsim.
6 Startncs.
7 Run the scenario.
8 Stopnetsim.
9 Stopncs.
For detailed instructions see Instructions to Run NCS Examples, on page 5. This chapter contains the following sections:
• Instructions to Run NCS Examples, page 5 • Common Mistakes, page 6
Instructions to Run NCS Examples
This guide refers to some of the examples in$NCS_DIR/examples.ncs. Read and run the README files in
parallel with this user guide.
Make sure NCS is installed according to the instructions in sectionInstalling NCS. Source thencsrcfile in
the NCS installation directory. For example:
$ source /opt/ncs/ncsrc
Go to the example:
$ cd
$NCS_DIR/examples.ncs/getting-started/using-ncs/1-simulated-cisco-ios
Every example directory is a complete NCS run-time directory. The README file and the detailed instructions later in this guide show how to generate a simulated network and NCS configuration for running the specific examples. To run the examples follow the below steps:
Step 1 Create a simulated network using the command ncs-netsim --create-network. For example:
$ ncs-netsim create-network $NCS_DIR/packages/neds/cisco-ios 3 c
This creates three Cisco IOS devices called c0, c1, and c2.
Step 2 Create NCS run-time environment. For example:
$ ncs-setup --netsim-dir ./netsim --dest .
The dot '.' refers to current directory, that is,1-simulated-cisco-ios. Note
This does the following:
1 --netsim-dir: Reads netsim data (list of devices) from the./netsimdirectory. This was created byncs-netsim
create-network command.
2 --dest: Creates local directories for NCS logs, database files, and NCS configuration file to the current directory.
Step 3 Start netsim
$ ncs-netsim start Step 4 Start ncs
$ ncs
It is important to make sure that you stopncsandncs-netsimwhen moving between examples. The following sequence illustrates how to shift from the 1-simulated-cisco-ios example to the datacenter/qinq example.
$ cd $NCS_DIR/examples.ncs/getting-started/1-simulated-cisco-ios $ ncs-netsim start $ ncs $ ncs-netsim stop $ ncs --stop $ cd $NCS_DIR/examples.ncs/datacenter/qinq $ ncs-netsim start $ ncs $ ncs-netsim stop $ ncs --stop
Common Mistakes
This section lists the four most common mistakes in brief. The exact steps are explained in later sections.
Running NCS Examples Common Mistakes
1 You have not sourced thencsrcfile: $ ncs
-bash: ncs: command not found
2 You are starting NCS from a directory, which is not a NCS runtime directory.
$ ncs
Bad configuration: /etc/ncs/ncs.conf:0: "./state/packages-in-use: \ Failed to create symlink: no such file or directory"
Daemon died status=21
What happens above is that ncs did not find ancs.conf in ./so it uses the default in/etc/ncs/ncs.conf.
Thatncs.confsays there shall be directories at./such as./state/packages-in-usewhich is not true.
Make sure youcdto the "root" of the example. Check that there is ancs.conf file, and acdb-dir.
3 You already have another NCS instance running (or same with netsim):
$ ncs
Cannot bind to internal socket 127.0.0.1:4569 : address already in use Daemon died status=20
$ ncs-netsim start
DEVICE c0 Cannot bind to internal socket 127.0.0.1:5010 : \ address already in use
Daemon died status=20 FAIL
In order to resolve the above, just stop the running NCS and netsim.
It does not matter where you started the running NCS and netsim, there is no need to cd back to the other example before stopping.
Note
4 The netsim devices have not loaded into ncs. This can happen if the order of commands are not followed. To resolve remove the database files in the NCS database directory. In this way NCS will load the XML initialization files.
$ncs --stop $ cd ncs-cdb/ $ ls
A.cdb C.cdb O.cdb netsim_devices_init.xml $ rm *.cdb
$ncs
Running NCS Examples
Running NCS Examples Common Mistakes
C H A P T E R
3
NCS Basics
The purpose of this section is to get started with NCS, learn the basic operational scenarios and get acquainted with the most common CLI commands.
Make sure you have installed NCS and that you have sourced thencsrcfile in$NCS_DIR. This sets up paths
and environment variables in order to run NCS. So this must be done all times before running NCS, so it is recommended to put that in your profile.
We will use the NCS network simulator to simulate three Cisco IOS routers. NCS will talk Cisco CLI to those devices. You will use the NCS CLI and Web UI to perform the tasks. Sometimes you will use the native Cisco device CLI to inspect configuration or do out of band changes.
Figure 3: The First Example
Both the NCS software and the simulated network devices run on your local machine
Note
• Starting the Simulator, page 10
• Starting NCS and Reading Device Configuration, page 11 • Writing Device Configuration, page 14
• More on Device Management, page 16 • Conflict Resolution, page 28
Starting the Simulator
Go to examples.ncs/getting-started/using-ncs/1-simulated-cisco-ios.
Most of this section follows the procedure in the README file so it is useful to have that open as well. First of all we will generate a network simulator with three Cisco devices. They will be called c0, c1, and c2. To start the simulator follow the below procedure:
Step 1 Run the command:
$ ncs-netsim create-network $NCS_DIR/packages/neds/cisco-ios 3 c
This creates three simulated devices all running Cisco IOS and the will be named c0, c1, c2. Start the simulator:
$ ncs-netsim start DEVICE c0 OK STARTED DEVICE c1 OK STARTED DEVICE c2 OK STARTED
Step 2 Run the CLI towards one of the simulated devices.
$ ncs-netsim cli-i c1
admin connected from 127.0.0.1 using console * c1> enable
c1# show running-config class-map m
match mpls experimental topmost 1 match packet length max 255 match packet length min 2 match qos-group 1
! ... c1# exit
This shows that the device has some initial configurations.
NCS Basics Starting the Simulator
Starting NCS and Reading Device Configuration
To start NCS, the first action is to prepare directories needed for NCS to run and populate NCS with information of the simulated devices. This is all done with thencs-setupcommand. (Again, ignore the details for time being).
Step 1 Go to the directory:
examples.ncs/getting-started/using-ncs/1-simulated-cisco-ios
Step 2 Run the following command:
$ ncs-setup --netsim-dir ./netsim --dest .
The (.) at the end of the command refers to current directory. What the command does is to create directories needed for NCS in the current directory and populates NCS with devices that are running in netsim. We call this the "run-time" directory.
Note
Step 3 Start NCS:
$ ncs
Step 4 Start the NCS CLI as user "admin" with a Cisco XR style CLI :
$ ncs_cli -C -u admin
NCS also supports a Juniper-Style CLI, that is started by using a -J modification to the command like this:
$ ncs_cli -J -u admin
Throughout this user guide the Cisco XR style commands are used.
Note
Reading Device Configuration into NCS
At this point NCS only knows the address, port, and authentication information of the devices. This management information was loaded to NCS by the setup utility. It also tells NCS how to communicate with the devices by using NETCONF, SNMP, Cisco IOS CLI etc. Although at this point, the actual configuration of the individual devices is un-known.
admin@ncs# show running-config devices device devices device c0
address 127.0.0.1 port 10022 ...
authgroup default
device-type cli ned-id cisco-ios state admin-state unlocked config
NCS Basics
no ios:service pad no ios:ip domain-lookup no ios:ip http secure-server ios:ip source-route ! ! ...
Let us analyze the above CLI command. First of all, when you start the NCS CLI it starts in operational mode, so in order to show configuration data you have to explicitly say show running-config.
NCS manages a list of devices, each device is reached by the path devices device "name" . You can use standard tab completion in the CLI to learn this.
The address and port fields tells NCS where to connect to the device. For now they all live in local host with different ports. The device-type structure tells NCS it is a CLI device and the specific CLI is supported by the Network Element Driver (NED) cisco-ios. A more detailed explanation on how to configure the device-type structure and how to chose NEDs will be addressed later in this guide.
So now NCS can be used to attempt to connect to the devices:
admin@ncs# devices connect connect-result {
device c0 result true
info (admin) Connected to c0 - 127.0.0.1:10022 }
connect-result { device c1 result true
info (admin) Connected to c1 - 127.0.0.1:10023 }
connect-result { device c2 result true
info (admin) Connected to c2 - 127.0.0.1:10024 }....
NCS does not need to have the connections "active" continuously, instead NCS will establish a connection when needed and connections are pooled to conserve resources. At this time NCS can read the configurations from the devices and populate the configuration database CDB.
The following command will synchronize the configurations of the devices with the CDB and respond with "true" if successful:
admin@ncs# devices sync-from sync-result {
device c0 result true }....
The NCS data-store, CDB, will store configuration for every device at the pathdevices device "name" config, everything after this path is configuration in the device. NCS keeps this synchronized. The
synchronization is managed with the following principles:
1 At initialization NCS can discover the configuration as shown above.
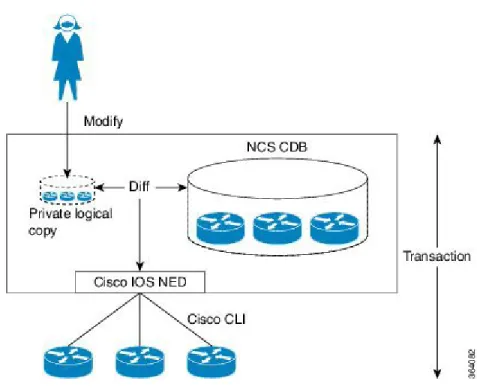
2 The modus operandi when using NCS to perform configuration changes is that the network engineer uses NCS (CLI, WebUI, REST,...) to modify the representation in NCS CDB. The changes are committed to the network as a transaction that includes the actual devices. Only if all changes happens on the actual devices will it be committed to the NCS data-store. The transaction also covers the devices so if any of the devices participating in the transaction fails, NCS will roll-back the configuration changes on the all modified devices. This works even in the case of devices that do not natively support roll-back like Cisco IOS CLI.
NCS Basics Reading Device Configuration into NCS
3 NCS can detect out of band changes and reconcile them by either updating the CDB or modifying the configuration on the devices to reflect the currently stored configuration.
NCS only needs to be synchronized with the devices in the event of a change being made outside of NCS. Changes made using NCS will reflected in both the CDB and the devices. The following actions do not need to be taken:
1 Perform configuration change via NCS
2 Perform sync-from action
The above incorrect (or not necessary) sequence stems from the assumption that the NCS CLI speaks directly to the devices. This is not the case, the northbound interfaces in NCS modifies the configuration in the NCS data-store, NCS calculates a minimum difference between current configuration and the new configuration, gives only the changes to the configuration to the NEDS that runs the commands to the devices. All this as one single change-set.
Figure 4: Device Transaction
View the configuration of the "c0" device using the command:
admin@ncs# show running-config devices device c0 config devices device c0 config no ios:service pad ios:ip vrf my-forward bgp next-hop Loopback 1 ! ...
Or show a particular piece of configuration from several devices:
admin@ncs# show running-config devices device c0..2 config ios:router devices device c0
config
ios:router bgp 64512
NCS Basics
aggregate-address 10.10.10.1 255.255.255.251 neighbor 1.2.3.4 remote-as 1
neighbor 1.2.3.4 ebgp-multihop 3 neighbor 2.3.4.5 remote-as 1 neighbor 2.3.4.5 activate
neighbor 2.3.4.5 capability orf prefix-list both neighbor 2.3.4.5 weight 300 ! ! ! devices device c1 config ios:router bgp 64512 ...
Or show a particular piece of configuration from all devices:
admin@ncs# show running-config devices device config ios:router
The CLI can pipe commands, try TAB after "|" to see various pipe targets.
admin@ncs# show running-config devices device config ios:router \ | display xml | save router.xml
The above command shows the router config of all devices as xml and then saves it to a filerouter.xml.
Writing Device Configuration
To write device configuration follow the below procedure:
Step 1 In order to change the configuration, enter configure mode:
admin@ncs# config
Entering configuration mode terminal
Step 2 Change or add some configuration across the devices, for example:
admin@ncs(config)# devices device c0..2 config ios:router bgp 64512 \ neighbor 10.10.10.0 remote-as 64502
Step 3 It is important to understand how NCS applies configuration changes to the network. At this point the changes are local to NCS, no configurations have been sent to the devices yet. Since the NCS Configuration Database, CDB, is in sync with the network, NCS can calculate the minimum diff to apply the changes to the network. The command below compares the ongoing changes with the running database:
admin@ncs(config-router)# top
admin@ncs(config)# show configuration devices device c0
config
ios:router bgp 64512
neighbor 10.10.10.0 remote-as 64502 ...
Step 4 It is possible to dry-run the changes in order to see the native Cisco CLI output (in this case almost the same as above):
admin@ncs(config)# commit dry-run outformat native device c0
NCS Basics Writing Device Configuration
router bgp 64512
neighbor 10.10.10.0 remote-as 64502 !
....
Step 5 The changes can be committed to the devices and the NCS CDB simultaneously with a single commit. In the commit command below, we pipe to details to understand the actions being taken.
admin@ncs% commit | details
Step 6 Changes are committed to the devices and the NCS database as one transaction. If any of the device configurations fail, all changes will be rolled back and the devices will be left in the state that they were in prior to the commit and the NCS CDB will not be updated. There are numerous options to the commit command which will affect the behavior of the atomic transactions. Press the tab key to display the options for the commit command.
admin@ncs(config)# commit Possible completions:
and-quit Exit configuration mode
async-commit-queue Commit through commit queue and return immediately bypass-commit-queue Commit directly even if commit queue exists
check Validate configuration
comment Add a commit comment
enable-backlog Enable backlog (Deprecated)
label Add a commit label
no-backlog No backlog (Deprecated) no-confirm No confirm
no-networking Send nothing to the devices no-out-of-sync-check Commit even if out of sync
no-overwrite Do not overwrite modified data on the device no-revision-drop Fail if device has too old data model
save-running Save running to file
sync-commit-queue Commit through commit queue and wait for reply through-commit-queue Alias for async-commit-queue
---
dry-run Show the diff but do not perform commit <cr>
Step 7 As seen by the details output, NCS stores a roll-back file for every commit so that the whole transaction can be rolled back manually. The following is an example of a roll-back file:
admin@ncs(config)# rollback configuration 10005
Step 8 Rollback "configuration" restores to that saved configuration, rollback "selective" just rollbacks the delta in that specific rollback file. Show the differences:
admin@ncs(config)# show configuration devices device c0 config ios:router bgp 64512 no neighbor 10.10.10.0 remote-as 64502 ! ! ! devices device c1 NCS Basics
config ios:router bgp 64512 no neighbor 10.10.10.0 remote-as 64502 ! ! ! devices device c2 config ios:router bgp 64512 no neighbor 10.10.10.0 remote-as 64502 ! ! !
Step 9 Commit the rollback:
admin@ncs(config)# commit Commit complete.
Step 10 A trace log can be created to see what is going on between NCS and the device CLI. Use the following command to enable trace:
admin@ncs(config)# devices global-settings trace raw trace-dir logs admin@ncs(config)# commit
Commit complete.
admin@ncs(config)# devices disconnect
Trace settings only take effect for new connections so is important to disconnect the current connections.
Note
Step 11 Make a change to for example c0:
admin@ncs(config)# devices device c0 config ios:interface FastEthernet \
1/2 ip address 192.168.1.1 255.255.255.0
admin@ncs(config-if)# commit dry-run outformat native admin@ncs(config-if)# commit
Step 12 Note the use of the commandcommit dry-run outformat native. This will display the net result device commands that will be generated over the native interface without actually committing them to the CDB or the devices. Exit from the NCS CLI and return to the Unix Shell. Inspect the CLI trace:
$less logs/ned-cisco-ios-c0.trace
More on Device Management
This section describes details about device groups, device templates, NCS policies, and out-of-band changes, transactions, pre-provisioning of devices.
NCS Basics More on Device Management
Creating Device Groups
As seen above, ranges can be used to send configuration commands towards several devices. Device groups can be created to allow for grouped actions that does not require naming conventions. A group can reference any number of devices. A device can be part of any number of groups, and groups can be hierarchical. The command sequence below creates a group of core devices and a group with all devices. Note that you can use tab completion when adding the device names into the group. Also note that it requires configuration mode. (If you are still in the Unix Shell from the steps above, do$ncs_cli -C -u admin)
admin@ncs(config)# devices device-group core device-name [ c0 c1 ] admin@ncs(config-device-group-core)# commit
admin@ncs(config)# devices device-group all device-name c2 device-group core admin@ncs(config-device-group-all)# commit
admin@ncs(config)# show full-configuration devices device-group devices device-group all
device-name [ c2 ] device-group [ core ] !
devices device-group core device-name [ c0 c1 ] !
admin@ncs(config)# do show devices device-group
NAME MEMBER INDETERMINATES CRITICALS MAJORS MINORS WARNINGS -------------------------------------------------------------------------
all [ c0 c1 c2 ] 0 0 0 0 0
core [ c0 c1 ] 0 0 0 0 0
The "do show" which shows the operational data for the groups. Device groups has a member attribute that shows all member devices, flattening any group members.
Note
Device groups can contain different devices and devices from different vendors. Configuration changes will be committed to each device in its native language without needing to be adjusted in NCS.
You can for example at this point use the group to check if all core are in sync:
admin@ncs# devices device-group core check-sync sync-result { device c0 result in-sync } sync-result { device c1 result in-sync }
Device Templates
Assume we would like to manage permit lists across devices. This can be achieved by defining templates and apply them to device groups. The following CLI sequence defines a tiny template, calledcommunity-list: admin@ncs(config)# devices template community-list config ios:ip \
community-list standard test1 \ permit permit-list 64000:40 admin@ncs(config-permit-list-64000:40)# commit
NCS Basics
Commit complete.
admin@ncs(config-permit-list-64000:40)# top
admin@ncs(config)# show full-configuration devices template devices template community-list
config
ios:ip community-list standard test1 permit permit-list 64000:40 ! ! ! ! [ok][2013-08-09 11:27:28]
This can now be applied to a device group:
admin@ncs(config)# devices device-group core apply-template template-name community-list admin@ncs(config)# show configuration
devices device c0 config
ios:ip community-list standard test1 permit 64000:40 !
!
devices device c1 config
ios:ip community-list standard test1 permit 64000:40 !
!
admin@ncs(config)# commit dry-run outformat native device c0
ip community-list standard test1 permit 64000:40 device c1
ip community-list standard test1 permit 64000:40 admin@ncs(config)# commit
Commit complete.
Defining Multi-vendor Templates
Since the configuration is written in IOS, the above template would not work with Juniper devices. Templates can be used on different device types (read NEDs) by using a prefix for the device model. The template would then look like:
template community-list { config { junos:configuration { ... } ios:ip { ... }
The above indicates how NCS manages different models for different device-types. When NCS connects to the devices the NEDs checks the device type and revision and returns that to NCS. This can be inspected (note, in operational mode):
admin@ncs# show devices device module
NAME NAME REVISION FEATURES DEVIATIONS
------------------------------------------------------------------- c0 tailf-ned-cisco-ios 2014-02-12 - - tailf-ned-cisco-ios-stats 2014-02-12 - - c1 tailf-ned-cisco-ios 2014-02-12 - - tailf-ned-cisco-ios-stats 2014-02-12 - - c2 tailf-ned-cisco-ios 2014-02-12 - - tailf-ned-cisco-ios-stats 2014-02-12 - - NCS Basics Device Templates
So here we see that c0 uses a tailf-ned-cisco-ios module which tells NCS which data-model to use for the device. Every NED comes with a YANG data-model for the device. This renders the NCS data-store (CDB) schema, the NCS CLI, WebUI and southbound commands.
The model introduces namespace prefixes for every configuration item. This also resolves issues around different vendors using the same configuration command for different configuration elements. Note that every item is prefixed with ios:
admin@ncs# show running-config devices device c0 config ios:ip community-list devices device c0
config
ios:ip community-list 1 permit ios:ip community-list 2 deny
ios:ip community-list standard s permit
ios:ip community-list standard test1 permit 64000:40 !
!
Another important question is how to control if the template shall merge the list or replace the list. This is managed via "tags". The default behavior of templates is to merge the configuration. Tags can be inserted at any point in the template. Tag values aremerge, replace, delete, create,andnocreate.
Assume that c0 has the following configuration:
admin@ncs# show running-config devices device c0 config ios:ip community-list devices device c0
config
ios:ip community-list 1 permit ios:ip community-list 2 deny
ios:ip community-list standard s permit}
If we apply the template the default result would be:
admin@ncs# show running-config devices device c0 config ios:ip community-list devices device c0
config
ios:ip community-list 1 permit ios:ip community-list 2 deny
ios:ip community-list standard s permit
ios:ip community-list standard test1 permit 64000:40 !
!
We could change the template in the following way to get a result where the permit list would be replaced rather than merged . When working with tags in templates it is often helpful to view the template as a tree rather then a command view. The CLI has a display option for showing a curly-braces tree view that corresponds to the data-model structure rather then the command set. This makes it easier to see where to add tags.
admin@ncs(config)# show full-configuration devices template devices template community-list
config
ios:ip community-list standard test1 permit permit-list 64000:40
! ! ! !
admin@ncs(config)# show full-configuration devices template | display curly-braces template community-list { config { ios:ip { community-list { standard test1 { permit { permit-list 64000:40;; } NCS Basics Device Templates
} } } } }
admin@ncs(config)# tag add devices template community-list config ios:ip \ community-list replace
admin@ncs(config)# commit Commit complete.
admin@ncs(config)# show full-configuration devices template | display curly-braces template community-list { config { ios:ip { /* Tags: replace */ community-list { standard test1 { permit { permit-list 64000:40;; } } } } } }
Different tags can be added across the template tree. If we now apply the template to device c0 which already have community lists the following happens:
admin@ncs(config)# show full-configuration devices device c0 config ios:ip community-list devices device c0
config
ios:ip community-list 1 permit ios:ip community-list 2 deny
ios:ip community-list standard s permit
ios:ip community-list standard test1 permit 64000:40 !
!
admin@ncs(config)# devices device c0 apply-template template-name community-list admin@ncs(config)# show configuration
devices device c0 config
no ios:ip community-list 1 permit no ios:ip community-list 2 deny
no ios:ip community-list standard s permit !
!
Any existing values in the list are replaced in this case. The following tags are available:
•merge (default): the template changes will be merged with the existing template
•replace: the template configuration will be replaced by the new configuration
•create: the template will create those nodes which does not exist. If a node already exists this will result in an error.
•nocreate: the merge will only affect configuration items that already exist in the template. It will never create the configuration with this tag, or any associated commands inside it. It will only modify existing configuration structures.
•delete: delete anything from this point
NCS Basics Device Templates
A template can have different tags along the tree nodes.
Note
A problem with the above template is that every value is hard-coded. What if you wanted a template where the community-list name and permit-list values are variables passed to the template when applied? Any part of a template can be a variable, (or actually an XPATH expression). We can modify the template to use variables in the following way:
1 Remove the previous template:
admin@ncs(config)# no devices template community-list config ios:ip \ community-list standard test1
2 Add a new template:
admin@ncs(config)# devices template community-list config ios:ip \ community-list standard {$LIST-NAME} permit \ permit-list {$AS}
admin@ncs(config-permit-list-{$AS})# commit Commit complete.
admin@ncs(config-permit-list-{$AS})# top
admin@ncs(config)# show full-configuration devices template devices template community-list
config
ios:ip community-list standard {$LIST-NAME} permit permit-list {$AS}
! ! ! !
The template now requires two parameters when applied (tab completion will prompt for the variable):
admin@ncs(config)# devices device-group all apply-template \ template-name community-list variable \ { name LIST-NAME value 'test2' } \ variable { name AS value '60000:30' } admin@ncs(config)# commit
The replace tag was still part of the template and it would delete any existing community lists, which is probably not the desired outcome in the general case.
Note
The template mechanism described so far is "fire-and-forget". The templates does not have any memory of what happened to the network, which devices they touched. A user can modify the templates without anything happening to the network until an explicit apply-template action is performed. (Templates are of course as all configuration changes done as a transaction). NCS also supports service templates that are more "advanced" in many ways, more information on this will be presented later in this guide.
Policies
In order to make sure that configuration is applied according to site or corporate rules you can use NCS policies. Policies are validated at every commit, they can be of type error that implies that the change cannot go through or a warning which means that you have to confirm a configuration that gives a warning.
NCS Basics
A policy is composed of:
1 Policy name
2 Iterator: loop over a path in the model, for example all devices, all services of a specific type.
3 Expression: a boolean expression that must be true for every node returned from the iterator, for example, snmp must be turned on.
4 Warning or error: a message displayed to the user. If it is of type warning the user can still commit the change, if of type error the change cannot be made.
An example is shown below:
admin@ncs(config)# policy rule class-map Possible completions:
error-message Error message to print on expression failure expr XPath 1.0 expression that returns a boolean foreach XPath 1.0 expression that returns a node set warning-message Warning message to print on expression failure admin@ncs(config)# policy rule class-map foreach /devices/device \
expr config/ios:class-map[name='a'] \
warning-message "Device {name} must have a class-map a" admin@ncs(config-rule-class-map)# top
admin@ncs(config)# commit Commit complete.
admin@ncs(config)# show full-configuration policy policy rule class-map
foreach /devices/device
expr config/ios:class-map[ios:name='a'] warning-message "Device {name} must have a class-map a" !
Now if we try to delete a class-map 'a' we will get a policy violation.
admin@ncs(config)# no devices device c2 config ios:class-map match-all a admin@ncs(config)# validate
Validation completed with warnings: Device c2 must have a class-map a admin@ncs(config)# commit
The following warnings were generated: Device c2 must have a class-map a Proceed? [yes,no] yes
Commit complete.
admin@ncs(config)# validate
Validation completed with warnings: Device c2 must have a class-map a
The {name} variable refers to the node-set from the iterator. This node-set will be the list of devices in NCS and the devices have an attribute called 'name'.
In order to understand the syntax for the XPATH expressions in the policy a pipe-target in the CLI can be used that displays the XPATH expression for an item:
admin@ncs(config)# show full-configuration devices device c2 \ config ios:class-map | display xpath
ncs:devices/ncs:device[ncs:name='c2']/ncs:config/
ios:class-map[ios:name='cmap1']/ios:prematch match-all ...
NCS Basics Policies
In order to debug policies look at the end oflogs/xpath.trace. This file will show all validated XPATH
expressions and any errors.
4-Sep-2014::11:05:30.103 Evaluating XPath for policy: class-map: /devices/device
get_next(/ncs:devices/device) = {c0}
XPath policy match: /ncs:devices/device{c0} get_next(/ncs:devices/device{c0}) = {c1} XPath policy match: /ncs:devices/device{c1} get_next(/ncs:devices/device{c1}) = {c2} XPath policy match: /ncs:devices/device{c2} get_next(/ncs:devices/device{c2}) = false
exists("/ncs:devices/device{c2}/config/class-map{a}") = true exists("/ncs:devices/device{c1}/config/class-map{a}") = true exists("/ncs:devices/device{c0}/config/class-map{a}") = true
Validation scripts can also be defined in Python. For more information about validation scripts, see section
Plug and Play Scripts, on page 71.
Out-of-Band Changes
Detecting and Reconciling Out-of-band Changes
In reality, network engineers will still modify configurations using other tools like out of band CLI or other management interfaces. It is important to understand how NCS handles this. The NCS network simulator supports CLI towards the devices. For example we can use the IOS CLI on say c0 and delete a permit-list. From the UNIX shell start a CLI session towards c0.
$ ncs-netsim cli-i c0 c0> enable
c0# configure
Enter configuration commands, one per line. End with CNTL/Z. c0(config)# show full-configuration ip community-list ip community-list standard test1 permit
ip community-list standard test2 permit 60000:30 c0(config)# no ip community-list standard test2 c0(config)#
c0# exit
Start the NCS CLI again:
$ ncs_cli -C -u admin
NCS detects if its configuration copy in CDB differs from the configuration in the device. Various strategies are used depending on device support;; transaction-ids, time-stamps, configuration hash-sums. For example a NCS user can request a check-sync operation:
admin@ncs# devices check-sync sync-result {
device c0
result out-of-sync
info got: e54d27fe58fda990797d8061aa4d5325 expected: 36308bf08207e994a8a83af710effbf0 } sync-result { device c1 result in-sync } sync-result { device c2 result in-sync NCS Basics Out-of-Band Changes
}
admin@ncs# devices device-group core check-sync sync-result {
device c0
result out-of-sync
info got: e54d27fe58fda990797d8061aa4d5325 expected: 36308bf08207e994a8a83af710effbf0 }
sync-result { device c1 result in-sync }
NCS can also compare the configurations with the CDB and show the difference:
admin@ncs# devices device c0 compare-config diff devices { device c0 { config { ios:ip { community-list { + standard test1 { + permit { + } + } - standard test2 { - permit { - permit-list 60000:30;; - } - } } } } } }
At this point we can choose if we want to use the configuration stored in the CDB as the valid configuration or the configuration on the device:
admin@ncs# devices sync- Possible completions:
sync-from Synchronize the config by pulling from the devices sync-to Synchronize the config by pushing to the devices admin@ncs# devices sync-to
In the above example we chose to overwrite the device configuration from NCS.
Resolving Conflicts
NCS will also detect out-of-sync when committing changes. In the following scenario a local c0 CLI user adds an interface. To add an interface:
1 Modify the device using the device CLI:
$ ncs-netsim cli-i c0
admin connected from 127.0.0.1 using console on ADMIN-M-915D c0> enable
c0# configure
Enter configuration commands, one per line. End with CNTL/Z.
c0(config)# interface FastEthernet 1/0 ip address 192.168.1.1 255.255.255.0
c0(config-if)# c0# exit
NCS Basics Out-of-Band Changes
2 Work with NCS CLI:
$ ncs_cli -C -u admin admin@ncs# config
Entering configuration mode terminal
admin@ncs(config)# devices device c0 config ios:interface \
FastEthernet 1/1 ip address 192.168.1.1 255.255.255.0 admin@ncs(config-if)# commit
Aborted: Network Element Driver: device c0: out of sync
At this point we have two diffs:
1 The device and NCS CDB (devices device compare-config)
2 The on-going transaction and CDB (show configuration)
admin@ncs(config)# devices device c0 compare-config diff devices { device c0 { config { ios:interface { FastEthernet 1/0 { ip { address { primary { + mask 255.255.255.0;; + address 192.168.1.1;; } } } } } } } }
admin@ncs(config)# show configuration devices device c0 config ios:interface FastEthernet1/1 ip address 192.168.1.1 255.255.255.0 exit ! !
To resolve this you can choose to synchronize the configuration between the devices and the CDB before committing. There is also an option to over-ride the out-of-sync check:
admin@ncs(config)# commit no-out-of-sync-check
or
admin@ncs(config)# devices global-settings out-of-sync-commit-behaviour Possible completions:
accept reject
As noted before, all changes are applied as complete transactions of all configurations on all of the devices. Either all configuration changes are completed successfully or all changes are removed entirely. Consider a simple case where one of the devices is not responding. For the transaction manager an error response from
NCS Basics
a device or a non-responding device are both errors and the transaction should automatically rollback to the state before the commit command was issued.
Stop c0:
$ ncs-netsim stop c0 DEVICE c0 STOPPED
Go back to the NCS CLI and perform a configuration change over c0 and c1:
admin@ncs(config)# devices device c0 config ios:ip community-list \ standard test3 permit 50000:30
admin@ncs(config-config)# devices device c1 config ios:ip community-list \ standard test3 permit 50000:30
admin@ncs(config-config)# top
admin@ncs(config)# show configuration devices device c0
config
ios:ip community-list standard test3 permit 50000:30 !
!
devices device c1 config
ios:ip community-list standard test3 permit 50000:30 !
!
admin@ncs(config)# commit
Aborted: Failed to connect to device c0: connection refused: Connection refused admin@ncs(config)# *** ALARM connection-failure: Failed to connect to
device c0: connection refused: Connection refused
NCS sends commands to all devices in parallel, not sequentially. If any of the devices fails to accept the changes or reports an error, NCS will issue a rollback to the other devices. Note, this works also for non-transactional devices like IOS CLI and SNMP. This works even for non-symmetrical cases where the rollback command sequence is not just the reverse of the commands. NCS does this by treating the rollback as it would any other configuration change. NCS can use the current configuration and previous configuration and generate the commands needed to rollback from the configuration changes.
The diff configuration is still in the private CLI session, it can be restored, modified (if the error was due to something in the config), or in some cases, fix the device.
NCS is not a "best effort" configuration management system. The error reporting coupled with the ability to completely rollback failed changes to the devices, ensures that the configurations stored in the CDB and the configurations on the devices are always consistent and that no failed or "orphan" configurations are left on the devices.
First of all, if the above was not a multi-device transaction, meaning that the change should be applied independently device per device, then it is just a matter of performing the commit between the devices. Second, NCS has a commit flag "async-commit-queue" or "sync-commit-queue". Commit queues should primarily be used for performance reasons when there is a high throughput of incoming configuration changes. Atomic transactions comes with a cost, the critical section of the data-store is locked per in the final piece of commit in each transaction. So, in cases where there are northbound systems of NCS that generates many simultaneous large configuration changes these might get queued. Commit queues will send the device commands as separate transactions, so the lock is much shorter. If any device fails an alarm will be raised.
admin@ncs(config)# commit async-commit-queue commit-queue-id 2236633674
Commit complete.
admin@ncs(config)# do show devices commit-queues
NCS Basics Out-of-Band Changes
KILO
BYTES WAITING TRANSIENT
ID AGE STATUS SIZE DEVICES FOR ERRORS DONE
------------------------------------------------------------------------- 2236633674 11 blocking 1 [ c1 c0 ] - [ c0 ] [ c1 ]
Go to the UNIX shell and start the device and monitor the commit queues.
$ncs-netsim start c0 DEVICE c0 OK STARTED $ ncs_cli -C -u admin
admin connected from 127.0.0.1 using console on ADMIN-M-915D admin@ncs# show devices commit-queues
KILO
BYTES WAITING TRANSIENT
ID AGE STATUS SIZE DEVICES FOR ERRORS DONE
------------------------------------------------------------------------- 2236633674 92 blocking 1 [ c1 c0 ] - [ c0 ] [ c1 ] admin@ncs# show devices commit-queues
KILO
BYTES WAITING TRANSIENT
ID AGE STATUS SIZE DEVICES FOR ERRORS DONE
------------------------------------------------------------------------- 2236633674 94 blocking 1 [ c1 c0 ] - [ c0 ] [ c1 ] ...
admin@ncs# show devices commit-queues % No entries found.
Devices can also be pre-provisioned, this means that the configuration can be prepared in NCS and pushed to the device when it is available. To illustrate this we can start by adding a new device to NCS that is not available in the network simulator:
admin@ncs(config)# devices device c3 address 127.0.0.1 port 10030 \ authgroup default device-type cli \ ned-id cisco-ios
admin@ncs(config-device-c3)# state admin-state southbound-locked admin@ncs(config-device-c3)# commit
Above we added a new device to NCS with IP address local host and port 10030. This device does not exist in the network simulator. We can tell NCS not to send any commands southbound by setting the admin-state to southbound-locked(actually the default). This means that all configuration changes will succeed, the result will be stored in CDB. At any point in time when the device is available in the network the state can be changed and the complete configuration pushed to the new device. The CLI sequence below also illustrates a powerful copy configuration command which can copy any configuration from one device to another. The from and to paths are separated by the keyword to.
admin@ncs(config)# copy cfg merge devices device c0 config \ ios:ip community-list to \
devices device c3 config ios:ip community-list admin@ncs(config)# show configuration
devices device c3 config
ios:ip community-list standard test2 permit 60000:30 ios:ip community-list standard test3 permit 50000:30 !
!
admin@ncs(config)# commit
admin@ncs(config)# devices check-sync ...
NCS Basics
sync-result { device c3 result locked }
Conflict Resolution
Different users or management tools can of course run parallel sessions to NCS. All on-going sessions have a logical copy of CDB. An important case needs to be understood if there is a conflict when multiple users attempt to modify the same device configuration at the same time with different changes. First lets look at the CLI sequence below, user admin to the left, user Joe to the right.
admin@ncs(config)# devices device c0 config \ ios:snmp-server community fozbar joe@ncs(config)# devices device c0 config \
ios:snmp-server community fezbar admin@ncs(config-config)# commit
System message at 2014-09-04 13:15:19...
Commit performed by admin via console using cli. joe@ncs(config-config)# commit
joe@ncs(config)# show full-configuration devices device c0 config ios:snmp-server devices device c0
config
ios:snmp-server community fezbar ios:snmp-server community fozbar !
!
There is no conflict in the above sequence, community is a list so both Joe and admin can add items to the list. Note that user Joe gets information about user admin committing.
On the other hand if two users modifies a single item that is not a list the following happens:
admin@ncs(config)# devices device c0 config ios:power redundancy-mode redundant joe@ncs(config)# devices device c0 config ios:power redundancy-mode combined admin@ncs% commit
System message at 2014-09-04 13:23:10...
Commit performed by admin via console using cli. joe@ncs% commit
joe@ncs(config-config)# commit Aborted: there are conflicts.
-------------------------------------------------------------------------- Resolve needed before configuration can be committed. View conflicts with the command 'show configuration' and execute the command 'resolved' when done, or exit configuration mode to abort.
Conflicting configuration items are indicated with a leading '!' Conflicting users: admin
-------------------------------------------------------------------------- joe@ncs(config)# show configuration
devices device c0 config
! ios:power redundancy-mode combined !
!
joe@ncs(config)# resolved
NCS Basics Conflict Resolution
joe@ncs(config)# commit Commit complete.
In this case Joe commits a change to redundancy-mode after admin and a conflict resolution process starts. Joe can see the value set by admin and his own value and choose resolution.
NCS Basics
NCS Basics Conflict Resolution
C H A P T E R
4
Network Element Drivers and Adding Devices
Network Element Drivers, NEDs, provides the connectivity between NCS and the devices. NEDs are installed as NCS packages. For information on how to add a package for a new device type, see section Packages, on page 107.
To see the list of installed packages (you will not see the F5 BigIP ):
admin@ncs# show packages packages package cisco-ios
package-version 3.0
description "NED package for Cisco IOS" ncs-min-version [ 3.0.2 ]
directory ./state/packages-in-use/1/cisco-ios component upgrade-ned-id
upgrade java-class-name com.tailf.packages.ned.ios.UpgradeNedId component cisco-ios
ned cli ned-id cisco-ios
ned cli java-class-name com.tailf.packages.ned.ios.IOSNedCli ned device vendor Cisco
NAME VALUE --------------------- show-tag interface
oper-status up
packages package f5-bigip package-version 1.3
description "NED package for the F5 BigIp FW/LB" ncs-min-version [ 3.0.1 ]
directory ./state/packages-in-use/1/bigip component f5-bigip
ned generic java-class-name com.tailf.packages.ned.bigip.BigIpNedGeneric ned device vendor F5
oper-status up !
The core parts of a NED are:
1 Data-Model : independent of underlying device interface technology NEDs come with a data-model in YANG that specifies configuration data and operational data that is supported for the device. For native NETCONF devices the YANG comes from the device, for JunOS NCS generates the model from the JunOS XML schema, for SNMP devices NCS generates the model from the MIBs. For CLI devices the NED designer wrote the YANG to map the CLI.
NCS only cares about the data that is in the model for the NED. The rest is ignored. See the NED documentation to learn more about what is covered for the NED.
2 Code: for NETCONF and SNMP devices there is no code. For CLI devices there is a minimum of code managing connecting over ssh/telnet and looking for version strings. The rest is auto-rendered from the data-model.
There are four categories of NEDs depending on the device interface:
1 NETCONF NED: the device supports NETCONF, for example Juniper.
2 CLI NED: any device with a CLI that resembles a Cisco CLI. This is used for most CLI based devices like Alcatel-Lucent, Ericsson, Force10, etc.
3 Generic NED: proprietary protocols like REST, non-Cisco CLIs.
4 SNMP NED: a SNMP device.
This chapter contains the following sections:
• Device Authentication, page 32
• Connecting Devices for Different NED Types, page 33 • Administrative State for Devices, page 35
• Trouble-shooting NEDs, page 36
Device Authentication
Every device needs an authgroup that tells NCS how to authenticate to the device:
admin@ncs(config)# show full-configuration devices authgroups devices authgroups group default
umap admin remote-name admin remote-password $4$wIo7Yd068FRwhYYI0d4IDw== ! umap oper remote-name oper remote-password $4$zp4zerM68FRwhYYI0d4IDw== ! !
devices authgroups snmp-group default default-map community-name public umap admin
usm remote-name admin
usm security-level auth-priv
usm auth md5 remote-password $4$wIo7Yd068FRwhYYI0d4IDw== usm priv des remote-password $4$wIo7Yd068FRwhYYI0d4IDw== !
!
The CLI snippet above shows that there is a mapping from NCS users admin and oper to the remote user and password to be used on the devices. There are two options, either a mapping from local user to remote user or to pass the credentials. Below is a CLI example to create a new authgroup foobar and map NCS user Joe:
admin@ncs(config)# devices authgroups group foobar umap joe same-pass same-user admin@ncs(config-umap-joe)# commit
This authgroup will pass on Joe's credentials to the device.
There is a similar structure for SNMPdevices authgroups snmp-groupthat supports SNMPv1/v2c, and
SNMPv3 authentication. The SNMP authgroup above has a default authgroup for not mapped users.
Network Element Drivers and Adding Devices Device Authentication
Connecting Devices for Different NED Types
Make sure you know the authentication information and created authgroups as above. Also try all information like port numbers, authentication information, and that you can read and set the configuration, before trying from NCS. For example CLI, if it is a CLI NED. So, if it is a CLI device, try to ssh (or telnet) to the device, and do show and set configuration.
All devices have aadmin-statewith default valuesouthbound-locked. This means that if you do not set
this value to unlocked no commands will be sent to the device.
CLI NEDs
Adding a Cisco IOS device to NCS is described below:
(See alsoexamples.ncs/getting-started/using-ncs/2-real-device-cisco-ios). Straightforward, adding
a new device on a specific address, standard ssh port:
admin@ncs(config)# devices device c7 address 1.2.3.4 port 22 device-type cli ned-id cisco-ios admin@ncs(config-device-c7)# authgroup
Possible completions: default foobar
admin@ncs(config-device-c7)# authgroup default
admin@ncs(config-device-c7)# state admin-state unlocked admin@ncs(config-device-c7)# commit
NETCONF NED for JunOS
Adding JunOS devices to NCS is described below:
See also/examples.ncs/getting-started/using-ncs/3-real-device-juniper. Make sure that NETCONF
over SSH is enabled on the JunOS device:
junos1% show system services ftp;; ssh;; telnet;; netconf { ssh { port 22;; } }
Then you can create a NCS NETCONF device as follows:
admin@ncs(config)# devices device junos1 address junos1.lab port 22 authgroup foobar \ device-type netconf
admin@ncs(config-device-junos1)# state admin-state unlocked admin@ncs(config-device-junos1)# commit
SNMP NEDs
By default all read-only objects are mapped to operational data in NCS and read-write objects are mapped to configuration data. This means that a sync-from operation will load read-write objects into NCS. We have previously explained that all configuration data for a device is available in CDB at the path
Network Element Drivers and Adding Devices