User’s Guide
PowerBuilder Application Server
Plug-In
DOCUMENT ID: DC00401-01-0100-01 LAST REVISED: November 2006
Copyright © 2006-2006 by Sybase, Inc. All rights reserved.
This publication pertains to Sybase software and to any subsequent release until otherwise indicated in new editions or technical notes. Information in this document is subject to change without notice. The software described herein is furnished under a license agreement, and it may be used or copied only in accordance with the terms of that agreement.
To order additional documents, U.S. and Canadian customers should call Customer Fulfillment at (800) 685-8225, fax (617) 229-9845. Customers in other countries with a U.S. license agreement may contact Customer Fulfillment via the above fax number. All other international customers should contact their Sybase subsidiary or local distributor. Upgrades are provided only at regularly scheduled software release dates. No part of this publication may be reproduced, transmitted, or translated in any form or by any means, electronic, mechanical, manual, optical, or otherwise, without the prior written permission of Sybase, Inc.
Sybase, SYBASE (logo), ADA Workbench, Adaptable Windowing Environment, Adaptive Component Architecture, Adaptive Server, Adaptive Server Anywhere, Adaptive Server Enterprise, Adaptive Server Enterprise Monitor, Adaptive Server Enterprise Replication, Adaptive Server Everywhere, Advantage Database Server, Afaria, Answers Anywhere, Applied Meta, Applied Metacomputing, AppModeler, APT Workbench, APT-Build, APT-Edit, APT-Execute, APT-Translator, APT-Library, ASEP, Avaki, Avaki (Arrow Design), Avaki Data Grid, AvantGo, Backup Server, BayCam, Beyond Connected, Bit-Wise, BizTracker, Certified PowerBuilder Developer, Certified SYBASE Professional, Certified SYBASE Professional Logo, ClearConnect, Client-Library, Client Services, CodeBank, Column Design, ComponentPack, Connection Manager, Convoy/DM, Copernicus, CSP, Data Pipeline, Data Workbench, DataArchitect, Database Analyzer, DataExpress, DataServer, DataWindow, DataWindow .NET, DB-Library, dbQueue, Dejima, Dejima Direct, Developers Workbench, DirectConnect Anywhere, DirectConnect, Distribution Director, Dynamic Mobility Model, e-ADK, E-Anywhere, e-Biz Integrator, E-Whatever, EC Gateway, ECMAP, ECRTP, eFulfillment Accelerator, EII Plus, Electronic Case Management, Embedded SQL, EMS, Enterprise Application Studio, Enterprise Client/ Server, Enterprise Connect, Enterprise Data Studio, Enterprise Manager, Enterprise Portal (logo), Enterprise SQL Server Manager, Enterprise Work Architecture, Enterprise Work Designer, Enterprise Work Modeler, eProcurement Accelerator, eremote, Everything Works Better When Everything Works Together, EWA, ExtendedAssist, Extended Systems, ExtendedView, Financial Fusion, Financial Fusion (and design), Financial Fusion Server, Formula One, Fusion Powered e-Finance, Fusion Powered Financial Destinations, Fusion Powered STP, Gateway Manager, GeoPoint, GlobalFIX, iAnywhere, iAnywhere Solutions, ImpactNow, Industry Warehouse Studio, InfoMaker, Information Anywhere, Information Everywhere, InformationConnect, InstaHelp, Intelligent Self-Care, InternetBuilder, iremote, iScript, Jaguar CTS, jConnect for JDBC, KnowledgeBase, Legion, Logical Memory Manager, lrLite, M2M Anywhere, Mach Desktop, Mail Anywhere Studio, Mainframe Connect, Maintenance Express, Manage Anywhere Studio, MAP, M-Business Anywhere, M-Business Channel, M-Business Network, M-Business Suite, MDI Access Server, MDI Database Gateway, media.splash, Message Anywhere Server, MetaWorks, MethodSet, mFolio, Mirror Activator, ML Query, MobiCATS, MobileQ, MySupport, Net-Gateway, Net-Library, New Era of Networks, Next Generation Learning, Next Generation Learning Studio, O DEVICE, OASiS, OASiS logo, ObjectConnect, ObjectCycle, OmniConnect, OmniQ, OmniSQL Access Module, OmniSQL Toolkit, OneBridge, Open Biz, Open Business Interchange, Open Client, Open ClientConnect, Open Client/Server, Open Client/Server Interfaces, Open Gateway, Open Server, Open ServerConnect, Open Solutions, Optima++, Partnerships that Work, PB-Gen, PC APT Execute, PC DB-Net, PC Net Library, Pharma Anywhere, PhysicalArchitect, Pocket PowerBuilder, PocketBuilder, Power++, Power Through Knowledge, power.stop, PowerAMC, PowerBuilder, PowerBuilder Foundation Class Library, PowerDesigner, PowerDimensions, PowerDynamo, Powering the New Economy, PowerScript, PowerSite, PowerSocket, Powersoft, PowerStage, PowerStudio, PowerTips, Powersoft Portfolio, Powersoft Professional, PowerWare Desktop, PowerWare Enterprise, ProcessAnalyst, Pylon, Pylon Anywhere, Pylon Application Server, Pylon Conduit, Pylon PIM Server, Pylon Pro, QAnywhere, Rapport, Relational Beans, RemoteWare, RepConnector, Report Workbench, Report-Execute, Replication Agent, Replication Driver, Replication Server, Replication Server Manager, Replication Toolkit, Resource Manager, RFID Anywhere, RW-DisplayLib, RW-Library, SAFE, SAFE/PRO, Sales Anywhere, Search Anywhere, SDF, Search Anywhere, Secure SQL Server, Secure SQL Toolset, Security Guardian, ShareLink, ShareSpool, SKILS, smart.partners, smart.parts, smart.script, SOA Anywhere Trademark,SQL Advantage, SQL Anywhere, SQL Anywhere Studio, SQL Code Checker, SQL Debug, SQL Edit, SQL Edit/TPU, SQL Everywhere, SQL Modeler, SQL Remote, SQL Server, SQL Server Manager, SQL SMART, SQL Toolset, SQL Server/CFT, SQL Server/DBM, SQL Server SNMP SubAgent, SQL Station, SQLJ, Stage III Engineering, Startup.Com, STEP, SupportNow, S.W.I.F.T. Message Format Libraries, Sybase Central, Sybase Client/Server Interfaces, Sybase Development Framework, Sybase Financial Server, Sybase Gateways, Sybase Learning Connection, Sybase MPP, Sybase SQL Desktop, Sybase SQL Lifecycle, Sybase SQL Workgroup, Sybase Synergy Program, Sybase Virtual Server Architecture, Sybase User Workbench, SybaseWare, Syber Financial, SyberAssist, SybFlex, SybMD, SyBooks, System 10, System 11, System XI (logo), SystemTools, Tabular Data Stream, The Enterprise Client/Server Company, The Extensible Software Platform, The Future Is Wide Open, The Learning Connection, The Model For Client/Server Solutions, The Online Information Center, The Power of One, TotalFix, TradeForce, Transact-SQL, Translation Toolkit, Turning Imagination Into Reality, UltraLite, UltraLite.NET, UNIBOM, Unilib, Uninull, Unisep, Unistring, URK Runtime Kit for UniCode, Viafone, Viewer, VisualWriter, VQL, WarehouseArchitect, Warehouse Control Center, Warehouse Studio, Warehouse WORKS, Watcom, Watcom SQL, Watcom SQL Server, Web Deployment Kit, Web.PB, Web.SQL, WebSights, WebViewer, WorkGroup SQL Server, XA-Library, XA-Server, XcelleNet, XP Server, XTNDAccess and XTNDConnect are trademarks of Sybase, Inc. or its subsidiaries. 07/06
Unicode and the Unicode Logo are registered trademarks of Unicode, Inc.
All other company and product names used herein may be trademarks or registered trademarks of their respective companies. Use, duplication, or disclosure by the government is subject to the restrictions set forth in subparagraph (c)(1)(ii) of DFARS 52.227-7013 for the DOD and as set forth in FAR 52.227-19(a)-(d) for civilian agencies.
Contents
About This Book ... v
CHAPTER 1 Installing and Configuring the PowerBuilder Server Plug-In... 1
Overview ... 1
JDK versions ... 2
Installing the server plug-in ... 3
Configuring the server plug-in ... 5
JBoss... 6
WebLogic ... 6
WebSphere ... 7
Running the server plug-in ... 8
CHAPTER 2 Creating Embedded Installations ... 9
Configuring and running the silent installer ... 9
Configuration and run files ... 10
Silent uninstaller files... 15
Troubleshooting and cleanup of the silent installer ... 16
CHAPTER 3 Developing PowerBuilder Components... 19
Developing PowerBuilder components ... 19
Application server component wizards ... 19
Specifying component properties ... 20
Data access... 29
Before deploying components... 31
JBoss... 31
WebLogic ... 31
WebSphere ... 32
Deploying components to an application server... 32
Generated code... 35
Naming conventions ... 35
Repository files ... 35
Contents
Live editing ... 36
Remote debugging ... 38
Writing messages to the server log ... 39
Troubleshooting ... 39
CHAPTER 4 Developing PowerBuilder Clients ... 41
Developing a PowerBuilder client ... 41
Creating a Connection object ... 42
Generating application server proxy objects ... 43
Accessing components ... 43
Proxy servers ... 44
Installing proxy servers... 44
Configuring proxy servers ... 44
Client Edition proxy servers... 47
Starting and stopping proxy servers... 47
Enabling PowerBuilder clients to communicate with EJBs... 49
Troubleshooting a proxy server... 52
About This Book
Subject This book contains information about installing and configuring the PowerBuilder® Application Server Plug-In, and developing PowerBuilder components and clients.
Audience This book is for anyone responsible for installing or configuring the server plug-in, or for creating and deploying components and clients.
How to use this book Chapter 1, “Installing and Configuring the PowerBuilder Server Plug-In,” contains instructions for installing the PowerBuilder Application Server Plug-In and configuring it for your application server.
Chapter 2, “Creating Embedded Installations,” explains how to install the PowerBuilder Application Server Plug-In silently.
Chapter 3, “Developing PowerBuilder Components,” describes how to develop and deploy PowerBuilder components.
Chapter 4, “Developing PowerBuilder Clients,” contains information about developing PowerBuilder clients and using a proxy server.
Related documents PowerBuilder documentation set The PowerBuilder documentation set is available on the Sybase Product Manuals Web site at
http://infocenter.sybase.com/help/index.jsp.
Conventions The formatting conventions used in this manual are:
Formatting example To indicate
commands and methods When used in descriptive text, this font indicates keywords such as: • Command or property names used in descriptive text
• Method or class names used in descriptive text
variables or files Italic font indicates:
• Program variables, such as myCounter
• Parts of input text that must be substituted, for example:
Server.log
• File names
File | Save Menu names and menu items are displayed in plain text. The vertical bar shows you how to navigate menu selections. For example, File | Save indicates “select Save from the File menu.”
Other sources of
information Use the Sybase Getting Started CD, the SyBooks™ CD, and the Sybase Product Manuals Web site to learn more about your product:
• The Getting Started CD contains release bulletins and installation guides in PDF format, and may also contain other documents or updated information not included on the SyBooks CD. It is included with your software. To read or print documents on the Getting Started CD, you need Adobe Acrobat Reader, which you can download at no charge from the Adobe Web site using a link provided on the CD.
• The SyBooks CD contains product manuals and is included with your
software. The Eclipse-based SyBooks browser allows you to access the manuals in an easy-to-use, HTML-based format.
Some documentation may be provided in PDF format, which you can access through the PDF directory on the SyBooks CD. To read or print the PDF files, you need Adobe Acrobat Reader.
Refer to the SyBooks Installation Guide on the Getting Started CD, or the
README.txt file on the SyBooks CD for instructions on installing and
starting SyBooks.
• The Sybase Product Manuals Web site is an online version of the SyBooks CD that you can access using a standard Web browser. In addition to product manuals, you will find links to EBFs/Maintenance, Technical Documents, Case Management, Solved Cases, newsgroups, and the Sybase Developer Network.
To access the Sybase Product Manuals Web site, go to Product Manuals at http://sybooks.sybase.com/nav/base.do.
Sybase certifications
on the Web Technical documentation at the Sybase Web site is updated frequently.
❖ Finding the latest information on product certifications
1 Point your Web browser to Technical Documents at http://www.sybase.com/support/techdocs/.
2 Select Products from the navigation bar on the left. configure Monospace font indicates:
• Information that you enter in the user interface, on the command line, or as program text
• Example program fragments • Example output fragments Formatting example To indicate
About This Book
3 Select a product name from the product list and click Go.
4 Select the Certification Report filter, specify a time frame, and click Go. 5 Click a Certification Report title to display the report.
❖ Creating a personalized view of the Sybase Web site (including support pages)
Set up a MySybase profile. MySybase is a free service that allows you to create a personalized view of Sybase Web pages.
1 Point your Web browser to Technical Documents at http://www.sybase.com/support/techdocs/.
2 Click MySybase and create a MySybase profile.
Sybase EBFs and software
maintenance
❖ Finding the latest information on EBFs and software maintenance
1 Point your Web browser to the Sybase Support Page at http://www.sybase.com/support.
2 Select EBFs/Maintenance. If prompted, enter your MySybase user name
and password. 3 Select a product.
4 Specify a time frame and click Go. A list of EBF/Maintenance releases is displayed.
Padlock icons indicate that you do not have download authorization for certain EBF/Maintenance releases because you are not registered as a Technical Support Contact. If you have not registered, but have valid information provided by your Sybase representative or through your support contract, click Edit Roles to add the “Technical Support Contact” role to your MySybase profile.
5 Click the Info icon to display the EBF/Maintenance report, or click the product description to download the software.
Accessibility
features PowerBuilder has been tested for compliance with U.S. government Section 508 Accessibility requirements. The online help for this product is also
provided in Eclipse help formats, which you can navigate using a screen reader.
Note You may need to configure your accessibility tool for optimal use. Some screen readers pronounce text based on its case; for example, they pronounce ALL UPPERCASE TEXT as initials, and MixedCase Text as words. You might find it helpful to configure your tool to announce syntax conventions. Consult the documentation for your tool.
For additional information about how Sybase supports accessibility, see
Sybase Accessibility at http://www.sybase.com/accessibility. The Sybase Accessibility site includes links to information on Section 508 and W3C standards.
C H A P T E R 1
Installing and Configuring the
PowerBuilder Server Plug-In
This chapter describes how to install and configure the PowerBuilder application server plug-in, which runs in the following application servers:
• JBoss 4.0.4
• WebLogic 9.2
• WebSphere 6.1
The server plug-in is supported for PowerBuilder version 10.5.1 and later. If PBVM patches that address issues with your application server become available, apply them to the PBVM.
This version of the PowerBuilder Application Server Plug-In is available on Windows platforms only.
Throughout this book, the PowerBuilder Application Server Plug-In is also called the server plug-in.
Overview
The server plug-in provides:
Topic Page
Overview 1
Installing the server plug-in 3 Configuring the server plug-in 5
Overview
• A deployment tool that wraps PowerBuilder NVOs as either Enterprise JavaBean (EJB) session beans or J2EE 1.4 Web services for deployment into a J2EE-compliant application server; for session beans, J2EE 1.3 and 1.4 are supported; for Web services, J2EE 1.4 or later is required
Note NVO is a generic term used to describe “custom class user objects,” which inherit directly from the PowerBuilder system type
NonVisualObject.
• A server runtime library that integrates a PowerBuilder Virtual Machine (PBVM) with an EJB container and an application server’s transaction and connection managers
• A remote debugging component that permits debugging from the
PowerBuilder IDE
• A proxy server, which allows PowerBuilder clients to call deployed PowerBuilder NVOs, without the need for a client-side JVM • Sample deployment and configuration templates for getting started
quickly and efficiently
Using the server plug-in, you can develop PowerBuilder components on the Windows platform. You can run the components on any platform where your application server supports a PBVM.
The deployment tool runs on your application server and emulates the PowerBuilder NVO deployment API.
JDK versions
The server plug-in installs version 1.4.2 and version 1.5.0 of the Java Development Kit (JDK) from Sun Microsystems. You can also configure the installation to use an existing version, as long as it is the required patch level.
Table 1-1: JDK versions and required patch levels
To verify the version and patch level of an existing installation, change to the
bin directory of the JDK installation and run: java -version
JDK version Patch level
1.4.2 13
CHAPTER 1 Installing and Configuring the PowerBuilder Server Plug-In
Installing the server plug-in
Install the server plug-in on the application server host, which need not be the same machine where the PowerBuilder IDE is running.:
1 Exit any programs that are running. If you do not, the Sybase installer may not be able to copy some files to the appropriate directories.
2 If you have downloaded PowerBuilder Application Server Plug-In, expand the installation software to a temporary location. Otherwise, insert the software CD into your CD drive.
3 Select Start | Run, and enter:
path\setup.exe
where path is the location of the installation software The installer starts, and the installation window displays. 4 Click Next in the installation window.
Note Use Back and Next to step backward and forward through the installation process to modify specifications as necessary.
Select Cancel to halt the installation process.
5 Select your country from the dropdown list to display the license agreement. You must read and accept the terms of the license agreement for your country before you can install any Sybase products. Click Next. 6 Enter the full path to which the PowerBuilder Application Server Plug-In
is to be installed.
If you want to modify the default locations of either the Sybase or Shared directory locations, select Show Advanced Locations and modify. 7 Select the type of installation, then click Next:
• Typical – installs the most common installation options. • Full – installs everything.
• Custom – allows you to choose specific installation options. Select the features to install by placing a check mark next to the feature.
Installing the server plug-in
8 To use a JDK that is already installed, select Use the Following JDK, and enter the path to the JDK installation or use the Browse button to locate it. The JDK version must be one of those listed in Table 1-1 on page 2. If the installer detects an existing JDK of the appropriate version, it is displayed as the default location.
If you do not select to use an existing JDK, the JDK is installed from the CD. If you choose a Typical install, JDK version 1.4.2 is installed. If you choose a Full install, both JDK versions 1.4.2 and 1.5 are installed. If you choose a Custom install, you can select which JDK versions to install. 9 The installer displays a summary of the features to be installed and the
installation directory. Review these entries, then click Next to continue or Back to modify your entries.
The installer begins copying files.
10 If the PowerBuilder Application Server Plug-In will obtain the licences it requires from a license server, select yes, and enter the host name and port number of the server.
11 To configure e-mail alerts, select yes, and enter:
• SMTP Server Host Name
• SMTP Server Port Number
• Sender E-mail
• Recipient E-mails
• Message Severity for E-mail Alerts
12 The installer prompts you for an administrative password. Enter and confirm a password, following the guidelines described by the installer. 13 A summary screen informs you when the installation is complete.
Select either of these options if you want to perform the corresponding tasks at this time. You can also perform these tasks at a later time:
CHAPTER 1 Installing and Configuring the PowerBuilder Server Plug-In
• Launch the Sybase Product Download Center (SPDC) Web Site – log
in to the SPDC Web site to obtain a license for the PowerBuilder Application Server Plug-In. You need to know the product edition and license type for your particular installation. If you do not have this information, ask your system administrator. See the FLEXnet
Licensing End User Guide, and the Sybase Software Asset Management User's Guide for more information.
14 Click Finish to exit the installer.
You can install multiple copies of the server plug-in on one machine, as long as each copy is in a separate installation directory.
Note PB_SERVER_HOME represents the server plug-in installation directory.
Configuring the server plug-in
To configure your system to run the server plug-in:
1 Open the %PB_SERVER_HOME%\bin\set-java-home.bat file, and verify
that the Java environment variable—either DJC_JAVA_HOME_14 or DJC_JAVA_HOME_15—refers to the home directory of the JDK you plan to use.
Verify that all the DJC_* variables are set to the correct JDK version; for example, for WebSphere:
set DJC_JAVA_HOME_15=%WAS_HOME%\java set DJC_RT_DEFAULT=15
set DJC_JDK_DEFAULT=15 set DJC_JAVAC_TARGET=1.5
2 Set the administrative password for the server plug-in by running:
“%PB_SERVER_HOME%”\bin\set-admin-password.bat
The system prompts you to enter a password, which must contain at least six characters, and one of these must be a digit.
3 Configure the server plug-in for your application server, as described in the following sections.
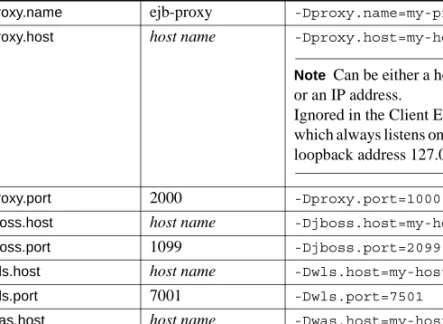
Configuring the server plug-in
When you configure the server plug-in, properties are added to
%PB_SERVER_HOME%\Repository. If you configure the server plug-in
for one application server, then want to configure the server plug-in for another application server, first remove the
%PB_SERVER_HOME%\Repository directory. Otherwise, the repository
will contain properties for both application servers, which causes problems.
Note If a directory name contains a space, you must enclose the “-D” options in double quotes for both configuring the server plug-in and starting the application server; for example, to run JBoss:
bin\run.bat “-Dpb.server.home=%PB_SERVER_HOME%”
JBoss
To configure the server plug-in installed in a JBoss application server: 1 Shut down the JBoss application server.
2 Change to the %PB_SERVER_HOME%\config directory.
3 Verify the settings in the configuration scripts:
• pb-server-jboss.xml – general server plug-in, listener, security, and
data source properties.
• ejb-proxy-jboss.xml – proxy server properties.
If required, edit then save the files.
4 Change to the %PB_SERVER_HOME%\bin directory.
5 Run the following command, where jboss-home-dir represents the JBoss installation directory:
configure pb-server-jboss –Djboss.home=jboss-home-dir
WebLogic
Note Sybase recommends that you use a Sun JVM with WebLogic; stability issues have been reported with the BEA jRockit JVM.
CHAPTER 1 Installing and Configuring the PowerBuilder Server Plug-In
To configure the server plug-in installed in a WebLogic application server: 1 Shut down the application server if it is running.
2 Change to the %PB_SERVER_HOME%\config directory.
3 Verify the settings in the configuration scripts:
• pb-server-weblogic.xml – general server plug-in, listener, security,
and data source properties.
• ejb-proxy-weblogic.xml – proxy server properties.
If required, edit, then save the files.
4 Change to the %PB_SERVER_HOME%\bin directory.
5 Run the following commands, where wls-home-dir represents the
WebLogic installation directory:
configure pb-server-weblogic –Dwls.home=wls-home-dir
WebSphere
To configure the server plug-in installed in a WebSphere application server:
1 Shut down the WebSphere application server.
2 Change to the %PB_SERVER_HOME%\config directory.
3 Verify the settings in the configuration scripts:
• pb-server-websphere.xml – general server plug-in, listener, security,
and data source properties.
• ejb-proxy-websphere.xml – proxy server properties.
If required, edit then save the files.
4 Change to the %PB_SERVER_HOME%\bin directory.
5 Run the following commands, where was-home-dir represents the
WebSphere application server installation directory:
configure pb-server-websphere –Dwas.home=was-home-dir
Note If you edit any of the configuration scripts after you have configured the server plug-in, re-run the configure command.
Running the server plug-in
Running the server plug-in
After you install and configure the server plug-in, start your application server:
1 WebLogic only: verify that %PB_SERVER_HOME%\lib\pb-server-15.jar
is in either the CLASSPATH or a location that is shared by all the deployed applications in the JVM.
2 Start your application server.
The configuration task creates the script start-<appServer>.bat, which you use to start the application server with the plug-in. Consult your application server administrator to determine the best start-up options, and add them to the script if necessary.
The configuration task also creates run-<appServer>.bat, which defines the environment variables that are required to run the server plug-in.
start-<appServer>.bat calls run-<appServer>.bat. ❖ Starting a JBoss application server
• Run:
%PB_SERVER_HOME%\bin\start-jboss.bat ❖ Starting a WebLogic application server
• Run:
%PB_SERVER_HOME%\bin\start-weblogic.bat
The first time you start the server:
a Use the WebLogic console to define a start-up class called
com.sybase.pb.server.PbServerStart. b Shut down, then restart the server. ❖ Starting a WebSphere application server
• Run:
%PB_SERVER_HOME%\bin\start-websphere.bat
The first time you start the server:
a Use the WebSphere administration console to enable the Start-up Beans service.
b Deploy the PowerBuilder start-up service:
%PB_SERVER_HOME%\deploy\websphere\pb-startup.jar.
C H A P T E R 2
Creating Embedded Installations
If you are packaging the PowerBuilder Application Server Plug-In with your own software, you may want to use a script to create a silent installation, so your end users can install the PowerBuilder Application Server Plug-In without interacting with the server plug-in installer.
Configuring and running the silent installer
The silent installer is a Java program. The installation CD contains a sample batch file to run the install with the correct JRE and CLASSPATH settings. An additional text file specifies the installation type and options. These instructions assume that you will include the PowerBuilder Application Server Plug-In install files and customized installer scripts with the install media for your own software.
❖ Configuring the silent installer
1 Create a directory for your install image.
2 Copy the following files from the PowerBuilder Application Server Plug-In installation CD to the install image directory:
• PBASP100.jar.
• readme.htm. This file contains a link to the online
documentation.
• The JRE_1_5 subdirectory and its contents. Sybase recommends that you use this JRE to run the install. Other JRE versions may not work as well.
• The Modules\LicensePanel directory is required, as are the files in the Modules folder.
Topic Page
Configuring and running the silent installer
3 Create configuration and run files as described in “Configuration and run files” on page 10. Copy any required additional files from the
PowerBuilder Application Server Plug-In CD to your install image, as described in that section.
4 To support the silent uninstallation process, create the files described in “Silent uninstaller files” on page 15.
❖ Testing and running the silent installer
1 Before running a silent installation:
a Exit any programs that are running. If you do not, the installer may not be able to copy some files to the appropriate directories. b Verify that there is enough space in your product directories; 450MB
are required.
c If your home directory contains an InstallShield vpd.properties file, make a backup copy. If you run the installer with a different user ID, check for this file in the home directory of that user ID and back it up if it exists.
2 Test the silent installer using the run script that you created at the command line or in your own product’s installation script. Running a silent installation takes 5 – 10 minutes, depending on the speed of your computer.
3 After each trial run, check for errors, and clean up your machine as described in “Troubleshooting and cleanup of the silent installer” on page 16.
Configuration and run files
In a silent installation, users cannot input information or choices. You must supply all required information in a configuration file or on the command line that runs the silent installer. The PowerBuilder Application Server Plug-In installation script contains a sample configuration file, SilentInstall.txt. The script SilentInstall.bat runs the install with this configuration. Start with copies of these files and modify them to suit your installation.
Place your configuration file and run script in the root directory of your install image. Edit the run script to refer to the file name you are using for your configuration file.
CHAPTER 2 Creating Embedded Installations
Installation location
To specify the installation location, set -W setPBInstallLocWindow.value.
The default value is C:\Program Files\Sybase\PBAppServer1.
License agreement
For the silent installation to run, you must change the value of
-V AgreeToSybaseLicense from false to true, indicating that you have read and agreed to the software license agreement. You can view license text by running the interactive install or on the Sybase Web site at
http://www.sybase.com/softwarelicenses.
JDK installation parameters
You can configure the PowerBuilder Application Server Plug-In to use the JDKs listed in Table 1-1 on page 2. For each JDK version, you can either install the JDK or use an existing installation.
The parameters in Table 2-1 allow you to configure the PowerBuilder Application Server Plug-In installation to use JDK installations that are already in place.
Table 2-1: Silent installer existing JDK parameters
To install a JDK from your install image, enable the feature parameter for that JDK and include the required files in your image, as listed in Table 2-2.
Parameter Specifies
-V EASJDKUseExisting_JDK14_CheckBox Whether to use an existing JDK 1.4 installation. To use an existing installation, set this parameter to true and specify the location as the value of the next parameter. Also, set the value of JDK14.active to false in the feature selection section.
-V EAS_JDK14_Install_Location If you are using an existing JDK 1.4 installation, the location where it is installed. Verify the version and patch level of the specified JDK as described in “JDK versions” on page 2.
-V EASJDKUseExisting_JDK15_CheckBox Whether to use an existing JDK 1.5 installation. To use an existing installation, set this parameter to true and specify the location as the value of the next parameter. Also, set the value of JDK15.active to false in the feature selection section.
-V EAS_JDK15_Install_Location If you are using an existing JDK 1.5 installation, the location where it is installed. Verify the version and patch level of the specified JDK as described in “JDK versions” on page 2.
Configuring and running the silent installer
Table 2-2: Parameters to install JDKs
Administrative password
To enable starting the application server, set the administrative password:
“set JVM_ARG=%JVM_ARG% -Deas.password=adminPassword”
Sybase Software Asset Management License input parameters
If licenses are to be obtained from the License Server, you must define the license server parameters. Set the parameters in Table 2-3 to define the license server.
Table 2-3: License server parameters
Sybase Software Asset Management e-mail alerts
To configure e-mail alerts, set:-V Variable_RBEmailAlertsYes=true -V Variable_RBEmailAlertsNo=false
Uncomment and set the -V Variable_CBSySAMEmailSeverity variable to one of these values:
WARNING INFORMATIONAL ERROR
Additional SySAM variables that you can set include: • -V Variable_TFSySAMEmailHost
• -V Variable_TFSySAMEmailPort
• -V Variable_TFSySAMEmailSender
Parameter Specifies Comments
-P JDKs.active Whether to install any JDKs from the install image
If not set to true, the next two parameters are ignored
-P JDK14.active Whether to install JDK 1.4
-P JDK15.active Whether to install JDK 1.5
Parameter Set the value to
-V Variable_LicServerYes Set to true to use a license server
-V Variable_LicServerHostname The license server host
CHAPTER 2 Creating Embedded Installations
• -V Variable_TFSySAMEmailRecipient
• -V Variable_CBSySAMEmailSeverity
See the Sybase Software Asset Management User’s Guide for additional information.
Feature selection parameters
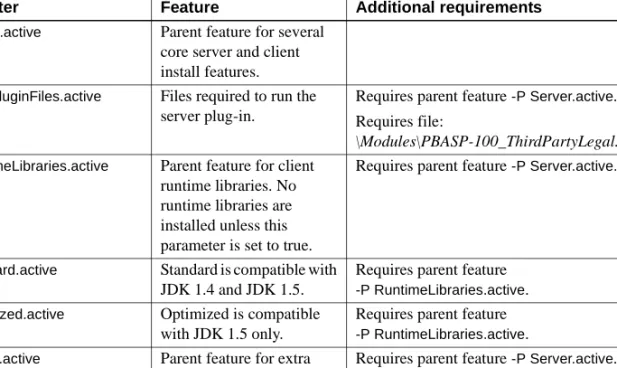
These parameters specify which optional features to install. Table 2-4 lists the parameters that select which features are installed. Each parameter requires a value. Specify true to install the feature or false to not install the feature. Some features have a parent-child relationship (shown by indentation in the sample installation script). To install child features, you must enable both the parent feature and the child feature.
Some features require additional files to be added to your installation image, as listed in Table 2-4. If you enable these features, add the required files to your image by copying them from the PowerBuilder Application Server Plug-In installation CD. Paths within your install image must match those listed in Table 2-4.
Table 2-4: Feature selection parameters
Parameter Feature Additional requirements
-P Server.active Parent feature for several core server and client install features.
-P CorePluginFiles.active Files required to run the server plug-in.
Requires parent feature -P Server.active. Requires file:
\Modules\PBASP-100_ThirdPartyLegal.pdf
-P RuntimeLibraries.active Parent feature for client runtime libraries. No runtime libraries are installed unless this parameter is set to true.
Requires parent feature -P Server.active.
-P Standard.active Standard is compatible with JDK 1.4 and JDK 1.5.
Requires parent feature
-P RuntimeLibraries.active.
-P Optimized.active Optimized is compatible with JDK 1.5 only.
Requires parent feature
-P RuntimeLibraries.active.
-P Extras.active Parent feature for extra features.
Requires parent feature -P Server.active.
-P jConnect605.active Installs the jConnect DB Scripts.
Configuring and running the silent installer
Specifying parameters on the command line
You may want to configure some install settings dynamically at install time. For example, you may want to set the PowerBuilder Application Server Plug-In installation directory to a location selected by the end user of your own installer. To do this, you can remove settings from the configuration file and specify them as command line arguments to the silent installer.
For example, if your silent installation script is SilentInstall.bat, this command installs the PowerBuilder Application Server Plug-In to
C:\Program Files\Sybase\PBserverPlugin: SilentInstall.bat -W
"setInstallLocWindow.value=C:\Program Files\Sybase\PBserverPlugin"
-P JDKs.active Parent feature for JDK installation.
-P JDK14.active Installs JDK 1.4. Requires parent feature -P JDKs.active. Requires file:
\Modules\eas-jdk-14.jar
-P JDK15.active Installs JDK 1.5. Requires parent feature -P JDKs.active. Requires file:
\Modules\eas-jdk-15.jar
-P SybaseSYSAM.active Parent feature for Sybase Software Asset
Management (SySAM)
-P NetworkLicenseServer.active Installs the SySAM network license server.
Requires parent feature -P SybaseSYSAM.active
Requires file:
\Modules\sysam.jar
-P LicenseUtils.active Installs the SySAM license utilities.
Requires parent feature -P SybaseSYSAM.active
Requires file:
\Modules\sysam-utils.jar
-P ToolsSupport.active Parent option for the tools support option. If this parameter is set to false, the tools support options are ignored.
-P PowerBuilderv1051.active Installs the PowerBuilder version 10.5.1 virtual machine.
Requires parent feature -P ToolsSupport.active. Requires file:
\Modules\pbvm1051.jar
CHAPTER 2 Creating Embedded Installations
You must also remove the equivalent settings from the silent install configuration file.
Silent uninstaller files
You can configure the silent installer to support silent uninstallation. This creates a script that your users can run to silently remove the installation from their system. The silent uninstaller requires:
• The PBASPuninstall.jar and uninstall.dat files that are created when users run the installer. The JAR file contains the Java uninstallation program, and the .dat file contains data about installed features. These files are installed in the _uninstall subdirectory of your PowerBuilder Application Server Plug-In installation.
• A JRE installation of the same version as found on the PowerBuilder Application Server Plug-In install CD.
• The files SilentUninstall.txt and SilentUninstall.bat. If these are present in the root directory of your silent installer, they are copied to the _uninstall directory when users run the install. You must prepare these files as described below before you release your silent installer to your users.
SilentUninstall.txt
A sample of this file is on the PowerBuilder Application Server Plug-In installation CD. However, SilentUninstall.txt does not run unless you edit the copy placed in your install image. This file configures the features to uninstall, using syntax similar to the options described in “Feature selection parameters” on page 13. To remove everything, set all the feature options to true. For a partial uninstallation, change the feature options to false for those features that should not be removed.
Note Some feature options in SilentUninstall.txt have a parent-child relationship, indicated by indentation in the sample file. To uninstall a parent feature, the parent feature and all child features must be set to true in
Configuring and running the silent installer
SilentUninstall.bat
Users will run this file to remove the installation from their systems. A sample of this file is on the PowerBuilder Application Server Plug-In installation CD. Place a copy in your install image, and verify the following, keeping in mind that the file will be run in the PowerBuilder Application Server Plug-In
_uninstall directory:
• The CLASSPATH includes PBASPuninstall.jar (located in the same
directory).
• The java command line specifies the path to a java executable of the same version as supplied on the PowerBuilder Application Server Plug-In software CD. You can run the uninstall with the JRE that is installed in the
_jvm subdirectory of the installation, for example: ..\_jvm\bin\java -classpath %CLASSPATH% run %* -options SilentUninstall.txt
The uninstaller does not remove all files. Files created after the installer was run are not deleted. This includes log files, property and resource files updated at runtime, and any application files that you have created in the PowerBuilder Application Server Plug-In directory. After uninstalling, you must remove these files manually.
Troubleshooting and cleanup of the silent installer
After a trial run of your silent install, check for errors, verify the installation, and clean up the machine before trying another run.
Check for installer errors on the console and in the installer log file in the specified install location. If you see ZipException errors, make sure you have included all required files in the install image.
When testing your installation results, start a server in the installation and verify that the expected features are licensed by checking the licensed features listed in the server log file. If not, verify that you have configured the license parameters described in “Sybase Software Asset Management License input parameters” on page 12.
Test any other features that you are installing, such as the Web Console, Web Services, and so forth.
CHAPTER 2 Creating Embedded Installations
❖ Cleaning up the machine
Before re-running a silent installation, uninstall the previous installation using the silent uninstaller—see “Silent uninstaller files” on page 15.
If your installer was not configured correctly, or you abort the installation before it completes, the uninstall process may fail. In that case, clean the previous installation from your machine as follows:
1 Delete the PowerBuilder Application Server Plug-In installation directory and subdirectories.
2 If you made a backup copy of the vpd.properties file, restore it. Otherwise, delete the vpd.properties file that was generated during the installation. 3 Make sure the DJC_HOME environment variable is not set in the shell
C H A P T E R 3
Developing PowerBuilder
Components
This chapter describes how to build and deploy PowerBuilder components using the PowerBuilder Integrated Development Environment (IDE) version 10.5.1.
Developing PowerBuilder components
PowerBuilder provides built-in system objects you can use in client/server, multitier, and Web applications. You can also build both visual and nonvisual user-defined objects. One type of nonvisual user-defined object, the custom class user object, inherits directly from the PowerBuilder NonVisualObject system class. Objects of this type, often called simply NVOs, can be deployed to J2EE-compliant application servers as EJB components and EJB 2.1 Web services. The server plug-in must be installed and configured on the application server.
Application server component wizards
Develop and deploy PowerBuilder NVOs as application server
components using application server component wizards and projects in the PowerBuilder development environment.
Topic Page
Developing PowerBuilder components 19 Specifying component properties 20
Before deploying components 31
Deploying components to an application server 32 Testing and debugging components 36
Specifying component properties
There are three application server component wizards, which are available from the Target, PB Object, and Project pages in the New dialog box.
Target From the Target page, the Application Server Component wizard creates a new PowerBuilder application server target, a PowerBuilder library (PBL), and a PowerBuilder custom class user object (NVO). It also creates a project from which you deploy the component to the server.
In the wizard, specify the properties of the application server component, including the profile of the server to which you want to deploy, a package name, transaction properties, and whether the components should be deployed as a Web service. For details, see “Specifying component properties” on page 20.
When you complete the wizard, open the NVO in the User Object painter, add methods to your component’s interface, and write scripts for events. The object has two pairs of events: Activate and Deactivate, and Constructor and Destructor. You typically use the Activate and Deactivate events to control instance pooling. For more information, see “Controlling the state of a pooled instance” on page 24.
PB Object To add additional objects to the same target, and optionally, to the same PBL, package, and project, right-click the application server target in the System Tree, select New, and complete the Application Server Component wizard from the PB Object page of the New dialog.
Project From the Project page, the Application Server Component wizard creates a new project to which you can add any NVOs in the current target’s library list. You might want to use this wizard to deploy a set of components to more than one application server.
Specifying component properties
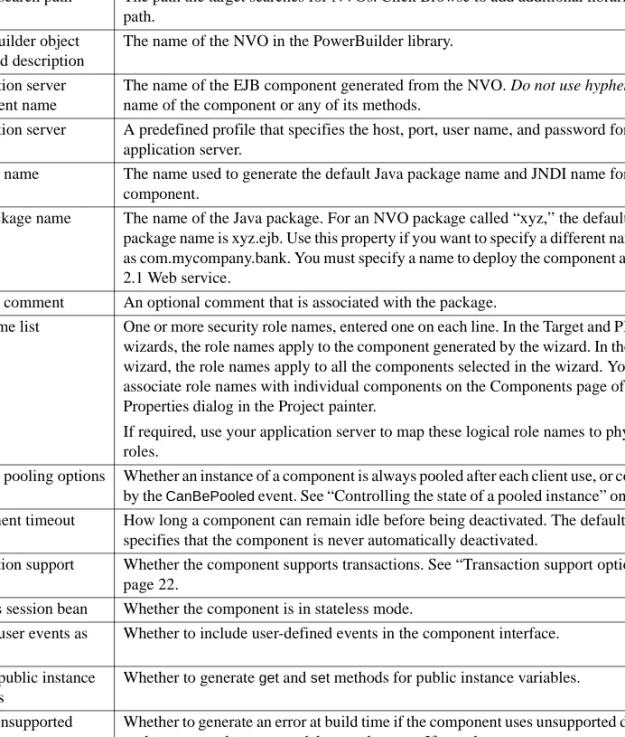
Most of the properties listed in this section can be specified in any of the wizards or in the Project painter. Table 3-1 lists the properties in the order they appear in the Application Server Component wizard that you launch from the Target page.
Note You must define an application server profile before you use a wizard. For more information, see “Creating an application server profile” on page 22.
CHAPTER 3 Developing PowerBuilder Components
Table 3-1: Component properties
Property Description
Application name, library, and target
By default, the name you use for the application is used for the library and target and as part of the object and component names.
Library search path The path the target searches for NVOs. Click Browse to add additional libraries to the path.
PowerBuilder object name and description
The name of the NVO in the PowerBuilder library. Application server
component name
The name of the EJB component generated from the NVO. Do not use hyphens in the name of the component or any of its methods.
Application server profile
A predefined profile that specifies the host, port, user name, and password for an application server.
Package name The name used to generate the default Java package name and JNDI name for the component.
Java package name The name of the Java package. For an NVO package called “xyz,” the default Java package name is xyz.ejb. Use this property if you want to specify a different name, such as com.mycompany.bank. You must specify a name to deploy the component as an EJB 2.1 Web service.
Package comment An optional comment that is associated with the package.
Role name list One or more security role names, entered one on each line. In the Target and PB Object wizards, the role names apply to the component generated by the wizard. In the Project wizard, the role names apply to all the components selected in the wizard. You can associate role names with individual components on the Components page of the Properties dialog in the Project painter.
If required, use your application server to map these logical role names to physical roles.
Instance pooling options Whether an instance of a component is always pooled after each client use, or controlled by the CanBePooled event. See “Controlling the state of a pooled instance” on page 24. Component timeout How long a component can remain idle before being deactivated. The default, 0,
specifies that the component is never automatically deactivated. Transaction support
options
Whether the component supports transactions. See “Transaction support options” on page 22.
Stateless session bean Whether the component is in stateless mode. Expose user events as
methods
Whether to include user-defined events in the component interface. Expose public instance
variables
Whether to generate get and set methods for public instance variables.
Use of unsupported datatypes generates an error
Whether to generate an error at build time if the component uses unsupported datatypes such as system datatypes and the Any datatype. If you choose not to generate errors, any functions or variables that use unsupported datatypes are not available in the component interface.
Specifying component properties
❖ Creating an application server profile
An application server profile is a named set of parameters stored in your system registry that defines a connection to a particular application server host. Before you use a wizard to create a component, create a profile for the server where the component will be deployed.
1 Select Tools | Application Server Profile.
The Application Server Profiles dialog displays, listing your configured application server profiles.
2 Select Add.
The Edit Application Server Profile dialog displays.
3 Enter the profile name, the TCP host name for the server, the IIOP port number on the server, the login name admin@system, and the password you specified for the server plug-in.
4 (Optional) Select Test to verify the connection.
5 Click OK to save your changes and close the dialog box.
The Application Server Profiles dialog displays, with the new profile name listed. The application server profile values are saved in the Registry in HKEY_CURRENT_USER/Software/Sybase/PowerBuilder/10.5/
JaguarServerProfiles. Transaction support
options Each component has a transaction attribute that indicates how the component participates in transactions. Table 3-2 lists the options. Perform full rebuild Whether to perform a full rebuild before deploying to the server to ensure that all
objects are synchronized.
Collapse class hierarchy Whether the methods of ancestor objects are included in the component interface. Debugging options Whether the component can be debugged remotely and rebuilt from the User Object
painter. These options are for use in test environments only. See “Testing and debugging components” on page 36.
Expose component as EJB 2.1 Web service
Whether to expose the component on the server as an EJB 2.1 Web service. The application server must support J2EE 1.4, and you must specify a Java package name. EJB 2.1 Web services do not support the ResultSet return type. You must use array or structure types instead. Method names cannot be overloaded.
Project name and description
The name and optional description of the project used to generate and deploy the component.
Dynamic library options Whether to consolidate all the libraries in the library list into a single PowerBuilder dynamic library (PBD) file. To ensure that DataWindow™ objects are included in the PBD, select Include Unreferenced Objects.
CHAPTER 3 Developing PowerBuilder Components
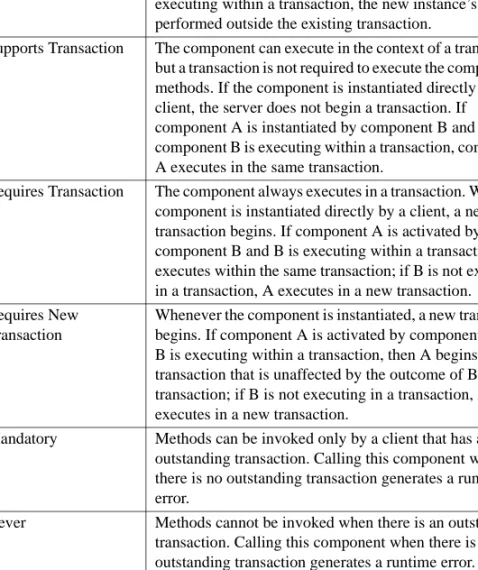
Table 3-2: Transaction attribute options
The PowerBuilder TransactionServer class supports the following methods: • CreateInstance – (for NVO intercomponent calls) use the two-argument
form, and specify the full JNDI name of the target component:
TransactionServer ts
getContextService(“TransactionServer”, ts) // generate and use proxies
pbtest_MyComp comp
ts.createInstance(comp, “pbtest/MyComp”) Transaction type Description
Not Supported The component never executes as part of a transaction. If the component is activated by another component that is executing within a transaction, the new instance’s work is performed outside the existing transaction.
Supports Transaction The component can execute in the context of a transaction, but a transaction is not required to execute the component’s methods. If the component is instantiated directly by a client, the server does not begin a transaction. If component A is instantiated by component B and component B is executing within a transaction, component A executes in the same transaction.
Requires Transaction The component always executes in a transaction. When the component is instantiated directly by a client, a new transaction begins. If component A is activated by component B and B is executing within a transaction, A executes within the same transaction; if B is not executing in a transaction, A executes in a new transaction.
Requires New Transaction
Whenever the component is instantiated, a new transaction begins. If component A is activated by component B, and B is executing within a transaction, then A begins a new transaction that is unaffected by the outcome of B’s transaction; if B is not executing in a transaction, A executes in a new transaction.
Mandatory Methods can be invoked only by a client that has an outstanding transaction. Calling this component when there is no outstanding transaction generates a runtime error.
Never Methods cannot be invoked when there is an outstanding transaction. Calling this component when there is an outstanding transaction generates a runtime error.
Specifying component properties
// call methods on comp
If the target NVO is not in the same EJB-JAR as the calling NVO, your application server’s class loader may not work correctly; you may get a ClassCastException. Consult your application server vendor for help with class-loader issues across EJB-JAR boundaries.
• DisableCommit – prevents the current transaction from being committed, because the component’s work has not been completed. The instance remains active after the current method returns.
• EnableCommit – do not deactivate the component after the current method invocation; allow the current transaction to be committed if the component instance is deactivated.
• IsTransactionAborted – determines whether the current transaction has been aborted.
• SetAbort – specifies that the component cannot complete its work for the current transaction and that the transaction should be rolled back. The component instance is deactivated when the method returns.
• SetComplete – indicates that the component has completed its work in the current transaction and that, as far as it is concerned, the transaction can be committed and the component instance can be deactivated.
Note If you are using neither a proxy server nor the
TransactionServer.CreateInstance method for NVO intercomponent calls, remove “-djcProxy” from the ejbSourceOptions property value in
pb-server-<targetServerName>.xml, and re-run configure. This prevents generating unused code.
Controlling the state of
a pooled instance When you create an application server component that supports instance pooling, that component might need to reset its state after each client has
finished using the pooled instance.
To allow you to control the state of a component, the application server triggers one or more of the events shown in Table 3-3 during the life cycle of the component.
CHAPTER 3 Developing PowerBuilder Components
Table 3-3: Component-state events
When the component’s pooling option is set to Supported, you might need to script the Activate and Deactivate events to reset the state of the pooled component. This is necessary if the component maintains state in an instance, shared, or global variable.
When the component’s pooling option is set to Not Supported, you can optionally script the CanBePooled event to specify whether a particular component instance should be pooled. If you script the CanBePooled event, you may also need to script the Activate and Deactivate events to reset the state of the pooled component. If you do not script the CanBePooled event, the component instance is not pooled.
The Application Server Component wizards that you launch from the Target and PB Object pages automatically add the Activate and Deactivate events to the NVOs they generate. If you want to script the CanBePooled event, add this event yourself. If you do this, map the event to the correct PBM code.
Constructor and Destructor are fired once When instance pooling is in effect, a component’s Constructor and Destructor events are each fired only once. The Constructor and Destructor events are not fired each time a new client uses the component instance. Therefore, to reset the state of a component instance that is pooled, add logic to the Activate and Deactivate events, instead of to the Constructor and Destructor events.
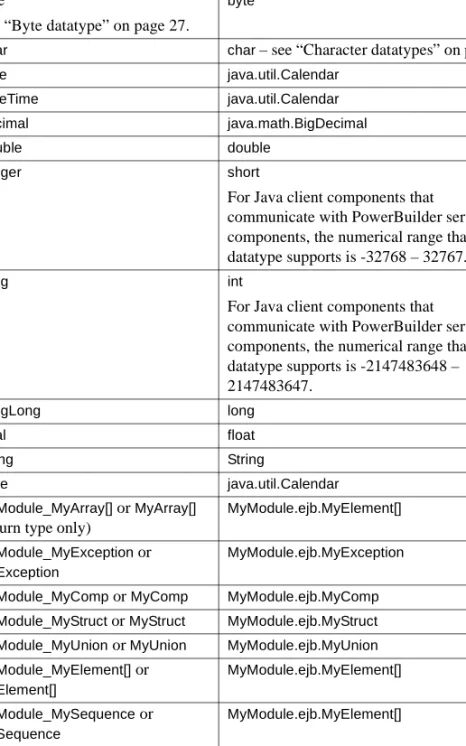
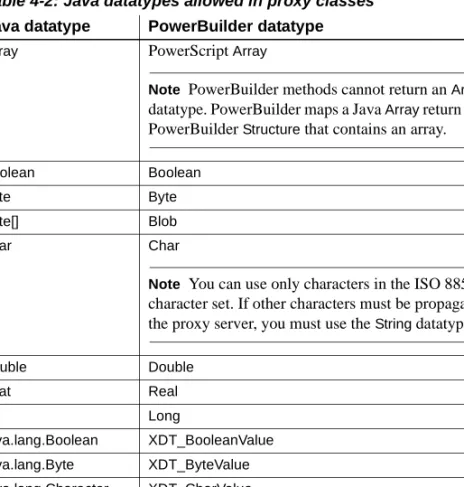
PowerBuilder to EJB
datatype mapping Table 3-4 lists the PowerBuilder to EJB datatype mappings, which are valid for datatypes passed by value, in and return parameter modes.
The PowerBuilder Application Server Plug-In does not support IDL inout and
out parameter modes, because JAX-RPC holder classes are not portable in EJB remote interfaces.
Event PBM code
Activate PBM_COMPONENT_ACTIVATE
CanBePooled PBM_COMPONENT_CANBEPOOLED
Specifying component properties
Table 3-4: PowerBuilder to EJB datatype mappings PowerBuilder type EJB parameter type
Blob byte[]
Boolean boolean
Byte
See “Byte datatype” on page 27.
byte
Char char – see “Character datatypes” on page 28.
Date java.util.Calendar DateTime java.util.Calendar Decimal java.math.BigDecimal
Double double
Integer short
For Java client components that communicate with PowerBuilder server components, the numerical range that this datatype supports is -32768 – 32767.
Long int
For Java client components that communicate with PowerBuilder server components, the numerical range that this datatype supports is -2147483648 – 2147483647. LongLong long Real float String String Time java.util.Calendar MyModule_MyArray[] or MyArray[]
(return type only)
MyModule.ejb.MyElement[]
MyModule_MyException or
MyException
MyModule.ejb.MyException
MyModule_MyComp or MyComp MyModule.ejb.MyComp MyModule_MyStruct or MyStruct MyModule.ejb.MyStruct MyModule_MyUnion or MyUnion MyModule.ejb.MyUnion MyModule_MyElement[] or
MyElement[]
MyModule.ejb.MyElement[]
MyModule_MySequence or
MySequence
(return type only)
MyModule.ejb.MyElement[]
MyModule_MyElement[n] or
MyElement[n]
CHAPTER 3 Developing PowerBuilder Components
Sybase suggests that you use the PowerBuilder DataStore system object with the ResultSet return type, especially for NVOs running in an application server. For improved performance, use NVO instance variables, and create the
DataStore and assign the DataObject in your NVO constructor.
Byte datatype PowerBuilder version 10.5 introduced a Byte datatype. To use the
PowerBuilder Char datatype for backward compatibility, run the following command (once) before deployment:
configure idl-octet-to-pb-char
To switch back to using the PowerBuilder Byte datatype, run the following command (once) before deployment:
configure idl-octet-to-pb-byte
Camel case option You can modify the default mapping of CORBA IDL identifiers to EJB identifiers to use Java naming conventions. This is called the “camel case” deployment option. When using this option, IDL operation and parameter names, such abc_xyz, map to abcXyz. IDL interfaces, sequence, structure, and union type names, such as abc_xyz, map to AbcXyz. These mappings are not applied to exception and structure field names. By default, the camel case option is disabled.
ResultSet java.sql.ResultSet ResultSets java.sql.ResultSet[]
XDT_BooleanValue java.lang.Boolean
See “XDT datatypes” on page 29.
XDT_CharValue java.lang.Character
See “Character datatypes” on page 28.
XDT_ByteValue java.lang.Byte XDT_ShortValue java.lang.Short XDT_IntValue java.lang.Int XDT_LongValue java.lang.Long XDT_FloatValue java.lang.Float XDT_DoubleValue java.lang.Double XDT_DecimalValue java.math.BigDecimal XDT_IntegerValue java.math.BigInteger XDT_DateValue java.util.Calendar XDT_TimeValue java.util.Calendar XDT_DateTimeValue java.util.Calendar
Specifying component properties
To enable the camel case option:
configure camel-case-on
To disable the camel case option:
configure camel-case-off
If you plan to expose components as Web services, enable the camel case option; otherwise, you may have problems with the JAX-RPC identifier mapping rules. See Chapter 20, “Appendix: Mapping of XML Names” in the JAX-RPC 1.1 specification, which you can download from Java Technology and XML Downloads at
http://java.sun.com/xml/downloads/jaxrpc.html#jaxrpcdocs11.
Character datatypes Only characters in the ISO 8859-1 character set can be used for in and return
parameter modes. To propagate other characters, use the String datatype. The char and java.lang.Character datatypes have no defined XML schema mappings for EJB Web services, so you cannot use these as a parameter types or structure field types if you intend to expose a component as a Web service. Use the String datatype instead.
DataStore system
object Sybase recommends that you use the PowerBuilder with the ResultSet return type, especially for NVOs running in an application DataStore system object
server. For improved performance, use NVO instance variables, and create the
DataStore and assign the DataObject in your NVO constructor.
ResultSet datatype If you intend to expose a component as a Web service, do not use the ResultSet
datatype, because java.sql.ResultSet is not portable in EJB Web service endpoint interfaces. You can use arrays (IDL sequences) of structures instead, Java arrays or PowerBuilder variable-sized arrays. The EJB return type
java.sql.ResultSet maps to a complex XML schema element that contains result set data and the schema for the result set. The content of the nested XML element is mapped according to the SQL/XML ANSI standard; for example:
<schema xmlns="http://www.w3.org/2001/XMLSchema" targetNamespace="jdbc.wst.sybase.com">
<import namespace="http://schemas.xmlsoap.org/soap/encoding/" /> <complexType name="DataReturn">
<sequence>
<element name="XML" nillable="true" type="xsd:string" /> <element name="updateCount" type="xsd:int" />
<element name="DTD" nillable="true" type="xsd:string" /> <element name="schema" nillable="true" type="xsd:string" /> </sequence>
</complexType> </schema>
CHAPTER 3 Developing PowerBuilder Components
Using IDL parameter modes inout and out with TabularResults::ResultSet is not supported for components that are exposed as Web services. You may find that using arrays (IDL sequences) of structures instead of ResultSets simplifies the coding of Web service client applications, and this technique is portable across all application servers. When writing PowerBuilder NVO methods, which do not permit the use of arrays as method return types, define a row structure to represent a result row, and a table structure containing an array of row structures to represent a ResultSet.
XDT datatypes To obtain the PowerBuilder XDT_* datatypes to use as PowerBuilder structure field types or component parameter types, use the EAServer Proxy wizard or the Application Server Proxy wizard in the PowerBuilder IDE to generate proxies for the XDT package. Each of the XDT_* datatypes contains a value field and an isNull field. You must set isNull to true if you want to indicate null values.
Data access
From PowerBuilder NVOs, you can access data using either JDBC data sources or Sybase native data sources.
❖ Accessing JDBC data sources in NVOs
1 To set up a JDBC data source in an NVO, use this PowerScript™ code:
sqlca.dbms = “JDBC”
sqlca.dbparm = “CacheName=’DefaultDS’” connect; // check error code
... // use embedded SQL or DataStore disconnect; // check error code
2 Using your application server facilities, define a JDBC data source and assign a JNDI name to it.
3 Edit %PB_SERVER_HOME%\config\pb-server-<serverName>.xml, and
map the value of the PowerBuilder CacheName to an application server data source JNDI name.
4 Re-run the configure command—see “Configuring the server plug-in” on page 5.
Specifying component properties
Native data sources The server plug-in supports five native data source types: Sybase, Oracle, Oracle Unicode, ODBC, and ODBC Unicode. These data source types create their connections using C/C++ code. The connections are managed using Java objects, which provide a JDBC API.
❖ Accessing Sybase native data sources in NVOs
1 The following PowerScript code sets the DBMS to Sybase native, and the cache name to the Sybase_JCM cache:
sqlca.dbms = “SYJ”
sqlca.dbparm = “CacheName=’Sybase_JCM’” ...
To use a cache other than “Sybase_JCM,” set CacheName to the value of a data source that is defined in
%PB_SERVER_HOME%\config\pb-server-<serverName>.xml.
2 In your application server interface, set the driver class and database URL data source properties, replacing dbName, userName, and password with the appropriate values.
3 Sybase_JCM data source type. The server plug-in uses different names for Open Client™ libraries. Copy the libraries from the Open Client dll directory to %PB_SERVER_HOME%\lib, changing the library names as appropriate—the Open Client library names begin with “lib” and the PowerBuilder library names begin with “libj.”
Data source
type Driver class Database connection URL
Sybase_JCM com.sybase.jaguar.jcm.sybase.SybaseDriver jdbc:sybase:jcm:sybase:databaseName=
db-name;user=userName; password=password
Oracle_JCM com.sybase.jaguar.jcm.oracle.OracleDriver jdbc:sybase:jcm:oracle:databaseName=
db-name;user=userName; password=password
Oracle_Unicode com.sybase.jaguar.jcm.oracle.OracleuDriver jdbc:sybase:jcm:oracle:databaseName=
db-name;user=userName; password=password
Odbc_JCM com.sybase.jaguar.jcm.odbc.OdbcDriver jdbc:sybase:jcm:odbc:databaseName=
db-name;user=userName; password=password
Odbc_Unicode com.sybase.jaguar.jcm.odbc.OdbcuDriver jdbc:sybase:jcm:odbc:databaseName=
db-name;user=userName; password=password
CHAPTER 3 Developing PowerBuilder Components
Before deploying components
This section describes tasks to perform before you deploy PowerBuilder components to your application server.
JBoss
Before you deploy PowerBuilder components to a JBoss application server: 1 Verify that automatic deployment is enabled—see the JBoss online
documentation at
http://wiki.jboss.org/wiki/Wiki.jsp?page=ConfiguringTheDeploymentScannerI nConfjbossSystem.xml.
2 Set the ScanEnabled attribute to true.
Sybase tests have shown that automatic redeployment does not always work correctly—you may need to restart JBoss to pick up your changes.
WebLogic
Before you deploy PowerBuilder components to a WebLogic application server:
1 Customize the WebLogic Ant deployment options in
%PB_SERVER_HOME%\config\wls-ejb-deploy.xml. See your WebLogic
documentation for details.
2 In %PB_SERVER_HOME%\bin\wls-ejb-deploy.bat, verify the settings
for:
• username
• password
• port
Open Client libraries PowerBuilder libraries
libcs.dll libjcs.dll
Deploying components to an application server
• servername
WebSphere
Before you deploy PowerBuilder components to a WebSphere application server, customize the WebSphere Ant deployment options in the following files, located in %PB_SERVER_HOME%\config:
• ws-ejb-deploy.xml
• ws-install-app.xml
See your WebSphere documentation for details.
Sybase tests have found that deploying an EJB-JAR to WebSphere can be slower than deploying to JBoss or WebLogic. Check your application-server or server plug-in log file to verify the status of deployment in progress.
Deploying components to an application server
The deployment tool provided with the server plug-in wraps PowerBuilder NVOs as standard EJB session beans and generates target-specific deployment descriptors to bind JNDI names and JDBC data source resource references automatically.
❖ Deploying PowerBuilder components
1 Open the PowerBuilder Application Server Component project in the Project painter.
2 Select Edit | Properties from the menu, or click Properties on the PainterBar.
3 On the Server Host page in the Properties dialog, verify that the properties you specified in the Application Server Profiles dialog are correct. See “Creating an application server profile” on page 22.
Note You can override the host name and port number that the server uses for its deployment listener by changing the iiopListeners property in
%PB_SERVER_HOME%\config\pb-server-<targetServerName>.xml. If