Turin Networks Inc.
TransNav Management System
Documentation
Release TN3.1.x
Publication Date: March 2007Document Number: 800-0006-TN31 Rev. A
FCC Compliance
This equipment has been tested and found to comply with the limits for a Class A digital device, pursuant to Part 15 of the FCC Rules. This equipment generates, uses, and can radiate radio frequency energy and, if not installed and used in accordance with the installation instructions may cause harmful interference to radio communications.
Canadian Compliance
This Class A digital apparatus meets all requirements of the Canadian Interference-Causing Equipment Regulations. Cet appareil numérique de la classe A respects toutes les exigences du Règlement sur le matériel brouilleur du Canada.
Japanese Compliance
This is a Class A product based on the standard of the Voluntary Control Council for Interference by Information Technology Equipment (VCCI). If this equipment is used in a domestic environment, radio disturbance may occur, in which case, the user may be required to take corrective actions.
International Declaration of Conformity
We, Turin Networks, Inc. declare under our sole responsibility that the Traverse platform (models: Traverse 2000, Traverse 1600, and Traverse 600) to which this declaration relates, is in conformity with the following standards:
EMC Standards
EN55022 EN55024 CISPR-22
Safety Standards
EN60950 CSA 22.2 No. 60950, ASINZS 3260
IEC 60950 Third Edition. Compliant with all CB scheme member country deviations.
Following the provisions of the EMC Directive 89/336/EEC of the Council of the European Union.
Copyright © 2007 Turin Networks, Inc.
All rights reserved. This document contains proprietary and confidential information of Turin Networks, Inc., and may not be used, reproduced, or distributed except as authorized by Turin Networks. No part of this publication may be reproduced in any form or by any means or used to make any derivative work (such as translation, transformation or adaptation) without written permission from Turin Networks, Inc.
Turin Networks reserves the right to revise this publication and to make changes in content from time to time without obligation on the part of Turin Networks to provide notification of such revision or change. Turin Networks may make improvements or changes in the product(s) described in this manual at any time.
Turin Networks Trademarks
Turin Networks, the Turin Networks logo, Traverse, TraverseEdge, TransAccess, TransNav, and Creating The Broadband Edge are trademarks of Turin Networks, Inc. or its affiliates in the United States and other countries. All other trademarks, service marks, product names, or brand names mentioned in this document are the property of their respective owners.
Government Use
Use, duplication, or disclosure by the U.S. Government is subject to restrictions as set forth in FAR 12.212 (Commercial Computer Software-Restricted Rights) and DFAR 227.7202 (Rights in Technical Data and
T
RANS
N
AV
M
ANAGEMENT
S
YSTEM
S
ERVER
G
UIDE
ContentsAbout this Document . . . iii
Section 1 Installation and Description Chapter 1
Installation for Solaris Workstations . . . 1-1 Chapter 2
Installation for Windows Workstations. . . 1-11 Chapter 3
Management Server Administration . . . 1-19
Section 2 Management Server Procedures Chapter 1
Creating the Management Servers . . . 2-1 Chapter 2
Management Server SNMP . . . 2-13 Chapter 3
Server Administration Procedures. . . 2-19
Server Guide [TN3.1.x] Document Description
About this Document
Introduction This description contains the following documentation topics: ■ Traverse System Product Documentation, page iii ■ TraverseEdge System Product Documentation, page iv
■ TransNav Management System Product Documentation, page v ■ Operations Documentation, page vi
■ Information Mapping, page vi ■ If You Need Help, page vii ■ Calling for Repairs, page vii
Refer to —“What’s New in the Documentation?” to review the new and changed features for this release.
Traverse System Product Documentation
The TraverseTM system product documentation set includes the documents described in
the table below.
Traverse System Product Documentation
Document Description Target Audience
Traverse Product Overview
This document provides a detailed overview of the Traverse system. It also includes engineering and planning information.
Anyone who wants to understand the Traverse system and its applications. Traverse
Installation and Configuration
This document provides required equipment, tools, and step-by-step procedures for:
■ Hardware installation
■ Power cabling
■ Network cabling
■ Node power up
■ Node start-up
Installers, field, and network engineers
Traverse Provisioning
This document provides step-by-step procedures for provisioning a network of Traverse nodes using the TransNav management system. See the TransNav Management System Product Documentation.
Network engineers, provisioning, and net-work operations center (NOC) personnel
TraverseEdge System Product Documentation
TraverseEdge System Product Documentation
The TraverseEdge 100TM User Guide includes the sections described in the table below.
TraverseEdge 100 System Product Documentation
Section Description Target Audience
Product Overview This section provides a detailed overview of the TraverseEdge system.
Anyone who wants to understand the Traver-seEdge system and its applications
Description and Specifications
This section includes engineering and planning infor-mation.
Field and network engi-neers
Installation and Configuration
This document identifies required equipment and tools and provides step-by-step procedures for:
■ Hardware installation
■ Power cabling
■ Network cabling
■ Node power up
■ Node start-up
Installers, field, and network engineers
Provisioning the Network
This section provides step-by-step procedures for provisioning a TraverseEdge network using the Tran-sNav management system. Also see the TransNav Management System Product Documentation.
Network engineers, provisioning, and net-work operations center (NOC) personnel Configuring
Equip-ment
This section provides step-by-step procedures for configuring module and interface parameters of a TraverseEdge using the TransNav management sys-tem. Also see the TransNav Management System Product Documentation.
Network engineers, provisioning, and net-work operations center (NOC) personnel
Creating TDM Ser-vices
This section provides step-by-step procedures for provisioning a TraverseEdge network using the Tran-sNav management system. Also see the TransNav Management System Product Documentation.
Network engineers, provisioning, and net-work operations center (NOC) personnel Creating Ethernet
Services
This section provides step-by-step procedures for provisioning a TraverseEdge network using the Tran-sNav management system. See the TransNav Man-agement System Product Documentation.
Network engineers, provisioning, and net-work operations center (NOC) personnel Appendices This section provides installation and provisioning
checklists, compliance information, and acronym descriptions.
Installers and anyone who wants reference information.
TransNav Management System Product Documentation TransNav Management System Product Documentation
The TransNavTM management system product documentation set includes the
documents described in the table below.
TransNav Management System Product Documentation
Document Description Target Audience
TransNav Man-agement System Product Overview
This document provides a detailed overview of the TransNav management system.
This document includes hardware and software requirements for the management system. It also includes network management planning information.
Anyone who wants to understand the Tran-sNav management sys-tem
TransNav Man-agement System Server Guide
This document describes the management server com-ponent of the management system and provides proce-dures and troubleshooting information for the server.
Field and network engi-neers, provisioning, and network opera-tions center (NOC) personnel TransNav
Man-agement System GUI Guide
This document describes the graphical user interface including installation instructions and logon proce-dures.
This document describes every menu, window, and screen a user sees in the graphical user interface. TransNav
Man-agement System CLI Guide
This document includes a quick reference to the com-mand line interface (CLI). Also included are compre-hensive lists of both the node-level and domain-level CLI commands.
TransNav Man-agement System TL1 Guide
This document describes the syntax of the TL1 lan-guage in the TransNav environment.
This document also defines all input commands and expected responses for retrieval commands as well as autonomous messages that the system outputs due to internal system events.
Operations Documentation
Operations Documentation
The document below provides operations and maintenance information for Turin’s TransNav managed products.
Information Mapping
Traverse, TransNav, and TraverseEdge 100 system documentation uses the Information Mapping format which presents information in small units or blocks. The beginning of an information block is identified by a subject label in the left margin; the end is identified by a horizontal line. Subject labels allow the reader to scan the document and find a specific subject. Its objective is to make information easy for the reader to access, use, and remember.
Each procedure lists the equipment and tools and provides step-by-step instructions required to perform each task. Graphics are integrated into the procedures whenever possible.
Operations Documentation
Document Description Target Audience
Node Operations and Maintenance
This document identifies required equipment and tools. It also provides step-by-step procedures for: ■ Alarms and recommended actions
■ Performance monitoring
■ Equipment LED and status
■ Diagnostics
■ Test access (SONET network only)
■ Routine maintenance
■ Node software upgrades
■ Node hardware upgrades
Field and network engineers
If You Need Help
If You Need Help
If you need assistance while working with Traverse products, contact the Turin Networks Technical Assistance Center (TAC):
■ Inside the U.S., toll-free: 1-866-TURINET (1-866-887-4638) ■ Outside the U.S.: 916-348-2105
■ Online: www.turinnetworks.com/html/support_assistance.htm
TAC is available 6:00AM to 6:00PM Pacific Time, Monday through Friday (business hours). When the TAC is closed, emergency service only is available on a callback basis. E-mail support (24-hour response) is also available through:
[email protected]. Calling for
Repairs
If repair is necessary, call the Turin Repair Facility at 1-866-TURINET (866-887-4638) for a Return Material Authorization (RMA) number before sending the unit. The RMA number must be prominently displayed on all equipment cartons. The Repair Facility is open from 6:00AM to 6:00PM Pacific Time, Monday through Friday.
When calling from outside the United States, use the appropriate international access code, and then call 916-348-2105 to contact the Repair Facility.
When shipping equipment for repair, follow these steps:
1. Pack the unit securely.
2. Enclose a note describing the exact problem.
3. Enclose a copy of the invoice that verifies the warranty status.
4. Ship the unit PREPAID to the following address: Turin Networks, Inc.
Turin Repair Facility Attn: RMA # ________ 1415 North McDowell Blvd. Petaluma, CA 94954 USA
S
ECTION
1 I
NSTALLATION
AND
D
ESCRIPTION
SECTION 1INSTALLATION AND DESCRIPTION
Contents
Chapter 1
Installation for Solaris Workstations
Introduction . . . 1-1 Before You Install Server Software . . . 1-1 Install Server Software on a Solaris Workstation . . . 1-2 Run the Server as a Daemon . . . 1-3 Install Server Online Help Files on a Solaris Workstations . . . 1-5 Install Help Files from CD (Solaris) . . . 1-5 Install Help Files from Your Customer Portal (Solaris) . . . 1-7 Remove Server Software from Solaris Workstation . . . 1-10
Chapter 2
Installation for Windows Workstations
Introduction . . . 1-11 Before You Install Server Software . . . 1-11 Install Server Software on a Windows Workstation. . . 1-12 Install Server Online Help Files on a Windows Workstations . . . 1-13 Install Help Files from CD (Windows) . . . 1-13 Install Help Files from Your Customer Portal (Windows) . . . 1-15 What is the All-In-One Online Help System? . . . 1-17 Uninstall Server Software from Windows Workstation . . . 1-18
Chapter 3
Management Server Administration
Introduction . . . 1-19 Using Multiple Servers . . . 1-19 Server Administration Tool Description . . . 1-20 Server Administration Components Description . . . 1-21 Management Server Parameters . . . 1-22
List of Figures
Figure 1-1 Window Menu Button . . . 1-6 Figure 1-2 EMS & FLASH Downloads Link . . . 1-7 Figure 1-3 All-In-One Online Help Download Link Sample . . . 1-7 Figure 1-4 Save As Dialog Box . . . 1-8 Figure 1-5 Window Menu Button . . . 1-9 Figure 1-6 Executive File in Explorer Window . . . 1-12 Figure 1-7 Management Server Installer Wizard . . . 1-13
TransNav Server Guide, Section 1 Installation and Description
Figure 1-8 Close Button Icon . . . 1-14 Figure 1-9 EMS & FLASH Downloads Link . . . 1-15 Figure 1-10 All-In-One Online Help Download Link Sample. . . 1-15 Figure 1-11 File Download Dialog Box . . . 1-16 Figure 1-14 Server Uninstall Wizard . . . 1-18 Figure 1-15 Server Admin Tool. . . 1-20 Figure 1-16 Execution Configuration Dialog Box . . . 1-22
List of Tables
Table 1-1 Before You Create the Management Server . . . 1-1 Table 1-2 Install Server Software on a Solaris Workstation . . . 1-2 Table 1-3 Run the Server as a Daemon . . . 1-3 Table 1-4 Install Help Files from CD (Solaris) . . . 1-5 Table 1-5 Install Help Files from Your Customer Portal (Solaris) . . . 1-7 Table 1-6 Remove Server Software from Solaris Workstation . . . 1-10 Table 1-7 Before You Install the Management Server. . . 1-11 Table 1-8 Install Server Software on a Windows Workstation. . . 1-12 Table 1-9 Install Help Files from CD (Windows) . . . 1-13 Table 1-11 Uninstall Server Software from Windows Workstation . . . 1-18
SECTION 1INSTALLATION AND DESCRIPTION
Chapter 1
Installation for Solaris Workstations
Introduction You can use the TransNav management system on either a Solaris or a Windows workstation. This chapter provides instructions on how to install management system software on the Sun Solaris workstation.
■ Before You Install Server Software, page 1-1
■ Install Server Software on a Solaris Workstation, page 1-2 ■ Run the Server as a Daemon, page 1-3
■ Install Server Online Help Files on a Solaris Workstations, page 1-5 ■ Install Help Files from the Turin Infocenter, page 1-7
■ Remove Server Software from Solaris Workstation, page 1-10
See Chapter 2—“Installation for Windows Workstations,” page 1-11 for the procedures to install the management system on a Windows workstation.
Before You Install Server Software
Before you install the management server software, understand the following requirements.
Table 1-1 Before You Install the Management Server Software
Requirement Reference
Disable any operating system firewall applications that may be installed on this computer.
Contact your local site administrator.
Server requirements TransNav Management System Product Overview, Section 2—Management System Planning,
Chapter 1—“TransNav Management System Requirements,” page 2-1
Server software includes the GUI application
You can use either the GUI or CLI interface on the same computer you are using as a management server. These applications are installed at the same time you install the server software.
For information on downloading the server software, refer to Section 2—Management Server Procedures, Chapter 3—“Server Administration Procedures,” Download the TransNav Management Software from the Turin Infocenter.. Server administration procedures See Section 2—Management Server Procedures for detailed
procedures on initializing, starting, stopping, and maintaining the TransNav management server.
TransNav Server Guide, Section 1: Installation and Description
Install Server Software on a Solaris Workstation
Install Server Software on a Solaris Workstation
Use this procedure to install the management server software on a Solaris workstation. Table 1-2 Install Server Software on a Solaris Workstation
Step Procedure
Important: You must install and start the server software with the same user name. The user should be a non-Root user (i.e., not be the super user).
1 Read the topic Before You Install Server Software, page 1-1 before you start this procedure.
2 On your Solaris system, ensure the Turin system software CD is inserted in the CD-ROM drive, the drive is mounted, and that the drive can be accessed by the current user. The mounting procedure is site-specific. For any required help with this procedure, contact your local UNIX
administrator.
3 Open a terminal window and create a user-defined directory according to local site practices.
Important: The user who is going to be the EMS server administrator must have read, write, and execute permissions to this new directory. For example:
$ mkdir /files/EMS
4 Change to the directory you created in Step 3. For example:
$ cd /files/EMS
5 Type the following command to unzip and untar the server software in one step.
For example:
$ gunzip c/cdrom/*.gz | tar xvf
-This particular example assumes /cdrom is the mountpoint for the CD. Change the syntax accordingly to your local setup. The spaces, the pipe character (|) and the dash (-) must be typed exactly as shown.
Important: The user who unzips the *.gz file will have the permissions on the directory files necessary to run the EMS server. To change permissions, contact your local UNIX administrator.
6 The Install Server Software on a Solaris Workstation procedure is complete.
Chapter 1 Installation for Solaris Workstations
Run the Server as a Daemon
Run the Server as a Daemon
Use this procedure to allow the server to restart on the workstation in case the workstation turns off or power cycles. This daemon restarts the server when the workstation starts again.
Important: You need Root access to the workstation on which the server is installed.
Table 1-3 Run the Server as a Daemon
Step Procedure
1 Complete the procedure: Install Server Software on a Solaris Workstation, page 1-2.
2 In the directory where the TransNav software is installed, switch to the Root user. Enter
$ su
Enter the password for the Root user.
3 At the command line, enter:
# ./ems_installdaemon.sh -u <userName> -d <directoryName>
where:
userName is the name by which the user logs onto the workstation.
directoryName is the name of the directory in which the management server software is installed.
4 Verify the information is correct when the system responds:
This script will install the EMS as a daemon on this machine.
The EMS will then be started automatically every time this machine boots.
Setup configuration: user: <userName>
User that will run EMS processes (use -u <user> to change)
dir: <directoryName>
Directory where EMS was installed (use -d <directory> to change) Do you wish to proceed? ([yes]|no) 5 Enter Y to continue the installation.
TransNav Server Guide, Section 1: Installation and Description
Run the Server as a Daemon
6 The system responds:
# Creating /etc/ems.conf ... done # Creating /etc/init.d/ems ... done
# Setting start links for runlevels ... 3 ... done # Setting kill links for runlevels ... 0 ... done Installation complete.
7 The Run the Server as a Daemon procedure is complete.
Continue to Install Server Online Help Files on a Solaris Workstations, page 1-5.
Table 1-3 Run the Server as a Daemon (continued)
Chapter 1 Installation for Solaris Workstations
Install Help Files from CD (Solaris)
Install Server Online Help Files on a Solaris Workstations
To learn more about the All-In-One, see What is the All-In-One Online Help System?, page 1-18.
Select one of these access points to: ■ Install Help Files from CD (Solaris)
■ Install Help Files from the Turin Infocenter Install Help
Files from CD (Solaris)
Use this procedure to install help files from the documentation CD to the management server on a Solaris workstation.
Table 1-4 Install Help Files from CD (Solaris)
Step Procedure
1 On your Solaris workstation, ensure the CD is inserted into the CD-ROM drive, the drive is mounted, and that the drive can be accessed by the current user. The mounting procedure is site-specific. For any required help with this procedure, contact your local UNIX administrator.
2 Open a terminal window and change directory to the management server online help directory.
Important: The user who is going to be the management server administrator must have read and write permissions to this directory. For example:
$ cd <server_home>/EMS/help where:
■ <server_home> is the user-defined directory assigned during the management server software installation (e.g., /server).
■ EMS/help is the system-defined directory assigned during the management server software installation.
TransNav Server Guide, Section 1: Installation and Description
Install Help Files from CD (Solaris)
3 Type this command to download and install the help files into the management server online help directory.
Important: The user who unzips the file will have the permissions on these files. To change permissions, contact your local UNIX administrator. Using the: ■ documentation CD: $ unzip /cdrom/Download/allinone<ReleaseNumber>.zip . ■ software CD: $ unzip /cdrom/allinone<ReleaseNumber>.zip . where:
■ allinone.zip is the source file containing the online help files. ■ the target directory
.
symbol is known as a dot and represents thecurrent directory.
Note: This particular example assumes /cdrom is the mountpoint for the CD. Change the source directory syntax accordingly to your local setup. The spaces and dots must be typed exactly as shown.
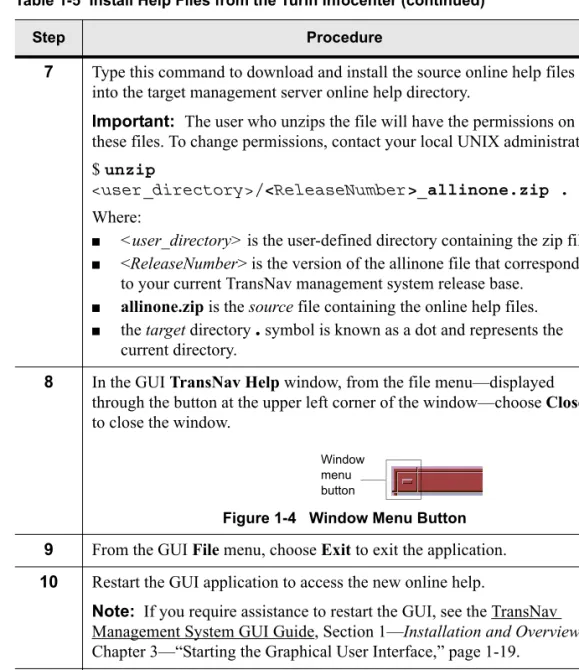
4 In the GUI TransNav Help window, from the file menu—displayed through the button at the upper left corner of the window—choose Close
to close the window.
Figure 1-1 Window Menu Button
5 From the GUI File menu, choose Exit to exit the application.
6 Restart the GUI application to access the new online help.
Note: If you require assistance to restart the GUI, see the TransNav Management System GUI Guide, Section 1—Installation and Overview, Chapter 3—“Starting the Graphical User Interface,” page 1-19.
7 The Install Help Files from CD (Solaris) procedure is complete. Continue to the server procedures in Section 2—Management Server Procedures. Table 1-4 Install Help Files from CD (Solaris) (continued)
Step Procedure
Window menu button
Chapter 1 Installation for Solaris Workstations
Install Help Files from the Turin Infocenter
Install Help Files from the Turin
Infocenter
Use this procedure to install help files from the Turin Infocenter to the management server on a Solaris workstation.
Important: User registration is required to access the Turin Infocenter. If you do not have a current CustomerID and password, contact your sales account team to register. Table 1-5 Install Help Files from the Turin Infocenter
Step Procedure
1 On your Solaris workstation, open an internet browser window.
2 In the Address bar, enter the address:
www.turinnetworks.com
3 In the Turin Infocenter login (located in the bottom left corner of the Turin Networks Infocenter webpage), enter the <username> and <password>
provided by the Turin webmaster and click OK to enter your site.
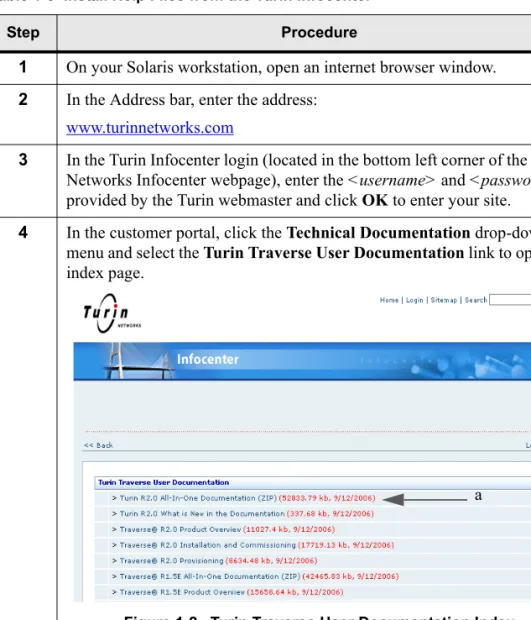
4 In the customer portal, click the Technical Documentation drop-down menu and select the Turin Traverse User Documentation link to open an index page.
Figure 1-2 Turin Traverse User Documentation Index
a. Locate and click the All-in-One Documentation download link that corresponds to your current TransNav management system release base.
TransNav Server Guide, Section 1: Installation and Description
Install Help Files from the Turin Infocenter
5 In the Save As dialog box, navigate to a temporary directory (e.g.,
<user_directory>), and click OK to save the zip file.
Figure 1-3 Save As Dialog Box
6 Open a terminal window and change directory to the management server online help directory.
Important: The user who is going to be the management server administrator must have read and write permissions to this directory. For example:
$ cd <server_home>/EMS/help Where:
■ <server_home> is the user-defined directory assigned during the management server software installation (e.g., /server).
■ EMS/help is the system-defined directory assigned during the management server software installation.
Table 1-5 Install Help Files from the Turin Infocenter (continued)
Chapter 1 Installation for Solaris Workstations
Install Help Files from the Turin Infocenter
7 Type this command to download and install the source online help files into the target management server online help directory.
Important: The user who unzips the file will have the permissions on these files. To change permissions, contact your local UNIX administrator. $ unzip
<user_directory>/<ReleaseNumber>_allinone.zip . Where:
■ <user_directory> is the user-defined directory containing the zip file. ■ <ReleaseNumber> is the version of the allinone file that corresponds
to your current TransNav management system release base. ■ allinone.zip is the source file containing the online help files. ■ the target directory
.
symbol is known as a dot and represents thecurrent directory.
8 In the GUI TransNav Help window, from the file menu—displayed through the button at the upper left corner of the window—choose Close
to close the window.
Figure 1-4 Window Menu Button
9 From the GUI File menu, choose Exit to exit the application.
10 Restart the GUI application to access the new online help.
Note: If you require assistance to restart the GUI, see the TransNav Management System GUI Guide, Section 1—Installation and Overview, Chapter 3—“Starting the Graphical User Interface,” page 1-19.
11 The Install Help Files from the Turin Infocenter procedure is complete. Continue to the server procedures in Section 2—Management Server Procedures.
Table 1-5 Install Help Files from the Turin Infocenter (continued)
Step Procedure
Window menu button
TransNav Server Guide, Section 1: Installation and Description
Remove Server Software from Solaris Workstation
Remove Server Software from Solaris Workstation
You many want to remove older versions of the server software to create space on the computer. Use this procedure to remove a previous version of the server software from a Solaris workstation.
Table 1-6 Remove Server Software from Solaris Workstation
Step Procedure
1 Perform the software upgrade. See Server Software Upgrade, page 2-32.
2 Ensure that the server is stopped. See Stop the Server, page 2-27.
3 Open a terminal window and change to the directory where the older version of the management server software is installed.
4 Remove the directory and all files and directories beneath it. For example: rm -rf DirectoryName
Where:
DirectoryName is the name of the directory where you installed the management system software.
5 The Remove Server Software from Solaris Workstation procedure is complete.
SECTION 1INSTALLATION AND DESCRIPTION
Chapter 2
Installation for Windows Workstations
Introduction You can use the TransNav management system on either a Solaris or a Windows workstation. This chapter provides instructions on how to install management system software on the Windows workstation.
■ Before You Install Server Software, page 1-11
■ Install Server Software on a Windows Workstation, page 1-12
■ Install Server Online Help Files on a Windows Workstation, page 1-13 ■ What is the All-In-One Online Help System?, page 1-18
■ Uninstall Server Software from Windows Workstation, page 1-18
See Chapter 1—“Installation for Solaris Workstations,” page 1-1 for the procedures to install the management server on a Sun Solaris workstation.
Before You Install Server Software
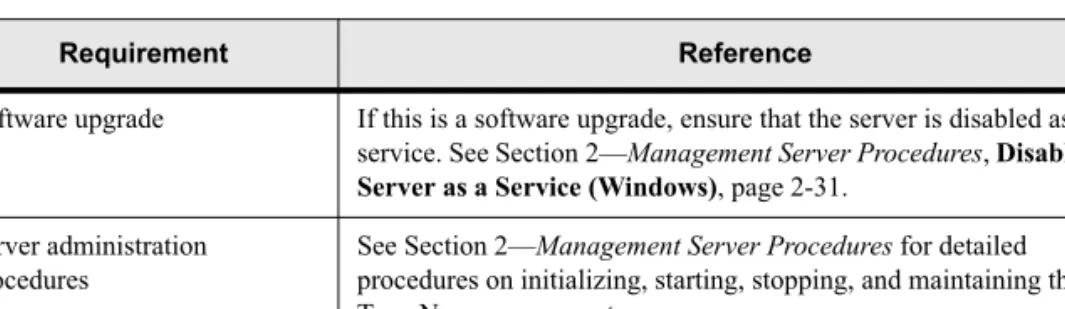
Before you install the management server software, understand the following requirements.
Table 1-7 Before You Install the Server Software
Requirement Reference
Disable any operating system anti-virus and firewall applications that may be installed on this computer.
Contact your local site administrator.
Server requirements TransNav Management System Product Overview,
Section 2—Management System Planning, Chapter 1—“TransNav Management System Requirements,” page 2-1.
Server software includes user interface applications.
You can use the user interface (either GUI, CLI, or TL1) on the same computer you are using as a management server. These applications are installed at the same time you install the server software. For information on downloading the server software, refer to Section 2—Management Server Procedures, Chapter 3—“Server Administration Procedures,” Download the TransNav Management Software from the Turin Infocenter.
TransNav Server Guide, Section 1: Installation and Description
Install Server Software on a Windows Workstation
Install Server Software on a Windows Workstation
Use this procedure to install the TransNav management system on a Windows workstation.
Software upgrade If this is a software upgrade, ensure that the server is disabled as a service. See Section 2—Management Server Procedures, Disable the Server as a Service (Windows), page 2-31.
Server administration procedures
See Section 2—Management Server Procedures for detailed procedures on initializing, starting, stopping, and maintaining the TransNav management server.
Table 1-7 Before You Install the Server Software (continued)
Requirement Reference
Table 1-8 Install Server Software on a Windows Workstation
Step Procedure
Important: To install the server software on a Windows workstation, the WindowsXP administrator must have an English language account name for the TransNav management system to function properly.
1 Read the topic Before You Install Server Software, page 1-11 before you start this procedure.
2 Insert the software CD into the CD drive on the PC.
3 In a Windows Explorer window, navigate to the correct CD drive.
4 Double-click the file PCSetup.exe to start the installation process.
Chapter 2 Installation for Windows Workstations
Install Help Files from CD (Windows)
Install Server Online Help Files on a Windows Workstation
To learn more about the All-In-One, see What is the All-In-One Online Help System?, page 1-18.
Select one of these access points to:
■ Install Help Files from CD (Windows) ■ Install Help Files from the Turin Infocenter Install Help
Files from CD (Windows)
Use this procedure to install help files from the documentation CD to the management server on a Windows workstation.
5 The Installer Wizard appears.
Figure 1-6 Management Server Installer Wizard
Follow the on-screen directions until the management server software is installed on your computer.
6 The Install Server Software on a Windows Workstation procedure is complete. Continue to Install Server Online Help Files on a Windows Workstation, page 1-13.
Table 1-8 Install Server Software on a Windows Workstation (continued)
Step Procedure
Table 1-9 Install Help Files from CD (Windows)
Step Procedure
1 On your Windows workstation, insert the documentation CD into the CD-ROM drive.
2 In an Explorer window, navigate to the correct CD-ROM drive (e.g., D:
TransNav Server Guide, Section 1: Installation and Description
Install Help Files from CD (Windows)
3 At the drive’s top-level directory (e.g., D:\), double-click the Download
directory to change directories, then double-click the <ReleaseNumber>allinone.zip file to open it. Where:
■ <ReleaseNumber> is the version of the allinone file that corresponds to your current TransNav management system release base.
■ allinone.zip is the source file containing the online help files.
4 From the zip tool Actions menu, choose Extract to extract the contents of the zip file.
5 In the Extract dialog box:
a. Select Files, then All Files to extract all the zip files.
b. Use the Folders/drives window to navigate to the management server online help directory, and click Extract to download the help files. The online help directory path is:
<server_home>\ems\help
Where:
<server_home> is the user-defined directory where the management server
software is installed (e.g., C:\server).
6 In the Confirm File Overwrite dialog box, click Yes to All.
7 From the zip tool File menu, choose Exit to exit the application.
8 From the GUI TransNav Help window, click the Close button in the upper right corner of the window to close the window.
Figure 1-7 Close Button Icon
9 From the GUI File menu, choose Exit to exit the application.
10 Restart the GUI application to access the new online help.
Note: If you require assistance to restart the GUI, see the TransNav Management System GUI Guide, Section 1—Installation and Overview, Chapter 3—“Starting the Graphical User Interface,” page 1-19.
11 The Install Help Files from CD (Windows) procedure is complete. Continue to the server administration procedures in
Section 2—Management Server Procedures. Table 1-9 Install Help Files from CD (Windows) (continued)
Step Procedure
Close button
Chapter 2 Installation for Windows Workstations
Install Help Files from the Turin Infocenter
Install Help Files from the Turin
Infocenter
Use this procedure to install help files from the Turin Infocenter to the management server on a Windows workstation.
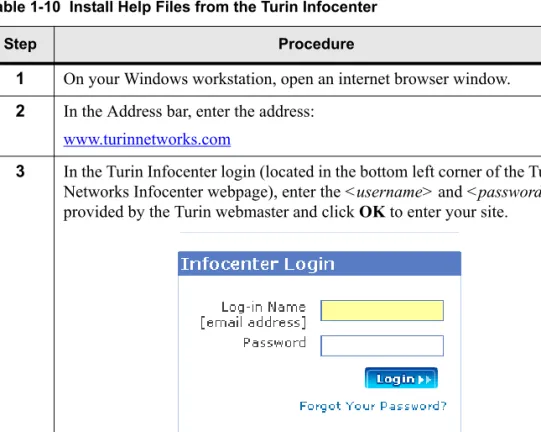
Important: User registration is required to access the Turin Infocenter. If you do not have a current CustomerID and password, contact your sales account team to register. Table 1-10 Install Help Files from the Turin Infocenter
Step Procedure
1 On your Windows workstation, open an internet browser window.
2 In the Address bar, enter the address:
www.turinnetworks.com
3 In the Turin Infocenter login (located in the bottom left corner of the Turin Networks Infocenter webpage), enter the <username> and <password>
provided by the Turin webmaster and click OK to enter your site.
TransNav Server Guide, Section 1: Installation and Description
Install Help Files from the Turin Infocenter
4 In the customer portal, click the Technical Documentation drop-down menu and select the Turin Traverse User Documentation link to open an index page.
Figure 1-9 Turin Traverse User Documentation Index
a. Locate and click the All-in-One Documentation download link that corresponds to your current TransNav management system release base.
5 In the File Download dialog box, click Save to save the zip file to a temporary directory of your choice (e.g., <user_directory>).
Figure 1-10 File Download Dialog Box
Table 1-10 Install Help Files from the Turin Infocenter (continued) (continued)
Step Procedure
Chapter 2 Installation for Windows Workstations
Install Help Files from the Turin Infocenter
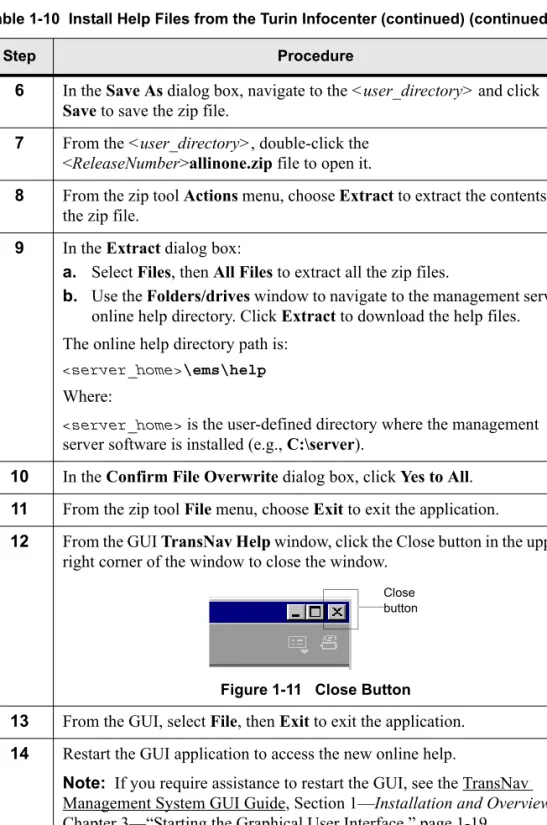
6 In the Save As dialog box, navigate to the <user_directory> and click
Save to save the zip file.
7 From the <user_directory>, double-click the <ReleaseNumber>allinone.zip file to open it.
8 From the zip tool Actions menu, choose Extract to extract the contents of the zip file.
9 In the Extract dialog box:
a. Select Files, then All Files to extract all the zip files.
b. Use the Folders/drives window to navigate to the management server online help directory. Click Extract to download the help files. The online help directory path is:
<server_home>\ems\help
Where:
<server_home> is the user-defined directory where the management
server software is installed (e.g., C:\server).
10 In the Confirm File Overwrite dialog box, click Yes to All.
11 From the zip tool File menu, choose Exit to exit the application.
12 From the GUI TransNav Help window, click the Close button in the upper right corner of the window to close the window.
Figure 1-11 Close Button
13 From the GUI, select File, then Exit to exit the application.
14 Restart the GUI application to access the new online help.
Note: If you require assistance to restart the GUI, see the TransNav Management System GUI Guide, Section 1—Installation and Overview, Chapter 3—“Starting the Graphical User Interface,” page 1-19.
15 The Install Help Files from Your Customer Portal (Windows) procedure is complete. Continue to the server administration procedures in
Section 2—Management Server Procedures.
Table 1-10 Install Help Files from the Turin Infocenter (continued) (continued)
Step Procedure
Close button
TransNav Server Guide, Section 1: Installation and Description
What is the All-In-One Online Help System?
What is the All-In-One Online Help System?
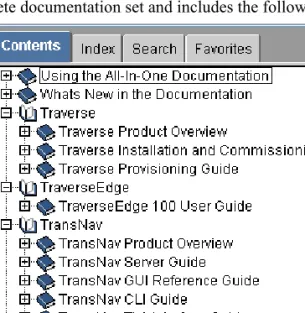
Each software and documentation CD includes the (HTML-based) All-In-One Documentation, which is also the basis for the management system software online help mechanism.
The All-In-One online help system (i.e., the All-In-One Documentation) provides access to the complete documentation set and includes the following guides:
Figure 12 All-In-One Online Help System Contents
The table of contents seen here makes it convenient to view pages from any guide. You can also click the following tabs:
■ Index:This tab displays a fully integrated index of all guides.
■ Search:This tab contains a search text box that allows you to enter any word or group of words. You can choose to search these words in one guide or across all guides. Uninstall Server Software from Windows Workstation
After upgrading the server software, you may want to remove the previous version. On a Windows workstation, the uninstall process uses a wizard similar to the Installer Wizard. After you have opened the Uninstaller Wizard, follow the on-screen directions to remove the server software from your computer.
Table 1-11 Uninstall Server Software from Windows Workstation
Step Procedure
1 Perform the software upgrade. See Server Software Upgrade, page 2-32.
2 Ensure that the server is stopped. See Stop the Server, page 2-27.
3 From the Start menu, select Programs > Turin_Networks> Uninstall TransNav Management System.
Chapter 2 Installation for Windows Workstations
Uninstall Server Software from Windows Workstation
4 The Uninstaller Wizard appears.
Figure 1-13 Server Uninstall Wizard
Follow the on-screen directions until the server software is removed from your computer.
5 In a Windows Explorer window, navigate to the directory where the application was installed. Remove the remaining files.
6 The Uninstall Server Software from Windows Workstation procedure is complete.
Table 1-11 Uninstall Server Software from Windows Workstation (continued)
TransNav Server Guide, Section 1: Installation and Description
SECTION 1INSTALLATION AND DESCRIPTION
Chapter 3
Management Server Administration
Introduction This chapter provides a brief overview of how multiple servers function in a Traverse and TraverseEdge 100 network. It also describes the TransNav management server administration tool, the management server components, and the configurable parameters for the server.
■ Using Multiple Servers, page 1-21
■ Server Administration Tool Description, page 1-22
■ Server Administration Components Description, page 1-23 ■ Management Server Parameters, page 1-24
Using Multiple Servers
The Traverse management system allows up to eight servers to be connected in the network. One server, designated the Primary server, actively manages the network. The remaining seven, or Secondary, servers, can passively view the network but cannot perform any management operations that would change the state of the network. Primary servers maintain all of the network-level information used to synchronize network elements such as alarm, PM templates, Ethernet bandwidth profiles, and classifiers. The Primary server also maintains local server information including customer records, Domain Users, report templates and schedules, alarm
acknowledgements, and annotations.
Secondary servers automatically collect current provisioning, service state, alarm and event information from all network elements in the domain, however, they do not collect and store PM data in the database. Users can, however, retrieve the PM data from the agent. Each Secondary server can perform the following functions: ■ Provision and display domain users and functional groups
■ Provision and display user preferences for domain users
■ Display and maintain current information about network elements and services ■ Display and log alarms and events
■ Establish Node CLI sessions to any node in the domain ■ Establish a connection to an NMS via a northbound interface ■ Respond to read requests
TransNav Server Guide, Section 1: Installation and Description
Server Administration Tool Description
To keep Secondary servers current, the Primary server database should be periodically exported and imported to the Secondary servers. Exporting the Primary server database will include all alarm and event information. Reports can be run to collect performance monitoring data. The reports can then be retained on a file server that is widely accessible.
Server
Administration Tool
Description
The server administration tool is a basic user interface designed to make server tasks easier. Start the server administration tool (see Section 2—Management Server Procedures, Chapter 1—“Creating the Management Servers,” Start the Server Administration Tool, page 2-2). The Server Admin window appears.
Chapter 3 Management Server Administration
Server Administration Components Description
Server
Administration Components Description
The Server Administration tool allows you to view the status of each component of the management server.
The function of each component is as follows:
RMI Registry: Repository of references on the server components.
Database: Object repository.
Apache: Web server that provides access to the GUI applet.
Event: Event object repository.
Alarm: Alarm object repository.
Topology: Configuration object repository.
MBean: Configuration object repository.
Configuration: Configuration object repository.
Administration: Provides administrative functions to the other server components.
Map: Maintains the network symbols for the graphical user interface.
Network: Controls network objects such as templates.
PreProvisioning: Maintains all the preprovisioned objects.
Report: Schedules report generation and deletion.
JDMKGateway: Interfaces between the EMS and the agents.
Discovery: Uses the uploaded topology information to start the management of newly added agents.
Performance Collection: Maintains the performance data (upload from agent, storage and ultimately deletion).
Session: Authenticates and authorizes the client requests.
SNMP Gateway: Provides SNMP northbound interface for alert management.
CLI Gateway: Provides CLI management.
TL1 Gateway: Provides TL1 management.
To exit from the server administration functions, select Exit from the File menu or click the Close button (indicated by a red “X”) in the top right corner of the dialog box.
TransNav Server Guide, Section 1: Installation and Description
Management Server Parameters
Management Server Parameters
The Server Administration tool allows you to view or change server administration parameters. In most cases, these parameters remain unchanged or you will only change them when you initially create the server. See Section 2—Management Server Procedures, Chapter 1—“Creating the Management Servers,” page 2-1.
In the Server Admin tool, from the Execution menu, click Configure Server, then click Parameter. The Execution Configuration dialog box displays.
Chapter 3 Management Server Administration
Management Server Parameters
The Execution Configuration dialog box allows you to change the following server administration parameters:
ANSITL1MetadataFile1:File containing the parameters of the management server
ANSI TL1 Metadata file. Do not change this value.
AdminTraceLevel1: Used for troubleshooting by the Turin Technical Assistance
Center. Do not change this value.
CliDataDictionaryFile1: Name of the XML file containing the CLI commands. Do not
change this value.
CliEmsHost1: IP address of the back end server (for distributed servers only).
CliTelnetPort: Port number on which the CLI Telnet server accepts client connections.
DatabaseBinDirectory1: Directory containing the binaries of the SOLID database
tools.
DatabaseExportFrequency (hours): The frequency to export the database to the path specified in DatabaseExportPath.
DatabaseExportPath: Path in which to save the server database.
DiscoveryPeriod (minutes)1: Number of minutes separating two topology audits.
EMSTL1DataDictionaryFile1:Name of the XML file containing the parameters of
the EMS TL1 file. Do not change this value.
GatewayTL1MetadataFile1:File containing the parameters of the gateway server
TL1 Metadata file. Do not change this value.
JdmkGatewayConnectorType: Type of connector to be used by the JDMK Gateway component when communicating to the agent (rmi or http).
JdmkGatewayPortNumber: Port to be used by the JDMK Gateway component connector when communicating to the agent.
JdmkGatewayRmiAddress: If the server has two IP addresses, this is the IP address used to communicate with the nodes. Only enter an IP address if the server has two network interface cards (NIC).
JdmkRequestTimeout (milliseconds): The time (in milliseconds) after a command is executed and the node does not respond. This Timeout is used by the JDMK Gateway component connector when communicating to the agent. If the system times out, an error message appears.
MBeanDBCacheMax1: Maximum number of entries in the MBean component cache.
MBeanDBCacheMin1: Minimum number of entries in the MBean component cache.
MBeanDBProcessCaching1: Enable (true) or disable (false) the caching in the MBean
component.
MBeanDBProcessConfigFile1: File containing the parameters of the MBean
component.
TransNav Server Guide, Section 1: Installation and Description
Management Server Parameters
MainBEServerIpAddress1: IP address of the back end server (for distributed server
only).
MaxNoOfUserSessions: The maximum number of combined simultaneous user sessions logged into any of the user interfaces (GUI, CLI, or TL1). Default is 20.
PerformanceDataCollectPeriod (minutes): Number of minutes between two uploads of performance data from the agent. Default is 15 minutes.
PerformanceDataRemovalCheckPeriod: Number of minutes between two removals of performance data from the agent. Default is 3 minutes.
PerformanceDataRemovalPeriod (hours): Number of hours after which the performance data stored in the performance database is deleted. Default is 72 hours.
PerformanceDatabase1: IP address of the performance database server (distributed
server only).
PerformanceDatabasePassword1: Password to be used to connect to the performance
database.
PerformanceDatabasePort1: Port on which the performance database is waiting for
connection.
PerformanceDatabaseUser1: Username to be used to connect to the performance
database.
ReportHost1: IP address of the server hosting the generated text reports (for
distributed server only).
ReportOutputDirectory1: Directory of the report server containing the generated text
reports.
ReportRemovalPeriod (days): Number of days after which the generated text reports stored on the report server are deleted from the server.
ReportScriptDirectory1: Directory of the report server containing the scripts used for
report generation.
SSL_KeyValidity (days): Sets the number of days for which the secure key remains valid. Default is 180 days.
SSL_PublicKeyStorePassword: p#33Phr#3e
SSL_PublicKeyStorePath: keyStore
SecurityAccessRightsFile1: File containing information on the users in each access
group.
SecurityOnOffFlag1: Checks the security level of users of the user interfaces.
Domain-level and node-level users have different privileges.
■ True (default): Enables the automatic checking of user security levels. ■ False: Disables the automatic checking of user security levels.
SessionHTMLConnector1: Enable (true) or disable (false) the JDMK HTML
connector on the session component.
SessionHTTPConnector: Enable (true) or disable (false) the JDMK HTTP connector on the session component.
Chapter 3 Management Server Administration
Management Server Parameters
SessionHTTPSConnector: Enables or disables the JDMK HTTP over SSL for a secure HTTP connection to session component.
■ True: Enables the secure (SSL) connector for JDMK HTTP. Set the SSL keys for encryption (SSL_KeyValidity, SSL_PublicKeyStorePassword, and
SSL_PublicKeySortPath).
■ False (default): Disables the secure HTTP connection to the session component.
SessionHtmlPort: Port on which the JDMK HTML connector is waiting for connections. Default is 8082.
SessionHttpPort: Port on which the JDMK HTTP connector is waiting for connections. Default is 8081.
SessionHttpsPort: Port on which the JDMK HTTPS connector is waiting for connections. Default is 8084.
SessionRMIConnector: Enables or disables the JDMK RMI connector on the session components.
■ True (default): Enables user sessions using RMI protocol. ■ False: Disables users sessions using the RMI protocol.
SessionRmiAddress: If the server has two IP addresses, this is the IP address used to communicate with either the GUI or CLI client workstation sessions. Only enter an IP address if the server has two network interface cards (NIC).
SessionRmiPort: Port on which the JDMK RMI connector is waiting for connections
SnmpAgentEnable: Enables or disables the management system to receive SNMP queries and forward system events:
■ True: Enables the management system to receive SNMP queries and forward system events to an SNMP server.
■ False (default): Does not allow the management system to send or receive SNMP queries.
SnmpAgentHtmlAdaptorPort1: Port on which the JDMK HTML adaptor of the
SNMP server is waiting for connection. Default is 7000.
SnmpAgentSnmpAdaptorPort: Port on which the JDMK SNMP adaptor is waiting for SNMP requests. Default is 7001.
SnmpAgentSnmpTrapsPort: Port to which the JDMK SNMP adaptor sends SNMP traps. Default is 7002.
SnmpAgentTurinEmsHost1: IP address of the server (for distributed server only).
Default is localhost.
SnmpCurrentCounterValidity (seconds): Allows third-party equipment to query the PM counters for all Ethernet interfaces on the Traverse network through the SNMP interface. The server refreshes the PM data after the time specified in this parameter. Default is 120 seconds.
TE100TL1DataDictionaryFile1: Name of the XML file containing the TE100 TL1
commands.
TL1EmsConnectorType1: Type of connector to be used by the TL1 component when
TransNav Server Guide, Section 1: Installation and Description
Management Server Parameters
TL1EmsHost1: IP address of the server (for distributed server only). Default is
localhost.
TL1LoggingEnabled: Determines if logs from the TL1 interface are collected on the server:
■ True: Enables logging of every TL1 command received and the respective response in a log file. Restart the server when you change this parameter to true. ■ False (default): Disables the logging function.
TL1PasswordEncryption: Indicates if password encryption is enabled on TL1 during log-on:
■ true: Password encryption is enabled. ■ false: Password encryption is not enabled.
TL1TcplpPort: The port to which a machine can open a TL1 session. Used for machine-to-machine TL1 communications such as Spirent TL1 test units. Default is 7788.
TL1TelnetPort: The telnet port on the server to which a user opens a TL1 session. Default is 7789.
TraverseTL1DataDictionaryFile: Name of the XML file containing the parameters of the Traverse TL1 file. Do not change this value.
UserImagesDirectory1: Directory for storing the background maps for the GUI.
UserPreferencesDirectory1: Directory for storing the GUI user preferences.
Command buttons are as follows:
OK: Click to save any changes and return to the Server Admin dialog box.
S
ECTION
2 M
ANAGEMENT
S
ERVER
P
ROCEDURES
SECTION 2MANAGEMENT SERVER PROCEDURESContents
Chapter 1
Creating the Management Servers
Introduction . . . 2-1 Before You Create the Management Servers . . . 2-1 Start the Server Administration Tool . . . 2-2 Configure Management Server Parameters . . . 2-3 Set the Primary Management Server as the Primary NTP Source . . . 2-4 Set NTP Server on a Solaris Workstation . . . 2-5 Set the NTP Server on a Windows 2000 Professional Workstation . . . 2-6 Set the NTP Server on a Windows XP Workstation . . . 2-7 Configure Log and Error Files . . . 2-11
Chapter 2
Management Server SNMP
Introduction . . . 2-13 Supported SNMP MIBs . . . 2-13 Location of SNMP MIB File . . . 2-13 Enable SNMP Agent . . . 2-14 Configure the SNMP Access Control List . . . 2-15 Ethernet Performance Monitoring and SNMP . . . 2-17 Ethernet Interfaces . . . 2-17 Performance Data . . . 2-17
Chapter 3
Server Administration Procedures
Introduction . . . 2-19 Start the Server Administration Tool . . . 2-20 Initialize the Database. . . 2-21 Enable the Server as a Service (Windows). . . 2-23 Start the Server . . . 2-24 Export the Database . . . 2-26 Stop the Server . . . 2-27 Promoting a Secondary Server to the Primary Role . . . 2-29 Disable the Server as a Service (Windows) . . . 2-31 Upgrade Server Software . . . 2-32 Download TransNav Management Software from Your Customer Portal. . . . 2-33 Import the Database . . . 2-35 Retrieve Server Log Files . . . 2-37
TransNav Server Guide, Section 2 Management Server Procedures
List of Figures
Figure 2-1 Start Menu . . . 2-2 Figure 2-2 Server Admin Tool. . . 2-2 Figure 2-3 Configure Server Parameters . . . 2-3 Figure 2-4 Management Server Parameters . . . 2-4 Figure 2-5 Command Buttons, Execution Configuration Dialog Box . . . 2-4 Figure 2-6 Run Dialog Box . . . 2-6 Figure 2-7 Registry Editor . . . 2-6 Figure 2-8 Run Dialog Box . . . 2-7 Figure 2-9 W23Time Config Registry . . . 2-8 Figure 2-10 Modify AnnounceFlags . . . 2-8 Figure 2-11 AnnounceFlags Edit DWORD Value . . . 2-8 Figure 2-12 NtpServer Subkey . . . 2-9 Figure 2-13 Modify NtpServer Enabled. . . 2-9 Figure 2-14 Enabled Edit DWORD Value . . . 2-9 Figure 2-15 Configure Logging . . . 2-11 Figure 2-16 Logging Configure Dialog Box. . . 2-11 Figure 2-17 Configure Server . . . 2-14 Figure 2-18 Configure Server Dialog Box . . . 2-14 Figure 2-19 Configure SNMP . . . 2-15 Figure 2-20 Edit the SNMP Access Control List . . . 2-15 Figure 2-21 Start Menu . . . 2-20 Figure 2-22 Server Admin Tool. . . 2-20 Figure 2-23 Initialize Database . . . 2-21 Figure 2-24 Database Initialize Confirmation . . . 2-21 Figure 2-25 Database Initialization Dialog Box . . . 2-22 Figure 2-26 Server Status. . . 2-23 Figure 2-27 Enable as Service . . . 2-23 Figure 2-28 Start Server . . . 2-24 Figure 2-29 Component Status. . . 2-25 Figure 2-30 Start Server Complete . . . 2-25 Figure 2-31 Export Database . . . 2-26 Figure 2-32 Database Export Dialog Box . . . 2-26 Figure 2-33 Export Status . . . 2-27 Figure 2-34 Export Database Complete . . . 2-27 Figure 2-35 Stop Server . . . 2-27 Figure 2-36 Server Shutdown Process . . . 2-28 Figure 2-37 Stop Server is Complete . . . 2-28 Figure 2-38 Disable as Service. . . 2-31 Figure 2-39 Customer Portal Screen . . . 2-34 Figure 2-40 Save Target As . . . 2-34 Figure 2-41 Import Database . . . 2-35 Figure 2-42 Database Initialize Confirmation . . . 2-35 Figure 2-43 Database Import Dialog Box . . . 2-36
TransNav Server Guide, Section 2 Management Server Procedures
Figure 2-45 Retrieve Log Directory in Windows . . . 2-37
List of Tables
Table 2-1 Before You Create the Management Servers . . . 2-1 Table 2-2 Start the Server Administration Tool . . . 2-2 Table 2-3 Configure Management Server Parameters . . . 2-3 Table 2-4 Set the Primary NTP Source on a Solaris Workstation. . . 2-5 Table 2-5 Set the Primary NTP Source on a Windows 2000
Professional Workstation . . . 2-6 Table 2-6 Set the Primary NTP Source on a Windows XP Workstation . . . . 2-7 Table 2-7 Configure Log and Error Files . . . 2-11 Table 2-8 Enable SNMP Agent Components . . . 2-14 Table 2-9 Configure the SNMP Access Control List . . . 2-15 Table 2-10 Start the Server Administration Tool . . . 2-20 Table 2-11 Initialize the Database. . . 2-21 Table 2-12 Enable the Server as a Service. . . 2-23 Table 2-13 Start the Server . . . 2-24 Table 2-14 Export the Database . . . 2-26 Table 2-15 Stop the Server . . . 2-27 Table 2-16 Promoting a Secondary Server to the Primary Role . . . 2-29 Table 2-17 Disable the Server as a Service . . . 2-31 Table 2-18 Server Software Upgrade . . . 2-32 Table 2-19 Download TransNav Management Software from Your
Customer Portal . . . 2-33 Table 2-20 Import the Database . . . 2-35 Table 2-21 Retrieve Server Log Files . . . 2-37
SECTION 2MANAGEMENT SERVER PROCEDURES
Chapter 1
Creating the Management Servers
Introduction This chapter contains procedures that an administrator will perform when first installing the management system software. This chapter includes information on creating the management servers:
■ Before You Create the Management Servers, page 2-1 ■ Start the Server Administration Tool, page 2-2 ■ Configure Management Server Parameters, page 2-3
■ Set the Primary Management Server as the Primary NTP Source, page 2-5 ■ Configure Log and Error Files, page 2-11
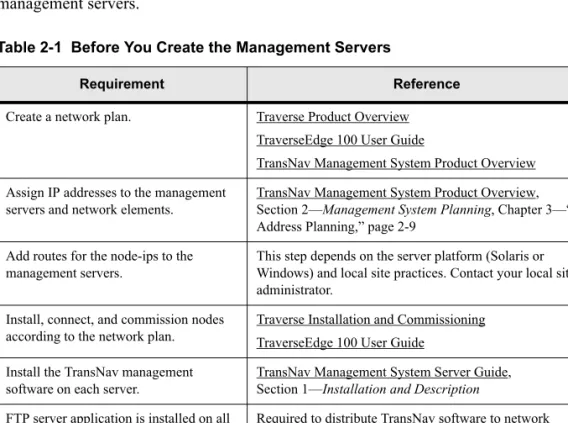
Before You Create the Management Servers
Review the information in this topic before creating the Primary and Secondary management servers.
Table 2-1 Before You Create the Management Servers
Requirement Reference
Create a network plan. Traverse Product Overview TraverseEdge 100 User Guide
TransNav Management System Product Overview Assign IP addresses to the management
servers and network elements.
TransNav Management System Product Overview, Section 2—Management System Planning, Chapter 3—“IP Address Planning,” page 2-9
Add routes for the node-ips to the management servers.
This step depends on the server platform (Solaris or Windows) and local site practices. Contact your local site administrator.
Install, connect, and commission nodes according to the network plan.
Traverse Installation and Commissioning TraverseEdge 100 User Guide
Install the TransNav management software on each server.
TransNav Management System Server Guide, Section 1—Installation and Description
FTP server application is installed on all management servers.
Required to distribute TransNav software to network elements.
Turin recommends WAR FTP for Windows. Download the application for free from Adobe’s site at: www.warftp.org. Telnet server application is installed. Required for remote access to the management servers.
TransNav Server Guide, Section 2: Management Server Procedures
Start the Server Administration Tool
Start the Server
Administration Tool
To access server administration functions, start the Server Administration Tool on the machine where you have the management server software installed.
Table 2-2 Start the Server Administration Tool
Step Procedure
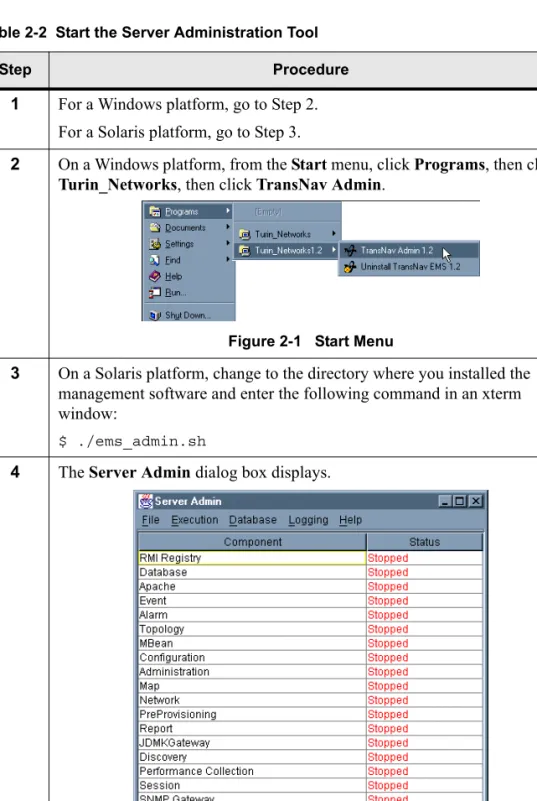
1 For a Windows platform, go to Step 2. For a Solaris platform, go to Step 3.
2 On a Windows platform, from the Start menu, click Programs, then click
Turin_Networks, then click TransNav Admin.
Figure 2-1 Start Menu
3 On a Solaris platform, change to the directory where you installed the management software and enter the following command in an xterm window:
$ ./ems_admin.sh
4 The Server Admin dialog box displays.
Chapter 1 Creating the Management Servers
Configure Management Server Parameters
Configure Management Server Parameters
View or change server administration parameters using the Configure Server option in the Server Admin tool. This server configuration information is stored in the
environment.conf file. This file is located in the same directory in which the server software was installed.
5 See the procedure, Server Administration Components Description, page 1-21, for a description of each server component.
6 The Start the Server Administration Tool procedure is complete. Table 2-2 Start the Server Administration Tool (continued)
Step Procedure
Important: Contact the Turin Technical Assistance Center for assistance in changing server administration parameters.
Table 2-3 Configure Management Server Parameters
Step Procedure
1 Start the Server Administration tool. See the procedure Start the Server Administration Tool, page 2-2. The Server Admin dialog box displays.
2 If the server is already started, stop the server. See the procedure Stop the Server, page 2-27.
3 From the Execution menu, click Configure Server, then click
Parameter.
TransNav Server Guide, Section 2: Management Server Procedures
Configure Management Server Parameters
4 In the Execution Configuration dialog box, change any of the default values for the parameters.
Figure 2-4 Management Server Parameters
See Server Administration Components Description, page 1-21, for the descriptions of each parameter.
Note: If you are creating a Secondary server, you must change the value of the ServerRole field on the Execution Configuration dialog box to
Secondary.
5 Click OK to close the Execution Configuration dialog box and return to the Server Admin tool.
Figure 2-5 Command Buttons, Execution Configuration Dialog Box
6 Restart the server for the changes to take effect. See the procedure Start the Server, page 2-24.
7 The Configure Management Server Parameters procedure is complete. Table 2-3 Configure Management Server Parameters (continued)