Rhythmyx
Administration
Manual
Version 6.7
Printed on 5 June, 2009protected by United States and Canadian copyright laws, other applicable copyright laws, and international treaty provisions. Percussion Software retains all rights, title, and interest not expressly grated. You may either (a) make one (1) copy of the SOFTWARE solely for backup or archival purposes or (b) transfer the SOFTWARE to a single hard disk provided you keep the original solely for backup or archival purposes. You must reproduce and include the copyright notice on any copy made. You may not copy the user documentation accompanying the SOFTWARE.
The information in Rhythmyx documentation is subject to change without notice and does not represent a commitment on the part of Percussion Software, Inc. This document describes proprietary trade secrets of Percussion Software, Inc. Licensees of this document must acknowledge the proprietary claims of
Percussion Software, Inc., in advance of receiving this document or any software to which it refers, and must agree to hold the trade secrets in confidence for the sole use of Percussion Software, Inc.
The software contains proprietary information of Percussion Software; it is provided under a license agreement containing restrictions on use and disclosure and is also protected by copyright law. Reverse engineering of the software is prohibited.
Due to continued product development this information may change without notice. The information and intellectual property contained herein is confidential between Percussion Software and the client and remains the exclusive property of Percussion Software. If you find any problems in the documentation, please report them to us in writing. Percussion Software does not warrant that this document is error-free. No part of this publication may be reproduced, stored in a retrieval system, or transmitted in any form or by any means, electronic, mechanical, photocopying, recording or otherwise without the prior written permission of Percussion Software.
Copyright © 1999-2009 Percussion Software. All rights reserved
Licenses and Source Code
Rhythmyx uses Mozilla's JavaScript C API. See http://www.mozilla.org/source.html for the source code. In addition, see the Mozilla Public License (http://www.mozilla.org/source.html).
Netscape Public License Apache Software License IBM Public License
Lesser GNU Public License
Other Copyrights
The Rhythmyx installation application was developed using InstallShield, which is a licensed and copyrighted by InstallShield Software Corporation.
The Sprinta JDBC driver is licensed and copyrighted by I-NET Software Corporation.
The Sentry Spellingchecker Engine Software Development Kit is licensed and copyrighted by Wintertree Software.
The Java™ 2 Runtime Environment is licensed and copyrighted by Sun Microsystems, Inc. The Oracle JDBC driver is licensed and copyrighted by Oracle Corporation.
The Ephox EditLive! for Java DHTML editor is licensed and copyrighted by Ephox, Inc. This product includes software developed by CDS Networks, Inc.
The software contains proprietary information of Percussion Software; it is provided under a license agreement containing restrictions on use and disclosure and is also protected by copyright law. Reverse engineering of the software is prohibited.
Due to continued product development this information may change without notice. The information and intellectual property contained herein is confidential between Percussion Software and the client and remains the exclusive property of Percussion Software. If you find any problems in the documentation, please report them to us in writing. Percussion Software does not warrant that this document is error-free. No part of this publication may be reproduced, stored in a retrieval system, or transmitted in any form or by any means, electronic, mechanical, photocopying, recording or otherwise without the prior written permission of Percussion Software.
AuthorIT™ is a trademark of Optical Systems Corporation Ltd.
Microsoft Word, Microsoft Office, Windows®, Window 95™, Window 98™, Windows NT® and MS-DOS™ are trademarks of the Microsoft Corporation.
This document was created using AuthorIT™, Total Document Creation (see http://www.author-it.com). Schema documentation was created using XMLSpy™.
Percussion Software 600 Unicorn Park Drive Woburn, MA 01801 U.S.A. 781.438.9900
Internet E-Mail: [email protected] Website: http://www.percussion.com
Contents
About the Rhythmyx Administration Manual
9
Managing Publishing
11
Reviewing Publishing Status ...12
Publishing Editions ...13
Cancelling an Edition ...14
Reviewing Publishing Logs ...15
Pruning Publishing Logs ...18
Republishing Failed Content ...19
Monitoring Publication of Localized Content ...20
Maintaining Schedules
21
Scheduled Tasks ...22Scheduled Task Editor...23
Creating a Scheduled Task ...24
Modifying a Scheduled Task ...25
Copying a Scheduled Task ...26
Timed Event Logs ...27
Task Notifications...28
Task Notification Editor ...29
Creating a Scheduled Task Notification ...30
Modifying a Timed Event...31
Deleting a Scheduled Task Notification ...31
Default Task Notification Variables ...31
Example Task Notifications ...34
Maintaining the Rhythmyx Server
39
Operating the Rhythmyx Server
41
Operating the Rhythmyx Server in a Windows Environment...42Starting Rhythmyx Server as a Windows Service ...42
Starting Rhythmyx Server as an Application ...42
Changing Rhythmyx Server Service Settings...43
Using a Command to Stop Rhythmyx Server...43
Stopping Rhythmyx Server from the Services Dialog...43
Operating the Rhythmyx Server in a Unix Environment...44
Starting Rhythmyx Server as a Daemon in a Unix Environment ...44
Starting the Rhythmyx Server as a Terminal Window in a Unix Environment...44
Stopping Rhythmyx Server in Unix Environment When Running as a Daemon ...45
Stopping Rhythmyx Server in a Unix Environment When Running as a Terminal Window...45
Common Server Initialization Errors...46
Issuing Commands to the Rhythmyx Server...48
Server Console Commands by Function ...48
Server Console Commands in Alphabetical Order...64
Tasks Requiring Restart of the Rhythmyx Server...70
Maintaining Users
71
Configuring Access to Content Explorer Tabs ...72Security Providers and Authentication ...74
Security Providers Tab ...75
Defining a Directory Connection Security Provider...75
Web Server ...77
Windows NT ...80
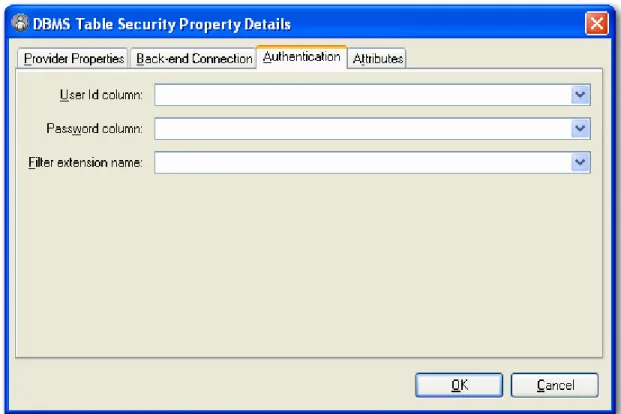
DBMS Table Security Provider...80
Using Directory Services ...87
LDAP Directory Services Framework...89
Implementing LDAP Directory Services...90
LDAP Configuration Examples...117
Roles ...139
Default Roles and Members ...140
Add/Edit Role Dialog ...143
Modify Member List for "Role" Dialog ...145
New Member Dialog ...147
Role and Member Properties ...148
Role and Member Properties Required by Rhythmyx Functions ...148
Adding a New Role ...149
Editing a Role ...149
Deleting a Role ...150
Adding Existing Members to a Role ...150
Adding New Members to a Role ...151
Editing a Member's Properties...152
Deleting a Member from a Role ...152
Search Configuration
155
Deployment Options for the Full-text Search Engine and Indices...157Configuring the Full-Text Search ...159
How to Override the Default Text Extractor ...160
How to Override the Default Text Analyzer ...162
Disabling Full-text Search ...164
Configuring Maximum Search Results Returned ...165
Full-text Search in Globalized Environments ...167
Maintaining Stop Words...168
Re-indexing the Full-Text Search ...169
System Management and Recovery
171
Physical Architecture of Rhythmyx...172All Physical Components Local ...172
Rhythmyx Server with Local Repository, Remote Web Server Using FTP Publishing...173
Integrating Rhythmyx with a Source Control System ...175
Backing Up the CMS...175
Backing Up Your Web Site ...176
Setting Up a Rhythmyx Failover Server ...179
Setting Up a Rhythmyx Disaster Recovery Server ...180
Index
181
C
H A P T E R1
About the Rhythmyx
Administration Manual
The Rhythmyx System Administration Manual documents how to manage and maintain the Rhythmyx Content Management System. Both day-to-day and long-term administration tasks are addressed in this document.
Users of this manual should be familiar with the Rhythmyx Concepts Guide, but need not have read detailed implementation documentation nor attended Rhythmyx Developer's Training.
Users need not read the complete manual. In many cases, a single chapter or section may address the specific task you need to accomplish.
If you manage Publishing, including monitoring publishing logs and troubleshooting and republishing failed Content Items, read Chapter 1, Managing Publishing.
If you need to start or stop the Rhythmyx server, or issue a command to the Rhythmyx server, read Chapter 2, Operating the Rhythmyx Server (see page 41).
If you need to manage users and their access to Rhythmyx, read Chapter 3, Maintaining Users (see page 71); specifically:
if you need to manage or add a new security provider, read Maintaining Security Providers (see "Security Providers and Authentication" on page 74);
if you use LDAP or Microsoft Active Directory to maintain user access to your system, read Using Directory Services (see page 87);
If you need to maintain Roles or user membership in a Role, read Roles (see page 139).
If you need to manage the Rhythmyx full-text search engine, read Search Configuration (see page 155).
If you need to manage the Rhythmyx Repository database, read Repository Database Management and Maintenance.
If you need to manage or maintain system hardware infrastructure, read System Management and Recovery (see page 171); specifically:
If you need to plan the physical deployment of the system, read Physical Architecture of Rhythmyx (on page 172);
If you need to implement source control or manage backups of the Rhythmyx Content Management System, read Source Control and Backups (on page 175);
If you need to set up failover of the Rhythmyx Content Management System, read
Setting Up a Rhythmyx Failover Server (on page 179).
If you need to set up a disaster recovery server for you system, read Setting Up a Rhythmyx Disaster Recovery Server (see page 180).
C
H A P T E R2
Managing Publishing
The publishing process converts the raw Content Items entered by content contributors into output consumable by visitors to your Web site. To help manage publishing, Rhythmyx provides both logs and publication maps.
Reviewing Publishing Status
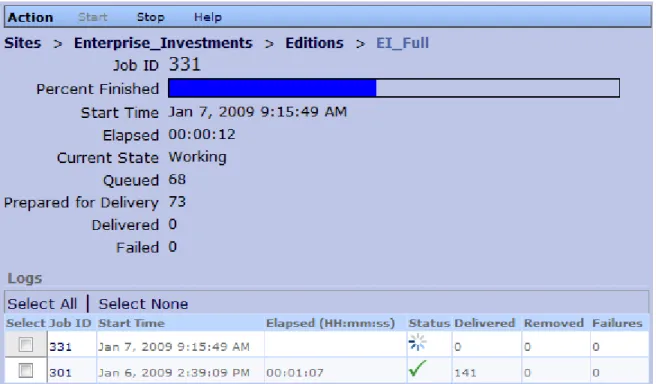
For an overview of the status of all Editions currently running or recently run in the system, in the Navigation pane, click Publishing Status. The View and Edit pane displays the Publishing Status dialog
Figure 1: Publishing Status
This dialog displays summaries of all Editions either currently running or that finished processing in the past hour. For details about a specific Edition, click on that Edition to see the Runtime Edition dialog.
Publishing Editions
In a production system, Editions generally run automatically as scheduled tasks. You may sometimes need to publish an Edition manually as well.
To publish an Edition:
1 Open the Publishing Runtime tab of Content Explorer.
2 Access the Runtime Edition dialog:
Expand the Sites node, expand the Site with which the Edition you want to run is associated, and double-click on the Edition.
or
Double-click the Publishing Status link. Rhythmyx displays the Publishing Status dialog in the View and Edit pane. Double-click on the Edition you want to run.
Figure 2: Runtime Edition page when an Edition is not running
Rhythmyx starts the Edition and adds runtime data to the Runtime Edition dialog.
Figure 3: Runtime Edition page while an Edition is running
Cancelling an Edition
When you cancel an Edition, all processing of that Edition stops and any output that has not been delivered is discarded. Delivered output is not changed, however.
To stop an Edition:
1 In the Navigation pane, double-click on Publishing Status. The View and Edit pane displays the Publishing Status dialog.
2 Select the Edition you want to cancel.
3 In the Menu bar, click Stop.
You can also cancel an Edition from the Runtime Edition dialog. If the Edition is running, the Stop menu option is enabled. Click Stop to cancel the Edition.
Reviewing Publishing Logs
Rhythmyx maintains a log of the results of each Edition publishing job. You can access these logs in two ways:
The Runtime Edition dialog lists all logs for the Edition.
The Publishing Logs dialog lists all logs for all Editions in the Site.
Figure 5: Publishing Log
The Status column indicates the outcome of the publishing run. This column contains one of the following graphics:
Graphic Brief description Full Description
Completed All Content Lists were processed successfully and all Content Items were published successfully.
Completed with failures Publishing of one or more Content Items may have failed. Check the log for the run to identify the Content Items for which publishing failed to determine the causes of the failures.
Publishing of one or more Content Lists may have failed. Check the console log (<Rhythmyxroot>/console.log) to determine which Content Lists failed and why.
Cancelled The Content Items were assembled and prepared for delivery but the Edition was cancelled by the user before the Content Items were delivered.
Graphic Brief description Full Description
Aborted The publishing job was aborted.
In some cases, the total number of Content Items reported in the log may not equal the total number of Content Items queued for processing. Logs results are only recorded for Content Items that have been processed by the Assembly Engine. Content Items that have been queued but not assembled will not have log results.
The Publishing Status page lists all Editions currently running or that were run within the past hour.
Figure 6: Publishing Status page, showing Editions currently running or run in the past hour You can access details of each log. When you click on the log entry, Rhythmyx displays the Log View in the View and Edit pane.
The Log View displays a list of the Content Items published with summary information about each Content Item. For details about a Content Item, double-click on the Content Item. Rhythmyx displays the Published Item Details in the View and Edit pane.
Figure 8: Published Item Detail
The Published Item Details includes publishing details for the Content Item in the Edition job. If publishing of the Content Item failed, the dialog displays an detailed error message.
Pruning Publishing Logs
Under the default configuration, Rhythmyx automatically purges publishing logs after one month. You can manually purge or archive logs as well.
To prune logs from the Runtime Edition page, select the logs you want to prune and to delete the logs, in the Menu bar, Action > Delete Selected Logs;
to archive the logs, in the Menu bar, choose Action > Archive Selected Logs. To prune logs from the Publishing Logs page, select the logs you want to prune and
to delete the logs, in the Menu bar, Action > Delete Selected Logs;
to archive the logs, in the Menu bar, choose Action > Archive Selected Logs. By default, archived logs are stored in the directory
<Rhythmyxroot>/AppServer/server/rx/deploy/publog.war as XML files with the name publog_<id>.xml where <id> is the publishign job ID of the archived log; for example, publog_109.xml.
NOTE: You can configure an alternate storage location for archived logs in the file
<Rhythmyxroot>/rxconfig/server/server.properties. In Windows environments, be sure to escape the backslashes in the path. The escape character is a backslash, so the path would be
Republishing Failed Content
When you review the Publication log, you may find that Rhythmyx published your Edition but did not publish some Content Items. After you resolve the problems causing the publication failure of these content items, you can republish just these items to your site by publishing an incremental Edition. You do not have to republish the entire Edition.
Monitoring Publication of Localized Content
Use Publishing logs to monitor the publication of localized content.If your Publishing Model is site-centric (publishes localized content to unique sites or destinations), you will have unique Sites and Editions for each Locale. Review the log for each Edition to determine whether the content of the Edition published correctly.
If your Publishing Model is content-centric (publishes all content to a single site or destination), you use a single Edition that includes the pages for all Localized versions of your content. Check the Single
Published Item details for each Content Item to see if the different versions within the Edition published correctly.
See the document Internationalizing and Localizing Rhythmyx for more information about localization. If Rhythmyx publishes your Editions or Edition, but does not publish some content items, republish the failed content (see "Republishing Failed Content" on page 19).
C
H A P T E R3
Maintaining Schedules
Automation of Rhythmyx processing is implemented by creating scheduled tasks in the Rhythmyx Server. Rhythmyx maintains a log of scheduled tasks as they are executed. Notification e-mails can be generated when scheduled task processing is executed.
Scheduled Tasks
Scheduled tasks are Rhythmyx tasks that are run automatically by the server. Examples of scheduled tasks include:
Running an Edition automatically. Purging logs.
Many Rhythmyx tasks can be automatically scheduled as timed events. A ScheduledTask extension must exist for the task. The standard Rhythmyx installation includes the following ScheduledTask extensions:
sys_purgePublishingLog
Purges publishing logs created more than the specified number of days in the past. sys_purgeScheduledTaskLog
Purges Scheduled Task logs created more than the specified number of days in the past. sys_runCommand
Runs the specified command. sys_runEdition
Runs the specified Edition.
You can create additional custom Scheduled Tasks to meet your needs. For details, see "Scheduled Tasks" in the Rhythmyx Technical Reference.
The Scheduled Task List dialog lists all scheduled tasks defined in the system:
Scheduled Task Editor
Use the Scheduled Task editor to create and maintain scheduled tasks in Rhythmyx. To access the Scheduled Task editor:
With the Scheduled Task List displayed, in the Menu bar, choose Action > Create New Scheduled Task.
In the Scheduled Task List dialog, double-click on the timed event you want to edit.
Figure 10: Scheduled Task Editor
Field Descriptions
Name Name of the schedule task configuration. Scheduled task configuration names must be begin with a letter, and can contain any alphanumeric characters, underscores, hyphens, or dots (periods).
Task Drop List. The ScheduledTask extension to execute. Options include all ScheduledTask extensions registered in the system. For details about implementing a ScheduledTask, see "Timed Events" in the Rhythmyx Technical Reference. The following ScheduledTask extensions are included with Rhythmyx by default:
sys_PurgePublishingLog
This task purges the publishing log. The extension includes parameters that define how far back to preserve logs, and whether to archive logs before purging them.
sys_PurgeScheduldeTaskLog
This task purges the scheduled task log. The extension includes a parameter that defines how far back to preserve logs.
sys_runCommand
This task runs a native system command. The extension includes a parameter where you can define the command you want to run.
sys_runEdition
This task runs an Edition. The extension includes a parameter where you can define the Edition you want to publish.
If you select a task that has parameters, an additional unnamed field is displayed where you can specify the values for the parameters. You can write a custom scheduled task extension if none of these extensions meet your needs. For details, see the Rhythmyx Technical Reference Manual.
Cron specification Set of values defining when to run the task. Rhythmyx uses the Quartz Enterprise Job Scheduler (http://www.opensymphony.com/quartz/). For details about writing a cron expression for Quartz, see http://www.opensymphony.com/quartz/wikidocs/CronTriggers%20Tutorial.html.
Server Name or IP address of server on which to run the task. Can be used to specify a task to run on a publishing hub. Port defaults to 9992; to specify a different port, specify the server and port as follows: server:port for example, Rhythmyx:9992. (Note: If you attempt to run a task specified for a different server, the task fails and an error will be logged. To run a task specified for another server, start a browser, connect to that server, log in to Content Explorer, go to the Admin tab, and run the task.
Notify when Drop list. Specifies the circumstances under which a notification should be sent out after the task is run. Options include:
Always (Notification is always sent out after the task has run.) Failure (Notification is only sent out if the task fails.)
Never (Notifications are never sent after the task has run. Role to Notify The user or Role to notify.
CC List List of additional recipients of any Notifications generated by this timed event.
Notification Drop list. The Task Notification Template to use to generate the the e-mails sent to the specified recipients.
Creating a Scheduled Task
To create a scheduled task:1 In the Rhythmyx Administration tab, click on the Scheduled Tasks link. The View and Edit pane displays the Scheduled Tasks List.
2 In the Menu bar, choose Create > Scheduled Task.
The View and Edit pane displays a blank scheduled task editor.
3 The Name defaults to TimedEvent_0. Optionally, enter a new Name.
4 Choose the Extension you want to use for the scheduled task. Options include all scheduled
task extensions registered in the system. The following scheduled task extensions are installed with Rhythmyx:
sys_purgePublishingLog
sys_purgeScheduledTaskLog
Purges Scheduled Task logs created more than the specified number of days in the past.
sys_runCommand
Runs the specified command. sys_runEdition
Runs the specified Edition.
5 If the Task you chose has parameters, the editor displays fields for the parameters. Specify values for any parameters of the task.
6 Enter the Cron specification. Rhythmyx uses the Quartz Enterprise Job Scheduler
(http://www.opensymphony.com/quartz/). For details about writing a cron expression for Quartz, see http://www.opensymphony.com/quartz/wikidocs/CronTriggers%20Tutorial.html.
7 All tasks run locally unless configured to run on a different server. If you want to run the task on a different server, such as a publishing hub, enter the name or IP address of that server in the Server field. (Note; the port defaults to 9992. If the server uses a different port, specify both the server and port as follows: server:port; for example, Rhythmyx:9992.)
8 In the Notify when drop list, specify the circumstances under which a notification e-mail
should be sent to the specified recipients. Options include Always, On Failure, and Never.
9 If you choose Always or On Failure in the Notify When drop list:
a) You must specify a Notify Role. Choose the Role you want to notify from the drop list. Options include all Roles defined in the system.
b) You can also specify additional Email Addresses to receive notifications. Use commas to separate e-mail addresses.
c) You must also specify the Notification Template to use to generate notification e-mail messages. Options include all task notifications defined in the system.
10 Click the [Save] button to save the scheduled task.
You can test your scheduled task by running it manually. To run a scheduled task manually, in the Menu bar, choose Action > Run Now. (Note: If you configured the task to run on a different server, you must run the task from that server. Running a task from a server other than the server for which it is configured results in an error. Start a browser and connect to the remote server, log in to Content Explorer, go to the Admin tab, and run the task)
Modifying a Scheduled Task
To modify a scheduled task:1 In the Rhythmyx Administration tab, click the Scheduled Task link The View and Edit tab displays the Scheduled Task List.
The View and Edit tab displays the scheduled task editor with the current data for the scheduled task you accessed.
3 You can change the value in any field. For details about writing a cron expression, see
http://www.opensymphony.com/quartz/wikidocs/CronTriggers%20Tutorial.html
(http://www.opensymphony.com/quartz/wikidocs/CronTriggers%20Tutorial.html).
4 Click the [Save] button to save your changes.
Copying a Scheduled Task
A quick way to create a new scheduled task is to copy an existing scheduled task that closely matches the scheduled task you want to create and modify the data in the copy.
To copy a scheduled task:
1 In the Rhythmyx Administration tab, click the Scheduled Task link. The View and Edit pane displays the scheduled task list.
In the scheduled task list, select the radio button in the row of the scheduled task you want to copy.
2 In the menu bar, choose Action > Copy.
3 Rhythmyx copies the scheduled task and displays the copy in the View and Edit pane. The Name of the copied scheduled task is Copy_of_<original scheduled task name>. All other data is copied directly from the original scheduled task.
4 You can change the value in any field. For details about writing a cron expression, see
http://www.opensymphony.com/quartz/wikidocs/CronTriggers%20Tutorial.html
(http://www.opensymphony.com/quartz/wikidocs/CronTriggers%20Tutorial.html).
Timed Event Logs
The scheduled task log lists scheduled tasks that have run, from most recent to oldest.
To access the scheduled task log, in the Rhythmyx Administration tab, click on the scheduled task Log link.
Figure 11: Scheduled Task Log
Scheduled task logs can be purged. Purging removes all scheduled task logs. To purge the scheduled task log, in the Menu bar, choose Action > Purge Logs.
Task Notifications
A task notification is a template used to generate e-mails automatically sent by the scheduled task engine. The scheduled task specifies which notification to send, the events that trigger sending an e-mail, and the recipients of the message.
Scheduled tasks extensions may define binding variables that can be used to include task data in notification e-mails generated by scheduled tasks that use that extension. The variable
$execution_datetime is available for all Scheduled Tasks. Other variables are defined by the Scheduled Task extension.
The Task Notification List lists all scheduled task notification defined in the system.
Task Notification Editor
Use the Task Notification editor to define notification templates. To access the Task Notification editor:
On the Rhythmyx Administration tab, click on the Task Notification link, then in the Menu bar, choose Action > Create Task Notification.
On the Task Notification List, double-click on the Task Notification you want to edit.
Figure 13: Task Notification Editor
Field Descriptions
Name Name of the notification.
Subject The text of the subject line of the notification e-mail message as a JEXL expression. Template Text of the notification e-mail message as a Velocity template.
Since the content of both the Subject and Template fields can use JEXL (JEXL is included in Velocity), binding variables can be included using the standard syntax $variablename. The specific variables available are defined by the Scheduled Task extension. For details about the variables available for the Scheduled Task extensions that ship with Rhythmyx, see Default Task Notification Variables (on page 31).
sys_runCommand (see page 33) sys_runEdition (see page 33)
sys_purgePublishingLog (see page 32) sys_purgeTaskLog (see page 32)
The variable $execution_datetime is available for all scheduled tasks.
Creating a Scheduled Task Notification
To create a scheduled task notification:1 On the Rhythmyx Administration tab, click the Task Notifications link. The View and Edit pane displays the Task Notifications List.
2 In the Menu bar, choose Create > Task Notification.
The View and Edit pane displays a blank Task Notification editor.
3 The Name defaults to Notification_0. Optionally, change the Name.
4 The Subject defaults to 'Set a new subject'. Enter the code to generate the subject line for the
notification e-mail message.
5 Enter the code to generate the text of the message in the Template field.
This value of the Subject and Template fields is a Velocity template, which means it can include HTML markup and binding variables. Use the format $variable_name to include a binding variable in the template. For all scheduled task extensions, the binding variable $execution_datetime is available. A scheduled task extension may return additional binding variables. For example, the sys_runEdition Scheduled Task returns the following binding variables: $edition_name $site_name $failure_count $edition_log_url $success_count
Two example scheduled task notifications, Run_Edition_Template and Task_Template are included when you install Rhythmyx. Use these as models to design the code for your own notifications.
Modifying a Timed Event
To modify a scheduled task notification:1 In the Rhythmyx Administration tab, click the Task Notification link. The View and Edit pane displays the task notification list.
2 Double-click on the task notification you want to modify. The View and Edit pane displays the notification you selected.
3 You can change the value in any field.
4 Click the [Save] button to save your changes.
Deleting a Scheduled Task Notification
If you delete a notification, no e-mails will be generated by scheduled tasks that use that notification. No error will be returned to inform you that generation of an e-mail failed.
To delete a scheduled task notification:
1 In the Rhythmyx Administration tab, click the Task Notification link. The View and Edit pane displays the task notification list.
2 Select the task notification you want to delete.
3 In the Menu bar, choose Edit > Delete Selected Task Notification.
The notification you selected is deleted. The task notification list is refreshed to show the available notifications.
Default Task Notification Variables
The Task Notification Variables available fore each extension are defined by that extension. The following extensions are shipped with Rhythmyx:
sys_runCommand (on page 33) sys_runEdition (on page 33)
sys_purgePublishingLog (on page 32) sys_purgeTaskLog (on page 32)
The variable $sys_executionDateTime is available for all scheduled task extensions. All Velocity tool utilities available in Rhythmyx (as defined by
<Rhythmyxroot>/AppServer/server/rx/deploy/rxapp.ear/rxapp.war/WEB-INF/config/velocity/tools.xml) are also available for use in task notifications.
sys_purgePublishingLog
This Scheduled Task extension purges publishing log entries created more than a specified number of days in the past. The following Task Notification variables are available from this extension:
Variable Name Type Description
$numberofDays String Number of days in the past to preserve logs. Logs older than the specified number of days will be purged,
$enableArchive Boolean True if purged logs are archived. The default archive location is <Rhtyhmyxroot>/AppServer/server/rx/deploy/publogs.war. The archive file is named "publog_ID.XML" where "ID" is the ID of the archived log.
$tools. Velocity tools utilities available in Rhythmyx. Available utilities are defined in the file
<Rhythmyxroot>/AppServer/server/rx/deploy/rxapp.ear/rxapp.war/ WEB-INF/config/velocity/tools.xml
$sys.taskName String The name of the task.
$sys.completed Booelan True if job processing was completed; otherwise false.
$sys.problemDesc String If processing was not completed, the description of the problem that cased the failure.
$sys.executionDateTime String Starting date and time of processing of the extension. $sys.executionElapsedTime Long The duration of the execution in milliseconds.
sys_purgeTaskLog
This Scheduled Task extension purges Scheduled Task log entries created more than a specified number of days in the past. The following Task Notification variables are available from this extension:
Variable Name Type Description
$numberofDays String Number of days in the past to preserve logs. Logs older than the specified number of days will be purged,
$tools. Velocity tools utilities available in Rhythmyx. Available utilities are defined in the file
<Rhythmyxroot>/AppServer/server/rx/deploy/rxapp.ear/rxapp.war/ WEB-INF/config/velocity/tools.xml
$sys.taskName String The name of the task.
$sys.completed Booelan True if job processing was completed; otherwise false.
$sys.problemDesc String If processing was not completed, the description of the problem that cased the failure.
$sys.executionDateTime String Starting date and time of processing of the extension. $sys.executionElapsedTime Long The duration of the execution in milliseconds.
sys_runCommand
This Scheduled Task extension runs a server command. The following Task Notification variables are available from this extension:
Variable Name Type Description
$command String The server command specified in the command parameter of the extension.
$tools. Velocity tools utilities available in Rhythmyx. Available utilities are defined in the file
<Rhythmyxroot>/AppServer/server/rx/deploy/rxapp.ear/rxapp.war/ WEB-INF/config/velocity/tools.xml
$sys.taskName String The name of the task.
$sys.completed Booelan True if job processing was completed; otherwise false.
$sys.problemDesc String If processing was not completed, the description of the problem that cased the failure.
$sys.executionDateTime String Starting date and time of processing of the extension. $sys.executionElapsedTime Long The duration of the execution in milliseconds.
sys_runEdition
This Scheduled Task extension publishes an Edition. The following Task Notification variables are available from this extension:
Variable Name Type Description
$editionName String Edition name, as defined by the editionName parameter of the extension.
$tools. Velocity tools utilities available in Rhythmyx. Available utilities are defined in the file
<Rhythmyxroot>/AppServer/server/rx/deploy/rxapp.ear/rxapp.war/ WEB-INF/config/velocity/tools.xml
$sys.taskName String The name of the task.
$sys.completed Booelan True if job processing was completed; otherwise false.
$sys.problemDesc String If processing was not completed, the description of the problem that cased the failure.
$sys.editionName String Name of the published Edition. $sys.siteName String Name of the published Site.
$sys.editionLogUrl String URL that can be used to view the Edition log. $sys.failureCount String Number of Content Items for which publishing failed. $sys.successCount String Number of Content Items for which publishing succeeded. $sys.executionDateTime String Starting date and time of processing of the extension.
Variable Name Type Description
$sys.executionElapsedTime Long The duration of the execution in milliseconds.
Example Task Notifications
Two example task notifications are installed with Rhythmyx: Run_Edition_Template (on page 34)
Task_Template (on page 37)
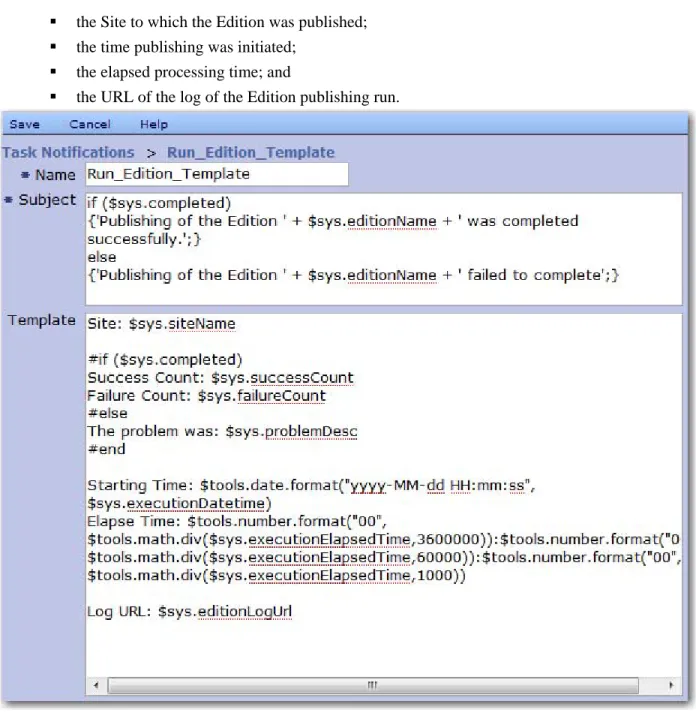
Run_Edition_Template
The Run_Edition_Template provides a generic notification template for a notification that is very commonly desired in Rhythmyx: the results of running an Edition. This template generates an e-mail message that reports:
the result of the run;
if the run completed successfully, how many individual Content Items were published successfully and how many individual Content Items failed to publish;
the Site to which the Edition was published; the time publishing was initiated;
the elapsed processing time; and
the URL of the log of the Edition publishing run.
Figure 14: Task Notification Editor The code in the Subject field generates text similar to one of the following
Publishing of the Edition <EditionName> was completed successfully.
This text is generated if processing of the Edition was successful. The text <EditionName> will be replaced with the name of the Edition that was processed.
Publishing of the Edition <EditionName> failed to complete.
This text is generated if processing of the Edition failed. The text <EditionName> will be replaced with the name of the Edition that was processed.
The code in the Template field first tells the recipient the Site to which the Edition was published.
Next, the message provides details regarding the success or failure of the publishing run. If the run was successful. the number of successful and failed Content Items is listed.
#if ($sys.completed)
Success Count: $sys.successCount Failure Count: $sys.failureCount
If the run failed, a description of the failure is included:
#else
The problem was: $sys.problemDesc
Following that, the e-mail notes the time that the Edition was launched and the elapsed time to run it:
Starting Time: $tools.date.format("yyyy-MM-dd HH:mm:ss", $sys.executionDatetime)
Elapse Time: $tools.number.format("00",
$tools.math.div($sys.executionElapsedTime,3600000)):$tools.number.format ("00",
$tools.math.div($sys.executionElapsedTime,60000)):$tools.number.format(" 00", $tools.math.div($sys.executionElapsedTime,1000))
The value of the $sys.execution.ElapsedTime is the amount of time, in milliseconds, to complete processing of the Edition. Dividing by 3600000 yields the number of hours for the processing, dividing by 60000 yields the number of minutes, and dividing by 1000 yields the number of seconds. Functions from the JEXL toolkit are used to calculate these values.
Finally, the URL of the job log is included:
Task_Template
The Task_Template is a generic notification to inform the recipient about the results of a scheduled task. This template generates an e-mail that reports:
the result of the run, and, if unsuccessful, the cause of the failure; and the starting time of the task and the elapsed time of the processing.
Figure 15: Task_Template The code in the Subject field generates text similar to one of the following
Execution of the task <TaskName> was completed.
This text is generated if Rhythmyx was able to execute the scheduled task. The text <TaskName> will be replaced with the name of the scheduled task that was initiated.
Execution of the task <TaskName> failed to complete.
This text is generated if Rhythmyx was not able to execute the scheduled task. The text <TaskName> will be replaced with the name of the scheduled task that was initiated.
The code in the Template field, if the scheduled task could not be executed, a description of the problem is included.
Following that, the e-mail notes the time that the Edition was launched and the elapsed time to run it:
Starting Time: $tools.date.format("yyyy-MM-dd HH:mm:ss", $sys.executionDatetime)
Elapse Time: $tools.number.format("00",
$tools.math.div($sys.executionElapsedTime,3600000)):$tools.number.format ("00",
$tools.math.div($sys.executionElapsedTime,60000)):$tools.number.format(" 00", $tools.math.div($sys.executionElapsedTime,1000))
The value of the $sys.execution.ElapsedTime is the amount of time, in milliseconds, to complete processing of the Edition. Dividing by 3600000 yields the number of hours for the processing, dividing by 60000 yields the number of minutes, and dividing by 1000 yields the number of seconds. Functions from the JEXL toolkit are used to calculate these values.
C
H A P T E R4
Maintaining the Rhythmyx Server
Many of the remaining sections of the Administration Manual refer you to server maintenance tasks that are completed using the Rhythmyx Server Administrator, the Rhythmyx interface that the system administrator uses to maintain the Rhythmyx Server. To open the Server Administrator:: In the Rhythmyx root, double-click RhythmyxServerAdministrator.exe.
In Windows, access Start > All Programs > Percussion Rhythmyx > Rhythmyx Server Administrator.
In Windows, open the command line interface. Change the command line directory to your Rhythmyx directory. Enter rhythmyxserveradministrator.
In Windows, access Start > Run. Browse to the Rhythmyx root directory and double-click RhythmyxServerAdministrator.exe.
In each case, you are prompted to enter your password. After you click [Login], the Server Administrator opens:
Figure 16: Status Tab
The Server Administrator separates administration tasks into nine categories displayed by its upper tabs. The tabs enable an administrator to do the following:
Status - Stop and start Rhythmyx applications and monitor their statistics. For more information about using the Status tab, see the Server Administrator help.
Settings - Optimize Rhythmyx’s performance by specifying idle time limits and maximum connections. In addition, this tab lets the administrator enable or disable the server cache and set its size. For more
Datasources - Maintain the data Rhythmyx uses to connect to an RDBMS and to a specific database or schema in the RDBMS. The administrator can maintain database driver definitions, JNDI datasource configurations, and specify the database or schema to which Rhythmyx can connect. For more information about using the Datasources tab, see the Server Administrator help.
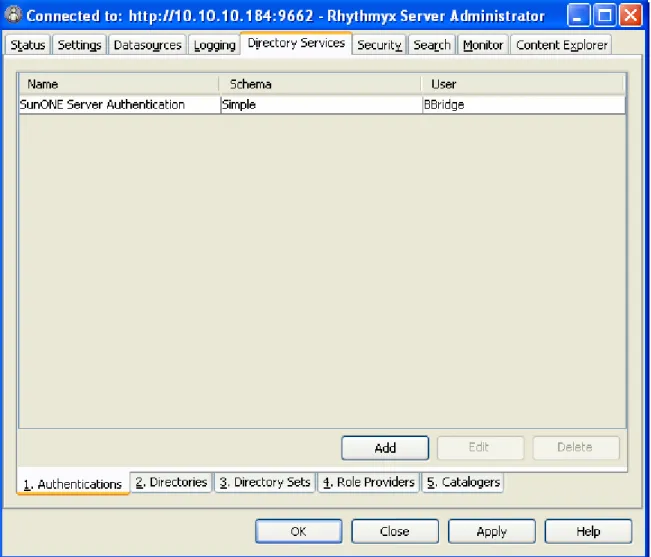
Logging - Set the types of events to log, specify how long to save log files, and query log records for information. For more information about using the Logging tab, see the Server Administrator help. Directory Services - Register Directory Services, add authentication information for users connecting to a Directory Service, and provide other data necessary for connecting to and using Directory Services. For more information about using the Directory Services tab, see Using Directory Services (see page 87). Security - Set up most of Rhythmyx’s security features. For more information about using the Security tab, see Maintaining Users (see page 71). For complete information about this tab, see the Server
Administrator help.
Search - Enable and disable the full-text search, change the default index directory and override the default indexing interfaces. For more information about using the Search tab, see Search Configuration
(see page 155).
Monitor - Remotely enter Server commands and view the Rhythmyx Server responses on a console. For more information about using the Monitor tab, see Issuing Commands to the Rhythmyx Server (see page 48).
Content Explorer - Configure which Java Plugin Content Explorer uses and its download location, and choose when to refresh the Content Explorer screen. For more information about using the Content Explorer tab, see the Server Administrator help.
C
H A P T E R5
Operating the Rhythmyx Server
This chapter describes: how to start and stop the Rhythmyx server in the following environments:
Windows (see "Operating the Rhythmyx Server in a Windows Environment" on page 42)
Solaris and Linux (see "Operating the Rhythmyx Server in a Unix Environment" on page 44)
troubleshooting recommendations when the Rhythmyx server fails to start (see "Troubleshooting Server Initialization" on page 46);
issuing commands to the Rhythmyx server (see page 48);
implementation and operational tasks that require restart of the Rhythmyx server (see page 70).
Operating the Rhythmyx Server in a
Windows Environment
The Rhythmyx server can run as a Windows service or as an application. The installation sets up the Rhythmyx service to start automatically when you start Windows. Run the server as a service in production environments. Run it as an application in development and test environments.
Starting Rhythmyx Server as a Windows Service
To start the Rhythmyx server as a Windows service1 Access the Windows Services dialog. (The procedure for accessing this dialog differs depending on the version of Windows you are running. Consult the Windows Help on your installation for the procedure to access this dialog.)
2 Select the Rhythmyx Server service.
3 Right-click and from the popup menu choose Start.
4 Alternately, you can double-click on the service to display the service properties dialog for the service. Click the [Start] button to start the service.
Starting Rhythmyx Server as an Application
Run Rhythmyx server as an application in development and test environments. Running Rhythmyx server as an application in production environments is not recommended.
To start Rhythmyx server as an application:
1 Browse to your Rhythmyx\bin folder.
2 Double-click the RhythmyxServer icon.
Windows will start Rhythmyx server as an application.
When starting Rhythmyx server as an application, you may get the message that authentication failed because the user does not have a required privilege. In this case, you need to modify the user’s rights so they can act as part of the operating system. Consult the Help for your version of Windows for details about assigning user rights to act as part of the operating system.
Changing Rhythmyx Server Service Settings
When the Rhythmyx installation application creates the Rhythmyx service, it is defines the following settings by default:
Start automatically when Windows starts.
Allow service to interact with the desktop. This setting displays the service as a DOS window on the desktop.
Use the service properties dialog to change these settings. The procedure to access this dialog differs for different versions of Windows; consult the Help for your version for the correct procedure.
To change the Startup Type, click the radio button for the start up type you prefer. Options include Automatic (starts the service automatically when you start Windows), Manual (users must manually start the service), or Disabled (disables the service so it can no longer run). To stop displaying the service in a DOS window, uncheck Allow Service to Interact with
Desktop. (NOTE: You will have to stop and restart the server for this option to take effect.)
Using a Command to Stop Rhythmyx Server
To stop the Rhythmyx server, access the admin JSP page (see page 48) and enter the command quit.
Stopping Rhythmyx Server from the Services Dialog
If you do not display Rhythmyx server in a DOS window, you will have to stop the Rhythmyx server from the Services dialog. You can also use this method if the server is displayed in a DOS window.
To stop the Rhythmyx server from the services dialog:
1 Access the Windows Services dialog. (The procedure for accessing this dialog differs depending on the version of Windows you are running. Consult the Windows Help on your installation for the procedure to access this dialog.)
2 Select the Rhythmyx Server service.
3 Right-click and from the popup menu choose Stop.
4 Alternately, you can double-click on the service to display the service properties dialog for the service. Click the [Stop] button to start the service.
Operating the Rhythmyx Server in a Unix
Environment
Operating Rhythmyx in a Unix environment requires a user to install and run Rhythmyx. You must create a unique run user for each instance of the Rhythmyx server that you operate.
When you install Rhythmyx , the installer creates the file rx_user.id. This file has three entries,
SYSTEM_USER_ID=
RHYTHMYX_USER_ID=admin1 RHYTHMYX_USER_PWD=demo
The value of SYSTEM_USER_ID is set during installation. Do not change this value.
The values of RHYTHMYX_USER_ID and RHYTHMYX_USER_PWD define the user that can shut down the Rhythmyx server. Rhythmyx uses this user as part of the shut-down process. If you change the password of the admin1 user, you will need to modify the value of the RHYTHMYX_USER_PWD to match the new password. If you delete the admin1 user, you must enter a valid Rhythmyx username and password. Note that this is a user within the Rhythmyx system, not the Rhythmyx user for Unix, and this user must be in a Role that has Administrative access to the server ACL.
Other than these modifications, do not modify this file. In particular, to not change the permissions on the file.
The post-installation process determines whether Rhythmyx runs as a daemon or as a console. If you choose to install Rhythmyx as a daemon, the InstallDaemon.sh application creates
S15RhythmyxD and K15RhythmyxD files in the /etc/rc2.d directory. The daemon thus starts automatically when you start your system. The daemon is controlled by a script located in /etc/rc2.d.
Starting Rhythmyx Server as a Daemon in a Unix
Environment
The Rhythmyx server daemon starts automatically when you start your system. If you need to restart the daemon after shutting it down, change to the Rhythmyx bin directory and enter the following:
./RhythmyxDaemon start <Rhythmyx root directory>
When you press <Enter>, the Rhythmyx server will start as a daemon.
Starting the Rhythmyx Server as a Terminal Window in a
Unix Environment
If you install Rhythmyx server as a console, you must start the server manually. Change to the Rhythmyx bin directory and enter sh StartServer.sh. When you press <Enter>, Rhythmyx will start as a console.
Stopping Rhythmyx Server in Unix Environment When
Running as a Daemon
To stop Rhythmyx server when running as a daemon, change to the Rhythmyx bin directory and enter the following:
./RhythmyxDaemon stop <Rhythmyx root directory>
When you press <Enter>, the Rhythmyx server will shut down.
Stopping Rhythmyx Server in a Unix Environment When
Running as a Terminal Window
To stop Rhythmyx server when running as a console, change to the Rhythmyx bin directory and enter the following:
./Sh StopServer.sh
When you press <Enter>, Rhythmyx server will shut down.
Uninstalling the Rhythmyx Daemon Control Scripts
To uninstall all instances of the Rhythmyx daemon control scripts (for all instances of Rhythmyx), execute the following commands as the root user:
# rm /etc/init.d/RhythmyxD # rm /etc/rc2.d/?15RhythmyxD
These commands remove the following files:
/etc/init.d/RhythmyxD /etc/rc2.d/S15RhythmyxD /etc/rc2.d/K15RhythmyxD
To remove a single instance from the daemon control scripts, remove the desired installation directories from the SERVER_DIR variable in the daemon control script /etc/init.d/RhythmyxD. The installation directories are colon (:) delimited. For example:
Troubleshooting Server Initialization
When the Rhythmyx server encounters an error during the initialization process, it shuts downimmediately. The server log (<Rhythmyxroot>/AppServer/server/rx/logs/server.log) will include details about the error that caused the shutdown.
The Rhythmyx server runs as a servlet within the JBoss Web application server. In some cases, problems in server initialization and operation may be issues in JBoss rather than in Rhythmyx. For JBoss operation and maintenance, see the JBoss documentation at www.jboss.org (http://www.jboss.org).
Common Server Initialization Errors
Common errors during server initialization include:Expired License
The server fails on startup with the following error message in the log:
The evaluation period for this license has expired.
This error indicates that your license for Rhythmyx has expired and you will need a new license. Contact Percussion Technical Support for a new license and for instructions about updating your installation.
Database Connectivity Problems
The server fails on startup with a long stack trace in the log. The initial error may be one of the following:
2007-02-08 10:49:55,963 WARN
[org.jboss.resource.connectionmanager.JBossManagedConnectionPool] Throwable while attempting to get a new connection: null
org.jboss.resource.JBossResourceException: Could not create connection; - nested throwable: (java.sql.SQLException: Network error IOException: Connection refused: connect)
This error indicates that you have a problem connecting to the database server. Either the server is down or you do not have network connectivity to the server. Confirm that the server is running and that the machine on which the Rhythmyx server resides can communicate with the machine on which the database server resides.
2007-02-08 11:16:43,597 WARN
[org.jboss.resource.connectionmanager.JBossManagedConnectionPool] Throwable while attempting to get a new connection: null
org.jboss.resource.JBossResourceException: Could not create connection; - nested throwable: (java.sql.SQLException: Unknown server host name 'RxAlt'.)
This error indicates that the datasource used to connect to the Rhythmyx server is misconfigured. In this specific case, the database server does not exist. This error commonly occurs when a Rhythmyx tree has been moved to a different machine
Other possible errors include incorrect login user names or passwords. The java.sql.SQLException should specify the error.
Port Conflicts
The server starts but with a stack trace at the end of startup. The stack trace starts with the following error:
13:24:05,415 ERROR [Http11Protocol] Error starting endpoint java.net.BindException: Address already in use: JVM_Bind:9662
This error indicates that you have a port conflict. The port Rhythmyx is trying to use is already in use. This often happens when you are restarting the Rhythmyx server when the original Rhythmyx server session did not completely terminate and is holding on to the port. Check whether the Rhythmyx process is still running. If so, terminate the process. Also, confirm that you do not have two Rhythmyx server installations on the same machine using the same port.
Issuing Commands to the Rhythmyx Server
Two interfaces are available for issuing commands to the Rhythmyx server: administration JSP page
The administration JSP page is an HTML interface that provides the capability to issue commands to the Rhythmyx server. To access the administration JSP page, open a browser and in the Address field, enter the URL of the administration page:
http://localhost:9992/Rhythmyx/admin/console.jsp
where
localhost is the name or IP address of the machine where the Rhythmyx server resides; and
9992 is the Rhythmyx port.
All server commands are valid using this interface. Rhythmyx Server Administrator
Use the Monitor tab of the Server Administrator to issue commands to the Rhythmyx server. Enter the Command and click the [Execute] button. The results are displayed in the Command Output field. (NOTE: The quit command is not valid using this interface.)
In both cases, the results are displayed in HTML format.
NOTE: In Rhythmyx Version 5.7 and earlier, commands could be issued directly to the server in the server terminal window. This functionality is not available in Rhythmyx Version 6.0 and later.
Server Console Commands by Function
This section organizes server commands by function: general server commands (see "General Server Console Commands" on page 48) server commands for Rhythmyx applications (see "Server Console Commands for
Applications" on page 52)
server commands for displaying resources (see "Server Console Commands for Displaying Resources" on page 56)
server commands for flushing caches (see "Server Console Commands for Flushing the Server and MetaData Caches" on page 58)
server commands for search (see "Server Console Commands for Search" on page 63)
General Server Console Commands
To . . . Enter the command . . . Notes and Examples
Empty the log queue log flush Forces the server to write all pending log messages
To . . . Enter the command . . . Notes and Examples Display server log on the
console.
log dump This command may dump a very large amount of data onto the console.
Display the server version show version Displays version and build of Rhythmyx. Example: show version <?xml version='1.0' encoding='UTF-8'?> <PSXConsoleCommandResults> <command>show version </command> <resultCode>0</resultCode> <resultText>Release 4.5 Build 20020829 (1311)</resultText> </PSXConsoleCommandResults>
To . . . Enter the command . . . Notes and Examples Display statistics for server
handling of all requests
show status server Displays how long the server has been running, the
number of events processed, failed, and pending, the number of hits and misses to the cache, and average, minimum and maximum processing time for events.
Example:
show status server
<?xml version='1.0' encoding='UTF-8'?> <PSXConsoleCommandResults> <command>show status server</command> <resultCode>0</resultCode> <resultText></resultText> <PSXStatistics/> <ElapsedTime> <days>0</days> <hours>1</hours> <minutes>15</minutes> <seconds>4</seconds> <milliseconds>26</milliseconds> </ElapsedTime> <Counters> . . . </PSXConsoleCommandResults>
To . . . Enter the command . . . Notes and Examples Display statistics for server
handling of requests by Workbench and Server Administrator
show status objectstore
Displays how long the server has been running, the number of Workbench and Server Administrator events processed, failed, and pending, the number of hits and misses by such events to the cache, and average, minimum and maximum processing time for these events.
Example:
show status objectstore
<?xml version='1.0' encoding='UTF-8'?> <PSXConsoleCommandResults> <command>show status objectstore</command> <resultCode>0</resultCode> <resultText></resultText> <PSXStatistics/> <ElapsedTime> <days>0</days> <hours>1</hours> <minutes>19</minutes> <seconds>49</seconds> <milliseconds>116</milliseconds> </ElapsedTime> <Counters> . . . <PSXConsoleCommandResults>
Server Console Commands for Applications
To . . . Enter the command . . . Notes Display a list ofactive server applications
show applications active Example:
show applications active <?xml version='1.0' encoding='UTF-8'?> <PSXConsoleCommandResults> <command>show applications</command> <resultCode>0</resultCode> <resultText></resultText> <Applications> <Application id="18" active="yes" enabled="yes"> <name>casArticle</name> </Application> <Application id="531" active="yes" enabled="yes"> <name>casArticleWord</name> . . . <PSXConsoleCommandResults>
To . . . Enter the command . . . Notes Display a list of
all server applications
show applications Examples:
show applications <?xml version='1.0' encoding='UTF-8'?> <PSXConsoleCommandResults> <command>show applications</command> <resultCode>0</resultCode> <resultText></resultText> <Applications> <Application id="18" active="yes" enabled="yes"> <name>casArticle</name> </Application> <Application id="531" active="yes" enabled="yes"> <name>casArticleWord</name> . . . <PSXConsoleCommandResults>
To . . . Enter the command . . . Notes Display statistics for server handling of requests to a specific application.
show status application applicationname
Displays how long the application has been running, the number of application events processed, failed, and pending, the number of hits and misses by application events to the cache, and average, minimum and maximum processing time for application events.
Example:
show status application sys_cmpCommunities <?xml version='1.0' encoding='UTF-8'?> <PSXConsoleCommandResults> <command>show status application sys_cmpCommunities</command> <resultCode>0</resultCode> <resultText></resultText> <PSXApplicationStatus> <name>sys_cmpCommunities</name > <PSXStatistics/> <ElapsedTime> <days>0</days> <hours>0</hours> <minutes>50</minutes> . . . <PSXConsoleCommandResults> Start a server application start application applicationname
Stop and restart a server application restart application applicationname Stop a server application stop application applicationname
To . . . Enter the command . . . Notes Turn on default tracing to interactively debug an application running on Rhythmyx. trace default applicationname
When tracing occurs, Rhythmyx returns the output of <Rhythmyx
root>/<application name>/~,application
name>.trace to the console. [link to Tracing Results] Example: trace default sys_caContentSearch <?xml version='1.0' encoding='UTF-8'?> <PSXConsoleCommandResults> <command>trace default sys_caContentSearch</command> <resultCode>0</resultCode> <resultText></resultText> </PSXConsoleCommandResults> Turn on specific tracing options to interactively debug an application running on Rhythmyx.
trace flag1 [flag2] [flag3] [flag4] applicationname
Tracer Types and Flags [link]
Enter up to four trace flags in hexadecimal format.
Example:
trace 0x1 0x100 0x200 0x1000 sys_caContentSearch
When tracing occurs, Rhythmyx returns output of <Rhythmyx root>/<application
name>/~,application
name>.trace to the console.
View tracing options
Server Console Commands for Displaying Resources
To . . . Enter the command . . . NotesDisplay information on various system resources
dump resources Displays database pool, user thread, request queue, user session, request dispatcher, and cache statistic information. Example: dump resources <?xml version='1.0' encoding='UTF-8'?> <PSXConsoleCommandResults> <command>dump resources </command> <ReaperThread isAlive="yes"/> <DefaultCredentials> <Credential server="INETDAE7/JENNIFER"> <User name="sa" password="****"/> </Credential> </DefaultCredentials> <InstalledDrivers> . . . <PSXConsoleCommandResults>
To . . . Enter the command . . . Notes Display
summaries of datasource information
dump datasources Example:
dump datasource <datasources> <datasource name="rxdefault" isCmsRepository="yes"> <jndiDatasourceName>jdbc/rxdefaul t </jndiDatasourceName> <jdbcUrl>jdbc:jtds:sqlserver://be nder </jdbcUrl> <database>rxRhino</database> <schema>dbo</schema> </datasource> </datasources> Display information about all handlers
dump handlers Example:
dump handlers <?xml version='1.0' encoding='UTF-8'?> <PSXConsoleCommandResults> <command>dump handlers </command> <RequestHandlers size="266"> <Handlers> <Handler name="data-xrd_cassyndarticles" class="com.percussion.server.PSAp plicationHandler"> <SupportedTypes>[POST, GET]</SupportedTypes> . . . <PSXConsoleCommandResults>
Server Console Commands for Flushing the Server and MetaData
Caches
MetaData Cache
To . . . Enter the command . . . Notes
Flush the metadata cache
flush dbmd [-d datasource] [-t table]
The -d database and -t table, parameters are optional.
Examples:
To flush metadata for a backend table named dbo.RXARTICLE:
flush dbmd -d rxmaster -t RXARTICLE
Get Help with the flush dbmd command flush dbmd OR flush dbmd -h Example: flush dbmd -h <PSXConsoleCommandResults> <command>flush dbmd </command> <resultCode>0</resultCode> <resultText>
Format of this command is: flush dbmd d [datasource] -t [-table]
or
flush dbmd [-h]
The switches are not case sensitive, and the space . . .
Server Cache
To . . . Enter the command . . . Notes
Delete all data from the server cache
flush cache Flushes all assembler and resource pages.
Delete specific data from the server cache
For assembler pages: flush cache assembler
[applicationname];[contentid ];
[revisionid];[variantid] For resource pages: flush cache resource
[applicationname];[datasetna me]
The parameters must be supplied in the specified orders; they may be omitted, but the semi-colon placeholder must be included.
Example:
To flush all pages where contentid=135 and revisionid=1: flush cache ;135;1; <?xml version='1.0' encoding='UTF-8'?> <PSXConsoleCommandResults> <command>flush cache ;135;1;</command> <resultCode>1532</resultCode >
<resultText>The cache has been flushed.</resultText> </PSXConsoleCommandResults>
Server Cache
To . . . Enter the command . . . Notes
Display
information from the server cache
dump cache Displays hit rate, total hits, total misses, number of items in cache, memory used, disk space used, average size of item, and disk hit rate. Amounts displayed are combined totals for cached assembler and resource pages Example: dump cache <?xml version='1.0' encoding='UTF-8'?>
![Figure 2: Runtime Edition page when an Edition is not running 3 In the Menu bar, click [Start]](https://thumb-us.123doks.com/thumbv2/123dok_us/324361.2535356/13.918.130.793.184.634/figure-runtime-edition-edition-running-menu-click-start.webp)


![Figure 28: Example Authentication Definition 5 Click the [OK] button when you have completed the necessary fields](https://thumb-us.123doks.com/thumbv2/123dok_us/324361.2535356/95.918.191.730.170.531/figure-example-authentication-definition-click-button-completed-necessary.webp)

