Users’ Manual
Xen v3.3
DISCLAIMER: This documentation is always under active development and as such there may be mistakes and omissions — watch out for these and please re-port any you find to the developers’ mailing list, [email protected]. The latest version is always available on-line. Contributions of material, sugges-tions and correcsugges-tions are welcome.
Xen is Copyright c2002-2008, Citrix Systems, Inc., University of Cambridge, UK, XenSource Inc., IBM Corp., Hewlett-Packard Co., Intel Corp., AMD Inc., and others. All rights reserved.
Xen is an open-source project. Most portions of Xen are licensed for copying under the terms of the GNU General Public License, version 2. Other portions are licensed under the terms of the GNU Lesser General Public License, the Zope Public License 2.0, or under “BSD-style” licenses. Please refer to the COPYING file for details. Xen includes software by Christopher Clark. This software is covered by the following licence:
Copyright (c) 2002, Christopher Clark. All rights reserved.
Redistribution and use in source and binary forms, with or without modi-fication, are permitted provided that the following conditions are met:
• Redistributions of source code must retain the above copyright
no-tice, this list of conditions and the following disclaimer.
• Redistributions in binary form must reproduce the above copyright
notice, this list of conditions and the following disclaimer in the doc-umentation and/or other materials provided with the distribution.
• Neither the name of the original author; nor the names of any
con-tributors may be used to endorse or promote products derived from this software without specific prior written permission.
THIS SOFTWARE IS PROVIDED BY THE COPYRIGHT HOLDERS AND CONTRIBUTORS ”AS IS” AND ANY EXPRESS OR IMPLIED WARRANTIES, INCLUDING, BUT NOT LIMITED TO, THE IMPLIED WARRANTIES OF MERCHANTABILITY AND FITNESS FOR A PAR-TICULAR PURPOSE ARE DISCLAIMED. IN NO EVENT SHALL THE COPYRIGHT OWNER OR CONTRIBUTORS BE LIABLE FOR ANY DIRECT, INDIRECT, INCIDENTAL, SPECIAL, EXEMPLARY, OR CON-SEQUENTIAL DAMAGES (INCLUDING, BUT NOT LIMITED TO, PROCUREMENT OF SUBSTITUTE GOODS OR SERVICES; LOSS OF USE, DATA, OR PROFITS; OR BUSINESS INTERRUPTION) HOW-EVER CAUSED AND ON ANY THEORY OF LIABILITY, WHETHER IN CONTRACT, STRICT LIABILITY, OR TORT (INCLUDING NEG-LIGENCE OR OTHERWISE) ARISING IN ANY WAY OUT OF THE USE OF THIS SOFTWARE, EVEN IF ADVISED OF THE
POSSIBIL-Contents
1 Introduction 1
1.1 Usage Scenarios . . . 1
1.2 Operating System Support . . . 2
1.3 Hardware Support . . . 2
1.4 Structure of a Xen-Based System . . . 3
1.5 History . . . 3
1.6 What’s New . . . 4
I Installation 5 2 Basic Installation 7 2.1 Prerequisites . . . 7
2.2 Installing from Binary Tarball . . . 8
2.3 Installing from RPMs . . . 8
2.4 Installing from Source . . . 8
2.4.1 Obtaining the Source . . . 8
2.4.2 Building from Source . . . 9
2.4.3 Custom Kernels . . . 9
2.4.4 Installing Generated Binaries . . . 10
2.5 Configuration . . . 10
2.5.1 GRUB Configuration . . . 10
2.5.2 Serial Console (optional) . . . 11
2.5.3 TLS Libraries . . . 14
2.6 Booting Xen . . . 14
3 Booting a Xen System 15 3.1 Booting Domain0 . . . 15
3.2 Booting Guest Domains . . . 16
3.2.1 Creating a Domain Configuration File . . . 16
3.2.2 Booting the Guest Domain . . . 16
II Configuration and Management 19
4 Domain Management Tools 21
4.1 Xend . . . 21
4.1.1 Logging . . . 22
4.1.2 Configuring Xend . . . 22
4.2 Xm . . . 23
4.2.1 Basic Management Commands . . . 23
4.2.2 Domain Scheduling Management Commands . . . 24
5 Domain Configuration 25 5.1 Configuration Files . . . 25
5.2 Network Configuration . . . 26
5.2.1 Xen virtual network topology . . . 26
5.2.2 Xen networking scripts . . . 27
5.3 Driver Domain Configuration . . . 27
5.3.1 PCI . . . 27
5.4 Support for virtual Trusted Platform Module (vTPM) . . . 30
6 Storage and File System Management 33 6.1 Exporting Physical Devices as VBDs . . . 33
6.2 Using File-backed VBDs . . . 34
6.2.1 Loopback-mounted file-backed VBDs (deprecated) . . . 35
6.3 Using LVM-backed VBDs . . . 36
6.4 Using NFS Root . . . 37
7 CPU Management 39 8 Migrating Domains 41 8.1 Domain Save and Restore . . . 41
8.2 Migration and Live Migration . . . 41
9 Securing Xen 43 9.1 Xen Security Considerations . . . 43
9.2 Driver Domain Security Considerations . . . 43
9.3 Security Scenarios . . . 45
9.3.1 The Isolated Management Network . . . 45
9.3.2 A Subnet Behind a Firewall . . . 45
9.3.3 Nodes on an Untrusted Subnet . . . 45
10 sHype/Xen Access Control 47 10.1 Overview . . . 48
10.2.1 Configuring/Building sHype Support into Xen . . . 49
10.2.2 Creating A WLP Policy in 3 Simple Steps with ezPolicy . . . 50
10.2.3 Deploying a WLP Policy . . . 52
10.2.4 Labeling Unmanaged User Domains . . . 53
10.2.5 Labeling Resources . . . 55
10.2.6 Testing The Xen Workload Protection . . . 55
10.2.7 Labeling Domain-0 –or– Restricting System Authorization . . 57
10.2.8 Labeling Managed User Domains . . . 59
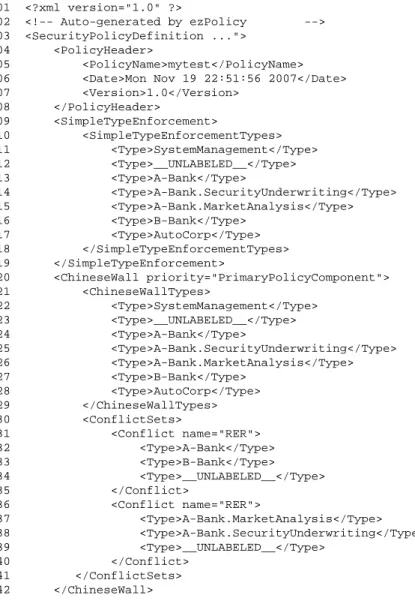
10.3 Xen Access Control Policy . . . 60
10.3.1 Policy Header and Policy Name . . . 61
10.3.2 Simple Type Enforcement Policy Component . . . 62
10.3.3 Chinese Wall Policy Component . . . 63
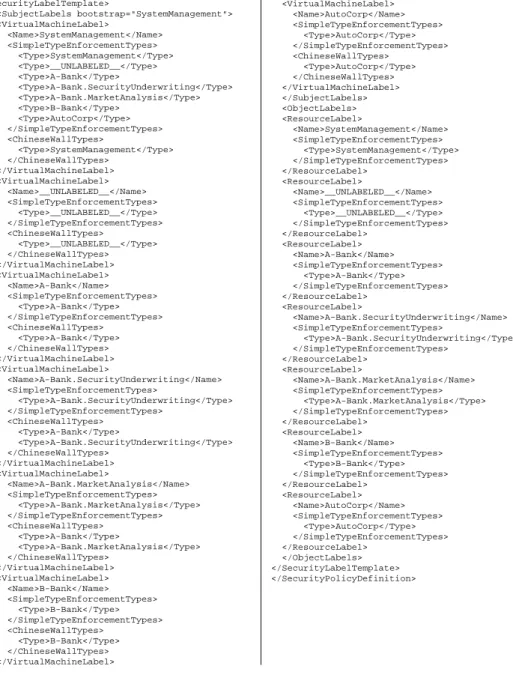
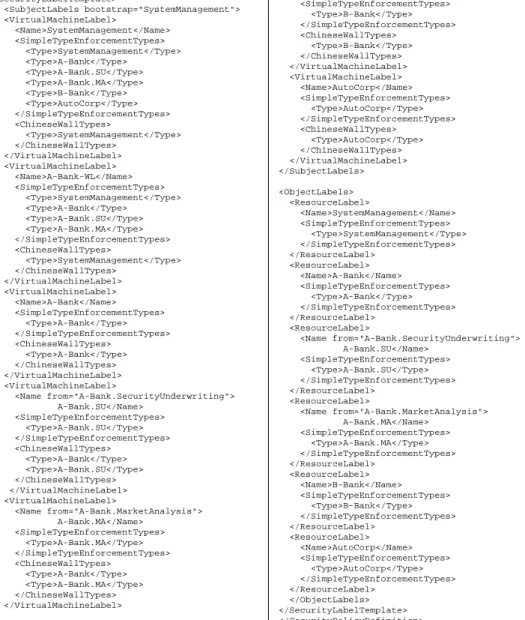
10.3.4 Security Labels . . . 64
10.3.5 Managing sHype/Xen Security Policies at Run-time . . . 67
10.3.6 Tools For Creating sHype/Xen Security Policies . . . 74
10.4 Current Limitations . . . 74
10.4.1 Network Traffic . . . 74
10.4.2 Resource Access and Usage Control . . . 74
10.4.3 Domain Migration . . . 75
10.4.4 Covert Channels . . . 75
III Reference 77 11 Build and Boot Options 79 11.1 Top-level Configuration Options . . . 79
11.2 Xen Build Options . . . 79
11.3 Xen Boot Options . . . 80
11.4 XenLinux Boot Options . . . 83
12 Further Support 85 12.1 Other Documentation . . . 85
12.2 Online References . . . 85
12.3 Mailing Lists . . . 86
A Unmodified (HVM) guest domains in Xen with Hardware support for Vir-tualization 87 A.1 Building Xen with HVM support . . . 87
A.2 Configuration file for unmodified HVM guests . . . 88
A.3 Creating virtual disks from scratch . . . 90
A.3.1 Using physical disks . . . 90
A.4 HVM Guests . . . 93
A.4.1 Editing the Xen HVM config file . . . 93
A.4.2 Creating HVM guests . . . 93
A.4.3 Mouse issues, especially under VNC . . . 93
A.4.4 USB Support . . . 96
A.4.5 Destroy HVM guests . . . 98
A.4.6 HVM window (X or VNC) Hot Key . . . 98
B Vnets - Domain Virtual Networking 99 B.1 Example . . . 100
B.2 Installing vnet support . . . 101
Chapter 1
Introduction
Xen is an open-source para-virtualizing virtual machine monitor (VMM), or “hypervi-sor”, for a variety of processor architectures including x86. Xen can securely execute multiple virtual machines on a single physical system with near native performance. Xen facilitates enterprise-grade functionality, including:
• Virtual machines with performance close to native hardware.
• Live migration of running virtual machines between physical hosts.
• Up to 321virtual CPUs per guest virtual machine, with VCPU hotplug.
• x86/32 with PAE, x86/64, and IA64 platform support.
• Intel and AMD Virtualization Technology for unmodified guest operating
sys-tems (including Microsoft Windows).
• Excellent hardware support (supports almost all Linux device drivers).
1.1
Usage Scenarios
Usage scenarios for Xen include:
Server Consolidation. Move multiple servers onto a single physical host with
perfor-mance and fault isolation provided at the virtual machine boundaries.
Hardware Independence. Allow legacy applications and operating systems to
ex-ploit new hardware.
Multiple OS configurations. Run multiple operating systems simultaneously, for
de-velopment or testing purposes.
Kernel Development. Test and debug kernel modifications in a sand-boxed virtual
machine — no need for a separate test machine.
Cluster Computing. Management at VM granularity provides more flexibility than
separately managing each physical host, but better control and isolation than single-system image solutions, particularly by using live migration for load bal-ancing.
Hardware support for custom OSes. Allow development of new OSes while
bene-fiting from the wide-ranging hardware support of existing OSes such as Linux.
1.2
Operating System Support
Para-virtualization permits very high performance virtualization, even on architectures like x86 that are traditionally very hard to virtualize.
This approach requires operating systems to be ported to run on Xen. Porting an OS to run on Xen is similar to supporting a new hardware platform, however the process is simplified because the para-virtual machine architecture is very similar to the under-lying native hardware. Even though operating system kernels must explicitly support Xen, a key feature is that user space applications and libraries do not require modifi-cation.
With hardware CPU virtualization as provided by Intel VT and AMD SVM technol-ogy, the ability to run an unmodified guest OS kernel is available. No porting of the OS is required, although some additional driver support is necessary within Xen itself. Un-like traditional full virtualization hypervisors, which suffer a tremendous performance overhead, the combination of Xen and VT or Xen and Pacifica technology complement one another to offer superb performance for para-virtualized guest operating systems and full support for unmodified guests running natively on the processor.
Paravirtualized Xen support is available for increasingly many operating systems: cur-rently, mature Linux support is available and included in the standard distribution. Other OS ports, including NetBSD, FreeBSD and Solaris are also complete.
1.3
Hardware Support
Xen currently runs on the IA64 and x86 architectures. Multiprocessor machines are supported, and there is support for HyperThreading (SMT).
The default 32-bit Xen requires processor support for Physical Addressing Extensions (PAE), which enables the hypervisor to address up to 16GB of physical memory. Xen also supports x86/64 platforms such as Intel EM64T and AMD Opteron which can currently address up to 1TB of physical memory.
Xen offloads most of the hardware support issues to the guest OS running in the
enumeration. Device drivers run within a privileged guest OS rather than within Xen itself. This approach provides compatibility with the majority of device hardware sup-ported by Linux. The default XenLinux build contains support for most server-class network and disk hardware, but you can add support for other hardware by configuring your XenLinux kernel in the normal way.
1.4
Structure of a Xen-Based System
A Xen system has multiple layers, the lowest and most privileged of which is Xen itself.
Xen may host multiple guest operating systems, each of which is executed within a secure virtual machine. In Xen terminology, a domain. Domains are scheduled by Xen to make effective use of the available physical CPUs. Each guest OS manages its own applications. This management includes the responsibility of scheduling each application within the time allotted to the VM by Xen.
The first domain, domain 0, is created automatically when the system boots and has special management privileges. Domain 0 builds other domains and manages their virtual devices. It also performs administrative tasks such as suspending, resuming and migrating other virtual machines.
Within domain 0, a process called xend runs to manage the system. Xend is responsible for managing virtual machines and providing access to their consoles. Commands are issued to xend over an HTTP interface, via a command-line tool.
1.5
History
Xen was originally developed by the Systems Research Group at the University of Cambridge Computer Laboratory as part of the XenoServers project, funded by the UK-EPSRC.
XenoServers aim to provide a “public infrastructure for global distributed computing”. Xen plays a key part in that, allowing one to efficiently partition a single machine to enable multiple independent clients to run their operating systems and applications in an environment. This environment provides protection, resource isolation and ac-counting. The project web page contains further information along with pointers to
papers and technical reports:http://www.cl.cam.ac.uk/xeno
Xen has grown into a fully-fledged project in its own right, enabling us to investigate interesting research issues regarding the best techniques for virtualizing resources such as the CPU, memory, disk and network. Project contributors now include Citrix, Intel, IBM, HP, AMD, Novell, RedHat, Sun, Fujitsu, and Samsung.
Xen was first described in a paper presented at SOSP in 20032, and the first public release (1.0) was made that October. Since then, Xen has significantly matured and is now used in production scenarios on many sites.
1.6
What’s New
Xen 3.3.0 offers:
• IO Emulation (stub domains) for HVM IO performance and scailability
• Replacement of Intel VT vmxassist by new 16b emulation code
• Improved VT-d device pass-through e.g. for graphics devices
• Enhanced C and P state power management
• Exploitation of multi-queue support on modern NICs
• Removal of domain lock for improved PV guest scalability
• 2MB page support for HVM and PV guests
• CPU Portability
Xen 3.3 delivers the capabilities needed by enterprise customers and gives computing industry leaders a solid, secure platform to build upon for their virtualization solutions. This latest release establishes Xen as the definitive open source solution for virtualiza-tion.
Part I
Chapter 2
Basic Installation
The Xen distribution includes three main components: Xen itself, ports of Linux and NetBSD to run on Xen, and the userspace tools required to manage a Xen-based sys-tem. This chapter describes how to install the Xen 3.3 distribution from source. Al-ternatively, there may be pre-built packages available as part of your operating system distribution.
2.1
Prerequisites
The following is a full list of prerequisites. Items marked ‘†’ are required by the xend
control tools, and hence required if you want to run more than one virtual machine;
items marked ‘∗’ are only required if you wish to build from source.
• A working Linux distribution using the GRUB bootloader and running on a
P6-class or newer CPU.
† Theiproute2package.
† The Linux bridge-utils1(e.g.,/sbin/brctl)
† The Linux hotplug system2 (e.g., /sbin/hotplug and related scripts). On
newer distributions, this is included alongside the Linux udev system3.
∗ Build tools (gcc v3.2.x or v3.3.x, binutils, GNU make).
∗ Development installation of zlib (e.g., zlib-dev).
∗ Development installation of Python v2.2 or later (e.g., python-dev).
∗ LATEX and transfig are required to build the documentation.
1
Available fromhttp://bridge.sourceforge.net
2
Available fromhttp://linux-hotplug.sourceforge.net/
Once you have satisfied these prerequisites, you can now install either a binary or source distribution of Xen.
2.2
Installing from Binary Tarball
Pre-built tarballs are available for download from the XenSource downloads page:
http://www.xensource.com/downloads/
Once you’ve downloaded the tarball, simply unpack and install:
# tar zxvf xen-3.0-install.tgz # cd xen-3.0-install
# sh ./install.sh
Once you’ve installed the binaries you need to configure your system as described in Section 2.5.
2.3
Installing from RPMs
Pre-built RPMs are available for download from the XenSource downloads page:
http://www.xensource.com/downloads/
Once you’ve downloaded the RPMs, you typically install them via the RPM com-mands:
# rpm -iv rpmname
See the instructions and the Release Notes for each RPM set referenced at:
http://www.xensource.com/downloads/.
2.4
Installing from Source
This section describes how to obtain, build and install Xen from source.
2.4.1 Obtaining the Source
The Xen source tree is available as either a compressed source tarball or as a clone of our master Mercurial repository.
Obtaining the Source Tarball
Stable versions and daily snapshots of the Xen source tree are available from the Xen download page:
Obtaining the source via Mercurial
The source tree may also be obtained via the public Mercurial repository at:
http://xenbits.xensource.com
See the instructions and the Getting Started Guide referenced at:
http://www.xensource.com/downloads/
2.4.2 Building from Source
The top-level Xen Makefile includes a target “world” that will do the following:
• Build Xen.
• Build the control tools, including xend.
• Download (if necessary) and unpack the Linux 2.6 source code, and patch it for
use with Xen.
• Build a Linux kernel to use in domain 0 and a smaller unprivileged kernel, which
can be used for unprivileged virtual machines.
After the build has completed you should have a top-level directory calleddist/in
which all resulting targets will be placed. Of particular interest are the two XenLinux kernel images, one with a “-xen0” extension which contains hardware device drivers and drivers for Xen’s virtual devices, and one with a “-xenU” extension that just
con-tains the virtual ones. These are found in dist/install/boot/ along with the
image for Xen itself and the configuration files used during the build.
To customize the set of kernels built you need to edit the top-level Makefile. Look for the line:
KERNELS ?= linux-2.6-xen0 linux-2.6-xenU
You can edit this line to include any set of operating system kernels which have
con-figurations in the top-levelbuildconfigs/directory.
2.4.3 Custom Kernels
If you wish to build a customized XenLinux kernel (e.g. to support additional devices or enable distribution-required features), you can use the standard Linux configuration
mechanisms, specifying that the architecture being built for isxen, e.g:
# cd linux-2.6.12-xen0 # make ARCH=xen xconfig # cd ..
# make
You can also copy an existing Linux configuration (.config) into e.g.linux-2.6.12-xen0
# make ARCH=xen oldconfig
You may be prompted with some Xen-specific options. We advise accepting the de-faults for these options.
Note that the only difference between the two types of Linux kernels that are built is the configuration file used for each. The “U” suffixed (unprivileged) versions don’t contain any of the physical hardware device drivers, leading to a 30% reduction in size; hence you may prefer these for your non-privileged domains. The “0” suffixed privileged versions can be used to boot the system, as well as in driver domains and unprivileged domains.
2.4.4 Installing Generated Binaries
The files produced by the build process are stored under thedist/install/
direc-tory. To install them in their default locations, do:
# make install
Alternatively, users with special installation requirements may wish to install them manually by copying the files to their appropriate destinations.
Thedist/install/bootdirectory will also contain the config files used for build-ing the XenLinux kernels, and also versions of Xen and XenLinux kernels that contain
debug symbols such as (xen-syms-3.0.0 andvmlinux-syms-2.6.12.6-xen0)
which are essential for interpreting crash dumps. Retain these files as the developers may wish to see them if you post on the mailing list.
2.5
Configuration
Once you have built and installed the Xen distribution, it is simple to prepare the machine for booting and running Xen.
2.5.1 GRUB Configuration
An entry should be added togrub.conf(often found under/boot/or/boot/grub/)
to allow Xen / XenLinux to boot. This file is sometimes calledmenu.lst, depending
on your distribution. The entry should look something like the following:
title Xen 3.0 / XenLinux 2.6
kernel /boot/xen-3.0.gz dom0_mem=262144
module /boot/vmlinuz-2.6-xen0 root=/dev/sda4 ro console=tty0
The kernel line tells GRUB where to find Xen itself and what boot parameters should be passed to it (in this case, setting the domain 0 memory allocation in kilobytes and
the settings for the serial port). For more details on the various Xen boot parameters see Section 11.3.
The module line of the configuration describes the location of the XenLinux kernel that Xen should start and the parameters that should be passed to it. These are standard Linux parameters, identifying the root device and specifying it be initially mounted read only and instructing that console output be sent to the screen. Some distributions
such as SuSE do not require theroparameter.
To use an initrd, add anothermoduleline to the configuration, like:
module /boot/my_initrd.gz
When installing a new kernel, it is recommended that you do not delete existing menu
options frommenu.lst, as you may wish to boot your old Linux kernel in future,
particularly if you have problems.
2.5.2 Serial Console (optional)
Serial console access allows you to manage, monitor, and interact with your system over a serial console. This can allow access from another nearby system via a null-modem (“LapLink”) cable or remotely via a serial concentrator.
You system’s BIOS, bootloader (GRUB), Xen, Linux, and login access must each be individually configured for serial console access. It is not strictly necessary to have each component fully functional, but it can be quite useful.
For general information on serial console configuration under Linux, refer to the
“Re-mote Serial Console HOWTO” at The Linux Documentation Project:http://www.
tldp.org
Serial Console BIOS configuration
Enabling system serial console output neither enables nor disables serial capabilities in GRUB, Xen, or Linux, but may make remote management of your system more convenient by displaying POST and other boot messages over serial port and allowing remote BIOS configuration.
Refer to your hardware vendor’s documentation for capabilities and procedures to en-able BIOS serial redirection.
Serial Console GRUB configuration
Enabling GRUB serial console output neither enables nor disables Xen or Linux serial capabilities, but may made remote management of your system more convenient by displaying GRUB prompts, menus, and actions over serial port and allowing remote GRUB management.
Adding the following two lines to your GRUB configuration file, typically either
/boot/grub/menu.lst or /boot/grub/grub.conf depending on your distro, will enable GRUB serial output.
serial --unit=0 --speed=115200 --word=8 --parity=no --stop=1 terminal --timeout=10 serial console
Note that when both the serial port and the local monitor and keyboard are enabled, the text “Press any key to continue” will appear at both. Pressing a key on one device will cause GRUB to display to that device. The other device will see no output. If no key is pressed before the timeout period expires, the system will boot to the default GRUB boot entry.
Please refer to the GRUB documentation for further information.
Serial Console Xen configuration
Enabling Xen serial console output neither enables nor disables Linux kernel output or logging in to Linux over serial port. It does however allow you to monitor and log the Xen boot process via serial console and can be very useful in debugging.
In order to configure Xen serial console output, it is necessary to add a boot option to your GRUB config; e.g. replace the previous example kernel line with:
kernel /boot/xen.gz dom0_mem=131072 com1=115200,8n1 console=com1,vga
This configures Xen to output on COM1 at 115,200 baud, 8 data bits, no parity and 1 stop bit. Modify these parameters for your environment. See Section 11.3 for an explanation of all boot parameters.
One can also configure XenLinux to share the serial console; to achieve this append “console=ttyS0” to your module line.
Serial Console Linux configuration
Enabling Linux serial console output at boot neither enables nor disables logging in to Linux over serial port. It does however allow you to monitor and log the Linux boot process via serial console and can be very useful in debugging.
To enable Linux output at boot time, add the parameter console=ttyS0(or ttyS1,
ttyS2, etc.) to your kernel GRUB line. Under Xen, this might be:
module /vmlinuz-2.6-xen0 ro root=/dev/VolGroup00/LogVol00 \ console=ttyS0, 115200
Serial Console Login configuration
Logging in to Linux via serial console, under Xen or otherwise, requires specifying a login prompt be started on the serial port. To permit root logins over serial console,
To automatically start a login prompt over the serial port, add the line:
c:2345:respawn:/sbin/mingetty ttyS0
to/etc/inittab. Runinit qto force a reload of your inttab and start getty.
To enable root logins, addttyS0to/etc/securettyif not already present.
Your distribution may use an alternate getty; options include getty, mgetty and agetty. Consult your distribution’s documentation for further information.
2.5.3 TLS Libraries
Users of the XenLinux 2.6 kernel should disable Thread Local Storage (TLS) (e.g.
by doing amv /lib/tls /lib/tls.disabled) before attempting to boot a
Xen-Linux kernel4. You can always reenable TLS by restoring the directory to its original
location (i.e.mv /lib/tls.disabled /lib/tls).
The reason for this is that the current TLS implementation uses segmentation in a way that is not permissible under Xen. If TLS is not disabled, an emulation mode is used within Xen which reduces performance substantially. To ensure full performance you should install a ‘Xen-friendly’ (nosegneg) version of the library.
2.6
Booting Xen
It should now be possible to restart the system and use Xen. Reboot and choose the new Xen option when the Grub screen appears.
What follows should look much like a conventional Linux boot. The first portion of the output comes from Xen itself, supplying low level information about itself and the underlying hardware. The last portion of the output comes from XenLinux.
You may see some error messages during the XenLinux boot. These are not neces-sarily anything to worry about—they may result from kernel configuration differences between your XenLinux kernel and the one you usually use.
When the boot completes, you should be able to log into your system as usual. If you are unable to log in, you should still be able to reboot with your normal Linux kernel by selecting it at the GRUB prompt.
4
Chapter 3
Booting a Xen System
Booting the system into Xen will bring you up into the privileged management domain, Domain0. At that point you are ready to create guest domains and “boot” them using thexm createcommand.
3.1
Booting Domain0
After installation and configuration is complete, reboot the system and and choose the new Xen option when the Grub screen appears.
What follows should look much like a conventional Linux boot. The first portion of the output comes from Xen itself, supplying low level information about itself and the underlying hardware. The last portion of the output comes from XenLinux.
When the boot completes, you should be able to log into your system as usual. If you are unable to log in, you should still be able to reboot with your normal Linux kernel by selecting it at the GRUB prompt.
The first step in creating a new domain is to prepare a root filesystem for it to boot. Typically, this might be stored in a normal partition, an LVM or other volume manager partition, a disk file or on an NFS server. A simple way to do this is simply to boot from your standard OS install CD and install the distribution into another partition on your hard drive.
To start the xend control daemon, type
# xend start
If you wish the daemon to start automatically, see the instructions in Section 4.1. Once
the daemon is running, you can use thexmtool to monitor and maintain the domains
running on your system. This chapter provides only a brief tutorial. We provide full details of thexmtool in the next chapter.
3.2
Booting Guest Domains
3.2.1 Creating a Domain Configuration File
Before you can start an additional domain, you must create a configuration file. We provide two example files which you can use as a starting point:
• /etc/xen/xmexample1is a simple template configuration file for describing a single VM.
• /etc/xen/xmexample2 file is a template description that is intended to be
reused for multiple virtual machines. Setting the value of thevmidvariable on
thexmcommand line fills in parts of this template.
There are also a number of other examples which you may find useful. Copy one of these files and edit it as appropriate. Typical values you may wish to edit include:
kernel Set this to the path of the kernel you compiled for use with Xen
(e.g.kernel = ‘‘/boot/vmlinuz-2.6-xenU’’)
memory Set this to the size of the domain’s memory in megabytes (e.g.
memory = 64)
disk Set the first entry in this list to calculate the offset of the domain’s
root partition, based on the domain ID. Set the second to the
lo-cation of/usrif you are sharing it between domains (e.g.disk =
[’phy:your hard drive%d,sda1,w’ % (base partition number + vmid), ’phy:your usr partition,sda6,r’ ]
dhcp Uncomment the dhcp variable, so that the domain will receive its
IP address from a DHCP server (e.g.dhcp=‘‘dhcp’’)
You may also want to edit the vif variable in order to choose the MAC address of the virtual ethernet interface yourself. For example:
vif = [’mac=00:16:3E:F6:BB:B3’]
If you do not set this variable, xend will automatically generate a random MAC ad-dress from the range 00:16:3E:xx:xx:xx, assigned by IEEE to XenSource as an OUI (organizationally unique identifier). XenSource Inc. gives permission for anyone to use addresses randomly allocated from this range for use by their Xen domains.
For a list of IEEE OUI assignments, seehttp://standards.ieee.org/regauth/
oui/oui.txt
3.2.2 Booting the Guest Domain
Thexmtool provides a variety of commands for managing domains. Use thecreate
based around/etc/xen/xmexample2, to start a domain with virtual machine ID 1 you should type:
# xm create -c myvmconf vmid=1
The-cswitch causesxmto turn into the domain’s console after creation. Thevmid=1
sets thevmidvariable used in themyvmconffile.
You should see the console boot messages from the new domain appearing in the terminal in which you typed the command, culminating in a login prompt.
3.3
Starting / Stopping Domains Automatically
It is possible to have certain domains start automatically at boot time and to have dom0 wait for all running domains to shutdown before it shuts down the system.
To specify a domain is to start at boot-time, place its configuration file (or a link to it)
under/etc/xen/auto/.
A Sys-V style init script for Red Hat and LSB-compliant systems is provided and will
be automatically copied to/etc/init.d/during install. You can then enable it in
the appropriate way for your distribution. For instance, on Red Hat:
# chkconfig --add xendomains
By default, this will start the boot-time domains in runlevels 3, 4 and 5.
You can also use theservicecommand to run this script manually, e.g:
# service xendomains start
Starts all the domains with config files under /etc/xen/auto/.
# service xendomains stop
Part II
Chapter 4
Domain Management Tools
This chapter summarizes the management software and tools available.
4.1
Xend
The Xend node control daemon performs system management functions related to virtual machines. It forms a central point of control of virtualized resources, and must be running in order to start and manage virtual machines. Xend must be run as root because it needs access to privileged system management functions.
An initialization script named/etc/init.d/xendis provided to start Xend at boot
time. Use the tool appropriate (i.e. chkconfig) for your Linux distribution to specify the runlevels at which this script should be executed, or manually create symbolic links in the correct runlevel directories.
Xend can be started on the command line as well, and supports the following set of parameters:
# xend start start xend, if not already running
# xend stop stop xend if already running
# xend restart restart xend if running, otherwise start it
# xend status indicates xend status by its return code
A SysV init script calledxendis provided to start xend at boot time.make install
installs this script in/etc/init.d. To enable it, you have to make symbolic links
in the appropriate runlevel directories or use thechkconfig tool, where available.
4.1.1 Logging
As xend runs, events will be logged to /var/log/xen/xend.log and (less
fre-quently) to/var/log/xen/xend-debug.log. These, along with the standard
sys-log files, are useful when troubleshooting problems.
4.1.2 Configuring Xend
Xend is written in Python. At startup, it reads its configuration information from
the file /etc/xen/xend-config.sxp. The Xen installation places an example
xend-config.sxpfile in the/etc/xensubdirectory which should work for most installations.
See the example configuration filexend-debug.sxp and the section 5 man page
xend-config.sxp for a full list of parameters and more detailed information. Some of the most important parameters are discussed below.
An HTTP interface and a Unix domain socket API are available to communicate with Xend. This allows remote users to pass commands to the daemon. By default, Xend does not start an HTTP server. It does start a Unix domain socket management server,
as the low level utilityxmrequires it. For support of cross-machine migration, Xend
can start a relocation server. This support is not enabled by default for security reasons.
Note: the examplexendconfiguration file modifies the defaults and starts up Xend as
an HTTP server as well as a relocation server. From the file:
#(xend-http-server no) (xend-http-server yes) #(xend-unix-server yes) #(xend-relocation-server no) (xend-relocation-server yes)
Comment or uncomment lines in that file to disable or enable features that you require. Connections from remote hosts are disabled by default:
# Address xend should listen on for HTTP connections, if xend-http-server # set.
# Specifying ’localhost’ prevents remote connections.
# Specifying the empty string ’’ (the default) allows all connections. #(xend-address ’’)
(xend-address localhost)
It is recommended that if migration support is not needed, thexend-relocation-server
4.2
Xm
The xm tool is the primary tool for managing Xen from the console. The general format of an xm command line is:
# xm command [switches] [arguments] [variables]
The available switches and arguments are dependent on the command chosen. The
variables may be set using declarations of the form variable=value and com-mand line declarations override any of the values in the configuration file being used, including the standard variables described above and any custom variables (for
in-stance, thexmdefconfigfile uses avmidvariable).
For online help for the commands available, type:
# xm help
This will list the most commonly used commands. The full list can be obtained using
xm help --long. You can also typexm help <command>for more information on a given command.
4.2.1 Basic Management Commands
One useful command is# xm listwhich lists all domains running in rows of the
following format:
name domid memory vcpus state cputime
The meaning of each field is as follows:
name The descriptive name of the virtual machine.
domid The number of the domain ID this virtual machine is running in. memory Memory size in megabytes.
vcpus The number of virtual CPUs this domain has. state Domain state consists of 5 fields:
r running b blocked p paused s shutdown c crashed
cputime How much CPU time (in seconds) the domain has used so far.
The xm list command also supports a long output format when the -l switch is used. This outputs the full details of the running domains in xend’s SXP configuration format.
If you want to know how long your domains have been running for, then you can use the# xm uptimecommand.
You can get access to the console of a particular domain using the# xm console
command (e.g.# xm console myVM).
4.2.2 Domain Scheduling Management Commands
The credit CPU scheduler automatically load balances guest VCPUs across all avail-able physical CPUs on an SMP host. The user need not manually pin VCPUs to load balance the system. However, she can restrict which CPUs a particular VCPU may run
on using thexm vcpu-pincommand.
Each guest domain is assigned aweightand acap.
A domain with a weight of 512 will get twice as much CPU as a domain with a weight of 256 on a contended host. Legal weights range from 1 to 65535 and the default is 256.
The cap optionally fixes the maximum amount of CPU a guest will be able to consume, even if the host system has idle CPU cycles. The cap is expressed in percentage of one physical CPU: 100 is 1 physical CPU, 50 is half a CPU, 400 is 4 CPUs, etc... The default, 0, means there is no upper cap.
When you are running with the credit scheduler, you can check and modify your
do-mains’ weights and caps using thexm sched-creditcommand:
xm sched-credit -d <domain> lists weight and cap
xm sched-credit -d <domain> -w <weight> sets the weight
Chapter 5
Domain Configuration
The following contains the syntax of the domain configuration files and description of how to further specify networking, driver domain and general scheduling behavior.
5.1
Configuration Files
Xen configuration files contain the following standard variables. Unless otherwise stated, configuration items should be enclosed in quotes: see the configuration scripts in/etc/xen/for concrete examples.
kernel Path to the kernel image.
ramdisk Path to a ramdisk image (optional). memory Memory size in megabytes. vcpus The number of virtual CPUs.
console Port to export the domain console on (default 9600 + domain ID).
vif Network interface configuration. This may simply contain an empty string for
each desired interface, or may override various settings, e.g.
vif = [ ’mac=00:16:3E:00:00:11, bridge=xen-br0’, ’bridge=xen-br1’ ]
to assign a MAC address and bridge to the first interface and assign a different bridge to the second interface, leaving xend to choose the MAC address. The settings that may be overridden in this way are type, mac, bridge, ip, script, backend, and vifname.
disk List of block devices to export to the domain e.g.disk = [ ’phy:hda1,sda1,r’ ]
exports physical device/dev/hda1to the domain as /dev/sda1with
read-only access. Exporting a disk read-write which is currently mounted is
dhcp Set to‘dhcp’if you want to use DHCP to configure networking.
netmask Manually configured IP netmask. gateway Manually configured IP gateway.
hostname Set the hostname for the virtual machine.
root Specify the root device parameter on the kernel command line. nfs server IP address for the NFS server (if any).
nfs root Path of the root filesystem on the NFS server (if any). extra Extra string to append to the kernel command line (if any)
Additional fields are documented in the example configuration files (e.g. to configure virtual TPM functionality).
For additional flexibility, it is also possible to include Python scripting commands in
configuration files. An example of this is the xmexample2file, which uses Python
code to handle thevmidvariable.
5.2
Network Configuration
For many users, the default installation should work “out of the box”. More compli-cated network setups, for instance with multiple Ethernet interfaces and/or existing bridging setups will require some special configuration.
The purpose of this section is to describe the mechanisms provided by xend to allow a flexible configuration for Xen’s virtual networking.
5.2.1 Xen virtual network topology
Each domain network interface is connected to a virtual network interface in dom0 by a point to point link (effectively a “virtual crossover cable”). These devices are namedvif<domid>.<vifid>(e.g.vif1.0for the first interface in domain 1,
vif3.1for the second interface in domain 3).
Traffic on these virtual interfaces is handled in domain 0 using standard Linux mech-anisms for bridging, routing, rate limiting, etc. Xend calls on two shell scripts to per-form initial configuration of the network and configuration of new virtual interfaces. By default, these scripts configure a single bridge for all the virtual interfaces. Arbi-trary routing / bridging configurations can be configured by customizing the scripts, as described in the following section.
5.2.2 Xen networking scripts
Xen’s virtual networking is configured by two shell scripts (by defaultnetwork-bridge
andvif-bridge). These are called automatically by xend when certain events occur, with arguments to the scripts providing further contextual information. These scripts
are found by default in/etc/xen/scripts. The names and locations of the scripts
can be configured in/etc/xen/xend-config.sxp.
network-bridge: This script is called whenever xend is started or stopped to
respec-tively initialize or tear down the Xen virtual network. In the default configura-tion initializaconfigura-tion creates the bridge ‘xen-br0’ and moves eth0 onto that bridge, modifying the routing accordingly. When xend exits, it deletes the Xen bridge and removes eth0, restoring the normal IP and routing configuration.
vif-bridge: This script is called for every domain virtual interface and can configure
firewalling rules and add the vif to the appropriate bridge. By default, this adds and removes VIFs on the default Xen bridge.
Other example scripts are available (network-routeandvif-route,network-nat
andvif-nat). For more complex network setups (e.g. where routing is required or integrate with existing bridges) these scripts may be replaced with customized variants for your site’s preferred configuration.
5.3
Driver Domain Configuration
5.3.1 PCIIndividual PCI devices can be assigned to a given domain (a PCI driver domain) to allow that domain direct access to the PCI hardware.
While PCI Driver Domains can increase the stability and security of a system by ad-dressing a number of security concerns, there are some security issues that remain that you can read about in Section 9.2.
Compile-Time Setup
To use this functionality, ensure that the PCI Backend is compiled in to a privileged domain (e.g. domain 0) and that the domains which will be assigned PCI devices have the PCI Frontend compiled in. In XenLinux, the PCI Backend is available under the Xen configuration section while the PCI Frontend is under the architecture-specific ”Bus Options” section. You may compile both the backend and the frontend into the same kernel; they will not affect each other.
PCI Backend Configuration - Binding at Boot
The PCI devices you wish to assign to unprivileged domains must be ”hidden” from your backend domain (usually domain 0) so that it does not load a driver for them. Use thepciback.hidekernel parameter which is specified on the kernel command-line and is configurable through GRUB (see Section 2.5). Note that devices are not really hidden from the backend domain. The PCI Backend appears to the Linux kernel as a regular PCI device driver. The PCI Backend ensures that no other device driver loads for the devices by binding itself as the device driver for those devices. PCI devices are
identified by hexadecimal slot/function numbers (on Linux, uselspcito determine
slot/function numbers of your devices) and can be specified with or without the PCI domain:
(bus:slot.func)example(02:1d.3)
(domain:bus:slot.func)example(0000:02:1d.3)
An example kernel command-line which hides two PCI devices might be:
root=/dev/sda4 ro console=tty0 pciback.hide=(02:01.f)(0000:04:1d.0)
PCI Backend Configuration - Late Binding
PCI devices can also be bound to the PCI Backend after boot through the manual binding/unbinding facilities provided by the Linux kernel in sysfs (allowing for a Xen user to give PCI devices to driver domains that were not specified on the kernel command-line). There are several attributes with the PCI Backend’s sysfs directory (/sys/bus/pci/drivers/pciback) that can be used to bind/unbind devices:
slots lists all of the PCI slots that the PCI Backend will try to seize (or ”hide” from
Domain 0). A PCI slot must appear in this list before it can be bound to the PCI
Backend through thebindattribute.
new slot write the name of a slot here (in 0000:00:00.0 format) to have the PCI
Back-end seize the device in this slot.
remove slot write the name of a slot here (same format asnew slot) to have the PCI Backend no longer try to seize devices in this slot. Note that this does not unbind the driver from a device it has already seized.
bind write the name of a slot here (in 0000:00:00.0 format) to have the Linux kernel
attempt to bind the device in that slot to the PCI Backend driver.
unbind write the name of a skit here (same format asbind) to have the Linux kernel unbind the device from the PCI Backend. DO NOT unbind a device while it is currently given to a PCI driver domain!
Bind a device to the PCI Backend which is not bound to any other driver.
# # Add a new slot to the PCI Backend’s list
# echo -n 0000:01:04.d > /sys/bus/pci/drivers/pciback/new_slot # # Now that the backend is watching for the slot, bind to it # echo -n 0000:01:04.d > /sys/bus/pci/drivers/pciback/bind
Unbind a device from its driver and bind to the PCI Backend.
# # Unbind a PCI network card from its network driver # echo -n 0000:05:02.0 > /sys/bus/pci/drivers/3c905/unbind # # And now bind it to the PCI Backend
# echo -n 0000:05:02.0 > /sys/bus/pci/drivers/pciback/new_slot # echo -n 0000:05:02.0 > /sys/bus/pci/drivers/pciback/bind
Note that the ”-n” option in the example is important as it causes echo to not output a new-line.
PCI Backend Configuration - User-space Quirks
Quirky devices (such as the Broadcom Tigon 3) may need write access to their con-figuration space registers. Xen can be instructed to allow specified PCI devices write access to specific configuration space registers. The policy may be found in:
/etc/xen/xend-pci-quirks.sxp
The policy file is heavily commented and is intended to provide enough documentation for developers to extend it.
PCI Backend Configuration - Permissive Flag
If the user-space quirks approach doesn’t meet your needs you may want to enable the permissive flag for that device. To do so, first get the PCI domain, bus, slot, and
function information from dom0 vialspci. Then augment the user-space policy for
permissive devices. The permissive policy can be found in:
/etc/xen/xend-pci-permissive.sxp
Currently, the only way to reset the permissive flag is to unbind the device from the PCI Backend driver.
PCI Backend - Checking Status
There two important sysfs nodes that provide a mechanism to view specifics on quirks and permissive devices:
/sys/bus/drivers/pciback/permissive
/sys/bus/drivers/pciback/quirks
Usecaton this file view a hierarchical view of devices bound to the PCI
back-end, their PCI vendor/device ID, and any quirks that are associated with that particular slot.
You may notice that every device bound to the PCI backend has 17 quirks standard
”quirks” regardless ofxend-pci-quirks.sxp. These default entries are necessary
to support interactions between the PCI bus manager and the device bound to it. Even non-quirky devices should have these standard entries.
In this case, preference was given to accuracy over aesthetics by choosing to show the standard quirks in the quirks list rather than hide them from the inquiring user
PCI Frontend Configuration
To configure a domU to receive a PCI device:
Command-line: Use the pci command-line flag. For multiple devices, use the option
multiple times.
xm create netcard-dd pci=01:00.0 pci=02:03.0
Flat Format configuration file: Specify all of your PCI devices in a python list named
pci.
pci=[’01:00.0’,’02:03.0’]
SXP Format configuration file: Use a single PCI device section for all of your
de-vices (specify the numbers in hexadecimal with the preceding ’0x’). Note that
domain here refers to the PCI domain, not a virtual machine within Xen.
(device (pci
(dev (domain 0x0)(bus 0x3)(slot 0x1a)(func 0x1) (dev (domain 0x0)(bus 0x1)(slot 0x5)(func 0x0) )
5.4
Support for virtual Trusted Platform Module (vTPM)
Paravirtualized domains can be given access to a virtualized version of a TPM. This enables applications in these domains to use the services of the TPM device for
exam-ple through a TSS stack1. The Xen source repository provides the necessary software
components to enable virtual TPM access. Support is provided through several differ-ent pieces. First, a TPM emulator has been modified to provide TPM’s functionality for the virtual TPM subsystem. Second, a virtual TPM Manager coordinates the vir-tual TPMs efforts, manages their creation, and provides protected key storage using
the TPM. Third, a device driver pair providing a TPM front- and backend is available for XenLinux to deliver TPM commands from the domain to the virtual TPM man-ager, which dispatches it to a software TPM. Since the TPM Manager relies on a HW TPM for protected key storage, therefore this subsystem requires a Linux-supported hardware TPM. For development purposes, a TPM emulator is available for use on non-TPM enabled platforms.
Compile-Time Setup
To enable access to the virtual TPM, the virtual TPM backend driver must be compiled for a privileged domain (e.g. domain 0). Using the XenLinux configuration, the neces-sary driver can be selected in the Xen configuration section. Unless the driver has been compiled into the kernel, its module must be activated using the following command:
modprobe tpmbk
Similarly, the TPM frontend driver must be compiled for the kernel trying to use TPM functionality. Its driver can be selected in the kernel configuration section Device Driver / Character Devices / TPM Devices. Along with that the TPM driver for the built-in TPM must be selected. If the virtual TPM driver has been compiled as module, it must be activated using the following command:
modprobe tpm_xenu
Furthermore, it is necessary to build the virtual TPM manager and software TPM by making changes to entries in Xen build configuration files. The following entry in the file Config.mk in the Xen root source directory must be made:
VTPM_TOOLS ?= y
After a build of the Xen tree and a reboot of the machine, the TPM backend drive must be loaded. Once loaded, the virtual TPM manager daemon must be started before TPM-enabled guest domains may be launched. To enable being the destination of a virtual TPM Migration, the virtual TPM migration daemon must also be loaded.
vtpm_managerd vtpm_migratord
Once the VTPM manager is running, the VTPM can be accessed by loading the front end driver in a guest domain.
Development and Testing TPM Emulator
For development and testing on non-TPM enabled platforms, a TPM emulator can be used in replacement of a platform TPM. First, the entry in the file tools/vtpm/Rules.mk must look as follows:
Second, the entry in the file tool/vtpm manager/Rules.mk must be uncommented as follows:
# TCS talks to fifo’s rather than /dev/tpm. TPM Emulator assumed on fifos CFLAGS += -DDUMMY_TPM
Before starting the virtual TPM Manager, start the emulator by executing the following in dom0:
tpm_emulator clear
vTPM Frontend Configuration
To provide TPM functionality to a user domain, a line must be added to the virtual TPM configuration file using the following format:
vtpm = [’instance=<instance number>, backend=<domain id>’]
The instance number reflects the preferred virtual TPM instance to associate with the domain. If the selected instance is already associated with another domain, the sys-tem will automatically select the next available instance. An instance number greater than zero must be provided. It is possible to omit the instance parameter from the configuration file.
The domain id provides the ID of the domain where the virtual TPM backend driver and virtual TPM are running in. It should currently always be set to ’0’.
Examples for valid vtpm entries in the configuration file are
vtpm = [’instance=1, backend=0’]
and
vtpm = [’backend=0’].
Using the virtual TPM
Access to TPM functionality is provided by the virtual TPM frontend driver. Similar to existing hardware TPM drivers, this driver provides basic TPM status information through the sysfs filesystem. In a Xen user domain the sysfs entries can be found in /sys/devices/xen/vtpm-0.
Commands can be sent to the virtual TPM instance using the character device /dev/tpm0 (major 10, minor 224).
Chapter 6
Storage and File System
Management
Storage can be made available to virtual machines in a number of different ways. This chapter covers some possible configurations.
The most straightforward method is to export a physical block device (a hard drive or partition) from dom0 directly to the guest domain as a virtual block device (VBD). Storage may also be exported from a filesystem image or a partitioned filesystem image as a file-backed VBD.
Finally, standard network storage protocols such as NBD, iSCSI, NFS, etc., can be used to provide storage to virtual machines.
6.1
Exporting Physical Devices as VBDs
One of the simplest configurations is to directly export individual partitions from
do-main 0 to other dodo-mains. To achieve this use the phy: specifier in your domain
configuration file. For example a line like
disk = [’phy:hda3,sda1,w’]
specifies that the partition/dev/hda3in domain 0 should be exported read-write to
the new domain as /dev/sda1; one could equally well export it as /dev/hda or
/dev/sdb5should one wish.
In addition to local disks and partitions, it is possible to export any device that Linux considers to be “a disk” in the same manner. For example, if you have iSCSI disks or GNBD volumes imported into domain 0 you can export these to other domains using
thephy:disk syntax. E.g.:
Warning: Block device sharing
Block devices should typically only be shared between domains in a read-only fashion otherwise the Linux kernel’s file systems will get very con-fused as the file system structure may change underneath them (having
the same ext3 partition mounted rwtwice is a sure fire way to cause
ir-reparable damage)! Xend will attempt to prevent you from doing this by checking that the device is not mounted read-write in domain 0, and hasn’t already been exported read-write to another domain. If you want read-write sharing, export the directory to other domains via NFS from domain 0 (or use a cluster file system such as GFS or ocfs2).
6.2
Using File-backed VBDs
It is also possible to use a file in Domain 0 as the primary storage for a virtual machine. As well as being convenient, this also has the advantage that the virtual block device will be sparse — space will only really be allocated as parts of the file are used. So if a virtual machine uses only half of its disk space then the file really takes up half of the size allocated.
For example, to create a 2GB sparse file-backed virtual block device (actually only consumes no disk space at all):
# dd if=/dev/zero of=vm1disk bs=1k seek=2048k count=0
Make a file system in the disk file:
# mkfs -t ext3 vm1disk
(when the tool asks for confirmation, answer ‘y’)
Populate the file system e.g. by copying from the current root:
# mount -o loop vm1disk /mnt
# cp -ax /{root,dev,var,etc,usr,bin,sbin,lib} /mnt # mkdir /mnt/{proc,sys,home,tmp}
Tailor the file system by editing /etc/fstab, /etc/hostname, etc. Don’t forget
to edit the files in the mounted file system, instead of your domain 0 filesystem, e.g.
you would edit /mnt/etc/fstab instead of /etc/fstab. For this example put
/dev/sda1to root in fstab. Now unmount (this is important!):
# umount /mnt
In the configuration file set:
As the virtual machine writes to its ‘disk’, the sparse file will be filled in and consume more space up to the original 2GB.
Note: Users that have worked with file-backed VBDs on Xen in previous versions
will be interested to know that this support is now provided through the blktap driver instead of the loopback driver. This change results in file-based block devices that are higher-performance, more scalable, and which provide better safety properties for VBD data. All that is required to update your existing file-backed VM configurations is to change VBD configuration lines from:
disk = [’file:/full/path/to/vm1disk,sda1,w’]
to:
disk = [’tap:aio:/full/path/to/vm1disk,sda1,w’]
6.2.1 Loopback-mounted file-backed VBDs (deprecated)
Note: Loopback mounted VBDs have now been replaced with blktap-based support
for raw image files, as described above. This section remains to detail a configuration that was used by older Xen versions.
Raw image file-backed VBDs may also be attached to VMs using the Linux loopback driver. The only required change to the raw file instructions above are to specify the configuration entry as:
disk = [’file:/full/path/to/vm1disk,sda1,w’]
Note that loopback file-backed VBDs may not be appropriate for backing I/O-intensive domains. This approach is known to experience substantial slowdowns
un-der heavy I/O workloads, due to the I/O handling by the loopback block device used to support file-backed VBDs in dom0. Loopback support remains for old Xen instal-lations, and users are strongly encouraged to use the blktap-based file support (using “tap:aio” as described above).
Additionally, Linux supports a maximum of eight loopback file-backed VBDs across all domains by default. This limit can be statically increased by using the max loop module parameter if CONFIG BLK DEV LOOP is compiled as a module in the dom0 kernel, or by using the max loop=n boot option if CONFIG BLK DEV LOOP is com-piled directly into the dom0 kernel. Again, users are encouraged to use the blktap-based file support described above which scales to much larger number of active VBDs.
6.3
Using LVM-backed VBDs
A particularly appealing solution is to use LVM volumes as backing for domain file-systems since this allows dynamic growing/shrinking of volumes as well as snapshot and other features.
To initialize a partition to support LVM volumes:
# pvcreate /dev/sda10
Create a volume group named ‘vg’ on the physical partition:
# vgcreate vg /dev/sda10
Create a logical volume of size 4GB named ‘myvmdisk1’:
# lvcreate -L4096M -n myvmdisk1 vg
You should now see that you have a/dev/vg/myvmdisk1Make a filesystem, mount
it and populate it, e.g.:
# mkfs -t ext3 /dev/vg/myvmdisk1 # mount /dev/vg/myvmdisk1 /mnt # cp -ax / /mnt
# umount /mnt
Now configure your VM with the following disk configuration:
disk = [ ’phy:vg/myvmdisk1,sda1,w’ ]
LVM enables you to grow the size of logical volumes, but you’ll need to resize the corresponding file system to make use of the new space. Some file systems (e.g. ext3) now support online resize. See the LVM manuals for more details.
You can also use LVM for creating copy-on-write (CoW) clones of LVM volumes (known as writable persistent snapshots in LVM terminology). This facility is new in Linux 2.6.8, so isn’t as stable as one might hope. In particular, using lots of CoW LVM disks consumes a lot of dom0 memory, and error conditions such as running out of disk space are not handled well. Hopefully this will improve in future.
To create two copy-on-write clones of the above file system you would use the follow-ing commands:
# lvcreate -s -L1024M -n myclonedisk1 /dev/vg/myvmdisk1 # lvcreate -s -L1024M -n myclonedisk2 /dev/vg/myvmdisk1
Each of these can grow to have 1GB of differences from the master volume. You can grow the amount of space for storing the differences using the lvextend command, e.g.:
# lvextend +100M /dev/vg/myclonedisk1
Don’t let the ‘differences volume’ ever fill up otherwise LVM gets rather confused. It
In principle, it is possible to continue writing to the volume that has been cloned (the changes will not be visible to the clones), but we wouldn’t recommend this: have the cloned volume as a ‘pristine’ file system install that isn’t mounted directly by any of the virtual machines.
6.4
Using NFS Root
First, populate a root filesystem in a directory on the server machine. This can be on a distinct physical machine, or simply run within a virtual machine on the same node. Now configure the NFS server to export this filesystem over the network by adding a
line to/etc/exports, for instance:
/export/vm1root 192.0.2.4/24 (rw,sync,no_root_squash)
Finally, configure the domain to use NFS root. In addition to the normal variables, you should make sure to set the following values in the domain’s configuration file:
root = ’/dev/nfs’
nfs_server = ’2.3.4.5’ # substitute IP address of server nfs_root = ’/path/to/root’ # path to root FS on the server
The domain will need network access at boot time, so either statically configure an
IP address using the config variablesip, netmask, gateway,hostname; or enable
DHCP (dhcp=’dhcp’).
Note that the Linux NFS root implementation is known to have stability problems under high load (this is not a Xen-specific problem), so this configuration may not be appropriate for critical servers.
Chapter 7
CPU Management
Xen allows a domain’s virtual CPU(s) to be associated with one or more host CPUs. This can be used to allocate real resources among one or more guests, or to make optimal use of processor resources when utilizing dual-core, hyperthreading, or other advanced CPU technologies.
Xen enumerates physical CPUs in a ‘depth first’ fashion. For a system with both hyperthreading and multiple cores, this would be all the hyperthreads on a given core, then all the cores on a given socket, and then all sockets. I.e. if you had a two socket, dual core, hyperthreaded Xeon the CPU order would be:
socket0 socket1
core0 core1 core0 core1
ht0 ht1 ht0 ht1 ht0 ht1 ht0 ht1
#0 #1 #2 #3 #4 #5 #6 #7
Having multiple vcpus belonging to the same domain mapped to the same physical CPU is very likely to lead to poor performance. It’s better to use ‘vcpus-set’ to hot-unplug one of the vcpus and ensure the others are pinned on different CPUs.
If you are running IO intensive tasks, its typically better to dedicate either a hyper-thread or whole core to running domain 0, and hence pin other domains so that they can’t use CPU 0. If your workload is mostly compute intensive, you may want to pin vcpus such that all physical CPU threads are available for guest domains.
Chapter 8
Migrating Domains
8.1
Domain Save and Restore
The administrator of a Xen system may suspend a virtual machine’s current state into a disk file in domain 0, allowing it to be resumed at a later time.
For example you can suspend a domain called “VM1” to disk using the command:
# xm save VM1 VM1.chk
This will stop the domain named “VM1” and save its current state into a file called
VM1.chk.
To resume execution of this domain, use thexm restorecommand:
# xm restore VM1.chk
This will restore the state of the domain and resume its execution. The domain will
carry on as before and the console may be reconnected using thexm console
com-mand, as described earlier.
8.2
Migration and Live Migration
Migration is used to transfer a domain between physical hosts. There are two vari-eties: regular and live migration. The former moves a virtual machine from one host to another by pausing it, copying its memory contents, and then resuming it on the destination. The latter performs the same logical functionality but without needing to pause the domain for the duration. In general when performing live migration the domain continues its usual activities and—from the user’s perspective—the migration should be imperceptible.
To perform a live migration, both hosts must be running Xen / xend and the destina-tion host must have sufficient resources (e.g. memory capacity) to accommodate the
domain after the move. Furthermore we currently require both source and destination machines to be on the same L2 subnet.
Currently, there is no support for providing automatic remote access to filesystems stored on local disk when a domain is migrated. Administrators should choose an appropriate storage solution (i.e. SAN, NAS, etc.) to ensure that domain filesystems are also available on their destination node. GNBD is a good method for exporting a volume from one machine to another. iSCSI can do a similar job, but is more complex to set up.
When a domain migrates, it’s MAC and IP address move with it, thus it is only possible to migrate VMs within the same layer-2 network and IP subnet. If the destination node is on a different subnet, the administrator would need to manually configure a suitable etherip or IP tunnel in the domain 0 of the remote node.
A domain may be migrated using thexm migratecommand. To live migrate a
do-main to another machine, we would use the command:
# xm migrate --live mydomain destination.ournetwork.com
Without the--liveflag, xend simply stops the domain and copies the memory image
over to the new node and restarts it. Since domains can have large allocations this
can be quite time consuming, even on a Gigabit network. With the--liveflag xend
attempts to keep the domain running while the migration is in progress, resulting in typical down times of just 60–300ms.
For now it will be necessary to reconnect to the domain’s console on the new machine
using the xm consolecommand. If a migrated domain has any open network
Chapter 9
Securing Xen
This chapter describes how to secure a Xen system. It describes a number of scenarios and provides a corresponding set of best practices. It begins with a section devoted to understanding the security implications of a Xen system.
9.1
Xen Security Considerations
When deploying a Xen system, one must be sure to secure the management domain (Domain-0) as much as possible. If the management domain is compromised, all other domains are also vulnerable. The following are a set of best practices for Domain-0:
1. Run the smallest number of necessary services. The less things that are present in a management partition, the better. Remember, a service running as root in the management domain has full access to all other domains on the system.
2. Use a firewall to restrict the traffic to the management domain. A firewall with default-reject rules will help prevent attacks on the management domain. 3. Do not allow users to access Domain-0. The Linux kernel has been known
to have local-user root exploits. If you allow normal users to access Domain-0 (even as unprivileged users) you run the risk of a kernel exploit making all of your domains vulnerable.
9.2
Driver Domain Security Considerations
Driver domains address a range of security problems that exist regarding the use of de-vice drivers and hardware. On many operating systems in common use today, dede-vice drivers run within the kernel with the same privileges as the kernel. Few or no mecha-nisms exist to protect the integrity of the kernel from a misbehaving (read ”buggy”) or