Symantec NetBackup™
Appliance Administrator's
Guide for Media Server
Software Release 2.0.2
NetBackup 52xx Series Appliance Administrator's Guide
The software described in this book is furnished under a license agreement and may be used only in accordance with the terms of the agreement.Documentation version: 2.0.2
Legal Notice
Copyright © 2012 Symantec Corporation. All rights reserved.
Symantec, NetBackup, and the Symantec Logo are trademarks or registered trademarks of Symantec Corporation or its affiliates in the U.S. and other countries. Other names may be trademarks of their respective owners.
This Symantec product may contain third party software for which Symantec is required to provide attribution to the third party (“Third Party Programs”). Some of the Third Party Programs are available under open source or free software licenses. The License Agreement accompanying the Software does not alter any rights or obligations you may have under those open source or free software licenses. Please see the Third Party Legal Notice Appendix to this Documentation or TPIP ReadMe File accompanying this Symantec product for more information on the Third Party Programs.
The product described in this document is distributed under licenses restricting its use, copying, distribution, and decompilation/reverse engineering. No part of this document may be reproduced in any form by any means without prior written authorization of Symantec Corporation and its licensors, if any.
THE DOCUMENTATION IS PROVIDED "AS IS" AND ALL EXPRESS OR IMPLIED CONDITIONS, REPRESENTATIONS AND WARRANTIES, INCLUDING ANY IMPLIED WARRANTY OF MERCHANTABILITY, FITNESS FOR A PARTICULAR PURPOSE OR NON-INFRINGEMENT, ARE DISCLAIMED, EXCEPT TO THE EXTENT THAT SUCH DISCLAIMERS ARE HELD TO BE LEGALLY INVALID. SYMANTEC CORPORATION SHALL NOT BE LIABLE FOR INCIDENTAL OR CONSEQUENTIAL DAMAGES IN CONNECTION WITH THE FURNISHING,
PERFORMANCE, OR USE OF THIS DOCUMENTATION. THE INFORMATION CONTAINED IN THIS DOCUMENTATION IS SUBJECT TO CHANGE WITHOUT NOTICE.
The Licensed Software and Documentation are deemed to be commercial computer software as defined in FAR 12.212 and subject to restricted rights as defined in FAR Section 52.227-19 "Commercial Computer Software - Restricted Rights" and DFARS 227.7202, "Rights in Commercial Computer Software or Commercial Computer Software Documentation", as applicable, and any successor regulations. Any use, modification, reproduction release, performance, display or disclosure of the Licensed Software and Documentation by the U.S. Government shall be solely in accordance with the terms of this Agreement.
Symantec Corporation 350 Ellis Street
Mountain View, CA 94043 http://www.symantec.com
Technical Support
Symantec Technical Support maintains support centers globally. Technical Support’s primary role is to respond to specific queries about product features and functionality. The Technical Support group also creates content for our online Knowledge Base. The Technical Support group works collaboratively with the other functional areas within Symantec to answer your questions in a timely fashion. For example, the Technical Support group works with Product Engineering and Symantec Security Response to provide alerting services and virus definition updates.
Symantec’s support offerings include the following:
■ A range of support options that give you the flexibility to select the right amount of service for any size organization
■ Telephone and/or Web-based support that provides rapid response and up-to-the-minute information
■ Upgrade assurance that delivers software upgrades
■ Global support purchased on a regional business hours or 24 hours a day, 7 days a week basis
■ Premium service offerings that include Account Management Services For information about Symantec’s support offerings, you can visit our Web site at the following URL:
www.symantec.com/business/support/
All support services will be delivered in accordance with your support agreement and the then-current enterprise technical support policy.
Contacting Technical Support
Customers with a current support agreement may access Technical Support information at the following URL:
www.symantec.com/business/support/
Before contacting Technical Support, make sure you have satisfied the system requirements that are listed in your product documentation. Also, you should be at the computer on which the problem occurred, in case it is necessary to replicate the problem.
When you contact Technical Support, please have the following information available:
■ Hardware information
■ Available memory, disk space, and NIC information ■ Operating system
■ Version and patch level ■ Network topology
■ Router, gateway, and IP address information ■ Problem description:
■ Error messages and log files
■ Troubleshooting that was performed before contacting Symantec ■ Recent software configuration changes and network changes
Licensing and registration
If your Symantec product requires registration or a license key, access our technical support Web page at the following URL:
www.symantec.com/business/support/
Customer service
Customer service information is available at the following URL: www.symantec.com/business/support/
Customer Service is available to assist with non-technical questions, such as the following types of issues:
■ Questions regarding product licensing or serialization
■ Product registration updates, such as address or name changes
■ General product information (features, language availability, local dealers) ■ Latest information about product updates and upgrades
■ Information about upgrade assurance and support contracts ■ Information about the Symantec Buying Programs
■ Advice about Symantec's technical support options ■ Nontechnical presales questions
Support agreement resources
If you want to contact Symantec regarding an existing support agreement, please contact the support agreement administration team for your region as follows:
customercare_apac@symantec.com Asia-Pacific and Japan
semea@symantec.com Europe, Middle-East, and Africa
supportsolutions@symantec.com North America and Latin America
Technical Support
... 4Chapter 1
Overview
... 11About NetBackup media server deployment ... 11
About NetBackup media server appliance deployment ... 11
About NetBackup appliance installation requirements ... 12
About the NetBackup Appliance documentation ... 13
Chapter 2
Administering your appliance
... 15About modifying the appliance settings ... 15
About the Administrator's password ... 16
About Network Configuration settings ... 18
About DNS Configuration settings ... 20
About date and time configuration ... 21
About the Call Home feature ... 61
About using SNMP ... 24
About license key management on the NetBackup appliance ... 26
About software release updates ... 28
Installing software release updates from the appliance UI ... 29
About rolling back to a previous software update ... 30
Rolling back to a previous software version ... 31
Expanding the bandwidth on the NetBackup appliance ... 32
About NetBackup appliance disk storage reconfiguration ... 32
Resizing appliance disk storage units ... 33
About appliance supported tape devices ... 35
Adding external robots to the NetBackup appliance ... 36
Configuring a tape library on a NetBackup appliance ... 37
About the NetBackup appliance USB flash drive recovery media ... 37
About NetBackup appliance replication configuration ... 38
About reimaging a NetBackup appliance ... 69
About reimaging a NetBackup appliance from the USB flash drive ... 71
About decommissioning an appliance ... 40
Decomissioning a media server only appliance ... 41
About disk storage configuration ... 41
Working with Devices ... 41
Working with Partitions ... 44
Chapter 3
NetBackup appliance hardware monitoring and
alerts
... 55About hardware monitoring, self test, and alerts ... 55
About the appliance UI hardware monitoring and alerts ... 56
About Email notification from a NetBackup appliance ... 59
About hardware self test ... 61
About the Call Home feature ... 61
Chapter 4
Troubleshooting
... 67About password recovery ... 67
About troubleshooting the NetBackup appliance ... 67
About reimaging a NetBackup appliance ... 69
About reimaging a NetBackup appliance from the USB flash drive ... 71
Appendix A
About Call Home upload information
... 73About the appliance hardware information that is uploaded ... 73
About the enclosure information that is uploaded ... 77
Appendix B
Fibre Channel and Fibre Transport connectivity
... 81About backup to tape support for NetBackup appliances ... 81
About the card slots on NetBackup appliances ... 82
About NetBackup SAN Client and Fibre Transport ... 84
About the SAN Client license key ... 85
About zoning the SAN for a NetBackup 5220 appliance ... 85
About Fibre Transport paths for NetBackup appliances ... 88
How to determine appliance HBA WWPNs ... 92
Appendix C
Technical specifications
... 95Technical specifications for NetBackup appliances ... 95
Safety and EMC standards compliance for NetBackup appliances ... 97
Industry standards compliance for NetBackup appliances ... 98
Certifications for NetBackup appliances ... 99
FCC information for NetBackup appliance users ... 101
Contents 8
Index
... 1059 Contents
Contents 10
Overview
This chapter includes the following topics: ■ About NetBackup media server deployment
■ About the NetBackup Appliance documentation
About NetBackup media server deployment
Deployment is best described as the complete installation and configuration of the appliance so that it is ready to use.
Appliance deployment is easier and faster than NetBackup installation and configuration, which has already been done for you. All you need to do is mount and connect the appliance. Then, configure it to work with your network and add it to your existing NetBackup environment.
For installation and initial configuration information, refer to the Symantec NetBackup Appliance Getting Started Guide.
See“About NetBackup media server appliance deployment”on page 11. See“About NetBackup appliance installation requirements”on page 12.
About NetBackup media server appliance deployment
The following table describes the tasks that you must complete to deploy or install your appliance.
1
Table 1-1 Required tasks to deploy the appliance
Description Task No.
Mount the appliance in the rack unit.
Refer to the Symantec NetBackup Appliance Getting Started Guide. For installation requirements, refer to the following topic: See“About NetBackup appliance installation requirements” on page 12.
1
Connect the appliance to the network and to AC power.
Refer to the Symantec NetBackup Appliance Getting Started Guide. 2
Connect a laptop to the appliance.
Refer to the Symantec NetBackup Appliance Getting Started Guide. 3
Configure the appliance to work with your network and add it to your NetBackup environment.
Refer to the Symantec NetBackup Appliance Getting Started Guide. 4
About NetBackup appliance installation requirements
For best performance, use the following requirements to install the appliance.
■ Install the appliance in a standard 19-inch rack.
■ Install the appliance in an environmentally controlled area with an ambient temperature range of 41° to 95°F (5°C to 35°C).
■ Install the appliance where there is adequate airflow so that it does not overheat. Appliance location
■ Plug the appliance into an unswitched 120 VAC 60Hz-AC outlet or into an uninterruptible power supply (UPS).
Warning:Do not plug the appliance into a switched outlet or a power strip with a switch and a circuit breaker. If the switch is turned off or if the circuit breaker trips while the appliance is running, data may be lost.
■ Ensure that there is overcurrent and overload protection.
Power requirements
Overview
About NetBackup media server deployment
Make sure to connect a ground wire to the ground terminal that is located on the back panel of a NetBackup 5200.
Ground connection
■ Use the power and the network cables that are supplied with the appliance.
■ To prevent cord strain or damage, make sure that you support and secure all appliance cables with cable ties where needed. Cable connections
See“About NetBackup media server appliance deployment”on page 11.
About the NetBackup Appliance documentation
Included with your NetBackup appliance are the following documents to ensure you can successfully install, configure, and use your appliance. You can find these documents on the Symantec Support Web, use the following URL.
http://www.symantec.com/docs/DOC2792
Note:It's possible that changes may occur after the documents have been initially released. The electronic versions of these documents on the Support Web site contain the most up-to-date information. You should refer to these documents for the latest information about the appliance. The documents are provided so that you can download and print them at any time.
This guide provides the following information:
■ A packing list that describes the items that are included in the box along with your appliance.
■ Configuration prerequisite information that you need to know to configure your appliance for the first time.
■ Hardware configuration steps
This section guides you through the required steps to install your appliance in a cabinet and connect your appliance to a laptop and the network.
■ Software configuration steps
This section guides you through the configuration process from the appliance user interface or from the appliance shell menu.
Symantec NetBackup™ Appliance Getting Started Guide
13 Overview
The Symantec NetBackup™ Appliance Administrator's
Guide for Media Server is provided as part of the
NetBackup 5200 software package. This guide may contain updates that have occurred since the initial release of the document. For the latest administration information always refer to this version of the guide.
The Symantec NetBackup™ Appliance Administrator's
Guide for Media Server contains the following types of
information:
■ Deployment information
■ Administering your appliance
■ Monitoring information
■ Appliance shell menu commands
Symantec NetBackup™ Appliance Administrator's Guide for Media Server
The Symantec NetBackup™ Appliance Command Reference
Guide provides a complete list of the commands that are
available for you to use through the appliance shell menu. This document is provided as a part of the product software that is installed on the appliance, and in electronic form on the Symantec Support Web site.
Symantec NetBackup™ Appliance Command Reference Guide
The NetBackup Product Family Third-party Legal Notices document lists the third-party software that is included in this product and it contains attributions for the third-party software. This document is available from the following Web site:
http://www.symantec.com/docs/DOC3775
Symantec NetBackup Product Family Third-party Legal Notices
See“About NetBackup media server deployment”on page 11. See“About hardware monitoring, self test, and alerts”on page 55.
Overview
About the NetBackup Appliance documentation
Administering your
appliance
This chapter includes the following topics: ■ About modifying the appliance settings
■ About software release updates
■ About rolling back to a previous software update
■ Expanding the bandwidth on the NetBackup appliance
■ About NetBackup appliance disk storage reconfiguration
■ About appliance supported tape devices
■ About the NetBackup appliance USB flash drive recovery media
■ About decommissioning an appliance
■ About disk storage configuration
About modifying the appliance settings
After you have successfully configured your appliance you can use the
administrative Web UI and the appliance shell menu to change various NetBackup appliance settings. You can use the Settings tab in the NetBackup appliance user interface to view and configure the following settings.
The following tables describe the Settings that are available: ■ Table 2-1, Settings > Configuration
■ Table 2-2, Settings > Applicance Reconfiguration
2
■ Table 2-3, Settings > Hardware Monitoring
Table 2-1 Settings > Configuration
Topic Lets you...
Setting
See“Settings > Configuration > SNMP Server options”on page 25.
Configure the SNMP server. SNMP
Table 2-2 Settings > Applicance Reconfiguration
Topic Lets you...
Setting
See“About Network Configuration settings” on page 18.
View and change network configuration settings.
Network Configuration
See“About DNS Configuration settings” on page 20.
Add or change DNS configuration settings.
DNS Configuration
See“About the Administrator's password” on page 16.
Change the admin password for your appliance.
Security
Change the date and time on your appliance.
Date and Time Configuration
Configure Fibre Transport your appliance.
Fibre Transport Configuration
Table 2-3 Settings > Hardware Monitoring
Topic Lets you...
Setting
See“About the Call Home feature”on page 61. Call Home.
Hardware Monitor Settings
About the Administrator's password
When you perform the initial configuration, you have the option to change the default administrator's password. After the initial configuration, you can change the administrator's password from the Settings > Appliance Reconfiguration > Security page.
Note:For maximum security, Symantec recommends that you set a regular schedule for password changes and keep a record of all passwords in a secure location.
Administering your appliance
About modifying the appliance settings
When the password is changed here, it is also updated for use with the command-line interface. If you change this password from the command-line interface, the new password is also used to log on to the appliance user interface. Passwords can be seven characters or longer and they must include a specific combination of characters. The following describes the minimum requirements for acceptable passwords. Passwords with seven characters must include all of the following requirements, while longer passwords must include at least three of the following requirements:
■ One uppercase letter ■ One lowercase letter ■ One number (0-9) ■ One special character
A password that begins with an uppercase letter and ends with a number is unacceptable, unless you include another uppercase letter and another number between them.
The following describes the data fields for administrator password changes. Description
Setting
The field where you enter the existing
administrator's password for the operating system that is installed on the appliance.
Note:When you perform the initial configuration, this field is prepopulated with the default password (P@ssw0rd).
Old Admin Password
The field where you enter a new password for the operating system that is installed on the appliance.
New Admin Password
Enter the new password again to confirm the change, then click Save.
Confirm New Admin Password
From the command-line interface you can use theMain_Menu > Settings > Password user_namecommand to change the current password. You define the user name that corresponds to the password that you want to change.
See“About modifying the appliance settings”on page 15. See“About Network Configuration settings”on page 18.
17 Administering your appliance
About Network Configuration settings
On the Settings > Appliance Reconfiguration > Network Configuration page you can do the following:
■ View the Ethernet device status and details.
■ View or add the network configuration of the appliance.
■ View or modify bond modes (link aggregation, also known as NIC bonding or NIC teaming).
■ View or modify the kernel routing configuration of the appliance. To configure and add a new network to your appliance, you can supply the following information and click Add. When you add entries to the Configure Network fields, those values are configured on the appliance. The configuration entries then appear automatically in the read-only fields of the Applied Network Configuration table in the user interface. To remove a previously configured network, click Remove next to the network that you want to eliminate.
Description Setting
The IPv4 address to be used for this appliance. You can also enter a new IP address of an appliance that you want to configure.
IP Address
The subnet value that corresponds to the IP address. Subnet Mask
This column displays the network device name that you can choose when you add a new network to the configuration. Use the following guidelines to bond multiple NICs:
■ The NIC drop-down list provides the available Ethernet ports that can be bonded. The list is compiled
automatically based on the physical network connections on the appliance.
■ Select Auto to have the NICs selected automatically. This mode selects the best possible set of NICs to plumb the IP address on. The selection is based on the available NICs, the link type (copper or FC), and the link speed. If multiple NICs have the same properties, then a bond (link aggregation) is created and the IP address is plumbed on the bond.
■ Only NICs of the same type and speed can be bonded.
■ Once a NIC is bonded, it cannot be bonded to another NIC. To reassign a bond, you must first remove the NIC from its current bond.
NIC
Administering your appliance
About modifying the appliance settings
Description Setting
This field lets you combine (aggregate) multiple network interfaces into a single logical "bonded" interface. The behavior of the bonded interfaces depends upon the mode. The default bond mode is balance-alb.
The available bonding modes are as follows:
■ balance-rr
■ active-backup
■ broadcast
■ 802.3ad
■ balance-tlb
Some bond modes require additional configuration on the switch or the router. You should take additional care when you select a bond mode.
For more information about bond modes, see the following documentation:
http://www.kernel.org/doc/Documentation/networking/bonding.txt Bond Mode
You can configure and add routing to your appliance by entering information into the following routing configuration settings and clicking Add. To remove a route configuration, click Remove next to the route that you want to eliminate.
Description Setting
The network IP address of a destination network. For the initial appliance configuration, this field contains a default value that cannot be changed. When you configure another destination IP, you must enter the appropriate address. Destination IP
The subnet value that corresponds to the IP address. For the initial appliance configuration, this field contains a default value that cannot be changed. When you configure another route, you must enter the appropriate value. Destination Subnet Mask
The address of the network point that acts as an entrance to another network.
Default Gateway
The appliance can use multiple network interface cards (NICs). This column displays the network device name. Refer to thelinux routecommand for more information about how to add routing entries.
NIC
See“About modifying the appliance settings”on page 15.
19 Administering your appliance
See“About the Administrator's password”on page 16. See“About DNS Configuration settings”on page 20.
About DNS Configuration settings
You can add or change the following DNS configuration settings from the Settings > Appliance Reconfiguration > DNS Configuration page.
Note:If you add a media server to your master appliance server in a non-DNS environment, the entry for the Windows NetBackup Administration console needs to be resolved in the appliance. To do this, use the Hostname Resolution field on this page to add the Windows host IP address and host name of the newly added media server.
The IP address of the DNS name server. To enter multiple names, use a comma character as the delimiter between each name.
DNS IP Address(es)
The suffix name of the DNS server.
For example, the suffix forxyz.symantec.com
would besymantec.com.
Note:If you enter a domain name suffix, you must also provide the DNS name server at the top of the page.
Domain Name Suffix
Use this field to add a domain to search. You can enter one or more DNS search domain names to search when an unqualified host name is given. To enter multiple search domain names, use a comma character as the delimiter between each name.
Note:If you enter any search domains, you must also provide the DNS name server at the top of the page.
Search Domain(s)
Administering your appliance
About modifying the appliance settings
To make sure that the appliance can resolve successfully to other servers and clients (hosts), enter the additional host information in the following fields:
Note:Entries are required for the IP Address and the Fully Qualified Hostname fields.
■ IP Address
Enter the IP address of the host.
■ Fully-Qualified-Hostname Enter the FQDN of the host.
■ Short-Hostname
This field is populated automatically based on the FQDN.
Click Add. The host name information that you entered now appears below the data fields. Repeat for as many servers and clients as needed. Click Save to save your host and system settings. Host Name Resolution
From the command-line interface, you can use theMain_Menu > Network > DNS
command to add or delete a search domain, set the appliance domain name, and show the current DNS information.
See“About modifying the appliance settings”on page 15. See“About the Administrator's password”on page 16. See“About Network Configuration settings”on page 18.
See“About NetBackup appliance disk storage reconfiguration”on page 32.
About date and time configuration
You can add or change the following date and time settings from the Settings > Appliance Reconfiguration > Date and Time Configuration page.
NTP (Network Time Protocol) is designed to synchronize the clocks of computers over a network. You can select to use an NTP server for synchronization of all computers, or you can enter the time, the date, and the time zone manually. The following describes the data fields to change the time, the date, and the time zone configuration:
If NTP is used and you want to change to a different NTP server, enter the new Server IP Address.
NTP
21 Administering your appliance
To synchronize all computer clocks without NTP, click None and select appropriate data in the following fields:
■ Date
Click on the drop-down boxes to select the month (mm), the date (dd), and the year (yyyy).
■ Time
Click on the drop-down boxes to select the hour (hh), the minutes (mm), and the seconds (ss).
None
Whether you select to use NTP or None, you must set the time zone.
Click on the Time Zone drop-down box to select the appropriate time zone.
Time Zone
After all selections have been made, click Save.
About the Call Home feature
The appliance can connect with a Symantec Call Home server and upload hardware and software information. The appliance uses the HTTPS protocol and uses port 443 to connect to the Symantec Call Home server. This capability is referred to as Call Home and this feature is enabled by default.
If you determine that you have a problem with a piece of hardware, you should contact Symantec Technical Support. The Technical Support Engineer can use the serial number of your appliance and assess the trends of the hardware status. You can perform various operations for the Call Home feature:
■ Enable or disable Call Home.
See“Enabling and disabling the Call Home feature”on page 63. ■ Configure a Call Home proxy server.
See“Configuring a Call Home proxy server”on page 64.
If you enable the Call Home feature, you can use theMain > Settings > CallHome Locationcommand to configure the contact information for your appliance. In
addition, you can enable or disable the ability to upload the contact information. For example, you can enter the following information:
■ The address of the location of the appliance.
■ The name of the person who is the first point of contact and responsible for the appliance.
■ The phone number of the contact person. ■ The email address of the contact person.
Administering your appliance
About modifying the appliance settings
To learn more about theMain > Settings > CallHomecommands, refer to the
NetBackup 52xx Series Command Reference Guide.
See“Changing the hardware monitoring settings”on page 24.
The following describes how a hardware failure is reported when the feature is enabled or disabled:
Table 2-4
Hardware failure routine Monitoring enabled or
disabled
When a hardware failure occurs, the following sequence of alerts occur:
■ The appliance uploads hardware and software information to a Symantec server.
The following hardware information is uploaded:
■ Power supply
■ CPU
■ Fan
■ Disk
■ Fibre Channel
■ Temperatures
■ RAID group
■ RAID adapter
■ Network card
The following software information is uploaded:
■ The backup jobs that failed in the last 12 hours
■ Total available deduplicated space
■ Used deduplicated space
■ The appliance generates a local alert by email to notify you of the hardware failure. The appliance also generates an SNMP trap.
Call Home enabled
The appliance generates a local alert by email to notify you of the hardware failure.
Call Home disabled
For a list of the hardware problems that cause an alert, see the following topic: See“About the appliance UI hardware monitoring and alerts”on page 56. See“About Email notification from a NetBackup appliance”on page 59. See“About hardware self test”on page 61.
23 Administering your appliance
Changing the hardware monitoring settings
On the Settings > Hardware Monitoring page, you can do the following: ■ Enable the Call Home feature.
■ Enable a Call Home proxy server and port.
Table 2-5
Description Option
Use the check box to enable and disable the Call Home feature.
Enable Call Home
Use the check box to enable and disable the use of a proxy server.
Enable proxy server
The name of the proxy server that is eitherthe TCP/IP address or the fully qualified name of the proxy server. Proxy server host name
The proxy port number on the proxy server. Proxy server port number
About using SNMP
This section provides information about SNMP and how NetBackup uses SNMP. See“About SNMP”on page 24.
See“About SNMP versions”on page 25.
See“About the Management Information Base (MIB)”on page 25.
About SNMP
The Simple Network Management Protocol (SNMP) is an application layer protocol that facilitates the exchange of management information between network devices. It is part of the Transmission Control Protocol/Internet Protocol (TCP/IP) protocol suite. SNMP enables network administrators to manage network performance, find and solve network problems, and plan for network growth.
SNMP is based on the manager model and agent model. This model consists of a manager, an agent, a database of management information, managed objects, and the network protocol.
The manager provides the interface between the human network manager and the management system. The agent provides the interface between the manager and the physical devices being managed.
The manager and agent use a Management Information Base (MIB) and a relatively small set of commands to exchange information. The MIB is organized in a tree
Administering your appliance
About modifying the appliance settings
structure with individual variables, such as point status or description, being represented as leaves on the branches. A numeric tag or object identifier (OID) is used to distinguish each variable uniquely in the MIB and in SNMP messages.
About SNMP versions
The NetBackup appliance supports the SNMPv2 version.
That version was created as an update of SNMPv1 adding several features. The key enhancements to SNMPv2 are focused on the SMI, manager-to-manager capability, and protocol operations.
SNMPv2c combines the Community-based approach of SNMPv1 with the protocol operation of SNMPv2 and omits all SNMPv2 security features.
■ The original SNMPv2 (SNMPv2p) ■ Community-based SNMPv2 (SNMPv2c) ■ User-based SNMPv2 (SNMPv2u) ■ SNMPv2 star (SNMPv2*).
About the Management Information Base (MIB)
Each SNMP element manages specific objects with each object having specific characteristics. Each object and characteristic has a unique object identifier (OID) that is associated with it. Each OID consists of the numbers that are separated by decimal points (for example, 1.3.6.1.4.1.2682.1).
These OIDs form a tree. The MIB associates each OID with a readable label and various other parameters that are related to the object. The MIB then serves as a data dictionary that is used to assemble and interpret SNMP messages.
Settings > Configuration > SNMP Server options
A description of the Settings > Configuration > SNMP Server options follows in the table.
Table 2-6 SNMP Server options
Description Option
Enter the SNMP (Simple Network Management Protocol) Server host name. You can enter a host name or an IP address to define this computer.
Notification of the alerts/traps that are generated in NetBackup are sent to this SNMP manager. SNMP Server Name
25 Administering your appliance
Table 2-6 SNMP Server options (continued)
Description Option
Enter the SNMP Server port number.
If you do not enter anything for this variable, then the default port is162.
SNMP Server port
Enter the community to which the alerts/traps are sent. For example, Backup Reporting Department.
You can enter a value that you configured on your SNMP server. For example, you can enter a company name or a name like,admin_group,public, orprivate. If you do not enter anything, then the default value ispublic. SNMP Community
Check this box to display the contents of the Management Information Base (MIB) file. This file contains the notification traps that are configured to monitor the appliance hardware.
Enable SNMP Hardware Monitoring
See“About SNMP”on page 24.
About license key management on the NetBackup appliance
You can review, add, and delete license keys through the administrative Web UI. The following describes the displayed license key information:
■ Key
Shows all of the installed license keys.
■ Type
Describes the license type.
■ Expiry Date
Indicates when the license expires. Upper table
■ Feature ID
Identifies the feature number that is associated with the selected license key.
■ Feature Name
Identifies the feature name that is associated with the selected license key.
Lower table
See“Managing license keys on the NetBackup appliance”on page 27.
Administering your appliance
About modifying the appliance settings
Managing license keys on the NetBackup appliance
The following procedures describe how to view, add, and delete NetBackup option license keys through the appliance user interface or the appliance shell menu. To view, add, and delete license keys through the administrative Web UI
1
Log in to the administrative Web UI.2
Click Settings > NetBackup License.All installed license keys, associated feature IDs, and associated feature names appear.
3
To add new license keys, do the following: ■ Click Add.■ In the Add License Key dialog box, enter the license key for the option that you want to install.
■ Click OK.
4
To delete license keys, do the following:■ In the Key column, select the license keys that you want to delete by clicking the check box next to the license key number.
■ After you have selected the appropriate license keys click Delete. To view, add, and delete license keys through the appliance shell menu
1
To view a list of all installed license keys or view the details of each key, enter one of the following commands:■ Main_Menu > Manage > License > List
A complete list of installed license keys appears. ■ Main_Menu > Manage > License > ListInfo
The associated feature IDs and feature names appear.
2
To add license keys, do the following:■ EnterMain_Menu > Manage > License > Add.
■ Enter the license key for the option that you want to install. Then press Enter.
■ To add another license key, pressy.
■ Repeat the previous step or pressnto exit.
3
To delete license keys, do the following:■ EnterMain_Menu > Manage > License > Remove.
27 Administering your appliance
■ Enter the license key for the option that you want to remove. Then press Enter.
■ To remove another license key, pressy. ■ Repeat the previous step or pressnto exit.
About software release updates
Symantec provides bundled, release-update packages for the appliance that you can download from the Symantec Support Web site. The bundled packages can include updates for any of the factory-installed software on your appliance.
Note:NetBackup appliances include an update mechanism that is specifically designed for appliance updates. You cannot use NetBackup LiveUpdate to update NetBackup appliances.
When you prepare to upgrade the software on your appliance, you should plan for a period of downtime for your appliance.
The upgrade process takes the necessary steps to make sure that your upgrade completes successfully. It first determines if the update that is available is newer than the version of software that you currently have installed.
To help make sure that the upgrade is successful, the upgrade mechanism is designed to stop processes. The upgrade process checks to see if there are any active NetBackup jobs. The upgrade process only proceeds if it is determined no active jobs are detected.
After a successful upgrade, the appliance version is updated to the latest release update level.
Use the following commands to view the detailed list of software information, see which update is currently installed, and see the current version of the appliance: ■ Main_Menu>Manage>Software>List Details
You can use this command see a detailed list of all of the installed RPMs or a detailed list of all of the factory-installed RPMs.
■ Main_Menu>Manage>Software>List Downloaded
This command shows a list of the downloaded software updates. ■ Main_Menu>Manage>Software>List EEBs
This command shows a list of EEBs that are installed on the appliance. ■ Main_Menu>Manage>Software>List Version
This command shows the current version of your appliance and of NetBackup.
Administering your appliance
About software release updates
See“Installing software release updates from the appliance UI”on page 29. See“Expanding the bandwidth on the NetBackup appliance”on page 32.
Installing software release updates from the appliance UI
Use the following procedure to upload software updates on the appliance and install them using the command-line interface.
To upload and install NetBackup appliance software updates from the command-line interface
1
You should perform this procedure from a computer that is connected to the appliance as well as to the Internet. That ensures that you can download the release update from the Symantec Support Web site to the appliance.2
Open an SSH session and log on to the appliance as an administrator.3
Enter the following command to open the NFS and the CIFS shares:Main_Menu > Manage > Software > Share Open
4
Map or mount the appliance share directory as follows: Map the following appliance CIFS share:\\<appliance-name>\incoming patches
Windows systems
Mount the following appliance NFS share:
<appliance-name>/inst/patch/incoming
UNIX systems
Note that on Windows systems, you are prompted to provide the user name,
admin, and its corresponding password.
5
Download the release update from the Symantec Support site onto the mapped or the mounted directory. The following URL indicates the download location for the NetBackup 52xx release updates.http://www.symantec.com/business/support/index?page=landing&key=58991
6
Unmap or unmount the directory after you have successfully downloaded the release updates7
From the appliance, enter the following command to close the NFS and the CIFS shares:Main_Menu > Manage > Software > Share Close
Once the release update is downloaded on to the share directory that you defined in Step 3, the update is moved to its proper location. You are not notified that this move has occurred.
29 Administering your appliance
If you run any of the following commands before you run theShare Close
command, the update is still moved from the share directory location to its proper location. Make sure that you have run theShare Closecommand to
make sure that you close the NFS and the CIFS shares. ■ List Version
■ List Details All
■ List Details Base
■ Share Open
■ Share Close
8
Enter the following command to list the available patches.Main_Menu > Manage > Software > List Available
9
Enter the following command to install the release update.Main_Menu > Manage > Software > install patch_name
Where patch_name is the name if the patch to install. You must make sure that the name you enter matches the patch that you uploaded on the appliance.
Note:Once the installation process begins, do not interrupt this process. If you decide you do not want to install a new software update, let the process complete, then begin a Rollback operation.
If you interrupt an upgrade during the process, the ability to Rollback to the previous version may fail.
10
Follow the online instructions to complete the installation of the patch software.See“About software release updates”on page 28.
About rolling back to a previous software update
After you have installed a patch you may determine that you need to revert back to the previously installed version. This process is referred to as a rollback operation and it is installed on your appliance by the Symantec update process. You can use this feature to roll back to the previous version only. And you are not able to roll back to a version that is greater than one release back.Administering your appliance
About rolling back to a previous software update
After you install the update, you must log off your appliance and log back on the appliance to see the new appliance shell menu options. TheRollbackcommand
is located in theMain_Menu > Manage > Softwareview.
Main_Menu> Manage> Software> Rollback
See“Rolling back to a previous software version”on page 31. See“About software release updates”on page 28.
See“About NetBackup media server appliance deployment”on page 11. See“Installing software release updates from the appliance UI”on page 29. See“About NetBackup appliance installation requirements”on page 12.
Rolling back to a previous software version
You can use the appliance shell menu rollback to the previous version of NetBackup on your appliance. The following procedure explains how to roll back to a previous version.
To roll back to a previous version of NetBackup
1
Make sure that you have logged off and logged on to the appliance. That ensures that theRollbackcommand is present in the appliance shell menuif you decide that you want to roll back immediately after you have installed a release update.
2
From the appliance shell menu, enter the following command:Main_Menu> Manage> Software> Rollback
3
At the following prompt, press the Y key to answer yes.Do you want to rollback to x.x.x.x? (y/n)
Where x.x.x.x is the number of the previous software version.
The rollback process requires various processes to be stopped and started. In addition, the previous version that is found, is displayed for you to see.
4
After Rollback has completed, log off and then log back on to your appliance. See“About rolling back to a previous software update ”on page 30.See“About software release updates”on page 28.
See“Installing software release updates from the appliance UI”on page 29.
31 Administering your appliance
Expanding the bandwidth on the NetBackup appliance
The NetBackup 52xx has the capability to provide link aggregation. Link aggregation increases the bandwidth and availability of the communications channel between the appliance and other devices. Link aggregation is enabled by default when you perform the initial network configuration from theadministrative Web UI or the appliance shell menu.
You can use the command-line interface to enable or disable link aggregation, as well as view the status of the link aggregation.
Use the following commands to enable, disable, and view the status of link aggregation:
■ To enable the network link aggregation:
Main_Menu > Network > LinkAggregation Enable ■ To disable the network link aggregation:
Main_Menu > Network > LinkAggregation Disable ■ To show the status of the network link aggregation:
Main_Menu > Network > LinkAggregation Status See“About Network Configuration settings”on page 18.
See“About NetBackup appliance disk storage reconfiguration”on page 32.
About NetBackup appliance disk storage
reconfiguration
After you have performed the initial appliance configuration, you can resize disk storage units from the administrative Web UI or the command-line interface. To resize disk storage units, you can enter the size or the percentage of storage that you want to allocate to the AdvancedDisk disk volume. After you enter that value, the remaining storage is calculated and assigned automatically to the NetBackup Deduplication volume. The new storage values for these two disk volumes, when added together, are displayed as the total size of the appliance disk group.
The following describes the fields that appear to resize disk storage units.
■ Deduplication volume
■ AdvancedDisk volume
■ Total Appliance Disk Group
See“Resizing appliance disk storage units”on page 33. Disk Group Size
Administering your appliance
Expanding the bandwidth on the NetBackup appliance
See“Expanding the bandwidth on the NetBackup appliance”on page 32.
Resizing appliance disk storage units
If you plan to resize disk storage, you must stop the NetBackup processes before the resize operation.
The following procedures describe how to resize disk storage units from the appliance user interface and the command-line interface. You must perform the following procedures in order:
■ Stop the NetBackup processes. SeeTo stop the NetBackup processes
■ Resize the disk storage units by using the administrative Web UI or the command-line interface.
SeeTo resize the disk storage units using the administrative Web UI SeeTo resize the disk storage units using the command-line interface ■ Start the NetBackup processes.
SeeTo start the NetBackup processes
Note:If the resize operation hangs, Symantec recommends that you use the
Main_Menu > Support > Rebootcommand to restart your appliance.
To stop the NetBackup processes
1
Open an SSH session and log on to your appliance. The logon isadminand the default password isP@ssw0rd.After you log on, the welcome message appears in the shell menu and the prompt is at the Main_Menu view.
2
Enter the following command to stop the NetBackup processes:Main_Menu > Support > Processes > NetBackup Stop
After the services stop, you can resize the disk storage units. You have to use the command-line interface to start the NetBackup processes after you resize the disk storage units.
33 Administering your appliance
To resize the disk storage units using the administrative Web UI
1
Log on to the administrative Web UI on the appliance.2
Click Settings > Disk Storage.3
Under Storage Allocation, for the NetBackup AdvancedDisk Volume, do the following:In the Specify resize field, enter a percentage or a value (in GB, TB, or PB) that you want to allocate for AdvancedDisk and click Resize.
The remaining disk space is allocated to the NetBackup Deduplication volume. To resize the disk storage units using the command-line interface
1
In the command-line shell menu, enter the following command to configure the disk storage on your appliance.Main_Menu > Storage > Resize
The Current Disk Configuration information appears.
2
Enter the percentage of the total disk pool size or the amount of disk size (in GB) that you want to allocate for the Catalog (on a Master appliance) or for AdvancedDisk (on a Media appliance).3
Enter a percentage or a value (in GB, TB, or PB) and press Enter.The remaining disk space is allocated to the NetBackup Deduplication volume. If you enter a percentage, the following statement is displayed that you must answer:
You have requested 4096 GBs (10% of total disk pool) Is this correct : (yes/no) (default: y)
Enteryesto confirm the change. Enternoto change you the value that you
entered.
The resized disk configuration appears.
4
If the AdvancedDisk size is greater than zero and the AdvancedDisk storage unit does not exist, the following prompt appears:No AdvancedDisk storage unit detected on this appliance. Do you want to create one ? (yes/no): yes
5
Enter yes, and press Enter. You are then prompted to add a name for the new AdvancedDisk volume.What Storage Unit Name do you want for the new AdvancedDisk pool (stu_adv_disk_appliancename):
Administering your appliance
About NetBackup appliance disk storage reconfiguration
6
Press Enter for default storage unit name or enter storage unit name and press Enter.Successfully created AdvancedDisk storage unit stu_adv_disk_appliancename
7
If the Deduplication disk storage size is greater than zero and the Deduplication storage unit does not exist, the following prompt appears:No Deduplication storage unit detected on this appliance. Do you want to create one ? (yes/no): y
8
Enter y, and press Enter. You are then prompted to add a name for the new Deduplication disk volume.What Storage Unit Name do you want for the Deduplication pool (stu_disk_appliancename):
9
Press Enter for default storage unit name or enter storage unit name and press EnterSuccessfully created Deduplication storage unit stu_disk_appliancename
10
TypeExitto exit the command-line interface.To start the NetBackup processes
◆ In the command-line shell menu, enter the following command to stop the NetBackup processes:
Main_Menu > Support > Processes > NetBackup Start
About appliance supported tape devices
The following describes the tape device support for the NetBackup appliance: The NetBackup appliance supports backup to tape libraries that are of NetBackup type TLD (tape library DLT). DLT is an acronym for digital linear tape.
For the TLD types that NetBackup supports, see the NetBackup hardware compatibility list at the following URL:
http://symantec.com/docs/TECH76495 Tape library
35 Administering your appliance
The NetBackup appliance supports Linear Tape - Open (LTO) tape drives that are capable of encryption. The NetBackup appliance encrypts all tapes automatically to ensure that all tapes that are moved off-site are secure.
For supported tape drives, see the NetBackup hardware compatibility list at the following URL:
http://symantec.com/docs/TECH76495 Note:WORM tape is not currently supported. Tape drives
Tapes with the barcode prefix of CLN are treated as cleaning tapes. Tapes with any other barcode prefix are treated as normal tapes. Tape usage
See“How to determine appliance HBA WWPNs”on page 92.
See“Adding external robots to the NetBackup appliance”on page 36.
Adding external robots to the NetBackup appliance
After the Fibre Channel HBA card has been installed, you can add external robots to the appliance.
Use the following procedure to add robots to the appliance. To add an external robot to the appliance
1
Set any physical address switches to the appropriate setting as described in the instructions from the vendor.2
Connect the robot to the HBA card as described in the instructions from the vendor.3
Install and configure the robot software so that the robot works with the operating system, as described in the instructions from the vendor. The operating system must be able to recognize the robot before you can configure it to work with the appliance. (This is an optional step.)4
Configure the added robot for backups as follows:Use the NetBackup Administration Console. See to "Configuring robots and drives" in the
NetBackup Administrator's Guide, Volume I.
For NetBackup 5200 media server only appliances:
See“About appliance supported tape devices”on page 35.
Administering your appliance
About appliance supported tape devices
Configuring a tape library on a NetBackup appliance
The following procedure describes how to configure a tape library to your appliance.
To configure a tape library to your appliance
1
Open an SSH session and log on to your appliance. The login isadminand the default password isP@ssw0rd.After you log in, the welcome message appears in the command shell menu and the prompt is at the Main_Menu view.
2
From the Main_Menu > Manage > Libraries view, enter the following command to configure the tape library on your appliance.Configure MediaServer
Where MediaServer is the name of the media server that you want to configure with the tape library.
3
From the Main_Menu > Manage > Libraries view, enter the following command to inventory libraries to volumes for a designated media server.Inventory MediaServer
Where MediaServer is the name of the media server that you want to configure with the tape library.
4
From the Main_Menu > Manage > Libraries view, enter the following command to view the attached libraries and the drive status for the media server.List
5
TypeExitto exit the command-line interface.See“About appliance supported tape devices”on page 35.
See“Adding external robots to the NetBackup appliance”on page 36.
See“About the NetBackup appliance USB flash drive recovery media”on page 37.
About the NetBackup appliance USB flash drive
recovery media
A USB flash drive is included with the appliance for disaster recovery purposes. For example, you may need to reinstall and reconfigure the appliance in the following situations:
■ Loss of the root disk or hard disk crash
37 Administering your appliance
■ Accidental removal of NetBackup or other appliance applications
You must consult and work with technical support in these situations. Do not attempt to perform appliance recovery without technical support assistance. See“About reimaging a NetBackup appliance”on page 69.
See“About NetBackup appliance replication configuration”on page 38.
About NetBackup appliance replication configuration
In a disaster recovery situation, it is critical to determine the cause of the disaster and recover as much data from the appliance as possible. The NetBackup appliance is designed in such a way that you can recover from hardware component failures. However, in the event that a disaster occurs, you should contact Symantec Technical Support for assistance. Guidance from the Support team is necessary to determine the cause of the disaster and how to best recover your appliance. With the media server appliance, Symantec recommends that you configure a backup policy on the NetBackup master server to replicate any data that you want backed up to an alternate server. After Symantec Technical Support has helped you correct the issue with your appliance or reimaged it, they can determine if your data can be restored from the alternate location.
See "Creating backup policies" in the Symantec NetBackup Administrator's Guide, Volume I.
See "Restoring from a backup at a remote master domain" in the Symantec NetBackup Administrator's Guide, Volume I.
See“About reimaging a NetBackup appliance”on page 69.
See“About the NetBackup appliance USB flash drive recovery media”on page 37.
About reimaging a NetBackup appliance
If you experience major problems with the appliance software, you may need to reimage it. A couple of options are available to you to help you in this situation. You can use the USB flash drive that was included with your appliance to reimage your appliance. Or you can use the appliance shell menu to run aFactoryReset
command to reset your appliance to its original default settings.
Warning:Reimaging or a Factory Reset deletes all backup data.
Administering your appliance
About the NetBackup appliance USB flash drive recovery media
Table 2-7 Situations where you may need to reimage the appliance:
Description Problem situation
Erratic behavior may indicate that NetBackup needs to be reinstalled.
The appliance must be examined to determine if NetBackup data can be saved or recovered. Those procedures must be done first before NetBackup is reinstalled.
Problems with NetBackup operation
Erratic behavior may indicate that the OS needs to be reinstalled. Also, an OS crash requires reinstallation. NetBackup data is typically not affected. However, verification must be done first.
Problems with the OS
You can use theMain_Menu> Support> FactoryResetcommand to reset your appliance to its original factory default settings. If you experience issues with your appliance, then you may want to contact Symantec Technical Support. The Technical Support Engineer can help you determine whether your data can be saved or recovered. And they can help you use theFactoryRestcommand to reset
the appliance configuration to factory settings.
Note:If you use the FactoryReset command to reset your appliance, your administrator password is also reset.
If technical support indicates that they cannot save any of your data, then they may recommend that you use the NetBackup 52xx Flash drive recovery media to reimage your appliance.
When you reimage an appliance with the USB flash drive, all applications are reinstalled and set to factory defaults. After you reinstall an application or reimage the appliance, you must configure your system the same way you did as a new appliance. The following list explains the tasks that Symantec Technical Support helps you perform if you need to reimage an appliance.
Symantec Technical Support helps you do the following: ■ Determine the source of the problem.
■ Determine which data can be saved or recovered. ■ Save or recover any necessary data.
■ Reinstall the appliance back to the factory setting. ■ Configure your appliance.
■ Test the appliance to ensure that the reinstalled application works correctly.
39 Administering your appliance
■ Investigate whether you can recover any replicated information to the appliance.
Note:At the time this document was published, the procedure to reimage with the USB flash drive was still in progress. Please refer to the Symantec NetBackup 52xx Series Troubleshooting Guide for the procedure on how to reimage the appliance with the USB flash drive.
About reimaging a NetBackup appliance from the USB flash drive
When you choose to use the 8GB flash drive to reimage your appliance you reinstall all of the software that originally comprised your appliance. This type of reimaging means that you are about to remove of data and the release updates that may be currently on the appliance.Symantec recommends that you configure a backup policy on the NetBackup master server to replicate any data that you want backed up to an alternate server.
Note:After you reimage the appliance, you can install the latest software updates to bring your appliance to the latest version level.
Note:At the time this document was published, the procedure to reimage with the USB flash drive was still in progress. Please refer to the Symantec NetBackup 52xx Series Troubleshooting Guide for the procedure on how to reimage the appliance with the USB flash drive.
About decommissioning an appliance
To decommission an appliance means to physically remove or eliminate the appliance from the backup environment. When you decide which appliance to decommission, you must make sure that the appliance is not configured as a backup destination for any clients.
You may need to decommission an appliance for any of the following reasons: ■ The appliance has hardware issues and needs to be replaced.
■ The appliance is no longer needed (down-sizing your backup environment). ■ The appliance may need to be removed from the network domain to be repaired. ■ The appliance is no longer supported and needs to be replaced.
See“Decomissioning a media server only appliance”on page 41.
Administering your appliance
About decommissioning an appliance
Decomissioning a media server only appliance
To decommission your appliance, Symantec recommends that you perform the following steps:
To decommission your appliance
1
From the appliance, run the following command to remove the media server configuration from the appliance.Main_Menu>Support>FactoryReset
2
Complete the decommissioning process from the NetBackup master server. See the section "Decommissioning a media server" in the Symantec NetBackup Administrator's Guide, Volume I for more information on how to decommission a NetBackup media server.You can also refer to the following Technote on the Symantec Support Web site:
http://www.symantec.com/docs/TECH31168
About disk storage configuration
You can view and manage the appliance storage configuration using the Manage > Disk Storage menu. You can also use theManage > Storageshell menu. This feature helps you to use the available storage space effectively. The Disk Storage screen is divided into the following sections:
■ Devices section is used to add and remove storage expansion units to the base storage unit.
See“Working with Devices”on page ?.
■ Partitions section is used to resize and move storage size among the various storage spaces.
See“Working with Partitions”on page ?.
For more information aboutMain > Manage > Storagecommands refer to
NetBackup™ Appliance Command Reference Guide.
Working with Devices
The Devices section provides a graphical representation and tabular representation of the storage devices that are installed into your appliance.
41 Administering your appliance
Figure 2-1 Devicespie chart and table
The following table lists the operations that can be performed using the shell menu and the administrative Web UI:
Example Value displayed
Column names
Base Unit Storage (unit_1) Displays the name of the storage unit.
Device
4 .5429 TB Displays the total storage space within a
unit. Total
1.5428 TB Displays the available space within the
storage unit that has not been allocated. Unallocated
In Use Displays the status of the storage unit, if in use by the appliance. In case it is a New Available unit an Add link is displayed in this column.
Status
The Devices section enables you to perform the following operations:
Administering your appliance
About disk storage configuration
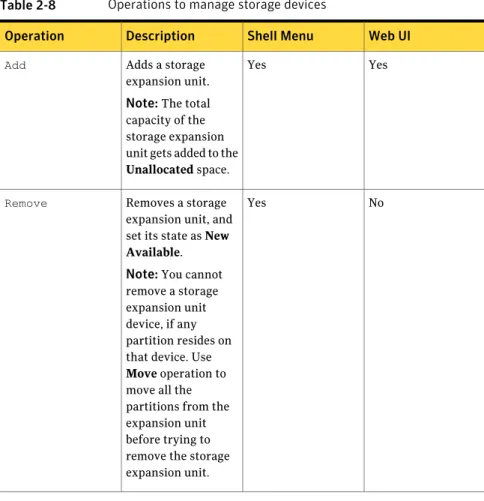
Table 2-8 Operations to manage storage devices
Web UI Shell Menu
Description Operation
Yes Yes
Adds a storage expansion unit. Note:The total capacity of the storage expansion unit gets added to the Unallocated space.
Add
No Yes
Removes a storage expansion unit, and set its state as New Available.
Note:You cannot remove a storage expansion unit device, if any partition resides on that device. Use Move operation to move all the partitions from the expansion unit before trying to remove the storage expansion unit.
Remove
See“Adding a new storage unit to an unallocated space”on page 43.
Adding a new storage unit to an unallocated space
The following procedure describes how to add a newly added storage expansion unit into an unallocated space.
To add a new storage expansion unit to an unallocated space
1
Log in to the Administrative Web UI.2
Click Manage > Storage.The Storage tab, displaying the Devices and Partition graphs and tables, appears.
43 Administering your appliance
3
The Devices graph and table display the newly added storage expansion unit to be added to the base storage unit. The Status of the added storage expansion unit is displayed as New Available with the Add link.4
Click on the Add link, to add the storage expansion unit. A dialog box displays the following message:This operation will add the disk to the Unallocated storage. Click OK to
continue.
5
Click Ok, to add the new storage unit to the base storage unit.When you add the new storage expansion unit, the appliance updates its Status to In Use. This change is also reflected in the Partitions section. The Total storage size of the Unallocated space is increased and displays the added storage in the Partitions graph and table.
See“Working with Devices”on page 41.
See“About disk storage configuration”on page 41.
Note:You can remove an expansion storage unit and set it as New Available using the appliance shell menu. For information on removing a storage unit, refer to
Main > Manage > Storage Removecommand in the Symantec NetBackup
Command Reference Guide.
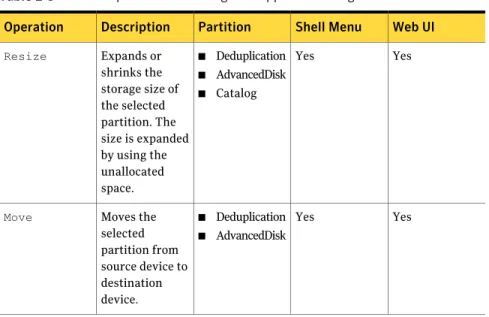
Working with Partitions
The Partitions section provides a graphical representation and a tabular representation of the storage partitions within your appliance. The appliance storage is divided using the following storage partitions:
■ Catalog represents the catalog space that contains the information regarding backups, storage devices, and configuration.
■ Deduplication represents the allocated space for deduplication on your appliance.
■ Advanced Disk enables you to backup data to tapes or cloud at a faster rate. It also helps you to restore data from the appliance at a faster rate.
■ Unallocated represents the storage space that has not been allocated to the Deduplication and AdvancedDisk partitions. When you expand the storage space for these partitions, it is used from the Unallocated space. When you add an expansion unit, the size of the Unallocated space increases. The size of the Catalog, AdvancedDisk, and Deduplication partitions remain same.
Administering your appliance
About disk storage configuration
Note:If you have not allocated the entire storage space in the initial configuration, to the Deduplication disk and AdvancedDisk it appears as unallocated space.
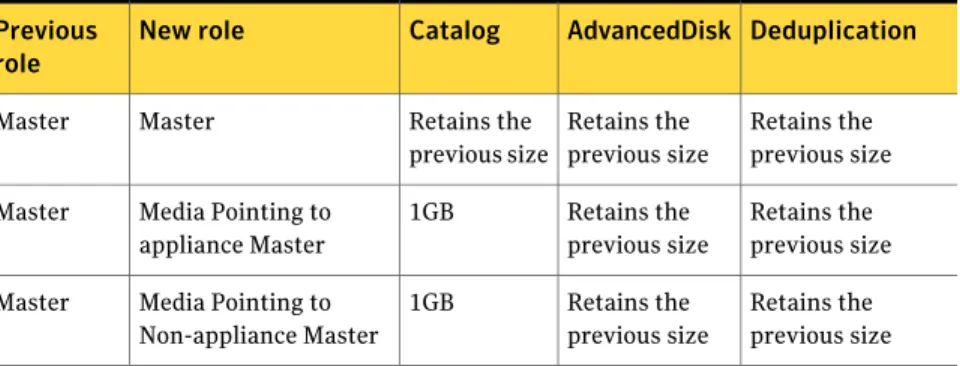
Note:The storage unit and disk pool are assigned a default name at the time of initial configuration. The default name that appears in the NetBackup
Administration Console are as follows: ■ For the AdvancedDisk:
Default storage unit name: stu_adv_<hostname> Default disk pool name: dp_adv_<hostname> ■ For the Deduplication:
Default storage unit name: stu_disk_<hostname> Default disk pool name: dp_disk_<hostname>
For more information on initial configuration of storage partitions, refer to Symantec NetBackup 52xx Series Getting Started Guide.
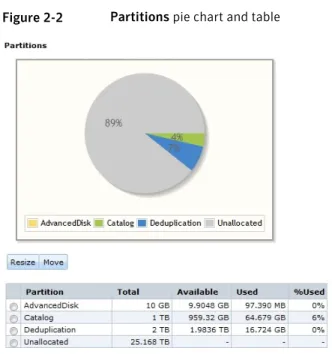
Figure 2-2 Partitionspie chart and table
It enables you to identify the following parameters for the partitions:
45 Administering your appliance