Read and
Retain for
Future
Reference
Cooper Bussmann
Network Management System
QuickStart Guide
Release Notice
This is the July 2013 release of the Cooper Bussmann Network Management System QuickStart Guide version 1.0, which corresponds to software version 1.0.
Follow Instructions
Read this entire manual and all other publications pertaining to the work to be performed before installing, operating, or servicing this equipment. Practice all plant and safety instructions and precautions. Failure to follow the instructions can cause personal injury and/or property damage.
Proper Use
Any unauthorized modifications to or use of this equipment outside its specified mechanical, electrical, or other operating limits may cause personal injury and/or property damage, including damage to the equipment. Any such unauthorized modifications: (1) constitute “misuse” and/or “negligence” within the meaning of the product warranty, thereby excluding warranty coverage for any resulting damage; and (2) invalidate product certifications or listings.
QuickStart Procedures . . . .4
Requirements . . . .4
Before You Begin . . . .4
Device Discovery . . . .5
Configuring the Localhost Location . . . .6
Configuring a Managed Switch/Router . . . .7
Configuring a Wireless Host Gateway . . . .10
Configuring an Agent for a 455U-D Gateway . . . .16
Configuring Remote Wireless Devices . . . .20
Q
uiCk
S
TarT
P
rOCEdurES
Use this QuickStart Guide to configure the Cooper Bussmann Network Management System (Cooper NMS) to monitor managed switches, wireless host gateways, and other remote wireless devices in your network. After you have configured monitoring, you can refer to the Cooper Network Management System User Manual to learn how to customize the Cooper NMS interface to view information that you find most useful.
Requirements
This guide assumes that you have completed the installation procedures in the Cooper NMS Installation Guide and have already set up the following:
• A Windows computer with VMware Player virtual machine and the Cooper NMS image installed and set up. • Connection to an Ethernet network that includes the devices you want to monitor with Cooper NMS.
For example, devices you may want to monitor could include 245U-E Ethernet Modems, 945U-E Ethernet Modems, 915U-2 Wireless Meshing I/O, and 455U-D Serial Modems.
Before You Begin
If you are not already logged on to Cooper NMS, do so now. Instructions on accessing Cooper NMS are provided in the Cooper NMS Installation Guide. After logging on, you will see the Home Dashboard page shown below. If you are using the trial version of Cooper NMS, the window displays an orange banner with information about the trial period. The banner is removed once a license has been purchased and the license keys are installed.
Device Discovery
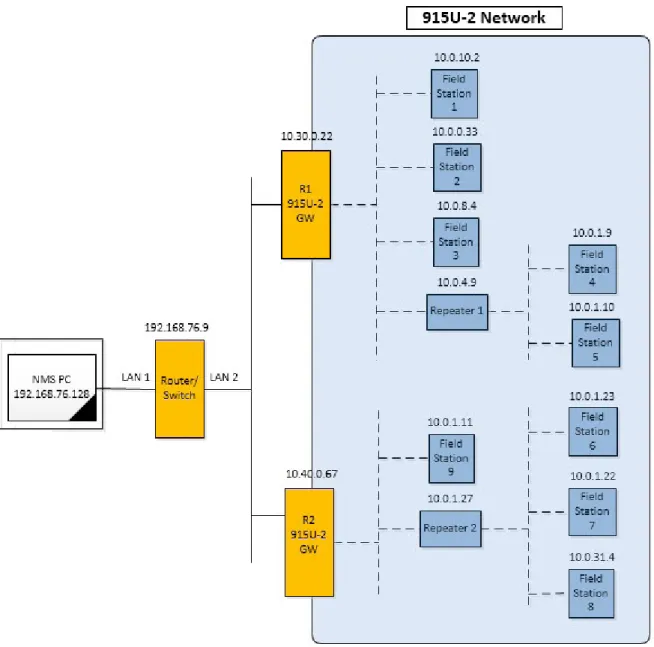
The procedures in this guide describe how to configure monitoring for the most common wireless network
topology (Figure 1). In this topology example, a router/switch is directly connected to the computer running Cooper NMS via a LAN connection, and wireless gateways are also connected to the router/switch via a LAN connection (as indicated by solid lines). The gateways communicate wirelessly with various field stations and repeaters (dashed lines).
NOTE As a general rule, devices that are hard-wired to a parent device need to be individually configured. Devices with a wireless connection to a parent device can be auto-discovered via the parent.
Configuring the Localhost Location
Cooper NMS allows you to view a configured network on Google maps. Before configuring the network you need to configure the actual location of the “localhost,” which is the computer running Cooper NMS. Once the location of the localhost is established, as you configure the network all newly discovered devices will automatically cluster near the localhost on the map, making it easy to drag them to their actual locations.
1. Click Home at the top of the page 2. Click Host Status from the menu.
The Host Status page appears, which currently lists only the localhost (the Cooper NMS computer). 3. Click the “localhost” link in the Host Name column.
4. On the Host Status Details page, click the Monitoring Configuration tab. 5. Click the Google Maps tab.
6. Drag the red location marker to the actual location of the Cooper NMS computer and click UpDate to save the change.
From now on, all newly discovered devices will cluster near the position of the localhost. After each device is discovered, you can manually move it to its exact location on the map.
Configuring a Managed Switch/Router
If the system you are configuring has a managed switch or router, you need to configure monitoring for this device before other devices.
1. Click Configure at the top of the page. 2. Click Run the Monitoring Wizard.
3. Scroll down the list of devices and click Network Switch/Router to start this Wizard.
4. Enter the following information. Then, click Next to continue. • Switch/Router Address—The IP address of the switch or router.
• SNMP Community—A user ID or password that allows access to the switch or router device statistics. The default value is “Public.” Check with your IT department before changing this setting.
• SNMP Version—SNMP version of the switch or router being used. • Router Vendor—If the vendor is not in the list choose “Other/Unknown.”
• Port Naming Scheme—You can choose either numbers or description.
• Scan Interfaces, Bandwidth Monitoring Defaults—It is recommended that you confirm these settings with your IT department.
The Network Switch/Router monitoring wizard then steps you through the setup. The details vary depending on the type of switch and the parameters that can be monitored.
5. Enter the following information, and click Next to continue.
• Under Switch Details, enter a name to identify the switch/router in the Name field. • Under Services, select the “Ping” checkbox if ping should be used for health checks.
• Under Bandwidth and Port Status, select the “Warning” checkbox if you want the bandwidth of a port to be monitored for warning and critical thresholds that you can define.
normal operating conditions and alert conditions. When finished, click Next to continue.
It is suggested to leave the period at the defaults until the data throughput of the gateway is known.
7. On the Notifications Settings page, specify what to do when a problem is detected or persists, and how alert notifications should be sent and how often. When finished, click Next to continue.
8. Select which groups the switch or router belongs to: • Under Host Groups, select “Wireless Hosts.” • Under Service Group, select “Wireless Services.”
• Under Parent Host, select the device that is connected as its parent host. Because this device is a Switch/ Router, select “Localhost,” which is the name of the NMS computer.
9. Select Next and continue through the rest of the setup.
Configuring a Wireless Host Gateway
Use this procedure to configure monitoring for a wireless host gateway. The wireless host gateway is usually the connection point between Cooper NMS and the wireless network, and there is typically a wireless host gateway for each type of network.
The following gateways are available:
• 915U-2 Gateway (Gateway mode must be enabled on the module) • 245U-E Ethernet Modem Access Point
• 945U-E Ethernet Modem Access Point • 455U-D Serial Modem Access Point
The 455U-D Serial Modem requires a serial-to Ethernet converter (Agent) to communicate with Cooper NMS. By default, Cooper NMS provides this Agent on its COM1 port.
Important: If you want to monitor a 455U-D that is not connected directly to the COM1 port on the Cooper NMS computer, you will need to configure an Agent for the 455U-D before you can configure
monitoring. Complete the steps in “Configuring an Agent for a 455U-D Gateway” and then return to this procedure.
1. Click Configure at the top of the page.
3. Click Single Wireless Host.
4. Select the host model and host type from the dropdown lists. Click Next to continue. • Host Model—Select the gateway you want to monitor.
• Host Type—Select “Gateway” because the wireless host gateway is the primary gateway between the NMS and the system.
5. Under Basic Setting, enter the following parameters:
• IP Address—The IP address of the wireless host (only available on 915U-2, 245U-E and 945U-E models). • Host Name—Name of the device or location.
The example on the left is for a 915U-2 host; the example on the right is for a 455U-D host.
6. If you are adding a 455U-D Modem wireless host, select the name of the Agent from the Agent Name drop down list.
If the 455U-D is directly connected to the COM1 port on your computer, select “Local Serial Port.” This selects the default Agent that is setup internally within Cooper NMS for COM1.
7. Under Host Services, select individual services that you want to monitor or Select “All” to add all services. Click Next to continue.
The list of services shown are for the model you selected in step 4. 8. Enter the status update period. Click Next to continue.
The status update period is the interval (in minutes) at which Cooper NMS will request status information from a wireless host. It is suggested to leave the status update period at 5 minutes until the data throughput of the gateway is known. The default period is 5 minutes.
9. On the Notifications Settings page, specify what to do when a problem is detected or persists, and how alert notifications should be sent and how often. Click Next to continue.
10. Select the groups that the wireless host belongs to. Click Next to continue. • Under Host Groups, select “Wireless Hosts.”
• Under Service Group, select “Wireless Services.”
• Under Parent Host, select the device that the wireless host gateway is connected to as its parent host. In the following example, “Managed Switch” is selected because this is the switch/router that was
configured in the previous section.
Note: If there is only one wireless host gateway and no switch or router is connected, select “Localhost,” which is the name of the NMS computer.
11. Click Apply to save the configuration of the wireless host.
The following screen appears, which allows you to run the Monitor Wizard again or view status of the configured wireless host.
Configuring an Agent for a 455U-D Gateway
The 455U-D requires either a local or an external Agent for serial-to-Ethernet conversion, depending on how the system is configured. There are two primary Agent scenarios:
• Local Ser2Eth Agent—If the 455U-D host is directly connected to COM1 port on the computer on which Cooper NMS is running, the 455U-D automatically uses the default Agent, Ser2Eth, which is setup internally within Cooper NMS for the COM1 port. In this case, no additional configuration is needed. See Scenario 1. • External Hardware Agent—If the 455U-D gateway is not directly connected to the Cooper NMS computer, an
external serial-to-Ethernet Agent, such as the 605M-R1 router, is required to be connected to the 455U-D to handle communications with Cooper NMS. See Scenario 2.
For Scenario 2, you need to configure the Agent for the 455U-D gateway. Follow the instructions provided in this section.
Scenario 2: 455U-D Using External Hardware Agent (605M-R1)
1. Click Configure at the top of the page.
The Manage Agents page appears. The list initially shows only the Cooper NMS default Agent, “Local Serial Port,” which is set up for COM1 (port 2002).
3. Add a new Agent for each 455U-D gateway that is using a 605M-R1 Agent or a software Agent on a remote server:
a. On the Manage Agents page, click Add New Agent.
b. Configure the following parameters:
• Agent Name—Name that you are assigning to this Agent.
• IP Address—IP address of the device or IP address of the Ethernet to serial converter.
• Port No.—Port number that will be used for the communications. This will need to be the same port as configured on the device.
• Description—Enter a brief description for the device.
• Inter Command Delay—The delay (in seconds) between two consecutive polling commands from
Cooper NMS. This delay helps slow communications between Cooper NMS and the gateway so that throughput is not affected. Default is 0.
c. If the device is to be configured remotely, provide the following information under Other Settings: • Baud Rate
• Parity • Stop Bits • Data bits
• Select flow control, either XON/XOFF, RTS/CTS or locally controlled DCD or DTR d. Click Add Agent to save the configuration.
4. Repeat step 3 to configure additional Agents, if needed.
Configuring Remote Wireless Devices
Follow these steps to configure monitoring for remote wireless devices that are communicating through the wireless host gateways configured earlier in “Configuring a Wireless Host Gateway.”
Note: To enable scanning of remote 915U-2 Gateways and 455U-D Modems, the modules must be setup for remote or over-the-air configuration. Additionally, the remote devices need to have recently sent data to the 915U-2 or 455U gateway so that these devices are in the gateway’s connectivity list. To set up remote or over-the-air configuration for a device, refer to the device user manual.
1. Click Configure at the top of the page.
2. Click Run the Cooper Wireless Auto Discovery Wizard.
4. Select the host gateway(s) and access points that you want to use for the wireless discovery scan.
5. Click Submit.
The module will scan and locate wireless devices that are communicating with the gateway or access point. The screen does not automatically refresh.
6. Wait 10 seconds then click Refresh Job List to display the number of hosts found.
7. Click the arrow in the Action column for the scanned target to see the results of the wireless discovery scan.
8. Specify the following for each module you want to monitor. Click Next when finished. • Select the checkbox next to the module you want to monitor.
If this checkbox is not selected, the module will not be saved in the database and cannot be monitored. • In the Host Type column, select the host type from the drop-down menu.
• For 455U-D modules, under Address Path specify the radio repeater path that the 455U uses to communicte. For example, if the communications path is from field station unit #1 through #4 (repeater) to unit #2 (gateway), you would enter R1=4 as it is the first repeater. If there are no repeaters, leave the address path blank.
9. Enter the update period for each host, and click Next to continue.
This is the time period the NMS will request status information from a Wireless Host. It is suggested to leave the period at the default of 10 minutes until the data throughput of the gateway is known.
10. On the Notifications Settings page, specify what to do when a problem is detected or persists, and how alert notifications should be sent and how often. Click Next to continue.
11. Select which groups the wireless host belongs to: • Under Host Groups select “Wireless Hosts.” • Under Service Group select “Wireless Services.”
12. Click Next to continue. Then, click Apply to save the configuration.
The following screen appears, which allows you to run the Monitor Wizard again or view the latest configuration.
13. Click Home at the top of the page, and then click Host Details on the menu at the left. The list of newly discovered devices appears (see example below).
The Cooper Network Management System is now ready to monitor
the managed switch, wireless host gateways and other Cooper
Wireless devices you have configured.
Once you have finished configuring all the devices you want to monitor, create
a snapshot and backup as described in the the Cooper Network Management
System User Guide.
©2013 Cooper Bussmann
www.cooperbussmann.com/wireless
Your Authorized Cooper Bussmann Distributor is:
The trade names and brand names contained herein are valuable trademarks of Cooper Industries in the U.S. and other countries. You are not permitted to use the Cooper Trademarks without the prior written consent of Cooper Industries.
Customer Assistance
Technical Support:
United States:+1 866 713 4409 Australasia.: +61 7 3352 8624 Other: +1 604 944 9247
Email: [email protected] Website: www.cooperbussmann.com/wireless Australasia Fax: +61 7 33528677
US Fax: +1 925 924 8502
Online Resources
Visit www.cooperbussmann.com/wirelessresources for the following resources and more:
• User Manuals • Installation Guides • Configuration Software • Datasheets
• Dimensional Drawings
North America & Latin America
5735 W. Las Positas Suite 100 Pleasanton, California 94588 USA Telephone: +1 925 924 8500 [email protected]
Australia, New Zealand
Cooper Technology Centre
Suite 2.01, Quad 2, 8 Parkview Drive
Sydney Olympic Park, NSW, 2127, AUSTRALIA Telephone: +61 2 8787 2777
China
955 Shengli Road
East Area of Zhangjiang High-Tech Park Shanghai, 201201, CHINA
Telephone: +86 21 2899 3600 [email protected]
Southeast Asia
2 Serangoon North Avenue 5
# 06-01 Fu Yu Building, 554911, SINGAPORE Telephone: +65 6645 9888