Kaspersky Password Manager
2
Dear User!
Thank you for choosing our product. We hope that this document will help you in your work and will provide answers to most of the questions regarding this software product.
Warning! This document is the property of Kaspersky Lab: all rights to this document are reserved by the copyright laws of the Russian Federation, and by international treaties. Illegal reproduction and distribution of this document or parts hereof result in civil, administrative or criminal liability pursuant to the laws of the Russian Federation.
Any type of reproduction or distribution of any materials, including translations, is allowed only with the written permission of Kaspersky Lab.
This document and graphic images related to it may be used exclusively for informational, non-commercial, and personal purposes.
This document may be amended without additional notification. You can find the latest version of this document at the Kaspersky Lab website, at http://www.kaspersky.com/docs.
Kaspersky Lab assumes no liability for the content, quality, relevance, or accuracy of any materials used in this document for which the rights are held by third parties, or for any potential damages associated with the use of such documents.
This document involves the registered trademarks and service marks which are the property of their respective owners. Revision date: 19.10.2010 © 1997-2010 Kaspersky Lab ZAO. All Rights Reserved.
http://www.kaspersky.com http://support.kaspersky.com/
3
CONTENTS
KASPERSKY LAB END USER LISENSE AGREEMENT... 5
ABOUT THIS GUIDE ... 10
In this document ... 10
Document conventions ... 11
ADDITIONAL SOURCES OF INFORMATION ... 12
Sources of information to research on your own ... 12
Discussing Kaspersky Lab applications on the web forum ... 13
Contacting the Sales Department ... 13
KASPERSKY PASSWORD MANAGER... 14
ACTIVATING THE APPLICATION ... 15
KASPERSKY PASSWORD MANAGER INTERFACE ... 16
Notification area icon ... 16
Context menu of Kaspersky Password Manager ... 16
Kaspersky Password Manager window ... 17
Password Database window ... 18
Application settings window ... 19
Caption Button ... 19
Plug-ins... 20
Pointer ... 20
PASSWORD DATABASE MANAGEMENT ... 21
Accessing Password Database ... 21
Adding personal data ... 22
Account ... 23
User name ... 28
Identity ... 28
Secure memo ... 29
Using personal data ... 29
Finding passwords ... 30
Deleting personal data ... 31
Importing / exporting data ... 31
Backup / Restoring Password Database ... 32
CONFIGURING APPLICATION SETTINGS ... 34
Default user name ... 35
Frequently used accounts... 36
Ignored web addresses ... 37
Trusted web addresses ... 37
Hot keys... 38
Location of the Password Database file ... 38
Creating new Password Database ... 40
Location of the backup copy ... 40
Selecting encryption method ... 41
Automatic locking of Password Database... 42
US E R GU I D E
4
Using USB-, Bluetooth-devices for authorization ... 43
Changing Master Password ... 44
Supported web browsers ... 44
Managing Secure memos templates ... 45
Time of application launch ... 46
Double-click action ... 46
Notifications ... 47
Time when the password was stored in the clipboard ... 48
Displaying Caption Button ... 48
CREATING STRONG PASSWORDS ... 49
USING THE PORTABLE VERSION OF KASPERSKY PASSWORD MANAGER ... 50
Creating and connecting the portable version ... 50
Password Database synchronization ... 51
KASPERSKY LAB ... 53
5
KASPERSKY LAB END USER LISENSE
AGREEMENT
IMPORTANT LEGAL NOTICE TO ALL USERS: CAREFULLY READ THE FOLLOWING LEGAL AGREEMENT BEFORE YOU START USING THE SOFTWARE.
BY CLICKING THE ACCEPT BUTTON IN THE LICENSE AGREEMENT WINDOW OR BY ENTERING CORRESPONDING SYMBOL(-S) YOU CONSENT TO BE BOUND BY THE TERMS AND CONDITIONS OF THIS
AGREEMENT. SUCH ACTION IS A SYMBOL OF YOUR SIGNATURE AND YOU ARE CONSENTING TO BE BOUND
BY AND ARE BECOMING A PARTY TO THIS AGREEMENT AND AGREE THAT THIS AGREEMENT IS ENFORCEABLE LIKE ANY WRITTEN NEGOTIATED AGREEMENT SIGNED BY YOU. IF YOU DO NOT AGREE TO ALL OF THE TERMS AND CONDITIONS OF THIS AGREEMENT, CANCEL THE INSTALLATION OF THE SOFTWARE AND DO NOT INSTALL THE SOFTWARE.
AFTER CLICKING THE ACCEPT BUTTON IN THE LICENSE AGREEMENT WINDOW OR AFTER ENTERING CORRESPONDING SYMBOL(-S) YOU HAVE THE RIGHT TO USE THE SOFTWARE IN ACCORDANCE WITH THE TERMS AND CONDITIONS OF THIS AGREEMENT.
1. Definitions
1.1. Software means software including any Updates and related materials.
1.2. Rightholder (owner of all rights, whether exclusive or otherwise to the Software) means Kaspersky Lab ZAO, a company incorporated according to the laws of the Russian Federation.
1.3. Computer(s) means hardware(s), including personal computers, laptops, workstations, personal digital assistants, ‘smart phones’, hand-held devices, or other electronic devices for which the Software was designed where the Software will be installed and/or used.
1.4. End User (You/Your) means individual(s) installing or using the Software on his or her own behalf or who is legally using a copy of the Software; or, if the Software is being downloaded or installed on behalf of an organization, such as an employer, "You" further means the organization for which the Software is downloaded or installed and it is represented hereby that such organization has authorized the person accepting this agreement to do so on its behalf. For purposes hereof the term "organization," without limitation, includes any partnership, limited liability company, corporation, association, joint stock company, trust, joint venture, labor organization, unincorporated organization, or governmental authority.
1.5. Partner(s) means organizations or individual(s), who distributes the Software based on an agreement and license with the Rightholder.
1.6. Update(s) means all upgrades, revisions, patches, enhancements, fixes, modifications, copies, additions or maintenance packs etc.
1.7. User Manual means user manual, administrator guide, reference book and related explanatory or other materials.
2. Grant of License
2.1. The Rightholder hereby grants You a non-exclusive perpetual license to store, load, install, execute, and display (to "use") the Software on a specified number of Computers in order to use the Software as described in the User Manual, according to the all technical requirements described in the User Manual and according to the terms and conditions of this Agreement (the "License") and you accept this License:
Trial Version. If you have received, downloaded and/or installed a trial version of the Software and are hereby granted an evaluation license for the Software, you may use the Software only for evaluation purposes and only during the single applicable evaluation period, unless otherwise indicated, from the date of the initial installation. Any use of the Software for other purposes or beyond the applicable evaluation period is strictly prohibited. Multiple Environment Software; Multiple Language Software; Dual Media Software; Multiple Copies; Bundles. If you use different versions of the Software or different language editions of the Software, if you receive the Software on multiple media, if you otherwise receive multiple copies of the Software, or if you received the Software bundled with other software, the total permitted number of your Computers on which all versions of the Software are installed shall correspond to the number of licenses you have obtained from the Rightholder
provided that unless the licensing terms provide otherwise, each purchased license entitles you to install and use the Software on such a number of Computer(s) as is specified in Clauses 2.2 and 2.3.
2.2. If the Software was purchased on a physical medium You have the right to use the Software on such a number of Computer(s) as is specified on the Software package.
US E R GU I D E
6
2.3. If the Software was purchased via the Internet You have the right to use the Software on such a number of Computers that was specified when You purchased the License to the Software.
2.4. You have the right to make a copy of the Software solely for back-up purposes and only to replace the legally owned copy if such copy is lost, destroyed or becomes unusable. This back-up copy cannot be used for other purposes and must be destroyed when you lose the right to use the Software or when Your license expires or is terminated for any other reason according to the legislation in force in the country of your principal residence or in the country where You are using the Software.
2.5. You can transfer the non-exclusive license to use the Software to other individuals or legal entities within the scope of the license granted from the Rightholder to You provided that the recipient agrees to be bound by all the terms and conditions of this Agreement and substitute you in full in the license granted from the Rightholder. In case You fully transfer the rights granted from the Rightholder to use the Software You must destroy all copies of the Software including the back-up copy. If You are a recipient of a transferred license You must agree to abide by all the terms and conditions of this Agreement. If You do not agree to be bound by all the terms and conditions of this Agreement, You may not install and/or use the Software. You also agree as the recipient of a transferred license that You do not have any additional or better rights than what the original End User who purchased the Software from the Rightholder, did.
2.6. In order to run the Software in full-service state You should receive and install license key as described in the User Manual.
2.7. From the time of the Software transition to full-service state (with the exception of a trial version of the Software)
You have the right to receive the following services according the terms at
http://support.kaspersky.com/support/rules::
- Updates of the Software via the Internet when and as the Rightholder publishes them on its website or through other online services. Аny Updates that you may receive become part of the Software and the terms and conditions of this Agreement apply to them;
- Technical Support via the Internet and Technical Support telephone hotline.
3. Repeated activation and trial version period of use.
3.1. If You modify Your Computer or make changes to other vendors’ software installed on it, You may be required by the Rightholder to repeat license key installation.
3.2. You have the right to use a trial version of the Software as provided in Clause 2.1 without any charge for the single applicable evaluation period (30 days) from the time of the Software activation according to this Agreement provided that the trial version does not entitle You Updates and Technical support via the Internet and Technical support telephone hotline. If Rightholder sets another duration for the single applicable evaluation period You will be informed via notification.
3.3. You have the right to use a trial version of the Software as provided in Clause 2.1 without any charge for the additional single applicable evaluation period (15 days) from the time of the Software trial period end mentioned in Clause 3.2. During this period the Software functionality state will be limited as described in User Manual.
4. Technical Support
The Technical Support described in Clause 2.7 of this Agreement is provided to You when the latest Update of the Software is installed (except for a trial version of the Software).
Technical support service: http://support.kaspersky.com 5. Limitations
5.1. You shall not emulate, clone, rent, lend, lease, sell, modify, decompile, or reverse engineer the Software or disassemble or create derivative works based on the Software or any portion thereof with the sole exception of a non-waivable right granted to You by applicable legislation, and you shall not otherwise reduce any part of the Software to human readable form or transfer the licensed Software, or any subset of the licensed Software, nor permit any third party to do so, except to the extent the foregoing restriction is expressly prohibited by applicable law. Neither Software’s binary code nor source may be used or reverse engineered to re-create the program algorithm, which is proprietary. All rights not expressly granted herein are reserved by Rightholder and/or its suppliers, as applicable. Any such unauthorized use of the Software shall result in immediate and automatic termination of this Agreement and the License granted hereunder and may result in criminal and/or civil prosecution against You.
5.2. You shall not transfer the rights to use the Software to any third party except as set forth in Clause 2.5 of this Agreement.
5.3. You shall not provide the activation code and/or license key to third parties or allow third parties access to the activation code and/or license key which are deemed confidential data of Rightholder and you shall exercise reasonable care in protecting the activation code and/or license key in confidence provided that you can transfer the activation code and/or license key to third parties as set forth in Clause 2.5 of this Agreement. The Rightholder reserves the right to use any means and verification procedures to verify the validity of the License and/or legality of a copy of the Software installed and/or used on Your Computer.
KA S P E R S K Y LA B EN D US E R LI S E N S E AG R E E M E N T
7
5.4. You shall not rent, lease or lend the Software to any third party.
5.5. The Rightholder has the right to block the license key or to terminate Your License to use the Software in the event You breach any of the terms and conditions of this Agreement and without any refund to You.
5.6. If You are using the trial version of the Software You do not have the right to receive the Technical Support specified in Clause 4 of this Agreement and You don’t have the right to transfer the license or the rights to use the Software to any third party.
5.7. Without prejudice to any other remedy in law or in equity that the Rightholder may have, in the event of any breach by You of any of the terms and conditions of this Agreement, the Rightholder shall at any time without notice to You be entitled to terminate this License to use the Software without refunding the purchase price or any part thereof.
6. Limited Warranty and Disclaimer
6.1. The Rightholder guarantees that the Software will substantially perform according to the specifications and descriptions set forth in the User Manual provided however that such limited warranty shall not apply to the following: (w) Your Computer’s deficiencies and related infringement for which Rightholder’s expressly disclaims any warranty responsibility; (x) malfunctions, defects, or failures resulting from misuse; abuse; accident; neglect; improper installation, operation or maintenance; theft; vandalism; acts of God; acts of terrorism; power failures or surges; casualty; alteration, non-permitted modification, or repairs by any party other than Rightholder; or any other third parties’ or Your actions or causes beyond Rightholder’s reasonable control; (y) any defect not made known by You to Rightholder as soon as practical after the defect first appears; and (z) incompatibility caused by hardware and/or software components installed on Your Computer.
6.2. You acknowledge, accept and agree that no software is error free and You are advised to back-up the Computer, with frequency and reliability suitable for You.
6.3. The Rightholder does not provide any guarantee that the Software will work correctly in case of violations of the terms described in the User Manual or in this Agreement.
6.4. THE SOFTWARE IS PROVIDED "AS IS" AND THE RIGHTHOLDER MAKES NO REPRESENTATION AND GIVES NO WARRANTY AS TO ITS USE OR PERFORMANCE. EXCEPT FOR ANY WARRANTY, CONDITION, REPRESENTATION OR TERM THE EXTENT TO WHICH CANNOT BE EXCLUDED OR LIMITED BY APPLICABLE LAW THE RIGHTHOLDER AND ITS PARTNERS MAKE NO WARRANTY, CONDITION, REPRESENTATION, OR TERM (EXPRESSED OR IMPLIED, WHETHER BY STATUTE, COMMON LAW, CUSTOM, USAGE OR OTHERWISE) AS TO ANY MATTER INCLUDING, WITHOUT LIMITATION, NONINFRINGEMENT OF THIRD PARTY RIGHTS, MERCHANTABILITY, SATISFACTORY QUALITY, INTEGRATION, OR APPLICABILITY FOR A PARTICULAR PURPOSE. YOU ASSUME ALL FAULTS, AND THE ENTIRE RISK AS TO PERFORMANCE AND RESPONSIBILITY FOR SELECTING THE SOFTWARE TO ACHIEVE YOUR INTENDED RESULTS, AND FOR THE INSTALLATION OF, USE OF, AND RESULTS OBTAINED FROM THE SOFTWARE. WITHOUT LIMITING THE FOREGOING PROVISIONS, THE RIGHTHOLDER MAKES NO REPRESENTATION AND GIVES NO WARRANTY THAT THE SOFTWARE WILL BE ERROR-FREE OR FREE FROM INTERRUPTIONS OR OTHER FAILURES OR THAT THE SOFTWARE WILL MEET ANY OR ALL YOUR REQUIREMENTS WHETHER OR NOT DISCLOSED TO THE RIGHTHOLDER .
7. Exclusion and Limitation of Liability
TO THE MAXIMUM EXTENT PERMITTED BY APPLICABLE LAW, IN NO EVENT SHALL THE RIGHTHOLDER OR ITS PARTNERS BE LIABLE FOR ANY SPECIAL, INCIDENTAL, PUNITIVE, INDIRECT, OR CONSEQUENTIAL DAMAGES WHATSOEVER (INCLUDING, BUT NOT LIMITED TO, DAMAGES FOR LOSS OF PROFITS OR CONFIDENTIAL OR OTHER INFORMATION, FOR BUSINESS INTERRUPTION, FOR LOSS OF PRIVACY, FOR CORRUPTION, DAMAGE AND LOSS OF DATA OR PROGRAMS, FOR FAILURE TO MEET ANY DUTY INCLUDING ANY STATUTORY DUTY, DUTY OF GOOD FAITH OR DUTY OF REASONABLE CARE, FOR NEGLIGENCE, FOR ECONOMIC LOSS, AND FOR ANY OTHER PECUNIARY OR OTHER LOSS WHATSOEVER) ARISING OUT OF OR IN ANY WAY RELATED TO THE USE OF OR INABILITY TO USE THE SOFTWARE, THE PROVISION OF OR FAILURE TO PROVIDE SUPPORT OR OTHER SERVICES, INFORMATON, SOFTWARE, AND RELATED CONTENT THROUGH THE SOFTWARE OR OTHERWISE ARISING OUT OF THE USE OF THE SOFTWARE, OR OTHERWISE UNDER OR IN CONNECTION WITH ANY PROVISION OF THIS AGREEMENT, OR ARISING OUT OF ANY BREACH OF CONTRACT OR ANY TORT (INCLUDING NEGLIGENCE, MISREPRESENTATION, ANY STRICT LIABILITY OBLIGATION OR DUTY), OR ANY BREACH OF STATUTORY DUTY, OR ANY BREACH OF WARRANTY OF THE RIGHTHOLDER OR ANY OF ITS PARTNERS, EVEN IF THE RIGHTHOLDER OR ANY PARTNER HAS BEEN ADVISED OF THE POSSIBILITY OF SUCH DAMAGES.
YOU AGREE THAT IN THE EVENT THE RIGHTHOLDER AND/OR ITS PARTNERS ARE FOUND LIABILE, THE LIABILITY OF THE RIGHTHOLDER AND/OR ITS PARTNERS SHALL BE LIMITED BY THE COSTS OF THE SOFTWARE. IN NO CASE SHALL THE LIABILITY OF THE RIGHTHOLDER AND/OR ITS PARTNERS EXCEED THE FEES PAID FOR THE SOFTWARE TO THE RIGHTHOLDER OR THE PARTNER (AS MAY BE APPLICABLE).
US E R GU I D E
8
NOTHING IN THIS AGREEMENT EXCLUDES OR LIMITS ANY CLAIM FOR DEATH AND PERSONAL INJURY. FURTHER IN THE EVENT ANY DISCLAIMER, EXCLUSION OR LIMITATION IN THIS AGREEMENT CANNOT BE EXLUDED OR LIMITED ACCORDING TO APPLICABLE LAW THEN ONLY SUCH DISCLAIMER, EXCLUSION OR LIMITATION SHALL NOT APPLY TO YOU AND YOU CONTINUE TO BE BOUND BY ALL THE REMAINING DISCLAIMERS, EXCLUSIONS AND LIMITATIONS.
8. GNU and Other Third Party Licenses
The Software may include some software programs that are licensed (or sublicensed) to the user under the GNU General Public License (GPL) or other similar free software licenses which, among other rights, permit the user to copy, modify and redistribute certain programs, or portions thereof, and have access to the source code ("Open Source Software"). If such licenses require that for any software, which is distributed to someone in an executable binary format, that the source code also be made available to those users, then the source code should be made available by sending the request to [email protected] or the source code is supplied with the Software. If any Open Source Software licenses require that the Rightholder provide rights to use, copy or modify an Open Source Software program that are broader than the rights granted in this Agreement, then such rights shall take precedence over the rights and restrictions herein.
9. Intellectual Property Ownership
9.1 You agree that the Software and the authorship, systems, ideas, methods of operation, documentation and other information contained in the Software, are proprietary intellectual property and/or the valuable trade secrets of the Rightholder or its partners and that the Rightholder and its partners, as applicable, are protected by civil and criminal law, and by the law of copyright, trade secret, trademark and patent of the Russian Federation, European Union and the United States, as well as other countries and international treaties. This Agreement does not grant to You any rights to the intellectual property including any the Trademarks or Service Marks of the Rightholder and/or its partners ("Trademarks"). You may use the Trademarks only insofar as to identify printed output produced by the Software in accordance with accepted trademark practice, including identification of the Trademark owner’s name. Such use of any Trademark does not give you any rights of ownership in that Trademark. The Rightholder and/or its partners own and retain all right, title, and interest in and to the Software, including without limitation any error corrections, enhancements, Updates or other modifications to the Software, whether made by the Rightholder or any third party, and all copyrights, patents, trade secret rights, trademarks, and other intellectual property rights therein. Your possession, installation or use of the Software does not transfer to you any title to the intellectual property in the Software, and you will not acquire any rights to the Software except as expressly set forth in this Agreement. All copies of the Software made hereunder must contain the same proprietary notices that appear on and in the Software. Except as stated herein, this Agreement does not grant you any intellectual property rights in the Software and you acknowledge that the License, as further defined herein, granted under this Agreement only provides you with a right of limited use under the terms and conditions of this Agreement. Rightholder reserves all rights not expressly granted to you in this Agreement.
9.2 You acknowledge that the source code, activation code and/or license key for the Software are proprietary to the Rightholder and constitutes trade secrets of the Rightholder. You agree not to modify, adapt, translate, reverse engineer, decompile, disassemble or otherwise attempt to discover the source code of the Software in any way.
9.3 You agree not to modify or alter the Software in any way. You may not remove or alter any copyright notices or other proprietary notices on any copies of the Software.
10. Governing Law; Arbitration
This Agreement will be governed by and construed in accordance with the laws of the Russian Federation without reference to conflicts of law rules and principles. This Agreement shall not be governed by the United Nations Convention on Contracts for the International Sale of Goods, the application of which is expressly excluded. Any dispute arising out of the interpretation or application of the terms of this Agreement or any breach thereof shall, unless it is settled by direct negotiation, be settled by in the International Commercial Arbitration Court at the Russian Federation Chamber of Commerce and Industry in Moscow, the Russian Federation. Any award rendered by the arbitrator shall be final and binding on the parties and any judgment on such arbitration award may be enforced in any court of competent jurisdiction. Nothing in this Section 11 shall prevent a Party from seeking or obtaining equitable relief from a court of competent jurisdiction, whether before, during or after arbitration proceedings.
11. Period for Bringing Actions
No action, regardless of form, arising out of the transactions under this Agreement, may be brought by either party hereto more than one (1) year after the cause of action has occurred, or was discovered to have occurred, except that an action for infringement of intellectual property rights may be brought within the maximum applicable statutory period.
KA S P E R S K Y LA B EN D US E R LI S E N S E AG R E E M E N T
9 12. Entire Agreement; Severability; No Waiver
This Agreement is the entire agreement between you and Rightholder and supersedes any other prior agreements, proposals, communications or advertising, oral or written, with respect to the Software or to subject matter of this Agreement. You acknowledge that you have read this Agreement, understand it and agree to be bound by its terms. If any provision of this Agreement is found by a court of competent jurisdiction to be invalid, void, or unenforceable for any reason, in whole or in part, such provision will be more narrowly construed so that it becomes legal and enforceable, and the entire Agreement will not fail on account thereof and the balance of the Agreement will continue in full force and effect to the maximum extent permitted by law or equity while preserving, to the fullest extent possible, its original intent. No waiver of any provision or condition herein shall be valid unless in writing and signed by you and an authorized representative of Rightholder provided that no waiver of any breach of any provisions of this Agreement will constitute a waiver of any prior, concurrent or subsequent breach. Rightholder’s failure to insist upon or enforce strict performance of any provision of this Agreement or any right shall not be construed as a waiver of any such provision or right.
13. Rightholder Contact Information
Should you have any questions concerning this Agreement, or if you desire to contact the Rightholder for any reason, please contact our Customer Service Department at:
Kaspersky Lab ZAO, 10 build. 1, 1st Volokolamsky Proezd Moscow, 123060
Russian Federation Tel: +7-495-797-8700 Fax: +7-495-645-7939 E-mail: [email protected]
Web site: www.kaspersky.com
© 1997-2010 Kaspersky Lab ZAO. All Rights Reserved. The Software and any accompanying documentation are copyrighted and protected by copyright laws and international copyright treaties, as well as other intellectual property laws and treaties.
10
ABOUT THIS GUIDE
This document is the Guide for installing, configuring and operating Kaspersky Password Manager. The document is designed for a wide audience. Users of the application should be able to operate a personal computer at a basic level: to be familiar with the Microsoft Windows operating system interface and navigation within it, and to know how to use popular email and Internet programs, such as Microsoft Office Outlook and Microsoft Internet Explorer.
The aim of the document:
to help users to activate and configure the program with regard to user's required tasks; to provide a readily available source of information on application related issues;
to provide alternative sources of information about the application and the means of getting technical support.
IN THIS SECTION:
In this document ... 10
Document conventions ... 11
I
N THIS DOCUMENT
Kaspersky Password Manager User Guide consists of the following main sections:
Additional sources of information
This section contains a description of the data on the sources of additional information regarding the application and an Internet-resource where you can discuss the application, share ideas, ask questions and receive answers.
Kaspersky Password Manager
This section describes the application's new features, and gives brief information about its individual components and basic functions.
Activating the application
This section contains information regarding the basic concepts used in the context of the application licensing as well as instructions that help you activate the program.
Kaspersky Password Manager interface
This section contains a description of the basic GUI components of the application.
Password Database management
AB O U T T H I S GU I D E
11
Configuring application settings
This section contains information on how to configure program for maximum efficiency.
Creating strong passwords
This section contains information about using strong passwords generator.
Using the portable version of Kaspersky Password Manager
This section contains information on how to create and use the portable version of Kaspersky Password Manager.
D
OCUMENT CONVENTIONS
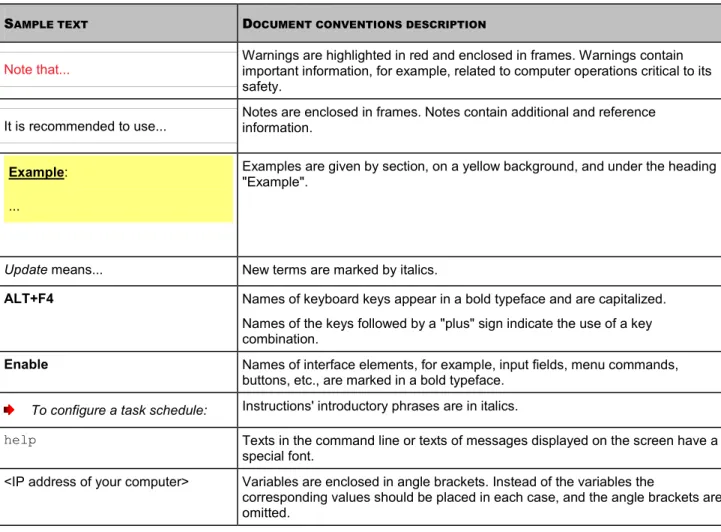
Document conventions used in this Guide are described in the table below.
Table 1. Document conventions
SAMPLE TEXT DOCUMENT CONVENTIONS DESCRIPTION
Note that... Warnings are highlighted in red and enclosed in frames. Warnings contain important information, for example, related to computer operations critical to its safety.
It is recommended to use... Notes are enclosed in frames. Notes contain additional and reference information.
Example: ...
Examples are given by section, on a yellow background, and under the heading "Example".
Update means... New terms are marked by italics.
ALT+F4 Names of keyboard keys appear in a bold typeface and are capitalized. Names of the keys followed by a "plus" sign indicate the use of a key combination.
Enable Names of interface elements, for example, input fields, menu commands, buttons, etc., are marked in a bold typeface.
To configure a task schedule: Instructions' introductory phrases are in italics.
help Texts in the command line or texts of messages displayed on the screen have a
special font.
<IP address of your computer> Variables are enclosed in angle brackets. Instead of the variables the
corresponding values should be placed in each case, and the angle brackets are omitted.
12
ADDITIONAL SOURCES OF INFORMATION
If you have any questions regarding choosing, purchasing, installing or using Kaspersky Password Manager, various sources of information are available at your convenience. You can choose the most suitable information source, with regard to the question of importance and urgency.
IN THIS SECTION:
Sources of information to research on your own ... 12
Discussing Kaspersky Lab applications on the web forum ... 13
Contacting the Sales Department ... 13
S
OURCES OF INFORMATION TO RESEARCH ON YOUR OWN
Kaspersky Lab provides the following sources of information about the application: application page on the Kaspersky Lab website;
application page on the Technical Support Service website (in the Knowledge Base); FastTrack Support service page;
help system.
Application page at the Kaspersky Lab website
This page http://www.kaspersky.com/kaspersky-password-manager provides you with general information on the application, its features and options.
Application page at the Technical Support Service website (Knowledge Base)
On this page http://support.kaspersky.com/kpm you will find the articles created by Technical Support Service specialists.
These articles contain useful information, advice and FAQs on purchasing, installing and using the application. They are sorted by subject, for example, Managing the product license, Configuring Update, or Eliminating operation failures. The articles may provide answers to the questions that concern not only this application but other Kaspersky Lab products as well. The articles may also contain news from the Technical Support Service.
FastTrack Support service
On this service page, you can find the database of FAQs with answers regarding the application's operation. To use this service, you need an Internet connection.
To go to the service page, in the main application window, click the Support link and in the window that opens click the FastTrack Support button.
Help system
The application installation package includes the file of full and context help that contains information about how to manage computer protection (view protection status, scan various computer areas for viruses, and execute other tasks). Besides, in the file of full and context help, you can find information on each application window such as the list of its proper settings and their description, and the list of tasks to execute.
AD D I T I O N A L S O U R C E S O F I N F O R M A T I O N
13
D
ISCUSSING
K
ASPERSKY
L
AB APPLICATIONS ON THE
WEB FORUM
If your question does not require an urgent answer, you can discuss it with Kaspersky Lab's specialists and other users in our forum at http://forum.kaspersky.com.
In this forum you can view existing topics, leave your comments, create new topics and use the search engine.
C
ONTACTING THE
S
ALES
D
EPARTMENT
If you have questions about selecting or purchasing Kaspersky Password Manager or extending your license, please phone the Sales Department in our Moscow Central Office, at:
+7 (495) 797-87-00, +7 (495) 645-79-39, +7 (495) 956-70-00
The service languages are Russian and English.
14
KASPERSKY PASSWORD MANAGER
Kaspersky Password Manager stores and protects all your personal data (e.g. passwords, user names, Internet pager accounts, contacts, phone numbers, etc.). Kaspersky Password Manager sticks passwords and accounts to Microsoft Windows applications and web pages for which they are used. All information is stored in encrypted form in the Password Database, access to which is protected by a Master Password. Personal data is easily accessible if the Password Database is unlocked. After launching a web page or application, Kaspersky Password Manager automatically enters the password, user name and other personal data. Thus, you need not remember all the passwords, you only need to remember one password.
Kaspersky Password Manager loads by default at system startup. This component is built in into the application which allows personal data to be managed directly from the application window.
Kaspersky Password Manager monitors the actions of applications with passwords and prevents the interception and theft of personal data. This component checks applications that use passwords or request them from other applications, before asking you to allow or forbid a suspicious action.
Additionally, Kaspersky Password Manager can: save and use your passwords (see page 29);
find accounts, passwords, user names and other personal information in the Password Database (see page 30); generate strong passwords (see page 48) when registering new accounts;
save all passwords on removable device (see page );49 restore Password Database from backup copy (see page 32); protect passwords from unauthorized access (see page 21).
15
ACTIVATING THE APPLICATION
The application activation procedure consists in registering a license key. The right of using the current version of the application is ensured based on the license key.
Each version of the application has its own license key that consists of a unique combination of characters. You receive your license key by email when purchasing Kaspersky Password Manager.
The license key should be used both for the current version of the application and for all updates.
Before installing the updates for the current version of the application, make sure that the license key is saved.
Kaspersky Password Manager runs in full-function mode during 30 days from the moment of the installation. When the trial version expires, some functions of the application become unavailable. You can activate the license either at the initial setup of Kaspersky Password Manager in the Setup Wizard window (see page 35), or anytime you wish within 30 days before the trial version expires. If you have not purchased the application license before the activation, you can do it when activating the application.
You can also purchase the Kaspersky Password Manager license in one of the following ways: at Kaspersky Lab's eStore;
from the Kaspersky Password Manager context menu – to do so, select the Activation item from the application's context menu;
in the application information window – to do so, select the HelpAbout Kaspersky Password Manager
item from the application's context menu;
when unblocking the password database using the Master Password – to do so, click the Purchase License Key online link in the unblocking window;
by clicking the Caption Button – to do this, you need to select Activation in the Caption Button menu. You can activate the application in one of the following ways:
From the application's context menu. To do so, select the HelpEnter License Key item from the application context menu.
In the application information window. To do so, select the HelpAbout Kaspersky Password Manager item from the application context menu.
When unblocking the password database using the Master Password. To do so, click the Enter your License Key to activate commercial version link in the unblocking window.
To activate the application, please do the following:
1. From the Kaspersky Password Manager context menu, select the HelpEnter License Key item.
2. In the window that will open, switch to purchasing the license, if necessary. To do so, click the Purchase online
16
KASPERSKY PASSWORD MANAGER
INTERFACE
In this chapter, we shall take a closer look at the main principles of working with Kaspersky Password Manager.
IN THIS SECTION:
Notification area icon ... 16
Context menu of Kaspersky Password Manager ... 16
Kaspersky Password Manager window ... 17
Password Database window ... 17
Application settings window ... 18
Caption Button ... 19
Plug-ins ... 19
Pointer ... 20
N
OTIFICATION AREA ICON
Immediately after starting Kaspersky Password Manager, its icon will appear in the Microsoft Windows taskbar notification area.
Depending on the situation, the Kaspersky Password Manager icon will take the following form:
active (green) – Kaspersky Password Manager is unlocked, access to your personal data is allowed; inactive (red) – Kaspersky Password Manager is locked, your personal data is inaccessible.
The following interface items are accessible by clicking the icon: context menu (see page 16);
Kaspersky Password Manager pointer.
C
ONTEXT MENU OF
K
ASPERSKY
P
ASSWORD
M
ANAGER
The Kaspersky Password Manager context menu provides access to the main tasks and contains the following items: Lock / Unlock – allowing or forbidding of access to your personal data.
Accounts – quick access to the most frequently used accounts. The number of accounts in the Password Database is specified in brackets. The list of frequently used accounts is created automatically. The list is available if it is configured to be displayed in the context menu (see page 36). When the application is first launched, the list will not be available since no record will have been used.
KA S P E R S K Y PA S S W O R D MA N A G E R I N T E R F A C E
17
Secure Memos – quick access to private notes. The number of secure memos in the Password Database is specified in brackets.
Add Account – add a new account to Kaspersky Password Manager.
Password Manager – switching to the main application window (see page 17). Settings – configuring application settings.
Portable version - launching Portable Version Creation Wizard (see page49 ). Password Generator – creating strong passwords (see page 48).
Help – viewing Kaspersky PURE help system.
Exit – closing the application. When this option is selected, the application will be unloaded from the computer’s RAM.
If the application is not unlocked, access to your personal data will be blocked. In this case, the context menu will only contain the following items: Unlock, Password Generator, Help, and Exit.
To open the context menu,
hover over the Kaspersky Password Manager icon in the taskbar notification area with the cursor and right-click it with the mouse.
K
ASPERSKY
P
ASSWORD
M
ANAGER WINDOW
The Kaspersky Password Manager window consists of three parts:
a button for locking and unlocking the Password Database (see page 21);
caption buttons for access to the main Kaspersky Password Manager functions: password creation, identity creation, Password Database management, application settings configuration, creation and synchronization of a portable version of the Kaspersky Password Manager (unavailable if the Password Database is locked); the Password Generator button (see page 48).
You can also use the following buttons and links:
Help - view Kaspersky Password Manager help system;
US E R GU I D E
18
P
ASSWORD
D
ATABASE WINDOW
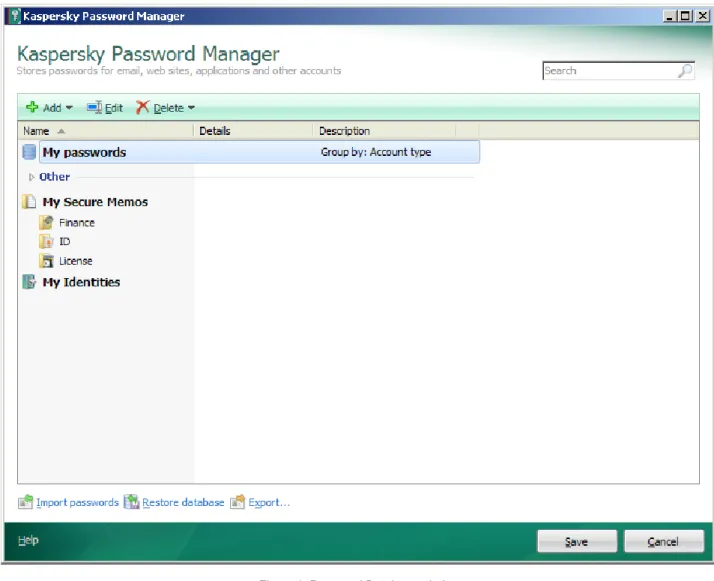
The Password Database window consists of three parts:
the upper part of the window allows you to quickly select the functions of Kaspersky Password Manager, and perform the main tasks;
the middle part of the window contains a list of all accounts and other personal data, and enables you to manage your personal information;
the lower part of the window contains links for managing the Password Database as a whole.
You can also use the search field in the upper part of the window. The search field helps you find the necessary information in the Password Database using a keyword.
KA S P E R S K Y PA S S W O R D MA N A G E R I N T E R F A C E
19
A
PPLICATION SETTINGS WINDOW
The settings window in Kaspersky Password Manager can be opened in one of the following ways:
from the context menu of Kaspersky Password Manager (see page 16) – to do so, select Settings in the context menu of Kaspersky Password Manager;
from the Kaspersky Password Manager main window– to do that, click the Settings button. The application settings window consists of two parts:
the left part of the window contains the list of application functions;
the right part of the window contains the list of settings for the chosen function, task, etc.
C
APTION
B
UTTON
The Caption Button enables you to work with personal data from the application / browser window. This button is located in the upper-right corner of the application.
Clicking the Caption Button opens a menu with a list of user names that are related to the application / web page. When selecting a user name, Kaspersky Password Manager automatically fills in authorization fields using data from the Password Database.
The Caption Button is active if Kaspersky Password Manager is not locked (see page 21). Click it to do the following: Add Account – add a new account.
Edit Account – add a user name / edit the activated account. The menu item is available if the account is activated.
Web Accounts – view the list of all Web accounts and open one of them. The number of accounts in the Password Database is specified in brackets.
List of frequently used accounts – launch an account from the list. The list is generated automatically based on how frequently the accounts are used. The list is available if it is configured to be displayed in the context menu (see page 36).
Identities – view the list of created Identities and select an Identity for the registration form. Help – switch to the application's help section.
The Caption Button is inactive , if Kaspersky Password Manager is locked. In such case, clicking the button will not enable any actions. The inactive button is displayed in the application window if the settings of Caption Button are additionally configured (see page 48).
US E R GU I D E
20
P
LUG
-
INS
Kaspersky Password Manager has plug-ins embedded in applications that require authorization. You can install plug-ins independently for the browsers you need. Installed plug-ins provide access to Kaspersky Password Manager's functions from the application / browser interface.
P
OINTER
Kaspersky Password Manager pointer lets you quickly choose the application / web page for automatic input of personal data.
To use a Kaspersky Password Manager pointer, please do the following:
1. Point the mouse cursor on the Kaspersky Password Manager icon in the taskbar notification area, and wait a few seconds.
2. When it appears, drag the Kaspersky Password Manager pointer to the required application window / web page. Kaspersky Password Manager automatically defines the action to be performed on the chosen application / web page.
21
PASSWORD DATABASE MANAGEMENT
The Password Database stores all accounts for applications and web pages with one or several user names, as well as Identities (cards containing, for example, contact details, phone numbers, Internet pager numbers, etc.).
You can use the Password Database if it is unlocked (see page 21). Before entering any changes in the Password Database, it is recommended that you configure the backup settings (see page 40). If this data is accidentally changed or deleted, use Restore Password Database (see page 32).
You can do the following:
add (see page 22), change, delete (see page 31) private data;
import / export (see page 31), restore (see page 32) Password Database.
IN THIS SECTION:
Accessing Password Database ... 21
Adding personal data ... 22
Using personal data ... 29
Finding passwords ... 30
Deleting personal data ... 31
Importing / exporting data... 31
Backup / Restoring Password Database ... 32
A
CCESSING
P
ASSWORD
D
ATABASE
To access the Password Database, select one of the following authorization methods:
Master Password protection. Master Password is used to access the Password Database.
USB device. To access the Password Database, connect any USB device to your computer. When the USB device is disabled, the Password Database is automatically locked.
Bluetooth device. To access the Password Database, connect a Bluetooth device to your computer. When the Bluetooth device is disabled, the Password Database is automatically locked.
No authorization. Access to the Password Database is unprotected.
By default, protection is set by the Master Password, which means that you only need to remember one password.
Master Password is the basic tool that protects your personal data. If you have selected the method of authorization with a device, and the latter has turned out to be unavailable (or lost), you can use the Master Password for accessing your personal data.
By default, Kaspersky Password Manager locks the Password Database when the application is launched and after a specified time during which the computer is not used (see page 42). The application can only be used if the Password Database is unlocked.
US E R GU I D E
22
You can also unlock / lock the Password Database using one of the following methods: in the Kaspersky Password Manager window (see page 17);
using a USB or Bluetooth device - only for authorization with a USB or Bluetooth device;
by double-clicking the application icon (see page 46) - the double-click action in this case must be configured additionally;
from the context menu of Kaspersky Password Manager (see page 16); by pressing the CTRL+ALT+L shortcut (see page 38).
To enter the Master Password, use a virtual keyboard that allows passwords to be entered without pressing keys on the keyboard.
To lock an application from the context menu of the application, please do the following:
1. Right-click the Kaspersky Password Manager icon in the taskbar notification area. 2. In the menu that opens, select the Lock item.
To unlock the Password Database from the context menu, please do the following:
1. Right-click the Kaspersky Password Manager icon in the taskbar notification area. 2. In the displayed menu, select Unlock.
3. Enter the Master Password in the displayed window.
A
DDING PERSONAL DATA
Personal data can be added if Password Database is not locked (see page 21). When launching an application / web page, a new account is recognized automatically if it was not found in the Password Database. Following authorization in the application / on the web page, Kaspersky Password Manager can then add personal data to the Password Database. The following types of personal data are available in the Password Database:
Account. Combination of a user name and password for authorization on the web page or in the program. Group of accounts. Used to organize accounts in the Password Database.
User name. By default, Kaspersky Password Manager provides the option to create an account with one user name. An additional user name is used when applications or web pages allow multiple user names to be created for accessing their resources.
Identity. Used to store data such as sex, date of birth, contact information, phone number, place of work, Internet pager number, homepage address, etc. To separate personal and business information, you can create several Identities.
PA S S W O R D DA T A B A S E M A N A G E M E N T
23
A
CCOUNT
Kaspersky Password Manager automatically recognizes a new account if it is not found in the Password Database. After authorization in the application / on the web page, Kaspersky Password Manager offers to save data in the Password Database. You can also add a new account to the Password Database manually.
Account contains the following data:
type of account (application account or Internet account); user name / several user names;
password;
path to the application / Internet address of the web page (depending on the account type); settings which define relations between the account and the object;
account activation settings;
comments;
settings for completing additional fields on the web page.
Kaspersky Password Manager lets you use one or several accounts for authorization in the program or on the web site. Based on the path to the application or Internet address of the web page, Kaspersky Password Manager allows specifying a scope for each account.
You can add an account in several ways:
by clicking the Caption Button – to do this, you need to select Add Account in the Caption Button menu; from the context menu of Kaspersky Password Manager – to do this, you need to select Add Account in the
context menu of Kaspersky Password Manager;
from the main window of Kaspersky Password Manager.
To add a new account from the main window:
1. Open the main application window.
2. In the bottom part of the window, click the Kaspersky Password Manager button.
3. In the Kaspersky Password Manager window that opens, click the Password Database button. 4. In the top part of the window that opens, click the Add button and select the Add Account item.
5. In the Account Creation Wizard that opens, select the type of account (Web Account, Application Account or expert mode) and click Next.
If you have selected an Internet account or an application account, specify the web site or application, for which the account will be used, and click Next.
If you have selected the advanced mode, on the Links tab, specify the path to the application / web page and configure the settings for account usage.
6. In the top part of the Account Name field, enter or edit the name of the new account. 7. Under the tab Login information, enter the user name (login) and password.
US E R GU I D E
24
The user name can consist of one or several words. To specify key words (see page 24) for the user name, click .
To copy a user name / password to the clipboard, click the button.
To copy a user name from another account, follow the Use shared Login from another Account link. To create a password automatically, click the Create new password link (see page 48).
8. On the Manual form edit tab, modify the settings for populating other fields of the web page, if necessary. 9. If necessary, under the Comments tab, enter some explanatory text for the account. To display comments in a
notification after activating the account, check the Show comments in the notification box.
KEYWORD SEARCH
To quickly search for personal data in the Password Database, you can use keywords. They are generated for each user name. It is recommended to assign keywords when adding an account (see page 22) / user name (see page 28).
To specify keywords for the user name, please do the following:
1. Open the main application window.
2. In the bottom part of the window, click the Kaspersky Password Manager button.
3. In the Kaspersky Password Manager window that opens, click the Password Database button. 4. Select a user name in the My passwords list, and in the top part of the window, click the Edit button. 5. In the window that opens, click next to the Login field and fill in the Description field.
If an account was chosen with one user name, in the Account with single Login window under the Login information tab, click .
ADDING PATH TO PROGRAM / WEB PAGE
To connect an account to an application or a web page, you should create a link. For a web page, a link is a web address. For an application, a link is a path to the executable application file on the computer. Without this data the account will not be sticked to any application / web page.
It is possible to stick the account to a program / web page in the following ways:
by following the link in the list of your browser's chosen websites or the list of applications on your computer; by manually specifying the path to the application / web page;
by using the Kaspersky Password Manager pointer.
To check the entered path, launch the application / web page by clicking .
To select a link from the list, please do the following:
1. Open the main application window.
2. In the bottom part of the window, click the Kaspersky Password Manager button.
PA S S W O R D DA T A B A S E M A N A G E M E N T
25
4. In the top part of the window, click the Add button and select the Add Account item. 5. In the displayed window, under the Links tab, in the field Link, click .
6. In the displayed window, in the field Link, enter the path for the application / web page.
To specify a web page from the list of saved web pages (Favorites), in the Bookmarks list, and click the Copy link from Favorites link. To copy the path to the web page from the browser window, click the Use path to the linked application link.
To create a link to the application, in the Link field click the button and specify the path to the executable application file.
To specify the path to the program / web page manually, please do the following:
1. Open the main application window.
2. In the bottom part of the window, click the Kaspersky Password Manager button.
3. In the Kaspersky Password Manager window that opens, click the Password Database button. 4. In the top part of the window, click the Add button and select the Add Account item.
5. In the displayed window, under the Links tab in the field Link, enter the path to the program / address of the web page. The address of the web page must begin with http://www.
To enter the path to the program / web page using the Kaspersky Password Manager pointer, please do the following:
1. Open the main application window.
2. In the bottom part of the window, click the Kaspersky Password Manager button.
3. In the Kaspersky Password Manager window that opens, click the Password Database button. 4. In the top part of the window, click the Add button and select the Add Account item.
5. In the displayed window, under the Links tab, in the Link field, enter the path to the program / web page by moving the Kaspersky Password Manager pointer to the application / browser window.
SELECTING A METHOD TO STICK THE ACCOUNT
To determine which account data should be entered automatically at each startup of the application / web page, Kaspersky Password Manager uses the path to the application / Internet address of web page.
Because Kaspersky Password Manager allows using several accounts for a single application / website, you should specify a scope for each account.
Based on the path to the application / Internet address of web page, Kaspersky Password Manager allows creating a scope for any account. Scope may be configured at the account creation (see page 22). You can alter the settings in the future.
Depending on the object (application or website), the way accounts are used varies. The following options are available for the application:
Use the account for the application. The account will be used for all application's dialogs which have fields for entering personal data.
US E R GU I D E
26
For example, one application can use multiple accounts. For different accounts, only the window headings will differ within one application. Kaspersky Password Manager will automatically enter data for the account based on the application window's heading.
The following options for using an account are available for web pages:
Only for the given web page. Kaspersky Password Manager automatically adds the user name and password to the identification fields on the given web page only.
For example, if the account is related to a web page with the address http://www.web-site.com/login.html, it will not be valid for other websites, e.g. http://www.web-site.com/pointer.php.
For websites from a directory. Kaspersky Password Manager automatically adds the user name and password to identification fields for all web pages in the most recent folder.
For example, if the website address http://www.web-site.com/cgi-bin/login.html was entered, the account will be used for web pages in the cgi-bin folder.
For the website: <third-level domain name and lower>. This account is used for any web page in the domain (third-level domain and lower).
For example, Kaspersky Password Manager automatically adds identity data for the following web pages:
http://www.domain1.domain2.web-site.com/login.html or http://www.domain1.domain2.web-site.com/index.php. However, the account will not be used for web pages with addresses that have different fourth-level domains:
http://www.domain3.domain2.web-site.com/pointer.php or http://www.domain4.domain2.web-site.com/pointer.php.
For the website: <name of website>. The account will be used for all web pages with fields for entering user names and passwords.
For example, Kaspersky Password Manager automatically adds identity cards for the following web pages:
http://www.domain1.domain2.web-site.com/login.html, http://www.domain2.domain2.web-site.com/index.php,
http://www.domain3.domain2.web-site.com/index.php, or http://www.domain4.domain2.web-site.com/index.php.
To set parameters for using an account, please do the following:
1. Open the main application window.
2. In the bottom part of the window, click the Kaspersky Password Manager button.
3. In the Kaspersky Password Manager window that opens, click the Password Database button. 4. Select an account from the My passwords list and click the Edit button.
5. In the window that opens, under the Links tab, select one of the options for using the account.
AUTOMATIC ACTIVATION OF THE ACCOUNT
By default, automatic activation of the account is enabled. Kaspersky Password Manager only enters the user name and password in the identity fields. You can set additional activation parameters of the account (see page 22).
A range of web addresses, for which automatic activation is used, is additionally specified for the web page. The following options are available for activating the account:
For the chosen web page. The account is activated only for the given web page. For the website. The account is activated on all web pages on the website.
To set automatic activation of the account, please do the following:
PA S S W O R D DA T A B A S E M A N A G E M E N T
27
2. In the bottom part of the window, click the Kaspersky Password Manager button.
3. In the Kaspersky Password Manager window that opens, click the Password Database button. 4. Select an account from the My passwords list and click the Edit button.
5. In the window that opens, on the Links tab, check the Automatically activate Account after loading box. Additionally, specify one of the methods to activate the account for the web page.
F
ILLING IN ADDITIONAL FIELDS
During authorization on a website, other data is often requested in addition to password and user name. Kaspersky Password Manager can automatically fill in additional fields. You can set options for automatic fill-in of additional fields for the account.
It is possible to set options for additional fields if the application path / website address is specified.
To set options for fields, Kaspersky Password Manager temporarily loads the web page, then analyzes all the fields and buttons. Fields and buttons are merged into groups for each web page.
Kaspersky Password Manager temporarily saves files and pictures on your computer from the loaded web page. To set options for additional fields, please do the following:
1. Open the main application window.
2. In the bottom part of the window, click the Kaspersky Password Manager button.
3. In the Kaspersky Password Manager window that opens, click the Password Database button. 4. Select an account from the My passwords list and follow the Edit button.
5. In the window that opens, on the Manual form edit tab, follow the Edit form fields link.
6. In the top part of the Manual form edit window, check the box next to the required field or button.
7. Activate the field in the Value column for the chosen field or button with a double-click, and set the field values.
C
REATING A GROUP OF ACCOUNTS
Using groups of accounts can help organize information in the Password Database. A group consists of a folder with accounts added to it.
Newly created groups are displayed in the context menu of Kaspersky Password Manager:Accounts <Group name> item.
To create a group of accounts, please do the following:
1. Open the main application window.
2. In the bottom part of the window, click the Kaspersky Password Manager button.
3. In the Kaspersky Password Manager window that opens, click the Password Database button. 4. In the top part of the window, click the Add button and select the Add Group item.
5. Enter the name of the new group.
US E R GU I D E
28
U
SER NAME
Multiple user names are often used for certain applications / websites. Kaspersky Password Manager allows multiple user names to be saved for one account. Kaspersky Password Manager automatically recognizes a user name when it is first used and provides the option to add it to an account for an application / website. You can add a new user name manually for an account and then change it. You can also use the same user name for different accounts.
You can add a new user name for an account in the following ways:
By clicking the Caption Button. To do so, in the Caption Button menu, select the Edit AccountAdd Account item.
From the main application window.
To add a user name for an account, please do the following:
1. Open the main application window.
2. In the bottom part of the window, click the Kaspersky Password Manager button.
3. In the Kaspersky Password Manager window that opens, click the Password Database button. 4. Select an account from the My passwords list, click the Add button and select the Add Account item. 5. In the window that opens, enter the user name and the password. The user name can consist of one or several
words. To specify keys words for a user name, click and then fill in the Description field.
To copy a user name / password to clipboard, click . To create a password automatically, follow the
Generate password (see page 48).
To copy a user name from another account, follow the Use shared Login from another Account link.
I
DENTITY
In addition to user name and password, other personal data is often used for registration on the website, e.g. full name, year of birth, sex, email address, phone number, country of residence, etc. Kaspersky Password Manager can store all this data in an encrypted Password Database in the form of Identities. During registration on a new website, Kaspersky Password Manager automatically fills in the registration form using data from a chosen Identity. To save private and business information separately, you can use several identities. You can change the Identity parameters later.
To create an Identity, please do the following:
1. Open the main application window.
2. In the bottom part of the window, click the Kaspersky Password Manager button.
3. In the Kaspersky Password Manager window that opens, click the Password Database button. 4. Click the Add Identity button in the top part of the window.
5. In the window that opens, in the Name field, enter the name of the identity.
PA S S W O R D DA T A B A S E M A N A G E M E N T
29
S
ECURE MEMO
Secure memos are designed for storing text information in encrypted from (for example, passport data, bank account data, etc.), and for quick access to the saved data. Kaspersky Password Manager includes a set of standard text editor tools to help you edit the text of Secure memo. When creating a Secure memo, you can use templates with a set of standard types of data (see page 45).
You can change the settings of Secure memo in the future.
To create a Secure memo from scratch, please do the following:
1. Open the main application window.
2. In the bottom part of the window, click the Kaspersky Password Manager button.
3. In the Kaspersky Password Manager window that opens, click the Password Database button. 4. Click the Create Secure Memo button in the top part of the window.
5. In the window that opens, in the Name field, enter the name of Secure memo. 6. Enter the necessary information in the text editor.
To create a Secure memo based on a template, please do the following:
1. Open the main application window.
2. In the bottom part of the window, click the Kaspersky Password Manager button.
3. In the Kaspersky Password Manager window that opens, click the Password Database button. 4. Click the Create Secure Memo button in the top part of the window.
5. In the window that opens, in the Name field, enter the name of Secure memo.
6. In the bottom part of the window, click the Select template button and select the required template. 7. Fill in the required data and format the text, if necessary.
To view the Secure memo,
open the context menu of Kaspersky Password Manager and select Secure Memos <name of group> <name of Secure memo>.
U
SING PERSONAL DATA
Kaspersky Password Manager sticks accounts to applications / web pages for which they are used. Password Database automatically searches for sticky accounts when applications / web pages are launched. If an account is found, personal data is entered automatically. If there is no sticky account in the Password Database, Kaspersky Password Manager automatically offers you to add one to the Password Database (see page 22).
Some applications / websites can use multiple user names. Kaspersky Password Manager allows several user names to be saved for one account.
If a new user name was used during authorization, Kaspersky Password Manager offers you to add it to the account (see page 28) for the application / web page you have opened. When the application / web page is next launched, a window with a list of user's names for this account will appear next to the personal data input fields.