Copyright © TEC Solutions Limited. All rights reserved. v2.0Rev20111208
IP-guard 3
Copyright
Copyright © 2008 TEC Solutions Limited.
All rights reserved. No part of this document may be reproduced, stored in a retrieval system, transmitted in any form or by any means, electronic, mechanical, photocopying, recording, chemical, handwriting or otherwise, or translated into any language or computer language without the prior permission in writing of TEC Solutions Limited.
Note
The information in this document is subject to change without notice and should not be construed as a commitment by TEC Solutions Limited. While every effort has been made to assure the accuracy of the information contained herein, TEC Solutions Limited assumes no responsibility for errors or omissions. TEC Solutions Limited assumes no liability for errors in this document or damages resulting from the use of the information contained in this document.
Table of Contents
Chapter Page 1. Introduction of IP-guard 1.1 Introduction... 1 1.2 Major Functions... 1 2. IP-guard Installation 2.1 Basic Structure... 4 2.2 Software Requirements... 5 2.3 Installation ……… 5 2.3.1 Database Installation ………... 52.3.2 Server and Console Installation ………... 7
2.3.3 Server Registration ………... 8 2.3.4 Checkcode Setting ………... 10 2.3.5 Server Log ………... 11 2.4 Agent Deployment ……….. 11 2.4.1 Direct Installation ………... 11 2.4.2 Remote Installation ………... 12
2.4.3 Logon Script Installation ………... 14
2.5 System Upgrade ……….. 16
2.5.1 Server and Console Upgrade ………... 16
2.5.2 Agent Upgrade ………... 16
2.6 Uninstall IP-guard ………... 16
2.6.1 Uninstall IP-guard Server and Console ………... 16
2.6.2 Uninstall IP-guard Agent ………... 16
3. IP-guard Startup 3.1 IP-guard Console... 19
3.1.1 Logon Console... 19
3.1.2 Change Password... 20
3.2 Using IP-guard Console... 20
3.3 Computer and User Operations... 24
3.3.1 Basic Information... 24 3.3.2 Grouping... 27 3.3.3 Find... 28 3.3.4 Delete... 28 3.3.5 Rename... 28 3.4 Control... 28
3.4.1 Notification... 28
3.4.2 Lock/Unlock Computer... 28
3.4.3 Log Off, Power Down / Restart Computer... 29
3.5 Supplementary Functions... 29
3.5.1 Export and Import... 29
3.5.2 Print and Print Preview... 29
4. Statistics 4.1 Application Statistics... 32
4.2 Web Statistics... 35
4.3 Traffic Statistics... 39
5. Event Log 5.1 Basic Event Log... 44
5.2 Application Log... 45
5.3 Web Log... 47
5.4 Document Operation Log... 48
5.5 Shared File Log... 50
5.6 Printing Log... 51
5.7 Removable-storage Log... 52
5.8 Assets Change Log... 53
5.9 Policy Log... 54
5.10 System Log... 55
6. Policy 6.1 Policy Introduction... 56
6.2 Basic Policy... 59
6.3 Device Control Policy... 61
6.4 Application Policy... 63
6.5 Web Policy... 64
6.6 Screen Snapshot Policy... 65
6.7 Logging Policy... 66
6.8 Remote Control Policy... 68
6.9 Alert Policy... 69
6.10 Bandwidth Policy... 70
6.15 Printing Policy... 81
6.16 Removable-Storage Policy... 83
7. Monitoring 7.1 Instant Message Monitoring... 85
7.2 Email Monitoring... 87
7.3 Real-time Screen Snapshot... 89
7.4 Multi-Screen Monitoring... 90
7.5 Query Screen Snapshot History... 92
7.6 View Screen Snapshot History... 93
7.6.1 Screen Snapshot Viewer... 93
7.6.2 Display... 94 7.6.3 View Menu... 94 7.6.4 Search Bar... 94 7.6.5 Export... 95 8. Remote Maintenance 8.1 Remote Maintenance... 96 8.1.1 Applications... 96 8.1.2 Processes... 97 8.1.3 Performance... 98 8.1.4 Device Manager... 99 8.1.5 Services... 100 8.1.6 Disk... 100 8.1.7 Shared... 101 8.1.8 Schedule... 102
8.1.9 Users and Groups... 103
8.2 Remote Control... 104
8.2.1 Remote Control... 104
8.2.2 Remote File Transfer... 106
9. Assets Management 9.1 Assets Management... 108
9.1.1 Assets Types and Property... 108
9.1.2 Assets Classes Management... 110
9.1.3 Hardware Query... 113
9.1.4 Hardware Change... 115
9.1.5 Software Query... 116
9.1.7 Other Assets... 116 9.2 Patches Management... 117 9.2.1 Patch Mode... 118 9.2.2 Computer Mode... 119 9.3 Vulnerability Check... 121 9.3.1 Vulnerability Mode... 121 9.3.2 Computer Mode... 121 9.4 Software Deployment... 122 9.4.1 Package Deployment... 122 9.4.2 Task Distribution... 127 10. Intrusion Detection 10.1 Startup Intrusion Detection... 129
10.2 Startup Intrusion Blocking... 132
10.3 Other Setting Functions... 133
10.3.1 Intrusion Detection Agent Selection... 133
10.3.2 Pre-defined Computer and Type... 134
10.3.3 Search and Delete Computers... 135
11. Removable Storage Management 11.1 Disk Encryption...
.
... 13611.2 Format Encrypted Disks into Non- encrypted Disks ... 137
11.3 Removable-storage Information ... 139
11.3.1 Account Management... 139
11.3.2 Removable-Storage Log... 140
11.3.3 Removable-Storage Policy... 141
11.4 Change Volume ID ... 142
12. Database Backup & Data Recovery 12.1 Database Backup... 143
12.2 Using IP-guard Console for Data Backup & Review... 147
12.2.1 Backups Management………... 147
12.2.2 Schedule Backup ...... 151
13.3 Alert Message... 157 13.4 Mail Report ... 157 13.5 Classes Management... 160 13.5.1 Application Class... 160 13.5.2 Web Class... 161 13.5.3 Removable-storage Class... 163
13.5.4 Time Types Class... 163
13.5.5 Network IP Address Class... 164
13.5.6 Network IP Port Class... 165
13.6 Server Management... 166 13.7 Agent Tools... 167 13.7.1 Confirm-code Generator... 167 13.8 Options... 169 13.8.1 Console Settings... 169 13.8.2 Server Settings... 170 14. Audit Console 14.1 Logon to Audit Console... 173
14.2 Audit Console Interface………... 174
Chapter 1 Introduction of IP-guard
1.1 Introduction
Corporate information becomes more important under the era of intellectual economy. The critical factor for success is to protect information effectively. With the fast growth in information technology, internet becomes an important channel to communicate between customers and corporations. Despite its convenience, information is more easily leaked. As important information leakage brings loss to corporations, a comprehensive control of computer usage is important. It controls and reduces the risk of loss caused by leakage of the confidential information and/or abuse of corporate resources and intellectual property.
More and more employees spend their time in browsing websites that are unrelated to work during working hour. Such behavior decreases productivity. Many employees may think that the office computers are their personal property; they can do whatever they want with the computers. Corporations should control and monitor their behaviors in order to enhance productivity and minimize the risk of misuse of computer resources.
According to researches of the Gartner Group and Forrester Research, nearly 50% of time within the MIS department has been spent on computer installation and software upgrading which occupy a large proportion of the computer cost. System administrators spend 70-80% of time working on daily maintenance tasks which increase the cost of computers. Moreover, productivity drops when computer problems cannot be solved immediately. Therefore, it is necessary to reduce the workload of system administrators on minor tasks to increase their productivity so that they can concentrate on computer management tasks and information system enhancement.
IP-guard is powerful software to solve the above problems for corporations. IP-guard can monitor and record the utilization of every computer. Its functions include daily operation statistics, policy management, screen snapshot, real-time recording, asset management, system patch management, software distribution, and remote control, etc. IP-guard can automatically record screen snapshots, record computer utilization, and playback records. With all these functions, corporations can realize the computer resources utilization, secure corporation information, and enhance productivity.
Update By Ryan Lee Last update: v2.0Rev20120809
1.2 Major Functions
Corporations nowadays not only protect their physical resources; human resources, intangible assets such as intellectual property, information, and goodwill are also very important. IP-guard provides effective monitoring and managing capabilities to help corporations minimize their risks in information security. IP-guard is an application to effectively monitor and manage corporate network activities, including:
Running Statistics
IP-guard can generate statistics reports on every application process, website browsing, and network flow in order to evaluate the behavior of staffs.
Real-time Monitoring
With IP-guard, administrator can monitor computer usage, including application usage, website browsing history, document operation, printing, screen snapshots, instant messages, and email contents in real time.
Policy Control
Computer restrictions including application usage, website browsing, document operation and printing, network usage, bandwidth, and devices can securely protect corporation information, enhance staff efficiency, and allow corporation to plan resources reasonably.
Real-time Maintenance
System administrators can monitor computers remotely with IP-guard. It controls computers, analyzes, and solves computer problems remotely.
Asset Management
IP-guard records hardware and software asset information in detail. Alert can be sent when there is any change in software or hardware. Asset information can be searched from custom-built query.
Patch and Vulnerability Management
IP-guard frequently checks Windows patches. It automatically downloads, distributes, and installs the patch to agents if new patch is found. Also, it scans for vulnerability frequently with analytical information and repair suggestions.
Software Deployment
IP-guard provides a simple way to distribute documents and deploy third party software to internal computers within the corporation to lighten the workload of administrator and enhance efficiency at the same time.
Characteristics of IP-guard include:
Powerful data compression, archiving and viewing features
Optimized data compress algorithm to ensure high efficiency data access. Historical screen snapshot information is stored in the internal archive system of the server using a specialized compression format. System administrator can backup the archived data to backup storage device. Authorized users can search and view the historical data by selecting the target computer and its recording period.
Data Encryption
Data transfer between workstation and server are encrypted using DES algorithm. With this encryption technology, data is protected from illegal data capture.
System Authentication
Authentication is required for communication between server, agent, and console. Agent workstation can only respond to authenticated server to prevent unauthenticated server connecting to the network to steal data.
Friendly User Interface
Despite powerful monitoring and data management functions, IP-guard has a simple and easy-to-use user interface. All functions are well-organized and visualized in the graphical user interface.
Expandable and Cost-saving Solution
Computer equipment can be fully utilized under IP-guard system. It can be easily deployed from a single workstation to a network environment. Number of managed workstations can also be adjusted. Hence, it reduces the software cost for hardware and network upgrade.
Update By Ryan Lee Last update: v2.0Rev20120809
Chapter 2 IP-guard Installation
2.1 Basic Structure
IP-guard system consists of 3 different components: Agent, Server, and Console. It is used on computers inside the network to enhance its security. Agent is installed in every inspected computer. Server is used for database storage and Agent management. Its main duty is to manage the inspected data. Usually, server should be installed on a server class computer with a large amount of system memory and large hard disk capacity. Console is used to audit, control and monitor the computers with Agent installed and examine the log history. In most cases, Console will be installed on the administrator’s computer alone, but it can also be installed with Server together on the same computer. The basic structure is shown below:
Figure 2.1 Basic System Architecture of IP-guard Server functions:
• Search the network periodically, manage all the computer with Agent installed and send policy settings and commands to Agents.
• Collect Agent data and save it to the database.
• Backup log history.
• Provide convenient log history management, such as, reading, archiving, and searching.
Console functions:
• Real-time screen capturing on agent computer
• Single or multiple real-time screens monitoring able to display screen snapshots of multiple targets at the same time.
• Set up monitor and control policy
• Play screen history saved in the Server database.
• Search screen history by designated computer on designated date.
Agent functions:
• Send the collected data to the Server periodically
• Respond to the real-time screen snapshot capturing request from Console.
• Control the operation of the user and computer according to the system policy.
2.2 Software Requirements
Module System Requirement
Database SQL Server 2000 SP4 or above / SQL Server 2005 SP1 or above MSDE SP4 / SQL Server 2005 Express
Server OS Win2000 SP4/XP SP2/2003 SP1/Vista Minimum Pentium III 500/256MB 10GB Hard disk space Recommended Pentium 4 2G/512MB 50GB Hard disk space
Console OS Win2000 SP4/XP/2003/Vista
Minimum Pentium 166/64MB 10MB Hard disk space Recommended Pentium III 1G/256MB 100MB Hard disk space
Agent OS Win Me/NT4/2000/XP/2003/Vista
Minimum Pentium 166/64MB 10MB Hard disk space Recommended Pentium III 500/128MB Hard disk space
Table 2.1 Software Requirements [Important]
Server & SQL Requirements
If the Server is installed on Windows 2000 SP4, please make sure the system is updated with service patch:
Win2000-KB891861-v2x86-*.exe
If you are using Microsoft Server 2000, please make sure that it is updated with Service Pack 4:
SQL2000-KB884525-SP4x86-ENU.exe
2.3 Installation
2.3.1 Database Installation
Prior to IP-guard installation, database must be installed on the IP-guard server. IP-guard supports SQL Server 2000 SP4 or later, SQL Server 2005 SP1 or later for database. If licensed SQL Server is not available, please install the free MSDE SP4 or SQL Express 2005 provided by Microsoft. Below are the instructions for installing MSDE:
[Important] SQL Server Limitations
Update By Ryan Lee Last update: v2.0Rev20120809
version if there are many agents and too much data has to be stored in the database.
Please ensure that SQL Server 2000 is installed together with SP4, and SQL Server 2005 is installed together with SP1. If IP-guard server cannot startup properly, please go to Windows Control Panel
Administrative Tools Event Viewer Application Log to confirm the version of SQL Server
MSDE Installation [How to]
1. Double click the MSDE setup file, and then it will display a default path for file extraction, please select a path and extract the setup files.
2. Open the directory where the setup files extracted, under the MSDE folder, there is a file named setup.ini.。 Default content of setup.ini:
[Options]
Please edit the file by adding the follow line: [Options]
BLANKSAPWD=1
Save the setup.ini after editing.
3. Run the setup.exe under the MSDE folder to start the installation.
4. Run the SQL Server Network Utility. Open a command prompt and type: c:\ svrnet.exe
Make sure that Name Pipes protocol is enabled.
SQL Server 2005 Express Installation
We recommend installing Express Edition with Advanced Service version
[Prerequisite] 1. IIS 5.0 or above
If your Windows does not install with IIS, please go to Windows Control Panel Add or Remove Programs Add or Remove Windows Components to install IIS
2. .NET Framework 2.0
Please go to Microsoft website to download .NET Framework 2.0 (x86) and install
3. Windows Installer 3.1
Please go to Microsoft website to download Windows Installer 3.1 and install
[How to]
1. Download SQL Server 2005 Express Edition with Advanced SP1 from Microsoft. Double click the
SQLEXPR_ADV.EXE to start the setup. After reading and accepting the End User License Agreement, click Next to continue
2. Prior to installing SQL Server, there is some software components required to install. Click Next to continue SQL Server setup when all required components are installed.
3. All necessary conditions are listed, click Next to continue
4. In the Registration Information windows, unclick the option Hide advanced configuration options. Click
Next to continue
5. In the Feature Selection windows, make sure Management Studio Express is selected. Click Next to continue
6. In the Instance Name windows, make sure Default Instance is selected. If another option is selected, it will cause the IP-guard server cannot start up properly.
7. In the Service Account windows, select Use the built-in System account and then select Local system. Click Next to continue.
8. The remaining parts should be followed by the default settings until the installation completed.
9. Open the SQL Server Configuration Manager from Start All Programs Microsoft SQL Server 2005
Configuration Tools SQL Server Configuration Manager
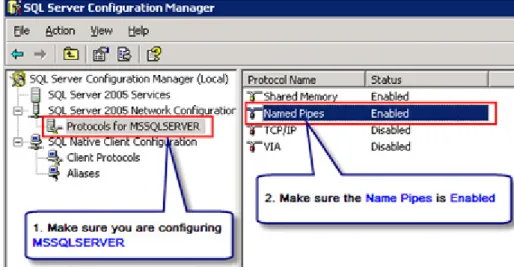
10. In the left panel, expend the SQL Server 2005 Network Configuration and then click the Protocols for
MSSQLSERVER, double click Named Pipes to make the status Enabled
Figure 2.2 SQL Server Configuration
11. Expend the SQL Native Client Configuration and then click the Client Protocols, double click Named Pipes to make the status Enabled.
2.3.2 Server and Console Installation
Make sure the SQL Server or MSDE is started up
[How to]
1) Double click IPguard3.exe, select the installation language, and then click Next; 2) Main installation interface will show up, click Next;
Update By Ryan Lee Last update: v2.0Rev20120809
4) The installation process prompts the types and components. Users can select IP-guard server and console as they need. Click Next;
5) Select the path of short-cut inside the “Start menu”. Click Next;
6) After verifying the settings, click Install and wait for the installation process to complete. Then, click Finish
to end the installation. The server will startup and the IP-guard Service Manager will be displayed on the task bar.
[Important]
Event Viewer helps trace the installation problems
During the server installation, installation process will determine the operation system and the version of the SQL Server. If the installation is not successful, please check the error message in Windows Event Viewer Application to analyze the problems
2.3.3 Server Registration
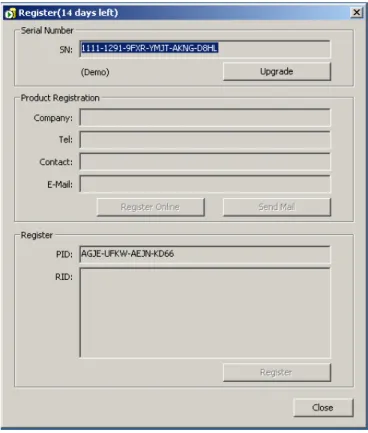
IP-guard will generate a trial key for 30-days trial at the first time installation, the serial number is composed of 6 groups of 4 digits string.
Figure 2.3 Server Registration
[How to]
1. Right click IP-guard Service ManagerToolsRegister, then input administrator password to enter the registration interface
2. Click the Upgrade button, the serial number text field becomes editable, input the licensed serial number 3. Click Confirm button to confirm the input serial number. If the input is correct, system will pop up a confirmation dialogue and remind you to activate the system. You have to register the product to obtain the register ID. Only with valid register ID input, the whole registration procedure is so-called completed. There are two methods to complete the registration:
1. Online Please fill in the product registration information with Company Name, Contact Person, Contact Number and email address. Click Register Online button, then the Register ID will be returned and displayed in the Register ID [RID] field.
A dialogue box with system message “ “ showed will pop up to confirm the registration. Click Close button to leave the registration interface.
2. Email Please fill in the product registration information with Company Name, Contact Person, Contact Number and email address. Click Send Email button.
Update By Ryan Lee Last update: v2.0Rev20120809
Click Close button to leave the registration interface.
Table 2.2 Registration Methods
[Important] About Registration...
You have to activate the product with input valid register ID within 15 days. Otherwise, the system will be stopped automatically and cannot work properly.
If your server cannot connect to Internet or other reasons, please email us with your Serial Number [SN] and Product ID [PID], we will help you process the registration individually.
2.3.4 Checkcode Setting
Checkcode is a unique identifier between server and agent. The checkcode stored in agent must be matched with server’s checkcode, then the server is granted to manage the agent. In case of more than one server running at the same time in a network, this avoid the agent is managed by another server which may not belong to its original parent server. So, we highly recommend the system administrator first set the checkcode before deploying any agents.
Figure 2.4 Set Checkcode
[How to]
After the server starts up at the first time, right click the Service Manager icon and select from the popup menu ToolsCheckcode. System would request to input administrator login and password before setting the Checkcode. To confirm the setting, please input the Checkcode twice. Click OK button to complete the setting.
The default Checkcode is empty. Once the checkcode is new set, reset or updated, this data will be updated to connected agents automatically.
[Important]
About Checkcode...
System Administrator has to memorize or record this Checkcode in the save place. In case the operating system is required to be re-installed or IP-guard is required to install on a new server, the last Checkcode must be input after the re-installation completed. Otherwise, those existing agents could not be connected to the new setup server because their checkcode are not matched. In this case, all agents must be re-installed.
If agents not appear in the Console, please go to IP-guard Console Events Log System to check whether it is checkcode error or not
2.3.5 Server Log
To examine the IP-guard server activity in details, please go to Windows Event Log. System Administrator may use the information to analyze the server problems.
Figure 2.5 View Event Logs
[How to]
Right click the Service Manager popup menu Tools Event Log. Click the Application from the
left-hand-side panel of the Event Viewer to check the OSERVER3 process logs including the startup, stop or error status of oserver3.exe.
2.4 Agent Deployment
There are three installation methods to install agents: Direct, Remote and Logon Script Installation methods. Depends on the deployment environment, system administrator can choose either one for the agent deployment
2.4.1 Direct Installation
To generate executable agent program, on IP-guard server, Start All Programs IP-guard V3 Agent Install Generator, showed as following:
Update By Ryan Lee Last update: v2.0Rev20120809 Figure 2.6 Agent Generator
Input the following fields, finally click Create Setup File button to generate the agent program
Server IP Address - Default is the IP of the local machine. If more than one IP addresses, you can input using comma “,” to separate the IPs e.g. 192.168.1.223, 58.177.209.222
- Static IP or Dynamic DNS is allowed to input
Setup File Full Path Input or Select the path and filename of the Agent setup file to be created
Silent Mode [optional]
- if selected, no user interface will show up during installation
Login & Password [optional]
- if the logon windows account is not administrator, the created agent program may not setup successfully. If so, you should input the administrator’s login and password before the program packed.
Table 2.3 Settings of Agent Generator
2.4.2 Remote Installation
[How to]
Using Remote Installation tool can help you install agents remotely and massively at a time. On the IP-guard server, click Start All Programs IP-guard V3 Agent Remote Installer to start the installation.
[Functionality] 1. Scanning Settings
By default, the system only scans all computers from IP-guard server’s network segment. If you want to extend the searching area, go to File Scanning Settings. In the opened dialogue, you can add the IP range.
Icon Color Window NT4.0/2000/XP Window 95/98/ me Online or not Agent Installed or not
Deep blue Yes No Yes No Deep blue No Yes Yes No Gray Yes No No No Gray No Yes No No Light Blue Yes No Yes Yes Light Blue No Yes Yes Yes
Table 2.4 Color Representation of the computer icons
3. Installation
Click which computers you would like to install the agent. After selected, go to Operation Install to start the installation. During installation, the administrator login and password are required if the current logon session is not administrator. The near bottom panel showing the details of installation status, if any failures happened, the panel will show you the description and corresponding error code.
[FAQ]
If failure occurred during remote installation, please check the following items are available in your targeted computer:
1) If the current logon session does not grant administrator right, at this time the system would pop up a dialogue box to request input the login account and password with administrator rights.
2) Check ADMIN$ share is opened or not. Go to DOS Command Promote and type: net share command to see whether ADMIN$ is already opened or not. If not, then type net share ADMIN$ to invoke this function
3) Check any shared folders function is available. If not, please try to share a folder to invoke this function. For example, right click a folder, select Properties Sharing. Then Select Share this folder. Input Share name and define permission. Click OK to invoke the shared folder function
[Important]
About Agent Installation...
This installation method only works on Windows NT4.0/2000/XP. If you need to install agents on Windows 9x/ME, you have to use Direct Installation method.
Because of some local security policies settings in Windows NT may affect the normal operations, remote installation method does not 100% guarantee. If you have followed the above checking and fulfilled the requirements, but still failed, we would recommend using Direct Installation method
Update By Ryan Lee Last update: v2.0Rev20120809
2.4.3 Logon Script Installation
If your local area network has a domain server,you can use this method to deploy IP-guard Agent to computers in your local area network. Use the Logon Script Manager to edit logon scripts of selected users in domain server. When those users use their computers to log on to the domain server, the logon script is run and IP-guard Agent will be installed to the selected computers remotely.
[How to]
1) Download the program first: http://www.ip-guard.com/Down/V3/supp/LogonScript.zip
2) Extract the zip file, then copy and paste the LogonScript folder to Domain Server any locations e.g. place it in Desktop or C:\
3) On the IP-guard Server, using Agent Installation Generator to generate the agent setup program, name ASetup.exe (Please refer the details in Section 2.4.1 Direct Installation how to generate the setup program)
4) Copy and paste the ASetup.exe into LogonScript folder 5) Execute the LgnManV3.exe
6) The interface of Logon Script Manager is shown as following, LgnManV3.exe will automatically scan and show all existing domain users. The user icon for the green color means that logon script has included our Agent installation settings.
7) Select required users to set installation script, you can use CTRL or SHIFT keyboard to select multiple users and right-click to select the users.
8) Click the button Set Script after you have selected required users.
9) When the selected users log on to the domain, the logon script will be run and IP-guard Agent will be installed to computers of the selected users.
10) Once IP-guard Agent is installed to the selected computer, you can restore the logon script of the selected user to the original logon script.
Figure 2.7 Logon Script Manager
[Functionality]
Set Scripts Add our installation command in logon scripts of selected users.
Unset Scripts Delete our installation command in logon scripts of selected users.
Refresh List Rescan user list
Remove Scripts Set selected users as having no logon script (It will not delete logon script)
Close Exit the program.
Table 2.5 Logon Script Manager Functional Buttons
[Important] About Logon Script
When we set selected users as having no logon script, our program will not delete script files .You have to clear the files yourself, and please make sure the files are not used by any script file before you delete them.
Update By Ryan Lee Last update: v2.0Rev20120809
2.5 System Upgrade
2.5.1 Server and Console Upgrade
It is easy to upgrade server and console using our Upgrade pack.
[How to]
1. Go to Windows Control Panel Administrative Tools Service to stop the following 2 services:
OCULAR V3 SERVER and OCULAR V3 UPDATE
2. Go to task manager Process, stop the service managerOControl3.exe and console OConsole3.exe
3. Now you can start the upgrade process by executing the upgrade program. In the upgrade program, you can see your current version and upgrade version details. Click Upgrade button to start. OR you can upgrade using IP-guard full package to replace the existing one completely.
4. After completed, go to Windows Control Panel Administrative Tools Service to start the
OCULAR V3 SERVER and OCULAR V3 UPDATE manually. (If you are using IP-guard full package method, the server will start up automatically)
2.5.2 Agent Upgrade
Once the server is upgraded successfully, the corresponding agents will be upgraded automatically. The agent machine must be restarted to complete the system upgrade.
2.6 Uninstall IP-guard
2.6.1 Uninstall IP-guard Server and Console
[How to]
1. Close all running Console
2. Go to All Programs IP-guard V3 Uninstall IP-guard V3 to uninstall IP-guard or go to Control Panel
Add/Remove Program to uninstall IP-guard
[Important]
Uninstall agents first before...
If you want to remove all IP-guard agents, Console and Server, please delete all agents first using Console before removing IP-guard. Otherwise, the agents are still running in every computer installed with IP-guard agent even the IP-guard Server is removed
2.6.2 Uninstall IP-guard Agent
To uninstall IP-guard agents, you can either do it from IP-guard Console or agent side machine. Once the agent is uninstalled, that agent will not be guarded by IP-guard anymore unless the agent is re-installed.
From IP-guard Console [How to]
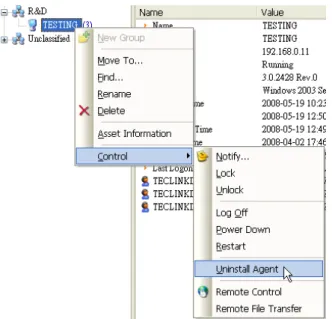
1. Select the agent from The Whole Network treethat you want to uninstall. If you want to uninstall all agents at a time, please click The Whole Network.
2. After selected, there are 3 ways to uninstall the agent: 2a) From the toolbar, select Control Uninstall Agent or
2b) Right click the agent from The Whole Network, select Control Uninstall Agent from the menu or
2c) Go to Tools Computers, click the Uninstall or Delete button
Notices that the difference between the function of Uninstall and Delete button
Uninstall button: the agent is uninstalled without releasing agent license
Delete button: the agent is uninstalled as well as releasing agent license
Figure 2.8 Uninstall Agent
From Agent side
For some agents that cannot connect to IP-guard server (i.e. the agent in offline mode), we provide another way to uninstall, the steps are as following:
[How to]
1) Go to Start Run, type agt3tool ocularadv command 2) Select Uninstall Agent and then click Generate button
3) Inform your System Administrator about the Operate Code showed in the Check confirm code dialog box
4) When a System Administrator gets the Operate Code, go to IP-guard Console Tools Agent Tool
Update By Ryan Lee Last update: v2.0Rev20120809
6) Once the agent user gets the Confirm Code, input it in the field of Confirm Code to process the un-installation immediately
[Important]
About Agent Un-installation...
Notices that only uninstall agent not exactly delete the agent as the agent license has not been released indeed according to the above methods 2a and 2b. If you only uninstall the agent, you will find that the agent still appearing in the IP-guard Console (i.e. The Whole Network tree) and its icon displayed in dark gray color. To delete the agent completely after uninstalled:
1. Go to IP-guard Console Tools Computers, select the agent from the list that you want to delete completely
2. Click Delete button. This action implied that the agent completely deleted and removed from IP-guard. Notices that if you only click the Uninstall button, this action implied that the agent will only be uninstalled without releasing the agent license.
To check the agent is deleted completely or not:
The agent will not appear in The Whole Network Tree
Go to IP-guard Console Tools Computers, the agent should not be listed and the total number of licenses should be decreased
Chapter 3 IP-guard Startup
3.1 IP-guard Console
3.1.1 Logon Console
Before starting the console, IP-guard server must be running.
[How-to]
1. Go to IP-guard default folder and click OConsole3.exeOR Go to Start All Programs IP-guard V3 IP-guard V3 Console. The Logon windows popped up (see Figure 3.1)
Figure 3.1 IP-guard Login Windows
Server Input IP address, Computer Name or Dynamic Domain Name
Account - By default, the account for administrator is admin and the account for auditor is audit
- After logon to the Console, the administrator can create different accounts with different access rights
(IP-guard ConsoleToolsAccounts)
Password - By default, the password for admin is empty
- After logon to the Console, the administrator can edit the password from Tools Change Password.
2. Input correct account and password, click OK to logon to Console
Update By Ryan Lee Last update: v2.0Rev20120809 [Important]
About Service Manager status...
Make sure the server is running properly: the color of the Service Manager should be like this:
If the status of the Service Manager is , it indicates that IP-guard server is still in initial stage, not completely running. In this case, please wait until the color of the icon changed to .
If the status of the Service Manager is , it indicates that IP-guard server is stop. In this case, right click Service Manager Service – Start to start IP-guard server
3.1.2 Change Password
You can change password to prevent others using your account to login to the system and perform illegal operations.
Logon to the Console, select Tools Change Password (see Figure 3.2). In Change Password dialogue box, input the old password (the password is blank for the first time). Then, enter New Password. In Confirm field, re-enter the same new password to make sure the new password is entered correctly. User can only change password of the current login account. The new password will be activated after it is saved in the server module.
Figure 3.2 Change Password Windows
3.2 Using IP-guard Console
After login to the console, user will see the following user interface (see Figure 3.3). The user interface consists of menu, tool bar, status bar, and main area. The left side of the main area is the console tree of computer (group) and user (group) on the network. The right side of the main area is the data view.
Figure 3.3 IP-guard Console [Functionality]
IP-guard Console Panel
1. Toolbar Includes all system menu
2. Menu bar includes the common functions
3. Agent Panel In the left window to display all installed agents list under The Whole Network tree and the corresponding computer grouping
4. User Panel In the left window to display all agents’ logon account user list under The Whole Network and the corresponding user grouping
5. Navigation Main Menu Quick access to the main functions: Audit, Events Log, Basic Policy, Advanced Policy, Monitoring, Maintenance
6. Navigation Sub-menu Quick access to the specific functions belonging its grouping
7. Functional Button Panel Provide different functional buttons e.g. for data sorting, add/delete/apply policy etc.
8. Data Display Panel Core view – all data display here
9. Chart Panel For audit functions with statistical data, the corresponding chart displays here
10 Searching Panel / Property Panel - Searching Panel: For searching purpose in audit, events log, IM and email monitoring
Update By Ryan Lee Last update: v2.0Rev20120809 Color Representations of Agent Icons:
Icon Color Definitions
Light Blue Agent is running
Light Grey The computer agent module is not running. The computer may be turned off or not connected to the network
Deep Grey The agent is un-installed
Table 3.2 Color Representations of Agent Icons
Color Representations of User Icons: Icon Color Definitions
Light Blue The agent user is running
Light Grey The agent user is not running. The user may not logon to the agent computer
Common Search Conditions
Figure 3.4 Common Search Panel
Date Range For the designated date range, the default start time and end time are not clicked, that is, all log data are searched and display as results. To specify the date range, click the start time and end time:
Icon Descriptions
Select the date as the start time from the calendar Select the date as the end time from the calendar Restore to default setting
Time IP-guard has several defined time types (All Day, Working Time, Rest and Weekend) which can be found in Tools Classes Management Time Types (see Figure 3.5). System
Administrator can also define new time types for their preferences to facilitate the queries.
Figure 3.5 Classes Management – Time Types
Network Range Click the button to select the network range, either a single computer, group or the entire
network for query
Update By Ryan Lee Last update: v2.0Rev20120809 Common Log
In the event log, including every common log, email log, instant messenger log, it commonly includes the following contents:
Time The time for the detailed log
Computer The log records belonging to the client machine, the computer name here is recorded by IP-guard showed in the agent panel
User The log records belonging to the user, the user here is recorded by IP-guard showed in the user panel
Table 3.5 Descriptions for Common Log Records
3.3 Computer and User Operations
3.3.1 Basic Information
Select from menu StatisticBasic Information to view the basic information of the computer, computer group, user, and user group (see Figure 3.6). The console displays the running status of the computer and agent when selected a computer.
1) Computer Basic Information
Figure 3.6 Computer Basic Information
Name The name displayed in the Computer Tree, in order to facilitate management, the name can be changed. If not changed, the name is same as computer name
Computer It is a real Windows computer name
IP Address Computer’s IP address
Status Agent status: Running, Offline, Uninstalled
Version IP-guard agent version
Running Time Agent’s startup time. This time only displayed if the status is running. Otherwise, it will not be displayed
Last Online The last communication time between IP-guard agent and server
Last Active Time The last active time means the recorded time of the last activities of the agent done in Windows
Installed Time The first installed time of agent
IP/MAC The agent’s IP/MAC address
Last Logon User The last logon user in that agent computer. The status of idle or lock also displayed here
Table 3.6 Computer Basic Information Fields Descriptions
Windows server allows more than one concurrent connections connected, in this case, the Basic Information also displays all current connections’ logon user information and the logon time (see Figure 3.7)
Figure 3.7 Computer Basic Information – Concurrent Logon Information
2) Computer Group Basic Information
Select a computer group will display all computer status under the selected group including computer name, IP address, operating system, and number of user login to the computer (see Figure 3.8).
Update By Ryan Lee Last update: v2.0Rev20120809
If The Whole Network selected, IP-guard Console displays all computer groups. Click the button can view all computers belonged to that group (see Figure 3.9)
Figure 3.9 Computer Basic Information – Expended Information
3) User Basic Information
Figure 3.10 User Basic Information
Name The name displayed in the User Tree, in order to facilitate management, the name can be changed. If not changed, the name is same as user name
User It is a real Windows logon user name. If it is a local user, it displays the logon name; if it is a domain user, it displays as domain\username
Status Agent status: Online, Offline etc.
Last Online The last communication time between IP-guard agent and server
Last Active Time The last active time means the recorded time of the last activities of the logon user done in Windows
Table 3.7 User Basic Information Fields Descriptions
If the user logons to different computers using the same account, all information about the logon computers and logon time will also display below the Last Logon Computer (see Figure 3.11)
Figure 3.11 Same user account logons to different computers
4) User Group Basic Information
Select a user group will display all user status under the selected group including user name, last online time, last active time, and number of computers login (see Figure 3.12)
Figure 3.12 User Basic Information – User Group
If The Whole Network selected, IP-guard Console displays all user groups. Click the button can view all users belonged to that group (see Figure 3.13)
Figure 3.13 User Basic Information – Expended Information
3.3.2 Grouping
By default, all new installed agent will be grouped into Unclassified group. To facilitate the computer/user management, System administrator can create some groups and classify them into target groups.
Update By Ryan Lee Last update: v2.0Rev20120809
console, computers and users under the group can be managed.
Select the whole network or any group, select FileNew Group will add a new group in the console tree and allow administrators to name the new group. Administrator can define multi-level groups for the organization. The operation of user group is identical.
Assign to group or changing groups
To assign a computer or user to a group, we can select the computer or user, select FileMove to and choose the target group. Then the computer and user will be moved to the selected group.
Alternatively, we can also use mouse drag. Select the target computer or group and drag it to a group. Then the selected computer will be moved to the destination group.
Hints:The default group, Unclassified, for computers and users. Unclassified group cannot be deleted, renamed, or add new sub-group within.
3.3.3 Find
Administrator can specify a computer or user quickly through the Find function to search related log data
Search Computer
In the Computer Tree Column, select FileFind. Input the search conditions e.g. computer name or IP address.
The matched results display in the listed box, double click any one record will be directed to related log or policy settings
Search User
Switch to the user column, select FileFind. Input the search conditions e.g. defined user name or Windows logon user name.
The matched results display in the listed box, double click any one record will be directed to related log or policy settings
3.3.4 Delete
Administrator can select File->Delete to delete computer (group) or user (group). Deleting computer (group) will uninstall the Agents of the selected group or selected computer as well as update the license number. Deleting user (group) will only remove current basic information.
3.3.5 Rename
3.4 Control
Administrator can control the running agents using IP-guard Console, the prerequisite is the agent must be in running status. To be reminded that all controls can only be done in Computer mode but not in User mode.
3.4.1 Notification
IP-guard can send notification to a computer or a group. Select ControlNotify to notify the selected computer or group. In Notify dialogue box, enter the message and click Send to notify the target computer or group.
3.4.2 Lock/Unlock Computer
IP-guard can lock the computer or the whole group of computers to prevent users on the agent computer to use the keyboard and mouse in case of abnormal event happened. Select Control->Lock Computer to lock. The locked computer will show that it is locked in its basic information
Select Control->Unlock to unlock the computer. The target computer will once again be able to use the mouse and keyboard.
3.4.3 Log Off, Power Down/Restart Computer
Administrator can turn off / log off / restart any running agent computers. Select Log Of, Restart or Power Down from the Control menu, he agent will execute the order immediately until the computer re-started or logon again.
3.5 Supplementary Functions
In IP-guard Console, there are some other common functions that often used, the followings introduced the detailed functions and descriptions
3.5.1 Export and Import
Export Data
In IP-guard, the data such as statistics, event logs, policies, instant message contents, emails and asset management all can be exported and saved as HTML/Excel/Text(csv) files.
Export Current Page
In any event logs, right click ExportRecords of Current Page will export the current page data. By default there are 20 records in each page, administrator can amend the maximum number of records in Console, ToolsOptionsConsole SettingsLogs.
Update By Ryan Lee Last update: v2.0Rev20120809 Export / Import Policy
Only policy control provides Import function. IP-guard facilitates administrator to export/import policies from one server to other servers
Export Function
In any policy settings panels, right click to select Export/Export Selected/Export All to save the policies in XML file (see Figure 3.14). If Exported Selection option is selected, only the selected policy will be exported and saved.
Figure 3.14 Export All Policies
Import function
Select specified computer (group) or user (group) from the Network tree first, right click Import in the policy setting panel (see Figure 3.15). The File Open Dialogue will popup, select the related XML file, import process will be started. To take effect on the imported policies, click the button to save the policies (see Figure 3.16)
Figure 3.16 Save Imported Policies
[Important] About Import Policy...
The imported type of policies must be as same as exported one, otherwise, the policies cannot be imported successfully.
3.5.2 Print and Print Preview
All data logs in IP-guard Console can print out. Select FilePrint to start to print your target data or select
Update By Ryan Lee Last update: v2.0Rev20120809
Chapter 4 Statistics
IP-guard assists management people to evaluate staff’s working performance according to the collected statistics reports on application usage, Internet browsing and network traffic.
4.1 Application Statistics
Application statistics provide powerful statistical functions to focus on the computer daily operations and application usage to provide detailed records and complete analysis report. The statistical data provides reference to managerial people to assess employees’ working behavior.
Select Statistic Application to query the application usage of computer (group) or user (group) in a given period of time. By default, it queries today’s statistics of application usage.
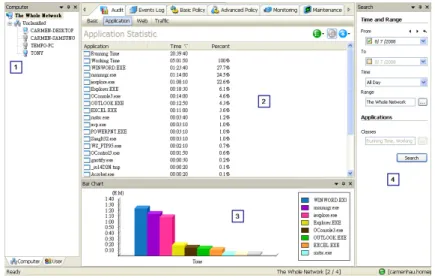
The interface of Application Statistics is divided into 4 parts: (1) Computer or User column, (2) Statistical Data Panel, (3) Chart Panel and (4) Search Panel (see Figure 4.1)
Figure 4.1 Interface of Application Statistics
[Function Button]
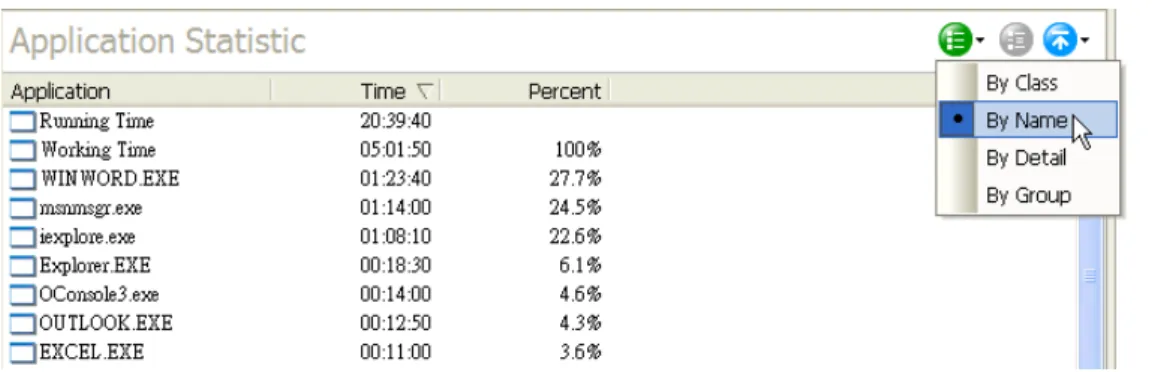
Mode – Administrator can select different application statistic view mode. Options include: By Class, By Name, By Detail or By Group
Expand – In By Class view mode, if an application classes have sub-classes, use this button to expand and view the sub-classes. For group view, expand button can expand the computer group or user group to view the computers or users within the group. This button will turn grey and be disabled in detail view.
Show – Control number of records to display. Options include All, Top 10, Top 20, and Custom. This button will turn grey and be disabled when selected by class mode and expand.
In Application Statistic, the startup time and working time are default collected statistical data. Startup time means that the agent computer starts running after logging to Windows; the working time means the operations of mouse and keyboard controlled by agent computer.
There are 4 modes in Application Statistics:
1. By Class
In this mode, System Administrator can query the statistics by class. The application class can be defined in Tools Classes Management Applications. Using this mode can facilitate to query defined application usage (Details refer to Chapter 12, Section 12.4.1)
To choose this option, click the Mode button and then select By Class. By default, it shows all statistics of defined application classes, each record contains the following details:
Class The name of application class defined in the Application Class Management
Time The total usage time of that particular application class.
Percent The total percentage used by particular application class.
Table 4.2 Statistics – By Class
Figure 4.2 Application Statistics – By Class
2. By Name
In this mode, it lists in the order of all statistics of application usage with application executable name, usage of time and its percentage of selected computer (group) or user (group).
Update By Ryan Lee Last update: v2.0Rev20120809 3. By Detail
In this mode, it listed in the order of the details of application, not by process. For example, there are two different versions of MSN program running in different agents, the process name are the same, called msnmsgr.exe. Using By Detail mode, they are counted as two different versions of MSN. However, if using By Name mode, the usage time of those two versions will be counted together. To choose this option, click the Mode button and then select By Detail.
Figure 4.3 Application Statistics – By Detail
4. By Group
In this mode, it analyzes the application and its percentage usage based on selected computer (group) or user (group). By default, the statistical data are working time and running time.
Figure 4.4 Application Statistics – By Group
To query other application classes usage should be selected from Search Panel Classes field and click the button , the following windows will popup.
For example (refer to above figure), to get the statistics of IM and Internet Browser application classes by specified computer (group) and user (group), the method is selecting the target application class from left panel, and click the button . Click OK to complete the selection. Finally, click the button
Search to get the result in the Data Panel
Figure 4.6 Application Statistics – By Group by specifying Application Class
Application Statistics not only show the list table, it can also generate charts to present the statistical data. There are two types of charts: Bar Chart and Pie Chart
Figure 4.7 Application Statistics – Bar Chart
Figure 4.8 Application Statistics – Pie Chart
4.2 Web Statistics
Update By Ryan Lee Last update: v2.0Rev20120809
By default, it queries today’s statistics of web usage.
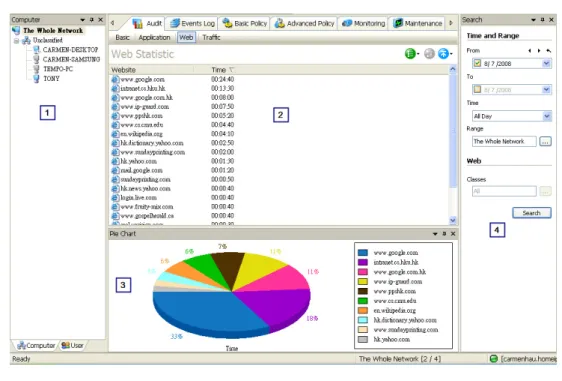
The interface of Web Statistics is divided into 4 parts: (1) Computer or User column, (2) Statistical Data Panel, (3) Chart Panel and (4) Search Panel (see Figure 4.9)
Figure 4.9 Interface of Web Statistics
[Function Button]
Mode – Administrator can select different web statistic view mode. Options include: By Class, By Detail or By Group
Expand – In By Class view mode, if a web classes have sub-classes, use this button to expand and view the sub-classes. For group view, expand button can expand the computer group or user group to view the computers or users within the group. This button will turn grey and be disabled in detail view.
Show – Control number of records to display. Options include All, Top 10, Top 20, and Custom. This button will turn grey and be disabled when selected by class mode and expand.
Table 4.3 Web Statistics – Functional Buttons
There are 3 modes in Web Statistics:
1. By Class
In this mode, System Administrator can query the statistics by class. The web class can be defined in
Tools Classes Management Web. Using this mode can facilitate to query defined web usage (Details refer to Chapter 12, Section 12.4.2)
To choose this option, click the Mode button and then select By Class. By default, it shows all statistics of defined web classes. All websites not classified are grouped into a class called Unclassified.
Figure 4.10 Web Statistics – By Class
2. By Detail
In this mode, it listed in the order of all details of website. If the website belongs to one of the web classes, the format of the representation is Website Identity – Website. For example, a Website Identity is Google, if www.google.com visited, it listed as Google – www.google.com. If none of any web classes it belongs to, it shows the URL directly and analyzed by its domain name.
To choose this option, click the Mode button and then select By Detail.
Figure 4.11 Web Statistics – By Detail
3. By Group
In this mode, it analyzes the website and its percentage usage based on selected computer (group) or user (group). By default, all statistical data is listed
Figure 4.12 Web Statistics – By Group
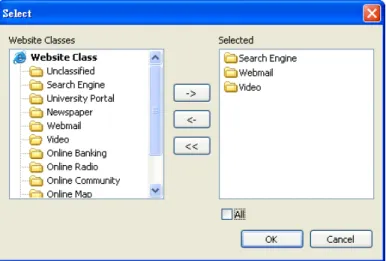
To query other web classes usage should be selected from Search Panel Classes field and click the button , the following windows will popup.
Update By Ryan Lee Last update: v2.0Rev20120809 Figure 4.13 Web Statistics Web Classes Selection Windows
For example (refer to above figure), to get the statistics of Search Engine, Webmail and Video web classes by specified computer (group) and user (group), the method is selecting the target web class es from left panel, and click the button . Click OK to complete the selection. Finally, click the button
Search to get the result in the Data Panel
Figure 4.14 Web Statistics – By Group by specifying Web Classes
Web Statistics not only show the list table, it can also generate charts to present the statistical data. There are two types of charts: Bar Chart and Pie Chart
Figure 4.17 Web Statistics – Pie Chart
4.3 Traffic Statistics
The Network Traffic Statistics help Network Administrator to quickly trace the network obstruction problems so that they can make the appropriate response measures to fix the problems. Network traffic statistics include both sides of the communications’ network address, ports and bandwidth, such information help Network Administrators to view the current network status.
Select Statistic Traffic to view the use of network traffic.
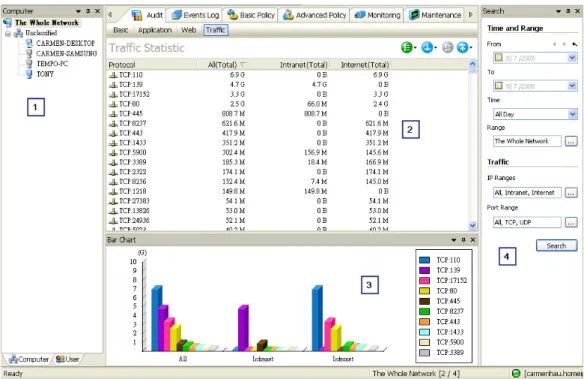
The interface of Traffic Statistics is divided into 4 parts: (1) Computer or User column, (2) Statistical Data Panel, (3) Chart Panel and (4) Search Panel (see Figure 4.18)
Update By Ryan Lee Last update: v2.0Rev20120809 [Function Button]
Mode – Administrator can select different traffic statistics view mode: By IP, By Port, By IP Classes, By Port Classes, By Computer/IP Classes or By Computer/Port Classes Direction – Traffic directions: Total, Sent or Received
Expand – In by IP classes or by Port classes view mode, if IP / Port classes have sub-classes, use this button to expand and view the sub-classes. In By Computer/IP classes view or By Computer/Port classes view, expand button can expand the computer group to view the computer detail within the group. This button will turn grey and be disabled in IP / Port detail view.
Show – Control number of records to display. Options include All, Top 10, Top 20, and Custom. This button will turn grey and be disabled when selected by class mode and expand.
Table 4.4 Traffic Statistics – Functional Buttons
[Search Conditions]
Date / Time Range Common Search conditions: Specified start date, end date, time and range
IP Range Specified remote IP addresses. System Administrator can select the Network IP classes which are defined in Tools Classes Management Network Address
or directly input the IP address in the IP Range field.
Port Range Specified remote IP ports. System Administrator can select the Network Port classes which are defined in Tools Classes Management Network Port or directly input the communication protocol with IP port e.g. TCP:139 in the IP Range field. If not specified the protocol, by default it is TCP.
Table 4.5 Traffic Statistics – Search Conditions
There are 6 modes in Traffic Statistics:
1. By IP
List the details of remote IP addresses traffic by selecting computer (group) or user (group). By default, the statistics shows the remote IP address and the corresponding Port/Port Classes traffic statistics: All (total), TCP (total) and UDP (total).
IP Address This column lists all remote IP address. If IP range is specified from the Search panel, it only lists the specified IP range
Select from Search Panel IP range to specify the IP range or input the IP address directly
All (Total) - It represents the total traffic of all ports. By default, the total traffic of TCP and UDP are also listed. If port range is specified from the Search panel, it only lists all specified range
- Select from Search Panel Port range to specify the port range
- Click the Direction button to specific the traffic directions: Total, Sent or Received
Figure 4.19 Traffic Statistics – By IP
2. By Port
List the details local IP address traffic by selecting computer (group) or user (group). By default, the statistics shows the protocol and port used in local IP address and the corresponding IP/IP Classes traffic statistics: All (total), TCP (total) and UDP (total).
Protocol This column lists all ports with corresponding protocol e.g. TCP: 80 If Port range is specified from the Search panel, it only lists the specified Port range
All (Total) - It represents the total traffic of local IP address. By default, the total traffic of Intranet and Internet are also listed.
- Select from Search Panel IP range to specify the IP range or input the IP address directly
- Click the Direction button to specific the traffic directions: Total, Sent or Received
Table 4.7 Traffic Statistics – By Port
Update By Ryan Lee Last update: v2.0Rev20120809 3. By IP Classes
List the details of IP Classes traffic by selecting computer (group) or user (group). By default, the statistics shows the IP Classes and the corresponding Port/Port Classes traffic statistics: All (total), TCP (total) and UDP (total).
Figure 4.21 Traffic Statistics – By IP Classes 4. By Port Classes
List the details of Port Classes traffic by selecting computer (group) or user (group). By default, the statistics shows the Port Classes and the corresponding IP/IP Classes traffic statistics: All (total), Intranet (total) and Internet (total).
Figure 4.22 Traffic Statistics – By Port Classes
5. By Computer / IP Classes
List the details of By Computer / IP Classes traffic by selecting computer (group) or user (group). By default, the statistics shows the Computer and the corresponding IP/IP Classes traffic statistics: All (total), Intranet (total) and Internet (total).
6. By Computer / Port Classes
List the details of By Computer / Port Classes traffic by selecting computer (group) or user (group). By default, the statistics shows the Computer and the corresponding Port/Port Classes traffic statistics: All (total), TCP (total) and UDP (total).
Figure 4.24 Traffic Statistics – By Computer/Port Classes
Traffic Statistics not only show the list table, it can also generate charts to present the statistical data. There are two types of charts: Bar Chart and Pie Chart
Figure 4.25 Traffic Statistics – Bar Chart
Figure 4.26 Traffic Statistics – Pie Chart
[Important]
About Traffic Statistics...