SuperDoctor 5
User's Guide
SuperDoctor 5 User's Guide Release: v 1.2
Document release date: 11/15/2013
Copyright © 2013 Super Micro Computer, Inc. All Rights Reserved.
Legal Notices
This software and documentation is the property of Super Micro Computer, Inc., and supplied only under a license. Any use or reproduction of this software is not allowed, except as expressly permitted by the terms of said license.
Information in this document is subject to change without notice.
Trademark Notice
ii SuperDoctor 5 User's Guide
Revision History
Date Rev Description
Jul-18-2013 1.0 1. Initial Document.
Aug-23-2013 1.1
1. Fixed typos.
2. Added more system information types. 3. Added power control functions.
4. Added BIOS flashing functions.
5. Added system tray support on system desktop.
Nov-15-2013 1.2
1. Added user-defined threshold functions.
2. Added support for completing SD5 installation without restarting the Windows operating system.
3. Changed default install folder.
iii SuperDoctor 5 User's Guide
Contents
Part 1 Background ... 1
CHAPTER 1. SuperDoctor 5 Overview ... 2
1.1 Key Features... 2
1.2 Minimum System Requirements... 4
1.3 Default TCP/UDP Ports ... 4
CHAPTER 2. Setting Up SD5 ... 5
2.1 Installing SD5 ... 5
2.1.1 Windows Installation ... 5
2.1.2 Linux Installation ... 12
2.1.3 Silent Mode Installation ... 18
2.1.4 Tips for Deploying a Large Number of SD5s ... 23
2.2 Verifying the Installation ... 24
2.3 Manually Controlling SD5 Service ... 24
2.4 Uninstalling SD5 ... 25
2.4.1 Uninstalling in Windows ... 25
2.4.2 Uninstalling in Linux ... 27
2.4.3 Silent Mode Uninstall ... 28
Part 2 SuperDoctor 5 ... 29
CHAPTER 3. SuperDoctor 5 Configurations ... 30
3.1 Working Concept ... 30
3.2 Connection Modes ... 31
3.3 Configuration Overview ... 36
3.3.1 Agent Object Definition ... 37
3.3.2 Acceptor Object Definition ... 38
3.3.3 Keystore Object Definition ... 39
3.3.4 Plug-in Object Definition ... 40
3.3.5 Action Object Definition ... 41
3.4 Built-in Plug-ins and Actions ... 42
3.4.1 admin plug-in (admin_plugin) ... 42
3.4.2 echo plug-in (echo_plugin) ... 47
3.4.3 executable plug-in (executable_plugin)... 48
3.4.4 healthinfo plug-in (healthinfo_plugin) ... 49
3.4.5 power plug-in (power_plugin) ... 54
3.4.6 systeminfo plug-in (systeminfo_plugin) ... 56
iv SuperDoctor 5 User's Guide
3.4.8 bios log plug-in (bios_log_plugin) ... 61
3.4.9 memory plug-in (memory_health_plugin) ... 62
3.4.10 storage plug-in (storage_health_plugin) ... 64
3.4.11 LSI RAID plug-in (lsiraid_plugin) ... 66
3.4.12 notification plug-in (notification_plugin) ... 67
CHAPTER 4. SD5 Web ... 70 4.1 SD5 Web Login ... 70 4.2 Health Information ... 71 4.3 System Information ... 74 4.4 Report ... 75 4.5 SD5 Web Configuration ... 75 4.5.1 Alert Configuration ... 76 4.5.2 Monitored Item ... 78 4.5.3 Password Setting ... 80 4.5.4 Flash BIOS ... 80 4.6 RAID ... 83 4.7 Power Control ... 87 CHAPTER 5. SNMP Extension ... 90
5.1 Setting Up the SNMP Service on Windows ... 90
5.1.1 Preparation ... 90
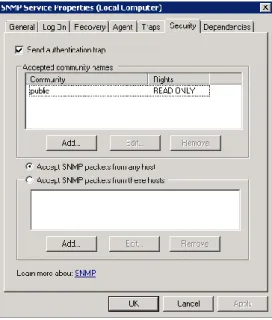
5.1.2 Configuring the SNMP Service ... 91
5.1.3 Verifying the SNMP Service ... 92
5.2 Setting Up the SNMP Service on Linux ... 92
5.2.1 Preparation ... 92
5.2.2 Configuring the SNMP Service ... 92
5.2.3 Verifying the SNMP Service ... 93
5.3 Supermicro MIB ... 94
CHAPTER 6. SuperDoctor 5 Command Line Program ... 96
6.1 SDC Commands ... 96
6.1.1 –h: Display sdc command arguments ... 96
6.1.2 –d: Dump SNMP messages ... 97
6.1.3 –e: Display all monitored items and their status ... 97
6.1.4 –f: Write SNMP messages to a specified file ... 98
6.1.5 –i: Display all monitored items and their status repeatedly ... 99
6.1.6 –ia: Import alert configuration ... 99
6.1.7 –r: Reset the chassis intrusion ... 101
v SuperDoctor 5 User's Guide
6.1.9 –v: Display sdc version information ... 102
6.1.10 –reboot: Reboot the System ... 103
6.1.11 –shutdown: Shutdown the System ... 103
6.1.12 –abort: About the shutdown or reboot command ... 104
6.1.13 –dt: Delay seconds to run power command ... 104
6.1.14 –flash: Flash BIOS ... 105
6.1.15 –flashlog: Show flash history ... 106
6.1.16 –et: Export threshold configuration ... 107
6.1.17 –it: Import threshold configuration ... 108
6.1.18 –rt: Reset threshold to default settings ... 109
CHAPTER 7. SD5 Tray ... 110
7.1 Verifying SD5 Tray on Windows ... 111
7.2 Manually Controlling SD5 Tray ... 112
Part 3 Advanced Topics ... 113
CHAPTER 8. SSM Utilities ... 114
8.1 Using ChangeJVM to Change a Java VM ... 114
8.2 Using Change_cert_pwd to Change Certificate Password ... 116
CHAPTER 9. SSM Certification ... 117
Part 4 Appendices ... 119
A. Log Settings ... 120
B. Third Party Software ... 121
1 SuperDoctor 5 User's Guide
2 SuperDoctor 5 User's Guide
CHAPTER 1. SuperDoctor 5 Overview
SuperDoctor 5 (SD5) is an agent system that runs on monitored hosts designed by Supermicro to provide local system health and information. SD5 supports a Web-based interface program and a command line interface program for server management.
1.1 Key Features
Supports monitoring, control, and management functions.
Hardware Monitoring: fan speed, temperature, voltage, chassis intrusion, redundant power failure, power consumption, disk health, raid health, and memory health.
17 Types of system information: BIOS, Baseboard, Chassis, Disk Drives, FRU, Memory, Network, Printer, Processor, System Slot, IPMI, Account, Operating System, Process, Service, Share, and Time Zone.
Provides SNMP extensions for network management system. Easy to use Web-based and command line interfaces.
Notifications sent via email and SNMP traps. Easy to customize:
Pluggable hardware and software monitoring plug-ins. Compatible with Nagios plug-ins.
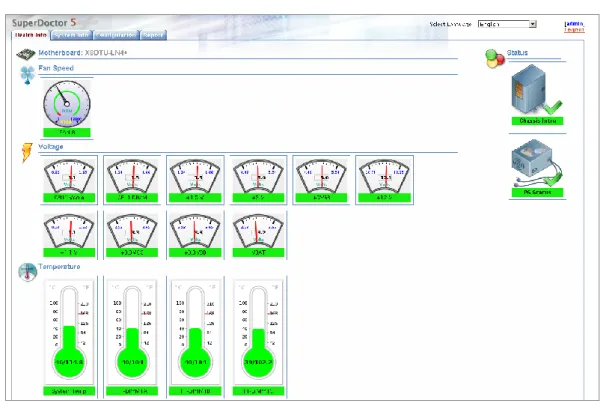
3 SuperDoctor 5 User's Guide
Figure 1-1: SD5 Web-based Console
Notes:
1. Monitoring memory health by SuperDoctor 5 is only available on Linux platforms. This function is not available on Supermicro desktop motherboards. Besides, not all Supermicro servers support the function of monitoring memory health. Please refer to the Supermicro web site for an up-to-date list of supported products. 2. Monitoring SMART health supports non-RAID internal hard disks and does not
support USB hard disks and flash disks. To use this function, install the smartctl utility program first.
3. Monitoring RAID health is available on LSI MegaRAID 2108 and 2208 controllers. LSI MegaRAID 2008, LSI Fusion-MPT based and Intel Rapid Storage Technology controllers are not supported.
4. The system information is platform dependent. Types include Computer System, Desktop Monitor, Floppy, Keyboard, Port Connector, Parallel Port, Pointing Device, Serial Port, Computer Summary, Startup Command, and Video Controller, which are supported on Windows platforms only.
5. BIOS flashing is supported on Windows platforms only. This function is available on Supermicro motherboards newer than H8, X8 and X9 series. Please refer to the Supermicro web site for an up-to-date list of supported products.
4 SuperDoctor 5 User's Guide
1.2 Minimum System Requirements
Hardware
Supermicro servers 200 MB free disk space 64 MB available RAM
An Ethernet network interface card Operating System
Red Hat Enterprise Linux Server 5.x Red Hat Enterprise Linux Server 6.x SUSE Linux Enterprise 11.x
Windows 2003 Server R2 Windows 2008 Server R2 Browser Internet Explorer 8.x Firefox 3.x Screen resolution 1024 x 768
1.3 Default TCP/UDP Ports
Binds TCP port 8181 for HTTP Binds TCP port 8444 for HTTPS
Binds TCP ports 5333, 5666, and 5999 for NRPE (See 3.2 Connection Modes for more information)
Binds for internal communications TCP port 7777 and a free TCP port between 31000-32999
SNMP GET sent on UDP 161 SNMP Trap sent on UDP 162
5
CHAPTER 2. Setting Up SD5
2.1 Installing SD5
SD5 provides installers for both Windows and Linux platforms. A user can run the installers in either of two modes: GUI interactive mode and text-console mode. The text-console mode can be run with either interaction or silence. If a user wants to deploy SD5 to a large number of hosts, installing with the text-console mode in silence is particularly useful.
2.1.1
Windows Installation
Step 1: Execute the SD5 installer. Note that you must have Administrator privileges to install and run SD5.
Step 2: Click the Next button to continue.
6
Step 3: Select the “I accept the terms of the License Agreement” option and click the Next button to continue.
Figure 2-2
Step 4: Click the Choose button to select a directory to install SuperDoctor 5 and click the Next button to continue.
7
Step 5: Select “Built-in (JRE 1.6.0)”built-in Java VM and click the Next button.
Note: If you select "Choose a Java VM", the architecture of the selected Java VM must be compatible with the installer. For example, to use an x86 version of SuperDoctor 5, you need to select an x86 version of Java VM.
Figure 2-4
Step 6: In this step, users can decide whether to install SuperDoctor 5 SNMP extension or not. SuperDoctor 5 contains an SNMP extension module that should be plugged in into the Microsoft Windows SNMP service. Users can therefore query the readings of monitored items via SNMP. To install the SNMP extension, the Microsoft Windows SNMP service must be installed first.
If the Microsoft Windows SNMP service is not installed, you can either :
exit the installation program to manually install the Microsoft Windows SNMP service,
or
8 Figure 2-5
If the Microsoft Windows SNMP service is installed and started, you can either install the SuperDoctor 5 and the SNMP extension,
or
install the SuperDoctor 5 without the SNMP extension.
9
Step 7: Select Yes to use the default key stores and click the Next button to continue. For more information on how the keystores are used, see CHAPTER 9 SSM Certification.
Figure 2-7
Step 8: Three communication modes are supported in SuperDoctor 5. See 3.2 Connection Modes for more information. By default, Mode B (SSL) and Mode C (Keypair) are enabled when SuperDoctor 5 is installed. You can configure the port numbers. Click the Next button to continue.
10
Step 9: SuperDoctor 5 provides the Web console “SD5 Web” (see CHAPTER 4 SD5 Web for more information). Select Yes to enable the SD5 Web. You can also configure the default HTTP port number and the default HTTPS port number to access the SD5 Web. When completed, click the Next button to continue.
Figure 2-9
Step 10: Click the Install button to install the SuperDoctor 5 software on your computer.
11
Step 11: The installation is complete. Note that you do not need to reboot your computer to use SD5.Click the Done button to exit.
12
2.1.2
Linux Installation
Step 1: Execute the SuperDoctor 5 installer. Note that you must have root privileges to install and run SD5.
Step 2: Press the Enter key (on your keyboard) to continue.
Figure 2-12
Step 3: Accept the license agreement and press the Enter key to continue.
13
Step 4: Enter a directory to install SuperDoctor 5 and press the Enter key to continue. We recommend installing SuperDoctor 5 to the default folder
(/opt/Supermicro/SuperDoctor5).
Figure 2-14
Step 5: Use the built-in Java VM and press the Enter key to continue. Note: If you select "Choose a Java VM" option, the architecture of the selected Java VM must be compatible with the installer. For example, to use an x86 version of SuperDoctor 5, you need to select an x86 version of Java VM.
14
Step 6: Use the default key stores and press the Enter key to continue. For more information on how the keystores are used, see CHAPTER 9 SSM Certification.
Figure 2-16
Step 7: Three communication modes are supported in SuperDoctor 5. See 3.2 Connection Modes for more information. By default, Mode B (SSL) and Mode C (Keypair) are enabled when SD5 is installed. You can configure the port numbers. Press the Enter key to continue.
15
Step 8: SuperDoctor 5 provides the Web console “SD5 Web” (see CHAPTER 4 SD5 Web for more information). Select 1 (Yes) to enable the SD5 Web. You can also configure the default HTTP port number and the default HTTPS port number to access the SD5 Web. When completed, click the Enter key to continue.
Figure 2-18
Step 9: This step shows the pre-installation summary. Press the Enter key to continue.
16
Step 10: Press the Enter key to install the SuperDoctor 5 software on your computer.
Figure 2-20
Step 11: The installation is complete. Press the Enter key to exit the installer. Note that you do not need to reboot your computer to use SD5.
17
Step 12: SuperDoctor 5 contains an SNMP extension module that can be plugged in to the default Linux SNMP service. The last step shows how to manually configure the default Linux SNMP service to enable the SuperDoctor 5 SNMP extension. To install the SNMP extension, the default Linux SNMP service must be installed first. The figure below shows the steps to manually plug the SuperDoctor 5 SNMP extension in to the default Linux SNMP service.
18
2.1.3
Silent Mode Installation
Silent mode installation provides a way to install SuperDoctor 5 without the interaction with users. This is particularly useful when users want to deploy the SuperDoctor 5 to a large number of hosts. To use silent mode installation, a property file that contains the necessary SuperDoctor 5 installation settings must be provided.
Step 1: Prepare a property file for silent mode installation. All configuration options required by the SuperDoctor 5 installer are included in the property file. The example below shows how SuperDoctor 5 is installed on a Linux platform.
# This file was built by the Replay feature of InstallAnywhere. # It contains variables that were set by Panels or Consoles.
#Choose Install Folder
# e.g., C:\\Program Files\\Supermicro\\SuperDoctor5 # /opt/Supermicro/SuperDoctor5
#---
USER_INSTALL_DIR=/opt/Supermicro/SuperDoctor5
#Choose Install Feature #--- CHOSEN_INSTALL_FEATURE_LIST=SuperDoctor5 #Choose a Java VM #--- USE_DEFAULT_JVM=Yes #INSTALLED_JVM_PATH=/usr/java/jdk1.6.0_43/jre/bin/java #--- #Setup a keystore #--- USE_DEFAULT_KEYSTORE=Yes #AGENT_PRIVATE_KEYSTORE_PATH=/opt/agent.auth #AGENT_PUBLIC_KEYSTORE_PATH=/opt/agent.trust #USE_AGENT_DEFAULT_KEYSTORE_PASSWORD=Yes #AGENT_KEYSTORE_PASSWORD=your-keystore-password
19 #Setup SNMP on Agent side
#--- # Install SNMP extension USE_AGENT_SNMP_EXTENSION=No
#Setup SD5 connection ports #--- AGENT_ALLOW_IP=127.0.0.1 AGENT_NO_SSL_PORT=5333 AGENT_SSL_PORT=5666 AGENT_KEYPAIR_PORT=5999 #Setup SD5 Web #--- USE_AGENT_WEB=Yes AGENT_WEB_HTTP_PORT=8181 AGENT_WEB_HTTPS_PORT=8444 ### End of file
Step 2: Modify the property to meet your needs. Possible attributes and values of the property file are listed below.
Attribute Description Option
USER_INSTALL_DIR Install folder
Note: It's necessary for you to choose the same install folder each time when you install each of these features on a host.
CHOSEN_INSTALL_ FEATURE_LIST
Install features
Note: Keep features in one line and be separated by a comma.
SuperDoctor5
USE_DEFAULT_JVM Uses default Java VM Yes | No
INSTALLED_JVM_PATH JVM path if USE_DEFAULT_JVM=No
USE_AGENT_SNMP_EXT ENSION
Installs SNMP extension No | Yes
USE_DEFAULT_KEYSTO RE
20
AGENT_PRIVATE_KEYST ORE_PATH
Agent private key store path if
USE_DEFAULT_KEYSTORE=No
AGENT_PUBLIC_KEYSTO RE_PATH
Agent public key store path if
USE_DEFAULT_KEYSTORE=No
USE_AGENT_DEFAULT_ KEYSTORE_PASSWORD
Uses default password for agent key store. Note: It’s required to set the
USE_DEFAULT_KEYSTORE=No when you use customized password.
Yes | No
AGENT_KEYSTORE_PAS SWORD
The password for agent key store if
USE_DEFAULT_KEYSTORE=No and
USE_AGENT_DEFAULT_KEYSTORE_P ASSWORD=No
Your-password
AGENT_ALLOW_IP Allows connections to Internet addresses
Note: Internet addresses should be in one line and separated by a comma.
AGENT_NO_SSL_PORT Binds TCP ports for connection with plain text
5333
AGENT_SSL_PORT Binds TCP ports for Anonymous SSL connection
5666
AGENT_KEYPAIR_PORT Binds TCP ports for SSL connection with a public key infrastructure
5999
USE_AGENT_WEB Enables SD5 Web Yes | No
AGENT_WEB_HTTP_POR T
SD5 Web listen port 8181
AGENT_WEB_HTTPS_PO RT
SD5 Web secure listen port 8444
Step 3: Begin the silent mode installation. For Windows platforms:
SuperDoctor5Installer.exe –i silent –f [property_file_name]
For Linux platforms:
./SuperDoctor5Installer.bin –i silent –f [property_file_name]
Note that there is no error message shown on the console in silent mode. Once the installation is completed, an SD5_InstallLog.log file is generated in the [install folder]
21 You can open the following log files to check whether SuperDoctor 5 is installed successfully. Note that these steps are optional and meant for troubleshooting only.
Step 4: Check SD5_InstallResult.log file to make sure SuperDoctor 5 is properly installed. Note that no error messages are shown on the console in silent mode. Once the installation is complete, the SD5_InstallResult.log file is generated in the [install folder] folder. The following SD5_InstallResult.log file shows that the SuperDoctor 5 is properly installed.
Installation Result: Success
If a previous version of SuperDoctor 5 is detected during the installation process, the log file is shown like this:
Installation Time: Tue May 15 09:58:53 CST 2012 Detect previous: 'YES'
Installation Result: Success
With the installation log data, you can start troubleshooting.
Step 5: Check SD5_InstallLog.log. The SD5_InstallLog.log file is generated in the [install folder] folder. This file contains installation log data that can be used for debugging installation process. The following SD5_InstallResult.log file shows an example that guides you to check SD5_InstallLog.log file.
Installation Result: Failed
Root Cause: Installation Process Failed
Please open SD5_InstallLog.log to check "WARNING" or "ERROR" keywords and see if there are problems.
22 After opening the SD5_InstallLog.log, you are able to see warnings or errors in the log file. .... Summary --- Installation: Successful 1885 Successes 5 Warnings 0 NonFatalErrors 0 FatalErrors
23
2.1.4
Tips for Deploying a Large Number of SD5s
Suppose that you are going to deploy the SuperDoctor 5 to a cluster containing 100 Supermicro servers. You can run the SuperDoctor 5 installer in silent mode to automate the installation process. Please follow these steps:
Step 1: Prepare the SuperDoctor 5 installation program.
Step 2: Prepare a silent mode installation file that will be used by the SuperDoctor 5 installer. Please refer to 2.1.3 Silent Mode Installation to prepare the silent mode installation file.
Step 3: Put the SuperDoctor 5 installation program and the silent mode installation file in a shared folder that can be accessed by the 100 Supermicro servers via the network (e.g., use NFS). Alternatively, you can establish an environment so that the 100 Supermicro servers can download the files using the wget program (e.g., put the files in a folder managed by a web server).
Step 4: Write a Linux shell script to install the SuperDoctor 5. The example below shows how SuperDoctor 5 is installed in the /opt folder on a Linux box:
cd /opt
echo "Delete the old SuperDoctor 5 Installer if there is one" rm ./SuperDoctor5Installer*.bin
echo "Try to uninstall SuperDoctor 5"
/opt/Supermicro/SuperDoctor5/Uninstall/Uninstall -i silent echo "Delete /opt/Supermicro/SuperDoctor5 folder" rm -rf /opt/Supermicro/SuperDoctor5
echo "Download the new SuperDoctor 5 Installer"
wget http://your-server.com:8080/SuperDoctor5Installer_5.0.0.bin echo "Download the silent mode configuration file "
wget http://your-server.com:8080/installer_agent.properties echo "Install SuperDoctor 5"
chmod +x SuperDoctor5Installer*.bin
./SuperDoctor5Installer_5.0.0.bin -i silent -f installer_agent.properties echo "Check SuperDoctor 5 service status"
service sd5 status
Step 5: Deploy the script to each of the servers and then run it to install SuperDoctor 5.
24
2.2 Verifying the Installation
You can use the following commands to check whether SuperDoctor 5 is installed successfully and the service is running. Note that these steps are optional and meant for troubleshooting only.
After restarting your Windows system, open a DOS prompt and enter the following commands to make sure the SD5 service has been installed and started.
Figure 2-23
For Linux users, use the following commands to check the SD5 service:
# service sd5 status
2.3 Manually Controlling SD5 Service
If SuperDoctor 5 service is not automatically started, you can start and stop the service manually.
For Windows platforms: In the [install folder] folder, execute startSD5Service.bat
and stopSD5Service.bat to start and stop the SuperDoctor 5 service, respectively. For Linux platforms: In the [install folder] folder, execute startSD5Service.sh and
25
2.4 Uninstalling SD5
In this section, we will show you how to uninstall SD5 on different platforms.
2.4.1
Uninstalling in Windows
Step 1: Execute the Uninstall.exe in the [install folder]\Uninstall folder. Note that you must have Administrator privileges to uninstall SD5.
Step 2: Click the Uninstall button to continue.
26
Step 3: Please wait while the program uninstalls.
Figure 2-25
Step 4: When the uninstall is complete, click the Done button to exit the uninstaller.
Figure 2-26
Note: SuperDoctor 5 and Super Doctor III share the same drivers on Windows platforms. Uninstalling Super Doctor III will remove the shared drivers and damage the SuperDoctor 5. Please do not install both applications on the same host.
27
2.4.2
Uninstalling in Linux
Step 1: Execute the Uninstaller program located in the [install folder]\Uninstall\
folder. Note that you must have root privileges to uninstall SD5.
Figure 2-27
Step 2: Press the Enter key (on your keyboard) to continue.
Figure 2-28
Step 3: Please wait while the program uninstalls.
Figure 2-29
28 Figure 2-30
2.4.3
Silent Mode Uninstall
Use the following argument to execute the Uninstaller program located in the [install folder]\Uninstall\ folder. Note that you must have root privileges to uninstall SD5. Uninstall -i silent -f [property_file_name]
29
30
CHAPTER 3. SuperDoctor 5 Configurations
SuperDoctor 5 needs to be installed on a host to provide in-band management functions. You can customize the SuperDoctor 5 by modifying its configuration file, which is the agent.cfg file located in the [install folder] folder. Note that you need to manually restart the SuperDoctor 5 after editing configurations. To restart the service of SuperDoctor 5, refer to 2.3 Manually Controlling SD5 Service. In most situations, you use a SuperDoctor 5 once it is installed without modifying its configurations. This chapter introduces the working concepts of the SuperDoctor 5 and the configuration objects it uses.
3.1 Working Concept
When the SuperDoctor 5 is started, it listens to the TCP/IP ports and waits for requests sent by the SSM Server, SSM Web, and SSM CLI. SuperDoctor 5 supports five configuration objects, which control how the SuperDoctor 5 functions.
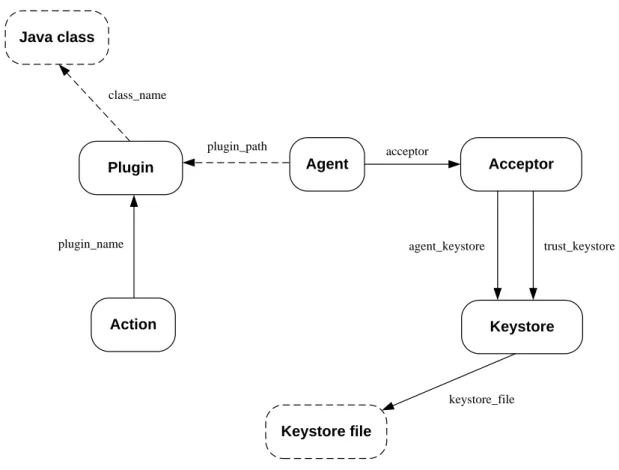
Agent Action plugin_path Acceptor Keystore Keystore file keystore_file acceptor agent_keystore Plugin plugin_name Java class class_name trust_keystore
31 Agent: An agent object represents the SuperDoctor 5 application, which contains
attributes such as agent_name, description, and version. Only one agent object can be defined in the configuration file. By connecting the agent object to acceptor objects, you can define the port number and the connection type (SSL or Non-SSL) that the SuperDoctor 5 should support.
Acceptor: An acceptor object contains an Internet address, a TCP port number, a connection type (SSL or Non-SSL), and key stores. An acceptor is enabled only when it is connected to an agent object. An agent object can have more than one acceptor object to provide multiple connection channels.
Keystore: When SSL is enabled in an acceptor object, you need to provide keystores to the acceptor to create an SSL connection. A keystore object is used to indicate the location of a keystore on the disk.
Plug-in: Similar to the SSM Server, the SuperDoctor 5 applies a plug-in architecture and relies on plug-ins to provide management functions. The primary function of a plug-in object is to tell the SuperDoctor 5 which plug-in main program should be invoked when a request is dispatched to the plug-in.
Action: A SuperDoctor 5 plug-in can provide multiple functions that can be called by clients (i.e. the SSM Server, SSM Web, and SSM CLI). An action object is used to export one function of a plug-in to the clients. A plug-in without defining any action object is useless because it cannot be invoked by the clients.
3.2 Connection Modes
SuperDoctor 5 supports three connection modes: plain text with allowed IP, anonymous SSL connection with allowed IP, and SSL connection with a public key infrastructure.
Mode A: Plain text with allowed IP
Mode A provides the best transmission efficiency because data is transmitted as plain text without encryption between the client and the SuperDoctor 5. To prevent unauthorized access to the SuperDoctor 5, a connection can be established only if the request comes from an Internet address listed on the allow_ip attribute of the agent object.
32
Configuration example:
1. Defining a non-SSL acceptor object
The definition of a built-in non-SSL acceptor object is shown below. The ssl_enabled
attribute is set to false and the default port number for the non-SSL connection is 5333.
2. Configuring the agent object
The definition of an agent object configured to use the above non-SSL acceptor is shown below. First, the acceptor attribute is set to non_SSL (the value of the
acceptor_name of the non-SSL acceptor) to tell the SuperDoctor 5 to enable this acceptor. Second, IP addresses or domain names (in this example, 192.168.12.175.) are added that are allowed to access the SuperDoctor 5 with the allow_ip attribute.
Mode B: AnonymousSSL connection with allowed IP
Mode B is a trade-off between transmission efficiency and security. In this mode, an anonymous SSL connection is established so that data is encrypted between the client and the SuperDoctor 5. However, since an anonymous SSL is used, preventing
define agent{
agent_name SuperDoctor 5
description Default SuperDoctor 5
allow_ip 192.168.12.175 plugin_path ./plugins acceptor non_SSL version 1.0.0 } define acceptor { acceptor_name non_SSL
description default non ssl port
port 5333 ssl_enabled false
33 unauthorized access to the SuperDoctor 5 is still required. Thus, the allow_ip attribute of an agent object is also used in mode B.
Configuration example:
1. Defining an anonymousSSL acceptor
The definition of a built-in anonymous SSL acceptor object is shown below. The
ssl_enabled attribute is set to true and the default port number is 5666. For establishing anonymous SSL connections, the agent_keystore attribute needs to be set to a keystore object, which is used to encrypt data.
2. Defining a keystore object
The definition of a built-in keystore object is shown below. The keystore contains a SuperDoctor 5 private key for encryption. The default keystore is located in the
[install folder]\certificates\agent.auth file. See CHAPTER 9 SSM Certification for more information on how to generate new keystores.
define acceptor {
acceptor_name default_acceptor description default ssl port
port 5666 ssl_enabled true agent_keystore default_agent_keystore } define keystore{ keystore_name default_agent_keystore description keystore keystore_file ./certificates/agent.auth keystore_password <your-keystore-password> }
34
3. Configuring the agent object
The definition of an agent object configured to use the above anonymous SSL acceptor is shown below. First, the acceptor attribute is set to default_acceptor (the value of the acceptor_name of the anonymous SSL acceptor) to tell the SuperDoctor 5 to enable this acceptor. Second, IP addresses or domain names (in this example, 192.168.12.175.) are added to the allow_ip attribute to access the SuperDoctor 5.
Mode C: SSL encryption with a public key infrastructure
Mode C ensures secure communications and simplifies the authentication configuration with a public key infrastructure (PKI). See CHAPTER 9 SSM Certification for more information about how the SSM Server and SuperDoctor 5 create a secure communication channel with the PKI. Since the PKI is used, the allow_ip attribute of an agent object is no longer required for authentication.
Configuration examples:
1. Defining an SSL acceptor supporting PKI
The definition of a built-in SSL acceptor object supporting PKI is shown in the example below. The ssl_enabled attribute is set to true and the default port number is 5999. To establish SSL connections with PKI, the agent_keystore and trust_keystore
attributes need to be set to a keystore object.
define agent{
agent_name SuperDoctor 5
description Default SuperDoctor 5
allow_ip 192.168.12.175
plugin_path ./plugins
acceptor default_acceptor
version 1.0.0 }
35
2. Defining two keystore objects
The definitions of two built-in keystore objects for supporting PKI are shown in the examples below. The default_agent_keystore contains an SD5 private key for encryption and the default_trust_keystore contains a client’s public key for
decryption.
3. Configuring the agent object
The definition of an agent object configured to use the above SSL acceptor is shown in the example below. All you need to do is to set the acceptor attribute to
keypair_acceptor (the value of the acceptor_name of the SSL acceptor with PKI) so that the SuperDoctor 5 can enable this acceptor. The allow_ip attribute is not used in this connection mode.
define keystore{ keystore_name default_agent_keystore description keystore keystore_file ./certificates/agent.auth keystore_password <your-keystore-password> } define keystore{ keystore_name default_trust_keystore description truststore keystore_file ./certificates/agent.trust keystore_password <your-keystore-password> } define acceptor{ acceptor_name keypair_acceptor description default ssl port
port 5999
ssl_enabled true
agent_keystore default_agent_keystore trust_keystore default_trust_keystore
36
Note: By default, only modes B and C are enabled. To enable mode A, please modify the agent object configuration and append no_SSL to the acceptor attribute.
3.3 Configuration Overview
Two kinds of configuration files are used by an SD5: agent.cfg: This is the main configuration file of an SD5. Three objects are defined in this file: Agent, Acceptor, and Keystore.
plugin.cfg: This file is used to define SuperDoctor 5 plug-ins and their exported actions. The plug-ins located in the same plug-in path specified in the
plugin_path attribute of an agent object should define one plugin.cfg file so that the SuperDoctor 5 can discover how many plug-ins and actions are supported. A subfolder of a plug-in path can define its own plugin.cfg file. This file can also be packaged in the same jar file containing the Java bytecode that implements a plug-in.
Note: Multiple plug-ins can be defined in one jar file and the SuperDoctor 5 will determine how many plug-ins are available according to the content of the plugin.cfg file.
The five object definitions are explained in the following sections. define agent{
agent_name SuperDoctor 5
description Default SuperDoctor 5 allow_ip plugin_path ./plugins acceptor keypair_acceptor version 1.0.0 } define agent{ …
acceptor default_acceptor, keypair_acceptor, no_SSL
37
3.3.1
Agent Object Definition
An agent object represents one SuperDoctor 5 program. It includes the information of the agent name, plug-in path and supporting connection modes.
agent_name*
The name of the agent object.
description
The description of the agent object.
allow_ip*
The IP addresses or host names allowed to connect to the Agent are defined here. Multiple values should be separated by a comma. This attribute works if a non-SSL or anonymous SSL connection is used.
plugin_path*
The root folder where the plug-ins are located.
acceptor*
The acceptors that are supported by the Agent. Multiple values should be separated by a comma.
Version
The version of the Agent.
(*indicates a required attribute) define agent{
agent_name SuperDoctor 5
description Default SuperDoctor 5
allow_ip 192.168.10.55, ssm.supermicro.com, 127.0.0.1 plugin_path ./plugins
acceptor default_acceptor, keypair_acceptor
version 1.0.0
38
3.3.2
Acceptor Object Definition
An acceptor object is used to define the acceptable ways for it to connect to its clients. By defining various Acceptor objects, the SuperDoctor 5 can support different kinds of connection methods at the same time.
acceptor_name*
The name of the acceptor object.
description
The description of the acceptor object.
address
The IP address where the acceptor should receive connections from. If a host has more than one network interface card, the SuperDoctor 5 can be configured with this attribute to accept connections from particular IP addresses bound to the network interface cards. The acceptor will forward connection requests from all network interface cards if this attribute is not declared or if its value is an asterisk.
port*
The port number the acceptor should listen to.
ssl_enabled*
Enables or disables SSL when a connection is established.
agent_keystore
The private key used by the acceptor. This attribute is required if connection define acceptor{
acceptor_name keypair_acceptor description default ssl port
address * port 5999 ssl_enabled true agent_keystore default_agent_keystore trust_keystore default_trust_keystore }
39 modes B and C are used.
trust_keystore
The public key of SuperDoctor 5 clients. This attribute is required if the third connection mode is used.
(The asterisk mark “*” indicates a required attribute.)
3.3.3
Keystore Object Definition
A keystore object is used to describe the name and the path (i.e., location) of a keystore as well as the password to access it. This object is applicable if the SSL connection is supported by a SuperDoctor 5. See 3.2 Connection Modes for more information.
keystore_name*
The name of the keystore object.
description*
The description of the keystore object.
keystore_file*
The full file name (including path) of the keystore.
keystore_password*
The password used to open the keystore.
(The asterisk mark “*” indicates a required attribute.) define keystore{
keystore_name default_agent_keystore
description A keystore for storing agent's public/private key keystore_file ./certificates/agent.auth
keystore_password <your-keystore-password> }
40
3.3.4
Plug-in Object Definition
The primary goal of a plug-in object is to indicate a Java class that implements monitoring, control, or management functions. Usually, a plug-in is only activated by a SuperDoctor 5 when a request is sent to the plug-in. By setting the active attribute of a plug-in object to 1, a SuperDoctor 5 proactively invokes the preload function of the plug-in every time the SuperDoctor 5 starts. A plug-in can be disabled by setting the
enable attribute to 0.
plug-in_name*
A unique name of the plug-in object.
class_name*
The Java implementation class of the plug-in object.
description*
The description of the plug-in object.
version*
The version of the plug-in object.
active
1: The plug-in will be loaded when the SuperDoctor 5 is started.
0: The plug-in will not be loaded when the SuperDoctor 5 is started. (Default value.)
enabled
1: Enable the plug-in. (Default value.) 0: Disable the plug-in.
(The asterisk mark “*” indicates a required attribute.) define plugin {
plugin_name healthinfo_plugin
class_name com.supermicro.ssm.agent.plugin.healthinfo.HealthInfoPlugin description HealthInfo Plugin
version 1.0.0 active 1 enabled 1 }
41
3.3.5
Action Object Definition
An action object defines the exported function and arguments provided by a plug-in.
action_name*
The name of the action object. The action name is the name to be invoked by SuperDoctor 5 clients. For example, when using jcheck_nrpe to connect to a SuperDoctor 5, this attribute is provided with the –c argument of jcheck_nrpe.
plugin_name*
The name of the plug-in object implemented by this action. Every action belongs to one and only one plug-in.
description*
The description of the action object.
args
The arguments required by the action. For example, when using jcheck_nrpe to connect to a SuperDoctor 5, this attribute is provided with the –a argument of jcheck_nrpe.
max_instance
The maximum number of concurrent clients allowed to invoke the action. This attribute is used to prevent a SuperDoctor 5 from being overloaded due to burst requests for an action. This attribute could be omitted if concurrent access constraint to an action is not necessary.
(The asterisk mark “*” indicates a required attribute.) define action {
action_name healthinfoitemnumber plugin_name healthinfo_plugin
description Return the number of health monitored items
args -mn $ARG1$
max_instance 0 }
42
3.4 Built-in Plug-ins and Actions
The built-in plug-ins of a SuperDoctor 5 are packaged in the
[install folder]\plugins\builtin\SSMAgentPlugin-build.xx.jar file. Note that you need to manually restart the SuperDoctor 5 after editing configurations. For details on restarting the service of SuperDoctor 5, refer to 2.3 Manually Controlling SD5 Service. In most situations, you do not need to understand or change the built-in plug-ins. However, if you want to write your own automation scripts to invoke the functions exported by the plug-ins, you can find the necessary information in this section. Users who want to develop new SuperDoctor 5 plug-ins can also learn how to define a plugin.cfg file for their own plug-ins.
3.4.1
admin plug-in (admin_plugin)
This plug-in is used to manage all SuperDoctor 5 plug-ins and the life cycle of a SuperDoctor 5. Actions provided by the admin plug-in include plugin_ver,
all_plugin_ver, restart, update, generate_config, and fetch_username. The definition of the plug-in is shown below.
3.4.1.1
plugin_ver Action
This action is used to query the version of a specific plug-in.
define action {
action_name plugin_ver plugin_name admin_plugin
description Get the version of the plug-in args -v -n $ARG1$
}
define plugin {
plugin_name admin_plugin
class_name com.supermicro.ssm.agent.plugin.admin.AdminPlugin description Admin Plugin
version 1.0.0 }
43
Options:
ARG1: The name of the plug-in.
Usage:
jcheck_nrpe -H <host address> -dk -c plugin_ver -a <ARG1>
Example:
Use jcheck_nrpe to query the version of admin_plugin on host 192.168.12.31.
Figure 3-2
3.4.1.2
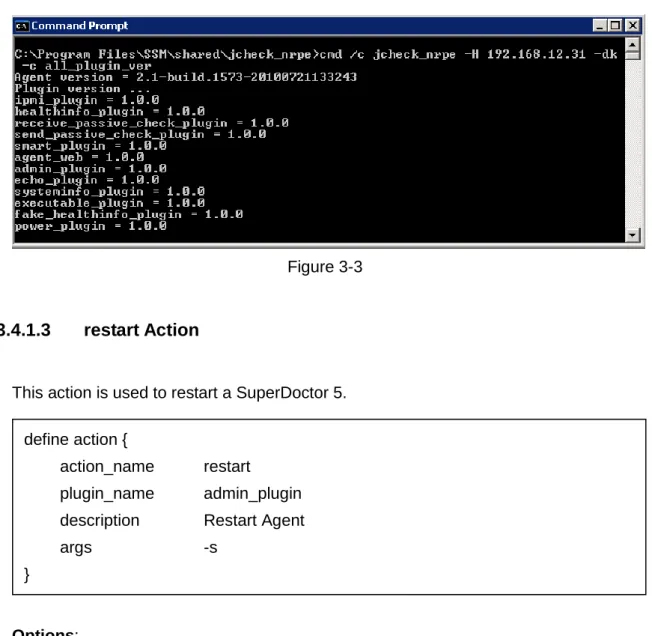
all_plugin_ver Action
This action is used to query the versions of all plug-ins.
Options: None.
Usage:
jcheck_nrpe -H <host address> -dk -c all_plugin_ver
Example:
Use jcheck_nrpe to inquire the versions of all plug-ins on host 192.168.12.31. define action {
action_name all_plugin_ver plugin_name admin_plugin
description Get versions of all plug-ins
args -v
44 Figure 3-3
3.4.1.3
restart Action
This action is used to restart a SuperDoctor 5.
Options: None.
Usage:
jcheck_nrpe -H <host address> -dk -c restart
Example:
Use jcheck_nrpe to restart SuperDoctor 5 on host 192.168.12.31.
Figure 3-4 define action {
action_name restart
plugin_name admin_plugin description Restart Agent
args -s
45
3.4.1.4
update Action
This action is used to update a SuperDoctor 5. The definition of this action is shown below.
Options:
ARG1: The update site containing the latest version of a SuperDoctor 5.
Note:
If the version of the installed SuperDoctor 5 is earlier than the latest version available on the update site, the action will be performed.
Usage:
jcheck_nrpe -H <host address> -dk -c update –a <ARG1>
Example:
Use jcheck_nrpe to update the SuperDoctor 5 on host 192.168.12.32.
Figure 3-5
If the program does not need to be updated, a message “Nothing to update” appears (see the figure below).
Figure 3-6 define action {
action_name update plugin_name admin_plugin description Update Agent
args -u $ARG1$
46
3.4.1.5
generate_config Action
This action is used to generate service object definitions for a particular plug-in. The definition of this action is shown below.
Options:
ARG1: The IP address of the agent-managed host.
ARG2: The name of the configuration object(s). Valid values include ALL, ping_host, and each of the plug-in names. Multiple values are separated by a comma.
ARG3: true: Generate IPMI related object definitions as well. false: Do not generate IPMI related object definitions.
Usage:
jcheck_nrpe -H <host address> -dk -c generate_config –a <ARG1>!<ARG2>!<ARG3> -plus
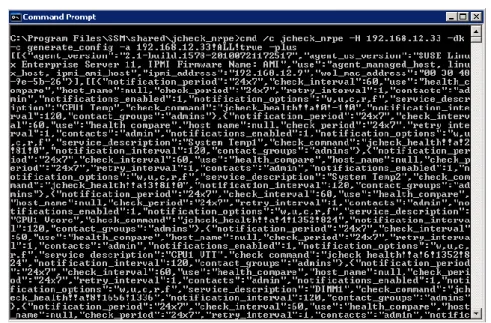
Example:
Use jcheck_nrpe to generate object definitions on host 192.168.12.33.
Figure 3-7 define action {
action_name generate_config plugin_name admin_plugin
description Generate configurations
args -H $ARG1$ --args $ARG2$ -check_ipmi $ARG3$ }
47 define action {
action_name echo
plugin_name echo_plugin description Echo
args --text $ARG1$ }
3.4.2
echo plug-in (echo_plugin)
This plug-in is used for testing purposes. The definition of this plug-in is shown below.
3.4.2.1
echo Action
This action is used to return the same message received by a SuperDoctor 5 back to the client.
Options:
ARG1: The input message.
Usage:
jcheck_nrpe -H <host address> -dk –c echo –a <ARG1>
Example:
Use jcheck_nrpe to echo a message.
Figure 3-8 define plugin {
plugin_name echo_plugin
class_name com.supermicro.ssm.agent.plugin.echo.EchoPlugin description Echo Plugin
version 1.0.0 }
48
3.4.3
executable plug-in (executable_plugin)
This plug-in is designed to execute external programs or scripts. By using this plug-in, users can extend the functions of a SuperDoctor 5 without writing new SuperDoctor 5 Java plug-ins. The definition of this plug-in is shown below.
3.4.3.1
executable Action
This action is used to execute an external program.
Options:
ARG1: The file name of the external program.
ARG2: The arguments for the external program. Multiple values should be separated by a space, such as “arg1 arg2 arg3”.
ARG3: The time in seconds the plug-in should wait for the external program to complete its execution. The default value is 60.
Usage:
jcheck_nrpe -H <host address> -dk –c executable –a <ARG1>!<ARG2>!<ARG3>
Example:
Use jcheck_nrpe to execute an echo program on host 192.168.12.33.
Figure 3-9 define action {
action_name executable
plugin_name executable_plugin
description Execute an external command
args --executable $ARG1$ --args $ARG2$ --timeout $ARG3$ }
define plugin {
plugin_name executable_plugin
class_name com.supermicro.ssm.agent.plugin.executable.ExecutablePlugin description Executable Plugin
version 1.0.0 }
49
3.4.4
healthinfo plug-in (healthinfo_plugin)
This plug-in is used to check the health of all monitored items. Six actions are included:
health_item_num, health_reading, health_compare, health_def, health_all, and
reset_switch. They are used to get the number of monitored items, query readings of monitored items, check health status with user-defined thresholds, retrieve definitions of monitored items, check health status using default thresholds, and reset chassis intrusion, respectively. The definition of this plug-in is shown below.
3.4.4.1 health_item_num Action
This action is used to get the number of monitored items.
Options:
ARG1: Types of monitored items. The valid values are: a: all monitored items
f: fan v: voltage s: switch c: circuit define action { action_name health_item_num plugin_name healthinfo_plugin
description Get the number of health monitored items
args -mn $ARG1$ } define plugin { plugin_name healthinfo_plugin class_name com.supermicro.ssm.agent.plugin.healthinfo2.HealthInfoPlugin2 description HealthInfo Plugin
version 1.0.0
active 1
50
Usage:
jcheck_nrpe -H <host> -dk –c health_item_num –a <ARG1>
Example:
Use jcheck_nrpe to get the count of all monitored items on host 192.168.12.33.
Figure 3-10
3.4.4.2
health_reading Action
This action is used to get the reading of a specific monitored item.
Options:
ARG1: -csv: Display the result in CSV format
ARG2: Types of monitored items. The valid values are: a: all monitored items
f: fan v: voltage s: switch c: circuit
ARG3: The index of a monitored item (begins with 0)
Usage:
jcheck_nrpe -H <host> -dk –c health_reading –a <ARG1>!<ARG2>!<ARG3>
Example:
Use jcheck_nrpe to get the reading of the first fan on host 192.168.12.33.
Figure 3-11 define action {
action_name health_reading plugin_name healthinfo_plugin
description Get reading of a health monitored item args $ARG1$ -t $ARG2$ -n $ARG3$ }
51
3.4.4.3 health_compare Action
Check the health status of a specific monitored item with user-defined thresholds.
Options:
ARG1: -csv: Display the results in CSV format
ARG2: Types of monitored items. The valid values are: a: all monitored items
f: fan v: voltage s: switch c: circuit
ARG3: The index of a monitored item (begins with 0). ARG4: The high limit.
ARG5: The low limit.
Usage:
jcheck_nrpe -H <host address> -dk –c health_compare –a <ARG1>!<ARG2>!<ARG3>!<ARG4>!<ARG5>
Example:
Use jcheck_nrpe to check the health status of the first voltage on host 192.168.12.33 with a user-defined high limit of 1350 mV and low limit of 1150 mV.
Figure 3-12 define action {
action_name health_compare plugin_name healthinfo_plugin
description Get and compare reading of a health monitored item with high/low limits
args $ARG1$ -t $ARG2$ -n $ARG3$ -high $ARG4$ -low $ARG5$ }
52
3.4.4.4
health_def Action
This action is used to retrieve the definitions of all monitored items. The generated definitions are used by SSM Web to generate the default monitoring services of an agent-managed host.
Options:
ARG1: The IP address of an agent-managed host. ARG2: 1: Filter inactive items;
0: Do not filter inactive items.
Usage:
jcheck_nrpe -H <host address> -dk –c health_def –a <ARG1>!<ARG2>
Example:
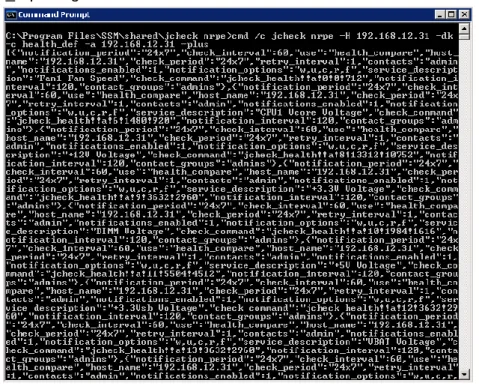
Use jcheck_nrpe to get the definitions of all monitored items on host 192.168.12.31.
Figure 3-13 define action {
action_name health_def
plugin_name healthinfo_plugin
description Get the definitions of all health monitored items args -d $ARG1$ -f $ARG2$
53
3.4.4.5
health_all Action
Check the health status of all monitored items with default thresholds.
Options:
ARG1: The index of monitored items to be excluded. Multiple values are separated by a comma.
ARG2: 1: Filter inactive items; 0: Do not filter inactive items.
Usage:
jcheck_nrpe -H <host address> -dk –c health_all –a <ARG1>!<ARG2>
Example:
Use jcheck_nrpe to check the health status of all monitored items on host 192.168.12.31 with default thresholds.
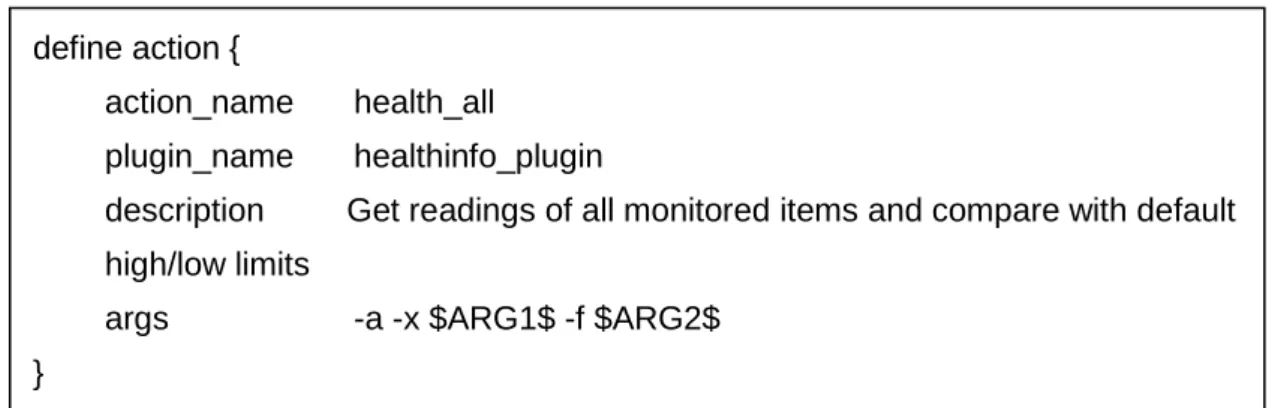
Figure 3-14 define action {
action_name health_all
plugin_name healthinfo_plugin
description Get readings of all monitored items and compare with default high/low limits
args -a -x $ARG1$ -f $ARG2$ }
54
3.4.4.6
reset_switch Action
Clear a chassis intrusion flag. The definition of this action is shown below.
Options: None.
Usage:
jcheck_nrpe -H <host address> -dk –c reset_switch
Example:
Use jcheck_nrpe to reset the chassis intrusion flag on host 192.168.12.31.
Figure 3-15
3.4.5
power plug-in (power_plugin)
This plug-in is used to support power control functions such as power off, reboot, and shutdown. The definition of this plug-in is shown below.
define plugin {
plugin_name power_plugin class_name
com.supermicro.ssm.agent.plugin.powercontrol.PowerControlPlugin description Power Plugin
version 1.0.0 }
define action {
action_name reset_switch
plugin_name healthinfo_plugin
description Clear the trigger created by switch args -reset
55
3.4.5.1
powercontrol Action
This action implements power off, reboot, and shutdown functions.
Options:
ARG1: Types of power control functions. The valid values are: 0: Abort. This argument is not recommended for use. 1: Power off. This argument is not recommended for use. 2: Reboot.
3: Shutdown.
ARG2: The number of seconds to wait before the power control command takes effect.
Usage:
jcheck_nrpe -H <host address> -dk –c powercontrol –a <ARG1>!<ARG2>
Example:
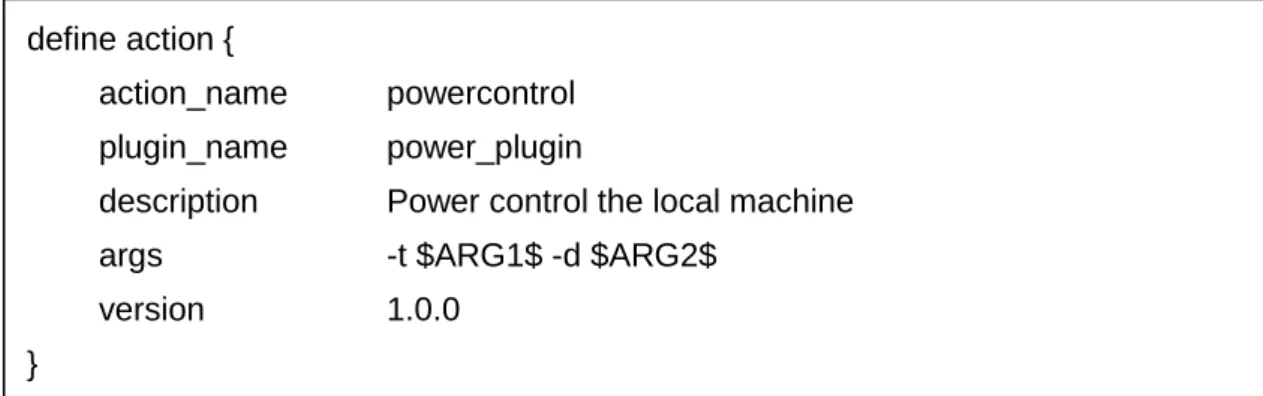
Use jcheck_nrpe to reboot host 192.168.12.31 after 10 seconds.
Figure 3-16 define action {
action_name powercontrol plugin_name power_plugin
description Power control the local machine args -t $ARG1$ -d $ARG2$
version 1.0.0 }
56
3.4.6
systeminfo plug-in (systeminfo_plugin)
This plug-in is used to query local system information. Two actions are included:
systeminfo for getting all system information items and systeminfo_item for getting one specific system information item. The definition of this plug-in is shown below.
3.4.6.1
systeminfo Action
This action is used to query software and hardware information such as the OS version, CPU model, physical memory, printer, services, and so on.
Options: None.
Usage:
jcheck_nrpe -H <host address> -dk –c systeminfo
Example:
Use jcheck_nrpe to get system information on host 192.168.12.31. define action {
action_name systeminfo
plugin_name systeminfo_plugin
description Get system information of local machine max_instance 1
}
define plugin {
plugin_name systeminfo_plugin
class_name com.supermicro.ssm.agent.plugin.systeminfo.SystemInfoPlugin description SystemInfo Plugin
version 1.0.0 }
57 Figure 3-17
3.4.6.2
systeminfo_item Action
This action is used to query one specific system information item.
Options:
ARG1: Types of system information items include:
Options: ARG1: 0: account 1: baseboard 2: bios 3: cd rom 4: chassis 5: computer system define action { action_name systeminfo_item plugin_name systeminfo_plugin
description Get specific system information of a local machine args -i $ARG1$
max_instance 1 }
58 6: disk 7: floppy 8: keyboard 9: logical disk 10: logical memory 11: memory 12: desktop monitor 13: network 14: os 15: processor 16: process 17: port connector 18: pointing device 19: parallel port 20: printer 21: service 23: share 24: serial port 25: system slot 26: computer summary 27: time zone 28: video controller 30: ipmi 34: startup command 35: fru Usage:
jcheck_nrpe -H <host address> -dk –c systeminfo_item –a <ARG1>
Example:
Use jcheck_nrpe to get user accounts on host 192.168.12.31.
59
3.4.7
smart plug-in (smart_plugin)
This plug-in is used to monitor the total number and health information of hard drives. Three actions are included: smart_check_cache, storage_health, and
storage_health_cache.
To use this plug-in, the hard drives to be monitored must support SMART.
3.4.7.1
storage_health Action
This action is used to query hard drive health information using real-time data. Depending on the total number of installed hard drives on the monitored host, the time needed to run this action ranges from a few seconds to tens of seconds.
Options:
ARG1: Expected numbers of hard drives (-1: Disable the check).
ARG2: Check the hard drives status with SMART (0: Disable the check). define plugin {
plugin_name smart_plugin
class_name com.supermicro.ssm.agent.plugin.smarthd.SMARTHDPlugin description SMART HD Plugin
active 1 version 1.0.0 } define action { action_name storage_health plugin_name smart_plugin description Storage Action
args -q $ARG1$ -s $ARG2$ }
60
Usage:
jcheck_nrpe -H <host address> -dk –c storage_health –a <ARG1>!<ARG2>
Example:
Use jcheck_nrpe to get the health information of hard drives on host 192.168.12.104.
Figure 3-19
3.4.7.2
smart_check_cache Action
This action is used to actively collect hard drive health information and save the information to a cache file every 3600 seconds (1 hour).
Options: None.
Usage:
The action is designed to automatically run periodically for maintaining a hard drive cache to increase the performance of the hard drive monitoring function.
3.4.7.3
storage_health_cache Action
This action is similar to the storage_health action except that this action queries hard drive health information from the hard drive cache maintained by the
smart_check_cache action. Regardless of the total number of installed hard drives define action {
action_name smart_check_cache plugin_name smart_plugin
description S.M.A.R.T. HDD Check(s) Cache version 1.0.0
check_interval 3600 }
61 on the monitored host, running this action usually takes a few seconds.
Options:
ARG1: Expected numbers of hard drives (-1: Disable the check). ARG2: Check the hard drive status with SMART (0: Disable the check).
Usage:
jcheck_nrpe -H <host address> -dk –c storage_health_cache –a <ARG1>!<ARG2>
Example:
Use jcheck_nrpe to get the health information of hard drives from the hard drive cache on host 192.168.12.104.
Figure 3-20
3.4.8
bios log plug-in (bios_log_plugin)
This plug-in is used to get BIOS event logs. The bios_log_num action retrieves BIOS event logs every 5 minutes. The definition of this plug-in is shown below.
Note that this plug-in applies to hosts running Linux operating systems only. define action {
action_name storage_health_cache plugin_name smart_plugin
description Storage Action
args -q $ARG1$ -s $ARG2$ -cache 1 }
define plugin {
plugin_name bios_log_plugin
class_name com.supermicro.ssm.agent.plugin.bioslog.BiosLogPlugin description BIOS Log Check Plugin
active 1
version 1.0.0 }
62
3.4.8.1
bios_log_num Action
This action is used to read BIOS event logs every 300 seconds (5 minutes).
Options: None.
Usage:
The action is designed to run automatically and periodically for retrieving BIOS event logs.
3.4.9
memory plug-in (memory_health_plugin)
This plug-in is used to monitor memory health information by counting CECC and UECC error events. It can also monitor the total number of DIMMs installed on the host under monitoring. One action is included: memory_health for getting memory health information. The definition of this plug-in is shown below.
Note that this plug-in applies to hosts running Linux operating systems only. define action {
action_name bios_log_num plugin_name bios_log_plugin description BIOS Log Check(s) args -t $ARG1$ -d $ARG2$ version 1.0.0 check_interval 300 } define plugin { plugin_name memory_health_plugin class_name com.supermicro.ssm.agent.plugin.memory.PhysicalMemPlugin description Memory Check Plugin
version 1.0.0 }
63
3.4.9.1
memory_health Action
This action is used to monitor memory health information.
Options:
ARG1: Expected number of DIMMs (-1: Disable the check). ARG2: The threshold for CECC and UECC.
The argument format is as follows:
[type][duration][fail count],….
[type]:
m: Correctable single bit ECC errors. M: Uncorrectable ECC errors.
[duration]: d: day h: hour m: minute s: second
[fail count]:The acceptable number of failures. To trigger a critical status, the failure counts must be greater than this value.
To specify a threshold for memory that indicates four single bit ECC errors per 1GB RAM within one day (24 hours) are allowed (i.e., m1d4) and 0 uncorrectable ECC errors are allowed within 1 hour (i.e., M1h0):
m1d4,M1h0
define action {
action_name memory_health
plugin_name memory_health_plugin
description CECC/UECC Checks for Physical Memory args -nm $ARG1$ -c $ARG2$
version 1.0.0 }
64
Usage:
jcheck_nrpe -H <host address> -dk –c memory_health –a <ARG1>!<ARG2>
Example:
Use jcheck_nrpe to get the health information of DIMMs on host 192.168.12.32.
Figure 3-21
3.4.10 storage plug-in (storage_health_plugin)
The plug-in is used to monitor the total number of hard disks, the SMART status of hard disks and the health status of RAID controllers. One action is included:
storage_health_allinone.
To use this plug-in, the hard drives to be monitored must support SMART. Currently, the RAID health check is only available on LSI MegaRAID 2108 and 2208 controllers.
3.4.10.1
storage_health_allinone Action
This action is used to query storage health information including SMART status of hard disks and health status of RAID controllers. The SMART health information is from the hard drive cache maintained by the smart_check_cache action. The RAID health information is from the RAID controller cache maintained by the raid_health action. Regardless of the total number of installed hard drives and RAID controllers on the monitored host, running this action usually takes a few seconds.
define plugin {
plugin_name storage_health_plugin
class_name com.supermicro.ssm.agent.plugin.storage.StoragePlugin description Storage Health Allinone Plugin
active 1
version 1.0.0 enabled 1 }
65
Options:
ARG1: Expected numbers of hard drives (-1: Disable the check). ARG2: Check the hard drive status with SMART (0: Disable the check). ARG3: Check RAID health (0: Disable the check).
Usage:
jcheck_nrpe -H <host address> -dk –c storage_health_allinone –a <ARG1>!<ARG2>!<ARG3>
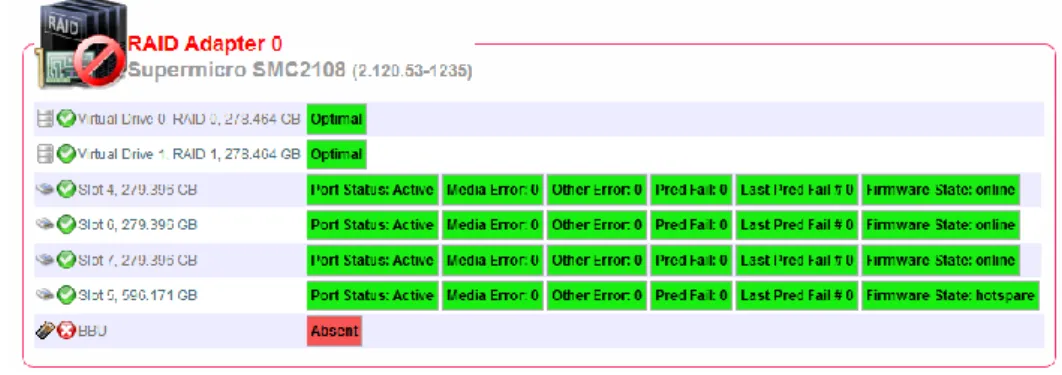
Example:
Use jcheck_nrpe to get the storage health information on host 192.168.12.104.
Figure 3-22 define action {
action_name storage_health_allinone plugin_name storage_health_plugin description Storage Allinone Action
args -q $ARG1$ -s $ARG2$ -r $ARG3$ }