NVG-101-8.2.2-EN-01 04/24/09
NetVault
:
Backup
version 8.2.2
Administrator’s Guide
Version: Product Number: NVG-101-8.2.2-EN-01NetVault: Backup v8.2.2 - Administrator’s Guide Software Copyright © 2009 BakBone Software
Documentation Copyright © 2009 BakBone Software
This software product is copyrighted and all rights are reserved. The distribution and sale of this product are intended for the use of the original purchaser only per the terms of the License Agreement. All other product trademarks are the property of their respective owners.
The NetVault: Backup v8.2.2 - Administrator’s Guide documentation is copyrighted and all rights are reserved.
This document may not, in whole or part, be copied, photocopied, reproduced, translated, reduced or transferred to any electronic medium or machine-readable form without prior consent in writing from BakBone Software.
THIS PUBLICATION IS PROVIDED “AS IS” WITHOUT WARRANTY OF ANY KIND, EITHER EXPRESS OR IMPLIED, INCLUDING, BUT NOT LIMITED TO, THE IMPLIED WARRANTIES OF MERCHANTABILITY, FITNESS FOR A PARTICULAR PURPOSE, OR
NON-INFRINGEMENT.
THIS PUBLICATION COULD INCLUDE TECHNICAL INACCURACIES OR TYPOGRAPHICAL ERRORS. CHANGES ARE PERIODICALLY ADDED TO THE INFORMATION HEREIN; THESE CHANGES WILL BE INCORPORATED INTO NEW EDITIONS OF THE PUBLICATION. BAKBONE SOFTWARE MAY MAKE IMPROVEMENTS AND/OR CHANGES IN THE PRODUCT(S) AND/OR THE PROGRAM(S) DESCRIBED IN THIS PUBLICATION AT ANY TIME.
BakBone Software
9540 Towne Centre Drive, Suite 100 San Diego, California 92121 866.484.2663Preface 15
• About this Document ... 15
• Target Audience ... 15
• Organization ... 15
• Recommended Additional Reading ... 17
• Technical Support ... 17
• Documentation Updates ... 17
Chapter 1: Introducing NetVault: Backup
19
• NetVault: Backup – At a Glance ... 19• Key Benefits ... 19
• Feature Summary ... 20
Chapter 2: Getting Started
21
• Starting the Graphical User Interface ... 21• Logging on to NetVault: Backup ... 22
• GUI Basics ... 22
• Using NetVault: Backup Keyboard Shortcuts ... 24
• Starting and Stopping NetVault: Backup Services ... 25
Chapter 3: Managing Clients
26
• NetVault: Backup Clients – An Overview ... 26• Adding a Client ... 27
- Locating a Client ... 28
- Adding NetVault: Backup Server as a Client ... 28
• Client Status Summary ... 29
• Administering Added Clients ... 29
- Viewing Client Properties ... 29
- Checking Client Access ... 30
- Establishing the Firewall Relationship ... 30
- Installing License Keys ... 31
- Installing and/or Removing NetVault: Backup Plugins ... 31
- Removing a Client from the NetVault: Backup Domain ... 31
• Working with Client Groups ...32
- Creating a Client Group ... 32
- Modifying a Client Group ... 32
- Removing a Client Group ... 33
Chapter 4: Managing Backup Devices
34
• Backup Devices – An Overview ...35• Virtual Tape Libraries – An Overview ...36
• Shared Virtual Tape Libraries – An Overview ...37
• SAN Considerations ...37
• Adding Devices Using the Automatic Device Configuration Wizard ...38
- Manually Starting the Device Configuration Wizard ... 39
• Adding a Library Manually ...40
• Adding a Standalone Drive Manually ...41
• Device Status Summary ...42
• Sharing Drives ...43
- Adding a Drive as Shared ... 43
- Adding Shared Drives to Client ... 45
• Creating and Adding a VTL ...46
• Creating and Adding a Virtual Standalone Drive ...48
• Creating and Adding an SVTL ...49
- Prerequisites ... 49
- Creating an SVTL ... 52
- Adding Library to the SVTL Controller ... 54
- Distributing SVTL Drives ... 54
- Sharing SVTL Drives ... 55
• Configuring Library Parameters ...56
• Configuring Drive Parameters ...57
- Configuring General Parameters ... 57
- Configuring Software Compression Parameters for Virtual Tape Drives ... 60
- Configuring NDMP Parameters ... 61
- Configuring Performance Parameters ... 61
- Configuring Data Collection Parameters ... 62
- Configuring Timeout for SCSI Commands ... 63
- Organizing Media in a Mixed Media Library ... 63
- Adding and Configuring a Mixed Media Library ... 64
- Adding Media to a Library with an Entry/Exit Port ... 66
- Adding Media to a Library without an Entry/Exit Port ... 67
• Administering Added Devices ... 67
- Viewing Device Status ... 67
- Modifying Library Configuration ... 68
- Toggling Devices View ... 68
- Removing a Library ... 68
- Removing a VTL ... 68
- Opening and/or Closing Library Door ... 69
- Opening and/or Closing Entry/Exit Ports ... 69
- Checking Offline Drives ... 69
- Taking Drives Offline in NetVault: Backup ... 69
- Loading and/or Unloading Media ... 70
- Exporting Media to Entry/Exit Port ... 70
- Restarting a Library ... 70
• Importing NetApp VTL’s Shadow Tape ... 70
• Working with Cleaning Tapes ... 72
- Configuring Cleaning Support ... 72
- Configuring Re-use Settings for Cleaning Media ... 73
- Viewing Drive Cleaning Status ... 73
- Setting Automatic Cleaning Routine ... 73
- Cleaning Drives Manually ... 74
Chapter 5: Backing up Data
75
• Backup – An Overview ... 76• Designing a Backup and Recovery Strategy ... 76
• Backing up Data with NetVault: Backup Plugins ... 77
• Defining a Backup Job ... 78
• Backup Device and Media Options ... 79
- Selecting Target Device ... 80
- Configuring Backup Media Options ... 80
• Advanced Backup Options ... 81
- Configuring Retention Policy for a Backup ... 82
- Using Pre and Post Backup Scripts ... 83
- Setting up Custom Notification Events for a Job ... 84
- Enabling Network Compression for a Backup ... 85
• Viewing and/or Modifying a Backup Job ...86
• Duplicating a Backup ...87
• Archiving Data ...88
• Encrypting a Backup ...88
- Limitations of the Encryption Plugin ... 88
- Installing the Encryption Plugin ... 89
- Configuring the Encryption Plugin ... 89
- Disabling the Encryption Feature ... 90
• Managing Backup Indexes ...90
- Deleting Online Indexes ... 91
- Compressing Online Indexes ... 91
Chapter 6: Scheduling Jobs
93
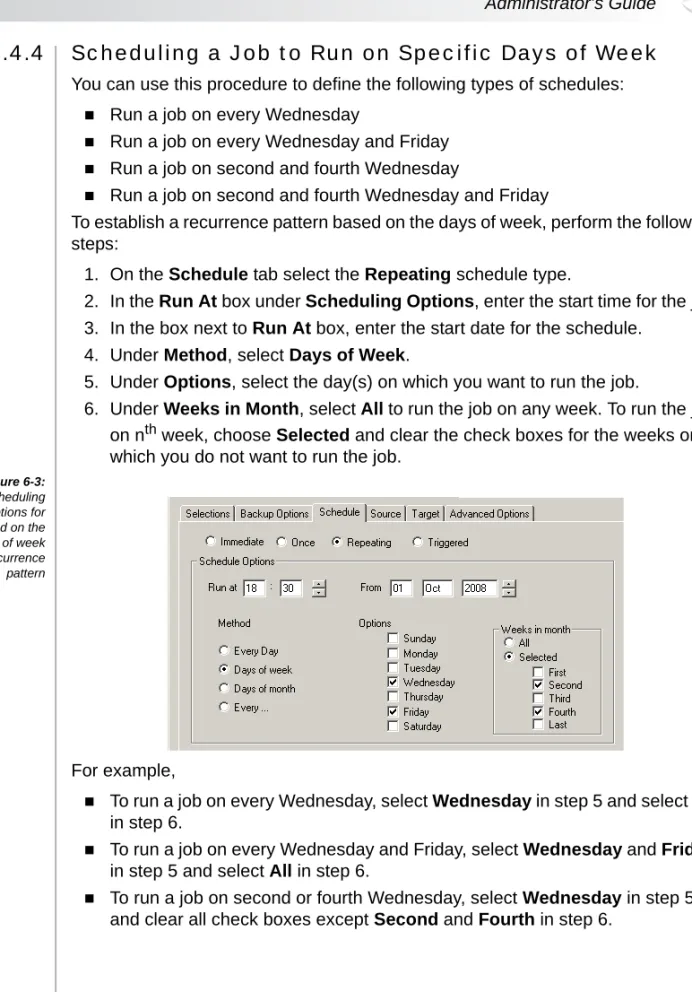
• Job Schedule – An Overview ...93• Scheduling a Job to Run Immediately ...94
• Scheduling a Job to Run on a Specific Date ...94
• Scheduling Recurring Jobs ...94
- Scheduling a Job to Run Every n Hour(s) ... 95
- Scheduling a Job to Run at the Same Time Every Day ... 95
- Scheduling a Job to Run Every n Day(s), Week(s) or Month(s) ... 96
- Scheduling a Job to Run on Specific Days of Week ... 97
- Scheduling a Job to Run on Specific Days of Month ... 98
• Scheduling Non-recurring Jobs ...99
- Scheduling Non-recurring Jobs to Run on Any Day ... 99
- Scheduling Non-recurring Jobs to Run on Specific Days of Week ... 99
- Scheduling Non-recurring Jobs to Run on Specific Days of Month ... 100
• Triggering a Job from an External Script ...101
• Scheduling Number of Retries ...101
• Setting the Job Priority ...102
Chapter 7: Using Selection Sets
103
• Selection Sets – An Overview ...103• Creating a Selection Set ...104
• Applying a Selection Set ...105
• Modifying a Selection Set ...106
• Deleting a Selection Set ... 108
Chapter 8: Working with Backup Policies 109
• Backup Policies – An Overview ... 109• Defining a Backup Policy ... 110
- Creating Selection Sets for Policy Backups ... 111
- Defining Jobs for Policy Backups ... 111
- Adding Clients and/or Client Groups for Policy Backups ... 112
- Finalizing and Submitting the Policy ... 113
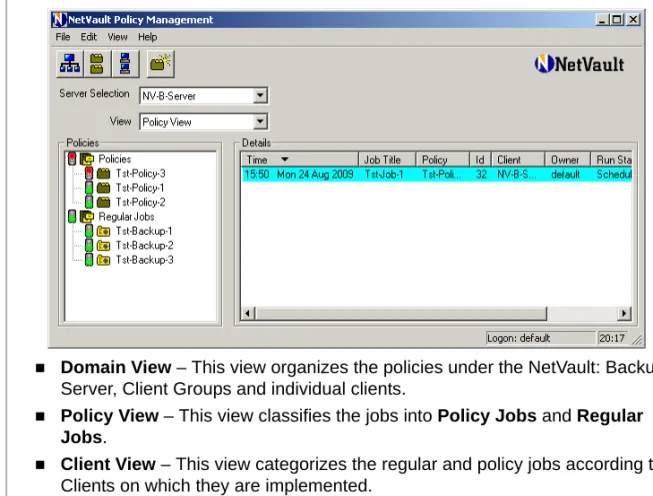
• Policy View Types ... 113
• Setting up Custom Notification Events for Policy Jobs ... 114
• Editing an Inactive Policy ... 115
• Editing an Active Policy ... 116
• Modifying an Individual Policy Job ... 117
• Modifying Client List for a Policy ... 117
• Acknowledging Errors/Warnings ... 117
• Deleting a Policy ... 118
Chapter 9: Restoring Data
119
• Restore – An Overview ... 119• Restoring Data with NetVault: Backup Plugins ... 120
• Defining a Restore Job ... 120
• Configuring Source Device for Restore ... 121
• Configuring Advanced Restore Options ... 122
- Using Pre and Post Restore Scripts ... 123
- Enabling Network Compression for a Restore ... 124
- Restoring Data from the Latest Saveset ... 124
• Restoring Data to an Alternate Server ... 125
• Restoring from a Saveset with Offline Indexes ... 125
• Restoring from a Saveset with Compressed Indexes ... 125
• Restoring Encrypted Savesets ... 126
• Changing the Saveset Sort Order ... 126
• Filtering Savesets ... 126
• Searching for Data Items ... 126
• Additional Notes ...128
Chapter 10: Managing Media
129
• Backup Media – An Overview ...129• Labeling and Grouping Media ...130
• Performing Bulk Media Labeling and /or Grouping ...131
• Viewing Media Status ...132
• Write-protecting Media ...133
• Retiring Backup Savesets ...133
• Marking Media for Re-use ...134
• Scanning Foreign Media ...135
• Tracking Off-site Location ...135
• Marking Media as Unusable ...135
• Deleting a Backup Index from the NVDB ...136
• Blanking a Media ...136
• Performing Bulk Media Blanking ...136
Chapter 11: Managing NetVault: Backup Jobs
137
• NetVault: Backup Job Management – An Overview ...137• Viewing NetVault: Backup Job Records ...138
• Customizing the Jobs Window ...138
• Filtering Job Records ...139
• Starting a Job Instance Immediately ...141
• Re-creating a Backup Job Instance ...141
• Holding and Resuming a Job ...141
• Aborting an Active Job ...141
• Viewing Media Request Details for a Job ...142
• Changing Media Request Priority for a Job ...142
• Deleting a Job Schedule ...143
• Deleting a Job Definition ...143
Chapter 12: Managing NetVault: Backup Logs
144
• NetVault: Backup Logs – An Overview ...144• Viewing NetVault: Backup Logs ...145
• Filtering Logs ... 146
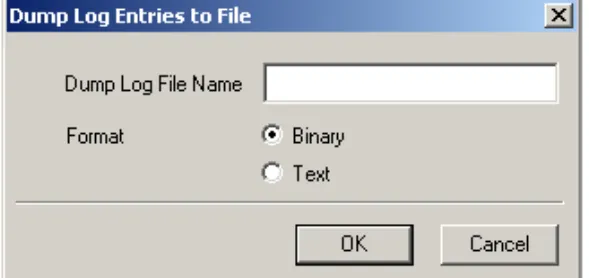
• Dumping Logs to a File ... 148
• Viewing Dumped Logs ... 149
• Deleting Logs Manually ... 149
• Raising a Custom Log Event ... 149
- Removing a Log Event ... 150
Chapter 13: Setting up Event Notification
151
• Events and Notification – An Overview ... 151- Available Notification Types ... 152
• Event Notified By Default ... 152
• Setting up a Global Notification Method ... 153
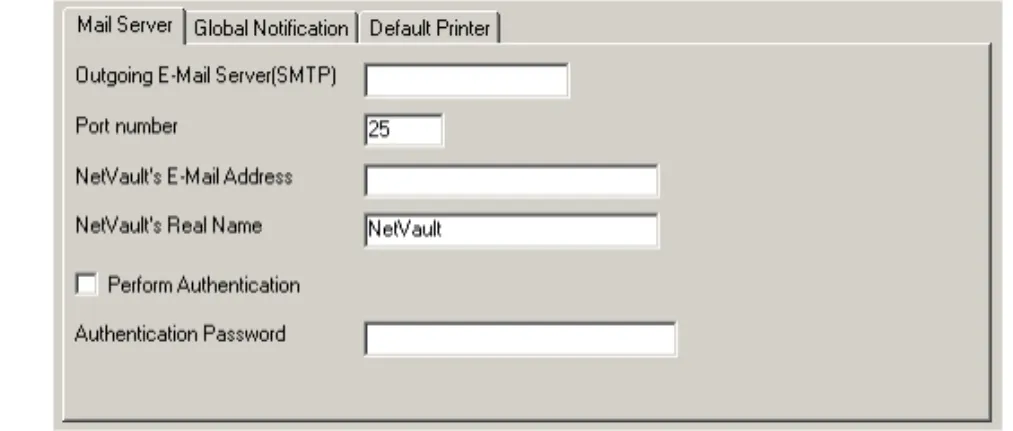
• Configuring Mail Server Address for Email Notification Method ... 155
• Configuring Sysop Mail Address for Email Notification ... 156
• Configuring a Default Printer for Notification ... 156
• Viewing Operator Messages ... 156
Chapter 14: Implementing Access Control Mechanisms
158
• Access Control Mechanisms – An Overview ... 158• Creating a New User Account ... 159
• Modifying a User Profile ... 161
• Updating General Details for a User Account ... 161
• Assigning Client Access Rights to a User ... 162
• Assigning Permissions for NetVault: Backup Operations ... 162
• Assigning Media Group Memberships to a User ... 164
• Setting Media Usage Quota for a User Account ... 164
• Setting Job Quota for a User Account ... 164
• Setting a Notification Profile for a User ... 165
• Setting User Account Password ... 165
• Setting Global Password Expiration Policy ... 166
• Deleting a User Account ... 166
Chapter 15: Reporting in NetVault: Backup
167
• NetVault: Backup Reports – An Overview ... 168• Creating a Custom Report ...170
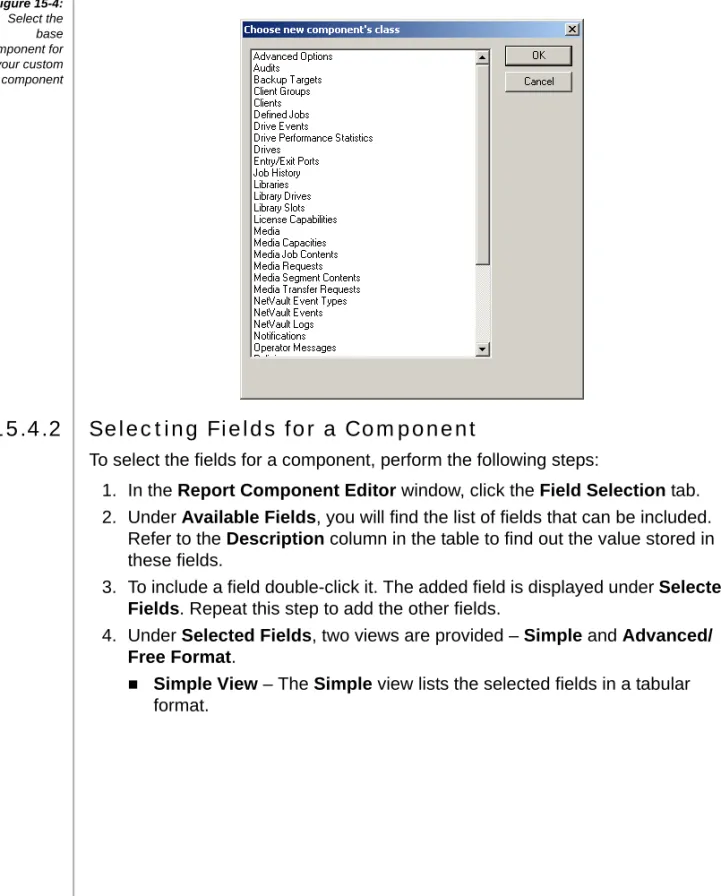
- Selecting the Report Components ... 170
- Inserting Custom Headers and Footers ... 172
- Defining Job Schedule ... 173
- Setting up Custom Notification Events for the Report Job ... 173
- Retaining Excluded Data for Historic Reports ... 174
- Finalizing and Submitting the Job ... 175
• Working with Custom Report Components ...175
- Selecting the Base Component ... 176
- Selecting Fields for a Component ... 177
- Sorting the Output ... 178
- Specifying the Output Type ... 179
- Setting the Output Options ... 180
- Defining Headers and Footers for the Component ... 181
- Setting Filter Conditions ... 181
- Saving the Component ... 185
• Working with Historic Reports ...186
• Editing/Viewing a Report Template ...187
• Viewing Logs for a Report Job ...188
• Configuring the Default Browser for Viewing Reports ...188
• Deleting a Report Template ...189
Chapter 16: Managing NetVault: Backup Domains
190
• Domain Management – An Overview ...190• Adding a Server ...191
- Locating a Server ... 192
• Controlled Server Status Summary ...192
• Managing a Domain Remotely ...192
• Changing the Default Server ...193
• Viewing Properties of a Controlled Server ...194
• Checking Access to a Remote NetVault: Backup Server ...194
• Removing a Controlled Server ...194
Chapter 17: Using NetVault: Backup in a Cluster Setup
195
• Support for Cluster Setup in NetVault: Backup ...196• Virtual Clients - An Overview ...196
- Prerequisites ... 197
- Installation Procedure ... 197
• Configuring a Cluster-aware Plugin ... 199
- Configuring Preferred Network Address ... 199
- Configuring Default Parameters ... 199
• Configuring Devices in a Cluster Setup ... 200
• Managing Virtual Clients ... 200
- Modifying a Virtual Client ... 200
- Checking Access to Virtual Clients ... 201
- Finding the Real Client ... 201
- Granting User Access to Virtual Clients ... 201
- Removing a Virtual Client ... 202
- Upgrading a Cluster-aware Plugin ... 202
• Backing up Data with a Cluster-aware Plugin ... 203
- Cluster Failover During Backups ... 203
• Restoring Data with a Cluster-aware Plugin ... 203
• Viewing Logs and Job Status ... 204
NetVault: Backup Core Plugins
Chapter 18: Using the NetVault: Backup File System Plugin
207
• The NetVault: Backup File System Plugin – An Overview ... 208• Available Backup Methods ... 208
- Backups Using Volume Shadow Copy Service (VSS) ... 209
- System State Backups on Windows ... 209
• Defining a Backup Strategy ... 209
• Available Restore Methods ... 212
• Configuring Global Parameters for the File System Plugin ... 212
- Accessing the Configure Window from Client Management Window ... 215
- Accessing the Configure Window from NetVault: Backup Configurator ... 215
• Performing a Full Backup with File System Plugin ... 215
- Selecting Data for a Backup ... 216
- Selecting the Backup Method ... 217
- Configuring the Backup Options ... 217
- Configuring a Job as Restartable ... 218
- Finalizing and Submitting a Job ... 218
• Performing a Differential Backup with the File System Plugin ...220
• Performing VSS Backups ...220
- Installing Evaluation License Keys for VSS Backups ... 220
- Procedure for Performing VSS Backups ... 221
• Configuring a Network Share ...221
• Stopping and Restarting a Job ...222
• Restoring Data with the File System Plugin ...222
- Selecting Data for a Restore ... 223
- Configuring the Restore Options ... 223
- Finalizing and Submitting a Job ... 224
• Renaming and/or Relocating Data During Restore ...225
• Restoring Data to an Alternate Server ...226
• Performing System State Restore ...226
- Prerequisites ... 227
- Procedure for Restoring System State ... 227
• Cluster Database Backup and Restore on Windows 2008 ...228
• Using Inclusion and Exclusion Lists ...229
- Exclusion List Considerations ... 229
- Adding an Exclusion List ... 231
- Removing an Exclusion List ... 232
- Inclusion List Considerations ... 232
- Adding an Inclusion List ... 232
- Removing an Inclusion List ... 233
• Additional Notes ...233
- General Notes on File System Plugin ... 233
- Backing up Extended Attributes on NSS Volumes ... 236
- Backing up and Restoring Distributed File System (DFS) Paths ... 237
Chapter 19: Using the NetVault: Backup Consolidate
Incremental Backups Plugin
238
• The NetVault: Backup Consolidate Incremental Backups Plugin – An Overview ...238• Performing a Backup Consolidation Job ...239
• Restoring Consolidated Savesets ...241
• Defining a Backup Consolidation Job in a Policy ...241
Chapter 20: Using the NetVault: Backup Data Copy Plugin 243
• The NetVault: Backup Data Copy Plugin – An Overview ...243• Making a Copy of the Selected Saveset ... 244
• Making a Copy of the Latest Saveset Using a Selection Set ... 246
• Restoring Copies of Savesets ... 248
• Defining a Data Copy Job in a Policy ... 248
Chapter 21: Using the NetVault Databases Plugin
250
• The NetVault Databases Plugin – An Overview ... 250• Configuring the NetVault Databases Plugin ... 251
- Accessing the Configure Window from Client Management Window ... 252
- Accessing the Configure Window from NetVault: Backup Configurator ... 252
• Backing up the NetVault Databases ... 252
• Restoring the NetVault Databases ... 253
Chapter 22: Using the NetVault: Backup Raw Device Plugin
256
• The NetVault: Backup Raw Device Plugin – An Overview ... 256• Additional Configuration for Large Number of Disks ... 256
• Backing up Raw Devices ... 257
• Restoring Raw Devices ... 258
• Relocating Data to a Different Disk ... 259
• Restoring Data to a Different Client ... 260
Appendix
Appendix A: NetVault: Backup Pre-defined Events
263
• Pre-defined Event Description ... 263Appendix B: NetVault: Backup Pre-defined Reports and
Components 269
• Canned Reports ... 269• Pre-defined Report Components ...271
Appendix C: NetVault: Backup User Permissions 279
• User Permission Definitions ...279Appendix D: NetVault: Backup Environment Variables
283
• Using Environment Variables ...283Appendix E: NetVault: Backup Processes
285
• NetVault: Backup Processes – An Overview ...285 • Process Description ...285P
REFACE
About this Document
This guide describes how to use NetVault: Backup and provides comprehensive information on all NetVault: Backup features and functionality.
Target Audience
This guide is intended for Backup Administrators and other technical personnel who are responsible for designing and implementing a backup strategy for the organization. A good understanding of the operating systems under which the NetVault: Backup Server and Clients are running is assumed.
Organization
The Administrator's Guide is organized as follows:
Chapter 1: Introducing NetVault: Backup gives an overview of NetVault: Backup and describes the features and benefits of the product.
Chapter 2: Getting Started provides a brief description of the NetVault: Backup Graphical User Interface.
Chapter 3: Managing Clients describes how to add and manage NetVault: Backup Clients.
Chapter 4: Managing Backup Devices describes how to add and manage the backup devices.
Chapter 5: Backing up Data describes how to backup data with NetVault: Backup.
Chapter 6: Scheduling Jobs explains how to set up a job schedule.
Chapter 7: Using Selection Sets explains how to create and use selection sets.
Chapter 8: Working with Backup Policies describes how to set up and manage backup policies.
Chapter 9: Restoring Data describes how to restore data with NetVault: Backup.
Chapter 10: Managing Media describes how to perform the media administration tasks.
Chapter 11: Managing NetVault: Backup Jobs describes how to perform job management tasks.
Chapter 12: Managing NetVault: Backup Logs describes how to view and manage the NetVault: Backup logs.
Chapter 13: Setting up Event Notification describes how to set up notification methods for NetVault: Backup events.
Chapter 14: Implementing Access Control Mechanisms describes how to implement NetVault: Backup’s access control mechanisms. This section is primarily intended for the NetVault: Backup Administrator who is responsible for managing the NetVault: Backup system.
Chapter 15: Reporting in NetVault: Backup describes how to use the NetVault: Backup Reporting tool.
Chapter 16: Managing NetVault: Backup Domains describes how to use NetVault: Backup to manage multiple sites.
Chapter 17: Using NetVault: Backup in a Cluster Setup provides guidelines and information that will help you set up and use NetVault: Backup in a cluster environment.
NetVault: Backup Core Plugins
Chapter 18: Using the NetVault: Backup File System Plugin describes how to use the NetVault: Backup File System Plugin.
Chapter 19: Using the NetVault: Backup Consolidate Incremental Backups Plugin describes how to use the NetVault: Backup Consolidate
Incremental Backups Plugin to create a composite set of full and incremental backups.
Chapter 20: Using the NetVault: Backup Data Copy Plugin describes how to use the NetVault: Backup Data Copy Plugin to create copies of backup savesets.
Chapter 21: Using the NetVault Databases Plugin describes how to use the NetVault Databases Plugin.
Chapter 22: Using the NetVault: Backup Raw Device Plugin describes how to use the NetVault: Backup Raw Device Plugin to backup physical disks and partitions.
Appendix
Appendix A: NetVault: Backup Pre-defined Events provides a brief description of the pre-defined event classes and events.
Appendix B: NetVault: Backup Pre-defined Reports and Components
provides a brief description of the pre-defined NetVault: Backup reports and components.
Appendix C: NetVault: Backup User Permissions provides a brief
description of the user permissions required to perform NetVault: Backup operations.
Appendix D: NetVault: Backup Environment Variables provides a brief description of the NetVault: Backup environment variables that can be used in scripts.
Appendix E: NetVault: Backup Processes provides a brief description of the NetVault: Backup processes.
Recommended Additional Reading
NetVault: Backup Installation/Upgrade Guide – This guide provides complete details on installing the NetVault: Backup Server and Client software.
NetVault: Backup Getting Started Guide – This guide is intended for a first-time user. It describes how to set up a NetVault: Backup system quickly and perform a test backup and restore.
NetVault: Backup Configurator Guide – This guide explains how to configure the default settings for NetVault: Backup.
NetVault: Backup Command Line Interface Guide – This guide provides detailed description of the command line utilities.
You can download these guides from the BakBone website at the following address:
http://www.bakbone.com/documentation
Technical Support
BakBone Software is dedicated to providing friendly, expert advice to NetVault customers. Our highly trained professionals are available to answer your
questions, offer solutions to your problems and generally help you make the most of your NetVault purchase. Log on to our web site for more information:
http://support.bakbone.com
Documentation Updates
For the latest documentation updates, refer to the BakBone Software Knowledge Base. BakBone's Knowledge Base article for NetVault: Backup v8.2.2 can be found at the following link:
Chapter 1:
I
NTRODUCING
N
ET
V
AULT
:
B
ACKUP
This chapter gives an overview of NetVault: Backup and describes the features and benefits of the product. The information in this chapter is organized into the following topics:
NetVault: Backup – At a Glance Key Benefits
Feature Summary
1.1 NetVault: Backup – At a Glance
NetVault: Backup offers enhanced data protection and enterprise-class
functionality that delivers ease of use while scaling to meet the demands of any sized environment, from a single server to complex, heterogeneous environment. The flexible, modular architecture provides proven reliability and high
performance, with a unique combination of features designed to reduce deployment costs and Total Cost of Ownership (TCO) by enabling you to implement a solution designed to meet current as well as future needs. Whether you are managing a few servers or a multi-site networked storage environment, there is a NetVault: Backup package designed to fit your needs.
1.2 Key Benefits
Rapid DeploymentNetVault: Backup's automated installation and device configuration features make it easy to add, manage or re-deploy distributed data management components throughout a growing enterprise storage environment. With our modular architecture you can license only those components you need today, while easily expanding the system as your storage environment or
performance requirements grow.
Enhanced Administrator Productivity
Policy based job management and enhanced reporting capabilities simplify maintenance of your data protection strategies. Many activities such as job definition and event notification can be defined and modified at a group level, making administrative tasks quicker and easier.
Increased Automation
NetVault: Backup's event notification enhancements and policy based job management features provide increased automation, especially when deployed across heterogeneous storage networks. NetVault: Backup enables administrators to define, manage and monitor jobs from remote clients, while the flexible notification feature ensures business continuance with the ability to define event contexts and triggers, tailoring the product to meet your unique requirements.
Lower Total Cost of Ownership
By dramatically simplifying implementation and networked storage administration, NetVault: Backup ensures improved data availability while reducing the associated labor costs. The product can significantly lower TCO and provide a return on initial software investment in as little as six to nine months.
1.3 Feature Summary
Extensive application data protection
Broad platform support
VMware protection without scripting
Policy based job management
Powerful reporting capabilities
Advanced SAN/NAS support
Comprehensive NDMP support
Command Line Interface (CLI) options
Full media management
Powerful Disk-to-Disk backup options
Dynamic device sharing
Event notification
Chapter 2:
G
ETTING
S
TARTED
This chapter provides a brief description of the NetVault: Backup Graphical User Interface. The information in this chapter is organized into the following topics:
Starting the Graphical User Interface Logging on to NetVault: Backup GUI Basics
Using NetVault: Backup Keyboard Shortcuts Starting and Stopping NetVault: Backup Services
2.1 Starting the Graphical User Interface
This section describes how to start the NetVault: Backup Graphical User Interface.
Starting the GUI on Linux/UNIX – On Linux/UNIX platforms, perform the following steps:
a. Log on to the system with root user privileges.
b. Start a terminal session and issue the following command:
nvgui
Alternatively, add ampersand (&) if you want an open prompt:
nvgui &
This command can be issued from any directory. Before you start the GUI, ensure that the path variable contains all font paths.
Starting the GUI on Windows – On Windows, perform the following steps: a. Log on to the system with Administrator privileges.
b. Click Start on the taskbar.
c. Point to Programs, point to NetVault, and then click NetVault.
Note: The NetVault: Backup Server and the Clients must be set to the same locale to display the GUI correctly.
2.2 Logging on to NetVault: Backup
By default, no login window is displayed when you start the GUI. NetVault: Backup performs an auto logon using the default user account. A login window will only appear if a password has been set for this user. If a login window is not displayed and you want to log on as a different user, click Log Off on the File menu. To log on to the NetVault: Backup system, perform the following steps:
Figure 2-1:
The login window
1. In the Welcome To list, the NetVault: Backup Server for the default domain is displayed. Do not change it unless you want to log on to a different NetVault: Backup domain. To log on to a different domain, select the NetVault: Backup Server for that domain in the list.
2. In the User box, enter your user name.
3. In the Password box, enter the password for your user account.
4. Select the Use this Login from Now On check box to save the user name. 5. Click OK.
To change your password, select Change Password. In the Set User Password window, set the password. For details on changing password refer to Setting User Account Passwordon page 165.
2.3 GUI Basics
The NetVault: Backup window consists of the menu bar, the toolbar, the Large Buttons panel and the status bar.
The menu bar displays the menus, which contain commands to perform a task in NetVault: Backup. The main tasks are organized under the Operations and Administration menu as follows:
Figure 2-2:
The NetVault: Backup Home Screen
Operations Menu – This menu contains the following commands:
Backup
Restore
Status
Media Management
Job Management
Reports
Logs
Administration Menu – This menu contains the following commands:
Client Management
Domain Management
Device Management
Policy Management
Access Control
Global Notification
To perform a task, open the corresponding task window. For example, to administer NetVault: Backup Clients, open the Client Management window as described below:
The commands on the menu bar vary depending on the active window. For example, the menu items for the Client Management window are different from the main NetVault: Backup window.
For the frequently accessed functions, NetVault: Backup provides toolbar buttons on the standard toolbar and the Large Buttons panel. You can use these buttons to open a window with a single click. For example, to open the Client
Management window, click Client Management on the toolbar or Large Buttons panel.
To hide or show the toolbar and/or Large Buttons panel, perform the following steps:
1. To hide the standard toolbar, clear the check mark for Tool Bar on the View menu. To hide the Large Buttons panel, clear the check mark for Large Buttons on the View menu.
2. To display them again, select Tool Bar and/or Large Buttons on the View menu.
The status bar displays the logged-in user name and the BakBone Time setting on the NetVault: Backup Server. For details on BakBone Time, refer to the description for the Time Sync tab in the NetVault: Backup Configurator Guide.
2.4 Using NetVault: Backup Keyboard Shortcuts
You can also use the NetVault: Backup's shortcut keys to open a task window from the main window. The keyboard shortcuts are listed in the following table:
Press To do this
A Open About window
B Open Backup window
C Open Client Management window
D Open Device Management window
H Show/hide Large Buttons panel
J Open Job Management window
L Open Logs window
M Open Media Management window
N Open Global Notification window
P Open Policy Management window
R Open Restore window
S Open Status window
2.5 Starting and Stopping NetVault: Backup
Services
NetVault: Backup services are automatically started when the installation completes. If the services need to be stopped or restarted, perform the following steps:
1. Start the NetVault: Backup Configurator.
On Linux/UNIX platforms, issue the following command:
nvconfigurator
Alternatively, add ampersand (&) if you want an open prompt.
nvconfigurator &
On Windows, click Start on the taskbar. Point to Programs, point to NetVault, and then click NetVault Configurator.
2. Open the Service tab
3. To stop service, click Stop Service. 4. To start service, click Start Service. 5. Click Apply to apply the settings.
U Open Access Control window
F1 Open Help window
F2 Open Report Component Editor
window
F3 Open Report Job Editor window
F4 Open Historic Reports window
F5 Open Reports window
F6 Open Domain Management window
F7 Open Access Control window
F8 Open Global Notification window
Chapter 3:
M
ANAGING
C
LIENTS
This chapter describes how to add and manage NetVault: Backup Clients. The information in this chapter is organized into the following topics:
NetVault: Backup Clients – An Overview Adding a Client
Locating a Client
Adding NetVault: Backup Server as a Client Client Status Summary
Administering Added Clients Viewing Client Properties Checking Client Access
Establishing the Firewall Relationship Setting Client Description
Installing License Keys
Installing and/or Removing NetVault: Backup Plugins Removing a Client from the NetVault: Backup Domain Working with Client Groups
Creating a Client Group Modifying a Client Group Removing a Client Group
3.1 NetVault: Backup Clients – An Overview
NetVault: Backup Clients are machines that act as backup and/or restore targets. These machines require at least the Client version of the NetVault: Backup software and TCP/IP connectivity to the NetVault: Backup Server. The Server and Clients can reside on different networks.
Clients which have locally-attached backup devices are called SmartClients. Such Clients require additional SmartClient licenses.
The Clients are added to the NetVault: Backup Server, which acts as the domain controller for the NetVault: Backup Domain. Only Member Clients can participate in the backup and restore operations within a NetVault: Backup Domain. The NetVault: Backup Server acts as a Client to itself and is a member of the NetVault: Backup Domain by default. A Client can be a member of more than one NetVault:
Backup Domain. You can also add one NetVault: Backup Server as a Client to another Server.
3.2 Adding a Client
Before starting this procedure, ensure that NetVault: Backup Client software version is not higher than the NetVault: Backup Server software version. To add a Client to the NetVault: Backup Server, perform the following steps:
1. Open the Client Management window (click Client Management on the toolbar or Large Buttons panel, or on the Administration menu, click Client Management).
2. Under Available NetVault Machines, you will find a list of NetVault: Backup Clients located on the network. These are machines on which you have installed either the NetVault: Backup Server or Client software. The icons on the left indicate the current status of the Client.
Figure 3-1:
The NetVault: Backup machines located on the network are listed under Available NetVault Machines
A Blue/Dimmed Blue icon indicates that the Client is currently up and can be added without any additional requirements.
A Blue/Dimmed Blue with Key icon indicates that the Client is currently available. However, this Client is password-protected. You will require the NetVault: Backup password for the machine in order to add it.
3. To add a Client that is currently available, double-click the Client in the Available NetVault Machines list. Alternatively, right-click the Client and select Add as Client.
4. If you have created any Client Groups (as described in the section Creating a Client Groupon page 32), then an Add Client to Groups window will be displayed. In the Select Group(s) list, select the groups to which you want to add the Client. Use the Shift+Click or Ctrl+Click methods to select the groups. 5. If no password was set for the Client during NetVault: Backup installation, the Client is added to the NetVault: Backup Server without any further action. For Clients on which a password was set during NetVault: Backup installation, a Password Required window will be displayed. Enter the NetVault: Backup password in the Enter Password box and click OK. On verification, the Client is added to the Server and listed under Clients.
3.2.1 Locating a Client
To locate a Client that is not listed under Available NetVault Machines, perform the following steps:
1. Under Find NetVault Machine at the bottom right, enter the NetVault: Backup name for the Client or its IP address.
2. Click Find.
NetVault: Backup re-scans the network for the Client, and if found, lists it under Available NetVault Machines (in alphabetical order).
A search can also fail for a number of reasons, including the following:
The DNS lookup table or the machine’s host table cannot be contacted.
NetVault: Backup service is not running on the machine.
NetVault: Backup software is removed from the machine.
3.2.2 Adding NetVault: Backup Server as a Client
You can also add a NetVault: Backup as a Member Client to another NetVault: Backup Domain. To add a NetVault: Backup Server as a Client to another NetVault: Backup Server, perform the following steps:
1. Start the NetVault: Backup Configurator.
2. On the Security tab, select This Machine May be Added as a Client to a Server to change the default security settings.
3. To add the Server as a Member Client, refer to Adding a Clienton page 27. A Red icon indicates that the Client is currently not available. Try adding it later when it comes online.
3.3 Client Status Summary
A Client that is added to the NetVault: Backup Server is listed under Clients in the Client Management window. The current status of these machines is indicated with one of following icons:
Blue/Dimmed Blue – This icon indicates that the Client is up and running. A dimmed icon represents a machine running NetVault: Backup 7.4.5 or an earlier version.
Blue/Dimmed Blue with Key – This icon could indicate either of the following:
The Client is in the process of being added
The NetVault: Backup password has changed since the Client was added A dimmed icon represents a machine running NetVault: Backup 7.4.5 or an earlier version.
Red – This icon indicates that the Client is currently unavailable. Either the machine is offline or NetVault: Backup services are stopped.
Note: A Yellow icon represents a Virtual Client which consists of a cluster of Clients. For details on Virtual Clients, refer to Using NetVault: Backup in a Cluster Setupon page 195.
You can get a consolidated view of the current status of the added clients, backup devices, and the submitted jobs from the NetVault: Backup Status interface. To access this interface click Status on the toolbar or Large Buttons panel, or on the Operations menu, click Status.
3.4 Administering Added Clients
This section describes the various Client administration procedures.
3.4.1 Viewing Client Properties
To view the Client properties, perform the following steps: 1. Under Clients, right-click the Client and select Properties.
2. The Client Properties window contains three tabs - System, Plugins and Installed Software. Click the corresponding tab to view the following information:
The System tab displays the machine name and description, NetVault: Backup version and build number, machine ID, network name for the machine, IP address, release information and operating system version number.
The Plugins tab lists the NetVault: Backup plugins installed on the Client. The details include the plugin name, version number, plugin ID, and installation date and time.
The Installed Software tab lists all the NetVault: Backup plugins installed on the Client. The details include the plugin name and the installation date.
3. Click OK to close the window.
3.4.2 Checking Client Access
To check access between the NetVault: Backup Server and a Client, perform the following steps:
1. Under Clients, right-click the machine and select Check Access.
2. NetVault: Backup attempts to connect to the Client and displays the status message corresponding to the Client accessibility.
3. Click OK to close the dialog.
3.4.3 Establishing the Firewall Relationship
A NetVault: Backup Server and Client can reside on different networks. If a firewall exists between these two networks, you can configure the firewall relationship as Outside Firewall to use open ports for message transfers, broadcasts, and data transfers to the Client.
Before establishing the firewall relationship between the networks, consider the following points:
If the Client and the Server are on the same side of the firewall, or if no firewall exists between the two networks, do not change the default configuration which is set as Inside Firewall.
The firewall relationship cannot be established for Clients running NetVault: Backup v7.4.5 or a previous version. Such Clients are represented with a dimmed blue icon. The communication with such Clients is always treated as an Outside Firewall operation and the Server adheres to the port restrictions set via the Firewall tab on the NetVault: Backup Configurator. As a result, you must open more ports to enable concurrent data transfers with multiple Clients that are outside the firewall.
This feature is not intended for use with the NAT firewalls.
This feature is not intended for configuring the firewall settings between two Clients. Client to Client communication is always treated as an Outside Firewall operation and adheres to the port restrictions configured via the NetVault: Backup Configurator. For details on port configuration, refer to the section on Firewall tab in the NetVault: Backup Configurator Guide.
To establish the firewall relationship between the Server and Client networks, perform the following steps:
1. Under Clients, right-click the Client and select Outside Firewall.
2. Once you select the Outside Firewall option, this command is replaced with Inside Firewall option, which can be used to update the firewall settings if there are any changes later.
3.4.4 Setting Client Description
To set the Client description, perform the following steps:
1. Under Clients, right-click the Client and select Set Description.
2. In the Enter Client Description box, enter a detailed description for the Client.
3. Click OK.
3.4.5 Installing License Keys
It is recommended that you install the permanent license keys for NetVault: Backup and the non-core plugins before the 45-day evaluation period expires. The permanent license keys can be requested at http://licenses.bakbone.com. To install the permanent license keys for the software, perform the following steps:
1. Under Clients, right-click the Client and select Install License Key. 2. Enter (or copy/paste) the license key in the Enter Key String box. 3. Click OK.
You can also install the license keys via the Configurator or CLI utility. For more information on these methods, refer to the NetVault: Backup Configurator Guide
and NetVault: Backup Command Line Interface Guide.
3.4.6 Installing and/or Removing NetVault: Backup Plugins
For detailed instructions on installing and/or removing a plugin, refer to the relevant APM/Plugin User’s Guide.3.4.7 Removing a Client from the NetVault: Backup Domain
To remove a Client from the NetVault: Backup Domain, perform the following steps:1. Under Clients, right-click the Client and select Remove. For Clients with a red icon, select Force Remove.
2. In the confirmation window, click Yes.
3.5 Working with Client Groups
NetVault: Backup automatically creates a Client Group called default. You can create other Client Groups and use them instead of selecting individual Clients for the operations like defining policy-based backups or granting Client access to users. This section describes the procedures for creating and managing the user-defined Client Groups.
3.5.1 Creating a Client Group
To create a Client Group, perform the following steps:
1. Open the Client Management window (click Client Management on the toolbar or Large Buttons panel, or on the Administration menu, click Client Management ).
2. Click the Client Groups tab.
3. Click Add Client Group to create a new Client Group. It is named New Client Group, by default.
4. To rename the group, perform the following steps: a. Right-click the group and select Rename Group.
b. In the New Name for the Group box, enter the group name. c. Click OK.
5. To set a detailed description for the group, perform the following steps: a. Right-click the group and select Set Description.
b. In the Group Description box, enter the details. c. Click OK.
6. To add the group members, perform the following steps: a. Right-click the group and select Add Member Clients.
b. In the Select Clients to Add list, select the Clients. Use Shift+Click to select consecutive Clients, or Ctrl+Click to select non-consecutive Clients. Alternatively, you can select the Group Includes ALL Clients check box to add all the existing Clients to the group.
c. Click OK.
3.5.2 Modifying a Client Group
To modify a Client Group, perform the following steps:
1. Open the Client Management window (click Client Management on the toolbar or Large Buttons panel, or on the Administration menu, click Client Management).
3. To add new members, perform the following steps: a. Right-click the group and select Add Member Clients.
b. In the Select Clients to Add list, select the Clients. Use Shift+Click to select consecutive Clients or Ctrl+Click to select non-consecutive Clients. Alternatively, you can select the Group Includes ALL Clients check box to add all the existing Clients to the group.
c. Click OK.
4. To remove group members, perform the following steps: a. Right-click the group and select Remove Member Clients. b. In the Remove Clients from Group list, select the Clients. Use
Shift+Click to select consecutive Clients, or Ctrl+Click to select non-consecutive Clients.
c. Click OK.
5. To rename a group, perform the following steps. a. Right-click the group and select Rename Group.
b. In the New Name for the Group box, enter the group name. c. Click OK.
6. To set or change the group description, perform the following steps: a. Right-click the group and select Set Description.
b. In the Group Description box, enter the details. c. Click OK.
3.5.3 Removing a Client Group
To remove a client group that is no longer in use, perform the following steps: 1. Open the Client Management window (click Client Management on the
toolbar or Large Buttons panel, or on the Administration menu, click Client Management).
2. Click the Client Groups tab and locate the Client Group. 3. Right-click the group and select Remove Group.
4. In the confirmation window, click Yes. This will remove the Client Group. However, the individual Member Clients remain part of the NetVault: Backup Domain.
Chapter 4:
M
ANAGING
B
ACKUP
D
EVICES
This chapter describes how to add and manage the backup devices. The information in this chapter is organized into the following topics:
Backup Devices – An Overview Virtual Tape Libraries – An Overview
Shared Virtual Tape Libraries – An Overview SAN Considerations
Adding Devices Using the Automatic Device Configuration Wizard Manually Starting the Device Configuration Wizard
Adding a Library Manually
Adding a Standalone Drive Manually Device Status Summary
Sharing Drives
Adding a Drive as Shared Adding Shared Drives to Client Creating and Adding a VTL
Creating and Adding a Virtual Standalone Drive Creating and Adding an SVTL
Prerequisites
General Prerequisites Setting up Raw I/O on Linux
Setting up Raw I/O on RedHat Linux Setting up Raw I/O on SUSE Linux
Setting up Raw I/O on RedHat Enterprise Linux 5 Creating an SVTL
Adding Library to the SVTL Controller Distributing SVTL Drives
Sharing SVTL Drives Configuring Library Parameters Configuring Drive Parameters
Configuring General Parameters
Configuring NDMP Parameters Configuring Performance Parameters Configuring Data Collection Parameters Using Mixed Media Libraries
Organizing Media in a Mixed Media Library Adding and Configuring a Mixed Media Library Adding Media to a Library with an Entry/Exit Port Adding Media to a Library without an Entry/Exit Port Administering Added Devices
Viewing Device Status
Modifying Library Configuration Toggling Devices View
Removing a Library Removing a VTL
Opening and/or Closing Library Door Opening and/or Closing Entry/Exit Ports Checking Offline Drives
Taking Drives Offline in NetVault: Backup Loading and/or Unloading Media
Exporting Media to Entry/Exit Port Restarting a Library
Importing NetApp VTL’s Shadow Tape Working with Cleaning Tapes
Configuring Cleaning Support
Configuring Re-use Settings for Cleaning Media Viewing Drive Cleaning Status
Setting Automatic Cleaning Routine Cleaning Drives Manually
4.1 Backup Devices – An Overview
NetVault: Backup supports a wide range of backup devices, including different types of tape libraries, autoloaders, tape drives and disk arrays. You can connect these devices to the Server, or any SmartClient or NAS filer within the backup domain. The devices can be configured for single or shared use and connected via SCSI, iSCSI, IP or Fibre Channel SAN interfaces. The built-in VTL (Virtual Tape Library) and SVTL (Shared Virtual Tape Library) features allow you to
emulate tape libraries on disk systems, which can be used for quicker disk-to-disk backups and restores. The VTLs and SVTLs can be created on the NetVault: Backup Server or any SmartClient.
To use a device for any NetVault: Backup operation, you must add the device to the set of devices controlled by the Server. A SmartClient attached device is recognized only after you add the Client to the Server. Similarly, a filer attached device is recognized only after you add the filer to the Server (using the NDMP Plugin).
On Windows, you must remove the resident drivers from the Windows Removable Storage Service before adding them to the NetVault: Backup Server. Refer to the
NetVault: Backup Installation/Upgrade Guide for instructions on disabling this service. Once added, the devices can be used for any local or LAN based backups and restores.
Note: NetVault: Backup Server may not recognize a standalone tape device locally attached to an RHEL4 U1 Client. This happens because on RHEL4 U1, the SG driver that supports the standalone devices is not loaded automatically. You must manually load this driver and restart the NetVault: Backup services. This issue only occurs when the RHEL4 U1 Client does not have any other locally attached library or changer. For details on obtaining and loading the SG driver, refer to the relevant RHEL4 U1 documentation.
4.2 Virtual Tape Libraries – An Overview
Virtual Tape Libraries (VTLs) are an emulation of tape libraries on disk, which enable disk-to-disk backups. With VTLs, you have the flexibility to perform quick backups to disks, and during off-peak hours migrate or duplicate the backup to physical systems for off-site storage. The media manager does not distinguish between a virtual and a physical tape, which simplifies the process of setting up backup policies, including retention period and rotation schemes.
VTLs are represented as directories on the disk. Each VTL contains three directories named drives, slots and media, which in turn contain numbered sub-directories. The virtual drives reside as files within the drives sub-sub-directories. These files contain links to the media files. The virtual tapes reside as media files within the media directory. When a virtual tape is moved between slot and drive, the media file itself stays in the media directory and the drives and slots files are modified to emulate the moving of the media.
A VTL can handle any number of concurrent NetVault: Backup Client backups. As with a physical library the number of drives contained in the VTL dictate how many simultaneous operations can be performed. The number of slots must be the same as or more than the number of drives configured. Different operating systems may impose limits on the maximum file size, which can affect the
maximum VTL media size. VTLs are independent of file systems (e.g., NTFS, UFS, ext3, etc.) and disk systems (e.g., IDE, SCSI, iSCSI, etc.).
4.3 Shared Virtual Tape Libraries – An Overview
SVTL extends the VTL implementation and lets you share a VTL with multiple NetVault: Backup machines for LAN-free backups. The interface can be Fibre Channel, iSCSI or SCSI. On Linux and Solaris platforms, SCSI_FCP protocol is also supported. The SVTLs are supported on the following platforms:
Windows
Linux (x86 and x86-64)
Solaris SPARC and Solaris x8664
The disks can be of any size. However, operating system imposed limitations do apply. The SVTL size can be changed on the fly using CLI utilities.
4.4 SAN Considerations
When configuring tape libraries within a SAN environment, we recommend that you use persistent binding (also known as SCSI mapping/persistent reservation/ persistent naming). NetVault: Backup cannot communicate with a library if its SCSI address changes as a result of changes within the SAN. Persistent binding assigns a fixed SCSI address to the device which does not change as devices are added or removed within the SAN. For the Host Bus Adapters (HBAs), you can map the Fibre Channel device address (World Wide Name(WWN) or World Wide Identifier (WWID)) or a Loop ID to the SCSI address. This ensures that changes within the SAN have no impact on NetVault: Backup.
You must also use persistent binding when the Server and the fibre devices are attached to separate switches, or when zoning is implemented. NetVault: Backup does not support multipathing to a tape library/device, so only one channel to the switch or target host must be attached. It is also recommend that you do not use the tape libraries/drives on the same switch or in the same zone that has disk devices attached. Problems might be encountered if packets from both device types co-exist in a SAN environment. It is recommended that you use separate HBAs for these devices, or at least different zones.
Apple supports multipathing in the FC Host Adapter and XserveRAID, and often this is the default setting after installation. But generally the FC sequential tape drives do not support multipath FC integrations. So connections must be logically or physically separated to ensure a consistent communication path.
4.5 Adding Devices Using the Automatic Device
Configuration Wizard
The Automatic Device Configuration wizard helps you to quickly add and configure backup devices. This wizard can recognize devices manufactured by multiple vendors, although not all are supported. NetVault: Backup automatically starts scanning for new devices in the domain when you start the software services. Note: To disable the auto scan feature, start the NetVault: Backup Configurator and set the Scan for Devices at Start of Day parameter on the Device Scan tab to Neither.
To automatically configure a backup device, perform the following steps:
1. Open the Device Management window (click Device Management on the toolbar or Large Buttons panel, or on the Administration menu, click Device Management).
2. The Automatic Device Configuration wizard starts automatically when a qualified device is found. Follow the wizard as it guides you through the configuration steps.
3. Verify the device details and click Yes to start the configuration procedure. 4. Configure the following parameters:
Figure 4-1:
The auto device configuration wizard
Name – This box displays the default name for the device. You can change it and assign another name for easy identification.
Configure Performance Options – Select this check box to modify the default performance settings.
Scan Client for Remote/Shared Devices – This option is used for sharing drives among multiple Clients. For details on sharing drives, refer to Sharing Driveson page 43. For devices controlled by a single Client, clear the check box.
5. If Configure Performance Options was selected in the previous step, re-configure the following parameters to improve performance:
Amount of Memory to Assign to Transfer Buffers (KB) – Enter the transfer buffer size (or the shared memory size). By default, the transfer buffer is set to 257 KB. Generally, the following rule applies for the shared memory size:
shared memory=x*block size + 1
For details on configuring this parameter, refer to Configuring Performance Parameterson page 61.
Media Block Size – Enter the media block size. The default block size is 32 KB. For details on configuring this parameter, refer to Configuring General Parameterson page 57.
Click Next to proceed.
6. NetVault: Backup adds the device and displays a message. Click Finish to complete the procedure. The device is added and listed on the Devices tab.
4.5.1 Manually Starting the Device Configuration Wizard
If a qualified device is not detected automatically, perform the following steps to start the wizard manually and complete the configuration procedure:
1. Open the Device Management window (click Device Management on the toolbar or Large Buttons panel, or on the Administration menu, click Device Management).
2. On the Add menu, click Auto-Configure Device.
3. In the Automatic Device Configuration window, configure the following parameters to begin scanning:
Device Type – Select the appropriate option to search for Standalone Drives or Libraries.
Clients – Under Select Clients, select the Clients that are to be scanned.
Force Re-scan – To force a re-scan instead of using the cached information, select Re-scan for Devices.
4. To scan for devices previously ignored using the Do Not Ask Again for This Device option, right-click the machine to which the device is physically connected, and then select Clear List of Ignored Devices.
5. Click Next to continue.
6. NetVault: Backup begins scanning the network for available devices and starts the Automatic Device Configuration wizard when a qualified device
is found. To complete the configuration, continue from step 3 of Adding Devices Using the Automatic Device Configuration Wizardon page 38.
4.6 Adding a Library Manually
To add a library manually, perform the following steps:
1. Open the Device Management window (click Device Management on the toolbar or Large Buttons panel, or on the Administration menu, click Device Management).
2. On the Add menu, click Add Library. This opens the Library Selection tab in the Add Library window.
3. Under Choose Library, open the Server/Client node to which the device is connected (double-click the node, or right-click it and select Open).
4. Depending on the library type, open the Robotic Libraries or NDMP Robotic Libraries node. The attached libraries are listed under their type. 5. Double-click the library or right-click and choose Select. The library picture,
type and details are displayed under Selected Library.
Figure 4-2:
Select the library under Choose Library
6. Click the Drive Selection tab.
7. Open the Server/Client node to which the device is connected.
8. Open the corresponding drive type node. The available drives are listed under this node.
9. For libraries with a single drive, double-click the drive, or right-click it and choose Select. The drive picture, type and details are displayed under Selected Drives.
10.For libraries with multiple drives, perform the following steps to assign the correct drive bay to each drive:
a. Enter 1 in the Select for Drive Bay box.
b. Under Choose Drives, double-click drive 1 or right-click it and choose Select. The drive picture, type and details are displayed under Selected Drives.
c. Repeat steps a and b for the remaining drives, changing the drive number and bay for each drive.
Figure 4-3:
Choose the correct drive bay
Note: While the drive number usually matches the bay number, depending on the library and drive configuration a different assignment of drives to bays might be necessary. If you experience failure during move or load/unload operations, consider adding your drives in a different order to their bays.
11. To configure the library and drive parameters, refer to Configuring Library Parameterson page 56 and Configuring Drive Parameterson page 57. 12.Click Save Details on the toolbar. The library is added and listed on the
Devices tab. When the library initialization and inventory completes, the status changes to online.
4.7 Adding a Standalone Drive Manually
1. Open the Device Management window (click Device Management on the toolbar or Large Buttons panel, or on the Administration menu, click Device Management).
2. On the Add menu, click Add Standalone Drive. This opens the Drive Selection tab in the Add Standalone Drive window.
3. Under Choose Drives, open the Server/Client node to which the device is connected (double-click the node, or right-click it and select Open).
4. Open the SCSI Tape drive nodes. The available drives are listed under this node.
5. Double-click the drive or right-click it, and choose Select. The drive picture, type and details are displayed under Selected Drives.
6. To configure the drive parameters, refer to Configuring Drive Parameterson page 57.
7. Click Save Details on the toolbar. The drive is added and listed on the Devices tab. When the drive initialization completes, the status changes to online.
4.8 Device Status Summary
A device that is added to the NetVault: Backup Server is listed on the Devices tab in the Device Management window. A different icon is used to represent libraries, drives, slots and entry/exit ports. The current status of these devices is
represented by one of the following status indicators:
Figure 4-4:
The device status indicators
Green Light – This icon indicates that the device is online and available for use.
Yellow Light – This icon indicates that a backup or restore job is currently using this device.
Red Light – This icon indicates that the device is currently offline. NetVault: Backup can detect the device but it cannot be accessed for backup or restore jobs.
Red Cross – This icon indicates that the device is unavailable (e.g., the SCSI cable is disconnected, the device is removed, etc.). NetVault: Backup cannot detect the device.
You can get a consolidated view of the current status of the added clients, backup devices, and the submitted jobs from the NetVault: Backup Status interface. To access this interface click Status on the toolbar or Large Buttons panel, or on the Operations menu, click Status.
4.9 Sharing Drives
In environments that support this, you can share drives among multiple clients for better resource utilization through direct access. This requires an infrastructure where multiple machines can establish direct paths to the tape drives, e.g., in switched Fibre Channel environments. While the drives are controlled by different clients, the library arm changer remains under the control of one client. Each drive that is to be shared by more than one machine consumes a Dynamically Shared Drive (DSD) licence.
The procedure for sharing a drive can be divided into two steps:
Adding a Drive as Shared Adding Shared Drives to Client
These steps are described in detail in the following sections. Before you proceed, make sure all the target Clients are added to the NetVault: Backup Server.
4.9.1 Adding a Drive as Shared
Depending on whether the device is a library or a standalone drive, refer to the relevant section.
4.9.1.a Sharing Drives of a Library
To add the drives of a library as shared, perform the following steps:
1. Open the Device Management window (click Device Management on the toolbar or Large Buttons panel, or on the Administration menu, click Device Management).
2. On the Add menu, click Add Library. This opens the Library Selection tab in the Add Library window.