Chapter 1: Configuring SQL Server
In This Chapter
⻬SQL Server configuration tools ⻬Adjusting server parameters ⻬Generating configuration scripts
W
ith each new release of SQL Server, Microsoft continues to improve and simplify the daily tasks of the database administrator. However, it’s still not possible to run the database on autopilot, or replace the DBA with a robot. Given that reality, this chapter aims to help administrators make sense of all the server-wide settings and properties that they encounter each day.We begin by giving you a brief overview of a collection of SQL Server’s con-figuration tools and technologies. However, from the day-to-day perspective of a database administrator, most configuration tuning is controlled via the SQL Server Management Studio. Consequently, the lion’s share of this chap-ter is dedicated to understanding how that tool allows you to fine-tune the dozens of parameters that influence SQL Server’s behavior. Finally, we show you how to generate scripts so that you can further automate the mainte-nance and administration of your SQL Server environment.
SQL Server Configuration Tools
If you’re new to SQL Server, the sheer number of available tactics that achieve the same goal might confuse you. Part of this is because SQL Server has been around for many years, and still ships with several legacy tech-nologies. However, Microsoft has been steadily moving in the direction of becoming 100-percent graphical, so it’s worthwhile to become familiar with these tools. Consequently, throughout this book, we devote the majority of our attention to making the most of the SQL Server Management Studio. We also point out, however, that character-based approaches to getting the job done still exist. These same rules apply to many administrative tasks. We look at each of the major technologies available for performing administra-tive work.
If you want to get a holistic view of how these tools work together, see Book I, Chapter 2.
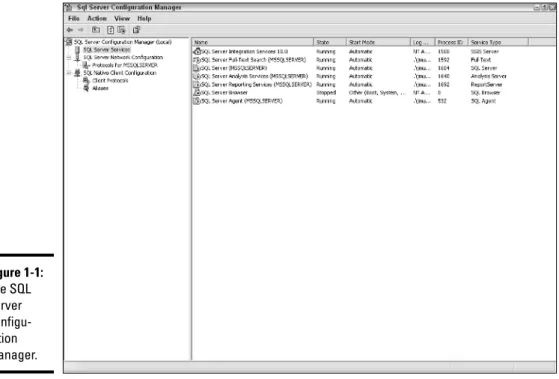
SQL Server Configuration Manager
This graphical tool (launched from within the SQL Server Configuration Tools menu) is primarily meant to let administrators enable or disable SQL Server’s system services as well as client/server communication protocols. Figure 1-1 shows this tool in the context of managing services.
SQL Server Surface Area Configuration Tool
This graphical tool (also launched from within the SQL Server Configuration Tools menu) allows the administrator to determine which features and capa-bilities will be available to users. Given the very real security risks and dan-gers faced by administrators, this tool is meant to help minimize the areas (or services) for a potential attack.
sp_configure
Before there were graphical tools, there was the sp_configurestored pro-cedure. Administrators have used this powerful procedure for many years to control SQL Server’s behavior, and many DBAs still perform all their configu-ration tasks this way.
Figure 1-1:
The SQL Server Configu-ration Manager.
Book VIII Chapter 1
Configuring
SQL Server
This procedure can be launched at least two ways. The first uses the character-based SQLCMD utility, and the second allows you to use a query window within the SQL Server Management Studio.
SQL Server Management Studio
This graphical tool, which ships with every edition of SQL Server, gives the database administrator unprecedented control over the behavior of his SQL Server environment. We spend the rest of the chapter showing you how to use this tool to manage your server configuration settings.
One of the most exciting features (especially from the perspective of the DBA) found in SQL Server 2008 is Policy-Based Management. This new capa-bility, tasked with simplifying and making SQL Server management more con-sistent, is explored in Book I, Chapter 2. We then show you how to use it later in that mini-book as part of Chapter 4. Book VII, Chapter 2 shows how Policy-Based Management can play a big role in performance optimization and management.
Adjusting Server Properties
In this section, we show you how to configure a wide variety of SQL Server properties. These settings affect all databases, so think carefully when going down this road.
Be as scientific as you can in your efforts. Whenever possible, change only one setting at a time. This makes it much easier to weigh the impact of any alterations.
We begin by illustrating how to use the SQL Server Management Studio to make these configuration parameter changes. Here’s how to get started:
1.
Launch SQL Server Management Studio.2.
Connect to the appropriate SQL Server instance.3.
Right-click the connection’s entry in the Object Explorer view, and choose Properties.This opens the Server Properties dialog box, as shown in Figure 1-2.
4.
Choose the appropriate properties page that contains the setting you want to change.You can select among eight different pages, including: General Connections
Memory Database settings Processors Advanced Security Permissions
We walk you through each of these pages and their associated settings in a moment.
5.
Make your change, and click OK.Note:Certain alterations require you to restart SQL Server for them to take effect.
When it comes to tuning and optimizing your SQL Server instance’s perform-ance, server settings are among the least effective mechanisms to use. Modern database environments (such as SQL Server) do a great job of real-time engine performance and throughput management. You’ll get much better mileage by focusing on your database design, indexing strategy, and how queries and other operations will interact with SQL Server. If perform-ance is something that interests you, Book VI is dedicated to this important topic.
Figure 1-2:
The General Server Properties page in SQL Server Manage-ment Studio.
Book VIII Chapter 1
Configuring
SQL Server
General properties
This page (refer to Figure 1-2) contains a collection of read-only settings and summaries. Although you can’t change them, it’s a good idea to familiarize yourself with these parameters:
✦ Memory:This is the total memory on the database server, not just the amount allocated to SQL Server.
✦ Processors:The number of physical central processing units (CPU) on the database server.
✦ Server Collation:Regionally driven settings that determine how data is compared and sorted.
✦ Is Clustered:Specifies whether this instance of SQL Server has been included in a failover cluster.
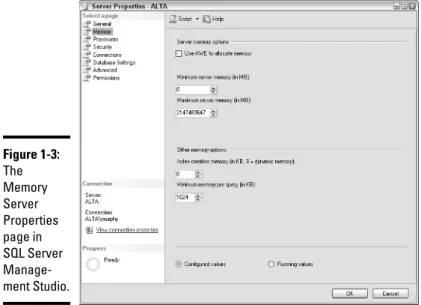
Memory properties
As you might surmise from its name, this is the page where you control SQL Server’s usage of memory. Its parameters include
✦ Use AWE to Allocate Memory:If your database server is running on a 32-bit version of Windows and sports more than 4GB of memory, you can instruct SQL Server to take advantage of Address Windowing Extensions (AWE) to employ up to 64GB of memory.
✦ Minimum Server Memory (in MB):This setting controls the minimum amount of buffer pool memory that’s available to SQL Server.
✦ Maximum Server Memory (in MB):This setting determines the maxi-mum amount of memory that’s available to SQL Server for its buffer pool. Generally, it’s wise to leave both these memory settings at their default values.
✦ Index Creation Memory (in KB):This parameter gives SQL Server a guideline on how much memory it can take advantage of when creating an index. The default of 0 (zero) means that SQL Server automatically determines the right value.
✦ Minimum Memory per Query (in KB):This setting provides a baseline for the memory that SQL Server consumes for each running query. It can be set from 512KB to 2GB.
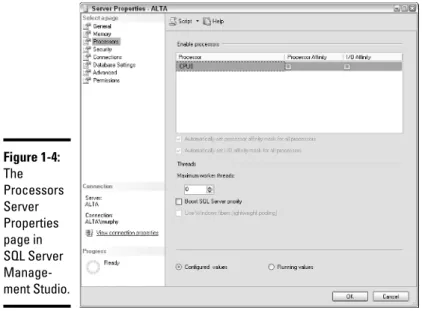
Processor properties
Figure 1-4 shows the Processors Server Properties page where you find a col-lection of settings aimed at optimizing how SQL Server interacts with your computer’s central processing unit (CPU). Additionally, deploying multi-processor servers is an increasingly popular way to derive added perform-ance from your SQL Server database environment. This page includes settings specifically tailored for those types of environments.
Several of these settings are meaningful only if you’re running a multiple processor database server. If the options are grayed-out in your environ-ment, then you don’t need to consider them.
Here’s a look at each of these sections:
✦ Enable Processors:This grouping of settings is aimed specifically at get-ting the most from multiprocessor environments. You can request that SQL Server bind itself to, and take advantage of, one or more of these processors by checking the processor affinity and I/O affinity boxes.
✦ Threads:This grouping of settings should be approached with caution. They let the SQL Server administrator dictate specialized, operating system–level performance requirements.
Figure 1-3:
The Memory Server Properties page in SQL Server Manage-ment Studio.
Book VIII Chapter 1
Configuring
SQL Server
Security properties
Chapter 3 in this mini-book is dedicated to a complete overview of all SQL Server considerations, including logins and permissions. At this point, we examine how to set some server-wide security settings, as shown in Figure 1-5.
Figure 1-5:
The Security Server Properties page in SQL Server Manage-ment Studio.
Figure 1-4:
The Processors Server Properties page in SQL Server Manage-ment Studio.
The Security Server Properties settings include
✦ Server Authentication:You can choose between Windows Authenti-cation mode, which relies on the operating system for its account infor-mation, and SQL Server and Windows Authentication mode, which requires coordination between the database and operating system. In many cases, the former option is simpler for administrators to maintain. In fact, the default setting is Windows Authentication Mode.
✦ Login Auditing:SQL Server allows you to audit (that is, create log entries) for failed logins, successful logins, or both. You can also elect not to audit logins at all.
✦ Server Proxy Account:If you want to designate a specific login for major SQL Server administration tasks (that is, a “proxy”), you can fill in those details here.
✦ Enable Common Criteria Compliance:By checking this box, you instruct SQL Server to enforce behavior and collect information that is used in support of the security standards (the Common Criteria) speci-fied by a multinational IT security organization.
✦ Enable C2 Audit Tracing:If you need to comply with C2 auditing, and its associated logging, check this box to begin collecting these detailed statistics.
✦ Cross Database Ownership Chaining:SQL Server allows you to manage multiple database objects by setting permissions on only one of them. This concept is ownership chaining,and enabling this check box makes it possible for this behavior to span multiple databases.
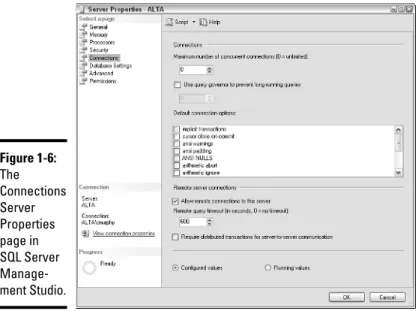
Connection properties
This page, as shown in Figure 1-6, is where you customize SQL Server’s behavior with regard to its handling of connections. Major settings include
✦ Maximum Number of Concurrent Connections:With a default value of 0, SQL Server allows as many connections as it can support with avail-able system resources. If you want to limit the number of concurrent connections, manually provide your own setting for this parameter.
✦ Use Query Governor to Prevent Long-running Queries:If you’re con-cerned about users or programs that might generate a seemingly never-ending query, check this box and provide a value (in seconds) that serves as a limit on how long a query can take to return results.
✦ Default Connection Options:Here, you find a group of options (each with its own check box) that determines how a connection to your server behaves. See Book II, Chapter 1 if you’re interested in understand-ing these options in more detail.
Book VIII Chapter 1
Configuring
SQL Server
✦ Remote Server Connections:This check box gives you the choice to let remote users and computers connect to this database server. If you elect to make this possible, you also have the ability to set a timeout value for how long it takes a remote query to complete execution. If you’re concerned about remote operations running for extended amounts of time, provide a maximum value.
✦ Require Distributed Transactions for Server-to-Server Communication:
The Microsoft Distributed Transaction Coordinator (DTC) helps ensure that transactions that span multiple computers complete successfully. Transactions are a big part of Book III, Chapter 8. For now, if you expect to run many distributed transactions, consider enabling this check box, especially if you have concerns either about the complexity of the trans-action or the quality of the underlying network infrastructure.
Database Setting properties
This page allows an administrator to define behavior for SQL Server’s backup, restore, and recovery capabilities. As shown in Figure 1-7, you can set the following parameters for your environment:
✦ Default Index Fill Factor:Book VII, Chapter 3 focuses heavily on proper index techniques for SQL Server. For now, this setting instructs SQL Server how full each index page should be when it creates a new index from existing data. A value of 0 (which behaves the same as a value of 100) tells SQL Server to fill these pages as much as possible. In most cases, the default value is fine.
Figure 1-6:
The Connections Server Properties page in SQL Server Manage-ment Studio.
✦ SQL Server New Tape Behavior:If your backup operations rely on tape, here’s where you tell SQL Server how long it should wait for you to pro-vide a new tape.
✦ Default Backup Media Retention:As part of its backup safeguards and capabilities, SQL Server doesn’t overwrite an existing backup tape until that tape has expired. Here’s where you provide details on how long you want a tape to be retained.
✦ Compress Backup:If you’re concerned about available space on your backup media, you can use this check box to tell SQL Server to com-press the archive.
✦ Recovery Interval:In most cases, SQL Server is perfectly capable of managing the time it takes to recover a database. The default value of 0 allows SQL Server to make its own determinations on how to proceed. However, if you’re concerned that a recovery might take too long, pro-vide your own value for this parameter. This places an upper limit on the time a recovery may take.
✦ Database Default Locations:To manage your information, SQL Server uses two types of files: data and log. Here’s where you can set default values about where these files are located. Note:You always have the freedom to specify individual file locations when creating or updating a database; this value merely sets a default location.
Figure 1-7:
The Database Settings Server Properties page in SQL Server Manage-ment Studio.
Book VIII Chapter 1
Configuring
SQL Server
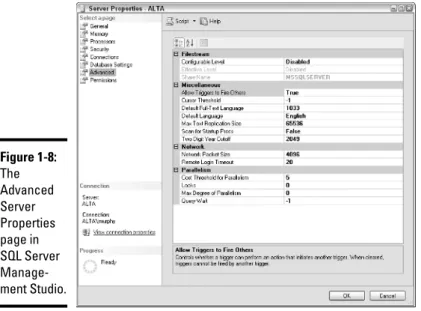
Advanced properties
This page is the kitchen sink of SQL Server properties — you find a little bit of everything on it. Figure 1-8 highlights how this page appears. Before we look at each of these settings, note that (in most cases) the default values provided by Microsoft are sufficient:
✦ Filestream Configurable Level:Recall that SQL Server allows you to use filestreams as a way of leveraging operating system disk storage in con-junction with the database. This setting determines the granularity(that is, scope) of filestream operations. SQL Server takes your configuration value and reports on it in the read-only Effective Level field.
✦ Filestream Share Name:If you’ve elected to enable filestreams, you can provide a reference name for the share here.
✦ Allow Triggers to Fire Others:Enabling this option allows one trigger to launch another trigger.
✦ Cursor Threshold:To enhance throughput, SQL Server can take advan-tage of asynchronous operations. This value guides SQL Server on when to enable this performance-enhancing capability. The default value of –1 is a good choice.
✦ Default Full-Text Language:This numeric code identifies the language to be used for full-text searches.
✦ Default Language:SQL Server uses this default language for any new login.
✦ Max Text Replication Size:You can place a cap on the amount of text that SQL Server replicates. Consider changes to this field carefully. You must balance performance considerations with the information preser-vation offered by replication.
✦ Scan for Startup Procs:As an administrator, you can instruct SQL Server to run one or more stored procedures when the database engine starts. This field controls whether SQL Server undertakes this operation.
✦ Two Digit Year Cutoff:Remember the Y2K crisis? This value allows you to specify the final year that will work with a two-digit year value.
✦ Network Packet Size:This parameter allows you to tweak the size of network packet messages. Only experienced database and network administrators should change this from its default value.
✦ Remote Login Timeout:This value, specified in seconds, sets the time that SQL Server waits before responding to a failed remote login attempt. If you’re concerned about denial of service or other remote attacks on your database, keep this setting high. If this is not a concern, you can safely lower it.
✦ Cost Threshold for Parallelism:This option tweaks the SQL Server behavior for paralleloperations (that is, taking advantage of multi-processors), based on query plans generated from the Optimizer. With a range from 0 to 32767, you have leeway to experiment, but make these changes carefully.
✦ Locks:For operations that employ parallel processing, this parameter determines the maximum number of locks employed as part of the pro-cedure. Leaving it at 0 is a good idea. This allows SQL Server to manage this important behavior.
✦ Max Degree of Parallelism:You can cap the number of processors that participate in a parallel operation by using this setting.
✦ Query Wait:You can tell SQL Server how many seconds you want the query to wait for resources before giving up and timing out. Unless you have special needs or complications, using the default of –1 is a good idea.
Permission properties
This page gives the administrator the ability to set explicit permissions for individual users (both logins and roles). If you’re looking for a detailed exploration of the entire security topic, see Chapter 3 in this mini-book.
Figure 1-8:
The Advanced Server Properties page in SQL Server Manage-ment Studio.
Book VIII Chapter 1
Configuring
SQL Server
Generating Configuration Scripts
Microsoft subscribes to the database administration philosophy that wiz-ards and graphical tools are good, and repetitive, tedious hand coding is bad. Despite this natural preference toward wizard-driven automation, cir-cumstances still exist where database administrators might need to create or modify scripts that manage their databases. Some DBAs even prefer to work this way, rather than always using graphical tools. For this important constituency, SQL Server makes it easy to generate, and then edit, all kinds of administrative scripts. We close this chapter by seeing how this is done. To get started, launch the SQL Server Management Studio. You’ll soon be in an excellent position to generate all the scripts you need. Here’s how:
1.
Launch SQL Server Management Studio.2.
Connect to the appropriate SQL Server instance.3.
Expand the connection’s entry in the Object Explorer view.4.
Expand the Databases folder.5.
Right-click the database that you want to administer.6.
Choose Tasks.7.
Choose Generate Scripts.This launches the Generate SQL Server Scripts Wizard. For the purpose of this example, we show you how to generate a simple script that cre-ates a table. When you start to use this wizard, however, you can do much more.
8.
Highlight the database where the object(s) that you want to script can be found, and click Next.9.
Customize the script options that you want an SQL Server to employ, and click Next.More than two dozen ways to tweak your script exist, ranging from error handling to the types of objects you want scripted. As is the case with many of SQL Server’s wizards, feel free to experiment with sample data-bases before trying this on production information.
10.
Identify the types of objects that you want to script, and click Next.These objects can include defaults, rules, tables, user-defined data types, and views.
11.
Identify the specific objects that you want to script, and click Next.Your available choices are dependent on what types of objects you select in Step 10.
12.
Decide where you want the output to be placed, and click Next.SQL Server dutifully creates the output in a file, on the Clipboard, or in a new query window.
13.
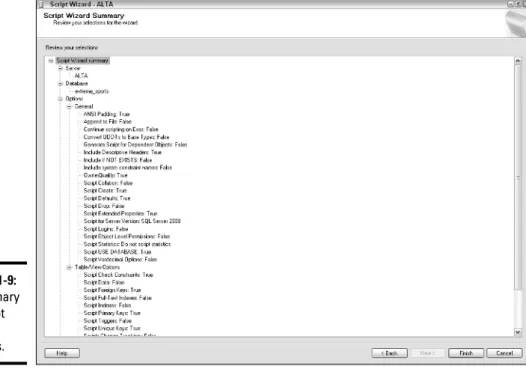
Review your script generation choices, and click Finish.SQL Server gives you one more chance to look over the options it will use when creating your script. For this simple example, Figure 1-9 shows how this script will be generated.
SQL Server takes a few moments to generate your script. You can moni-tor the progress and view or edit your script when things are done. Figure 1-10 shows the results of this simple example.
Figure 1-9:
A summary of Script Wizard settings.
Book VIII Chapter 1
Configuring
SQL Server
Figure 1-10:
A script generated by the Script Wizard.