ASTRO
®
25
INTEGRATED VOICE AND DATA
MCC 7100 IP DISPATCH
CONSOLE SETUP AND
USER GUIDE
November 2013
The Motorola products described in this document may include copyrighted Motorola computer programs. Laws in the United States and other countries preserve for Motorola certain exclusive rights for copyrighted computer programs. Accordingly, any copyrighted Motorola computer programs contained in the Motorola products described in this document may not be copied or reproduced in any manner without the express written permission of Motorola.
© 2013 Motorola Solutions, Inc. All Rights Reserved
No part of this document may be reproduced, transmitted, stored in a retrieval system, or translated into any language or computer language, in any form or by any means, without the prior written permission of Motorola Solutions, Inc. Furthermore, the purchase of Motorola products shall not be deemed to grant either directly or by implication, estoppel or otherwise, any license under the copyrights, patents or patent applications of Motorola, except for the normal non-exclusive, royalty-free license to use that arises by operation of law in the sale of a product.
Disclaimer
Please note that certain features, facilities, and capabilities described in this document may not be applicable to or licensed for use on a particular system, or may be dependent upon the characteristics of a particular mobile subscriber unit or configuration of certain parameters. Please refer to your Motorola contact for further information.
Trademarks
MOTOROLA, MOTO, MOTOROLA SOLUTIONS, and the Stylized M Logo are trademarks or registered
trademarks of Motorola Trademark Holdings, LLC and are used under license. All other trademarks are the property of their respective owners.
European Union (EU) Waste of Electrical and Electronic Equipment (WEEE)
directive
The European Union's WEEE directive requires that products sold into EU countries must have the crossed out trash bin label on the product (or the package in some cases).
As defined by the WEEE directive, this cross-out trash bin label means that customers and end-users in EU countries should not dispose of electronic and electrical equipment or accessories in household waste.
Customers or end-users in EU countries should contact their local equipment supplier representative or service centre for information about the waste collection system in their country.
Motorola Solution Support Center
The Solution Support Center (SSC) is the primary Motorola Solutions support contact. Call: • Prior to any software reload.
• To confirm troubleshooting results and analysis prior to removing and replacing a Field Replaceable Unit (FRU) and Field Replaceable Entity (FRE) to repair the system.
For... Phone
Domestic Calls 800-221-7144 International Calls 302-444-9800
North America Parts Organization
For assistance in ordering replacement parts or identifying a part number, contact the Motorola Parts organization. Your first response when troubleshooting your system is to call the Motorola SSC.
For... Phone
Phone Orders 800-422-4210 (US and Canada Orders)
For help identifying an item or part number: select choice 3 from the menu.
302-444-9842 (International Orders)
includes help for identifying an item or part number and for translation as needed
Fax Orders 800-622-6210 (US and Canada Orders)
Comments
Send questions and comments regarding user documentation to [email protected]. Provide the following information when reporting a documentation error:
• The document title and part number • The page number with the error • A description of the error
We welcome your feedback on this and other Motorola manuals. To take a short, confidential survey on Motorola Customer Documentation, go to docsurvey.motorolasolutions.com or scan the following QR code with your mobile device to access the survey.
Version Description Date 6871024P93-A Original release of the MCC 7100 IP Dispatch Console Setup and
User Guide manual.
Contents
Copyrights... 3
Contact Us... 5
Document History...7
List of Figures... 15
List of Tables... 17
List of Processes... 19
List of Procedures... 21
About MCC 7100 IP Dispatch Console Setup and User Guide...25
What is Covered In This Manual?...25
Helpful Background Information... 25
Related Information...25
Chapter 1: MCC 7100 IP Dispatch Console – Overview...27
MCC 7100 IP Dispatch Console in Console Site Architectures... 29
MCC 7100 IP Dispatch Console Features...29
System Level Features...29
ASTRO 25 Trunking Features... 30
ASTRO 25 Conventional Features...30
MDC 1200 Analog Conventional Features... 30
Analog Conventional Features... 31
Encryption Features...31
Integrated Tone Paging Encoder Features...31
MCC 7100 IP Dispatch Console System Components... 32
MCC 7100 IP Dispatch Console... 32
PRX 7000 Console Proxy... 32
Console Site Control Room Firewall... 33
License Server... 33
Key Management Facility for MCC 7100 IP Dispatch Console...33
Customer Enterprise Network Components...33
DNS Server...33
DHCP Server...34
VPN Server...34
MCC 7100 IP Dispatch Console Theory of Operations...34
Zone Database Server and LDAP... 34
MCC 7100 IP Dispatch Console – Encryption... 34
MCC 7100 IP Dispatch Console – Link Op...34
MCC 7100 IP Dispatch Console and ISSI 8000 / CSSI 8000...34
Centralized Event Logging...34
Audio Logging and the MCC 7100 IP Dispatch Console... 35
Aux I/O in the MCC 7100 IP Dispatch Console... 35
Chapter 2: MCC 7100 IP Dispatch Console – Setup and Installation... 37
MCC 7100 IP Dispatch Console Software Requirements...37
MCC 7100 IP Dispatch Console Hardware Requirements... 37
MCC 7100 IP Dispatch Console Cohab Configurations...38
MCC 7100 IP Dispatch Console Call Capacities...39
Dynamic System Resilience Considerations...39
Windows Installation and Motorola OS Installer (MOSI)... 41
Configuring Windows Components...41
Setting Display Properties... 42
Setting Windows Power Options... 42
Setting Up SNMP Services Inside the ASTRO RNI...43
Configuring Windows SNMP Components for a Console inside the ASTRO RNI... 43
Configuring Primary DNS Suffix...45
Installing the .NET Framework 3.5 on the Windows 8 Operating System Outside the ASTRO RNI... 46
Generating License Certificates for the MCC 7100 IP Dispatch Console... 46
Installing the MCC 7100 IP Dispatch Console Software...47
CRYPTR micro Installation Considerations... 48
Associated Windows Components Software Installation... 49
Load Secure Keys and Algorithms ...49
Hardware Key Storage (CRYPTR micro)-Based Encryption...49
Software Keyfiles-Based Encryption... 52
Third Party or Cohab Software Installation... 54
MOTOPATCH Installation... 55
Windows Supplemental Configuration... 55
Network Interface Card (NIC) Configuration... 56
Configuring the Network Interface Card for an MCC 7100 IP Dispatch Console Inside the ASTRO RNI... 56
Peripheral Configuration... 57
Modifying the Default Audio Peripherals... 58
Disabling/Enabling Audio Devices in Windows...58
Disabling Feedback Audio for Headset Devices...58
Setting Up Network...59
Setting Up a Proxy Server Connection Outside the ASTRO RNI... 59
Setting Up the Domain for an MCC 7100 IP Dispatch Console Inside the ASTRO RNI... 60
Configuring the Local Hosts File for Consoles in Conventional K1/K2 Systems and Outside the ASTRO RNI... 61
Configuring the External NTP Time Source on Consoles in ASTRO 25 Conventional K1/K2 System...62
Credentials for Secure SNMPv3 Common Agent (Optional)... 62
Adding a Remote Console to the ASTRO DNS Server... 63
Hardware CRYPTO Configuration... 63
Changing the Default CRYPTR micro Password... 63
CRYPTR micro Software Upgrade ...64
Enable / Disable FIPS ...64
MCC 7100 IP Dispatch Console Maintenance and Troubleshooting... 65
Dispatch Console PC Firewall Exceptions...65
Upgrading the MCC 7100 IP Dispatch Console Software...65
Failure to Upgrade or Uninstall the MCC 7100 IP Dispatch Console Software...65
Elite Console Application Stuck in Application Initializing State...66
Restoring the Windows User Account Profile... 66
Elite Console was Denied Access due to an Embedded Password Mismatch... 67
Elite Console was Denied Access due to an Embedded Password Mismatch after Reinstalling All Software...67
Adding a New Domain Console User... 67
Troubleshooting Audio on MCC 7100 IP Dispatch Console...68
Audio Quality Issues... 68
Volume Levels Are Too Low...68
No Audio Sent or Received from the Peripherals... 68
Troubleshooting Secure Audio on MCC 7100 IP Dispatch Console with CRYPTR micro-Based Encryption...69
CRYPTR Password Issues ... 69
Secure Call Failures...71
SD Host Controller Driver Considerations (CRYPTR Failures)... 72
Troubleshooting Detection of CRYPTR micro Device... 73
Troubleshooting Connection Issues (Outside the ASTRO RNI)... 74
License Troubleshooting – MCC 7100 IP Dispatch Console... 75
Troubleshooting the Instant Recall Recorder License Issues...75
Changing the Maximum Transmission Unit (MTU)...76
MCC 7100 IP Dispatch Console Disaster Recovery...76
Recovering an MCC 7100 IP Dispatch Console Installation... 76
Critical Backup Files for the MCC 7100 IP Dispatch Console...77
Recovering a Damaged or Missing CRYPTR micro Card...78
Chapter 3: PRX 7000 Console Proxy – Setup and Installation... 81
PRX 7000 Console Proxy Software and Hardware Requirements... 81
PRX 7000 Console Proxy Cohab with MCC 7500 Installations... 81
Setting Up the PRX 7000 Console Proxy... 81
Operating System Installation for the PRX 7000 Console Proxy... 82
Windows Installation and Motorola OS Installer (MOSI)... 82
Setting Windows Power Options... 82
Generating License Certificates for the PRX 7000 Console Proxy... 83
Installing the PRX 7000 Console Proxy Software... 84
Configure a Black List for Remote MCC 7100 IP Dispatch Consoles (Optional)... 85
MOTOPATCH Installation... 85
Windows Supplemental Configuration (K-Core)...85
Network Interface Card (NIC) Configuration... 86
Configuring the PC Network Interface Card for the PRX 7000 Console Proxy...86
Setting Up the Domain for the PRX 7000 Console Proxy on L and M Core... 87
PRX 7000 Console Proxy Maintenance and Troubleshooting...88
Upgrading the PRX 7000 Console Proxy Software... 88
Uninstalling the PRX 7000 Console Proxy Software... 88
Remote Console Cannot Connect to the Proxy Server...89
License Troubleshooting – PRX 7000 Console Proxy...89
Changing the Maximum Transmission Unit (MTU)...90
PRX 7000 Console Proxy Disaster Recovery... 90
Recovering a PRX 7000 Console Proxy Installation... 90
Critical Backup Files for the PRX 7000 Console Proxy... 91
Chapter 4: USB Audio Interface Module... 93
USB Audio Interface Module Connections...93
Peripherals Supported with USB Audio Interface Module... 94
Desk Microphone... 94
Footswitch... 95
Headset Jacks... 96
External Paging Encoder Port... 97
Local Logging Recorder Port... 97
Telephone/Headset Port... 98
Local Console Relay Outputs...99
Enabling the Relays in the Windows Registry...99
USB Audio Interface Module Specifications...100
USB Audio Interface Module FRU/FRE Information... 100
USB Audio Interface Module – Bonding and Grounding Requirements... 101
Installing and Configuring USB Audio Interface Module... 102
Connecting USB Audio Interface Module... 102
Upgrading the USB Audio Interface Module Software... 103
USB AIM Device Information... 104
USB Audio Interface Module Troubleshooting... 104
USB Audio Interface Module Indicators...104
USB AIM Status Icon...106
Diagnosing Audio Malfunction in USB Audio Interface Module... 106
Troubleshooting USB Audio Interface Module USB Communication Issues...107
Troubleshooting USB Audio Interface Module Upgrade Issues...107
Troubleshooting Problems with Peripherals... 107
Chapter 5: Console Dispatch Status and Peripheral Configuration Tool... 109
Console Dispatch Status (MCC 7100 IP Dispatch Console)... 109
Console Dispatch Status Taskbar Icon...109
Customizing the Console Dispatch Status Taskbar Icon...110
Proxy Server List...110
Proxy Server List Status Indicator...111
Proxy Server List Buttons... 111
ASTRO Domain Configuration...112
Adding a Proxy Server Connection...112
Editing a Proxy Server Connection... 112
Removing a Proxy Server Connection... 112
Encryption/Licensing... 113
Console Dispatch Status (PRX 7000 Console Proxy)...113
Remote OP Connection List...114
Remote OP Connection Black List... 115
Adding a Remote MCC 7100 IP Dispatch Console to the Black List... 115
Editing a Remote MCC 7100 IP Dispatch Console on the Black List...116
Removing a Remote MCC 7100 IP Dispatch Console from the Black List... 116
MCC 7100 Peripheral Configuration Tool...116
Audio Outputs Tab... 117
Mapping and Unmapping a Speaker... 118
Testing a Speaker... 118
Configuring a non-Motorola Headset...119
Audio Inputs Tab...119
Mapping and Unmapping a non-Motorola Desktop Microphone... 119
PTT/Monitor Tab... 120
Configuring a non-Motorola USB Footswitch...120
USB AIM Tab... 120
Mapping and Unmapping Motorola Peripherals... 120
Peripheral Configuration Summary...122
Peripheral Configuration Profile... 122
Creating a Profile with non-Motorola Peripherals... 123
Customizing a Profile with Motorola Peripherals...123
Deleting a Profile...124
Control Panel Button... 124
Motorola Peripherals – Audio Gain... 125
Chapter 6: Instant Recall Recorder... 127
Audio Types Recorded by the Instant Recall Recorder Application... 127
Configuring the Instant Recall Recorder Application...128
Instant Recall Recorder Basic Operations...129
Starting the Instant Recall Recorder Application...129
Closing the Instant Recall Recorder Application... 129
Switching the Instant Recall Recorder Window to the Compact Mode...130
Expanding and Collapsing Sections in the Instant Recall Recorder Window... 130
Managing Detail Columns in the Instant Recall Recorder Call List...130
Playing Back Calls in the Instant Recall Recorder Application...131
Filtering Calls in the Instant Recall Recorder Application... 132
Call Filters in the Instant Recall Recorder Application... 132
Sorting Calls in the Instant Recall Recorder... 132
Rewinding and Fast Forwarding Calls in the Instant Recall Recorder Application... 133
Changing the Playback Speed in the Instant Recall Recorder Application... 133
Modifying the Playback Volume and Playback Quality in the Instant Recall Recorder Application.. 133
Zooming In and Zooming Out Waveform in the Instant Recall Recorder Application...134
Saving Calls to a File in the Instant Recall Recorder Application...134
Appendix A: MCC 7100 IP Dispatch Console - Additional Procedures and
Information...135
Removing All MCC 7100 IP Dispatch Console Applications... 135
Removing the Elite Admin and Elite Dispatch Applications Only...135
Configuring a Preconfigured Patch Console (Inside the ASTRO RNI)...136
Configuring an Automatic Windows Login...136
Adding Windows Domain Username and Password to Windows Registry... 137
Configuring the Domain Controller for the Preconfigured Patch OP... 137
Adding Elite Authentication Username and Password to the Windows Registry... 138
Creating Batch File for Automatic Network Authentication... 138
Fault Managment...139
Fault Management for Devices Inside the ASTRO RNI...139
MCC 7100 IP Dispatch Console Fault Management... 139
PRX 7000 Console Proxy Fault Management... 140
Control Room Firewall Fault Management...140
Fault Management for Devices Outside the ASTRO RNI... 140
Embedded Password Management...140
Appendix B: Enhanced Alert Tones...141
Enhanced Alert Tones Overview... 141
Enhanced Alert Tones – Audio File Specifications... 141
Enhanced Alert Tones – Audio Files Configuration... 142
Appendix C: MCC 7100 IP Dispatch Console – System Release
Compatibility... 147
ASTRO 7.14 MCC 7100 IP Dispatch Console System Components in an ASTRO 7.11 System... 147
Setting Up the ASTRO 7.14 MCC 7100 IP Dispatch Console in an ASTRO 7.11 System... 148
ASTRO 7.14 MCC 7100 IP Dispatch Console System Components in an ASTRO 7.13 System... 149
Setting Up the ASTRO 7.14 MCC 7100 IP Dispatch Console in an ASTRO 7.13 System... 149
Configuring Console Alias Manager for MCC 7100 Software in an ASTRO 7.11 System...150
List of Figures
Figure 1: MCC 7100 IP Dispatch Console System Diagram ... 28
Figure 2: Administrative Tools - Services ...43
Figure 3: SNMP Service Properties ...44
Figure 4: SNMP Service Configuration – Security ... 44
Figure 5: SNMP Service Configuration – Traps ... 45
Figure 6: microSD to SD Adapter ... 50
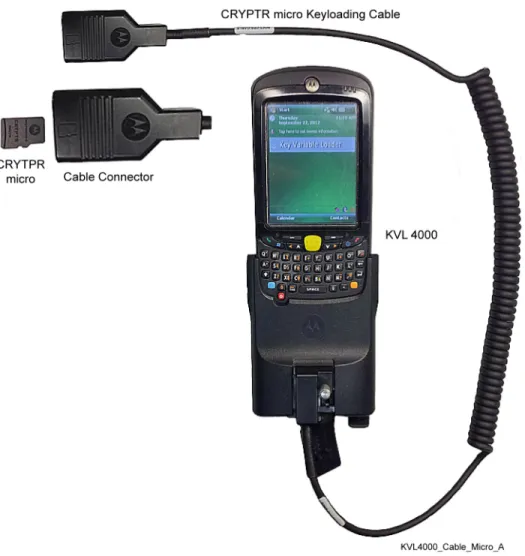
Figure 7: KVL 4000 Model T7537B with CRYPTR micro Keyloading Cable ... 51
Figure 8: CRYPTRmicroManagement – Selecting About CRYPTRmicroManagement ... 70
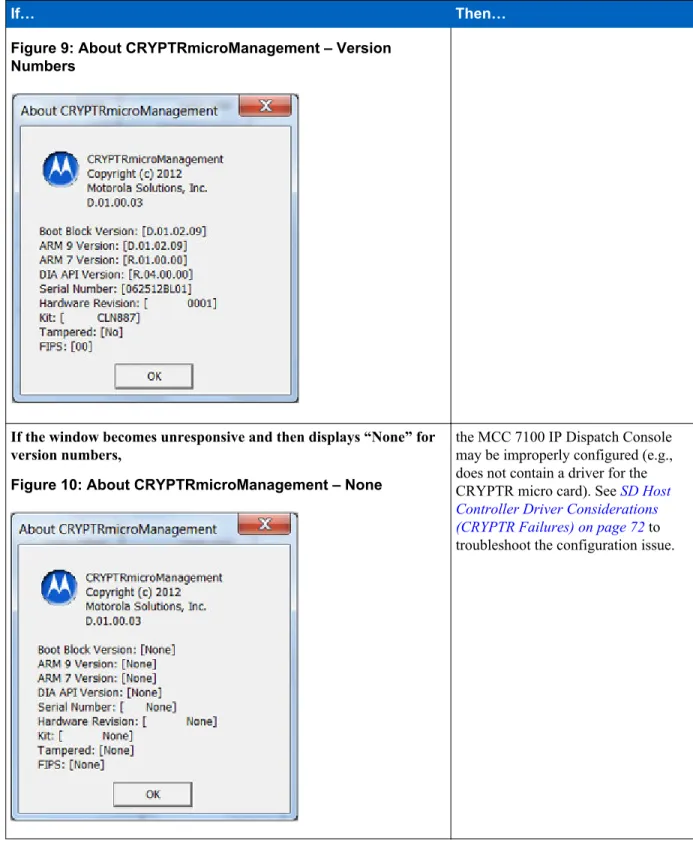
Figure 9: About CRYPTRmicroManagement – Version Numbers ...71
Figure 10: About CRYPTRmicroManagement – None ... 71
Figure 11: USB Audio Interface Module – Audio Routing ... 93
Figure 12: USB Audio Interface Module Port Connections ...94
Figure 13: Gooseneck Microphone ... 95
Figure 14: Footswitch ... 95
Figure 15: Headset Jack ...96
Figure 16: USB Audio Interface Module State Indicators ... 105
Figure 17: Console Dispatch Status Taskbar Icon ...109
Figure 18: Windows 7 Taskbar Notification Area ...110
Figure 19: Console Dispatch Status Proxy Server List ... 111
Figure 20: Proxy Server List Status Indicator ... 111
Figure 21: Console Dispatch Status Encryption/Licensing ... 113
Figure 22: Remote OP Connection List ...114
Figure 23: Remote OP Connection Black List ... 115
Figure 24: Motorola Peripheral Configuration Tool ... 117
Figure 25: Mapping and Unmapping Speakers ... 118
Figure 26: Speaker Test ... 118
Figure 27: Mapping and Umapping the Motorola Peripherals ... 121
Figure 28: Peripheral Configuration Summary ... 122
Figure 29: Peripheral Configuration Summary – Motorola peripherals ...122
List of Tables
Table 1: System Level Feature for the MCC 7100 IP Dispatch Console ... 29
Table 2: ASTRO 25 Trunking Feature for the MCC 7100 IP Dispatch Console ...30
Table 3: ASTRO 25 Conventional Feature for the MCC 7100 IP Dispatch Console ... 30
Table 4: MDC 1200 Analog Conventional Feature for the MCC 7100 IP Dispatch Console ... 30
Table 5: Analog Conventional Feature for the MCC 7100 IP Dispatch Console ...31
Table 6: Encryption Feature for the MCC 7100 IP Dispatch Console ... 31
Table 7: Integrated Tone Paging Encoder Feature for the MCC 7100 IP Dispatch Console ... 31
Table 8: Hardware Specifications – HP Z420 Workstation ... 37
Table 9: Hardware Specifications – Customer Provided Laptop ... 38
Table 10: MCC 7100 IP Dispatch Console Call Capacities ... 39
Table 11: MCC 7100 IP Dispatch Console Files to Backup ... 77
Table 12: PRX 7000 Console Proxy Files to Backup ...91
Table 13: USB Audio Interface Module Peripherals ...94
Table 14: Footswitch Pinout ...96
Table 15: External Paging Encoder Port Pinout ... 97
Table 16: External Phone Interface Connector Pinout ... 98
Table 17: Generic Auxiliary Outputs Pinout ... 99
Table 18: USB Audio Interface Module Specifications ... 100
Table 19: USB Audio Interface Module FRU/FRE Information ... 101
Table 20: USB Audio Interface Module States ... 105
Table 21: Proxy Server List Buttons ... 111
Table 22: ASTRO 7.14 MCC 7100 IP Dispatch Console System Components in an ASTRO
7.11 System ...147
Table 23: ASTRO 7.14 MCC 7100 IP Dispatch Console System Components in an ASTRO
7.13 System ...149
Setting Up the MCC 7100 IP Dispatch Console ... 40
Configuring Windows Components ... 41
Generating License Certificates for the MCC 7100 IP Dispatch Console ... 46
Setting Up Network ... 59
Upgrading the MCC 7100 IP Dispatch Console Software ... 65
No Audio Sent or Received from the Peripherals ...68
Recovering an MCC 7100 IP Dispatch Console Installation ... 76
Recovering a Damaged or Missing CRYPTR micro Card ... 78
Setting Up the PRX 7000 Console Proxy ...81
Generating License Certificates for the PRX 7000 Console Proxy ...83
Upgrading the PRX 7000 Console Proxy Software ... 88
Recovering a PRX 7000 Console Proxy Installation ...90
Installing and Configuring USB Audio Interface Module ... 102
Configuring a Preconfigured Patch Console (Inside the ASTRO RNI) ... 136
Configuring an Automatic Windows Login ... 136
Setting Display Properties ... 42
Setting Windows Power Options ...42
Setting Up SNMP Services Inside the ASTRO RNI ... 43
Configuring Windows SNMP Components for a Console inside the ASTRO RNI ... 43
Configuring Primary DNS Suffix ...45
Installing the .NET Framework 3.5 on the Windows 8 Operating System Outside the ASTRO
RNI ...46
Installing the MCC 7100 IP Dispatch Console Software ... 47
Configuring the Network Interface Card for an MCC 7100 IP Dispatch Console Inside the
ASTRO RNI ...56
Modifying the Default Audio Peripherals ... 58
Disabling/Enabling Audio Devices in Windows ...58
Disabling Feedback Audio for Headset Devices ... 58
Setting Up a Proxy Server Connection Outside the ASTRO RNI ...59
Setting Up the Domain for an MCC 7100 IP Dispatch Console Inside the ASTRO RNI ... 60
Configuring the Local Hosts File for Consoles in Conventional K1/K2 Systems and Outside
the ASTRO RNI ...61
Configuring the External NTP Time Source on Consoles in ASTRO 25 Conventional K1/K2
System ...62
Adding a Remote Console to the ASTRO DNS Server ... 63
Changing the Default CRYPTR micro Password ...63
Restoring the Windows User Account Profile ...66
Adding a New Domain Console User ... 67
Testing an Unresponsive CRYPTR micro Card ...70
SD Host Controller Driver Considerations (CRYPTR Failures) ...72
Troubleshooting the Instant Recall Recorder License Issues ... 75
Changing the Maximum Transmission Unit (MTU) ... 76
Setting Windows Power Options ...82
Installing the PRX 7000 Console Proxy Software ... 84
Configuring the PC Network Interface Card for the PRX 7000 Console Proxy ... 86
Setting Up the Domain for the PRX 7000 Console Proxy on L and M Core ...87
Uninstalling the PRX 7000 Console Proxy Software ...88
Enabling the Relays in the Windows Registry ... 99
Connecting USB Audio Interface Module ... 102
Configuring USB Audio Interface Module ... 103
Upgrading the USB Audio Interface Module Software ...103
Diagnosing Audio Malfunction in USB Audio Interface Module ...106
Troubleshooting USB Audio Interface Module USB Communication Issues ... 107
Troubleshooting USB Audio Interface Module Upgrade Issues ... 107
Troubleshooting Problems with Peripherals ...107
Customizing the Console Dispatch Status Taskbar Icon ...110
Adding a Proxy Server Connection ... 112
Editing a Proxy Server Connection ... 112
Removing a Proxy Server Connection ... 112
Adding a Remote MCC 7100 IP Dispatch Console to the Black List ...115
Editing a Remote MCC 7100 IP Dispatch Console on the Black List ... 116
Removing a Remote MCC 7100 IP Dispatch Console from the Black List ... 116
Mapping and Unmapping a Speaker ...118
Testing a Speaker ...118
Configuring a non-Motorola Headset ...119
Mapping and Unmapping a non-Motorola Desktop Microphone ... 119
Configuring a non-Motorola USB Footswitch ... 120
Mapping and Unmapping Motorola Peripherals ... 120
Creating a Profile with non-Motorola Peripherals ...123
Customizing a Profile with Motorola Peripherals ... 123
Deleting a Profile ...124
Configuring the Instant Recall Recorder Application ... 128
Starting the Instant Recall Recorder Application ... 129
Closing the Instant Recall Recorder Application ... 129
Fixing the Instant Recall Recorder Window on the Top of the Desktop ...130
Switching the Instant Recall Recorder Window to the Compact Mode ... 130
Expanding and Collapsing Sections in the Instant Recall Recorder Window ...130
Managing Detail Columns in the Instant Recall Recorder Call List ... 130
Playing Back Calls in the Instant Recall Recorder Application ... 131
Filtering Calls in the Instant Recall Recorder Application ...132
Sorting Calls in the Instant Recall Recorder ...132
Rewinding and Fast Forwarding Calls in the Instant Recall Recorder Application ...133
Changing the Playback Speed in the Instant Recall Recorder Application ...133
Modifying the Playback Volume and Playback Quality in the Instant Recall Recorder
Application ...133
Zooming In and Zooming Out Waveform in the Instant Recall Recorder Application ... 134
Saving Calls to a File in the Instant Recall Recorder Application ... 134
Removing All MCC 7100 IP Dispatch Console Applications ... 135
Removing the Elite Admin and Elite Dispatch Applications Only ... 135
Adding Windows Domain Username and Password to Windows Registry ...137
Configuring the Domain Controller for the Preconfigured Patch OP ... 137
Adding Elite Authentication Username and Password to the Windows Registry ...138
Creating Batch File for Automatic Network Authentication ...138
Setting Up the ASTRO 7.14 MCC 7100 IP Dispatch Console in an ASTRO 7.13 System ...149
Configuring Console Alias Manager for MCC 7100 Software in an ASTRO 7.11 System ... 150
This manual provides setup and user guide descriptions for the MCC 7100 IP Dispatch Console (software only) feature. It also describes the requirements and considerations necessary for implementing this feature in an ASTRO®
25 system.
What is Covered In This Manual?
This manual contains the following chapters:
• MCC 7100 IP Dispatch Console – Overview on page 27, describes the MCC 7100 IP Dispatch Console, its components and operational features.
• MCC 7100 IP Dispatch Console – Setup and Installation on page 37, provides setup and installation procedures for all components related to the MCC 7100 IP Dispatch Console.
• PRX 7000 Console Proxy – Setup and Installation on page 81, provides information and activities associated with the setup and installation of the PRX 7000 Console Proxy.
• USB Audio Interface Module on page 93, provides information and activities associated with the setup and installation of the USB Audio Interface Module.
• Console Dispatch Status and Peripheral Configuration Tool on page 109, provides descriptions and procedures for using the Peripheral Configuration Tool and Console Dispatch Status that are installed as part of the MCC 7100 IP Dispatch Console and PRX 7000 Console Proxy installations.
• Instant Recall Recorder on page 127 provides descriptions and procedures for using the Instant Recall Recorder that is installed as part of the MCC 7100 IP Dispatch Console.
• MCC 7100 IP Dispatch Console - Additional Procedures and Information on page 135, provides additional helpful procedures and information that are not part of the typical MCC 7100 IP Dispatch Console installation. • Enhanced Alert Tones on page 141, provides information about creating customized alert tones and using them
on the MCC 7100 IP Dispatch Console.
• MCC 7100 IP Dispatch Console – System Release Compatibility on page 147, provides support for using the MCC 7100 IP Dispatch Console in ASTRO 7.11 and ASTRO 7.13 systems.
Helpful Background Information
Motorola offers various courses designed to assist in learning about the system. For information, go to http:// www.motorolasolutions.com/training to view the current course offerings and technology paths.
Related Information
For associated information about the radio system, see the following documents.
Related Information Purpose
Standards and Guidelines for
Communication Sites Provides standards and guidelines that should be followed when setting up aMotorola communications site. Table continued…
Related Information Purpose
Also known as R56 manual. This manual may be purchased on CD 9880384V83, by calling the North America Parts Organization at 800-422-4210 (or the
international number: 302-444-9842).
System Documentation
Overview For an overview of the ASTRO
®
25 system documentation, open the graphical user interface for the ASTRO® 25 system documentation set and select the System Documentation Overview link. This opens a file that includes:
• ASTRO® 25 system release documentation descriptions • ASTRO® 25 system diagrams
• ASTRO® 25 system glossary
For an additional overview of the system, review the architecture and descriptive information in the manuals that apply to your system configuration.
Dynamic System Resilience Provides information necessary to understand, operate, maintain, and troubleshoot
the Dynamic System Resilience (DSR) feature which may be implemented on your ASTRO® 25 system. This feature adds a geographically separate backup zone core
to an existing zone core to protect against catastrophic zone core failures.
Conventional Operations Provides information regarding conventional channel resource operating
characteristics in standalone systems or ASTRO® 25 radio communication systems with K Series, L Series or M Series.
MCC 7500 Dispatch Console
with Voice Processor Module Describes site-level characteristics of VPM-based Console Dispatch sites includingtheory of operation, installation and configuration for hardware and software,
operation, maintenance, and troubleshooting information.
MCC 7500/7100 Elite Admin
User's Guide Provides administrators with information required to configure and administer theElite Dispatch software application to enable communication paths between
dispatch console operators and radio system resources for the MCC 7500 and MCC 7100 dispatch consoles.
MCC 7500/7100 Elite Dispatch
User's Guide Provides user guide information intended for dispatch console operators. Thismanual describes how to use the Elite Dispatch software application supporting the
MCC 7500 and MCC 7100 dispatch consoles.
Dispatch Console Backward
Compatibility Guide The Dispatch Console Backward Compatibility Guide is a reference guide thatprovides a list of console features supported by various ASTRO®
25 system releases. While the backward compatibility feature makes it possible to use an MCC 7500 Dispatch Console or MCC 7100 IP Dispatch Console in a system release previous to the system release in which the console was introduced, the features available for a backward compatible console can be limited to those identified in this manual.
1
MCC 7100 IP Dispatch Console – Overview
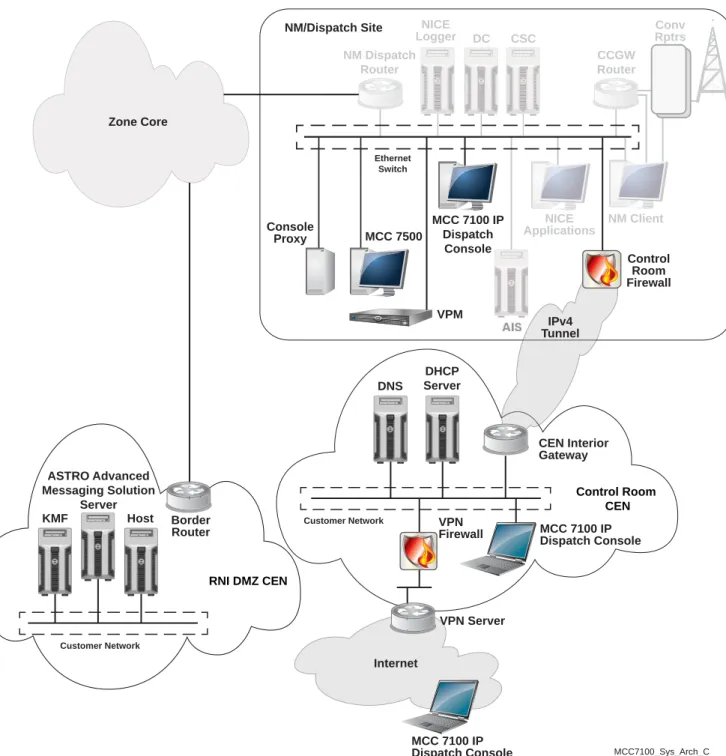
The MCC 7100 IP Dispatch Console is a software-based dispatch console that requires no external hardware connections to perform dispatch operations. The MCC 7100 IP Dispatch Console can be located inside the ASTRO RNI at a console site or conventional subsystem. It can also be deployed outside the ASTRO RNI and connected over the Internet through a firewall to a console proxy located inside the ASTRO RNI.
Figure 1: MCC 7100 IP Dispatch Console System Diagram KMF ASTRO Advanced Messaging Solution Server Host Border Router
RNI DMZ CEN
Customer Network DNS DHCP Server Control Room CEN Customer Network CEN Interior Gateway
MCC 7100 IP Dispatch Console VPN
Firewall
VPN Server Internet
MCC 7100 IP Dispatch Console Control Room Firewall NICE Logger NM Dispatch Router DC CSC CCGW Router NM Client NICE Applications
MCC 7100 IP Dispatch
Console
VPM Console
Proxy MCC 7500
Ethernet Switch
Zone Core
NM/Dispatch Site Conv
Rptrs
MCC7100_Sys_Arch_C
IPv4 Tunnel
The following are the system components for the MCC 7100 IP Dispatch Console: • MCC 7100 IP Dispatch Console Software
• PRX 7000 Console Proxy
• Console Site Control Room Firewall • Customer Supported Components:
- DNS Server - DHCP Server
- Customer Enterprise Network (CEN) Firewall - Virtual Private Network (VPN)
MCC 7100 IP Dispatch Console in Console Site Architectures
Dispatch console sites can have one or more console operator positions. The location of the dispatch console, the system architectures it supports, and your organizational requirements determine the equipment required at a console site.
An MCC 7100 IP Dispatch Console is supported in K, L, and M core system architectures. An MCC 7100 IP Dispatch Console is not supported in ASTRO Express systems.
The MCC 7100 IP Dispatch Console can be located in the following console sites: • Console Site - inside the ASTRO Radio Network Infrastructure (RNI)
• Remote Console Site - outside the ASTRO RNI
• Remote Console Site at a Distributed Conventional Hub Site in a Conventional Subsystem
MCC 7100 IP Dispatch Console Features
This section provides a list of features supported by the MCC 7100 IP Dispatch Console as compared to the MCC 7500 Dispatch Console:
The section lists the features that are supported with the MCC 7100 IP Dispatch Console within the following areas: • System Level
• ASTRO® 25 Trunking • ASTRO® 25 Conventional
• MDC 1200 Conventional • Analog Conventional • General Security
• Integrated Tone Paging Encoder • Peripheral Configuration Tool • Console Dispatch Status
• Integrated Instant Recall Recorder Related Links
MCC 7100 Peripheral Configuration Tool on page 116
Console Dispatch Status (MCC 7100 IP Dispatch Console) on page 109 Instant Recall Recorder on page 127
System Level Features
The system level features supported by the MCC 7100 IP Dispatch Console are listed in this section.
Table 1: System Level Feature for the MCC 7100 IP Dispatch Console
System Level Feature Co-hab with ASTRO Advanced Messaging Solution
Smart Client
Full Participation in Radio System Agency Partitioning Configured via Radio System Configuration Manager Participation in Radio System Fault Management when
in ASTRO RNI
ASTRO 25 Trunking Features
The ASTRO® 25 trunking features supported by the MCC 7100 IP Dispatch Console are listed in this section.
Table 2: ASTRO 25 Trunking Feature for the MCC 7100 IP Dispatch Console
ASTRO 25 Trunking Feature AMBE Half Rate Vocoder for Phase II TDMA
Resources
Trunked Private Calls IMBE/AMBE Vocoder for ASTRO 25 Resources Trunked PTT ID and Alias Trunked Announcement Group Calls Trunked Tactical/Normal Trunked Call Alerts Trunked Talk Group Calls Trunked Emergency Alarms Trunked Remote Monitor Trunked Emergency Calls Trunked Repeater On/Off
ASTRO 25 Conventional Features
The ASTRO® 25 conventional features supported by the MCC 7100 IP Dispatch Console are listed in this section.
Table 3: ASTRO 25 Conventional Feature for the MCC 7100 IP Dispatch Console
ASTRO 25 Conventional Feature Autokey Key Display Secure Keyset Select
Call Alert Radio Check
Emergency Alarm and Call Radio Enable/Disable Ignore Mobile to Mobile Calls Radio Message Display Mixed Mode (Analog/Digital) Operation Radio Status Display Momentary Key Override Radio Status Request PTT ID and Alias Received Key Display
Secure Call Remote Monitor
Secure Key Select Voice Selective Call
MDC 1200 Analog Conventional Features
The MDC 1200 analog conventional features supported by the MCC 7100 IP Dispatch Console are listed in this section.
Table 4: MDC 1200 Analog Conventional Feature for the MCC 7100 IP Dispatch Console
MDC 1200 Conventional Feature
Call Alert Radio Check
Emergency Alarm Radio Message Display Emergency Call Radio Status Display Ignore Mobile to Mobile Calls Radio Status Request
MDC 1200 Conventional Feature PTT ID and Alias Remote Monitor Radio Enable/Disable Voice Selective Call
Analog Conventional Features
The analog conventional features supported by the MCC 7100 IP Dispatch Console are listed in this section.
Table 5: Analog Conventional Feature for the MCC 7100 IP Dispatch Console
Analog Conventional Feature
Analog Talk & Listen Private Line (PL) Selection E & M Control Repeater On/Off
Frequency Selection RF Cross Busy Line Operated Busy Light (LOBL) RF Cross Mute Main/Alternate Conventional Interfaces Tone Remote Control
Monitor Supervisor Takeover (via Relay) Mute Second Receiver WildCard I & II
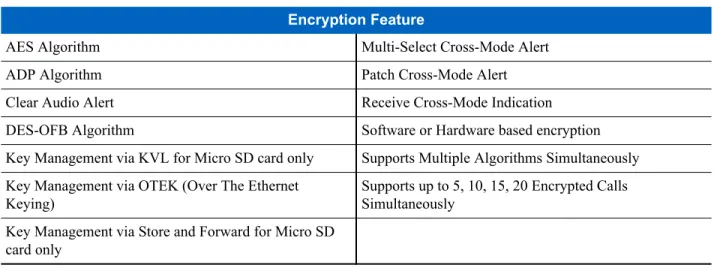
Encryption Features
The encryption features supported by the MCC 7100 IP Dispatch Console are listed in this section.
Table 6: Encryption Feature for the MCC 7100 IP Dispatch Console
Encryption Feature
AES Algorithm Multi-Select Cross-Mode Alert ADP Algorithm Patch Cross-Mode Alert Clear Audio Alert Receive Cross-Mode Indication DES-OFB Algorithm Software or Hardware based encryption Key Management via KVL for Micro SD card only Supports Multiple Algorithms Simultaneously Key Management via OTEK (Over The Ethernet
Keying)
Supports up to 5, 10, 15, 20 Encrypted Calls Simultaneously
Key Management via Store and Forward for Micro SD card only
Integrated Tone Paging Encoder Features
The integrated tone paging encoder features supported by the MCC 7100 IP Dispatch Console are listed in this section.
Table 7: Integrated Tone Paging Encoder Feature for the MCC 7100 IP Dispatch Console
Integrated Tone Paging Encoder Feature
ASTRO 25 Conventional Call Alert Simultaneous Paging Operation
Integrated Tone Paging Encoder Feature Digital Dial 1 (1500 Hz) Quick Call I
Digital Dial 2 (2805 Hz) Quick Call II B - Tone & Voice Digital Dial 3 (1500/2805) Quick Call II C - Tone Only Knox Quick Call II D - Battery Saver Manual Group Pages Quick Call II E - Competitive Manual Individual Pages Quick Page Buttons
MDC 1200 Call Alert Selected Channel" Paging Motorola 5/6 Tone Single Tone 0.5
Pre-Defined Group Pages Single Tone 1.5 Pre-Defined Individual Pages Talk Extend Private Line Stripping Touch Code Sequential Paging Operation Trunked Call Alert
MCC 7100 IP Dispatch Console System Components
The main system components that are used with the MCC 7100 IP Dispatch Console are described in this section.
MCC 7100 IP Dispatch Console
The MCC 7100 IP Dispatch Console is a software-based dispatch console that requires no external hardware connections to perform dispatch operations. Audio Vocoding is performed within the Windows 7 operating system. The MCC 7100 IP Dispatch Console can work with the computer's built-in speakers and microphone, if equipped. External peripherals such as a microphone, headset and footswitch are also supported. A minimum audio quality of DAQ 3.4 is highly recommended when using certified commercially available peripherals. The MCC 7100 IP Dispatch Console can be configured to dispatch trunking and/or conventional resources. The MCC 7100 IP Dispatch Console supports secure (AES, ADP, and DES-OFB) end-to-end audio encryption. Key storage can be performed through hardware CRYPTR micro or software. See Load Secure Keys and Algorithms on page 49 for details. The MCC 7100 IP Dispatch Console can be located inside the ASTRO RNI at a console site or conventional
subsystem. The MCC 7100 IP Dispatch Console can also be deployed outside the ASTRO RNI and connect through a firewall to a PRX 7000 Console Proxy located inside the ASTRO RNI.
PRX 7000 Console Proxy
The PRX 7000 Console Proxy is used when MCC 7100 IP Dispatch Consoles are deployed outside the ASTRO RNI. Due to routing issues, multicast audio packets are unable to be sent outside of the ASTRO RNI into the customers network and ultimately over the Internet. The PRX 7000 Console Proxy is located at a traditional console site or in a conventional subsystem. The PRX 7000 Console Proxy is an application that converts multicast audio packets (delivered inside the ASTRO RNI) to unicast audio packets and sends them outside of the ASTRO RNI to an MCC 7100 IP Dispatch Console. The PRX 7000 Console Proxy is also used to perform link maintenance inside the ASTRO RNI on behalf of the MCC 7100 IP Dispatch Consoles when deployed outside of the ASTRO RNI.
Console Site Control Room Firewall
The SSG 140 control room firewall is used at a console site to allow secured communications with outside networks. It is configured for Network Address Translation (NAT) functionality to help eliminate conflicts between an IP address in a Customer Enterprise Network (CEN) and an IP address in the ASTRO RNI. The control room firewall is configured to only allow dispatch console related traffic to and from the CEN. The control room firewall
communicates with the CEN interior gateway using Internet Protocol version 4 (IPv4).
The PRX 7000 Console Proxy communicates to the remote MCC 7100 IP Dispatch Console through a firewall. The firewall is located at the console site to allow traffic to/from the PRX 7000 Console Proxy and CEN. Any VPN functionality in the CEN must be provided by the customer.
The interior gateway in the CEN and the console site control room firewall share the link from the console site to the zone core.
A control room firewall can be installed at any console site in the system. There can be multiple control room firewalls in a system; one at each console site. The control room firewall is the demarcation point for the ASTRO network. The networking equipment used to establish a path to a remote MCC 7100 IP Dispatch Console is provided by the customer.
Note: An intrusion detection system (IDS) is not required at each console site, but is an option for security conscious customers.
License Server
The license server is a web server used to generate a license file for activating an MCC 7100 IP Dispatch Console during installation. This file contains the required licensing information as well as the number of connections that the PRX 7000 Console Proxy supports. The license server is not part of the ASTRO RNI or the CEN. It is hosted by Motorola.
Note: The generation of license files is performed by Motorola’s Licensing group. Instructions on how to allocate and download license files are provide to the customer.
Key Management Facility for MCC 7100 IP Dispatch Console
The Key Management Facility (KMF) is the centralized key manager in the ASTRO system. The KMF delivers keys securely, using the OTEK feature, to the MCC 7100 IP Dispatch Consoles configured with hardware-based
encryption. For MCC 7100 IP Dispatch Consoles configured with software-based encryption, the KMF exports a file that is used to import keys into the console.
Note: The Key Management Facility does not support ADP keys.
Customer Enterprise Network Components
The network components that are provided by the customer are defined in this section. The following components reside within the Customer Enterprise Network (CEN):
• DNS Server • DHCP Server • VPN Server
DNS Server
The Domain Name System (DNS) server contains a database of network hostnames and their associated IP addresses for Intranet resources connected to the Intranet. The DNS server contains entries for the ASTRO RNI devices (PRX 7000 Console Proxy, ELAM Server, KMF, etc…).
DHCP Server
The Dynamic Host Configuration Protocol (DHCP) server assigns an IP address to a computer from a defined range of numbers configured for a given network. Each MCC 7100 IP Dispatch Console that is remote from the ASTRO RNI will be assigned a static IP address in the DHCP Server.
VPN Server
The VPN server allows for virtual private network (VPN) connections by an MCC 7100 IP Dispatch Console deployed outside the CEN. The MCC 7100 IP Dispatch Console connects to the CEN over the Internet. This provides individual dispatch operators with secure access to the CEN and ultimately to the ASTRO RNI.
MCC 7100 IP Dispatch Console Theory of Operations
This section describes the functional relationships between components that support the MCC 7100 IP Dispatch Console:
Zone Database Server and LDAP
The MCC 7100 IP Dispatch Console uses Lightweight Directory Access Protocol (LDAP). The Dynamic Host Configuration Protocol (DHCP) server assigns an IP address to a computer from a defined range of IP address numbers configured for a given network. Each MCC 7100 IP Dispatch Console outside the ASTRO RNI is assigned a static address in the DHCP Server.
MCC 7100 IP Dispatch Console – Encryption
The MCC 7100 IP Dispatch Console supports secure encryption. See Load Secure Keys and Algorithms on page 49 for a complete description on encryption.
MCC 7100 IP Dispatch Console – Link Op
The first dispatch console at a console site that registers with the system and assigns a resource is known as the Link Op. The Link Op refers to the console that is in control of the active link between the site and the zone controller or site controller.
A Link Op is required at a site that contains a PRX 7000 Console Proxy so that an MCC 7100 IP Dispatch Console outside the ASTRO RNI can operate. Every site, including remote console sites, require a Link Op inside the ASTRO RNI in order to operate. An MCC 7100 IP Dispatch Console outside the ASTRO RNI cannot become a Link Op.
Note: For more information, see the “MCC 7500/7100 Dispatch Console - Control Paths and Affiliation” section in the Conventional Operations manual.
MCC 7100 IP Dispatch Console and ISSI 8000 / CSSI 8000
The MCC 7100 IP Dispatch Console operator position supports the ISSI 8000 feature. The MCC 7100 IP Dispatch Consoles receive foreign talk group and other foreign system configuration data downloaded from the PRX 7000 Console Proxy (LDAP server). See the ISSI 8000/CSSI 8000 – InterSystem Gateway manual for details.
Centralized Event Logging
The MCC 7100 IP Dispatch Console inside the ASTRO RNI sends event logs to the Centralized Event Logging server in the same way as supported by the MCC 7500 Dispatch Console inside the ASTRO RNI, except for
connection information. The MCC 7100 IP Dispatch Console deployed outside the ASTRO RNI does not send event logs to the Centralized Event Logging server. The PRX 7000 Console Proxy logs the following events with
Centralized Event Logging server: • Remote clients connected • Remote clients disconnected • Remote clients refused
See the Centralized Event Logging manual.
Audio Logging and the MCC 7100 IP Dispatch Console
The AIS / Logger supports the logging of audio from an MCC 7100 IP Dispatch Console (inside and outside the RNI), as follows:
• Recording of console audio by the AIS/ Logging recorder is supported. • Local (VPM-based) audio logging is not supported.
Note: See the MCC 7500 Dispatch Console with Voice Processor Module manual for details.
Aux I/O in the MCC 7100 IP Dispatch Console
The Aux I/O comparator display function in the MCC 7100 IP Dispatch Console uses modified MOSCAD RTUs. The Aux I/O architecture is a client-server model where the MOSCAD RTU and the MCC 7100 IP Dispatch Console provide the server and client functionality, respectively.
The Aux I/O data for the comparator display function, (i.e., comparator controls, report status changes, etc.), between the RTU-server and the MCC 7100 IP Dispatch Console client is communicated through a TCP/IP connection established between the RTU and the MCC 7100 IP Dispatch Console.
The MCC 7100 IP Dispatch Console can connect to one or more RTUs by establishing a TCP/IP connection with each RTU. Similarly, an RTU can support multiple MCC 7100 IP Dispatch Console connections.
If the link between the remote MCC 7100 IP Dispatch Console and the Aux I/O server is lost, the affected MCC 7100 IP Dispatch Consoles will no longer receive any of the comparator display functionality until it reestablishes a connection.
The MCC 7100 IP Dispatch Console supports up to 200 Aux I/Os on the SDM 3000 units ( “global” Aux I/O) functionality.
Note: The MCC 7100 IP Dispatch Console supports four local Aux Outputs. They have very specific functions tied to them:
• Indicating Emergency;
• Indicating presence of an inbound call on the currently selected channel • Indicating a console PTT
• Providing an external output to report activity of one or more general AuxIOs of the console.
If you employ the Aux I/O Server device in a Conventional Subsystem, you must configure it properly to support the Unified Network Configurator (UNC) discovery. You perform the configuration by using the SDM3000 Builder application. If the Aux I/O Server device used in a Conventional Subsystem is not configured properly, UNC discovery lists the device in the UNC Lost and Found folder. If this situation occurs, you must configure the device properly and rediscover it. For detailed information about the SDM3000 Builder, see the MOSCAD Network Fault Management manual. After the Aux I/O Server device in a Conventional Subsystem is recognized by UNC, you can use UNC to configure the device. For more information, see the Unified Network Configurator manual.
2
MCC 7100 IP Dispatch Console – Setup and Installation
This chapter provides setup and installation procedures for all components related to the MCC 7100 IP Dispatch Console.
MCC 7100 IP Dispatch Console Software Requirements
The MCC 7100 IP Dispatch Console requires a Windows-based PC or workstation running at least Windows 7 Professional operating system.
Windows XP and Windows Vista operating systems are not supported.
Windows 8 64-bit operating system is supported only outside the ASTRO Radio Network Interface (RNI). Note: Windows 7 Ultimate is supported but not required.
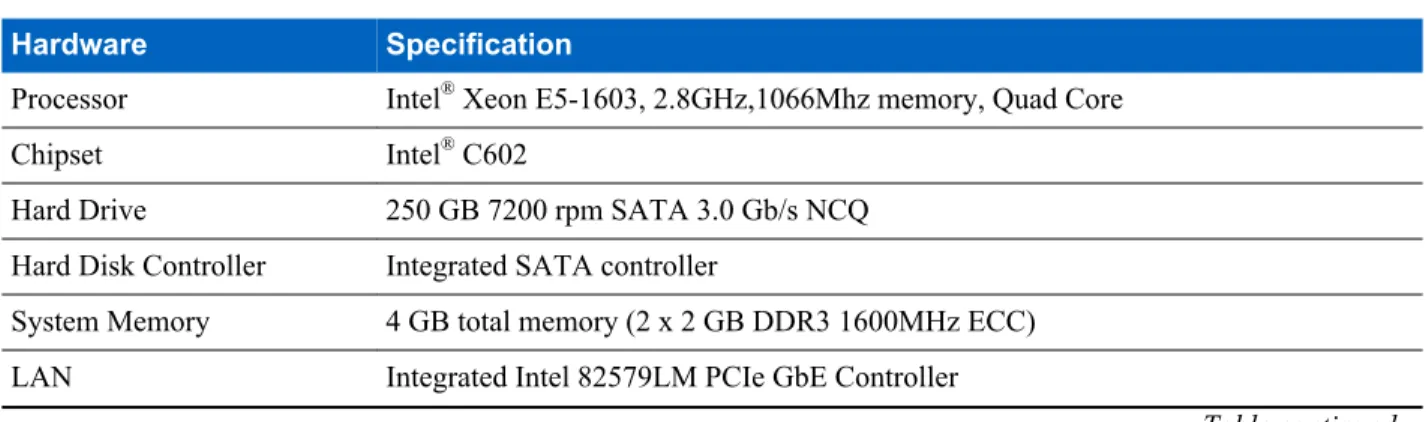
MCC 7100 IP Dispatch Console Hardware Requirements
The MCC 7100 IP Dispatch Console software is supported by the Motorola certified HP Z420 desktop computer. The software is also supported by a customer provided laptop or desktop computer meeting the minimum hardware requirements in Table 9: Hardware Specifications – Customer Provided Laptop on page 38.
Motorola Certified HP Z420 Hardware Specifications
The following hardware specifications are for the Motorola certified HP Z420 workstation:
Note: The HP Z400 workstation does not support the MCC 7100 IP Dispatch Console software.
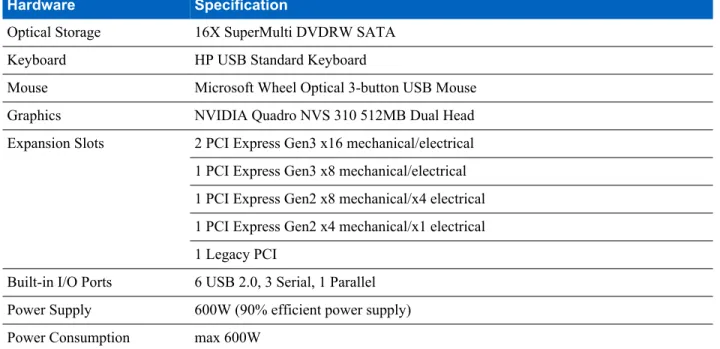
Table 8: Hardware Specifications – HP Z420 Workstation
Hardware Specification
Processor Intel® Xeon E5-1603, 2.8GHz,1066Mhz memory, Quad Core Chipset Intel® C602
Hard Drive 250 GB 7200 rpm SATA 3.0 Gb/s NCQ Hard Disk Controller Integrated SATA controller
System Memory 4 GB total memory (2 x 2 GB DDR3 1600MHz ECC) LAN Integrated Intel 82579LM PCIe GbE Controller
Hardware Specification
Optical Storage 16X SuperMulti DVDRW SATA Keyboard HP USB Standard Keyboard
Mouse Microsoft Wheel Optical 3-button USB Mouse Graphics NVIDIA Quadro NVS 310 512MB Dual Head Expansion Slots 2 PCI Express Gen3 x16 mechanical/electrical 1 PCI Express Gen3 x8 mechanical/electrical 1 PCI Express Gen2 x8 mechanical/x4 electrical 1 PCI Express Gen2 x4 mechanical/x1 electrical 1 Legacy PCI
Built-in I/O Ports 6 USB 2.0, 3 Serial, 1 Parallel Power Supply 600W (90% efficient power supply) Power Consumption max 600W
Customer Provided Laptop Minimum Hardware Requirements
The following hardware specifications are the minimum requirements for a laptop provided by the customer.
Table 9: Hardware Specifications – Customer Provided Laptop
Hardware Specifications
Processor Intel® Core™ i5-560M Processor (2.66 GHz, 3 MB L3 cache)
System Memory minimum 4 GB total memory Hard Drive minimum 320 GB internal drive Optical Storage minimum CD drive to install software
Expansion slots 1 USB 2.0 port per peripheral, 100Mb Ethernet
Native SD Host controller bus Interface required when using hardware key storage
MCC 7100 IP Dispatch Console Cohab Configurations
You can install the MCC 7100 IP Dispatch Console as a standalone product or cohabited with other applications. Important: Before you install the MCC 7100 IP Dispatch Console software, you must uninstall any prior installations of dispatch console software, for example, MCC 7500 Dispatch Console software. See the
MCC 7500 Dispatch Console with Voice Processor Module manual for removing the MCC 7500 Dispatch Console software.
Note: The Local Alias Service Client is the only application that can be installed as an additional cohabited application.
Inside the ASTRO Radio Network Infrastructure (RNI), the following Cohab Applications are supported: • K-core Configuration Manager
• ASTRO Advanced Messaging Solution Smart Client • Radio Control Manager
• Local Alias Service Server • Voting Control and Display Client • Local Alias Service Client
Outside the ASTRO RNI, the following Cohab Applications are supported: • ASTRO Advanced Messaging Solution Smart Client
• Local Alias Service Client
In the ASTRO 7.11 System, the following Cohab Applications are supported: • K-core Configuration Manager
• ASTRO Advanced Messaging Solution Smart Client • Radio Control Manager
• Local Alias Service Server • Voting Control and Display Client • Local Alias Service Client
In the ASTRO 7.13 System, the following Cohab Applications are supported: • ASTRO Advanced Messaging Solution Smart Client
• Local Alias Service Server • Local Alias Service Client
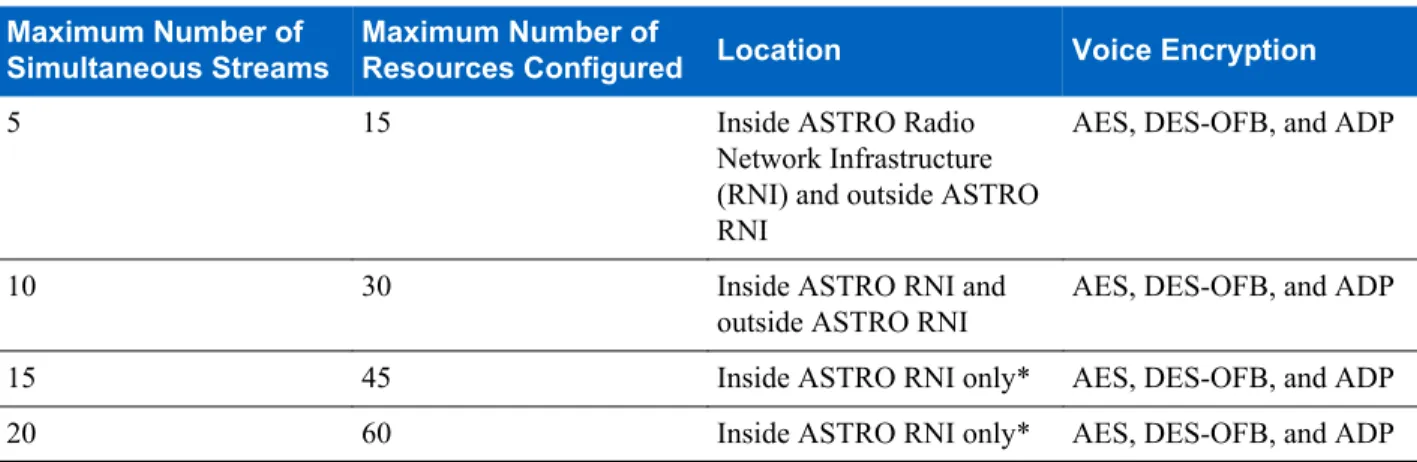
MCC 7100 IP Dispatch Console Call Capacities
The MCC 7100 IP Dispatch Console supports four capacities that are enforced by licensing. The capacities can also depend on the location of the dispatch console.
Table 10: MCC 7100 IP Dispatch Console Call Capacities
Maximum Number of Simultaneous Streams
Maximum Number of
Resources Configured Location Voice Encryption
5 15 Inside ASTRO Radio
Network Infrastructure (RNI) and outside ASTRO RNI
AES, DES-OFB, and ADP
10 30 Inside ASTRO RNI and
outside ASTRO RNI
AES, DES-OFB, and ADP 15 45 Inside ASTRO RNI only* AES, DES-OFB, and ADP 20 60 Inside ASTRO RNI only* AES, DES-OFB, and ADP * If you deploy a higher tier dispatch console outside the ASTRO RNI, the number of the simultaneous streams it supports is automatically downgraded to ten streams.
Dynamic System Resilience Considerations
Dynamic System Resilience (DSR) strengthens ASTRO®25 voice and data communications networks for greater
redundancy to ensure operational continuity in the event of disaster. Each zone in a system with DSR is supported by two cores: a primary core and a geographically separate backup core. For more information, see the Dynamic System Resilience manual.
Warning: Dynamic System Resilience feature is not supported in ASTRO® 25 Conventional IV&D K1/K2
System.
When you install or upgrade a dispatch console in a system with DSR, the dispatch console must apply the DSR configuration to operate in the DRS mode. To enable the DSR mode, meet the following the requirements during the installation:
• Allow the dispatch console to apply the DSR configuration: Start the Elite application to receive the following critical change notification that appears in the status bar of the application: Critical configuration parameters have changed. Please reboot the PC to utilize the updates. At this point reboot the computer. Otherwise the dispatch console cannot apply the DSR configuration and operate in DSR mode, for example, it cannot operate when switching between the primary and backup Master Switching Office (MSO).
• Configure the primary and secondary DNS server addresses for both master sites: For the correct network settings, see Setting Up the Domain for an MCC 7100 IP Dispatch Console Inside the ASTRO RNI on page 60 and the system configuration documentation or contact Motorola Solution Support Center (SSC) for further assistance.
Note: The console site can operate seamlessly on the primary master site with some dispatch consoles in a DSR mode and others in non-DSR mode until the reboot of all dispatch consoles.
Setting Up the MCC 7100 IP Dispatch Console
Use the following process to install the MCC 7100 IP Dispatch Console in your system together with all the necessary system components on which it depends.
Prerequisites: If you use a system with Dynamic System Resilience (DSR), see Dynamic System Resilience Considerations on page 39.
Process:
1 Install and configure the Windows 7 operating system on the workstation that you want to use as a dispatch console:
a) Run the Motorola Operating System Installer (MOSI). See Windows Installation and Motorola OS Installer (MOSI) on page 41.
b) Configure Windows Components. See Configuring Windows Components on page 41.
2 Generate License Certificates for the MCC 7100 IP Dispatch Console. See Generating License Certificates for the MCC 7100 IP Dispatch Console on page 46.
3 Install the MCC 7100 IP Dispatch Console software. See Installing the MCC 7100 IP Dispatch Console Software on page 47.
4 Load secure keys and Algorithms. See Load Secure Keys and Algorithms on page 49.
5 Install third party or cohab software. See Third Party or Cohab Software Installation on page 54. 6 Install MOTOPATCH. See MOTOPATCH Installation on page 55.
7 Perform Windows Supplemental Configuration. See Windows Supplemental Configuration on page 55.
8 Configure Network Interface Card (NIC) on PC or server inside the ASTRO Radio Network Infrastructure (RNI). See Configuring the Network Interface Card for an MCC 7100 IP Dispatch Console Inside the ASTRO RNI on page 56.
9 Setup the peripherals. See Peripheral Configuration on page 57. 10 Setup the network. See Setting Up Network on page 59.
11 Only for dispatch consoles inside the ASTRO RNI: Discover the MCC 7100 IP Dispatch Console in the Unified Event Manager. See the “Discovering Devices” procedure in the Unified Event Manager manual.
Windows Installation and Motorola OS Installer (MOSI)
Before you install the MCC 7100 IP Dispatch Console software, you must update the Windows 7 operating system with an approved service pack.
The installation of a fresh Windows 7 Professional operating system with an approved service pack is required to ensure proper operation. Motorola provides two different installations depending on the computer hardware. • MOSI 64-bit installation DVD for Motorola purchased workstations (i.e., HP Z420).
• Windows 7 Professional OEM DVD for customer laptop installations.
Note: For Windows 7 OEM installations, customers are responsible for installing all required drivers. Note: The following restrictions must be followed when naming a laptop during the installation of the Windows 7 operating system:
- Minimum length: 2 - Maximum length: 48 - Allowed numbers: [0–9] - English letters: [a-zA-Z] - Special characters: . – - No leading and trailing spaces
Note: Workstations purchased from Motorola are imaged with the correct Windows 7 operating system and approved service pack. All required drivers are configured and installed. The MOSI installation and configuration (local or over-the-network) minimizes the wait time normally experienced during OS installations. The MOSI media is updated periodically to provide continual support for installations on Motorola purchased workstations. Information on using MOSI is available on the Motorola Online (MOL) web portal. See the MOSI media label or readme.txt for information regarding access to Motorola Online (MOL).
Configuring Windows Components
Before you instal the MCC 7100 IP Dispatch Console software, configure the general Windows 7 Professional operating system components.
Prerequisites: Install the required Windows 7 operating system with an approved service pack. See Windows Installation and Motorola OS Installer (MOSI) on page 41 or contact the Motorola.
Note:
When and where to use: The general configuration of Windows 7 components is applicable for all MCC 7100 IP Dispatch Console installations, inside or outside the ASTRO Radio Network Infrastructure (RNI).
Process:
1 Set display properties. See Setting Display Properties on page 42.
2 Set power save properties. See Setting Windows Power Options on page 42.
3 Set up SNMP services. SeeSetting Up SNMP Services Inside the ASTRO RNI on page 43.
4 Configure SNMP Components for a console inside the ASTRO RNI. See Configuring Windows SNMP Components for a Console inside the ASTRO RNI on page 43.
Setting Display Properties
The settings for screen resolution and color is dependent on the video adapter install on the PC. See the Windows 7 documentation or the PC manufacturer documentation for assistance with changing display settings.
Procedure:
1 In the Control Panel of the Windows operating system, navigate to the Screen Resolution pane. 2 In the Resolution drop-down menu, set the resolution to 1024x768 or greater.
The available options depend on the installed video adapter. 3 Click Advanced settings.
4 In the Monitor tab, from the Colors drop-down list, select True Color (32 bit). 5 Click OK on all subsequent windows.
Setting Windows Power Options
The power options for Windows 7 must be set correctly to ensure uninterrupted operation. See the Windows 7 documentation or the PC manufacturers documentation for information regarding the steps for setting power options. The steps described in this procedure may not reflect recent updates to the operating system. For installations on HP laptop/workstation, disable the “HP Power Assistant Service”. See the relevant HP documentation for details. Procedure:
1 In the Control Panel of the Windows operating system, navigate to the Power Options pane. 2 For the Balanced (recommended) plan, click Change plan settings.
3 Click Change advanced power settings.
Step result: The Power Options window appears.
4 Expand Hard disk → Turn off hard disk after and perform one of the following actions: • If you use a laptop, from the On battery and Plugged in lists, select Never.
• If you use a desktop computer, from the Setting list, select Never. 5 Expand Sleep → Sleep after and perform one of the following actions:
• If you use a laptop, from the On battery and Plugged in lists, select Never. • If you use a desktop computer, from the Setting list, select Never.
6 Expand Sleep → Allow hybrid sleep and perform one of the following actions: • If you use a laptop, from the On battery and Plugged in lists, select Off. • If you use a desktop computer, from the Setting list, select Off.
7 Expand Sleep → Hibernate after and perform one of the following actions: • If you use a laptop, from the On battery and Plugged in lists, select Never. • If you use a desktop computer, from the Setting list, select Never.
8 Expand Sleep → Allow wake timer and perform one of the following actions: • If you use a laptop, from the On battery and Plugged in lists, select Disable. • If you use a desktop computer, from the Setting list, select Disable.
9 Expand USB settings → USB selective suspend setting and perform one of the following actions: • If you use a laptop, from the On battery and Plugged in lists, select Disabled.
• If you use a desktop computer, from the Setting list, select Disabled.
10 Expand Display → Turn off display after and perform one of the following actions: • If you use a laptop, from the On battery and Plugged in lists, select Never. • If you use a desktop computer, from the Setting list, select Never.
11 Click OK.
Setting Up SNMP Services Inside the ASTRO RNI
The services for Windows Simple Network Management Protocol (SNMP) are initially configured in Windows. Procedure:
1 In the Control Panel of the Windows operating system, navigate to the Programs and Features pane. 2 From the left-hand menu, select Turn Windows features on or off.
3 In the Windows Features window, expand the Simple Network Management Protocol (SNMP) node. 4 Select the WMI SNMP Provider check box.
5 Click OK.
Configuring Windows SNMP Components for a Console inside the ASTRO
RNI
The configuration of Simple Network Management Protocol (SNMP) allows the computer to receive SNMP trap messages. These message are then forwarded to SNMP management programs running on the computer. When and where to use: Use this procedure for SNMP version 1 or 2 only. For SNMPv3 configuration, see the
SNMPv3 manual.
Note: The SNMP services are not available for a console deployed outside the ASTRO RNI. Procedure:
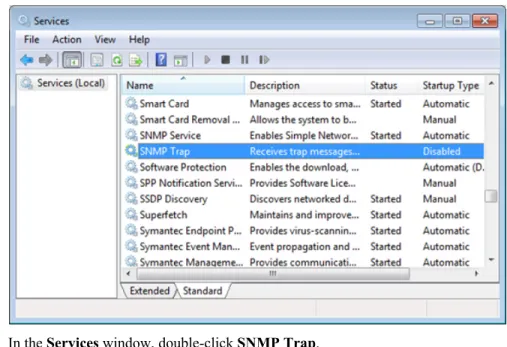
1 In the Control Panel of the Windows operating system, navigate to the Administrative Tools pane. 2 Double-click Services.
Note: If a User Account Control dialog box displays, click Continue.
Figure 2: Administrative Tools - Services
3 In the Services window, double-click SNMP Trap.
4 In the General tab of SNMP Trap Properties window, from the Startup type drop-down list, select Disabled. Click OK.
Figure 3: SNMP Service Properties
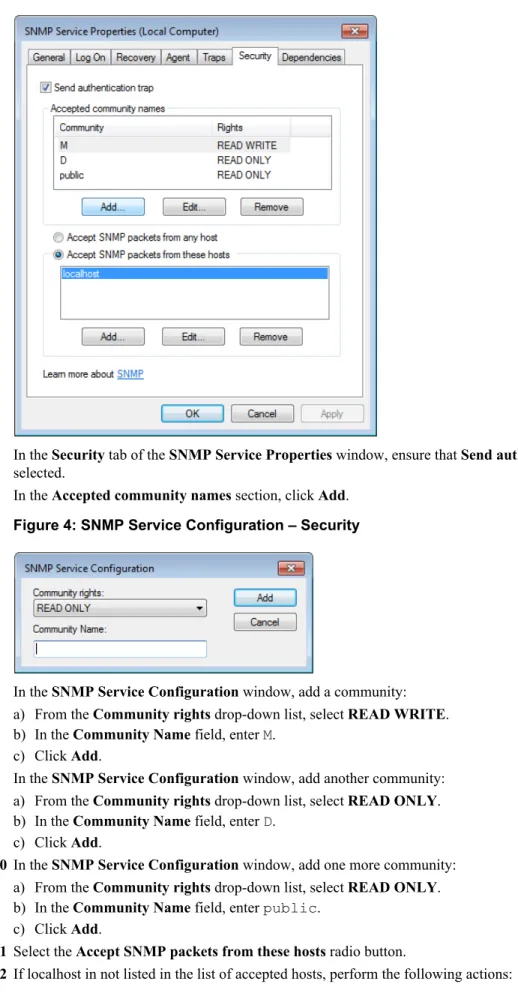
6 In the Security tab of the SNMP Service Properties window, ensure that Send authentication trap check box is selected.
7 In the Accepted community names section, click Add.
Figure 4: SNMP Service Configuration – Security
8 In the SNMP Service Configuration window, add a community: a) From the Community rights drop-down list, select READ WRITE. b) In the Community Name field, enter M.
c) Click Add.
9 In the SNMP Service Configuration window, add another community: a) From the Community rights drop-down list, select READ ONLY. b) In the Community Name field, enter D.
c) Click Add.
10 In the SNMP Service Configuration window, add one more community: a) From the Community rights drop-down list, select READ ONLY. b) In the Community Name field, enter public.
c) Click Add.
11 Select the Accept SNMP packets from these hosts radio button.