DATA STEWARD
MANUAL 2014-15
Revision Date: April 14, 2015
All screen shots, data dictionaries, and templates shown or referred to in this manual are accurate on the Revision Date noted above.
When this manual is updated, the Revision Date will also be updated. An alert will be posted on the Test Updates webpage. A summary of changes is included in the Appendix under Document History.
HELP DESK
For questions regarding the online testing system or for additional assistance, please contact the Help Desk at 1-855-277-9751 (toll-free) or [email protected].
• The Help Desk is open Monday through Friday from 8:00 a.m. to 7:00 p.m. Central Time.
• During your state’s spring testing window, the Help Desk is open from 7:00 a.m. to 7:00 p.m. Central Time.
• The Help Desk is closed in observance of the following holidays.
Labor Day Monday, September 1, 2014
Veterans Day Tuesday, November 11, 2014
Thanksgiving Day Thursday, November 27, 2014 & Friday, November 28, 2014 Christmas & New Year’s
break
Wednesday, December 24, 2014 (half day) through
Thursday, January 1, 2015 Martin Luther King, Jr. Day Monday, January 19, 2015
Memorial Day Monday, May 25, 2015
Independence Day Friday, July 3, 2015
The Help Desk provides support for a variety of situations, including: • Testing environment issues
• Test administration and user account issues • Student information issues
When contacting the Help Desk, provide as much detail as possible about the issues encountered and the system on which it occurred. Please include:
• Your contact information (email address, name) • The state and district in which your school is located • Error messages
• Operating system and browser information • Information about network configuration
Test Administrators are directed to contact the local Technical Liaison if they encounter technical issues related to Internet availability, KITE installation, display resolution, and/or issues with sound/headphones/speakers, etc.
DATA STEWARD MANUAL 2014-15
CONTENTS
Help Desk ... 2
Audience and Purpose ... 5
Kansas Users ... 5
INTRODUCTION ... 6
About Dynamic Learning Maps ... 6
About KITE and Educator Portal ... 6
Access Additional Resources ... 7
CHECKLIST FOR DATA STEWARD ... 8
DLM Testing Phases for 2014-15 ... 9
STATE ORGANIZATIONS AND AUTHORITY ... 10
The State Organization Table ... 10
Provide New State Data to DLM ...10
Provide Updated State Data to DLM ...10
State-Level User Accounts ... 10
EDUCATOR PORTAL USER GUIDE FOR DATA STEWARDS ... 12
Overview ... 12
Required Software ... 13
Supported Browsers ...13
PDF Viewer ...14
Manage User Account ... 15
Activate Educator Portal Account ...15
Access Educator Portal ...18
Reset Educator Portal Password ...19
Change Password ...21
Load a User File ...30
Add a User Manually ...32
Assign a User Role or Multiple Roles ...35
Merge Multiple Accounts ...40
Change User Account Information ...40
Resend the KITE Activation Email Message ...44
View User Data Extract ...46
Manage Enrollment Data ... 47
Create an Enrollment File ...47
Load an Enrollment File ...54
Change Enrollment Data Previously Uploaded ...56
Add a Student Record Manually ...56
Edit a Student Record Manually ...62
Remove a Student from Educator Portal ...63
Load a TEC File ...68
View Enrollment Data Extract ...69
Manage Student Moves ... 69
Move a Student from One Building to Another ...69
Move a Student from One District to Another ...70
Manage Roster Data ... 71
Create a Roster File ...71
Load a Roster File ...74
Change Roster Data ...77
Create a Roster Manually ...79
View Roster Data Extract ...81
Reports and Data Extracts ... 82
View a Data Extract ...82
Troubleshooting ... 84
Common Data Upload Issues ...84
System Error Messages ...84
Help Desk Assistance Required ...85
APPENDIX ... 86
AUDIENCE AND PURPOSE
This document supports the Data Steward in preparing schools for the Dynamic Learning Maps™ assessment. It provides information about gathering, editing, and uploading user (teacher/staff), enrollment (student), and roster (assigning students to teachers) data in Educator Portal.
It provides an overview of DLM and includes a checklist of key duties. It addresses planning needs, resources, and detailed procedures for each of the Data Steward’s responsibilities.
Be sure to check your state specific page on the DLM website to see if your state has provided additional information about responsibilities for local and state Data Stewards. KANSAS USERS
Data Stewards in Kansas will only use parts of this manual because of the state’s current contract with the Center for Educational Testing and Evaluation (CETE) which allows data to be uploaded via the KIDS system. Kansas Data Stewards should:
1. Complete all activities related to new users.
INTRODUCTION
ABOUT DYNAMIC LEARNING MAPS
Dynamic Learning Maps™ (DLM) is a multi-state consortium that has developed a new type of computer-delivered alternate assessment. The DLM Alternate Assessment System is an assessment program designed to more validly measure what students with significant cognitive disabilities know and can do.
The DLM system includes computer-based assessments and a web-based dashboard for educators to manage student information and educator professional development. DLM assessments are administered on a variety of devices.
As a Data Steward, you will be asked to support the data needs for your state, district, or school.
For more information about the Dynamic Learning Maps Consortium, please visit http://dynamiclearningmaps.org/.
ABOUT KITE AND EDUCATOR PORTAL
The Kansas Interactive Testing Engine (KITE) platform was designed and developed to meet the needs of the next generation of large-scale assessments. KITE™ consists of four applications. The two parts students and teachers see are:
Students have accounts in KITE Client.
KITE Client delivers assessments to students through the use of a customized secure web browser accessible on multiple devices. Practice activities and released tests are also available to students through KITE. In this manual we use KITE to describe the KITE Client. Staff do NOT have
accounts in KITE.
Staff and educators have accounts in Educator Portal (EP). Educator Portal is the administrative application where staff and educators manage student data; access professional development
modules, required test administration training, and practice activities; and retrieve reports. The Data Steward uses Educator Portal. You can access EP via https://educator.cete.us. NOTE: The Instructional Tools tab will not be active until Phase B in November 2014. Reports will not be available until spring 2015.
ACCESS ADDITIONAL RESOURCES
Additional resources for Data Stewards and Test Administrators are available on the DLM website under Assessments | Operational Testing
http://dynamiclearningmaps.org/content/operational-testing.
• To find materials specific to your state, choose your state from the menu. • To find materials specific to a role, choose the role from the menu.
Standard resources available across all states which Data Stewards may find helpful include:
Data Steward Manual (PDF) Supports the Data Steward in gathering, editing, and uploading user (teacher/staff), enrollment (student), and roster (assigning students to teachers) data via Educator Portal.
Test Administration Manual (PDF) Supports the Test Administrator in preparing themselves and students for testing.
CHECKLIST FOR DATA STEWARD
The key duties of the local Data Steward are to gather, validate, and upload teacher, student, and roster data into Educator Portal; and to update records as needed. A brief summary of key responsibilities and steps is summarized in the table below.
Work with your Assessment Coordinator to determine due dates to meet your district testing schedule. An additional resource for planning is the DLM Testing Phases for 2014-15 calendar on page 9.
Step
1. Read this Data Steward Manual.
2. Use the resources on your state’s page to become familiar with DLM and the procedures to prepare your district’s data. See Access Additional Resources on page 7.
3. Activate your Educator Portal account and complete the security agreement upon your first login if it appears.
4. Review your district’s State Organizational Date; alert state representative of incorrect data as needed.
5. Collect teacher, student, and roster data. Use the instructions in this manual and the templates to prepare User, Enrollment, and Roster files. CSV templates are available on the Operational Testing webpage.
6. Validate data for accuracy.
a. Send test email message to users to validate accuracy of email address. b. Confirm students and teachers are linked to correct schools in the User
and Enrollment Templates.
c. Confirm students are linked to correct teacher in the Roster Template. 7. Upload User file to Educator Portal.
8. Assign a role or roles to each user. See Assign a User Role or Multiple Roles on page 35.
9. Upload Enrollment and Roster files to Educator Portal.
10. Alert Assessment Coordinator and teachers when data uploads are complete. 11. Assist with changes to user, enrollment, and roster data. We recommend
changes only be made during the windows for data validation and cleanup as noted in the DLM Testing Phases for 2014-15 calendar on page 9.
DLM TESTING PHASES FOR 2014-15
Phase A
Field Test Field Test Phase B Field Test Phase C Field Test Braille Spring Test Operational Instructionally Embedded Operational Instructionall y Embedded (tentative)
Oct 13-31 Nov 10-Dec 20 Jan 5-Mar 6 Jan 19-Feb 13 Mar 16-Jun 12
Tasks from Checklist Due Date Due Date Due Date Due Date Due Date Organizational Table Changes Submitted to DLM (state level) 9/5 9/5 9/5 9/5 9/5 1-8 9/29 10/27 12/22 1/5 3/2 9 10/1-10 10/1-10 10/1-10 10/1-10 2/23-3/13
How do I get started?
My state/district is… Go to the section in this manual titled…
New to DLM testing (has NOT
participated in a field test or pilot test). STATE ORGANIZATIONS AND AUTHORITY Not new to DLM. We have used
Educator Portal to upload teacher and student data to DLM before.
EDUCATOR PORTAL USER GUIDE FOR DATA STEWARDS
STATE ORGANIZATIONS AND AUTHORITY
The state must set up an organizational file before the Data Steward can begin work the first time.
THE STATE ORGANIZATION TABLE
Educational units in the DLM consortium states are organized in a variety of structures. Some states organize districts into regions; others define the smallest unit as a school or a building. The KITE system has been designed to accommodate many centralized, distributed, and decentralized organizational structures.
Before any users in a state can be uploaded into Educator Portal, the State Education Agency (SEA) must provide DLM with State Organization Tables. If you are uncertain if your state has already provided this information, check with your SEA or review your state’s DLM webpage.
It is important that you follow the structure in your State’s Organization Table because data in your User (teacher), Enrollment (student), and Roster files will not load unless the organization information you use matches information in your State Organization Table.
PROVIDE NEW STATE DATA TO DLM
Email [email protected] to connect the state data team with the DLM data team and begin the process to provide your state organization table which is the first step in providing teacher and student information to DLM.
PROVIDE UPDATED STATE DATA TO DLM
States are responsible for providing changes to state organizational data. Email [email protected] with those details. State and district users should await confirmation that changes have been made before proceeding.
STATE-LEVEL USER ACCOUNTS
Each state must define its own distribution of authority and responsibility for tasks associated with DLM testing. A state may, for example, retain all authority and
responsibility for assessment coordination and data stewardship; or distribute parts of that authority to Assessment Coordinators and Data Stewards at the regional, district, or school level.1
1 Regardless of the organizational structure, Assessment Coordinators and Data Stewards outside the SEA are referred to as “local” in this guide.
Once the State Organization Table is defined in Educator Portal, SEAs must also provide a user file with records for the state-level Assessment Coordinator and Data Steward. DLM will load this information and set the roles and permissions. DLM will set up (in Educator Portal) the top-most user account at the state level. Those users will, in turn, set up user accounts at the next level. States that wish to use a completely centralized model do not need to set up additional user accounts except for teacher records.
EDUCATOR PORTAL USER GUIDE
FOR DATA STEWARDS
This section outlines the step-by-step procedures a Data Steward might use in Educator Portal.
Hint: If Educator Portal or KITE look or behave differently and you are
using a printed version of this manual, please check for an updated
version of the manual on your state’s DLM webpage.
OVERVIEW
Several procedures are required to successfully upload the required data to Educator Portal. We recommend you review the entire series of procedures to understand the complete process, the required and optional steps, before you begin.
Educator Portal is the administrative application where staff and educators manage student data; access professional development modules, required test administration training, and practice activities; and retrieve reports. EP operates with related tables of data. Upload files in this order so that records and relationships are correctly linked. 1. The User File creates user accounts for state and district users such as teachers, test
proctors, and administrators in Educator Portal.
2. The Enrollment File creates student records in Educator Portal, allowing the student access to KITE.
3. The Roster File groups students by course rosters and links students to their teachers so that the teacher can access the student information in Educator Portal. The key fields linking these tables are:
• District, School, and Building Identifiers (State Organization Table) • Educator_Identifier (links a teacher to a roster of students)
• State_Student_Identifier (uniquely identifies a student) • E-mail (also the teacher username for Educator Portal)
Hint: Note fields which are included in more than one file. The data in these
fields must match across files, especially where the same data applies
to many records (e.g., Attendance_School_Program_Identifier in the
Enrollment File will apply to many students and must match the
Organization value in the User file). Use copy and paste to avoid
typos.
You will use three upload templates (User, Roster, and Enrollment). These files must be saved and uploaded as Comma-Separated Values (CSV) tables. We recommend that you prepare and upload your data in batches (by school for example). Working in small batches will make it easier to find and fix data upload issues.
Each of the following sections summarizes the steps to upload the three types of files. Also listed are the field names and definitions for each field in these files. These “data dictionaries” are in the same order as each CSV upload template.
REQUIRED SOFTWARE SUPPORTED BROWSERS
See the KITE Requirements webpage to choose a browser which will work well with Educator Portal. For more information on browsers and technology in your district, contact your Technical Liaison.
To access the KITE Requirements webpage, follow these steps: 1. Go to www.dynamiclearningmaps.org.
3. Click View KITE Requirements.
4. Look for the section titled Supported Browsers. PDF VIEWER
To view PDFs in Educator Portal, educators will need Adobe Reader or other software which allows you to view and print PDFs. Download Adobe Reader from
http://get.adobe.com/reader/. Contact your Technical Liaison for questions related to technology specifications.
MANAGE USER ACCOUNT ACTIVATE EDUCATOR PORTAL ACCOUNT
Before you can upload data to Educator Portal for other users, you need to activate your Educator Portal account. You should have been given an account with the District Test Coordinator role assigned so you can fulfill your Data Steward responsibilities. If you already have an account, skip to the procedure titled
Access Educator Portal on page 18.
1. After the SEA Data Steward has uploaded the data required to set up Educator Portal accounts for local Data Stewards, you will receive an “Activate your Account for KITE Assessment Administration” email message from [email protected].
Hint: The email message may reference KITE, but this is the path to
Educator Portal.
2. Click the link in the message. The Activate User screen appears. 3. Complete these fields:
First Name Last Name Password
Confirm Password 4. Click Activate.
ACCESS EDUCATOR PORTAL
Hint: The first time you access Educator Portal, go to the procedure titled
Activate Educator Portal Account on page 12.
To access Educator Portal, follow these steps:
1. Using a recommended internet browser, go to https://educator.cete.us/. 2. Complete these fields on The Sign In screen.
Username (usually your email address; use lower case) Password (case sensitive)
RESET EDUCATOR PORTAL PASSWORD
Hint: Use this procedure ONLY if you forgot your password. To change
your password, see Change Password on page 21.
To reset a password in Educator Portal, follow these steps: 1. Go to Educator Portal at https://educator.cete.us. 2. Click Forgot Password?
3. Type your Username.
4. Click Submit. Receive a password reset email from [email protected] within one hour; check your junk or spam email folders if this automated message does not
arrive.
5. Click the link in the message. 6. Type your Username.
7. Type a new password in the Password and Confirm Password fields.
8. Click Submit.
CHANGE PASSWORD
To change your password, follow these steps: 1. Click My Profile.
2. Click Change Password on the left menu. 3. Complete these fields.
Current Password New Password Confirm Password
4. Click Save.
COMPLETE SECURITY AGREEMENT
Educators and Educator Portal users who have access to DLM assessments will be required to read and respond to a security agreement. This information is stored in Educator Portal and is renewable annually. The Security Agreement should appear the first time you log in to Educator Portal.
A summary of completed agreements will be distributed to DLM state partners at the end of the year.
1. Go to My Profile.
2. Click Security Agreement on the left menu. 3. Read the agreement.
4. Choose your reply.
5. Type your full name in the field. 6. Click Save.
CHANGE DISPLAY NAME
The display name is the name that shows when you log into the application. The default display name is the first name and last name that was defined in the user upload
completed by your Data Steward to create your account. Changing your display name is optional.
To edit your display name, follow these steps: 1. Click My Profile.
2. Click Edit Display Name on the left menu. 3. Type your Display Name.
4. Click Save.
CHANGE DEFAULT ORGANIZATION AND ROLE
The default organization and role impact the view that appears when you log into Educator Portal. The default organization and role was defined in the user upload completed by your Data Steward to create your account. Changing your default organization and role is optional.
To change your default organization and role, follow these steps: 1. Click My Profile.
2. Click Change Default Organization and Role on the left menu. 3. Choose the organization and role you want to be the default.
4. Click Save.
MANAGE USER DATA OVERVIEW
You will use the User File to create unique user accounts in Educator Portal with permission to access specific student data within the assigned school or district. Users include teachers, test administrators, Data Stewards, and Assessment Coordinators. Optionally, you may consider creating an account for Technical Liaisons.
Creating a new user account is a multi-step process where you upload the user who is automatically assigned the role of teacher. If they require a different role or additional roles you will assign those using the procedure titled Assign a User Role or Multiple Roles on page 35.
To activate their account, a user completes steps from the system-generated activation email message. See the flow chart below showing an overview of the steps required to upload and activate a user account in Educator Portal. Data Stewards are able to add additional roles or change a user’s role and re-send the account activation message.
On the sign in screen, there is an option for any user to create their own Educator Portal account. PLEASE DO NOT ENCOURAGE THE USE OF THIS FEATURE AS IT MAY CAUSE FUTURE PROBLEMS UPLOADING DATA.
Please note:
• This form cannot be used to overwrite existing data in the system.
• If a user completes this form using data identical to data previously uploaded, the user will receive an error message.
• If a user completes the form using different or new data, the user might have trouble getting their roster assigned to the right account.
• If this form is completed first and the Data Steward tries to upload a data file with that user in it, the Data Steward will receive an error message.
• If a user uses this form to create an account, they will only be assigned the role of PD User. The Data Steward must update the user’s role to reflect additional roles needed.
The User file contains these fields: • Legal First Name
• Legal Last Name • Educator Identifier
• Organization • Organization Level
Educator Portal displays the Legal First Name and Legal Last Name exactly as they are entered in the User file. Best practices are to use mixed-case (Sarah DuShagne) not all capitals (SARAH DUSHAGNE). Use spaces, hyphenation, and accent marks to produce better results later.
The Educator Identifier field is the key connector between teachers and students and is used to group student records into rosters. Educator Portal uses the Educator Identifier field to control building-level account access to individual student data. This code must be unique within the state. If you do not have an identifier value for a teacher, DO NOT upload that user. Users who do not need to be connected to students are not required to have an Educator Identifier.
The column labeled Organization is an alphanumeric field used to identify a specific school or district. Upon logging into Educator Portal, only the student records that match the user’s assigned Organization ID will be displayed. See your State Organizational Tables for more information.
Use the Organization Level field to indicate the scope of user access to student data within Educator Portal. For example, teacher accounts will typically be created at the school level by recording the letters SCH in the Organization Level column. SCH stands for School/Building. To support a teacher with responsibilities for classes in multiple buildings, choose one Organizational Level in the User file (typically SCH) and use the procedure titled Add a User Manually on page 32 to add more Organizational Levels.
CREATE A USER FILE
This is a required procedure.
To create a user file, follow these steps:
1. Download the User Template from your state’s DLM webpage.
Hint: Always start by downloading the template to ensure sure you have the
current file.
2. Open the User Template in a spreadsheet program that can save data in the CSV format. Template MUST be uploaded as a CSV file format.
3. When using the upload template, make sure all fields are formatted as text. This will preserve leading zeroes. If, after saving the file as CSV, you reopen it, you will need to reset the format to text to ensure the leading zeroes remain.
All of the field names must be included as column headings in your CSV file for the upload process to work. The “Req?” column indicates whether or not a field
must contain information for each user to ensure a successful file upload. Columns with “No” in the table below can be blank for a user.
4. Using a new line (row) for each user, type the information for each new user into the CSV file.
5. Verify that all column headings appear in the file, even if some columns are blank.
Hint: Not all columns in the CSV template require data. However, all
columns in the CSV template must be included to successfully upload.
6. Save the file as a CSV file. The system will only load files saved in CSV format.
Hint: Save the file in a location you can easily access later.
Your state may offer a resource which maps the field names shown below to codes and identifiers commonly used in your state or district. See the Appendix on page 86 and Access Additional Resources on page 7.
Field Format; Length Req? Description Special Notes
Legal_First_Name Alphanumeric Yes The user’s first name. Double-check that you have first and last names listed in the correct columns. Legal_Last_Name Alphanumeric Yes The user’s last name Double-check that you have first and last
names listed in the correct columns. Educator_Identifier Alphanumeric; 30
Special characters found in email addresses are allowed
Yes for teachers No for other users
The user’s identification code. For
educators, this is usually their state license number.Alternatively, another state identification number may be used. NEVER use social security numbers. Check with your SEA Data Steward if you have questions about this value.
If a user will not be assigned to students, leave this field blank. For example, a district supervisor would not need an educator identifier.
E-mail Alphanumeric
Use only lower case. Yes The user’s email address. This will become the user’s Educator Portal login name. New users will receive their KITE activation email message to this address. As a key field, it must be accurate. It is strongly recommended that it be the official work-issued address. We
recommend sending an email message to verify the accuracy of the address before including it in your upload.
Organization Alphanumeric Yes The code for the user’s district, school, or other organizational unit. Must include any leading zeros.
Use the Organization code from your State Organizational Table. Data in this field will be matched against the organization information provided by your state and present in KITE and Educator Portal. Failure to match will
LOAD A USER FILE
This is a required procedure.
To load a user file to Educator Portal, follow these steps: 1. Click Configuration.
2. Click Users.
3. Select Upload Users.
4. Apply filters in the Select Organization fields to choose the level you need.
Hint: If you do not see the correct option listed, your account permissions
may need to be changed. Contact your state-level Data Steward.
5. Click to find the CSV file on your computer. A browser window appears.
6. Locate the CSV file you created. 7. Click the file name to select it.
8. Click Open.
The filename appears in the File field.
Hint: Verify that the file has a .csv file extension. Filenames with extensions
ending in .xls or .xlsx will be rejected.
9. Click Upload.
The confirmation message indicates the number of records uploaded and if applicable, the number of records rejected.
Hint: Each line in the CSV file is one record.
10. Click View Details to see error messages related to the upload.
Hint: If the rejection reason is that the email address is invalid, this may
mean that the user already has an account in the system.
ADD A USER MANUALLY
This procedure is most helpful when adding only a few users. When adding several students it is best to use the User Template.
To add a user manually, follow these steps: 1. Click Configuration.
2. Click Users.
3. From Select Action, choose Add User Manually.
4. Complete these fields: First Name Last Name
Email Address (will be used as the login ID)
Educator Identifier (If the user is a teacher, this field is required to allow students to be rostered to them.)
5. Select your State.
Hint: After you select your state, additional fields with drop-down menus
display.
6. Select choices for the other fields.
Note: All fields with a red asterisk are required, but you should enter all known information to be sure the user is assigned the correct level of access.
7. Select the checkbox to the left of the role or roles listed under the Available Roles.
8. Choose one Default Role.
Hint: You may need to use the scroll bars to see all roles. For example, the
Teacher role is near the bottom of the list.
ASSIGN A USER ROLE OR MULTIPLE ROLES
Data Stewards can change user roles by following the Change User Account Information procedure on page 40.
This is a required procedure if the user requires a role other than the role of teacher which is assigned by the system when the User file is uploaded.
Before a user can begin using Educator Portal the account must be assigned at least one role. The role determines the tasks the user can complete.
Beginning November 3, users uploaded via the User Template are assigned a default role of "Teacher" and the KITE activation email message is automatically sent. The role may be changed by following these steps:
Hint: The user will not be able to see student data until their Educator ID is
rostered to student(s). See the section titled Manage Roster Data on
page 71.
Role in Educator
Portal Description
Teacher
A teacher account. Teachers access only the records for those students linked to their account by a roster. They can view student records and edit some information. This role is a good match for the Test Administrator, Teacher, or Test Examiner.
District Test Coordinator
A person at the district level who needs to be able to perform test coordination functions. Can add roles and users in a district and the contained buildings. Can upload enrollment and roster files and modify student records. This role is a good match for district Data Stewards and Assessment Coordinators.
Building User Can access records for all students in that building. Can view student records and edit some information.
Role in Educator
Portal Description
District User Has limited access to all students in the district with some view and edit permissions. District
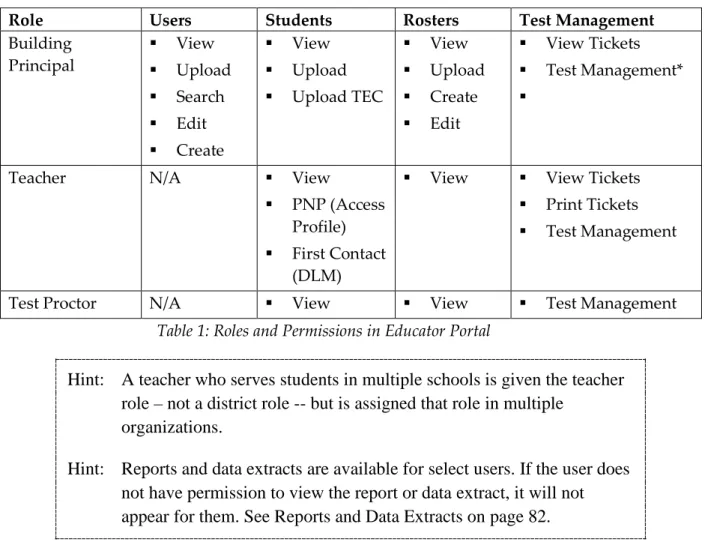
Superintendent Has view and edit permissions for users, students, and rosters in a district. This table shows the permissions for common roles in Educator Portal. “Upload” refers to completing the task using a CSV file upload. “Create” and “Add Manually” refers to completing the task through the User Interface in Educator Portal.
Role Users Students Rosters Test Management
Building Test Coordinator View Upload Search Edit Create View Upload Upload TEC View Upload Create View Tickets Print Tickets Test Management
Building User View
Upload Search Edit Create View View Upload Create View Tickets Print Tickets Test Management District Superintendent View Upload Search Edit Create View Upload Add Manually Upload TEC View Upload Create View Tickets Print Tickets Test Management District Test Coordinator View Upload Search Edit Create View Upload Add Manually Upload TEC Edit View Upload Create View Tickets Print Tickets Test Management
District User View
Upload Search Edit Create View Upload Add Manually Upload TEC View Upload Create View Tickets Print Tickets Test Management
Role Users Students Rosters Test Management Building Principal View Upload Search Edit Create View Upload Upload TEC View Upload Create Edit View Tickets Test Management*
Teacher N/A View
PNP (Access Profile)
First Contact
(DLM)
View View Tickets Print Tickets
Test Management
Test Proctor N/A View View Test Management
Table 1: Roles and Permissions in Educator Portal
Hint: A teacher who serves students in multiple schools is given the teacher
role – not a district role -- but is assigned that role in multiple
organizations.
Hint: Reports and data extracts are available for select users. If the user does
not have permission to view the report or data extract, it will not
appear for them. See Reports and Data Extracts on page 82.
To assign a user role, follow these steps: 1. Click Configuration.
2. Click Users.
3. Select View Users. 4. Select State.
5. Apply filters in the Select Organization fields to choose the level you need; click
Search.
Hint: The levels you see depend upon how your state is organized and your
Educator Portal role. A state-level user will see more levels than a
teacher in a single school district.
6. Sort or filter the Status field to view New users.
Hint: The
Status
field reflects whether the account is New, Pending, or
Active.
New
indicates the user information has been uploaded, but a
role has not yet been assigned. Once a role has been assigned (in this
procedure), the KITE activation email message is generated. The
status appears as
Pending
. When the user activates their account, the
status changes to
Active
.
8. Click Modify User (the pencil).
10. Select the checkbox to the left of the role or roles listed under Available Roles.
11. Choose one Default Role.
12. Click Save to save your work and close the dialog box.
Hint: An educator with roles in multiple organizations will use a filter on the
Home Page of Educator Portal to see students on different school
rosters.
MERGE MULTIPLE ACCOUNTS
When a user needs to access multiple organizations, the best practice is to establish a single user account with multiple roles. If you need to merge multiple accounts into a single user account you may follow these steps:
1. Determine which account is the one you want to retain and enhance. We recommend you choose the one with the Username that matches the user’s email address.
2. Contact the Help Desk with the accounts to be combined, clarifying which Username you wish to retain.
CHANGE USER ACCOUNT INFORMATION
Some Educator Portal users have permissions to change a user’s account information such as the display name, email address, or role. Use this procedure if you need to change user account information (excluding a password). Also see Table 1: Roles and Permissions in Educator Portal.
Hint: Users may change their own Display Name, Password, and Default
Organization and Role in the
My Profile
section of Educator Portal.
The T
ESTA
DMINISTRATIONM
ANUALincludes these procedures.
To change user account information, follow these steps: 1. Click Configuration.
2. Click Users. 3. Select View Users. 4. Select your State.
5. Apply filters in the Select Organization fields to choose the level you need; click
Search.
Hint: The levels you see depend upon how your state is organized and your
Educator Portal role. A state-level user will see more levels than a
teacher in a single school district.
6. Locate the user (options to filter, sort and search are available).
Hint: Existing users have an Active status.
7. Click the row to highlight the user. 8. Click Modify User (the pencil).
9. The Modify User screen appears.
10. What do you want to do?
If you want to… Then…
Change First Name, Last Name, or
Email Address.
Type the new information into the matching field.
If you want to… Then…
Add a role Select the checkbox to the left of the role listed under Available Roles.
Change the default role Click the button in the Default Role
column to the right of the desired role. Correct Educator Identifier Contact the Help Desk on behalf of the
user.
Add an organization Click Add Organization.
Remove an organization Click Remove Organization. (Button sits below the section it will remove.)
11. Click Save.
12. KITE will issue an email to the user indicating that a change has been made. RESEND THE KITE ACTIVATION EMAIL MESSAGE
Use this procedure if you need to resend the KITE activation e-mail message.
Educator Portal logins are connected to email addresses, and each user must activate their user account individually. After the user is loaded into Educator Portal, the system will automatically generate a KITE activation email from [email protected]. The user should use the information in the email to activate their Educator Portal account. The activation link expires after 20 days.
If a user is having difficulty logging on to Educator Portal, you can use the steps below to resend their activation email message. To resend the activation email message, follow these steps:
2. Click Users.
3. Select View Users.
4. Locate the user (options to filter, sort and search are available).
Hint: A Pending status indicates that the user has not clicked the link in the
KITE activation email message to active their account possibly
because:
- a spam filter caught the KITE activation email message
- the email address used in the User upload is incorrect
5. Click the checkbox to select the user.
6. Click Resend Email.
7. Optional: contact the user and ask them to watch for the email. VIEW USER DATA EXTRACT
The User Data Extract includes all records for Educator Portal users in the user’s
organization. This includes those uploaded via web service, User file, or the manual user interface.
Most columns match the User Template/File. Other columns include: • State
• Organization Name
• User Status – Pending, New, Active, Inactive • Create Date
• Several columns for each Educator Portal role
Hint: There will be multiple records for one user if the user is assigned to
multiple organizations.
See page 29 for the definitions of column headings matching those in the User Template. Follow the steps on page 82 to View a Data Extract.
MANAGE ENROLLMENT DATA
An enrollment file is used to upload demographic information for each student who will be participating in DLM testing. The enrollment file is only loaded once, unless changes are required.
Kansas does NOT use the Enrollment process described here. Kansas student records for DLM testing are included in the KIDS data and Student Course
(STCO) records. See your state Data Steward for more information. CREATE AN ENROLLMENT FILE
This is a required procedure.
To create an Enrollment file, follow these steps:
1. Download the Enrollment Template from your state’s DLM webpage.
Hint: Always start by downloading the template to ensure sure you have the
current file.
2. Open the Enrollment Template in a spreadsheet program that can save data in the CSV format.
3. Using a new line (row) for each user, type the information for each new student into the CSV file.
4. Verify that all column headings appear in the file, even if some columns are blank.
Hint: Not all columns in the CSV template require data. However, all
columns in the CSV template must be included to successfully upload.
5. Save the file as a CSV file. The system will only load files saved in CSV format.
Hint: Save the file using a location you can easily access later.
Use the tables on the next several pages to compile your enrollment information. Some of the fields with limited or complex entry structures are explained at the end of this
Your state may offer a resource which maps the field names shown below to codes and identifiers commonly used in your state or district. See the Appendix on page 86 and Access Additional Resources on page 7.
Field Format; Length Req? Definition Special Notes
AYP_School_
Identifier Alphanumeric; 30 No The unique number that has been assigned by DLM to the school building as listed in your State Organization Table.
Use the School Number provided in your State Organizational Table. If your data has leading zeroes, check that they are retained after each save. The number must match one in your
organization, or the file upload will fail.
Residence_District_
Identifier Alphanumeric; 30 Yes The district where the student attends school. The unique code that has been assigned to the district by DLM. This identifies the parent organization for a school (such as the school district).
Use the District Number provided in your State Organizational Table. If your data has leading zeroes, check that they are retained after each save. The number must match one in your
organization, or the file upload will fail.
Student_Legal_
Last_Name Alphanumeric; 60 Yes The student’s last name. Student_Legal_ Alphanumeric; 60 Yes The student’s first name.
Field Format; Length Req? Definition Special Notes
Generation_Code Alphanumeric; 10 No The part of the student’s name used to denote the generation in his/her family, e.g., Jr., Sr., III, etc.
Gender Numeric; 1
0 = Female 1 = Male
Yes The student’s gender.
Date_of_Birth MM/DD/YYYY; 10 Yes The date (month, day, and year) on which the student was born.
Current_Grade_
Level Numeric; 2 3-12. Do not use leading zeroes.
Yes The grade level or primary instructional level at which a student enters and receives services in a school or an educational institution during a given academic session. For example, 3=3rd grade, 11=11th grade.
For Kansas, who uploads using the KIDS system, this information is different. This field helps determine which assessment the student is assigned.
Local_Student_ Identifier
Alphanumeric; 10 No The unique code assigned to the student by the school or local education agency. State_Student_
Identifier Numeric; 10 Yes The student’s state ID number. Current_School_
Year YYYY; 4 Yes The ending year of the current school year (e.g., for the 2014–2015 school year, enter 2015).
Use 2015 for all DLM students.
Field Format; Length Req? Definition Special Notes
Funding_School Alphanumeric; 30 No The unique code assigned by the state that indicates the location where the student is counted for state funding and/or for the Principal’s Building Report. If a district does not have a school for an educational level (e.g., does not have a high school), the district central office building number should be used.
Use the code provided in your State Organizational Table.
Attendance_School_
Program_Identifier Alphanumeric; 10 Yes The building number (typically four digits) or other location identifier assigned by DLM to represent where the student attends school. This is the building that will see the student information, including the student username and password.
Use the School Number provided in your State Organizational Table. If your data has leading zeroes, check that they are retained after each save. The number must match one in your organization, or the file upload will fail.
School_Entry_Date MM/DD/YYYY; 10 Yes The date on which the student enrolls and begins to receive instructional services in a school. If the student should leave and then re-enroll, this date should reflect the most recent enrollment date.
Field Format; Length Req? Definition Special Notes
State_Entry_Date MM/DD/YYYY; 10 No The date on which the student enrolls and begins to receive instructional services in the state. If the student should leave the state and then re-enroll in school, this date should reflect the most recent enrollment date. Comprehensive_
Race Numeric; 5 Yes General racial category (or categories) that most clearly reflects the individual’s recognition of his or her racial background.
Details about potential values are provided in a separate table below.
Primary_Disability_
Code Alpha; 2 No Indicates whether or not the student has an active Individual Education Plan (IEP) under the Individuals with Disabilities Education Act (IDEA—Part B).
Details about potential values are provided in a separate table below.
Gifted_Student Alpha; 5 TRUE FALSE
No Indicates whether or not the student has an active Individual Education Plan (IEP) for giftedness.
Leave blank for DLM students.
Hispanic_Ethnicity Alphanumeric; 3 No The code which reflects the individual’s recognition of his or her Hispanic ethnicity background. (Yes, No, blank)
First_Language Alphanumeric; 2 No The code for the primary language or dialect
(not ethnicity) of the student. Details about potential values are provided in a separate table below.
DLM_Status Blank
TRUE FALSE
Yes TRUE enables Dynamic Learning Maps and
the First Contact Survey for the student. Must be TRUE for all DLM students. ESOL_Participation_
Code Numeric; 1 Yes The type of ESOL/Bilingual Program in which the student participates. Details about potential values are provided in a separate table below.
Comprehensive_Race Entry Definition 1 White 2 African American 4 Asian 5 American Indian 6 Alaska Native 7 Two or More Races
8 Native Hawaiian or Pacific islander
First_Language
Entry Definition Entry Definition
Blank English 24 Hindi
1 Chinese (Mandarin or
Cantonese) 25 Urdu
2 Dinka (Sudanese) 26 Swahili
3 French 27 Nepali
4 High German 28 American Sign Language (ASL)
5 Hmong 29 Serb
6 Khmer (Cambodian) 30 Croatian
7 Korean 31 Turkish
8 Lao 32 Karen languages (e.g., Burma,
Myanmar) 10 Filipino or Tagalog
(Philippines) 33 Haitian/Haitian Creole
11 Russian 34 Gujarati 13 Spanish 35 Punjabi 14 Vietnamese 36 Pashto 15 Arabic 37 Dari 16 Other 38 Quiche 17 Somali 39 Mam 18 Thai 40 Ilokano 19 Portuguese 41 Visaya
20 Farsi (Iranian) 42 Low German
21 Chuukese (e.g., Marshall
Primary_Disability_Code
Entry Definition Entry Definition
Blank None MR Mental retardation
AM Autism ID Intellectual disability
DB Deaf/blindness OH Other health impairment
DD Developmentally delayed (ages
3-9 only) OI Orthopedic impairment
ED Emotional disturbance SL Speech or language impairment
HI Hearing impairment TB Traumatic brain injury LD Specific learning disability VI Visual impairment MD Multiple disabilities
ESOL_Participation_Code Entry Definition
0 Not an ESOL eligible student and not an ESOL monitored student 1 Title III Funded
2 State ESOL/Bilingual Funded
3 Both Title III and State ESOL/Bilingual Funded 4 Monitored ESOL student
5 ESOL program eligible, based on an English language proficiency test, but not currently receiving ESOL program services. Example: Parents that have waived their child out of ESOL services, but the district is still obligated to provide ESOL support.
6 Receives ESOL services and not funded with Title III and/or State ESOL Funding.
LOAD AN ENROLLMENT FILE This is a required procedure.
Hint: Up to 5,000 records at a time may be loaded. However, large files may
load slowly and can be difficult to troubleshoot. We recommend
loading 100 or fewer records at a time, unless you are confident about
the quality of your data.
To load the Enrollment file, follow these steps: 1. Click Configuration.
2. Click Students.
4. Select State.
If you do not see the correct option listed, your account permissions may need to be changed. Contact your state-level Data Steward or SEA.
5. Apply filters in the Select Organization fields to choose the level you need. 6. Click to find the CSV file on your computer.
A browser window appears.
7. Locate the CSV file you created. 8. Click the file name to select it.
10. Click Upload.
The confirmation message indicates the number of records uploaded.
Hint: Each line in the CSV file is one record.
CHANGE ENROLLMENT DATA PREVIOUSLY UPLOADED
Prepare a new file with the correct information and repeat the upload steps. The new record will be matched to the previous record using the State_Student_Identifier field. The new record replaces the previous record.
Contact the Help Desk:
• If you change any of the name fields. This requires follow up action by the Help Desk team.
• To correct an error in the State_Student_Identifier field. ADD A STUDENT RECORD MANUALLY
This procedure is most helpful when adding only a few students. When adding several students it is best to use the Enrollment Template.
To add a student record manually using the Educator Portal interface, follow these steps:
1.
In Quick Links, click
Student
.
3.
Select your
State
Hint: After you select your state, additional menus will display.
4.
From the additional menus, select the appropriate information (e.g.,
District
,
5.
Complete the remaining fields using the tables which begin on page 59.
Hint: Some fields are required for DLM even though they are not marked as
required on this screen. You may click
Reset
to clear all fields.
The information in this table only applies when adding a student manually. When uploading an Enrollment File, use the table(s) on page 49.
Field Req? Definition Special Notes
State Yes The state.
District Yes The district. Options appear after you select a state. School Yes The school. Options appear after you select a district. Legal First Name Yes The student’s first name.
Legal Middle Name No The student’s middle name Legal Last Name Yes The student’s last name.
Generation No The part of the student’s name used to denote the generation in his/her family, e.g., Jr., Sr., III, etc.
Date Of Birth No The date (month, day, and year) on which the student was born. Gender No The student’s gender (female, male).
Current School Year Yes The ending year of the current school year. Choose 2015. Current Grade Yes The grade level or primary instructional level at which a student
enters and receives services in a school or an educational institution during a given academic session.
AYP School
Identifier No The unique alphanumeric code that has been assigned by DLM to the school building as listed in your State Organization Table. Residence District
Identifier
Yes The unique alphanumeric code that has been assigned to the
district by DLM. This identifies the parent organization for a school (such as the school district).
Use the district-level ID provided in your State Organizational Table. Comprehensive No General racial category (or categories) that most clearly reflects the Choose from options
Field Req? Definition Special Notes
State Student
Identifier Yes The student’s state ID number. Local Student
Identifier No The unique alphanumeric code assigned to the student by the school or local education agency. Gifted Student No Indicates whether or not the student has an active Individual
Education Plan (IEP) for giftedness. (Yes, No, blank)
Leave blank for DLM students.
State Entry Date No The date on which the student enrolls and begins to receive instructional services in the state. If the student should leave the state and then re-enroll in school, this date should reflect the most recent enrollment date.
School Entry Date Yes* The date on which the student enrolls and begins to receive instructional services in a school. If the student should leave and then re-enroll, this date should reflect the most recent enrollment date. (*While the interface does not mark this as a required field,
completing this field allows for the Test Exit and Clear (TEC) file to work. The TEC file is used when exiting a student from a school.)
District Entry Date No The date on which the student enrolls and begins to receive instructional services in a school district.
Primary Disability
Code No Indicates whether or not the student has an active Individual Education Plan (IEP) under the Individuals with Disabilities Education Act (IDEA—Part B).
Choose from options presented.
DLM Status Yes* Yes enables Dynamic Learning Maps and the First Contact Survey for the student. (*While the interface does not mark this as a required field, you must choose Yes for all DLM students.)
Choose YES to access the First Contact Survey and all
Dynamic Learning Maps features.
These fields appear only when an option other than English is chosen in the First Language field.
Field Req? Definition Special Notes
ESOL Participation
Code Yes The type of ESOL/Bilingual Program in which the student participates. ESOL Entry Date No Date the ESOL participation began.
USA Entry Date No Date of entry into USA.
6.
Click
Save
.
Best Practices for the Add Student Manually Interface and the Test, Exit, and Clear (TEC) File
Background: In this scenario, the following criteria create an error during the TEC file process and the student is NOT successfully removed from the system.
• A student record is added using the Add a Student Record Manually procedure AND • The School Entry Date field is left blank AND
• The student is later exited from the school using the Test, Exit, and Clear (TEC) file
Correction: If the TEC file shows it successfully updated a student, but the student still appears in the system, add the student record with a date in the School Entry Date field. Then re-upload the TEC file. The student should be successfully removed.
Best Practice: When adding a student record manually, include a School Entry Date and choose Yes in the DLM Status field to prevent problems when exiting a student using the TEC file.
EDIT A STUDENT RECORD MANUALLY
To edit a student record using the Educator Portal interface, follow these steps:
1.
In Quick Links, click
Student
.
2.
Select
View Students
.
3.
Apply filters in the
Select Organization
fields to choose the level you need.
4.
Click
Search
.
5.
Click the State ID for the student record you wish to edit.
6.
On the View Student Record window, click
Edit
.
Note: If you do not see the link to edit the student, you do not have sufficient access privileges to make this change.
7.
On the Edit Student Record window, make the necessary changes.
8.
Click
Save
.
9.
On the window that displays, click
OK
.
10.
Close the Edit Student Record window.
REMOVE A STUDENT FROM EDUCATOR PORTALThis procedure is required when a student moves from one DLM district to another or is no longer attending school in one of the DLM member states.
Your district or state may have a system in place for submitting multiple student records to Educator Portal. Before using these procedures, check with your
organization and/or the Help Desk.
Kansas does NOT use the procedure described here. Kansas student records for DLM testing are included in the KIDS data and Student Course (STCO) records.
See your state Data Steward for more information.
Hint: Student data, including the Access (Personal Needs and Preferences)
Profile and First Contact data, travel with the student record WITHIN
THE STATE. When a student moves from one building to another or
one district to another, the student data supplied by the previous school
or district appears so the “new” school or district may validate or
modify it.
For a student who moves outside of the state, they are assigned a new
State Student Identifier and therefore an entirely new record in
Educator Portal. Their data does not travel with them.
To remove a student from Educator Portal, follow these steps:
1. Download the Test, Exit, and Clear (TEC) Template from your state’s DLM webpage.
Hint: Always start by downloading the template to ensure sure you have the
current file.
2. Open the TEC Template in a spreadsheet program that can save data in the CSV format.
3. Using a new line (row) for each student, type the information into the CSV file. 4. Verify that all column headings appear in the file, even if some columns are blank. 5. Save the file as a CSV file. The system will only load files saved in CSV format.
Hint: Save the file using a location you can easily access later.
Up to 5,000 records at a time may be loaded. However, large files may
load slowly and can be difficult to troubleshoot. We recommend
loading 100 or fewer records at a time, unless you are confident about
the quality of your data.
6. Save your file in a location you can access later.
Your state may offer a resource which maps the field names shown below to codes and identifiers commonly used in your state or district. See the Appendix on page 86 and Access Additional Resources on page 7.
Field Format; Length Req? Description Special Notes
Record_Type Alpha
• Test
• Exit
• Clear
Yes Each line in the CSV file will have one of the following
types:
• Test – makes the student available for enrollment in
a test.
• Exit – marks the student to be removed from
enrollment in a particular location.
• Clear – resets the test or exit value for the student to
blank.
DLM will choose Exit.
State_Student_ Identifier
Numeric; 10 Yes Student’s state ID number.
Attendance_ School_ Program_ Identifier
Alphanumeric;
30 Yes The number of the location where the student is enrolled.
The number must match a number in your organization, or the file upload will fail.
Exit_Reason Numeric; 2 Yes See the table on page 67.
Exit_Date MM/DD/YYYY Yes The date on which this change is effective.
Test_Type Alphanumeric; 1 No Indicates the type of test. DLM users choose:
• 3 = Alternate Assessment (DLM)
Subject Alpha; 3 No Enter the subject for the test. Current choices are:
• M = Mathematics
• ELA = English Language Arts
Exit_Reason Field
These values are used in a test, exit, and clear file for the Exit_Reason column.
Entry Definition Entry Definition
01 Transfer to public school, same
district 13 Reached maximum age for services 02 Transfer to public school,
different district, same state
14 Discontinued schooling 03 Transfer to public school,
different state 15 Transfer to accredited or non-accredited juvenile correctional facility—educational services provided
04 Transfer to an accredited private school
16 Moved within the United States, not known to be enrolled in school 05 Transfer to a non-accredited
private school 17 Unknown
06 Transfer to home schooling 18 Student data claimed in error/never attended
07 Matriculation to another school 19 Transfer to an adult education facility (i.e., for GED
completion) 08 Graduated with regular
diploma 20 Transfer to a juvenile or adult correctional facility—no educational services provided 09 Completed school with other
credentials (e.g., district-awarded GED)
21 Student moved to another country, may or may not be continuing enrollment
10 Student death 98 Unresolved exit
11 Student illness 99 Undo a previously submitted exit record
12 Student expulsion (or long-term suspension)
LOAD A TEC FILE
1. In the Quick Links section, click Student.
2. From the Select Action menu, select Upload TEC.
3. Select your State.
Hint: After you select your state, additional drop down menus display.
4. Make selections in the additional drop-down menus. 5. In the File field, click the CSV Browse button.
6. Locate the CSV file you need. 7. Open the CSV file.
Hint: Verify that the file has a .csv file extension. Filenames with extensions
ending in .xls or .xlsx will be rejected.
8. Click Upload.
VIEW ENROLLMENT DATA EXTRACT
The Enrollment Data Extract includes all records for students who are enrolled in the user’s organization. This includes those uploaded via web service, Enrollment file, or the manual user interface.
Hint: There will be multiple records for one student if the student has been
enrolled in more than one school or grade.
The first three columns in the Enrollment Data Extract are unique. They are: • Extract State
• Extract District • Extract School Name
The remaining column headings are identical to those in the Enrollment Template. See page 49 for those definitions. This allows you the option to remove the first three columns and use the extract as an Enrollment File to correct enrollment data. See the procedure titled Change Enrollment Data Previously Uploaded on page 56.
Follow the steps on page 82 to View a Data Extract.
MANAGE STUDENT MOVES
In this section we describe the recommended steps a Data Steward should take to process a student moving from one district to another or from one school to another, especially moves occurring between March 15 and the end of the state’s spring testing window. This includes best practices, troubleshooting, and when to contact the Help Desk for support.
Students who move to a different building or district during the spring testing window may not receive DLM testlets at their new location unless these actions are taken. MOVE A STUDENT FROM ONE BUILDING TO ANOTHER
To move a student from one building to another within the same school district, follow these steps in order.
1. The district exits the student. Use the procedure titled Remove a Student From Educator Portal. When completed, School A will no longer have access to the