©1985, 1986 AT&T
All Rights Reserved Printed in USA
NOTICE
The information in this document is subject to change without notice. AT&T assumes no responsibility for any errors that may appear in this document.
GSS and GSS-DRIVERS are trademarks of Graphic Software Systems, Inc.
Diablo is a registered trademark of the Xerox Corporation. EPSON is a registered trademark of Epson America, Inc. Okidata and Microline are trademarks of Okidata Corporation.
Retro-Graphics is a trademark of Digital Engineering Corporation. Summagraphics is a registered trademark and Summatablet is a trademark of Summagraphics Corporation.
VT100 is a trademark of Digital Equipment Corporation.
1
Contents
Overview
Overview
Purpose of GSS~DRIVERS Graphics Standardization GSS~DRIVERS Features
List of Figures
Figure 1~ 1 Generating a Metafile Figure 1~2 Interpreting a Metafile
1
Overview
Overview
Purpose of GSS~DRIVERS Graphics Standardization GSS~DRIVERS Features
Overview
This booklet contains general information about GSS~DRIVERS
and the procedure for installing the GSS~DRIVERS software on the AT&T UNIX™ PC. The booklet is intended to be used in conjunction with the Virtual Device Interface (VOl) Programmer's Guide which provides specific information about each device
driver supported by GSS~DRIVERS.
GSS~DRIVERS must be installed before GSS~based graphics applications software can be run on the UNIX PC. Part of the
GSS~DRIVERS software are programs called" device drivers." The proper device driver must be installed in order to select and control the corresponding printer and/or plotter connected to the UNIX PC. The device drivers need not be installed if
GSS~based graphics applications will not be run on the UNIX PC.
Note
The VOL Programmer's Guide was previously titled GSS-DRIVERS C Binding Programmer's Guide.
GSS~DRIVERS refers to the device drivers that are bundled with the UNIX PC system software. These devices include:
AT&T UNIX PC Model 7300 Display AT&T Model 455 Letter Quality Printer AT&T Model 470 Graphics Printer
Hewlett~Packard 7470A Plotter
Hewlett~Packard 7475A Plotter
There are two sections in this manual. Each of the sections is shown in the following list, with a description of the section and how it can be used to your best advantage.
Section 1
Section 2
Note
This section contains general information about
GSS~DRIVERS and a brief description of the kinds of output primitives and attributes that are used in the GSS~DRIVERS software. Use this section to become familiar with GSS~DRIVERS
and with these graphic components.
The second section of this manual provides you with an installation procedure for the device drivers. Use this one~time~only procedure to install the software on your personal computer.
Additional device drivers are available in the GSS~DRIVERS+
software package that can be ordered separately.
GSS~DRIVERS+ includes the following device drivers: Diabl<1C150 Ink Jet Color Printer
EpsorrMX-lOO Printer HIPLOT® DMP-29 Plotter
NEC Model 7730 Letter Quality Printer NEC Model 3550 Letter Quality Printer Okidata MicrolineM92 Printer
Okidata Microline 93 Printer
Okidata Mieroline 84 Printer with Step 2 Support SummagraphiclSummatablet™
VT100TMTerminal with Retro-Graphics Card
Purpose of GSS-DRIVERS
GSS~DRIVERS is a software package designed to provide a
Graphics Standardization
There are several types of graphic output devices and few operate in exactly the same manner. Terminals do not necessarily draw lines like plotters. Plotters do not necessarily fill in areas like printers. Even within device types, those that are manufactured by different companies often perform the same function in different ways.
Until recently, it was difficult to connect peripherals from different vendors to the same host system. Now, industry
standards are emerging that define the interface between different graphics systems.
One of the emerging standards is the Virtual Device Interface (VDI). This proposed and widely accepted standard, defines how graphics peripherals should communicate with a host computer. Within the VOl, graphics devices are represented generically with respect to their function or purpose. Details about specific device operation is transparent at higher levels to isolate the application program from the equipment that is connected to a system.
A second graphics standard is the Virtual Device Metafile (VDM). This standard establishes a uniform method for
recording graphic images on an external storage device, such as a hard disk. The files that are created to store these images are called "metafiles." With YOM, application programs can send graphics information to a metafile in the same manner that they send information to a peripheral device.
GSS-DRIVERS Features
The device drivers within the GSS~ORIVERS software package adhere to both the VOl and VOM graphic standards. These device drivers are transparent to the operating system of your UNIX PC, allowing you to run graphics applications and direct the result to an output device, without the need for additional software.
Status Inquiry
Since graphic application programs are extremely variable and the system environment must vary accordingly, it is essential that a graphics application program has some method to monitor system status. GSS~ORIVERS meets this need with a series of
"inquiry" routines. In addition to system status, the inquiry routines allow the application program to acquire feedback about the actual capabilities of the output device that is currently open.
Output Primitives
The output primitive is the smallest component of a device~
independent image. Although there are smaller device~
dependent elements, such as the pixel, the output primitive is the base component of a mobile graphics image.
The device drivers in this software package use ten output primitives. Each of these output primitives is described in the following list, with a brief note about their typical attributes.
Polyline A polyline can be a single vector, but is usually a series of vectors that are connected
end~to~end, intersect, or are aligned in some other manner. Both the origin and terminus of each vector must be specified.
Polymarker
The typical attributes of poly lines are line style, line width, and color.
A polymarker can be a single marker~position, but is usually a series of related marker~
positions. The location of each marker~
position must be specified.
Graphic Text
Cursor Text
Alpha Text
Filled Areas
Bar
Circle
1-6 Overview
Graphic Text consists of one or more characters in a string that can appear at any screen location. The location of the string and the text attributes must be specified. The typical attributes of Graphic Text are font, size, and rotation.
Cursor Text consists of one or more characters within a rectangular grid. The location of the grid is device~dependent and cannot be changed. Each Cursor Text grid is formed by a series of rows and columns (typically 24 x 80). A Cursor Text string has only one font and is neither scalable or rotatable.
Alpha Text consists of one or more characters in a string that appears at some selectable location. The location of the string and the text attributes must be specified.
There are many kinds of attributes for Alpha Text, including fonts, spacing, underlining, bolding, subscripting, and superscripting. A Filled Area consists of an area that is defined by its perimeter and filled with some pattern.
The typical attributes of a Filled Area
correspond to the interior fill and are Hollow, Solid, or Hatch. The Hatch attribute usually has alternative kinds of fill patterns.
A Bar is a rectangular~shaped Filled Area that appears at some selectable location. The Bar is defined by two diagonally opposite vertices. The attributes of the Bar correspond to those of the Filled Area.
A Circle is defined by a center point and a radius.
Arc An Arc is a curved line defined by a center point, aradius, and the angles of both its origin and terminus.
The attributes of the Arc correspond to the attributes of Polylines.
Pie Slice A Pie Slice is a Filled Area that is defined by a center point, an arc, and two vectors that correspond to the angles of the origin and terminus of the arc.
The attributes of the Pie Slice correspond to those of the Filled Area.
Graphics Input
There are several methods for an end,user to enter data into an operating graphics program. Each method is associated with an input device. The following list shows the more common Graphics Input devices.
0 Mouse
0 Joystick
0 Thumbwheel 0 Switch
0 Cursor or Arrow Keys 0 Alphanumeric Keys
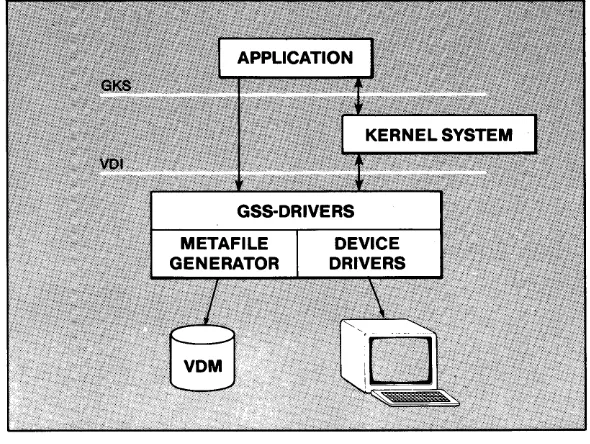
Metafile Generation
Metafile Generation is a standard method for saving a graphics picture on a file,oriented storage device. Metafiles make it possible to save a copy of a graphics display or to defer actual output from a graphics program.
Once a picture has been stored in the VDM format, it must be interpreted before being output to a graphics device. This is done by a separate product, the AT&T UNIX PC
GSS~TOOLKITTM Metafile Interpreter. Metafile interpreter
functions can be used in conjunction with a graphics application and other utilities to integrate a picture into the final output.
FIGURE 1-1 Generating a Metafile
[image:16.396.40.335.186.408.2]FIGURE 1-2 Interpreting a Metafile
VOl
GSS-DRIVERS
2 Installation
Installation
This section contains a guide to installing the AT&T UNIX PC GSS,DRIVERS software. Depending upon the version of the operating system being used, some procedures and screen displays may vary from those shown here. Typical variations in the procedure are addressed within this guide, although others may exist.
Before you begin the installation procedure, locate the following floppy disks:
AT&T UNIX PC GSS-DRIVERS Disk 1 of 2
AT&T UNIX PC GSS-DRIVERS Disk 2 of 2
1 When prompted by Please login:
D Type your user login or you can type install.
D Press~.
If a password is required for system access, the Password: prompt will appear and you must continue with the following instructions. Otherwise, proceed with the instructions in step 2.
D Type the password exactly as it was defined to the system. As a security measure, the password will not be displayed on the screen when it is typed.
2 The system briefly displays a message that shows the amount of available storage space.
Note
If there is less than 15% of the storage space available, you may want to choose one of the following options:
Delete unnecessary files from the Wastebasket. Backup files from the hard disk onto floppy disks and delete these files from the hard disk.
Remove software that is no longer required.
See the AT&T UNIX PC Owner's Manual for details on
performing these operations.
3 After a few seconds, the system displays the following Office Window with the Administration selection highlighted .
• ;DiRihi4imm
Clipboard Filecabinet Floppydisk Preferences Printer Queue Telephone UNIX System Wastebasket
- - - _11M _ _
_
o Press~.
4 The system displays the Administration Window.
Clipboard Filecabinet Floppydisk Preferences Printer Queue Telephone UNIX System Wastebasket
a:aamuum-fjW.iiUJAs'
Date and ilile---Diagnostics Floppy Disk Backup Disk Restore
Floppy Disk Operations Hardware Setup Mail Setup Software Setup System Information User logins
MIl
I I---D Press ~ until you have highlighted Software Setup.
5 The system displays the Software Window with the Install Software from Floppy selection highlighted.
LUlIIHW.IIJI, DATA 2 Thu Sept 12, 4:38 pili
5J
OfficeIT
5J
AdllinistrationI1J
Ir=---, .rr;mmt1d5l1tifii Clipboard Filecabinet Floppydisk Prefel'ences Printer Queue Telephone UNIX System Wastebasket
---o
Press~.2-4 Installation
Changing Password Date and Time Diagnostics Floppy Disk Backup Disk Restore
Floppy Disk Operations Hardware Setup Mail Setu
.
System User log---6 At this point, depending upon the version of the operating system being used, the system may display the Install Window with the cursor positioned at the prompt Number of diskettes: as shown below. If so, continue with the following
instructions. Otherwise, proceed with the instructions in step 7.
Number of diskettes:
-rmp.a1iljii€lOA'Op'i.UiU£W
Reuoye Installed So tware Show Installed Software
o Enter the number of diskettes that are included with the software package being installed.
7 The system displays the Confirm Window with the following message or a similar message instructing you to insert the first diskette:
MrGtn"i'4-imilfMj
Clipboard Filecabinet
Changing Password Date and tillie D ostics Floppy
F loppydisk
.a.III1I1I1 •••••••••
Pl'eferences II!Printer Qu Telephone UHIX System Wastebasket
To install programs frolll floppy disks, you mllst insert thell one by one, as you are prompted, in order. Please insert the first floppy.
Touch EHTER to continue or CANCl to stop.
c Insert the AT&T UNIX PC GSS-DRIVERS Disk 1 of 2 into the diskette drive with the label facing up.
[J Close the drive by flipping the lever down.
[J Press~.
Note
If an error message appears on the screen during installation, check for the following:
Make sure that the diskettes are being inserted in the proper sequence.
Make sure that both diskettes are in good working condition.
8 Depending upon the version of the operating system being used, the system may display the Confirm Window with the
Install in Progress message as shown below. If so, continue with the following instructions. Otherwise, a screen message informs you of the storage space available on your system and offers you the opportunity to continue by pressing ~ or to cancel the installation by pressing ~. If not enough space is available, see the options listed under step 2.
Install in progress
9 When it is safe to remove the diskette, the system displays the following screen:
Install in progress
It is safe to re.oye the floppy diskette.
E~IT - press {E} followed by <RETURN>.
continue - insert the next floppy disk and press the <RETURN) key.
o
Open the diskette drive by flipping the drive lever up.o
Remove the AT&T UNIX PC GSS-DRIVERS Disk 1 of 2.10 Next, get the AT&T UNIX PC GSS-DRIVERS Disk 2 of 2.
o
Insert the second GSS,DRIVERS diskette into the drive with the label facing up.o Close the drive by flipping the drive lever down.
o
Press~.11 The system displays the following message:
Transfer in progress. Do not remove the floppy diskette.
Shortly you see the following message appear within the Confirm Window as each driver is installed:
It is safe to remove the floppy diskette.
Creating driver directory. Installing device drivers: pc7300 att455 att470 hp7470 hp7475 epmx80 ddmeta
Updating special Office Manager files.
12 Shortly thereafter, the system displays the following window:
Before using GSS-Drivers, you must assign device drivers for your system's default printer and plotter, if any. Only one printer and one plotter Ray be assigned, even if your system has Dore than one.
Please press Enter to continue
o
Remove the AT&T UNIX PC GSS-DRIVERS Version 1.00 2 of 2 disk from the floppy drive.o After you have read the message concerning the
Note
Even though printers and plotters are installed through the drivers installation instructions presented in this booklet, a printer must also be set up through the Printer Set Up Menu. See the AT&T UNIX PC Owner's Manual for details on performing this operation.
13 Next, you see the following Assign Device Drivers window:
Printer Type: IHltll!DUI1' • • • •
or
o Now, you may select a default printer. Notice that NONE is highlighted within the window . You may leave the system without a designated default printer device driver by pressing ~, or by using the mouse to position the arrow at [OK] and pressing the left mouse key. If you select NONE, proceed with the instructions in step 15. Otherwise, continue with the following instructions.
o If you wish to select a printer driver as the default, press the ~ key, or the middle mouse key.
14 The system displays the following Printer window:
DATA 2
5J
OfficeE!I Assign D ~
mmm
att455Printer att478 att475 epmxS8 epfxS8
Tue Oct S, 3:45 po
D Press the ~ key, or use the mouse to highlight the desired printer driver, and then press ~, or the left mouse key.
15 The Assign Device Driver window now shows the current default plotter driver:
o Now, you may select a default plotter. Notice that NONE is highlighted within the window. You may leave the system without a designated default plotter by pressing the ~ key, or by using the mouse to position the arrow at [OK] and pressing the left mouse key. If you select NONE, proceed with the instructions in step 17. Otherwise, continue with the following instructions.
o
If you wish to select a plotter driver as the default, press the ~ key, or the middle mouse key.16 The system displays the following Plotter window:
D Press the ~ key, or use the mouse to highlight the desired plotter driver, and then press ~ or the left mouse key.
D The Assign Device Drivers screen will reappear with the name of the plotter driver you have selected. Now select this driver as the default plotter driver by pressing the
17 The next window message explains how to reassign device drivers in the future.
WIIIH.Mm.. DATA 2 Tue Oct 8, 4: 18 Pll
1~~~,~O=f=f=ic=e========-.:::::iI[f=?JjE!l=· ,=A=dll=i=n=is=t=r=at=i=o;-n _ _ _ _
i,rn
5J ord
loppy
I f at SOfie future time you change your default printer or plotter, you Dust reassign the GSS-Drivers device drivers using the Hardware Setup nenu.
Please press Enter to continue.
D Press ~ as indicated on the screen.
__ --"rn
18 When the installation is complete, the system displays the following message:
The installation of the GSS-ORIVERS Version 1.01 install Set 1 package is now complete.
Please press Enter to continue.
D Press ~ as indicated on the screen.
19 The system removes the Confirm Window from the screen and displays the Software Window.
D Press
@
to return to the Administration Window.D Press