The MESSENGER™
PLAN 4000 (TM)
THE MESSENGER (TM) ELECTRONIC MAIL PROGRAM
reviewed and is believed to be reliable; nevertheless, Nestar Systems, Incorporated makes no warranties, either express or implied, with respect to this manual or with respect to the software described in this manual, its quality, performance, merchantability, or fitness for any particular purpose. The entire risk as to its quality and performance is with the buyer. The software herein is transferred "AS IS".
Nestar Systems, Incorporated, reserves the right to make changes to any products described herein to improve their functioning or design. Nestar programs are licensed products whose use is defined in the Nestar System Software License Agreement. Server Programs usually require a separate license for each machine on which they run.
In no event will Nestar Systems, Incorporated be liable for direct, indirect, incidental, or consequential damages at law or in equity resulting from any defect in the software, even if Nestar Systems, Incorporated has been advised of the possibility of such damages. Some states do not allow the exclusion or limitation of implied warranties or liability for incidental or consequential damages, so the above limitation or exclusion may not apply to you.
The Regents of the University of California, Apple Computer, Inc. and International Business Machines, Inc., make no warranties, either express or implied, regarding the computer software programs described herein, their merchantability or their fitness for any particular purpose. UCSD, UCSD Pascal, and UCSD p-System are all trademarks of the Regents of the University of California.
This document is copyrighted and all rights are reserved. This document may not, in whole or part, be copied, photocopied, reproduced, translated, or reduced to any electronic medium or machine readable form without prior consent, in writing, from Nestar Systems, Incorporated.
Copyright 1981, 1982, 1983 by Nestar Systems, Inc. 2585 E. Bayshore, Palo Alto, California, 94303 (415) 493-2223 Telex 171420 Nestar PLA
How to Use This Manual
The Messenger (TM) electronic mail program allows users of the PLAN 4000 (TH) System to send messages to one or more of the users on the same or any connected network. This software features comprehensive English prompts and "Help" displays which make it easy to use.
The PLAN 4000 System supports The Messenger electronic mail program under a number of microcomputer operating systems (environments). Since this is the case, our documentation assumes that you have already read these manuals written by the manufacturer of your microcomputer explaining the use of your computer under the operating system you intend to be using. In the body of this manual we describe how the mail system works. When it is necessary to provide specific instructions for particular environments, we do so in the appendix for that environment (found at the end of this manual).
The recommended PLAN 4000 manuals are:
File Server User's Manual
File Server User's Guide for your environment
General Information Manual
About This Manual:
Chapter 1 is an introductory overview. It defines the different components of a message and describes the stages the message goes through between its creation by the sender and its final disposition by the recipient. The procedures the user follows in order to send a message are also introduced here.
Chapter 2 explains how the mail program is started up and provides a breakdown of its different levels: the command level, the incomming level, and the outgoing level.
Chapter 3 explains in detail how to receive mail. Each of the commands and relevant to sending and receiving explained in detail here.
send and options mail is
Chapter 4 explains how to file mail. Each of the options and commands relevant to filing mail is explained in detail here. Mail can also. be printed on a shared printer (if your installation has the Print Server subsystem), or on a local printer through use of the "Write" command. This capability is also discussed in Chapter 4.
Chapter 5 mail. The system is printed on
capability is introduced here and detailed in the appendices for the various environments.
NOTE: Chapters 2-5 contain tables of commands and options. The table in Chapter 2 shows all commands and options and explains which level they are issued from and what they do. The tables in Chapters 4 and 5 include only those commands and options relevant to the topics for those chapters.
Chapter 6 covers other commands \vhich you can use when running this software. For instance, there are a number of "HELP" displays which privide on-line documentation for the user.
Chapter 7 contains instructions for setting defaults which will cause the Mail program to run automatically when the system is started up and which will cause the mail program to automatically execute the function of the user's choice.
Chapter 8 contains instructions intended for programmers who are using this software in combination with other programs. This chapter describes the Nestar CVAL convention, which makes chaining of programs possible.
Mail subsystem installers and system managers should read this User's Manual as well as the Messenger Installation and Operations ~1anual.
The material in this document applies to Version 2.2 of the Messenger software.
Contents
Disclaimer ii
How to Use This i1a.nual . . . • • . • . iii
Contents. . . . . . . . . . . . . . . . . . . . . . . . . . . . . . . . . . . .. vii
Chapter 1 Introduction
1.0 What is a Message? ••••••••••••••••••••. 1-1 1.1 The Progress of a Message ••••.•••••.•••• 1-2 1.2 The Storage of a Message •••••••.•••••••• 1-3 1.3 Using The Messenger: An Example ••••••••• 1-4
Chapter 2 Using The Messenger
2.0 Getting Started ••••••••••••••....•••••.• 2-1 2.1 Automatic Startup and Read •...••.•••. 2-1 2.2 What Happens .When the Messenger Software
is Started Manually... 2-2 2.3 The Messenger's Three Levels •....••••••• 2-2 2.4 General Rules •••••••••.•••••••.•••••••• 2-7
Chapter 3 Sending and Receiving Mail
3.0 The READ' Command... • • • • • • • • • • • • • • • • • • • •. 3-1 3.1 The Incoming Mail Menu •.•••.•.••.••••••• 3-3 3.2 The K(eep) Menu Item •••...••••.•.••... 3-6 3.3 Reading Registered (Return Receipt)
Mail . . . 3-6
3. 4 The CHECK Command... 3-8 3.5 The SEND Command ..•••••.•.•...•.. 3-8 3.6 The Ou tgoi ng Mai 1 Menu... 3-10 3.7 The S(end) Henu Item •... 3-13 3.8 Using Text Files •••••••••..•...•. 3-14
Chapter 4 Filing Mail
4. 1 The F (ile) t-lenu Item... 4-2 4.2 The CLASSIFY Command •••••••••••••••••••• 4-4 4Q3 Specifying Messages in the Mail File •••• 4-5 4.4 The DECLASSIFY Command •••••••••••••.•••• 4-9 4.5 The RENAME Command •••.•••••••••••••••••• 4-10 4.6 The SHOW CLASSES Command... 4-11 4.7 The DELETE Command •••••.••.••••••••••.•• 4-12 4.8 The UNDELETE Command ••••••••••••.••.•••. 4-12
Chapter 5 Using Filed Mail
5.0 The DISPLAY Command ••••••••••••••••••••• 5-1 5.1 The HEADERS Command ••••••••••••••••••••• 5-3 5.2 The ANSWER Command... 5- 4 5.3 Header Line Suggestions Supplied by
ANSWER ••••• 0 . . . 5-5 5.4 The FORWARD Command ••••••••••••••••••••• 5-6 5.5 The FORWARD Header... 5-6 5.6 Header Line Suggestions for FORWARD ••••• 5-7 5. 7 The RESEND Command... 5-8 5.8 The WRITE Command... 5- 9 5.9 The PRINT Command ••••••••••••••.•••••••• 5-11
Chapter 6 Other Commands
6.0 Other Commands •••••••.••.••..•.••.•••••• 6-1 6.1 The CLEAR COlDIlla nd . . . . • . . . . . . . . . . . . . . . . . . 6-1 6.2 The HELP Command •••••••••••••••••••••••• 6-2 6.3 The "?" Command ••••••••••••••••••••••••• 6-2 6.4 The NEWS COlDIIland •••••••••••••••••••••••• 6-2 6.5 The INFO COlDJIland ••••••••••••••• ' • •••••••• 6-3 6.6 The NET Command ••••••••••••••••••••••••• 6-3 6.7 The SHOW Command •••••••••••••••••••••••• 6-4 6.8 The QUIT Command or Menu I tern ••••• 0 • • • • • 6-4
Chapter 7 Tailoring Your System
Chapter 8 The Nestar CVAL Convention
8.0 Introduction •••••••••••••••••••••••••••• 8-1 8. 1 CV AL • • • • • • . . . • . . . • . • • . . . • . • . 8- 1 8.2 Format of CVAL String •••••••••••••••••• 8-2 8.3 Complex Chain Sequences •••••••••••••••• 8-2
Appendix A Using the Messenger Program
in the Apple
II
Pascal EnvironmentA.O lnt roduc tion ••••••••••••••••••••••••••• A-I A.l Invoking the Mail Program •••••••••••••• A-I A.2 Invoking the Mail Program Automatically
Upon Start Up of Your Workstation ••••••• A-2 A.3 Proper Syntax for File Names \.fuen Storing
and Using Text Files ••••••••••••••••••• A-3 A.4 Printing Messages on a Local Printer •••• A-4 A.5 Freezing the Screen Display •••••••••.•• A-5
Appendix B Using the Messenger Program in the Apple
III
SOS EnvironmentB.O Introduction •••••••••.••••••••••••••••• B-1 B.l Invoking the Mail Program •••••••••••••• B-1 B.2 Invoking the Mail Program Automatically
Upon Start Up of Your Workstation •••••• B-2 B.3 Proper Syntax for File Names When Storing
and Using Text Files •.••••••••••••••••• B-3 B.4 . Printing Messages on a Local Printer •••• B-4 B.5 Freezing the Screen Display •••••••••••• B-5
Appendix C Using the Messenger Program in the IBM PC UCSD p-System Environment
C.o Introduction ••••.•••••..•••.••••••••••• C-l C.l Invoking the Mail Program •••••••••••.•• C-l C.2 Invoking the Mail Program Automatically
Ce3 Proper Syntax for File Names When Storing and Using Text Files •••••••••••••••••• 0 C-3
C.4 Printing Messages on a Local Printer •••• C-4 C.S Freezing the Screen Display •••••••••••• C-S
Index
Bibliography
Chapter 1
Introduction
1.0 What is a Message?
In the Messenger System, sequence of text lines.
a message is simply For example:
a
TO: Jones FROM: Smith
DATE: Thu 19-Feb-1981 11:33:10 SUBJECT: Tomorrow's meeting
Please be sure to have the final audit report with you so that you can answer any specific questions that come up.
Note that the message contains two parts: the "header" and the "body". The header contains
special lines that identify the sender,
receiver, date, and subject of the message. The body, which is separated from the header by a blank line, consists of any number of lines of text.
'When a message is composed and sent, some of the header lines are supplied automatically by the Messenger, while others are supplied by the sender. All the header lines are displayed when the message is received. Some common header lines are:
TO:
cc:
FROH:
Who is to be a primary recipient of the mail (always present) Who else is to receive a copy (optional)
Who sent the message
DATE: When the message was sent (always present-automatically generated) SUBJECT: A short description of the contents
(optional)
IN-REPLY-TO: A reference to a previous message (automatically generated for replies)
The header lines TO, FROM, and DATE are present in all messages.
1.1 The Progress of a Message
Messages can go through several stages between their creation by a sender and their final disposition by a recipient. The three fundamental stages are:
1. The message is composed. For short messages, the sender may simply type in the text at the keyboard. Previously prepared text can be included at any point.
2. The message is sent to one or more recipients. These can be primary recipients (those on the TO list), or people receiving copies (those on the CC list). The sender may, if desired, retain a copy of the message. The recipients, of course, need not be using the Messenger at the time the message is sent; mail will be held awaiting delivery for as long as necessary.
These are the basic stages in the life of a simple message. More complex operations are possible, such as forwarding mail to others, or requesting return receipts when mail is read, but these are just elaborations of the simple scheme.
1.2 The Storage of a Message
Messages reside in one of three places:
1. At the user station, as an "active" message that is currently being composed or read.
2. On disk, stored and awaiting delivery. Every user of the mail system has a queue of incoming messages that have not yet been read; this is the "new mail" queue, which may be thought of as an electronic In-basket.
3. On disk, filed away for future reference by the sender or the recipient, or both. Every user of the mail system has an area on the disk for saving copies of mail sent to· others and mail received; this is the "mail file", which may be thought of as an electronic filing cabinet.
In addition, messages can be printed locally (on a printer attached directly to the user's workstation) or on a shared printer, and can be transferred to and from textfiles. The appendix for your particular environment discusses this.
be used to manage groups of messages.
1.3 Using The Messenger: An Example
Using the Messenger is extremely simple and does not require extensive training or a knowledge of programming. The following example demonstrates two basic operations:
1. Reading an incoming message.
2. Composing and sending an answer to that message.
In the example that follows, the user's input is underlined; everything else is typed automatically by the Messenger. <RETURN) indicates that the return key has been pressed.
NOTE: The following is an example. You don't need to be running the mail software at this point. However, in later chapters, you will. This manual assumes that a system manager has already taken the necessary steps to configure the mail system software to be ready to support the user. If this has not been done the user's station will not be prepared to send or receive mail. The PLAN 4000 (TM) Messenger (TM) Installation' And Operation Manual contains all the instructions for configuring the software to support, new user's.
When the Messenger becomes active, it displays a greeting:
[With the READ command the user asks to read any mail currently in the new mail queue his In-basket.]
You have 1 message:
02/19 12:54 SMITH
Read 02/19 12:54 SMITa (YIN)?
!
(RETURN)[Only one new message has arrived since this user last read his mail. The timestamp and name in the label are used by the system to identify the message. By replying "Y" to the Messenger'S prompt the user has asked to read the message.]
To: JONES From: SMITH
Date: Thu 19-Feb-1981 12:54:14 Subject: Tomorrow's meeting Display it (YIN)?
!
(RETURN)[The header of the message has been displayed, and the user, Jones, can decide whether or not to look at the message itself. Since Jones has replied "'Y"', the Messenger displays the body of the message.]
Please be sure to have the final audit report with you so that you can answer any specific questions that come up.
IN:A(nswer) D(isplay) F(ile) FO(rward)
K(eep) N(ext) P(rint) Q(uit) tv(rite)?
!
(RETURN)[The body of the message has been listed, followed by a menu of actions appropriate for incoming messages (the "Incoming" menu, appearing here as it does on a 40 column screen). Afer reading the message, Jones has decided to send back an answer, and so has typed
To: SMITH? <RETURN) CC: ? <RETURN)
Subject: Re: Tomorrow's meeting ? <RETURN) Enter message or %filename,
terminate with <ESC) <RETURN)
[The mail system automatically suggests values for the header fields, and by pressing the return key, JONES indicates that the suggestions are acceptable. He now enters his reply to Smith. ]
I'm expecting the audit report to be delivered this afternoon at 4; if it gets here on time I'll be able to bring it to the meeting. If not, we may have to stall them another day or so. <ESC) <RETURN)
[In order to signal the end of the message, JONES types an ESC followed by a RETURN. {~ile he is typing the message, JONES can correct errors by using the appropriate delete keys (these vary according to personal computer type). However, he can only correct errors within the same line. Once he has typed a RETURN at the end of a line, he can not return to the text in that line and correct it.]
OUT:D(isplay) F(ile) P(rint) Q(uit) R(eceipt) S(end) W(rite)? ~ <RETURN)
[Another option list, appropriate for outgoing messages, is displayed after the reply has been composed (the "Outgoing" menu). Jones chooses "S" in order to send his reply.]
Smithc Writing ••• Sent.
[The reply has been sent and is now in Smith's new mail queue, and he will get it when he next reads his mail. Since Jones doesn't want to do anything more with the reply he has just sent
(such as saving a copy for himself), he answers "Q" for quit and returns to reading the mail.]
IN:A(nswer) D(isplay) F(ile) FO(rward)
K(eep) N(ext) P(rint) Q(uit) W(rite)? ~ <RETURN)
[The Messenger has returned to the menu that asks Jones what he wants to do with the incoming message. Since he doesn't want to do anything more with it (like forwarding it to someone else), he again reponds with "Q".]
Command?
[The mail system is now waiting for more commands. Jones has received a message, read it, and composed and sent a response.]
Chapter 2
Using the Messenger
2.0 Getting Started
There are two ways to invoke the mail program. You can run the program, as explained in the appendix for your environment, or the file on your boot volume can be edited to start the mail program automatically when you power up your system. Your system manager will help you with this procedure, which is explained in Chapter 7 of this manual.
2. 1 Automatic Start.up and Read
In addition to configuring your startup file so that your mail system will run when your workstation is powered up, the Defaults.Text file on your boot volume can also be configured
to perform some automatic functions for you.
Here is an
automatically:
example of what it
WELCOME TO THE MESSENGER, Version X.X Today is Thu 19-JAN-1983 13:33:13 For help type ? RETURN to any request
Command? READ <RETURN)
does
2.2 What Happens When The Messenger Software is Started Manually
If you do not choose to hav~ your mail program invoked automatically each time you power up, such instructions can be left out of your boot volume's startcmd.text file. When you have manually invoked the mail software as explained in the appendix for your environment (and if your Defaults.Text file contains no relevant defaults), you will see the mail program's banner and the following prompt:
Who are You?
The user will respond with the identification assigned to him by the system manager (last name or initials, for example), and the Messenger will ask
Command?
The mail program is now operational.
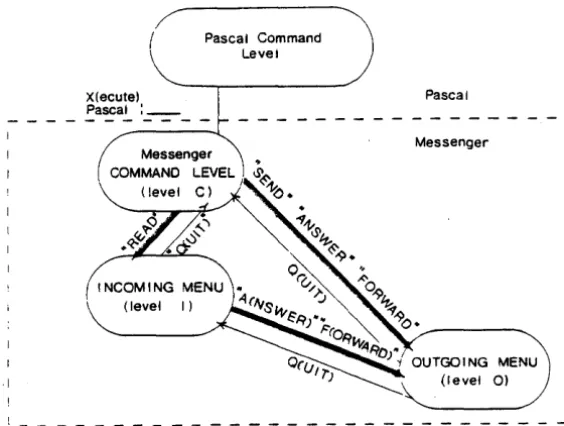
2.3 The Messenger's Three Levels
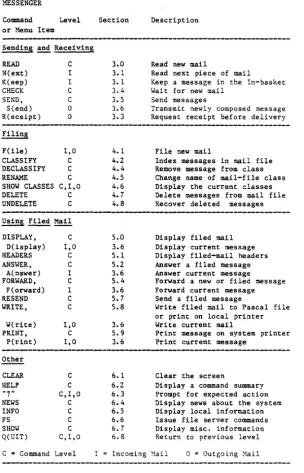
The Messenger's commands and menu items can be divided into four categories and can be entered at three different levels (See Table 1, page 2-6):
1. the "Command" Level (C Level)
2. the "Incoming Mail" Level (I Level) 3. the "Outgoing Mail" Level (0 Level)
Levels I and 0 each present the user with a menu of further actions after a message has been read or composed. For instance, if a user types READ
at the outermost (Command) level of the
Mail men~ of further options is then presented, so that the message can be filed, answered, printed out, or otherwise manipulated by the user. These actions occur at the Incoming Mail Level, and the menu options presented there are for that message alone.
Table 1 lists the commands and menu items available at each level~ The command "READ" moves the user from Level C to Level I. The commands "SEND", "ANSWER", and "FORWARD" move the user from Levels C or I to Level 0.
Level C prompts for a command with
Command?
On Levels I displayed in menu appears as
and 0, available commands are menu form. The Level I Incoming
IN:A(nswer) D(isplay) F(ile) FO(rward) K(eep) N(ext) P(rint) Q(uit) W(rite)?
The Incoming and Outgoing menus are for use only with the current message being read, answered, or forwarded, or to ask for the next piece of new mail. Typing Q(RETURN> returns the user to the previous level.
When Level C (the Command Level) is displayed no activity is pending. The Messenger displays the "Command ?" prompt because it is waiting for the user to initiate an activity by entering a command.
·1
Command X(ecute) Pascal : _ _
Level
INCOMING MAIL MENU
OUTGOING MAIL MENU
Pascal Command Level
[image:24.399.76.358.128.341.2]Figure 1
Command?
i
I READ
I
t
I
f
1
A<NSWER' /Figure 2
Pascal
Messenger
- - I
1
(level 0)
DELETE aCUIT>
I
READ
't'
or Menu Item
Sending and Receiving
READ N(ext) K(eep) CHECK SEND, S(end) R(eceipt) Filing F(lle) CLASSIFY DECLASSIFY RENAME SHOW CLASSES DELETE UNDELETE DISPLAY, D(isplay) HEADERS ANS\~ER, A(nswer) FORWARD, F(orward) RESEND WRITE, W(rite) PRINT, P(rint) Other CLEAR HELP "?" NEWS INFO FS SHOW Q(UIT)
C '" Command
2-6 C I I C C 0 0 I,D C C C C,I,O C C C I,D C C I C I C C 1,0 C 1,0 C C C,I,O C C C C C,I,O
Level I =
3.0 3.1 3.1 3.4 3.5 3.6 3.3 4.1 4.2 4.4 4.5 4.6 4.7 4.8 5.0 3.6 5.1 5.2 3.6 5.4 3.6 5.7 5.8 3.6 5.9 3.6 6.1 6.2 6.3 6.4 6.5 6.6 6.7 6.8 Incoming
Read new mail
Read next piece of mail
Keep a message in the In-basket Wait for new mail
Send messages
Transmit newly composed message Request receipt before delivery
Fi Ie new mail
Index messages in mail file Remove message from class Change name of mail-file class Display the current classes Delete messages from mail file Recover deleted messages
Display filed mail Display current message Display filed-mail headers Answer a filed message Answer current message
Forward a new or filed message Forward current message Send a filed message
Write filed mail to Pascal file or print on local printer Write current mail
Print message on system printer Print current message
Clear the screen
Display a command summary Prompt for expected action Display news about the system Display local information Issue file server commands Display misc. information Return to previous level
~ai1 o = Outgoing Mail
Table 1
[image:25.402.35.339.31.504.2]2.4 General Rules
There are certain general rules that apply to all communication with the Messenger:
1. All input can be in upper or lower case.
2. All input (with two exceptions noted later) is terminated by pressing the <RETURN)' key. Before the return key has been pressed, errors may be corrected and replacements typed using the left arrow, backspace, or delete key, depending upon the configuration of the workstation.
3. To leave the current level in the Messenger press Q <RETURN). Q<RETURN) is equivalent to a command to "return to what was being done before".
4. If the user is unsure about how to respond to any prompt, typing ?<RETURN) causes a
reminder to be displayed. The reminder
describes what the Messenger expects next from the user. (Further information is available with the HELP command.)
5. If any part of a command is left out, the Messenger will ask for it. Thus, if a user can't remember what information should be supplied with a particular command, typing in the command name alone will produce a prompt.
6. Prompts that end in "(Y/N) ?" require a yes/no response; type either "Y" or "N" (or "y" or "n"), followed by <RETURN).
7. To discontinue any activity, type
selected and input is being prompted for, this action will return the user to the menu.
8. At the Command level, commands may be abbreviated by the first three or more letters (REA for READ, for example). However, all letters typed must be in the correct order. For example, DELETE can be abbreviated DELE, but not DELI.
9. (This is the first exception to rule 2.) To stop a display from scrolling off the top of
the screen, see the appendix for your
environment.
10. (This is the second exception to rule 2, and applies to the Apple environments.) To abort a display or other operation in progress, and go on to something else, type <CTRL-C) (hold down the CTRL key and press C). Pressing <RETURN) is not necessary.
Chapter 3
Sending and Receiving Mail
Command Level Section Description
or Menu Item
READ C 3.0 Read new mail
N(ext) I 3.1 Read the next
piece of mail
K(eep) I 3.1 Save new mail
without reading
CHECK C 3.4 Wait for new mail
SEND, C 3.5 Send mail
S(end) 0 3.6 Transmit a newly
composed message
R(eceipt) 0 3.3 Request a receipt
before mail delivery
C Command Level I Incoming Mail Menu 0 Outgoing Mail Menu
---3.0 The READ Command
The READ command is entered at the Command level . and is used to ask the Messenger to look for incoming messages in the new mail queue. The Messenger will respond to READ with
You have no new mail
You have 3 messages: 02/19 14:24 SMITH 02/19 14:30 JONES 02/19 15:03 BRO\VN
Read 02/19 14:24 SMITH (Y/N)?
The Hessenger asks whether new mail should be displayed, listing the messages one at a time.
The messages are presented in chronological order (the order in which they were generated). If more than one network segment is present, this order may not be absolutely chronological. The message identification includes the month, day, hour and minute at which the messages were created, and sender identification.
Pressing "N" <RETURN)~ will cause the Messenger to go on to the next message. Messages that are not read will remain in the new mail queue for next time.
Responding with "Y" <RETURN) will cause the message to be read from the new mail queue. The header of the message will be displayed, and the Messenger will ask whether or not to display the body of the message:
TO: JONES,BROWN FROM: SMITH
DATE: Thu 19-JAN-1983 14:24:29 SUBJECT: Upcoming Audit
IN-REPLY-TO: Message of Thu 19-JAN-1983 13:46:15 Display it (Y/N)?
!
The 1982 information is ready for your use.
Next, whether the body of the message has been displayed or not, a menu of choices is presented called the "Incoming" menu. This menu is used to determine the disposition of the message.
3.1 The Incoming Mail Menu
After a message has been READ, a menu of options is displayed
IN:A(nswer) D(isplay) F(ile) FO(rward) K(eep) N(ext) P(rint) Q(uit) W(rite)?
To choose a menu item, type the capitalized letters (not those in parentheses), followed by <RETURN). Q(uit) returns the user to the Messenger Command level. A(nswer) and FO(rward) move the user to the Outgoing Menu (the Messenger Level 0).
A(nswer) Temporarily suspends examination of new mail, and allows the user to compose and send a reply. See the ANSWER command (Section 5.2) for an explanation of the A(nswer) prompts. \.Jhen the A(nswer) process is finished, the Incoming Mail (Level I) menu will be redisplayed so that further action can be taken on the same incoming message.
D(isplay) displays the message again (header and body) and then repeats the Incoming menu.
the message without classifying it.
Classes? MEETINGS <RETURN) Filed message number 37
When the message has been filed, the Messenger returns to the new mail (Incoming) menu. Filing and classifying mail is discussed in detail in Chapter 4.
FO(rward) forwards this message to someone
else. This command temporarily suspends
examination of incoming mail, and allows the reader to send a copy of this message to one or more people, preceded by an optional preface that the reader composes. See the FORWARD command (Section 5.4) for an explanation of the FO(rward) prompts. After the message has been forwarded, the new mail menu will be redisplayed for other action on the same incoming message.
K(eep) keeps the message in the new mail queue. Incoming mail that has been read (whether or not the body was displayed) is normally removed from the new mail queue. To keep the message in the queue, choose the K(eep) option of the menu and the message will be presented again the next time the READ command is used.
N(ext) goes on to the next message. Use this menu option after the current message has been processed. The current message will be discarded from the new mail queue unless the K(eep) option was selected first.
P(rint) For networks with a print server, the Print menu item will cause the current message
to be printed out.
unless K(eep) was selected before Q(uit). The user returns to the command line after typing "Q", all subsequent messages in the queue remain until next time the READ command is used.
W(rite) writes the incoming message to a text file or local printer. The Messenger will ask for the name of a text file to create and write the message to. The header and body are written in the same format as is displayed on the screen. Using such text files is discussed in Section 3.5. When the message has been written, the new mail menu will be redisplayed. Anything already in the text file is erased.
If the file is to be written to a local printer, the user must have a printer connected directly to the workstation and the printer must be supported by the operating system. The appendix for your environment contains information about printing from a printer that is connected directly to your workstaton.
NOTE: <ESC> <RETURN> - Exiting from the new mail menu by using the escape key causes the current message (and all subsequent messages) to be left in the new mail queue, and the user to be returned to' the command level.
The Incoming mail menu will be displayed until the user selects Q(uit), A(nswer), F(orward), or N(ext) and is moved to another level. At the end of the new mail queue, the Messenger will display
End of new mail.
New Mail has arrived
and list the new messages.
3.2 The K(eep) Menu Item
This is an incoming menu item. If a user responds to the prompt
You have 1 message: 07/13 11:00 SMITH
Read 07/13 11:00 SMITH (Y/N)?
with "N" <Return>, the piece of mail will be kept in the new mail queue. A "Y" reply will cause the header of the message to be displayed, together with a second prompt:
TO: Jones CC: Brown FROM: Smith
DATE: Mon 13-Jan-1983 11:00:46 SUBJECT: Missing Audits
IN-REPLY-TO: Message of Mon 13-Jan-1983 10:58:16 Display it (Y/N)?
Typing "Y" displays the body of the message. Typing "N" displays the Incoming menu. Then, pressing "K" <Return> for K(eep) will cause the Messenger to keep the message in the new mail queue, just as if the header had never been displayed. The Incoming menu will then be redisplayed.
3.3 Reading Registered (Return Receipt) Mail
small message that documents the date and time that the original message was accepted. Registered mail can also be refused, in which case the return receipt indicates refusal, and the recipient is not shown the original message.
When a registered message is delivered, the header is displayed and the recipient is asked,
OK to send return receipt (YIN) ?
Answering "Y" causes a return receipt to be sent to the originator and the recipient may proceed to display the message. An "N" causes the Messenger to ask
Reject this mail (YIN) ?
If "Y", a rejection message is sent to the originator indicating that the recipient has chosen not to read the mail. The Messenger then continues with the next message in the new mail queue.
"N" to both questions (neither accepting nor rejecting the message) causes the message to be left in the new mail queue and the same questions will be asked the next time the READ command is used.
To send a registered message, press "R" for Receipt when the Outgoing Mail menu is displayed, after the message has been composed but before it has been sent. The.Messenger will respond with
3.4 The CHECK Command
The CHECK command is very much like the READ command in that it looks at the new mail queue and allows incoming messages to be read. It differs from the READ command in the following ways:
1. If the new mail queue is empty, CHECK displays:
Waiting for new mail. Press space to enter commands.
and the time. The Messenger then waits for new messages to be received. When a message arrives, the computer bell rings and the Messenger displays the message identification
just as if the READ command had been used.
2. After all the new mail has been read, the Messenger returns to wait for more new mail, instead of going to the command level.
To return to the command level from Check mode, type a space. The prompt
Command?
will appear.
3.5 The SEND Command
The SEND command is used to compose and send messages. To use it, type SEND <RETURN) at the outer level, as in
Command? SEND <RETURN)
questions to obtain the information to be displayed in the header of the message, and then will ask for the text that will form the body of the message.
1. Who is to receive the message: To?
Respond with the identification of the direct recipients of the message. If there are more than one, separate them with commas. The identifications depend upon how the Messenger is installed by the System Manager; they are often the last names or the initials of the users.
To? SMITHE,JONES
If an incorrect identifier is typed in response to the prompt To?, the- Messenger will later display
SMITHE: No such user
when the S(end) option is used. In this example, Jones has entered Smith's name incorrectly in response to the To:? prompt.
2. Who is to receive copies of the message: CC?
Note: To have no one on the CC list, press <RETURN) in response to the prompte
3. What is the subject: Subject?
Respond with a short description (on a single line) of the message. To supply no subject, press <RETURN).
All the information necessary for the header has now been given. The date, time, and sender's identification are supplied automatically. The Messenger next asks for the body of the message:
Enter message or %filename; terminate with <ESC)<RETURN)
Type in the text of the message. (Header and body entries can include text copied from text files; file names to be copied are preceded by "%". A discussion of this subject is found in Section 3.8, "Using Text Files".) Terminate each line with <RETURN).
When the body of the message has been completed, type <ESC), either on a line by itself or at th~ end of the last line of the message.
The message is now completely assembled, and the Messenger presents a menu of choices, called the "outgoing mail menu", which can be used to determine what is to be done with it.
3.6 The Outgoing Mail Menu
To choose a menu item (as with all menus the Messenger), type the of the name and press (RETURN). presented by
capitalized part For example, to "D(RETURN)".
D(isplay) the message, type
D(isplay) displays the entire message that has been composed. Both the header and the body are displayed.
F(ile) This menu item saves a copy of the message in the sender's mail file. The Messenger will ask for an optional list of classes; respond with one or more class names separated by commas, or with (RETURN) to file a copy without assigning a class.
Classes? (RETURN) Filed message number 38
The outgoing mail menu will be redisplayed for further action.
Q(uit)
P(rint)
stops the processing of this outgoing message. All action that you have previously specified will take place, but nothing else. If you have not F(iled), SCent), P(rinted), or W(ritten) a copy of the message, you will be reminded that upon exiting, the message will be lost:
OK to discard message (yIN)?
same as screen display format.
R(eceipt) This requests that a "return receipt" be sent to you when the message is read by each recipient. The return receipt is a message that indicates whether the message was refused or accepted, and at what time. This option, if it is used, must be specified before S(end). Receiving "registered" mail is described in Section 3.3.
W(rite)
S(end) This sends the message to all people in the TO and CC lists of the message. As the message is sent to each person, the identification is displayed. If the message is being sent to a long list of people, using <CTRL-C> (holding down "CTRL" and pressing "COO) will stop the transmissions, but any copies already sent cannot be rescinded.
writes a copy of the outgoing message to a text file or local printer. The Messenger will ask for the name of a text file to create and write the message to. After the message has been written, the outgoing mail menu will be redisplayed. If the text file already exists, you will be asked for permission to overwrite it.
If the file is to be written local printer, the user station have a local printer connected the printer must be supported by operating system under which Messenger is being run. Appendices for details.
<ESC> <RETURN> Exiting from the outgoing mail menu by using the escape key is the same as typing Q(uit). If you have not F(iled),
SCent), P(rinted), or
W(ritten) a copy of the
message, you will be reminded that upon exiting the message will be los t:
OK to discard message (Y/N)?
The outgoing mail menu will displayed until the Q(uit) <RETURN> are used to return to Incoming Mail level.
continue to be option or <ESC> the Command or
3.7 The S(end) Menu Item
The S(end) outgoing menu item is executed by pressing ..
s ..
<Return> when the Outgoing menu is presented. S(end). causes the Messenger todeliver the message that has just been
composed.
If Send is not used, the newly composed message will not be sent. Note that by composing but not sending messages, the user can use the Messenger to write notes or messages to be filed (using the File menu item) in one's own mail file under some convenient class name.
To compose a message and send i t at a later date, use the RESEND command (Section 5.7).
Command level, and type SEND again to repeat the process. Typing S(end) again without returning to the Command level will cause the Messenger to display
Already sent. Send again? (yIN)?
for each recipient in the TO: list. This is to remind the user that in order to compose a new message, "SEND" must be typed in at the Command level.
3.8 Using Text Files
Text files can be included in message headers (except for subject: field) and bodies by specifying the filename, preceded by "%", in response to the Messenger's prompts.
For example, the prompt and response
To? %STAFF
will cause the Messenger to send the message being composed to the mailing list found in the file STAFF. This option is especially useful when messages are frequently sent to a long list of recipients. Recipients should be listed in the file just as they would be in the To: and CC: headers. (For readibility, carriage returns may be used between names in the file.) Names that are not part of the file may be included either before or after specifying the file. For example,
To? %TECHSTAFF,JONES,SHITHE
If a file with text other than a list of identifications is used for a message if recipients are not identified the specified file, the Messenger recipient
header, or properly in will display
SMITHE: No such user
when the S(end) option is used.
Text files may be inserted into the body of a message in any order. To include a previously prepared text file at any point, type
%filename <RETURN>
on a separate line at the place where the file is to be inserted. Note that % must be placed in the first space of the line; otherwise it is • treated like any other character. The Messenger will display the contents of the file as it is being used. Include as many files as desired, interspersed in any fashion with text entered from the keyboard.
In the case of multiple insertions files, all available space in the workstataion memory may be used up.
***MEMORY OVERFLOW***
of large local user The message
Chapter 4
Filing Mall
Command Level
or Menu Item
F(ile) I,C
CLASSIFY C
DECLASSIFY C
RENAME C
SHOW CLASSES C,I,O
DELETE C
UNDELETE C
Section Description
4.1
4.2
4.44.5
4.6 4.7 4.8File new mail
Classify messages in one or more classes in mail file
Remove message from classes in mail file Change the name of a mail-file class
Display the current classes
Delete messages from mail file
Recover messages accidentally deleted
Level C Level I Level
°
Command Level Incoming Mail Menu Outgoing Mail Menu
4.0 Filing Commands
The Messenger's filing system is simple to use. Prompts are provided for the user by the system. Remember, however, that not all commands and menu items are available at all levels of the system.
list of commands and menu items (CLASSIFY, DECLASSIFY, RENAME, UNDELETE) are available only at level, and can not be used when the outgoing menus are being displayed.
4.1 The F(ile Menu Item
above, five DELETE, and the command incoming or
The F{ile menu item saves a copy of the message that is currently being read, sent, answered, or forwarded, storing it in the user's mail file (as if it were an electronic filing cabinet). This file can be cross-indexed with as many as 24 subjects or categories (called "classes"). A me$sage can be cross-indexed in any or all classes, and classifying and declassifying the messages stored in them, are discussed in Sections 4.2 through 4.5.
A mail class is simply a name chosen by the user to characterize a set of messages; the class name can be used in commands to the mail system. 24 classes are allowed by the Messenger, and each filed message can belong to any set of them. In addition to any class names given to it, each filed message also has a message number that can be used to reference it.
A new class name is created when the first message is put into that class. When a message is displayed, its message number and the classes to which it belongs are also displayed.
When the F(ile option is selected from the Incoming or Outgoing menu, the Messenger asks
Class?
class names, or with <RETURN) to file the message without a class.
For example, at the Outgoing level, a message is composed and the Outgoing menu is displayed:
Out: D(isplay) F(ile P(rint Q(uit R(eceipt S(end W(rite F <RETURN)
Class? MEETING, CUSTOMERS <RETURN)
Filed message number 37
In this example, the user, having composed a message, files it in two classes, MEETING and CUSTOMERS. As discussed in the following sections, class names and message numbers are used to identify messages to be stored, displayed, and sent. Responding to the "Class?" prompt with <Return) causes the Messenger to file the message being sent without assigning it to any class.
After filing the message, the redisplays the Incoming or Outgoing further action at the current level.
i1essenger menu for
If the mail file is full and no more messages can be filed in it, the Messenger will display, for example,
Not enough free blocks; need 9, have 3
there. (DELETE and WRITE are discussed in Sections 4.6 and 5.8.)
4.2 The CLASSIFY Command
The CLASSIFY command allows the user to add new classifications to one or more messages saved in the mail file. The syntax is
CLASSIFY <messages>,<classes>
where <messages> describes which messages are to have classes added, and <classes> is a list of one or more class names. For example,
CLASSIFY 33
Class? COMPETITORS,SALES
(This example shows how information not supplied is asked for.)
If, as in this example, the Messenger asks for the class name, the user can name a class or classes, or respond with "SHOW CLASSES" to have the current list of known classes displayed. The "Class?" question will then be asked again. Pressing <RETURN> or <ESC><RETURN> returns the user to the Command? prompt.
When a class name is used that has never been used before, the Messenger prompts
No class xxx exists. Create it (Y/N) ?
For "Y", the class name is entered into the class table and assigned to the messages; for "N", the class is not created.
display the message
Too many classes
If this happens, the current message can be filed temporarily without a class. Before it can be placed in a new class using CLASSIFY, one or more existing classes must be removed using the RENAME command (Section 4.5) at the outer Command level.
Using the CLASSIFY command to place a message in new classes does not create extra copies of the message with new message numbers; the single
copy is simply recorded as a member of
additional classes.
As explained in the previous section, this same sequence may be used when classes are being assigned to mail that is filed using the F(ile) option of the Incoming and Outgoing menus.
4.3 Specifying Messages in the Mail File
Many of the Messenger commands operate on one or more messages in the mail file. There are many ways to specify which" messages are to be affected by a command; a complete formal description is provided in 4.3.1 below. Some of the common ways, shown using the DISPLAY command (discussed in Section 5.1) are:
1. A message number. Simply give the number of the message.
Example: DISPLAY 21
class will be selected.
Example: DISPLAY &MEETINGS
3. A range of message numbers. Give the starting and ending message numbers separated by to:" (a colon).
Example: DISPLAY 2:5
4.
All messages in your message file. Just say "ALL" •Example: DISPLAY ALL
5. All unclassified messages. Type "&NONE"
Example: DISPLAY &NONE
6. The current message. The last message accessed in the mail file is refered to as the "current" message and can be specified by using ",," (period).
Example: DISPLAY ..
7. The first, last, next, or previous message. "First" and "last" refer to the first message in the mail file (message number 1) and the last message in the mail file (the highest numbered message). "Next" and "previous" refer to the messages before and after the current message.
Examples: DISPLAY F DISPLAY L DISPLAY P DISPLAY N
(first message) (last message) (previous message) (next message)
described in Section 4.3.1.
Here are some examples and their
interpretations:
DISPLAY L-5 Display the fifth message from the last.
DISPLAY @NOTES IN 1:10
Display any of the first ten messages that are also in the class "NOTES".
DISPLAY .! 5 Display the next five messages.
In descriptions of <messages> is used
messages from the
specified. Use any messages in place of example, the DISPLAY
the commands, the symbol to indicate that some
mail file are to be
of the ways to describe the symbol <messages>. For command is described as
DISPLAY <messages>,<classes>
and any of the examples in this section can be used in place of <messages>.
4.3.1 Formal Definition of <Messages>
The symbol <messages> is used in the command description wherever the Messenger expects a specification of some subset of the messages in the mail file. The following is a formal recursive grammer specification of the syntax of <messages>.
ALL All the messages in MAIL
<expr> A single message, by number
<expr1>:<expr2> Message numbers from <expr1> to <expr2>, inclusive.
<expr1>!<expr2> <expr2> messages, starting with message number <expr1>
@<classname> [IN <messages>] All messages
<expr> number
( .-1)
: :=
<expr1>+<expr2>
<expr>-<expr>
in <messages> which are also in the class
<classname>. IN ALL assumed if it is omitted.
<number> A specific message
L The last message
F The first message
The current message
N The next message (.+1)
p The previous message
The sum of two expressions (usually a message number
plus a constant, like "F+2").
the right: 1-2-3 =1-(2-3) =
o.
<classname> ::= <a 1-15 character name>
<number> ::= <a positive integer>
4.4 The DECLASSIFY Command
The DECLASSIFY command allows the user to remove classifications from one or more messages in the mail file. The syntax is:
DECLASSIFY <messages>,<class>
where <messages> indicates which messages are to have classifications removed, and <class>
indicates which classification is to be
removed. For example
DECLASSIFY L,SALES
will remove the last message in the mail file from the "SALES" class, if the message is currently so classified.
If any ·of the specified messages are not in the named class, the prompt
Message #nn is not in class.
will appear. If there is no such class name, messenger displays
4.5 The RENAME Command
The RENAME command allows any classification name to be changed. The syntax is:
RENAME <oldname>,<newname>
where <oldname> is the current name of the classification, and <newname> is the new name of the classification. For example,
RENAME DATES,APPOINTMENTS
This moves all messages in the DATES class to a new class named APPOINTMENTS, and the DATES class no longer exists. This does not affect any of the other classes that messages in DATES might also have been in.
RENAME can be used to eliminate unwanted classes completely (e.g., when 24 classes have been named, and room for new class names is needed). For example,
RENAME DATES, <blank>
will remove the classification DATES from all messages filed in that class. The Messenger will make sure that <newname> is not being forgotten by asking "New Class?". Type <RETURN> and DATES will be eliminated as a class name. The Messenger will display the message number and subject header of each message in DATES as it is declassified.
4.6 The SHOW CLASSES Command
The command SHOW CLASSES lists all the
classification names that are currently defined. At the Command level, type in SHOW CLASSES in response to the prompt "Command?", or to "Class?", which appears when the commands CLASSIFY or DECLASSIFY are given. At the
Incoming or Outgoing menu levels, after
selecting the F(ile) option, type in SHOW
CLASSES when the Messenger prompts with
"Class?". For example,
Command? classify 5 <Return> Class? show classes <Return>
CONTRACTS DATEBOOK
AUDITS AJAX FILE
FISCAL
5 of 24 classes are named Class? Fiscal <Return>
Here, the user has decided to classify message number 5 in the mail file, but wishes to see a listing of current classes first. Message 5 is then classified in "Fiscal".
The same action at the Incoming level:
In:A(nswer) D(isplay) F(ile) FO(rward)
K(eep) N(ext) P(rint) Q(uit) W(rite)? F <RETURN> Class? show classes <Return>
CONTRACTS DATEBOOK
AUDITS AJAX FILE
FISCAL
5 of 24 classes are named Class? Fiscal <Return>
Pressing <Return> in response "Class?" at the Incoming and will cause the Messenger to without classifying it.
4.7 The DELETE Command
The DELETE command is used to remove one or more messages from the mail file. The syntax is
DELETE <messages>
where <messages> describes which messages are to be deleted.
DELETE 1: 10 DELETE &NOTES
As each message is deleted, its message number will be displayed. If, in the example above, a message belongs to the class &NOTES and to another class, it will not be deleted, but only removed from the class &NOTES.
WARNING: Message numbers are always consecutive in the Messenger. For example, immediately after deleting, for example, message number 12, the message whose number was 13 is now 12, the message whose number was 14 is now 13, etc. Take care, in doing a sequence of DELETE commands, that this implicit renumbering of the messages does not cause accidental deletions of the wrong messages. To delete several messages by message number, delete the highest numbered messages first.
4.8 The UNDELETE Command
The UNDELETE command is a seldom-used command used to retrieve filed messages that have been accidentally deleted. The syntax is simply
All previously deleted messages that can be recovered will be filed at the end of the user's mail file. If no new messages have been filed since the last DELETE command, then at least all
the messages recently deleted will be
recovered. It is likely that additional
messages deleted earlier will also be recovered, in which case it may be necessary to display all the recovered messages and delete those not wanted.
Chapter 5
Using Filed Mail
Command Level Section . Description
or Henu Item
DISPLAY, C
D(isplay) 1,0
HEADERS C
ANS\-lER, C
A(nswer) I
FORWARD, C
F(orward) I
RESEND C
WRITE, C
W(rite) 1,0
PRINT, C
P(rint) 1,0
Level C Level I Level
°
5.0 3.6 5.1 5.2 3.1 5.4 3.1 5.7 5.8 3.1 5.9 3.1
Display filed mail Display current message
Display only the headers of filed mail Answer a filed message Answer current message Forward a filed message Forward current message Send a filed message Write a filed message to a Pascal file or local printer
Write current message to a Pascal file or local printer
Print a filed message on system printer Print current message on system printer
Command Level Incoming Mail Menu Outgoing Mail Menu
5.0 The DISPLAY Command
the user's mail file. When selected from the Incoming or Outgoing mail menu, D(isplay) redisplays the message that. has just been read or composed. At the Command level, the syntax is:
DISPLAY <messages>
where <messages> describes which messages are to be displayed. For example
DISPLAY L
displays the last message (the one most recently filed) in the mail file. As discussed in Section 4.4, there are many ways to specify which messages are to be affected by a command; a complete formal description is given in Appendix A. The most common ways are to give the number of the message, or specify "ALL", or give the name of a message class or range of message numbers.
Remember that, as with other commands, there are two ways to interrupt the output of the DISPLAY command:
1. Temporarily, using <CTRL-S> to stop and again to start.
5.1 The HEADERS Command
The HEADERS command will print a one-line summary of one or more messages that have been filed in the mail file. The command syntax is:
HEADERS <messages>
where <messages> describes which messages are to be summarized. For example
HEADERS ALL
HEADERS output has the format
#l<=Smith Tue 19-Feb Tomorrow's meeting (1) #2=>Jones Tue 19-Feb Audit for meeting (1) #3=>JDN,SKF,; •• Wed 20-Feb Audit format (2)
••• and so on
The number in the first column of this example is the message number in . the mail file; this number can be used to refer to this message as part of the <messages> item in other commands. The arrow indicates whether the message was to ( => ) or from « = ) the person listed in the next column. If the message was sent by the user to other people, then the arrow will point to the right
=> names
An ellipsis ( ••. ) will appear if there are too many names to fit in the field. For a message to the user from someone else, the arrow will point left
<= name
The next two fields display a partial date and the subject of the message. The last field in each header, in parentheses, gives a rough idea of the length of the message; each increment corresponds to about 500 characters.
5.2 The ANSWER Command
The ANSWER command is a variant of the SEND command, used to reply to messages stored in the mail file. ANSWER supplies suggestions for some of the header fields, to make it easier to compose a response to the filed message.
To use the ANSWER command, type
ANSWER <messages>
where <messages> identifies the message (or messages, although there usually will be only one) in the mail file to be answered.
The sequence described here for the ANSWER command can also occur by selecting the A(nswer) option of the new mail menu. In that case the message being answered is the one being read.
No'te: The Messenger cannot ANSWER, FOR\~ARD, or RESEND long messages, and will display "Memory Overflow" to indicate that a message is too long for ANSWER to be used.
When constructing the header of the message using ANSWER, the Messenger will suggest values based on the header lines of the message being answered or forwarded. The sender can either
1. accept the suggested <RETURN>, or
2. supply a substitute by typing it followed by <RETURN>. To remove the suggestion and leave it blank, type a blank followed by <RETURN>. Or
3. add to the suggested value by typing in ,<addition><RETURN>.
If the sender supplies· a substitute for the suggested value, the Messenger will again display the information for confirmation, this time using the substitute as the suggestion. It will continue to prompt with suggested values until <RETURN> only is pressed.
5.3 . Header Line Suggestions Supplied by ANSWER
These are the suggestions supplied automatically by the Messenger for the header lines of a message that is answering an earlier message:
1. For the "TO" header line, the suggested value is the sender of the message being answered.
2. For the "CC" header line, the suggested value is the concatenation of the "TO" and "CC" header lines of the message being answered, except that the current sender is removed.
3. For the "SUBJECT" header line, the suggested value is the subject of the message being answered, with "Re:" before it.
5.4 The FORWARD Command
The FORWARD command is a variant of the SEND command. Use it to send a message from the mail file to one or more people, along with any desired prefatory remarks.
To use the FORWARD command, type
FORWARD <messages)
where <messages) identifies the message (or messages, although there usually will be only one) in the mail file to be forwarded.
Note: The sequence described here for the FORWARD command can also occur by selecting the FO(rward) option of the Incoming mail menu (Section 3.1.1). In that case the message being forwarded is the one currently being read. As with the ANSWER command, the Messenger cannot FORWARD long messages and will display "Memory Overflow" to indicate that a message is too long to be forwarded.
5.5 The FORWARD Header
When constructing the header of the message using FORWARD, the Messenger will, as with ANSWER, suggest values based on the header lines of the message being answered or forwarded. Either
1. accept the suggested value, by <RETURN), or
pressing
Or
3. add to the suggested value ,<addition><RETURN).
by typing
<