Layouts
A layout defines the visual structure for a user interface, such as the UI for an activity or app widget. You can declare a layout in two ways:
• Declare UI elements in XML.
– Android provides a straightforward XML vocabulary that corresponds to the View classes and subclasses, such as those for widgets and layouts.
• Instantiate layout elements at runtime.
Sample Layout
<?xml version="1.0" encoding="utf-8"?> <LinearLayout
xmlns:android="http://schemas.android.com/apk/res/android" android:layout_width="match_parent"
android:layout_height="match_parent" android:orientation="vertical" >
<TextView android:id="@+id/text"
android:layout_width="wrap_content" android:layout_height="wrap_content" android:text="Hello, I am a TextView" /> <Button android:id="@+id/button"
android:layout_width="wrap_content" android:layout_height="wrap_content" android:text="Hello, I am a Button" /> </LinearLayout>
Loading the layout from XML file
• When you compile your application, each XML layout file is compiled into a View resource.
• You should load the layout resource from your application code, in your Activity.onCreate() callback implementation.
– Do so by calling setContentView(), passing it the reference to your layout resource in the form of:R.layout.layout_file_name.
Loading the layout from XML file
public void onCreate(Bundle savedInstanceState)
{ super.onCreate(savedInstanceState); setContentView(R.layout.main_layout); }
Defining View/Wigets in XML file
Define a view/widget in the layout file and assign it a unique ID:
<Button android:id="@+id/my_button"
android:layout_width="wrap_content"
android:layout_height="wrap_content"
Controlling Views/Wigets from
Java Code
• Create an instance of the view object and capture it from the layout (typically in the onCreate()method):
Types of Layout in Android
S.N. Layout & Description1 • Linear LayoutLinear Layout
• LinearLayout is view group that aligns all children in a single direction,Relative Layout
vertically or horizontally. 2 • Relative LayoutTable Layout
RelativeLayout is a view group that displays child views in relative positions. 3 Table Layout
TableLayout is a view that groups views into rows and columns. 4 Absolute Layout
AbsoluteLayout enables you to specify the exact location of its children. 5 Frame Layout
The FrameLayout is a placeholder on screen that you can use to display a single view.
6 List View
ListView is a view group that displays a list of scrollable items. 7 Grid View
Linear Layout
•
LinearLayout is a view group that aligns all children in
a single direction, vertically or horizontally.
•
You can specify the layout direction with
the
android:orientation
attribute.
•
Example
Layout_weight
• LinearLayout also supports assigning a weight to individual
children with the android:layout_weight attribute.
• This attribute assigns an "importance" value to a view in terms of how much space is should occupy on the screen.
• A larger weight value allows it to expand to fill any remaining space in the parent view.
• Child views can specify a weight value, and then any remaining space in the view group is assigned to children in the proportion of their declared weight.
Example:Layout_weight
• if there are three text fields and two of them declare a weight of 1, while the other is given no weight, the third text field without weight will not grow and will only occupy the area required by its content.
• The other two will expand equally to fill the space remaining after all three fields are measured.
• If the third field is then given a weight of 2 (instead of 0), then it is now declared more important than both the others, so it gets half the total remaining space, while the first two share the rest equally.
Equally weighted children
• To create a linear layout in which each child uses the same amount of space on the screen, set theandroid:layout_height of each view to "0dp" (for a vertical layout) or theandroid:layout_width of each view to "0dp" (for a horizontal layout). Then set
android:layout_gravity
• Standard gravity constant that a child supplies to its parent. Defines how the child view should be positioned, on both the X and Y axes, within its enclosing layout.
Constant Value Description
top 0x30 Push object to the top of its container, not changing its size. bottom 0x50 Push object to the bottom of its container, not changing its size. left 0x03 Push object to the left of its container, not changing its size. right 0x05 Push object to the right of its container, not changing its size.
center_vertical 0x10 Place object in the vertical center of its container, not changing its size.
fill_vertical 0x70 Grow the vertical size of the object if needed so it completely fills its container. center_horizontal 0x01 Place object in the horizontal center of its container, not changing its size.
fill_horizontal 0x07 Grow the horizontal size of the object if needed so it completely fills its container.
center 0x11 Place the object in the center of its container in both the vertical and horizontal axis, not changing its size.
fill 0x77 Grow the horizontal and vertical size of the object if needed so it completely fills its container.
clip_vertical 0x80 Additional option that can be set to have the top and/or bottom edges of the child clipped to its container's bounds. The clip will be based on the vertical gravity: a top gravity will clip the bottom edge, a bottom gravity will clip the top edge, and neither will clip both edges.
clip_horizontal 0x08 Additional option that can be set to have the left and/or right edges of the child clipped to its container's bounds. The clip will be based on the horizontal gravity: a left gravity will clip the right edge, a right gravity will clip the left edge, and neither will clip both edges.
Problem
<?xml version="1.0" encoding="utf-8"?> <LinearLayout xmlns:android="http://schemas.android.com/apk/res/android" android:layout_width="match_parent" android:layout_height="match_parent" android:paddingLeft="16dp" android:paddingRight="16dp" android:orientation="vertical" > <EditText android:layout_width="match_parent"
android:layout_height="wrap_content" android:hint="@string/to" />
Relative Layout
• RelativeLayout is a view group that displays child views in relative positions.
• The position of each view can be specified as relative to sibling elements (such as to the left-of or below another view) or in
positions relative to the parent RelativeLayout area (such as aligned to the bottom, left or center).
• RelativeLayout lets child views specify their position relative to the parent view or to each other (specified by ID).
Relative Layout…
Some of the many layout properties available to views in a RelativeLayout include:
• android:layout_alignParentTop
– If "true", makes the top edge of this view match the top edge of the parent.
• android:layout_centerVertical
– If "true", centers this child vertically within its parent.
• android:layout_below
– Positions the top edge of this view below the view specified with a resource ID.
• android:layout_toRightOf
Relative Layout…
Following are the important attributes specific to RelativeLayout:
Attribute Description
android:id This is the ID which uniquely identifies the layout.
android:gravity This specifies how an object should position its content, on both the X and Y axes. Possible values are top, bottom, left, right, center, center_vertical, center_horizontal etc. android:ignoreGravity This indicates what view should not be affected by
<RelativeLayout
xmlns:android="http://schemas.android.com/apk/
Example res/android" android:layout_width="fill_parent"
android:layout_height="fill_parent" android:paddingLeft="16dp"
android:paddingRight="16dp" >
• <EditText android:id="@+id/name" android:layout_width="fill_parent" android:layout_height="wrap_content" android:hint="@string/reminder" />
• <TextView android:id="@+id/dates" android:layout_width="0dp"
android:layout_height="wrap_content" android:layout_below="@id/name" android:layout_alignParentLeft="true" android:layout_toLeftOf="@+id/times" />
• <TextView android:id="@id/times" android:layout_width="96dp"
android:layout_height="wrap_content" android:layout_below="@id/name"
android:layout_alignParentRight="true" />
• <Button android:layout_width="96dp" android:layout_height="wrap_content" android:layout_below="@id/times" android:layout_centerInParent="true" android:text="@string/done" />
package com.example.helloworld; SimpleDateFormat dateFormat = new
import java.text.SimpleDateFormat; SimpleDateFormat("yyyy/MM/dd");
import java.util.Calendar; Date date = new Date();
import java.util.Date; String nowDate =
import android.os.Bundle; dateFormat.format(date); import android.app.Activity;
TextView dateView =
import android.text.format.DateFormat;
import android.view.Menu; (TextView)findViewById(R.id.dates);
dateView.setText(nowDate);
import android.widget.TextView;
public class MainActivity extends SimpleDateFormat timeFormat =
new SimpleDateFormat("HH:mm:ss");
Activity {
String nowTime =
@Override timeFormat.format(date);
TextView timeView =
protected void onCreate(Bundle (TextView)findViewById(R.id.times);
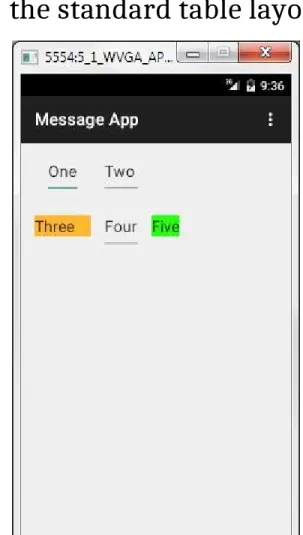
Table Layout
Table Layout
<?xml version="1.0" encoding="utf-8"?>
<TableLayout
xmlns:android="http://schemas.android.com/apk/res/android" android:layout_width="match_parent" android:layout_height="match_parent" android:paddingLeft="16dp" android:paddingRight="16dp" android:orientation="vertical" > <TableRow android:layout_width="fill_parent" android:layout_height="fill_parent"> <EditText android:layout_width="wrap_content" android:layout_height="wrap_content" android:id="@+id/editText" android:text="One" android:layout_column="0" /> <EditText android:layout_width="wrap_content" android:layout_height="wrap_content" android:id="@+id/editText2" android:text="Two" android:layout_column="1" /><TableRow
android:layout_width="fill_parent" android:layout_height="fill_parent"> <EditText android:layout_width="wrap_content" android:layout_height="wrap_content" android:id="@+id/editText3" android:text="Three" android:layout_column="0" android:background="#ffffb633" /> <EditText android:layout_width="wrap_content" android:layout_height="wrap_content" android:id="@+id/editText4" android:text="Four" android:layout_column="1" /> <EditText android:layout_width="wrap_content" android:layout_height="wrap_content" android:id="@+id/editText5" android:text="Five" android:layout_column="2" android:background="#ff2cff11" /></TableRow>
</TableRow>
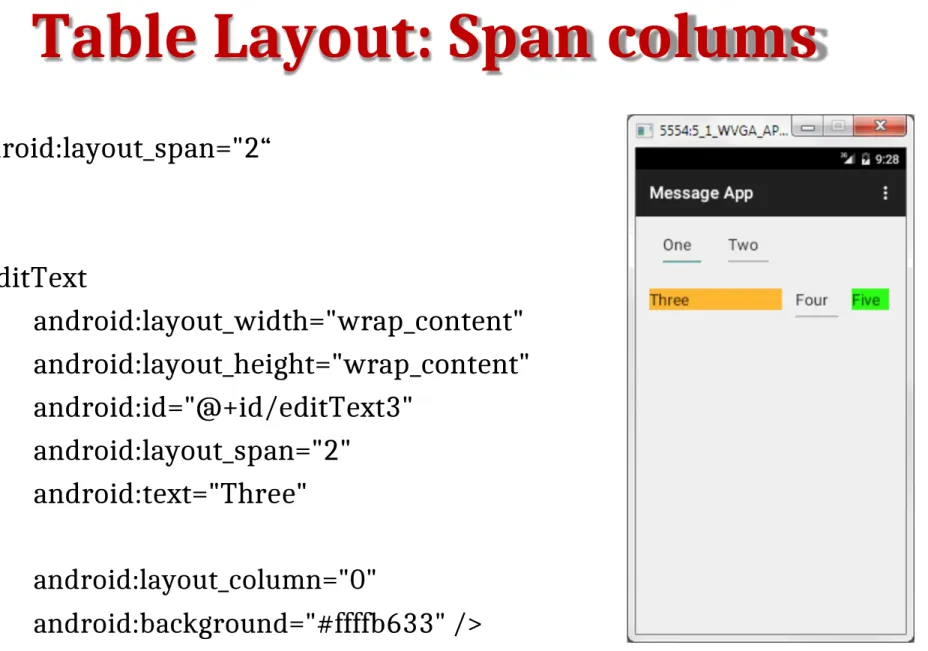
Table Layout: Span colums
android:layout_span="2“
<EditText
android:layout_width="wrap_content" android:layout_height="wrap_content" android:id="@+id/editText3"
android:layout_span="2" android:text="Three"
android:layout_column="0"
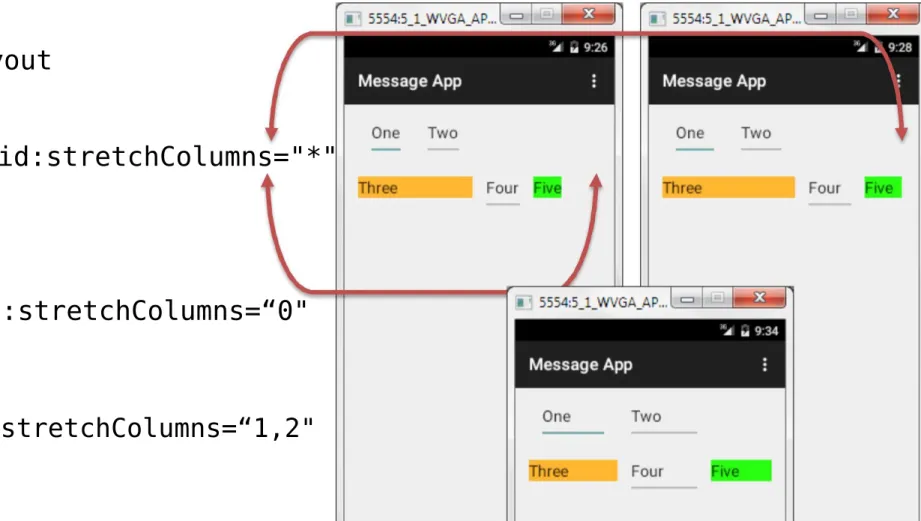
Table Layout...
• Android:strech_colum
<TableLayout .
.
android:stretchColumns="*" .
>
android:stretchColumns=“0"
Absolute Layout
• An Absolute Layout lets you specify exact locations (x/y coordinates) of its children.
• Absolute layouts are less flexible and harder to maintain than other types of layouts without absolute positioning.
• Following are the important attributes specific to AbsoluteLayout:
Attribute Description
android:id This is the ID which uniquely identifies the layout. android:layout_x This specifies the x-coordinate of the view.
Example
<AbsoluteLayout xmlns:android="http://schemas.android.com/apk/res/android" android:layout_width="fill_parent"
android:layout_height="fill_parent">
<Button
android:layout_width="100dp"
android:layout_height="wrap_content" android:text="OK"
android:layout_x="50px" android:layout_y="361px" /> <Button
android:layout_width="100dp"
android:layout_height="wrap_content"
Remember its Deprecated now
android:text="Cancel" android:layout_x="225px" android:layout_y="361px" />
Frame Layout
• Frame Layout is designed to block out an area on the screen to display a single item.
• Generally, FrameLayout should be used to hold a single child view, because it can be difficult to organize child views in a way that's scalable to different screen sizes without the children overlapping each other.
• You can, however, add multiple children to a FrameLayout and
Example Frame Layout
<FrameLayout
xmlns:android="http://schemas.android.com/apk/res /android"
android:layout_width="fill_parent" android:layout_height="fill_parent">
<ImageView
android:src="@drawable/ic_launcher" android:scaleType="fitCenter"
android:layout_height="250px" android:layout_width="250px"/>
<TextView
android:text="Frame Demo" android:textSize="30px" android:textStyle="bold"
android:layout_height="fill_parent" android:layout_width="fill_parent" android:gravity="center"/>
List Layout
• Android ListView is a view which groups several items and display them in vertical scrollable list.
• The list items are automatically inserted to the list using an Adapter that
pulls content from a source such as an array or database.
• An adapter actually bridges between UI components and the data source that fill data into UI Component.
• Adapter can be used to supply the data to like spinner, list view, grid view etc.
• The ListView and GridView are subclasses of AdapterView and they can be populated by binding them to an Adapter, which retrieves data from an external source and creates a View that represents each data entry.
• Android provides several subclasses of Adapter that are useful for
retrieving different kinds of data and building views for an AdapterView ( ie. ListView or GridView).
• The two most common adapters are
– ArrayAdapter and
Problem
Design a list view based app
for displaying the names of
the playing 11 for the
current ICC Cricket world
cup 2015.
Layout.xml
<RelativeLayout xmlns:android="http://schemas.android.com/apk/res/android"
android:layout_width="fill_parent" android:layout_height="fill_parent"> <ListView
android:layout_width="wrap_content" android:layout_height="wrap_content" android:id="@+id/list"
public class MainActivity extends Activity { ListView listView ;
@Override
protected void onCreate(Bundle savedInstanceState) { super.onCreate(savedInstanceState);
setContentView(R.layout.activity_main);
// Get ListView object from xml
listView = (ListView) findViewById(R.id.list);
// Defined Array values to show in ListView
String[] values = new String[]
{"Dhawan","Kohli","Rohit","Rahane","Raina","Dhoni","Jadeja","Ash win","Shami","Mohit","Umesh"
};
/ Define a new Adapter / First parameter - Context
/ Second parameter - Layout for the row
/ Third parameter - ID of the TextView to which the data is written
/ Forth - the Array of data
ArrayAdapter<String> adapter = new ArrayAdapter<String>(this,
android.R.layout.simple_list_item_1, android.R.id.text1, values);
/ Assign adapter to ListView
listView.setAdapter(adapter);
// ListView Item Click Listener
listView.setOnItemClickListener(new AdapterView.OnItemClickListener() {
@Override
public void onItemClick(AdapterView<?> parent, View view, int position, long id) {
// ListView Clicked item index int itemPosition = position;
// ListView Clicked item value String itemValue = (String) listView.getItemAtPosition(position);
/ Show Alert
Toast.makeText(getApplicationContext(),
Source Code
public class MainActivity extends Activity { GridView gridView;
static final String[] numbers = new String[] { "A", "B", "C", "D", "E",
"F", "G", "H", "I", "J", "K", "L", "M", "N", "O", "P", "Q", "R", "S", "T", "U", "V", "W", "X", "Y", "Z" };
@Override
public void onCreate(Bundle savedInstanceState) { super.onCreate(savedInstanceState);
setContentView(R.layout.activity_main);
gridView = (GridView)
findViewById(R.id.gridview1); // Create adapter to set value for grid view
ArrayAdapter<String> adapter = new ArrayAdapter<String>(this, android.R.layout.simple_list_item_1, numbers); gridView.setAdapter(adapter); gridView.setOnItemClickListener(new AdapterView.OnItemClickListener() { @Override
public void onItemClick(AdapterView<?> parent, View v, int position, long id) {
Toast.makeText(getApplicationContext(), ((TextView) v).getText() ,
Toast.LENGTH_SHORT).show(); }
References
• http://www.tutorialspoint.com/