PARTNER MAIL VS
®
Voice Messaging System
Release 5
Installation and Programming
zpzÐÕÕzÐÕ
Copyright 1998 Lucent Technologies 585-322-532
All Rights Reserved Comcode 108355173
Printed in USA Issue 1
December 1998
Notice
Every effort was made to ensure that the information in this book was complete and accurate at the time of printing. However, information is subject to change.
Your Responsibility for Your System's Security
Toll fraud is the unauthorized use of your telecommunications system by an unauthorized party, for example, persons other than your companys employees, agents, subcontractors, or persons working on your companys behalf. Note that there may be a risk of toll fraud associated with your telecommunications system, and if toll fraud occurs, it can result in substantial additional charges for your telecommunications services.
You and your System Manager are responsible for the security of your system, such as programming and configuring your equipment, to prevent unauthorized use. The System Manager is also responsible for reading all installation, instruction, and system administration documents provided with this product in order to fully understand the features that can introduce risk of toll fraud and the steps that can be taken to reduce that risk.
Lucent Technologies does not warrant that this product is immune from or will prevent unauthorized use of common-carrier telecommunication services or facilities accessed through or connected to it. Lucent Technologies will not be responsible for any charges that result from such unauthorized use.
Federal Communications Commission Statement
This equipment has been tested and found to comply with the limits for a Class A digital device, pursuant to Part 15 of the FCC Rules. These limits are designed to provide reasonable protection against harmful interference when the equipment is operated in a commercial environment. This equipment generates, uses, and can radiate radio frequency energy and, if not installed and used in accordance with the instruction manual, may cause harmful interference to radio communications. Operation of this equipment in a residential area is likely to cause harmful interference, in which case the user will be required to correct the interference at his own expense.
Canadian Department of Communications (DOC) Interference Information
This digital apparatus does not exceed the Class A limits for radio noise emissions set out in the radio interference regulations of the Canadian Department of Communications.
Le Présent Appareil Numérique német pas de bruits radioélectriques dépassant les limites applicables aux appareils numériques de la class A préscrites dans le reglement sur le brouillage radioélectrique édicté par le ministère des Communications du Canada.
Trademarks
PARTNER, PARTNER MAIL VS, PARTNER MAIL, MLS-34D, MLS-18D, MLS-12D, MLS-12, MLS-6, MLC-6, MDC 9000, MDW 9000, MDW 9010, and MDW 9030P are registered trademarks of Lucent Technologies in the U.S. and other countries. Microsoft, Windows, and Windows NT are registered trademarks of Microsoft Corporation.
Ordering Information
Call: Lucent Technologies Publications Center
Voice 1 800 457-1235 International Voice 317 361-5353 Fax 1 800 457-1764 International Fax 317 361-5355
Write: Lucent Technologies Publications Center 2855 N. Franklin
Indianapolis, IN 46219
Order: Document No. 585-322-532, Issue 1, December 1998, Comcode 108355173
Support Telephone Number
In the continental U.S., Lucent Technologies provides a toll-free customer helpline 24 hours a day. Call the Lucent Technologies Helpline at 1 800 628-28881 800 628-2888 or your Lucent Technologies authorized dealer if you need assistance when installing, programming, or using your system. Consultation charges may apply. Outside the continental U.S., contact your local Lucent Technologies authorized representative.
Lucent Technologies Fraud Intervention
Important Safety Instructions
!
WARNING:
The following list provides basic safety precautions that should always be followed when using the system:
1. Read and understand all instructions.
2. Follow all warnings and instructions marked on the product.
3. Unplug all telephone connections before cleaning. DO NOT use liquid cleaners or aerosol cleaners. Use a damp cloth for cleaning.
4. This product should be serviced by (or taken to) a qualified repair center when service or repair work is required.
5. DO NOT use this product near water, for example, in a wet basement location.
6. DO NOT place this product on an unstable cart, stand, or table.
7. Never push objects of any kind into slots or openings as they may touch dangerous voltage points or short out parts that could result in a risk of fire or electric shock. Never spill liquid of any kind on the product.
8. Avoid using this product during an electrical storm. There may be a remote risk of electric shock from lightning.
9. DO NOT use the telephone to report a gas leak in the vicinity of the leak.
10. The product is provided with a three-wire grounding type plug. This is a safety feature. DO NOT defeat the safety purpose of the grounding type plug. DO NOT staple or otherwise attach the AC power supply cord to building surfaces.
!
CAUTION:
DO NOT block or cover the ventilation slots and openings. They prevent the product from overheating. DO NOT place the product in a separate enclosure unless proper ventilation is provided.
Contents
About This Document
xi■ Purpose xi
■ Terminology xii
■ How to Use This Guide xiii
Product Safety Statements xiv
How to Comment on This Guide xiv
■ Reference Materials xv
■ Identifying Your Communications System xv
1
Overview
1-1■ Tutor Feature 1-3
■ Languages 1-3
■ Voice Messaging Services 1-4
Automated Attendant Service 1-6
Call Answer Service 1-11
Voice Mail Service 1-13
■ Security 1-15
System Security Guidelines 1-15
Security Policy and User Education 1-16
■ System Manager Activities Checklist 1-18
2
Installation
2-1■ Before You Start 2-1
■ Installing the PARTNER MAIL VS Module 2-2
■ Connecting a PC to the
Contents
3
Understanding Programming
3-1■ Communications System Programming 3-1
Planning Forms 3-2
Using System Programming 3-4
■ Voice Messaging System Programming 3-6
Planning Forms 3-6
Using System Programming 3-9
4
Initial Programming
4-1■ Overview 4-1
■ Voice Mail System Configurations 4-2
Upgrading Your Voice Mail System from a 2-Port
to a 4-Port Configuration 4-2
■ Initial Programming Checklist 4-3
Communications System Programming Checklist 4-3
Voice Messaging System Programming Checklist 4-4
■ Initial Communications System Setup 4-6
VMS Hunt Group Extensions 4-6
Outgoing Call Restriction 4-7
■ Voice Messaging System Programming 4-8
Language 4-8
Changing the System Administration Prompt
Language 4-8
Automated Attendant Service 4-10
Voice Mail Service 4-16
Line Ownership 4-21
■ Communications System Programming 4-22
Automated Attendant Service 4-22
Call Answer Service 4-28
Telephone Button Programming 4-31
■ Verifying System Operation 4-35
Voice Mail Service 4-35
Automated Attendant Service 4-35
Call Answer Service 4-37
Contents
5
System Management
5-1■ General Information 5-2
Changing Your Password 5-2
Changing the System Administration Prompt
Language 5-3
Training Co-Workers 5-3
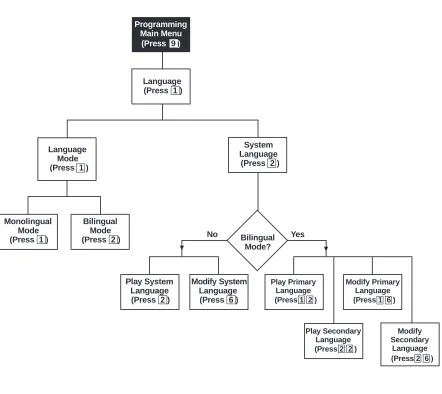
■ Language 5-10
Modifying the Language Mode 5-11
Playing the System, Primary, or Secondary
Language 5-12
Modifying the System, Primary, or Secondary
Language 5-14
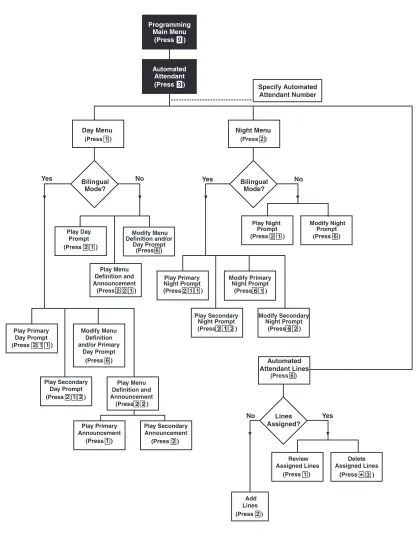
■ Automated Attendant Service 5-17
Menu Definition, Prompt, and Announcements 5-20
Automated Attendant Line Assignment 5-23
Playing the Menu Definition and Announcements 5-26
Playing the Day or Night Menu Prompt 5-27
Modifying the Menu Definition, Day Menu Prompt,
and Announcements 5-29
Modifying the Night Menu Prompt 5-33
Group Call Distribution (Option 1) 5-35
VMS Hunt Delay (PARTNER ACS Release 3.0
or later) 5-36
VMS Hunt Delay (All Other PARTNER Systems) 5-36
Automatic Extension Privacy 5-37
VMS Hunt Schedule (PARTNER ACS
Release 3.0 or later) 5-38
VMS Hunt Schedule (All Other PARTNER Systems) 5-38
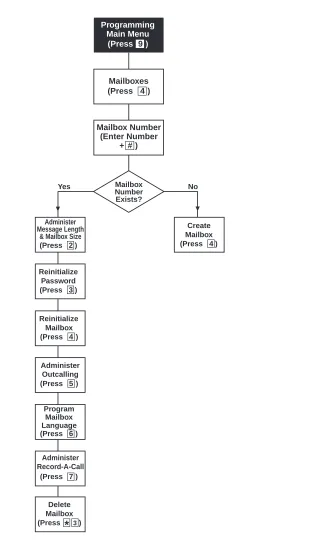
■ Modifying Mailboxes 5-39
Hardware Considerations 5-42
Guest Mailboxes 5-42
Checking a Mailbox's Status 5-44
Deleting a Mailbox 5-45
Creating a Mailbox 5-46
Reinitializing a Password 5-48
Reinitializing a Mailbox 5-49
Changing Mailbox Message Length or Size 5-50
Playing a Mailbox's Language 5-52
Modifying a Mailbox's Language 5-53
Contents
Administering Record-a-Call for a Mailbox 5-56
Automatic VMS Cover 5-58
VMS Cover Rings (PARTNER ACS Release 3.0
or later) 5-59
VMS Cover Rings (All Other PARTNER Systems) 5-59
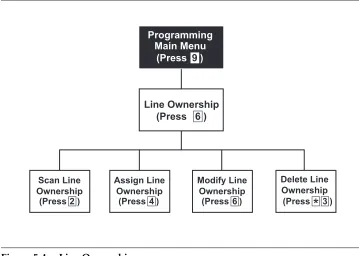
■ Line Coverage 5-60
VMS Line Coverage 5-61
Extension Line Coverage 5-67
■ Telephone Button Programming 5-68
VMS Cover (F15) 5-68
Do Not Disturb (F01) 5-69
Voice Mailbox Transfer (F14) 5-69
Voice Mail Auto Dial 5-70
Station Lock (F21) 5-70
Record-a-Call (PARTNER ACS Release 3.0
or later) (F24) 5-71
Call Screening (PARTNER ACS Release 3.0
or later) (F25) 5-71
■ Generating a Configuration Report 5-73
■ Performing a System Backup 5-76
■ Performing a System Restore 5-78
6
Troubleshooting
6-1■ When You Need Help 6-1
■ Automated Attendant Service 6-2
Outside Callers Hear Ringing, but System Does
Not Answer 6-2
Outside Callers Hear Silence, Tones, or Ringing
During Transfer 6-3
System Does Not Answer Immediately 6-4
System Cuts Off Part of Greeting 6-5
System Transfers Call to Receptionist Before
Playing the Menu Prompt 6-5
System Does Not Transfer Calls Properly 6-5
System Does Not Respond to Entered Digits 6-6
Contents
■ Call Answer Service 6-7
Call Answer Service Takes Too Long to
Answer Calls 6-7
Call Answer Service Terminates Message While
Caller Is Recording 6-7
Messages Cannot Be Deposited in Mailbox 6-7
■ Voice Mail Service 6-9
Subscriber Unable to Log In to Voice Mail 6-9
Date or Time in Message Headers Is Incorrect 6-9
Subscriber Cannot Forward Messages to Another
Subscriber 6-10
Subscribers Hear Busy Signal When Calling In
to Voice Mail 6-10
Message Light Does Not Turn Off 6-11
Outcalling Is Delayed 6-12
Outcalling to a Digital Pager Is Not Working 6-12
Outcalling to a Telephone Is Not Working 6-13
■ Language 6-14
Cannot Switch Between Primary and Secondary
Languages 6-14
Cannot Understand Language Prompts 6-14
■ Error Messages 6-15
A
Specifications
A-1B
FCC Information
B-1■ Federal Communications Commission (FCC)
Interference Information B-1
FCC Notification and Repair Information B-2
■ IC Notification and Repair Information B-3
Renseignements sur la notification du ministére
Contents
C
Warranty Information
C-1■ Repair Information C-1
In-Warranty Repairs C-1
Post-Warranty Repairs C-2
■ Lucent Technologies Warranty and Limitation
of Liability C-3
Limitation of Liability C-4
D
Dial Plans
D-1Systems with Fax Tone Detect D-7
E
Case Studies
E-1■ Purpose E-1
■ Case Study #1 E-2
About the Customer E-2
Filling Out the Planning Forms E-4
Post-Installation Recommendations E-8
■ Case Study #2 E-29
About the Customer E-29
Filling Out the Planning Forms E-30
Post-Installation Recommendations E-34
GL
Glossary
GL-1Figures
1
Overview
1-1. Voice Messaging Service 1-5
2
Installation
2-1. Voice Messaging System Extensions for
PARTNER Advanced Communications System Release 2.0 or later with 308 and PARTNER MAIL
Voice Messaging System Modules 2-3
2-2. Installing the PC Card 2-4
3
Understanding Programming
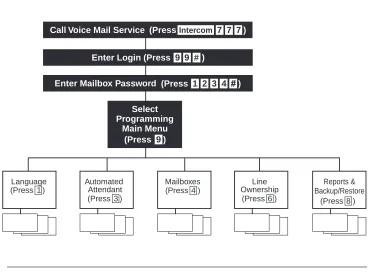
3-1. Programming Menus 3-10
5
System Management
5-1. Language Menu 5-10
5-2. Automated Attendant Service Menu 5-18
5-3. Modifying Mailboxes 5-40
5-4. Line Ownership 5-61
D
Dial Plans
D-1. Dial Plan for PARTNER Advanced Communications
System Release 2.0 or Later D-2
D-2. Dial Plan for PARTNER Advanced Communications
System Release 2.0 or Later D-3
D-3. Dial Plan for PARTNER Endeavor Release 1.0 and PARTNER Advanced Communications System
Release 1.0, 1.1, 2.0 or Later D-4
D-4. Dial Plan for PARTNER Endeavor Release 1.0 and PARTNER Advanced Communications System
Figures
D-5. Voice Messaging System Extensions for
PARTNER Plus and PARTNER II Communications
Systems D-6
D-6. Dial Plan for Systems with Fax Tone Detect and a
Voice Messaging System Module D-8
D-7. Dial Plan for Systems with Fax Tone Detect and a
About This Document
Purpose
This guide provides instructions for installing, upgrading, programming,
and managing the PARTNER MAIL VS® Voice Messaging System on the
PARTNER® Plus, PARTNER II, PARTNER Endeavor, or PARTNER Advanced
About This Guide
Terminology
This guide uses the following terms:
■ Voice messaging system (VMS): The PARTNER MAIL VS Voice Messaging System.
■ Subscribers: Users who have a mailbox on the voice messaging system.
■ Communications system (CS): in most countries, Release 3.1 or later
of the PARTNER Plus and PARTNER II systems, Release 1.0 of the
PARTNER Endeavor, and Release 1.0 or later of the PARTNER Advanced Communications Systems. In the U.K., Release 2.0 or later of the
PARTNER Plus system. (Some VMS features are not available on all communications systems.)
■ System phones: the telephones specifically designed to work with the communications system, including (where available) the PARTNER-34D, PARTNER-18D, PARTNER-18, PARTNER 6, PARTNER Endeavor-34D, PARTNER Endeavor-18D, PARTNER Endeavor-18, PARTNER Endeavor-6, MLS-34D, MLS-18D, MLS-12D, MLS-12, MLS-6, MDC 9000, and
How to Use This Guide
How to Use This Guide
If you are the technician, refer to the appropriate chapters to help you:
■ Install the voice messaging system hardware. Chapter 2 provides instructions for installing and upgrading the voice messaging system module in the communication system's control unit.
■ Refresh your memory about programming. Chapter 3 offers general programming information for both the communications system and the voice messaging system.
■ Perform initial programming. Chapter 4 provides step-by-step
programming instructions for integrating the voice messaging system with the communications system. It also provides test procedures that you should use after installation to ensure that the system is working properly.
■ Solve problems. Chapter 6 provides information to help you identify and correct problems you may have with the voice messaging system.
If you are the System Manager, refer to the appropriate chapters to help you:
■ Learn about the voice messaging system. Chapter 1 describes the voice messaging system's features and services.
■ Learn about programming. Chapter 3 offers general programming information for both the communications system and the voice messaging system.
■ Manage the voice messaging system. Chapter 5 provides instructions for changing system settings to accommodate the changing needs of the business. It also offers guidelines for setting up and using the
receptionist's extension.
■ Solve problems. Chapter 6 provides information to help you identify and correct problems you may have with the voice messaging system.
After you are experienced with the system, refer to the Menu Map and System Programming Reference pages at the back of this book to confirm or change system settings.
About This Guide
Product Safety Statements
Product safety statements are identified in this guide by a
!
CAUTION:
Indicates the presence of a hazard that will or can cause minor personal injury or property damage if the hazard is not avoided.
!
DANGER:
Indicates the presence of a hazard that can cause severe or fatal personal injury if the hazard is not avoided.
How to Comment on This Guide
A feedback form is located at the end of this guide, after the appendixes. If the form is missing, send your comments and recommendations for
Reference Materials
Reference Materials
In addition to this guide, the following materials are available (the order numbers are in parentheses) for the voice messaging system:
■ Using the PARTNER MAIL VS Voice Messaging System (585-322-531) provides instructions for using the voice messaging system features (including how to listen to voice mail messages, record a personal greeting, program a personal operator, create group lists, and program Outcalling numbers and schedule).
■ PARTNER MAIL VS Voice Messaging System Planning Forms
(585-322-533) contains the forms that the System Manager must complete before programming the voice messaging system.
To order these materials, call the Lucent Technologies BCS Publications Fulfillment Center at 1 800 457-1235 in the continental U.S. or at
1 317 361-5353.
Some of these materials also are available in other languages. For more information about these materials or about communications system materials, contact the BCS Publications Fulfillment Center, your Lucent Technologies Representative or local Authorized Dealer.
Identifying Your Communications
System
Not all voice messaging system features are available on all PARTNER communications systems. To determine which PARTNER Advanced
Communications System you are using, press
f59
at a display phone.1
Overview
The PARTNER MAIL VS Voice Messaging System is designed to work with the communications system to automate the call handling needs of the business.
The voice messaging system:
■ Expands easily from a 2-port to a 4-port configuration to accommodate
growth and ensure optimal performance. Both configurations include a maximum of 48 mailboxes.
■ Handles up to two calls (in the 2-port configuration) or four calls (in the 4-port configuration) simultaneously and provides service for a
predetermined number of subscribers.
You can program your voice messaging system to answer outside calls, play a customized message prompting the caller to press digits for the party with whom the caller wants to speak, and efficiently route the call to the appropriate party all without the aid of a receptionist.
PARTNER MAIL VS provides four Automated Attendants, each of which answers different lines. You can create up to two Automated Attendant Announcements (in each language selected for the system) for each Automated Attendant. For example, you can offer callers a choice of a standard business hours/location announcement or a frequently updated announcement featuring special offers for your sales department and two other announcement choices for your service department.
Overview
Subscribers (that is, your employees who have been assigned voice mailboxes) can use the voice messaging system to retrieve messages from any touch-tone phone on the premises or from a remote location, to create a Personal Greeting for their mailbox, to forward messages with comment to one or more mailboxes on the system, to create and send a message to other mailboxes on the system.
In addition, you can assign subscribers permission to have the system outcall a list of up to five telephone and pager numbers according to a predefined schedule whenever a new message is received. If you have a PARTNER Advanced Communications System Release 3.0 or later, subscribers can listen while a caller is leaving a message in their mailbox. You can also assign these subscribers permission to record a conversation while they are active on a call at an internal telephone.
Tutor Feature
Tutor Feature
Tutor is an on-line help feature that allows users to easily access and listen to information about commonly-used communications system features. Any user can access the Tutorusers do not have to be voice messaging system subscribers.
Tutor provides information about the following subjects:
■ System phone features such as ringing patterns, volume control,
speakerphone, display, buttons, and lights.
■ Various types of internal calls including group paging calls, voice interrupt on busy calls, and hands-free answer on intercom calls.
■ System features such as Conference, Transfer, Auto Dialing, Personal
Speed Dialing, Last Number Redial, and Save Number Redial.
To access the Tutor menu, users simply make a call to the voice messaging system. The system plays:
Welcome to PARTNER MAIL VS. Please enter extension and #. Otherwise, to access PARTNER Tutor, press * 4.
When users dial
*4
, they hear instructions for using Tutor, followed by a list of topics and subtopics. The user can then enter the topic and subtopic numbers of their choice. Refer to Using the Tutor Feature in Chapter 5 for a list of topic and subtopic numbers.Instruction labels, which are designed for placement in the handset cradle on the base of the system phone, are shipped with the voice messaging system hardware.
Languages
The voice messaging system supports multiple languages. You can choose to have outside callers hear all voice prompts and customized messages in one of the supported languages (Monolingual Mode) or you can let outside callers choose between two available languages preselected for the system by the System Manager (Bilingual Mode).
Overview
Voice Messaging Services
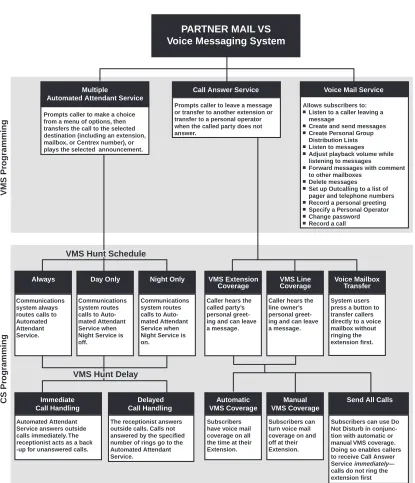
The voice messaging system provides three types of service:
■ Automated Attendant Service. Answers outside calls and transfers them to the destination selected by the caller or plays an Announcement selected by the caller.
■ Call Answer Service. Allows the caller to leave a message or to transfer to another extension if the called party is busy or does not answer.
■ Voice Mail Service. Allows subscribers to listen to messages and manage their own mailbox.
Voice Messaging Services
Figure 1-1. Voice Messaging Service
Always Day Only Night Only VMS Extension
Coverage VMS LineCoverage Voice MailboxTransfer
Immediate Call Handling Delayed Call Handling Automatic VMS Coverage Manual VMS Coverage
Send All Calls
Communications system always routes calls to Automated Attendant Service.
Communications system routes calls to Auto-mated Attendant Service when Night Service is off.
Communications system routes calls to Auto-mated Attendant Service when Night Service is on.
Caller hears the called party’s personal greet-ing and can leave a message.
Caller hears the line owner’s personal greet-ing and can leave a message.
System users press a button to transfer callers directly to a voice mailbox without ringing the extension first.
Automated Attendant Service answers outside calls immediately. The receptionist acts as a back -up for unanswered calls.
The receptionist answers outside calls. Calls not answered by the specified number of rings go to the Automated Attendant Service.
Subscribers have voice mail coverage on all the time at their Extension.
Subscribers can turn voice mail coverage on and off at their Extension.
Subscribers can use Do Not Disturb in conjunc-tion with automatic or manual VMS coverage. Doing so enables callers to receive Call Answer
Service —
calls do not ring the extension first
immediately
VMS Hunt Delay VMS Hunt Delay
CS Pr
ogramming
PARTNER MAIL VS Voice Messaging System
VMS Pr
ogramming
VMS Hunt Schedule VMS Hunt Schedule
Call Answer Service Multiple
Automated Attendant Service
Voice Mail Service
Prompts caller to make a choice from a menu of options, then transfers the call to the selected destination (including an extension, mailbox, or Centrex number), or plays the selected announcement.
Prompts caller to leave a message or transfer to another extension or transfer to a personal operator when the called party does not answer.
Allows subscribers to: Listen to a caller leaving a message
Create and send messages Create Personal Group Distribution Lists Listen to messages Adjust playback volume while listening to messages Forward messages with comment to other mailboxes
Delete messages Set up Outcalling to a list of pager and telephone numbers Record a personal greeting Specify a Personal Operator Change password Record a call
Overview
Automated Attendant Service
The Automated Attendant Service can answer and route outside calls without assistance from a receptionist. Release 5.0 offers four Automated Attendants, allowing the incoming lines that are directed to the voice messaging system to be answered by separate Automated Attendants. The System Manager is
responsible for assigning lines to the appropriate Automated Attendant. By programming multiple Automated Attendants, you can customize how calls are answered for separate areas of your business that use different sets of lines.
After an outside call is answered, the Automated Attendant Service plays a customized message (called the menu prompt). Typically the message welcomes callersto let them know they have reached the correct number then offers callers a menu of options for transferring to the desired party or listening to an Announcement. (It is recommended that the menu offer not more than five options to avoid confusing callers.) A call can be transferred to an extension number (including the receptionists), preprogrammed mailbox number, or to a preprogrammed Centrex number.
With the Multiple Automated Attendant feature, you can record up to two Announcements for each Automated Attendant. Note that each of these Automated Attendants operates in the same language (or language
combinations, if the system is configured for Bilingual Mode). Announcements are often used to answer frequently asked questions, such as business hours and location, emergency service, special offers, etc. Each Announcement can be up to four minutes in length. Callers can choose to listen to these
Announcements, so your staff has more time to answer other calls and perform other tasks.
For each Automated Attendant, you can customize the menu prompt for use during normal business hours (called the Day Menu Prompt) and for use after normal business hours (called the Night Menu Prompt). For example, you can set up Automated Attendant Service so that callers hear the following prompt during the day if the system is set for Monolingual Mode and the System Language is U.S. English:
Thank you for calling the ANY Travel Agency. We’re open Monday through Saturday from 9 to 5. If you know the extension you want, dial it now. For getaway package information, press 3. For airline or hotel reservations, press 4. For other assistance, press 0 or remain on the line. To replay this message, press * 4.
Note that callers who want general information regarding the current discount travel package or agency location can choose to listen to an Announcement. For
example, when callers press
3
they hear the following Announcement:Are you tired of battling the ice, snow, and
Voice Messaging Services
Puerto Rico for $439 per person, including hotel and airfare. To speak to an agent about this package or other winter getaways, press * 8 and extension 13.
For after-hours callers, you can set up Automated Attendant Service to play this prompt:
You have reached the ANY Travel Agency. Our hours are 8 to 5, Monday through Friday. Please press 9 to leave a message and we will return your call when the office opens.
For a system set for Bilingual Mode, the Day Menu Prompt should let callers know that they can switch from the Primary Language to the Secondary
Language. Note that callers can also press
*1
while listening to an Automated Attendant Announcement to switch between the Primary and SecondaryLanguages. In the following example, the Primary Language is Latin American Spanish and the Secondary Language is U.S. English:
Gracias por llamar a Software México. For English, press * 1. Si usted tiene teléfono de tonos y conoce el número de extensión, marquelo ahora. De lo contrario, espere a ser atendido por nuestra operadora.
For after-hours callers, you can set up Automated Attendant Service to play this prompt:
Gracias por llamar a Software México. For English, press * 1. Nuestro horario de oficina es de 9 a 14:30 horas y de 16 a 18 horas. Si usted tiene teléfono de tonos y conoce el número de la extensión a la que desea llamar, marquelo ahora. De lo contrario, espere y deje un mensaje con la operadora.
NOTE:
When the system is installed initially, Automated Attendant Service has this factory-set Day Menu Prompt:
Hello, welcome to PARTNER MAIL VS. Please enter the extension number of the person you wish to reach or press 0 to reach the receptionist.
Overview
In addition, Automated Attendant Service has this factory-set Night Menu Prompt:
Good Evening. Welcome to PARTNER MAIL VS. Please enter the extension number of the person you wish to reach, or press 9 to leave a message with the receptionist.
Automated Attendant Service is useful for many businesses, such as car dealerships, insurance agencies, and stores. For example, a car dealership can use Automated Attendant Service to allow its customers to reach the customer service department directly (even if that department is located elsewhere and is connected to the business by Centrex service). This frees sales people to handle customer transactions while the Automated Attendant Service transfers service calls to the appropriate department. In this case, the Automated Attendant Service can be programmed to prompt the caller to enter a single digit to reach any available customer service representative.
Communications System Features Affecting
Automated Attendant Service
When planning Automated Attendant Service for each Automated Attendant, you must choose settings for the following communications system features:
■ Group Call Distribution. Specifies the outside lines that are to be answered by each Automated Attendant Service.
■ VMS Hunt Delay. Specifies whether the Automated Attendant Service is to provide immediate or delayed call handling.
■ VMS Hunt Schedule. Specifies when the communications system is to route calls to the Automated Attendant Service.
■ Transfer Return Extension. Specifies where unanswered calls are transferred by the voice mail system.
Each of these features is explained briefly below. For more information about these communications system features, see the Programming and Use guide for your communications system.
Group Call Distribution
This feature lets you specify the outside lines for which you want Automated Attendant Service coverage. You can specify some or all of your company's outside lines.
VMS Hunt Delay
Voice Messaging Services
On PARTNER ACS Release 3.0 or later, you can specify the VMS Hunt Delay by the number of rings (from 0 to 6) after which the Automated Attendant Service answers calls. You can specify this on a per-line basis. The greater the number of rings, the greater the delaygiving the receptionist more time to answer a call before it is routed to the Automated Attendant Service. Note that the number of rings you specify for this option will depend on whether you subscribe to Caller ID service from your local telephone company. (See Chapter 4 for more
information.) You can also specify different settings for day and night operation.
For all other communications systems, you can choose one of the following settings, which will be used for both day and night operation:
■ Immediate (factory setting). The Automated Attendant Service answers outside calls on the second ring (default) and plays the Day or Night Menu Prompt. The receptionist can act as backup. Callers using rotary phones or callers requesting assistance can be transferred to the receptionist's extension.
■ Delayed. The Automated Attendant Service answers outside calls after the fourth ring. This delay gives the receptionist time to answer the call.
VMS Hunt Schedule
This feature determines when the communications system is to route calls to the Automated Attendant Service. On the PARTNER ACS Release 3.0 or later, this feature allows you to specify this information for each line. For all other communications systems, the information you specify applies to all lines receiving Automated Attendant Service. VMS Hunt Schedule works in
conjunction with the communication system's Night Service feature so that the voice messaging system can play the appropriate menu prompt. In other words, the menu prompt the caller hears depends on the VMS Hunt Schedule setting you select and the status of the Night Service button at the receptionist's extension.
You can choose one of the following VMS Hunt Schedule settings:
■ Always (factory setting). Routes outside calls to Automated Attendant Service for call handling all the time. When Night Service is off, the Day Menu Prompt plays; when Night Service is on, the Night Menu Prompt plays.
■ Day Only. Routes outside calls to Automated Attendant Service only when Night Service is off. The Day Menu Prompt plays.
■ Night Only. Routes outside calls to Automated Attendant Service only when Night Service is on. The Night Menu Prompt plays.
Transfer Return Extension
Overview
you have programmed. The call rings at this extension until it is answered. For extensions that do not have Voice Mail coverage, this option can be programmed to ensure that unanswered calls transferred by the mail system return to the designated extension, where they ring until answered.
Automated Attendant Service Scenarios
The following sample scenarios illustrate typical ways in which Automated Attendant Service for an individual Automated Attendant is set up with the communications system features:
■ Case 1: The receptionist is the primary call handler both day and night. Automated Attendant Service handles overflow.
1. Use Group Call Distribution (#206) Setting 1 to identify the lines to be answered by Automated Attendant Service.
2. Set VMS Hunt Schedule (#507) to Always. 3. Set VMS Hunt Delay (#506) to Delayed.
■ Case 2: Automated Attendant Service is the primary call handler.
1. Use Group Call Distribution (#206) Setting 1 to identify the lines to be answered by Automated Attendant Service.
2. Set VMS Hunt Schedule (#507) to Always. 3. Set VMS Hunt Delay (#506) to Immediate.
■ Case 3: The receptionist answers calls during the day; Automated
Attendant Service answers calls at night.
1. Use Group Call Distribution (#206) Setting 1 to identify the lines to be answered by Automated Attendant Service.
2. Set VMS Hunt Schedule (#507) to Night Only. 3. Set VMS Hunt Delay (#506) to Immediate.
Music On Hold
If you use Automated Attendant Service, you also may want to use the
communications system's Music On Hold feature. When Music On Hold is Active and an audio source is connected to the system, callers waiting to be transferred hear music or recorded material. If Music On Hold is Not Active, callers hear tones, ringing, or silence (depending on how the communications system is set up) while they are being transferred.
Voice Messaging Services
Call Answer Service
This service offers callers the following options when they reach an extension that is unable to answer their call:
■ If the system is in Bilingual Mode, press
*1
while listening to the personal greeting to switch between the Primary and Secondary Languages.■ Leave a detailed, confidential message in the called party's mailbox.
■ Press
0
to transfer to the receptionist's extension for assistance or to the extension (or Guest Mailbox) administered as the Personal Operator.■ Press
*8
to transfer to another system extension.Callers can press
0
or*8
before, during, or after leaving a message.NOTE:
Until subscribers record a personal greeting for their mailbox, outside callers hear this factory-set message in either the System Language (Monolingual Mode) or the Primary Language (Bilingual Mode):
Extension XX is not available. To leave a message, wait for the tone. After recording hang up or press 1 for more options.
Communications System Features Affecting Call
Answer Service
Call Answer Service works with the following communications system features:
■ VMS Extension Coverage
■ Do Not Disturb
■ VMS Line Coverage Extension
■ Voice Mailbox Transfer
Overview
VMS Extension Coverage
VMS Extension Coverage may be either automatic or manual.
■ Automatic VMS Coverage: When the communications system's Automatic VMS Cover feature (#310) is Assigned for an extension, intercom and transferred callers can leave messages or transfer to another extension when the called person does not answer by the fourth ring (or by the number of rings specified with the communications
system's VMS Cover Rings feature (#321 on PARTNER ACS Release 3.0 or later, #117 on all other communications systems)1. The system greets the caller with the subscriber's personal greeting (or with the system greeting if a personal greeting is not recorded). If the system is in Bilingual Mode and the subscriber recorded a personal greeting in two languages, the
caller can switch between the two languages by pressing
*1
.■ Manual VMS Coverage: Regardless of the Automatic VMS Cover setting, the communications system allows subscribers to press a programmed button to turn voice mail coverage on and off at their extension. To make this possible, the VMS Cover feature (F15) must be programmed on a button with lights on the subscriber's system phone.
Do Not Disturb
The Do Not Disturb button can be used to prevent calls for the extensions from audibly alerting (lights still flash). Subscribers (with PARTNER II Communications System 4.0 or any PARTNER ACS release) who have VMS Extension Coverage either automatic or manualcan use this communications system feature when they want calls sent to their mailboxes immediately.
Line Coverage Extension
Line Coverage Extension (#208) identifies an extension as the line owner of a specific outside line so unanswered calls on that line will be sent to the owners voice mailbox when either Automatic VMS Cover (#310) or VMS Cover (see Manual VMS Coverage above) is on at the owners extension. Typically, line coverage is assigned to lines, such as personal lines, that are not assigned Automated Attendant Service coverage. You can use VMS Cover Rings (#321 on PARTNER ACS Release 3.0 or later, #117 on all other communications systems) to specify the number of times calls ring before they are sent to the line owners mailbox.
VMS Line Cover
As an alternative to Line Coverage Extension, you can program VMS Line Cover (#206, Option 3). Calls are routed directly to the voice mailbox of a specific user after four rings, when you program VMS Line Cover for the lines assigned to Hunt Group 7 and assign a line owner in the voice messaging system.
Voice Messaging Services
Voice Mailbox Transfer
A Voice Mailbox Transfer (F14) button can be programmed on a user's phone to transfer callers directly to a subscriber's mailbox without ringing the extension first. This feature is useful when a user is handling calls for a subscriber who is not at his or her desk or when transferring calls to a guest mailbox.
Voice Mail Service
This service allows subscribers to manage their own mailboxes. With it, a subscriber can:
■ Create and send messages to other system mailboxes.
■ Listen to messages, then save or delete them.
■ Forward messages with comment to another subscribers mailbox.
■ Record a personal greeting (in Bilingual Mode, the user may record his or
her personal greeting in both the Primary and Secondary Languages).
■ Create and maintain Personal Group Lists.
■ Change the default password for his or her mailbox to ensure that
messages are kept confidential.
■ Listen to a caller leaving a message in the subscribers mailbox. (Note that this feature is available only to subscribers using a PARTNER ACS Release 3.0 or later.)
■ Specify a Personal Operator for their mailbox.
■ Have the system outcall a list of specified telephone and pager numbers
according to a predefined schedule whenever a new message is received.
■ Transfer to another extension or to the receptionist's extension.
■ Listen to and forward recorded conversations at your extension. (Note that this feature is available only to subscribers using a PARTNER ACS Release 3.0 or later with a 4-port PARTNER MAIL VS R5.0 configuration for whom the System Manager has administered the feature.)
■ Adjust the playback volume while listening to messages. To increase the
volume of messages being played back, press
4
, or press7
to decrease the volume.A subscriber's extension number and mailbox number are the same. When a caller leaves a message, the voice messaging system places the message in the subscriber's mailbox, and turns on the message light (if available) at the
Overview
subscriber can also define the time interval between outcall attempts and the number of times the list of Outcalling numbers is dialed for each attempt.
Subscribers can retrieve messages at their convenience from any touch-tone phone either while on-site or from an off-site location. The system informs subscribers of the number of new and old (saved) messages in their mailboxes, and plays new messages first. Subscribers can refer to their Using PARTNER MAIL VS® booklet for instructions on recording a personal greeting, changing a password, forwarding a message, specifying an outcall list and schedule for Outcalling, and performing other Voice Mail Service procedures.
Voice Mail Service also allows the System Manager to program the voice messaging system. See Voice Messaging System Programming in Chapter 3 for more information.
When subscribers call into the Voice Mail Service, they hear this factory-set prompt in either the System Language (Monolingual Mode) or the Primary and Secondary Language (Bilingual Mode):
Welcome to PARTNER MAIL VS. Please enter extension and #. Otherwise, to access PARTNER Tutor, press * 4.
The System Manager can change, on a per mailbox basis, the language subscribers hear after they access their mailboxes. The mailbox language can be different from the System Language selected in Monolingual Mode or the Primary and Secondary Languages selected in Bilingual Mode.
Mailboxes
The voice messaging system provides 48 mailboxes, which are assigned to extensions 10 through 57.
NOTE:
To protect system security, the System Manager should delete any unused mailboxes.
Guest Mailboxes
Security
Security
The System Manager is responsible for the security of the system. It is important that you fully understand and appropriately administer this product to reduce your risk of incurring charges that result from unauthorized use of the system. Under the law, you, the customer are responsible for paying part or all of those unauthorized calls.
Be aware that criminals called hackers may attempt to gain unauthorized access to your communications system and your voice mail system. Hackers often try to trick a companys employees into providing them with access to an outside line or an outside operator. They may also concentrate their activities in two areas related to the mail system:
■ They try to dial into a mailbox, then execute a transfer by dialing
*8
. Then they dial an access code, followed by a digit string to either direct dial or access a network operator to complete the call.■ They try to locate unused or unprotected mailboxes and use them as
drop-off points for their own messages.
System Security Guidelines
To reduce the risk of unauthorized use of your communications and voice mail systems, you should
■ require that the System Managers Password be changed from the factory
setting. Use a hard-to-guess value.
■ delete any unused mailboxes immediately.
■ require all employees who have voice mailboxes to use passwords to
protect their mailboxes.
■ permit no Outcalling or permit this privilege only for those with legitimate business need.
■ advise subscribers to change their passwords (a 4-digit password is
recommended) when they log into the Voice Mail Service for the first time and frequently thereafter. Subscribers can refer to the instructions for
changing their passwords in Using the PARTNER MAIL VS®.
■ familiarize yourself with the impact of the Outcalling feature on system performance and security. If Outcalling is not permitted on the system, Outgoing Call Restriction should be set to Inside Only for the voice mail system extensions. It is strongly recommended that you use the
Overview
You should also
■ provide effective physical security for the room containing your
telecommunications equipment and the room with administrative tools, records, and System Administration information. These areas should be locked when unattended.
■ provide a secure trash disposal for all sensitive information, including your companys telephone directories, call accounting records, or anything that may supply information about your communications system. This trash should be shredded.
Security Policy and User Education
As part of your responsibility for protecting system security, you should establish and communicate security policies for all system users. You should let users know what measures they should take to protect system security and explain how hackers may try to gain access to the system. In particular, you should provide users with the following information:
■ All reports of trouble, requests to move extensions, or any other
administrative details associated with the communications system or the voice mail system should be handled by one person (the System
Manager) or within one department. Anyone claiming to be a telephone company representative should be referred to this person or department.
■ If a caller claims to be an authorized telephone company representative,
verify his or her identity before permitting that person any access to the system.
■ Establish well-controlled policies for passwords:
Establish a specific date for changing passwords (for example, the first of each month) and help users remember to do it.
Advise subscribers to use a 4-digit password.
Tell users that passwords should not be recycled. They should be hard to guess and should not contain:
■ all the same numbers (for example, 4444)
■ sequential characters (for example, 1234)
■ personal information that can be associated with them (such
as their name, birthdate, telephone number, or social security number)
Discourage the practice of writing down passwords. If a password needs to be written down, keep it in a secure place and never discard it while it is still active.
Security
■ Educate employees that hackers may try to trick them into providing them
with dial tone or dialing a number for them.
■ Ask users to tell you if any of the following suspicious activity occurs:
inability to log into Voice Mail
lost mail messages or altered greetings inability to get an outside line
series of calls where there is silence on the other end or the caller hangs up
sudden increase in wrong numbers caller complaints that your lines are busy
callers claiming to represent the phone company. Ask for a callback number.
callers trying to obtain sensitive information or asking for assistance in placing outside or long-distance calls. Ask for a callback
number.
increases in internal requests for assistance in making outside calls (particularly international calls or requests for dial tone).
■ Make users with Outcalling privileges aware of the potential risks and their responsibilities.
■ Never distribute the office telephone directory to anyone outside the company.
■ Collect old office telephone directories and shred them.
■ Never discuss your telephone systems numbering plan with anyone
outside your company.
Overview
System Manager Activities Checklist
For each new PARTNER MAIL VS system, perform the following activities:
■ Complete the communications system and voice messaging system
planning forms (see Chapter 3).
■ Install the voice messaging system (see Chapter 2).
■ Change the factory-set password for the System Managers login (99) in
the voice messaging system (see Chapter 5).
■ Change the System Administration Programming Language, if necessary
(see Chapter 4).
■ Complete the appropriate communications system and voice messaging
system programming (see the Initial Programming Checklist in Chapter 4).
■ Verify system operation (see Chapter 4).
■ Generate a System Configuration Report (see Chapter 4).
2
Installation
This chapter provides instructions for installing the voice messaging system's hardware in the communications system's control unit. It also includes
instructions for connecting a printer to the system to allow you to print the System Configuration Report.
Before You Start
Refer to Appendix A to verify that you have the appropriate voice messaging system and communications system hardware. Then
■ Make sure the communications system control unit, processor module(s),
and line/extension modules have been installed.
Installation
Installing the PARTNER MAIL VS
Module
To install the voice messaging system module in the communications system's control unit:
1. Turn off power to the communications system's control unit: either pull out the main circuit breaker on the upper right rear corner of the control unit or move the on/off switch to the off position, or remove the power cord from the AC outlet.
!
CAUTION:
Failure to turn off power may damage the control unit and/or the voice messaging system.
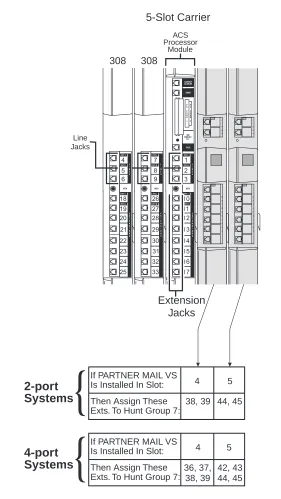
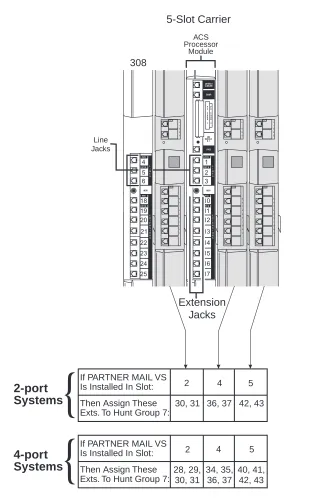
2. Install the voice messaging system module in the first available slot to the right of the last installed communications system module (in a 5-slot configuration). Keep in mind the following guidelines:
The voice messaging system module should always be installed after the communications system modules to ensure consecutive extension numbering.
On the PARTNER Endeavor or Advanced Communications System, you must install the voice messaging system module in the slot to the right of the PARTNER ACS module in the 2-slot carrier (see Figure D- 4 in Appendix D).
If your system has a 5-slot carrier, you may install the voice messaging system module in any slot except the center slot (see Figure 2-1, as well as Figures D-1, D-2, D-3 in Appendix D). If the control unit is upgraded with more communications system
modules, the voice messaging system module should be removed, the new modules should be installed, and the voice messaging system module should be installed in the first available slot after the communication system modules. The VMS Hunt Group Extensions and Transfer Return Extensions must then be reprogrammed (see Chapter 4).
Do not install the voice messaging system module in the first slot of the PARTNER Plus system control unit or the PARTNER II system primary carrier (see Figure D-5).
NOTE:
Installing the PARTNER MAIL VS Module
3. Refer to Figure 2-1 or to the figures in Appendix D, which illustrate the most common configurations and dial plans, to determine the dial plan for your system. Then record the extensions associated with the PARTNER MAIL VS module on Form B1 of the System Planner for the
communications system.
Note that the communications system recognizes the voice
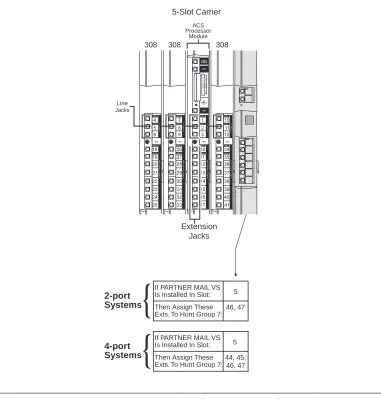
messaging system module as a 6-extension module (such as a 200, 206, or 400 module). Therefore, Figure 2-1 depicts the voice
messaging system module as a (shaded) 6-extension module, which is how it appears to the communications system, even though the voice messaging system module has no physical line jacks.
1 2 3 10 11 12 13 14 15 16 17 5-Slot Carrier Extension Jacks ACS Processor Module Line Jacks L I N E S PFT E X T E N S I O N S PFT
If PARTNER MAIL VS Is Installed In Slot:
Then Assign These Exts. To Hunt Group 7:
5
46, 47
2-port Systems
If PARTNER MAIL VS Is Installed In Slot:
Then Assign These Exts. To Hunt Group 7:
5
44, 45, 46, 47
4-port Systems
4 7 10
5 8 11
6 9 12
18 26 34
19 27 35
20 28 36
21 29 37
22 30 38
23 31 39
24 32 40
25 33 41
Installation
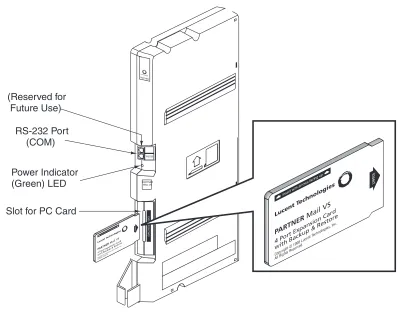
Figure 2-2. Installing the PC Card
4. To install the PC Card (that is, a 2-Port Card with Backup and Restore or 4-Port Expansion Card with Backup and Restore), insert the card in the vertical slot on the lower frontof the voice messaging system module (see the area labeled Slot for PC Card in Figure 2-2). Make sure the arrows on the card label face up and in. Also make sure the card is pushed in all the way.
NOTE:
After you have administered the voice messaging system for the first time, it is recommended that you perform a system backup. See Chapter 4 for details.
Installing the PARTNER MAIL VS Module
6. After the voice messaging system module is powered up, it performs some self-diagnostic tests. When these tests are complete the LED on the voice messaging system module works as follows:
If the LED lights steady red (that is, the test failed), do the following: Power down the voice messaging system.
Re-install the PC Card.
Power up the control unit again.
If the LED lights steady red again, contact your local Authorized Dealer or the Lucent Technologies Technical Service Center at 1 800 628-2888. 7. At this point, do one of the following:
■ To determine which voice messaging system and communications
system planning forms must be completed before you begin programming, see Chapter 3.
■ To review system programming guidelines, see Chapter 3.
■ To review the programming required for your PARTNER Voice
Messaging System, refer to the Initial Programming Checklist in Chapter 4, and complete the appropriate procedures included in that chapter.
■ To update PARTNER Voice Messaging System programming, refer
to Chapter 5 or to the System Programming Reference pages at the end of this guide.
LED Color and Pattern State
Steady Green ON
Installation
Connecting a PC to the
PARTNER MAIL VS
You can generate a Configuration Report in the PARTNER MAIL VS system and send it to your PC, where it is saved in a text file that you can open and print. See the instructions for generating a Configuration Report in chapters 4 and 5.
To connect a PC to the PARTNER MAIL VS, you need the following equipment:
■ a PC with an available serial (COM) port and running Windows 95,
Windows NT 4.0 or later, or Windows 98
■ a D8W-87 cable
■ an AT&T 355A connector (or equivalent)
■ a 25-pin female-to-female connector
■ a 25-pin to 25-pin serial cable
■ a 9-pin to 25-pin adapter (if your PC has a 9-pin serial (COM) port)
To connect your PC to the PARTNER MAIL VS: 1. Turn off your PC.
2. Connect the D8W-87 cable to the PMVS serial port (see the area labeled COM in Figure 2-2).
3. Connect the other end of the D8W-87 cable to the AT&T 355A connector. 4. Connect the 25-pin female-to-female connector to the AT&T 355A
connector.
5. Connect the 25-pin to 25-pin serial cable to the 25-pin female-to-female connector.
6. Perform one of the following steps:
If your PC has a 25-pin serial (COM) port, connect the other end of the 25-pin to 25-pin serial cable to the serial (COM) port on your PC.
If your PC has a 9-pin serial (COM) port, connect the 9-pin to 25-pin adapter to the other end of the 25-pin to 25-pin serial cable, and then connect the 9-pin connector into the serial (COM) port on your PC.
3
Understanding Programming
This chapter provides general programming information for the communications system and the voice messaging system. Both systems must be programmed so they can work together as an integrated unit. Before you begin any
programming, you must ensure that all required communications system and voice messaging system planning forms described in this chapter are completed. You will refer to these forms during programming.
Communications System
Programming
When the communications system is installed, it uses factory settings that reflect the most common usage of the equipment. You can change these settings as required to customize them for the business.
You can program the communications system from extension 10. Some systems also allow programming from extension 11. Check the Programming and Use guide for the communications system for more information. If your system supports programming from both extensions, you may find it more convenient to program from extension 11. This capability allows the receptionist to continue handling calls at extension 10 while you program.
System Programming changes settings for the system as a whole, or for individual lines or extensions. (Refer to the Programming and Use guide for the communications system for more information about System Programming options.)
Understanding Programming
Planning Forms
Refer to the communications system's System Planner when you are changing system settings, and be sure to record any changes you make. The following forms from the System Planner contain information about the voice messaging system:
■ Form A: System Configuration. Contains basic information about the system including the line number and type of voice messaging service required for each line.
■ Form B1: System Extensions. Contains basic information about each extension. This includes the type of phone or auxiliary equipment at the extension, and the name of the user or a description of how the extension is used.
■ Form B2: Customized Extension Settings. Contains feature settings, such as Automatic VMS Cover and Automatic Extension Privacy, and group assignments for each extension.
■ Form C: Button Assignments. Specifies which features are
Communications System Programming
Using the Forms
The following table shows what procedures should be used and to which communications systems forms they correspond in planning for voice mail system installation and programming:
To Use Feature/Procedure Complete
CS Form
Assign the extensions associated with the VMS
hardware to Hunt Group 7. Hunt Group Extensions (#505)
B2
Assign lines to Hunt Group 7 so calls can ring di-rectly to the VMS and receive Automated Attendant Service.
Group Call Distribution
(#206, Option 1) B1
Assign lines to Hunt Group 7 so calls can ring
di-rectly to the VMS and receive Call Answer Service. Group Call Distribution (#206, Option 3) B1 Identify an extension as an owner of an outside line
so calls on that line can ring directly to the owners voice mailbox when Automatic VMS Cover or VMS Cover is on at owners ext.
Line Coverage Extension
(#208) A, B2
Determine how quickly outside calls should be an-swered by the Automated Attendant Service of the VMS (i.e., by the number of rings on PARTNER ACS Release 3.0 or later; immediate or delayed call handling on all other systems). On PARTNER ACS Release 3.0 or later, this feature can be ad-ministered on a per-line basis and differently for day and night.
VMS Hunt Delay (#506) A
Determine when outside calls should ring the VMS Hunt Group (always, day only, or night only) de-pending on the status of the Night Service Button at ext. 10. On PARTNER ACS Release 3.0 or later, this feature can be administered on a per-line ba-sis.
VMS Hunt Schedule (#507)
A
Determine whether an extensions unanswered in-tercom and transferred calls and outside calls on lines assigned ownership (#208) are automatically covered by the VMS.
Automatic VMS Cover
(#310) B2
Specify the number of times intercom and trans-ferred calls or outside calls on lines assigned own-ership ring at extensions before they are sent to the VMS.
VMS Cover Rings (#117; on PARTNER ACS Re-lease 3.0 or later #321)
A
Identify the extension to which a call transferred by
the VMS should be routed if the destination exten- Transfer Return Exten-sion (#306)
Understanding Programming
Using System Programming
System Programming requires a system display phone at extension 10
(or 11 if available), with a programming overlay placed over the phone's dialpad. System Programming procedures are identified by # and a 3-digit code (for example, the procedure code for System Date is #101).
You can program the system in one of two ways:
■ Direct Method. You access a programming procedure directly by dialing the code for that procedure. This method works best when you are using only a few procedures during the programming session, and you know the
codes. For example, press
#101
to change the system date.■ Cycle Method. You cycle through a sequence of procedures in numerical
order by pressing
N
orP
. You should use thismethod when programming the communications system for the first time, or when you are changing a series of related settings. However,
procedures #399, #609, and #728 are skipped when you cycle through procedures.
NOTE:
You can talk on the telephone while you program. This is useful if you need to call for support while programming. However, you must place the call before you enter programming mode, and you must use the handset (not the speakerphone) to talk.
The Programming Overlays
During System Programming, the normal functions of several buttons on the
phone at extension 10 (or 11 if available) change. For example, left
i
becomes
s
, which is the button used to enter programming mode. Toidentify these buttons while programming, place the appropriate programming overlay provided with the system over the dialpad of the phone at extension 10 or 11.
Use the following special buttons while programming:
■
N
andP
cycle forward and backward through theprogramming procedures.
■
n
andp
cycle forward and backward through a procedure'sparameters. A parameter is typically an outside line, an extension, or a telephone list entry.
■
D
andd
cycle forward and backward through the valid listentries. These buttons work only for fixed data, such as a line or extension number. They do not work for variable data such as date, time, password, telephone numbers, or doorphone assignments.
Communications System Programming
■
e
ends an entry of variable length, such as a telephone number in anAllowed Phone Number List.
■
s
starts the System Programming process.■
c
starts the Centralized Telephone Programming process (thatis, customizing individual telephones from extension 10, or 11 if available).
■
f
, when followed by00
, enters or exits programming mode.Programming Mode
To enter programming mode:
1. At extension 10 (or 11 if available), make sure the programming overlay is in place over the system phone's dialpad.
2. Press
f00
.3. Press
ss
.4. Enter the System Password, if required.
Understanding Programming
Voice Messaging System Programming
Before you program the voice messaging system, obtain completed copies of planning forms for the communications system and the voice messaging system. These forms provide the names, extensions, mailboxes and other information required to program the voice messaging system.
Planning Forms
You need the following forms for the voice messaging system:
■ Form 1: Language. Shows the Language Mode, Monolingual or Bilingual. Also specifies the System Language for Monolingual Mode or the Primary and Secondary Language for Bilingual Mode. It also shows the System Administration Prompt Language, in which programming prompts are played.
■ Form 2: Mailbox Assignments. Shows factory-set mailbox assignments. Allows you to delete mailbox assignments, to indicate whether Outcalling capability and Record-a-Call permission are assigned, and to identify the language used for each mailbox.
■ Form 3: Menu Definition. Shows the lines assigned to an Automated Attendant, the Dial 0/Timeout Extension, and transfer options for
Automated Attendant Service. Allows you to specify the action to be taken for each selector code. (A separate copy of this form should be made for each Automated Attendant.)
■ Form 3A: Automated Attendant Announcement—System Language
or Primary Language. Shows the announcement number(s) and the
script(s) used to record the associated announcement(s) in the System Language for Monolingual Mode or the Primary Language for Bilingual Mode. You can record up to two announcements. (A separate copy of this form should be made for each Automated Attendant.)
■ Form 3B: Automated Attendant Announcement—Secondary
Language. Used only if the system is set for Bilingual Mode. Shows the
announcement number(s) and the script(s) used to record the associated announcement(s) in the Secondary Language for Bilingual Mode. You can record up to two announcements. (A separate copy of this form should be made for each Automated Attendant.)
■ Form 4: Day Menu Prompt—System Language or Primary Language. Shows the script used to record the Day Menu Prompt in the System Language for Monolingual Mode or the Primary Language for Bilingual Mode. (A separate copy of this form should be made for each Automated Attendant.)
Voice Messaging System Programming
■ Form 5: Night Menu Prompt: System Language or Primary Language. Shows the script used to record the Night Menu Prompt in the System Language for Monolingual Mode or the Primary Language for Bilingual Mode. (A separate copy of this form should be made for each Automated Attendant.)
■ Form 5A: Night Menu Prompt: Secondary Language. Used only if the system is set for Bilingual Mode. Shows the script used to record the Night Menu Prompt in the Secondary Language. (A separate copy of this form should be made for each Automated Attendant.)
Understanding Programming
Using the Forms
The following table shows which voice mail system forms should be completed according to your voice mail system feature selection:
To Use VMS
Form
From Programming Main Menu, press
Select Language Mode, System Administration Prompt Language, System Language, Primary and Secondary Language
1
1
Assign Mailboxes to subscribers, identify Mailbox Language and Outcalling and Record-a-Call privileg-es, administer Mailbox Message Length and Size
2
4
Identify lines assigned to an Automated Attendant, Dial 0/Timeout Extension, Menu Definition (i.e., Direct Extension Transfer, Selector Code Transfer, Centrex Transfer, Mailbox Transfer, and Announcements), Ext. # or Group # for Selector Code Transfer, or Annc. #. Required for Automated Attendant Service.
3
3
Script Automated Attendant Announcements (in
Sys-tem or Primary Language). Required if Annc. # is
assigned to a Selector Code.
3A
3
Script Automated Attendant Announcements (in
Sec-ondary Language). Required for Bilingual Mode if
Annc. # is assign