585-310-748
Comcode 107889354
Issue 2
January 1997
Notice
Every effort was made to ensure that the information in this book was complete and accurate at the time of printing. However, information is subject to change. Your Responsibility for Your System’s Security
Toll fraud is the unauthorized use of your telecommunications system by an unauthorized party, for example, persons other than your company’s employees, agents, subcontractors, or persons working on your company’s behalf. Note that there may be a risk of toll fraud associated with your telecommunications system and, if toll fraud occurs, it can result in substantial additional charges for your telecommunications services.
You and your system manager are responsible for the security of your system, such as programming and configuring your equipment to prevent unauthorized use. The system manager is also responsible for reading all installation, instruction, and system administration documents provided with this product in order to fully understand the features that can introduce risk of toll fraud and the steps that can be taken to reduce that risk. Lucent Technologies does not warrant that this product is immune from or will prevent unauthorized use of common-carrier telecommunication services or facilities accessed through or connected to it. Lucent Technologies will not be responsible for any charges that result from such unauthorized use.
Lucent Corporate Security
Whether or not immediate support is required, all toll fraud incidents involving Lucent products or services should be reported to Lucent Corporate Security at 1 800 821-8235. In addition to recording the incident, Lucent Corporate Security is available for consultation on security issues, investigation support, referral to law enforcement agencies, and educational programs.
Lucent Technologies Fraud Intervention
If you suspect that you are being victimized by toll fraud and you need technical support or assistance, call Technical Service Center Toll Fraud Intervention Hotline at 1 800 643-2353.
Federal Communications Commission Statement
Part 15: Class B Statement. This equipment has been tested and found to comply with the limits for a Class B digital device, pursuant to Part 15 of the FCC Rules. These limits are designed to provide reasonable protection against harmful interference in a residential installation. This equipment generates, uses, and can radiate radio-frequency energy and, if not installed and used in accordance with the instructions, may cause harmful interference to radio communications. However, there is no guarantee that interference will not occur in a particular installation. If this equipment does cause harmful interference to radio or television reception, which can be determined by turning the equipment off and on, the user is encouraged to try to correct the interference by one or more of the following measures:
• Reorient the receiving television or radio antenna where this may be done safely.
• To the extent possible, relocate the receiver with respect to the telephone equipment.
• Where the telephone equipment requires ac power, plug the telephone into a different ac outlet so that the telephone equipment and receiver are on different branch circuits.
Part 15: Personal Computer Statement. This equipment has been certified to comply with the limits for a Class B computing device, pursuant to Subpart J of Part 15 of FCC Rules. Only peripherals (computing input/output devices, terminals printers, etc.) certified to comply with the Class B limits may be attached to this computer. Operation with noncertified peripherals is likely to result in interference to radio and television reception..
Part 68: Network Registration Number. This equipment is registered with the FCC in accordance with Part 68 of the FCC Rules. It is identified by an FCC registration number.
Part 68: Answer-Supervision Signaling. Allowing this equipment to be operated in a manner that does not provide proper answer-supervision signaling is in violation of Part 68 rules. This equipment returns answer-supervision signals to the public switched network when:
• Answered by the called station • Answered by the attendant
• Routed to a recorded announcement that can be administered by the CPE user
• A busy tone is received • A reorder tone is received
Canadian Department of Communications (DOC) Interference Information
This digital apparatus does not exceed the Class A limits for radio noise emis-sions set out in the radio interference regulations of the Canadian Department of Communications.
Le Présent Appareil Nomérique n’émet pas de bruits radioélectriques dépassant les limites applicables aux appareils numériques de la class A préscrites dans le reglement sur le brouillage radioélectrique édicté par le ministére des Communi-cations du Canada.
Trademarks
See the section titled “About This Book”. Ordering Information
Call: Lucent Technologies Publications Center
Voice 1 800 457-1235 International Voice 317 361-5353 Fax 1 800 457-1764 International Fax 317 361-5355 Write: Lucent Technologies Publications Center
P.O. Box 4100 Crawfordsville, IN 47933 Order: Document No. 585-310-748
Comcode 107889354 Issue 2, January 1997
You can be placed on a Standing Order list for this and other documents you may need. Standing Order will enable you to automatically receive updated versions of individual documents or document sets, billed to account information that you provide. For more information on Standing Orders, or to be put on a list to receive future issues of this document, please contact the Lucent Technologies Publications Center.
Warranty
Lucent Technologies provides a limited warranty on this product. Refer to the “Limited Use Software License Agreement” card provided with your package. European Union Declaration of Conformity
Lucent Technologies Business Communications Systems declares that XXX equipment specified in this document conforms to the referenced European Union (EU) Directives and Harmonized Standards listed below:
EMC Directive 89/336/EEC Low-Voltage Directive 73/23/EEC
The “CE” mark affixed to the equipment means that it conforms to the above directives.
Comments
To comment on this document, return the comment card at the front of the docu-ment.
Acknowledgment
This document was prepared by the Product Documentation Development group, Lucent Technologies, Denver, CO and
Contents
Page iii
Contents
Contents iii
■ Important Numbers and Codes
for Your Messaging System vii
■ Welcome 1
■ Call Your Mailbox 3
■ Get Around in Your Mailbox 4
Voice Prompts and Help 4
Basic Commands 5
■ Change Your Password 6
■ Record Your Name 7
■ Record a Greeting for Callers 8
Recording Your Basic Greeting 8
Recording a Special Greeting for
Voice/Fax Messages 9
Recording a Special Greeting for a
Personal Fax Extension 10
■ Get Messages You’ve Received 11
Multimedia Component Limits 11
Listening to a Voice/E-Mail Message 11
Responding to a Message 12
Acting on a Message 13
Handling a Call When You Hear Fax Tones 15
Option One ____ 15
Option Two ____ 15
Printing Fax/E-Mail Messages 15
Fax Print Prefixes 16
Printing All New Faxes at Once 16
Downloading a Fax or E-Mail to a
Modem-Equipped Computer 16
■ Record and Send Messages 18
Multimedia Component Limits 18
Sending a Voice or Voice-Fax Message 19
Sending a Fax-Only Message 21
Sending a Voice-Fax Message by Forwarding
Contents
Page iv
Sending a Multimedia Message by
Forwarding E-Mail and Attached Files 22
Enhanced Delivery Options 23
■ Leave a Message When a User Doesn’t Answer 25
■ Set Fax/E-Mail Print Options 27
Selecting Autoprint/Autodelete (Optional) 28
■ Create Mailing Lists 29
Deleting Addresses from a List 30
Scanning List Summaries 31
Reviewing and Modifying a List 31
■ Set the Message Medium You Want to Get First 32
Setting the Preferred Medium 32
■ Create and Use Multiple Personal
Greetings 33
Call Types 33
Defining Call Types the First Time 34
Changing Call Types 34
Assigning Greetings to Call Types 34
Activating Previously Recorded Greetings 35
Scanning All Greetings 36
■ Check and Reuse Outgoing or Filed
Messages 38
Checking the Status of Messages You’ve Sent 38
Changing and Re-sending a Message 39
Re-sending a Message 39
■ Create a Personal Directory 41
Creating and Appending a Directory 41
Reviewing and Deleting Entries from a Directory 42
■ How to Use Directory Assistance 43
■ Scan/Print Messages Quickly 44
■ How the System Interprets Text/E-Mail 45
Rules for Creating Text Messages You Send to
Phone Mailboxes 48
■ Joined Telephone and E-Mail
Mailboxes 49
Options to Join Mailboxes 49
Contents
Page v
■ Set Addressing Options 53
Addressing a Message Before Recording It 53
■ Leave Messages with the Guest
Password 55
Leaving a Guest Password Message 55
■ Tips and Highlights 57
General Message Handling 57
Getting Messages 57
Leaving Messages When No One Answers 60
Mailing Messages 60
■ Terms and Concepts 63
Contents
Page vii Important Numbers and Codes for Your Messaging System
Important Numbers and Codes
for Your Messaging System
This page lists the primary numbers and codes you need to use your multimedia messaging system effectively. If the blanks on this page have not been completed, call your system administrator for the proper codes/numbers.
■ System phone number: ___________
■ System default password: ___________
■ Your system administrator’s telephone number: ___________
■ Guest password: ___________
■ Your mailbox holds ______ minutes of greetings and messages. One fax page is
the equivalent of 40 seconds of a voice message. Two kilobytes of e-mail or a binary file is the equivalent of 1 second of a voice message.
■ A message can be up to _____ minutes in length.
■ A message expires and is deleted after _____ days in your mailbox.
■ Mail prefixes for remote locations:
■ Fax print prefix numbers:
■ Transfer into AUDIX code: _______________________
■ Joined mailbox polling time and
frequency: _____________________________ Prefix Description
_____________ _______________________________________
_____________ _______________________________________
_____________ _______________________________________
_____________ _______________________________________
See attachment for additional mailing prefixes.
_________ (prefix) and ________ (digits required, in-house system)
_________ (prefix) and ________ (digits required, local area)
_________ (prefix) and ________ (digits required, long-distance
_________ (prefix) and ________ (digits required,__________________)
Page viii Important Numbers and Codes for Your Messaging System
■ Available options for joined mailboxes (marked with X):
■ Current large list extensions:
For information about PC-based voice/fax message handling, see the Lucent Intuity Message Manager User’s Guide for your specific system.
AUDIX to E-mail Options
Lotus to E-mail Options
❑
Link❑
Link❑
Copy headers only❑
Copy headers only❑
Transfer❑
Transfer❑
Unread only❑
Unread only❑
Remove old copies❑
Remove old copies❑
Propagate expirationsList Extension Description
_____________ _______________________________________
_____________ _______________________________________
_____________ _______________________________________
_____________ _______________________________________
Page 1 Welcome
Welcome
With the INTUITYTM AUDIX® messaging system, you have the following capabilities using your telephone:
1. A binary file is a computer software file that you can look at with the appropriate software product. For example, you might receive binary files that you view and modify with Lotus® 1-2-3™ or Microsoft® Word™.
CAUTION: By sending or receiving an attached file, you might inadvertently spread a computer virus. Always check files you send or receive for viruses before running them.
Call Answering
The system answers calls when you can’t. Callers may then leave messages in your “mailbox.” Later, you can access your mailbox to get those messages.
Voice Mail You can record voice messages in advance and send them to the mailboxes of other users without actually calling their telephones.
Other users also can record and send voice mail messages directly to your mailbox. When convenient, you can access your mailbox to get those messages.
Fax Messaging
Callers can send faxes to your normal telephone number instead of to a fax machine. In addition, you and other users can:
■ Attach a fax to a voice mail message in a single call ■ Forward received faxes
■ Send faxes to printers, PCs, or laptop computers
■ Send or forward faxes to internal extensions, system mailing lists, and/or external numbers.
Text Message Storage and Retrieval
AUDIX lets you receive e-mail and attached binary files1. You can:
■ Print an e-mail message to a fax machine
■ Forward e-mail and binary files to:
— Internal extensions and mailing lists
— External numbers, including PCs or laptop computers — Notes and cc:mail users connected to your system
■ Listen to e-mail
Page 2 Welcome
1. CAUTION: By sending or receiving an attached file, you might inadvertently spread a computer virus. Always check files you send or receive for viruses before running them. Lucent
INTUITY
Message Manager
Lucent INTUITY Message Manager is a WindowsTM-based interface to AUDIX that runs on your P.C. With it, you can:
■ Create, send, receive, forward, respond to, and review all message types, including voice, fax, text, and attached files1
■ Launch (start) other applications to view and use an attached file ■ Reorder the sequence used to store and playback messages
■ See a list of message headers
■ Annotate messages with subject headings
For more information, see the Lucent INTUITY™ Message Manager Release 4 User Guide, 585-310-743.
Messaging to and from e-mail systems
You can send voice or fax messages to an e-mail user (such as a user of Lotus Notes or cc:mail). You can also receive e-mail in your voice mailbox if integrated messaging software is connected to your system.
In addition, you have joined mailboxes. Joined mailboxes are logically linked so you can:
■ Manage all of your incoming messages (voice, fax, e-mail, and binary files) from either mailbox. Thus, a voice message in your voice mailbox also appears in your e-mail mailbox. E-mail in your e-mail mailbox also appears in your voice mailbox.
■ Click on an icon in your e-mail mailbox to listen to a voice message,
instead of logging into your voice mailbox.
■ Print e-mail from your voice mailbox in the same way you print faxes.
■ Listen to e-mail from your voice mailbox (if text-to-speech conversion is available on your system).
■ Copy headers only from one mailbox to the other so you are notified that you have messages in the other mailbox.
Page 3 Call Your Mailbox
Call Your Mailbox
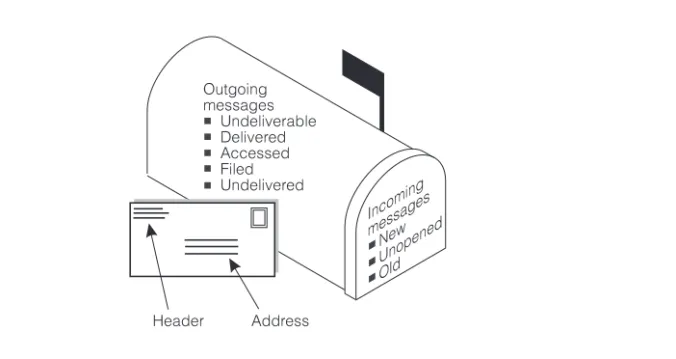
Your mailbox stores incoming and outgoing voice, fax, e-mail, or multimedia messages and headers. Your mailbox stores messages by their status (see Figure 1).
Figure 1. Your Voice Mailbox
To call the first time, pick up your phone and enter:
1. Your system-access number.
2. Your extension, followed by .
3. Your default password, followed by .
NOTE:
Change your default password to a new password as soon as possible. See
‘‘Change Your Password’’ on page 6.
#
Page 4 Get Around in Your Mailbox
Get Around in Your Mailbox
When you call your mailbox and login, you reach the Main Menu. The Main Menu is also referred to as the Activity Menu.
Voice Prompts and Help
After you log in, the voice prompts always tell you what to do.
■ For help at any time, press ( ) to get a list of your current options, or
■ To return to the Main Menu, press ( ).
MAIN MENU OPTIONS
Record and send messages
Create, address, and select delivery options for mail messages.
Get messages
Listen to, respond to, print, and delete messages.
Create greetings
Create, change, and activate personal greetings
Outgoing and filed messages
Determine the status of and listen to messages you previously created.
Personal options
Set up mailing lists, personal directory, fax printing, preferred medium, password, recorded name, and addressing sequence.
Outcalling
Select if, when, and where the system calls you when new messages are delivered to your mailbox.
Autoscan/Autoprint
Scan messages or print all new faxes by pushing just two buttons.
Tips Usually, you can dial through a voice prompt to enter a command without waiting for the prompt to finish. But you can’t dial through error messages and prompts the system wants you to hear.
1
2
3
4
5
6
7
*
H*
4Page 5 Get Around in Your Mailbox
Basic Commands
Touch-Tone Keys Command
(or ) Help
(or ) Return to Main Menu
(or ) Wait
(or ) Look up number/name
(or ) Exit system
Transfer call to operator
(or ) Delete
(or ) Undelete
(or ) Hold message in category
(or ) Transfer out
(or ) Log in again
Use while listening to messages
Increase speed
Decrease speed
Increase volume
Decrease volume
Skip forward
Skip backward
Skip to next message component
Skip to previous message component
Use while addressing
(or ) Alternate between name and number addressing
(or ) Use mailing list for addressing
*
4*
H*
7*
R*
9*
W* *
6* *
N* *
9* *
X*
0*
3*
D* *
8* *
U* *
4* *
H*
8*
T* *
7* *
R9
8
4
7
6
5
*
6*
5*
2*
APage 6 Change Your Password
Change Your Password
Your system administrator establishes your default password. Change this password immediately after you login the first time.
To change your password:
1. Press from the Main Menu.
2. Enter the new password (up to 15 digits), followed by .
3. Re-enter the new password again, followed by .
!
SECURITY ALERT:
Don’t use a password that uses:
■ Ascending or descending digits (for example, 1234 or 4321)
■ The same digits (for example 0000)
■ Digits matching your name or initials (for example, 5646 for John)
■ The current year (for example, 1996)
■ The same number as your extension (for example, extension 3455,
password 3455)
■ A reverse extension (for example, extension 3455, password 5543)
■ Numbers that identify you, such as your social security number, employee
ID, room number, or department
■ A programmable function key or speed-dial key
Figure 2. Change Password
5 4
#
#
Log into mailbox
Personal options
admin. Enter Enter
New password New password Change
Page 7 Record Your Name
Record Your Name
Record your name to replace the system greeting for your mailbox. Callers hear your voice and feel comfortable they have reached the right person.
To record your name:
1. Press from the Main Menu. Speak your name after the tone.
2. Press to stop.
3. (Optional): One of the following:
4. to approve.
Figure 3. Record Your Name1
1. The bold line in this figure shows the simplest, most direct path.
Re-record.
Play back.
5 5
1
1
2 3
#
Stop Record
name Personal
options
Record name
Re-record Playback
Approve Log into
mailbox
Initial login to mailbox
Page 8 Record a Greeting for Callers
Record a Greeting for Callers
When you don’t answer your telephone, the system works just like an answering machine. The system sends the call to your mailbox. Then, the caller either hears a system greeting or a greeting you’ve recorded.
You can record and store several personal greetings, each for a specific situation. You can manually activate each greeting as needed, or you can keep a number of greetings active at once (see ‘‘Create and Use Multiple Personal Greetings’’ on page 33).
Recording Your Basic Greeting
To record your basic greeting:
1. Press from the Main Menu. Speak your greeting at the tone.
You may need to enter a greeting number before you speak your greeting.
2. (Optional): Press one of the following:
3. Press to approve. Do one of the following:
■ Follow the prompts to activate the greeting.
■ Press to leave the greeting inactive.
Pause (and again to continue recording).
Play back.
( ) Delete and begin again.
3 1
1 1
2 3
*
3*
D #Page 9 Record a Greeting for Callers
Figure 4. Record Basic Greeting2
Recording a Special Greeting for
Voice/Fax Messages
Fax messaging is new. So your greeting should briefly tell callers how to send a fax to your mailbox number.
Example:
“This is Richard Hyatt. I’m away from my desk. Please leave a message at the tone. My telephone is also a fax line. To send me a fax, send it to this number the same way you send any fax.”
2. The bold line in this figure shows the simplest, most direct path.
Record greeting
Record greeting Listen to
greeting
Scan greetings Personal
greeting administration
Activate greeting
Greeting number
If greeting not
recorded
If greeting recorded
Delete
Approve Review status
Play
Re-record
Stop/ continue recording
Delete
Playback
Approve
Active
Not active
Activate previously
recorded greetings
Page 10 Record a Greeting for Callers
Recording a Special Greeting for a
Personal Fax Extension
If you receive frequent faxes, your system administrator may set up a second fax-only extension, your personal fax extension. In this case,your greeting should tell callers how to send a fax to your fax extension.
Example:
“This is Diane Downer. I’m unable to take your call; please leave a message at the tone. If you want to send me a fax, please call my fax number at 332-3626.”
NOTE:
Page 11 Get Messages You’ve Received
Get Messages You’ve Received
You can listen to:
■ Message headers, which tell you:
— Message type(s) — voice, fax, e-mail, and/or binary file
— Who sent the message
— When the message was sent and how big it is
■ Voice messages
■ E-Mail messages. See ‘‘How the System Interprets Text/E-Mail’’ on page 45.
You can print out:
■ Fax messages
■ E-Mail messages
A cover page is included when you print. It lists the size of each component of a message, including the size of attached files. You can view an attached file only by using Message Manager or a joined e-mail mailbox.
!
CAUTION:
By sending or receiving an attached file, you might inadvertently spread a computer virus. Always check files you send or receive for viruses before running them.
Multimedia Component Limits
A single message can contain up to four message components. But it can contain only one component of each media type — voice, fax, e-mail, and binary file. The system removes any additional components of a single media type. Thus, if someone sends you a message with two or more components of the same media, the system tells you that some components couldn’t be delivered.
For example, say that an e-mail user sends a message directly to your phone mailbox with a voice component and two binary files. The system stores only the first binary file in your phone mailbox.
Listening to a Voice/E-Mail Message
1. Press from the Main Menu. Listen to the header of the first message. Tips See ‘‘Joined Telephone and E-Mail Mailboxes’’ on page 49
for a description of what messages may or may not appear in your phone mailbox.
Page 12 Get Messages You’ve Received
If someone sends you a message with two or more components of the same media, the system tells you that some components couldn’t be delivered. In this case, contact the sender to find out what you failed to receive.
2. Press any of the following:
Responding to a Message
3. (Optional):Press , and one of the following:
If you press any key other than , continue with Steps a, b, and c.
a. Record and address your message, if necessary. See Step 4 in ‘‘Sending a Voice or Voice-Fax Message’’ on page 19. (If you’re replying to the sender, you don’t need to address the message.)
b. Press to approve, if necessary.
Listen to the voice or e-mail message, if any. Press again to rewind and listen from the start.
With a joined e-mail mailbox, you may hear headers that don’t have an attached message. See ‘‘Joined Telephone and E-Mail Mailboxes’’ on page 49 for more information.
Rewind to the start of the message. Press to skip to the previous message.
Play back the header after pressing .
Print the fax or e-mail, if any. See ‘‘Printing Fax/E-Mail Messages’’ on page 15.
Increase speed
Decrease speed
Increase volume
Decrease volume
Skip forward
Skip backward
Skip to next message component
Skip to previous message component
Call the sender. In this case, you exit your mailbox.
Reply to the sender by voice mail.
Forward with comment at the beginning.
Forward with comment at the end.
Record and address a new message.
0 0
2
*
23 2
*
19
8
4
7
6
5
*
6*
51
0
1
2
3
4
0
Page 13 Get Messages You’ve Received
c. Press to send, or enter a delivery option, then press . See ‘‘Enhanced Delivery Options’’ on page 23.
NOTE:
The components of a response or message you forward always have the following sequence:
The system puts the message components in this sequence even if the original sequence was different.
Acting on a Message
4.
Press one of the following:
.Voice Fax E-Mail File
( ) Delete the message.
( ) Undelete the message.
Save and skip to the next message.
Save and skip to the previous message.
( ) Hold the message in the current category and skip to the next message.
Skip to the next message category.
Tips Your mailbox keeps incoming messages until you delete them or until the system deletes them automatically. Because space is limited, it is wise to review and delete messages regularly.
If you have a joined mailbox, deleting a message from your phone mailbox may also delete the same message in your e-mail mailbox. See ‘‘Joined Telephone and E-Mail Mailboxes’’ on page 49.
# #
*
D*
3* *
U* *
8 #*
2* *
H* *
4Page 14 Get Messages You’ve Received
Figure 5. Get and Respond to Messages3
3. The bold line in this figure shows the simplest, most direct path. Log into
mailbox
Print fax and e-mail
Print to default fax machine
Print to fax machine attached to your phone
Yes
No Attach original
Get messages
Listen to message
header
Listen to message
Delete Skip to next category
Skip to next header Replay header
Hold message in current category Respond
Call sender
Reply to sender by voice mail
Forward with comment at end
Forward with
comment at beginning
Record a new message
Record message
Press
on fax machine
START Enter Enter
Fax print prefix
Fax machine number/extension
Page 15 Get Messages You’ve Received
Handling a Call When You Hear Fax Tones
You may answer your phone and hear fax tones. Fax tones indicate someone’s trying to send you a fax. In this case, you must manually transfer the call to your mailbox.
To transfer the call to your mailbox, do the following (marked with an X):
Option One ____
1. Press TRANSFER on your telephone.
2. Enter the Transfer into Mailbox code.
3. Press TRANSFER again.
This action sends the fax call to your mailbox.
Option Two ____
1. Press TRANSFER on your telephone.
2. Enter the Transfer into Mailbox code.
3. Enter your mailbox extension when prompted.
4. Press TRANSFER again.
This action sends the fax call to your mailbox.
Printing Fax/E-Mail Messages
To print a fax or e-mail:
1. Press from the Main Menu.
2. Listen to the message header.
3. Press to print the fax and/or e-mail portions of the message.
2
Page 16 Get Messages You’ve Received
4. Select one of the following options:
Fax Print Prefixes
Your system administrator may designate the same fax print prefix for internal, local, long distance, and international calls or a different prefix for each call type.
Examples:
Printing All
New
Faxes at Once
See ‘‘Scan/Print Messages Quickly’’ on page 44.
Downloading a Fax or E-Mail to a
Modem-Equipped Computer
Downloading faxes or e-mail to a modem-equipped PC or laptop is similar to printing from a fax machine with a handset.
To download a fax or e-mail to a PC or laptop:
1. Set up your modem and fax-software: Print to your
default fax machine.
Press . Important. You must already have selected and set up your default fax printer. See
‘‘Set Fax/E-Mail Print Options’’ on page 27.
Print to the fax machine
attached to your phone.
Press .
Press START on the fax machine, and hang up.
The button on your fax machine may be labeled something other than START
.
Common alternates arePRINTand RECEIVE.
Print to a fax machine you specify
Enter the fax print prefix and the fax machine’s extension/phone number.
Press .
For this option,you must enter a fax print prefix and the correct number of digits for the extension/phone number of the fax machine.
To print to a fax machine that is . . .
You might use prefix Followed by
Within your system ( for fax) 4 digits (for example, extension 5679)
An external local telephone call
( for fax local)
8 digits (for example, 9 555 3201)
A long-distance telephone call
( for fax long distance)
10 digits (for example, 9 303 555 3201)
#
*
6#
3 F
3 5 F L
Page 17 Get Messages You’ve Received
a. Connect the fax modem to the computer with a serial cable (if you’re using an external modem).
b. Connect your telephone wall jack to the modem jack marked “Line.”
c. Connect the telephone set to the modem jack marked “Phone.”
d. Disable the ANSWERON (number of rings) and/or AUTOMATICRECEIVE options in your fax-software dialogue.
e. Enable the MANUALRECEIVE in your fax-software dialogue.
2. Place a call to your mailbox from the telephone handset.
3. Press to listen to the message.
4. Press to print.
5. Press to print on the fax machine from which you are calling. (Here, your PC or laptop substitutes for the fax machine.)
6. At the prompt, select MANUALRECEIVEfrom the fax-software dialogue.
NOTE:
Your fax dialogue choice may be labelled something other then MANUAL RECEIVE. Common alternates are START, CONNECT, RECEIVE, or PRINT. Press whatever key begins the downloading process.
2
*
1Page 18 Record and Send Messages
Record and Send Messages
Sending voice, fax, voice-fax, and voice-e-mail messages from your mailbox are similar tasks, but there are important differences:
■ You can record and send a voice message from any telephone.
■ You can send a fax or voice-fax message from any telephone attached to a fax
machine.
■ You can send a fax to your own mailbox and forward the fax (forwarding requires
that you attach a voice comment).
■ You can record and send a voice-e-mail or a voice-fax-e-mail message (with or
without attached files) only if you first send the e-mail to your phone mailbox (from Message Manager or your e-mail mailbox) and then forward it with an attached fax. (Of course, you can send voice-e-mail and voice-fax-e-mail messages in a single step with Message Manager or an integrated e-mail mailbox.)
!
CAUTION:
By sending or receiving an attached file, you might inadvertently spread a computer virus. Always check files you send or receive for viruses before running them
.
Multimedia Component Limits
Page 19 Record and Send Messages
Sending a Voice or Voice-Fax Message
NOTE:
This procedure says to record the message, then address it. For an alternative sequence, see ‘‘Addressing a Message Before Recording It’’ on page 53.
1. Press from the Main Menu.
2. Record your voice message at the tone.
(Optional): To edit, press one of the following:
3. Press to approve the message.
4. To address, select one or more of the following:
■ Enter the user’s extension and press .
If the user is in a different location, you may need to also add a prefix.
■ Enter an enhanced list extension and press .
An enhanced list is a large list of users that your administrator makes. The system automatically forwards the message you send to each user in the enhanced list. Users on certain systems may not be able to reply to you with , , , or . You may want to include a comment about this in your message.
NOTE:
You should schedule delivery of messages to enhanced lists for off-peak hours, for example, at 10:00 p.m. or 4:00 a.m. That way, delivery of messages will not conflict with other user-generated traffic.
■ To send to an e-mail user:
a. Be sure you are in name-addressing mode. You may need to press ( ) to change addressing modes.
b. Enter the name, last name first, of the e-mail user.
c. Press .
■ To send to a mailing list:
a. Press to access a list.
b. Enter the list owner’s extension and press . If you’re the owner, press .
c. Enter the list ID (name) and press .
Pause. Press again to continue recording.
Play back.
(or ) Delete (and begin again).
1
1 1
2 3
*
D*
3 ##
#
1 1 9 1 1 6 1 4 1 0
*
2*
A#
*
L#
#
Page 20 Record and Send Messages
5. Press to approve the address.
6. (Optional):To attach a fax, press .
This option works only if you are using a phone attached to a fax machine.
7. Press to send. Or, enter other options, and press to send. See ‘‘Enhanced Delivery Options’’ on page 23.
8. If attaching a fax, do the following:
a. Load the document into the fax machine.
b. Press START on the fax machine.
NOTE:
The button on your fax machine may be labeled something other than START. Common alternates are SEND, TRANSMIT, and CONNECT.
Figure 6. Recording and Sending Messages4
4. The bold line in this figure shows the simplest, most direct path.
#
5
# #
Record message
Speak
message Address
message Log into
mailbox
Pause
Delete Playback
Approve
Approve addresses Continue
Priority
Schedule delivery Private
File a copy
Attach a fax
Approve
If attaching a fax, press
on fax machine and hang up Fax only
(no voice)
START
Page 21 Record and Send Messages
Sending a Fax-Only Message
To send a fax-only message from a telephone that is attached to a fax machine:
1. Press from the Main Menu.
2. Press to bypass voice recording.
3. Address the message. (See Step 4 in‘‘Sending a Voice or Voice-Fax Message’’ on page 19.)
4. Press to approve addresses.
5. Load the document into the fax machine.
6. Press to send. Or, enter other options, and press to send. See ‘‘Enhanced Delivery Options’’ on page 23.
7. Press START on the fax machine.
The button on your fax machine may be labeled something other than START.
Common alternates are SEND, TRANSMIT, and CONNECT.
Sending a Voice-Fax Message by Forwarding
a Fax
You can send a fax to your own mailbox and then forward the fax. However, you must always attach a voice message when you forward a fax.
1. From any fax machine, send a fax to your own mailbox.
2. Log into your mailbox.
3. Press from the Main Menu. Listen to your message headers.
4. Press to forward the fax with your voice comment attached.
5. Speak your message at the tone.
(Optional): To edit, press one of the following:
6. Press to approve the voice message.
7. Address the message. (See Step 4 in ‘‘Sending a Voice or Voice-Fax Message’’ on page 19.)
8. Press when finished addressing.
9. Press to send. Or, enter other options, and press to send. See ‘‘Enhanced Delivery Options’’ on page 23.
Continue recording.
Play back.
( ) Delete (and begin again).
1
#
#
# #
2
1 2
1
2 3
*
D*
3 ##
Page 22 Record and Send Messages
Sending a Multimedia Message by
Forwarding E-Mail and Attached Files
You can send e-mail and/or an attached file to your own phone mailbox and then forward it. However, you must record a voice message when you forward e-mail or an attached file. You may also attach a fax.
1. From your e-mail mailbox or from Message Manager, send an e-mail and/or attached file message to your own phone mailbox.
2. Log into your mailbox.
3. Press from the Main Menu. Listen to your message headers.
4. Press to forward the e-mail/attached file with your voice comment attached.
5. Speak your message at the tone.
(Optional): To edit, press one of the following:
6. Press to approve the voice message.
7. Address the message. See Step 4 in ‘‘Sending a Voice or Voice-Fax Message’’ on page 19.
8. Press when finished addressing.
9. (Optional):To attach a fax, press .
10. Press to send. Or, enter other options, and press to send. See ‘‘Enhanced Delivery Options’’ on page 23.
11. If attaching a fax, do the following:
a. Load the document into the fax machine.
b. Press START on the fax machine.
NOTE:
The button on your fax machine may be labeled something other than
START. Common alternates are SEND, TRANSMIT, and CONNECT. Continue recording.
Play back.
( ) Delete (and begin again).
2
1 2
1
2 3
*
D*
3 ##
5
Page 23 Record and Send Messages
Enhanced Delivery Options
When you have created/addressed a message and are ready to send, several delivery options are available. Select any of the following:
Review delivery options
Make your message private. (Press again to undo.)
NOTE:
The person receiving a private message can’t forward it.
NOTE:
The system cannot deliver a private message to an e-mail user.
Make your message priority (if available). (Press again to undo.)
NOTE:
The system places a priority message in a mailbox ahead of all other messages, regardless of when the other messages were received.
Schedule delivery. (Press again to undo.)
To schedule delivery:
a. Enter the delivery time (405 = 4:05).
b. Enter ( ) for AM or ( ) for PM and press .
c. Enter month and day of delivery (502 = May 2nd) and press
d. Press to approve or (or ) to start over.
You should schedule delivery of messages to enhanced lists for off-peak hours, for example, at 10:00 p.m. or 4:00 a.m. That way, delivery of messages will not conflict with other user-generated traffic.
File a copy. (Press again to undo.)
Include a fax (only if you are calling from a telephone attached to a fax machine).
0
1 1
2 2
3 3
2 A 7 P #
#
#
*
3*
D4 4
Page 24 Record and Send Messages
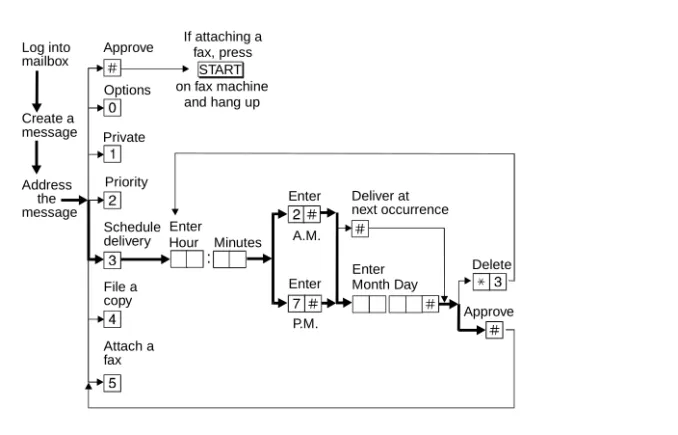
Figure 7. Enhanced Call Delivery5
5. The bold line in this figure shows the simplest, most direct path.
Enter
Enter
Approve Deliver at
next occurrence
Delete Enter
Enter Hour Minutes
Month Day Approve
Options
Private
Priority
Schedule delivery
File a copy
Attach a fax Log into mailbox
Create a message
Address the message
:
P.M. A.M. START
If attaching a fax, press
Page 25 Leave a Message When a User Doesn’t Answer
Leave a Message When a User Doesn’t
Answer
If you call a user who doesn’t answer, your call goes to the user’s mailbox. At this point, you have several options for making full and efficient use of the system. When you hear the user’s mailbox greeting, do any of the following:
1. (Optional): Press to dial through the greeting (if you won't be missing information in the greeting).
2. Record your voice message at the tone.
Leave a detailed message (it's generally more efficient to convey information than just requesting a return call).
3. (Optional): To edit, press one of the following:
4. Hang up, or press to approve the message and enter other options. See
‘‘Enhanced Delivery Options’’ on page 23.
5. If attaching a fax, do the following:
a. Load the document into the fax machine.
b. Press START on the fax machine.
Pause. Press again to continue recording.
Play back.
(or ) Delete (and begin again).
1
1 1
2 3
Page 26 Leave a Message When a User Doesn’t Answer
Before or after leaving a message, you can transfer to another extension.
To transfer to another extension:
a. Press T ( ).
b. Enter the extension.
c. Press .
NOTE:
If you record a message and either hang up or go to another option, the system automatically delivers your message to the person you are calling. To prevent delivery of your message, you must delete it with ( ).
Figure 8. Leaving a Message and/or Fax6
6. The bold line in this figure shows the simplest, most direct path.
*
*
8#
*
D*
3Mailbox answers subscriber’s phone
Speak message
Approve Approve Enter
Extension Hang up
Transfer
Escape to attendant Stop/
continue recording
Delete Review
Private
Priority
Attach a fax
START If attaching a
fax, press
Page 27 Set Fax/E-Mail Print Options
Set Fax/E-Mail Print Options
To print faxes and e-mail to the same fax machine each time, select the telephone number of a fax machine as your default fax print number.
Toselect your default fax/e-mail print number:
1. Press from the Main Menu.
2. Press to select the default fax print number.
3. Enter the fax print prefix number and the default fax print number.
For example:
When the fax-print prefix is 329 (FAX) and the fax machine extension is 12345, enter 32912345.
NOTE:
You must enter a fax print prefix. Attach this prefix to the front of the extension or telephone number of the fax machine. You must also use the correct number of digits in the phone number or extension of the fax machine.
4. Press to approve.
5. (Optional if autoprint is turned on): Press:
( ) Turn on autodelete. Autodelete deletes each fax (and e-mail message if included in the same message) immediately after it autoprints. Manually printed faxes won’t autodelete.
( ) Turn off autodelete.
5 3
1
#
9 Y
Page 28 Set Fax/E-Mail Print Options
Selecting Autoprint/Autodelete (Optional)
To have your faxes print automatically to the default fax machine, do the following:
NOTE:
Autoprint includes e-mail if the e-mail is included in the same message as a fax.
1. Press from the Main Menu.
2. Press ( ) to turn autoprint on. Press ( ) to turn autoprint off.
3. (Optional if autoprint is turned on):To have your fax and e-mail messages deleted automatically after they print to the default printer, press ( ) to turn autodelete on. Press ( ) to turn autodelete off.
5 3
9 Y 6 N
9 Y
Page 29 Create Mailing Lists
Create Mailing Lists
A mailing list is a list of users to whom you might send a message simultaneously. A mailing list can save you a lot of time if you periodically send messages to the same group or groups of people.
1. Press from the Main Menu.
2. Enter the list ID (up to six letters or digits) and press .
3. Press one of the following:
4. Enter an address and press .
If the user is in a different location, you may need to add a prefix to the extension.
NOTE:
When including e-mail-only users, be sure you are in name-addressing mode. You may need to press ( ) to change addressing modes.
5. Repeat Step 4 until the list is complete.
6. Press to approve.. Make the list private.
Make the list public
Tips When creating a list, you can also include an existing list by entering ( ) at step 4.
5 1 1
#
1
2
#
*
2*
A#
Page 30 Create Mailing Lists
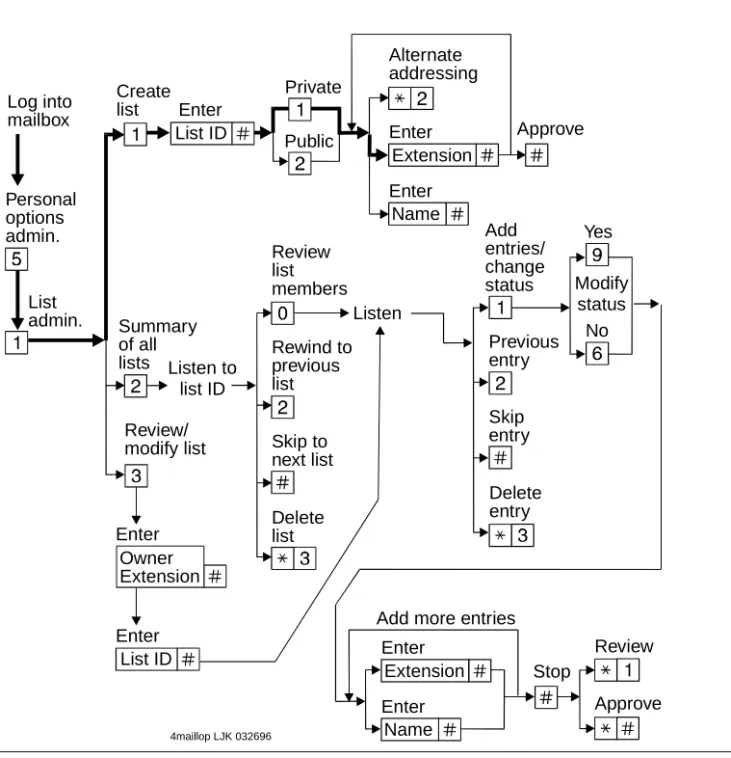
Figure 9. Create a Mailing List7
Deleting Addresses from a List
There are two ways to delete addresses:
■ Review the list until you find an address, then press ( ), or
■ At step 4 (when creating a list), enter the address again and press
( )
NOTE:
Though it appears that you have added a recipient twice, by deleting that number immediately after you add it, it will be deleted.
7. The bold line in this figure shows the simplest, most direct path.
Log into
mailbox Enter Approve
Create list Private Public Personal options admin. List admin. Enter Enter Review/ modify list Approve Stop Review Delete list Skip to next list Rewind to previous list Review list members Delete entry Yes No Summary of all lists
Add more entries Listen to list ID Listen Modify status Add entries/ change status Previous entry Skip entry Alternate addressing Enter Enter Enter Enter Name Name List ID List ID Extension Extension Owner Extension
4maillop LJK 032696
*
D*
3Page 31 Create Mailing Lists
Scanning List Summaries
1. Press from the Main Menu.
2. Listen to the list summary.
3. Press any of the following:
Reviewing and Modifying a List
1. Press from the Main Menu.
2. Enter the list owner’s extension and press . (If you own the list, you need only press .)
3. Enter the list ID and press .
4. Listen to the first name, then press any of the following:
5. Press when finished reviewing. Skip to next list.
( ) Delete the entire list.
Review/modify list members. See ‘‘Reviewing and Modifying a List’’ on page 31.
Skip to the next name.
( ) Delete the name.
Repeat the name.
Return to the previous name.
Review from the beginning.
Add entries or change public/private status, then do the following:
a. Press ( ) or ( ) to change the status.
b. Enter the address and press .
c. Listen to the name.
d. Repeat steps b and c for each addition.
Stop reviewing/modifying specified entries.
5 1 2
#
*
D*
3 05 1 3
#
#
#
#
*
D*
3 22 2
*
1 1Y 9 N 6
#
Page 32 Set the Message Medium You Want to Get First
Set the Message Medium You Want to Get
First
You can set your mailbox so that the first messages you get over the telephone are in a specific medium. Thus, if you specify faxes as your preferred medium, you get all new faxes before any new voice messages, e-mail messages, or binary files. You also get all old faxes before any old messages in other media.
The preferred medium you set also applies to multimedia messages whose primary medium matches the one you set. For example, say that a new voice/fax/e-mail message arrives in your mailbox. If your preferred medium is fax and most of this new message consists of a fax, you will get the message before any other voice, e-mail, or binary file messages that are in a single medium.
NOTE:
The system still plays priority messages first, regardless of their primary medium.
Setting the Preferred Medium
1. Press to access the preferred media list.
2. Press:
No preferred media (keep a chronological order)
Voice
Fax
Text
Binary files
( ) Return to Main Menu
5 8
0
1
2
3
4
Page 33 Create and Use Multiple Personal Greetings
Create and Use Multiple Personal
Greetings
After you have recorded several personal greetings, you may want to assign those greetings to specific types of incoming calls. Besides the basic mode of using one greeting for all calls, you can set up specific greetings for:
■ Internal and external calls
■ Busy and no-answer calls
■ Prime-time internal, prime-time external, and out-of-hours calls
■ Prime-time busy, prime-time no-answer, and out-of-hours calls
The first step is to define the types of calls you want to differentiate; then move on to changing call-type definitions and assigning greetings to call types.
Call Types
Internal Calls from inside your business location.
External Calls from outside your business location.
Busy Calls that come in when you’re using your telephone line(s).
No answer Calls that come in when you don’t answer.
Out-of-hours Calls that come in after standard business hours (as defined by your system administrator).
Page 34 Create and Use Multiple Personal Greetings
Defining Call Types the First Time
1. Press from the Main Menu.
2. Press one of the following:
3. Press one of the following:
Changing Call Types
1. Press from the Main Menu.
2. Press any of the following:
3. Press to approve, then see ‘‘Assigning Greetings to Call Types’’ on page 34.
Assigning Greetings to Call Types
1. Press from the Main Menu.
2. Listen to the summary of active greetings.
3. Press to activate a greeting.
4. Enter a number (0 to 9) to indicate which greeting you want to assign to a call type.
5. Press any of the following:
Differentiate internal/external calls.
Differentiate busy/no-answer calls.
Differentiate out-of-hours calls.
Make no distinction between prime time and out-of-hours calls.
Differentiate internal/external calls.
Differentiate busy/no-answer calls.
Differentiate out-of-hours calls.
Turn off out-of-hours differentiation.
Use a single greeting for all calls (negate call-type definition).
Use the greeting for each call type.
Use the greeting for internal (or busy) calls.
3 4
1
2
3
4
3 4
1
2
3
4
5
#
3
3
1
Page 35 Create and Use Multiple Personal Greetings
6. Press to approve.
7. Press ( ) to return to the Main Menu.
NOTE:
To set up different greetings strictly for prime-time and out-of hours calls, you must assign the same greeting to the two prime-time call types (internal/external or busy/no-answer) and a second greeting for out-of-hours calls.
Activating Previously Recorded Greetings
1. Press from the Main Menu.
2. Enter the greeting number.
3. Listen to the prompts for instructions on activating call types. Use the greeting for external (or no-answer) calls.
Use the greeting for out-of-hours calls.
Use a single greeting for all calls (negate call-type definition).
3
4
5
#
*
R*
7Page 36 Create and Use Multiple Personal Greetings
Scanning All Greetings
1. Press from the Main Menu.
2. Listen to the status of the first greeting.
3. Press any combination of the following:
4. Press to quit scanning.
Listen to a greeting.
Re-record a greeting.
( ) Delete and skip to the next greeting.
Return to the previous greeting.
Save and skip to the next greeting.
3 2
0
1
*
D*
3 2#
Page 37 Create and Use Multiple Personal Greetings
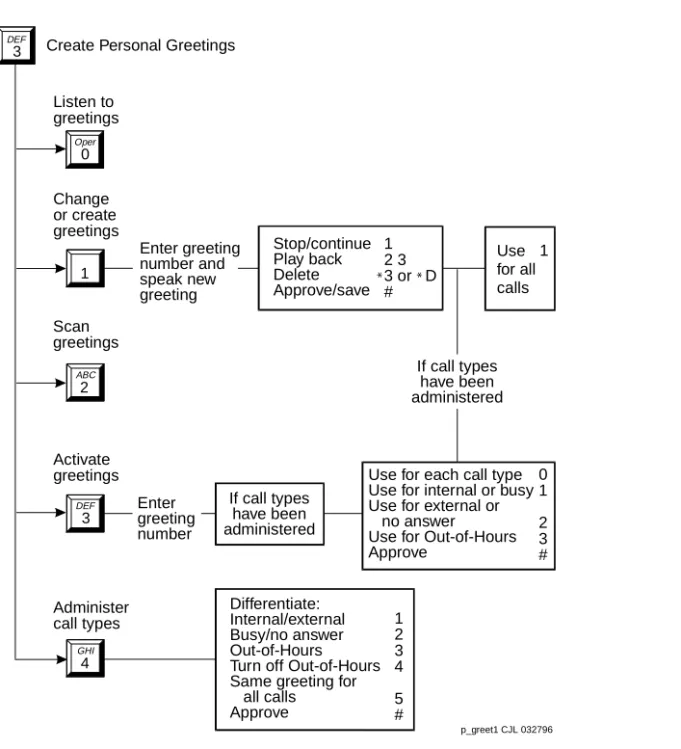
Figure 10. Create Multiple Personal Greetings Differentiate: Internal/external Busy/no answer Out-of-Hours Turn off Out-of-Hours Same greeting for
all calls Approve
Use for each call type Use for internal or busy Use for external or
no answer Use for Out-of-Hours Approve Listen to greetings Change or create greetings Scan greetings 0 1 2 3 # Activate greetings Administer
call types 1
2 3 4
5 # Create Personal Greetings
Enter greeting number and speak new greeting Enter greeting number 4 GHI 0 Oper 1 2 ABC 3 DEF 3 DEF
If call types have been administered Use for all calls 1 Stop/continue Play back Delete Approve/save 1 2 3 3 or D #
If call types have been administered
Page 38 Check and Reuse Outgoing or Filed Messages
Check and Reuse Outgoing or Filed
Messages
After you’ve sent a message, it progresses through a series of status categories. These categories are::
You can check the status of outgoing messages. Or you can select, modify, and re-send them.
Checking the Status of Messages You’ve Sent
To check the status of outgoing messages:
1. Press from the Main Menu.
2. Listen to the first category and message header.
Undelivered Not yet sent because it’s scheduled for future delivery. You can listen to, re-address, and re-record the message prior to delivery.
Delivered Delivered but not yet listened to.
Accessed Delivered and listened to.
Undeliverable Can't be delivered, usually because the recipient's mailbox is full. You can listen to, re-address, and re-record the message.
Filed Copies and saves the outgoing message to re-send and/or modify.
Page 39 Check and Reuse Outgoing or Filed Messages
3. Press any or none of the following:
NOTE:
For delivered or accessed messages, you can listen to the headers only. After you review an accessed message header, the system deletes the header
automatically.
Changing and Re-sending a Message
4. Press to change and/or re-send the selected message.
■ Press to re-send the message as is.
■ To change the message:
a. Press .
b. Speak the message at the tone.
c. (Optional):To edit, press one of the following:
d. Press to approve.
Re-sending a Message
5. For filed and undeliverable messages:
a. Enter address(es) or list via ( ).
b. Press to approve and send immediately, or enter delivery options and press .
For undelivered messages:
a. Enter additional addresses and press .
b. Press to review and edit original addresses. Listen to the message.
Modify/re-send modified messages.
Play back the message header.
( ) Delete and skip to the next message.
Return to previous messages.
Save and skip to the next message.
Skip to the next message category.
Continue recording.
Play back.
( ) Delete (and begin again).
0
1
2 3
*
D*
3 2 2#
*
#1
#
1
1
2 3
*
D*
3#
*
L*
5 # ##
#
Page 40 Check and Reuse Outgoing or Filed Messages
c. Change delivery times or options.
Figure 11. Checking Status of Messages You’ve Sent8
8. The bold line in this figure shows the simplest, most direct path.
Tips You can change/re-send three types of outgoing messages:
■ Undelivered (scheduled for future delivery)
■ Undeliverable (incorrect address or recipient’s mailbox
is full)
■ Filed
Press to re-send an undelivered message to the original recipient only.
If you re-send a filed message, it leaves the file cabinet portion of your mailbox. You must file a copy again to retain it.
# #
Log into mailbox
Skip
Skip to next category
Listen
Delete Change/ send again Check status
of outgoing messages
Listen to header
Record / modify new message
Approve and resend existing message
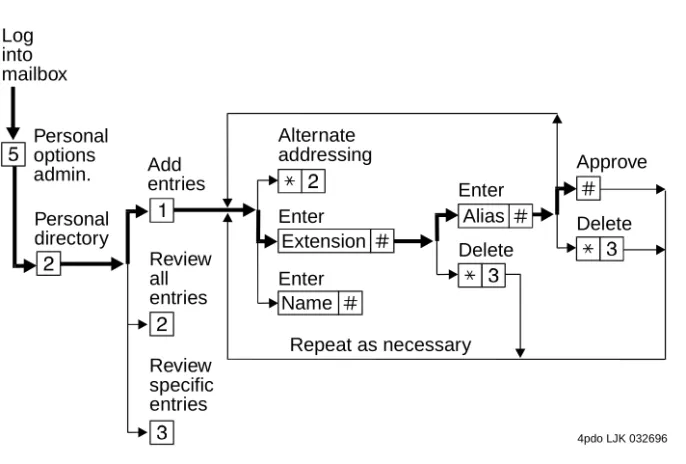
Page 41 Create a Personal Directory
Create a Personal Directory
You can create a personal directory of abbreviated names (aliases) for frequently used addresses. Essentially, it’s a sophisticated speed-dialing feature.
NOTE:
You must be addressing by name ( ) to use an alias as an address.
Creating and Appending a Directory
1. Press from the Main Menu.
2. Enter an address and press .
You can enter most addresses in your personal directory using name or number addressing. However, you must identify an e-mail-only user with name
addressing.
3. Listen to your entry’s address.
If the name is incorrect, press ( ) to delete and repeat step.
4. Enter your abbreviated version of the address (up to 10 characters) and press .
5. Repeat Steps 2 to 4 to add more names to your personal directory.
6. Press to approve.
Figure 12. Create a Personal Directory9
*
A*
25 2 1
#
*
D*
3#
#
Enter
Delete
Delete Approve Log
into mailbox
Personal options admin.
Personal directory
Add entries
Review all entries
Review specific entries
Repeat as necessary Alternate
addressing
Enter Enter
Name Extension
Alias
Page 42 Create a Personal Directory
Reviewing and Deleting Entries from a Directory
1. Press from the Main Menu.
2. Press:
■ to review all aliases. While listening to each entry, press:
■ to review specific aliases:
a. Enter an alias to review and press .
b. Listen to the corresponding address.
c. Press ( ) to delete.
d. Repeat for more aliases.
e. Press to stop reviewing.
3. Press ( ) to return to the Main Menu.
9. The bold line in this figure shows the simplest, most direct path.
Skip to the next alias.
( ) Delete.
Return to the previous alias.
Stop reviewing.
Tips The system refers to your personal directory automatically each time you enter a name address.
The system doesn’t care what numbers or letters you use for each alias.
A common method is to use two- or three-letter abbreviations that use people’s initials. For example, for Mel F. Lewis, you might enter M F L instead of the longer name.
You can also use an alias when transferring out of the system with T ( ).
5 2
2
#
*
D*
3 2 2# #
3
#
*
D*
3*
#*
R*
7Page 43 How to Use Directory Assistance
How to Use Directory Assistance
If you know the name of a person, you can use directory assistance to find that person’s extension. If you know the extension, you can use directory assistance to find the name of the person with that extension.
1. Press ( ) from anywhere in the system.
2. Do one of the following:
■ To hear the extension number associated with a name, enter the name (last
name first, with no spaces between the first and last name), then press .
■ To hear the name associated with an address, press ( ), enter the
address, then press .
Tips The extension you hear associated with a name is not always the entire address.
Add the appropriate prefix numbers for users on remote systems.
* *
N* *
6#
Page 44 Scan/Print Messages Quickly
Scan/Print Messages Quickly
The autoscan option lets you get messages automatically with just 2 button presses. Autoscan is useful for car telephone users because it requires fewer button presses.
The autoscan option also lets you print all new faxes (and e-mail messages, if included with a fax). Note however that this option doesn’t print e-mail if a fax is not also included in the same message.
1. Press from the Main Menu, then press:
2. Use theRESPOND and ACTON options as necessary.
Figure 13. Autoscanning Messages/Autoprinting All New Faxes Scan headers and messages.
Scan headers only.
Scan messages only.
Print all new faxes.
7 1 2 3 4 Log into mailbox Auto message scan Print new faxes and e-mail messages "Messages" "No messages" Return to activity menu Headers and messages Header Header Message Message Headers only Messages only Enter
Print to default fax machine
Print to fax machine you’re calling from
Enter
Press
on fax machine START Fax print
prefix
Fax machine number/extension
Page 45 How the System Interprets Text/E-Mail
How the System Interprets Text/E-Mail
Your system changes e-mail into speech so you can listen to it. The system follows certain rules to make these changes. Therefore, some parts of an e-mail message may sound odd because of the way the system interprets it. The following list explains what things might sound odd.
Acronyms and abbreviations that use capital letters
The system normally pronounces words exactly as they are spelled. The system also pronounces acronyms as words. For example, for unicef, the system says “UNICEF.”
The system also pronounces many all-capital abbreviations letter by letter. For example, for IBM, the system says “I B M.”
However, the system may inappropriately pronounce some all-capital abbreviations as words. For example, the abbreviation VAT stands for the value-added tax typical of European countries. The system reads this abbreviation as “vat,” not “V A T.”
If a period (.) appears before a space in an all-caps abbreviation, the system ignores it. Thus, for V. A. T. , the system says“V A T.” If a period is followed by a letter or number, the system says “period.”
Other common abbreviations
The system pronounces many common abbreviations in their full form. For example, the system pronounces Wed. as “Wednesday,” Mr. as “Mister”, and Oct. as “October.” It also pronounces re: as “regarding.”
However, some abbreviations may have more than one interpretation. In these cases, the system may pronounce the wrong interpretation. For example, Dr could be “drive,” “doctor,” or “Denver.” But the system is sensitive to the context of the abbreviation. So if the context is clear, the system usually uses the correct interpretation.
Dates The system pronounces numbers written with two single slashes (/) as dates. For example, the system says “April tenth, 1996,” if written as 04/10/96. However, the system pronounces 04/10 (without the year) as “four tenths.” Also, the system doesn’t pronounce numbers with single dashes(-) as dates. For example, the system says “4 dash 10 dash 96” if written as 4-10-96.
Page 46 How the System Interprets Text/E-Mail
1. The system ignores a period(.) at the end of a sentence or when a space follows the period. The system says “period” if text follows the period. For example, U.S.A. is pronounced “U period S period A.”
Fractions and Decimals
The system recognizes a slash (/) with a number before and after it as a fraction. For example, for 1/3, the system says “one third.” The system also recognizes decimal points. For example, for 2.50, the system says “two point five zero.”
Punctuation1 The system ignores most punctuation, including the following:
■ Comma (,)
■ Exclamation point (!)
■ Parentheses ()
■ Dash (–), except with numbers before and after it
■ Colon and semicolon
■ Brackets, both square [ ] and curly { }
■ Question mark (?)
■ Slash (/) and backslash (\)
■ Double quotes (“)
■ Smily face — colon and right parenthesis ( :) )
■ Apostrophe (‘). NOTE: The system pronounces contractions
Page 47 How the System Interprets Text/E-Mail
Spoken symbols
The system pronounces some symbols as follows:
■ ampersand (&) as “and”
■ plus sign (+) as “plus sign”
■ equals sign (=) as “equals sign”
■ greater than (>) as “greater than sign”
■ less than (<) as “less than sign”
■ percent sign (%) as “percent sign”
■ dollar sign ($) as “dollar sign,” or “dollars” when followed by
numbers
■ at sign (@) as “at sign”
■ minus sign (-) as “minus”(with a number before and after it)
■ greater than and less than (<>) as “less than sign greater than
sign”
■ less than and equals (<=) as “less than sign equals sign”
■ greater than and equals (<=) as “greater than sign equals
sign”
■ circumflex (^ ) as “circumflex”
■ asterisk (*) as “asterisk”
■ <grin> as “less than sign grin greater than sign”
Other special characters
Page 48 How the System Interprets Text/E-Mail
Rules for Creating Text Messages You Send to
Phone Mailboxes
Because of the way the system interprets text, use the following rules when sending text messages to users who might listen to, not read, them:
1. Use capital letters only at the beginning of a sentence or for very common all-capital abbreviations.
2. Do not use abbreviations, if possible.
3. For all capital abbreviations, insert a period and space between each letter, if possible.
4. Write dates with slashes, including the year, or spell out the dates.
5. Always include a space after a period, except for decimal numbers.
6. Use a colon (:) in clock time, a slash (/) for fractions, a dollar sign ($) followed by numbers for dollars, and an apostrophe in contractions.
Page 49 Joined Telephone and E-Mail Mailboxes
Joined Telephone and E-Mail
Mailboxes
You may have an e-mail mailbox, such as Lotus Notes or Lotus cc:Mail mailbox, that is joined to your telephone mailbox. In this case, two factors affect the messages in your telephone mailbox:
■ The options you use to join your AUDIX and e-mail mailboxes
■ The frequency with which your AUDIX and e-mail mailboxes are polled a