September, 1995
DEFINITY
Communications System Generic 3
Basic Call Management System
Operations
Contents
Table of Contents
i1
Introduction
1-1■ Overview 1-1
■ Organization 1-1
■ Conventions Used in This Document 1-2
2
BCMS Description and Applications
2-1■ Overview 2-1
■ BCMS Reports 2-1
Feature Capacity Limits (Maximums) 2-3
Hardware Configuration 2-4
■ BCMS Applications 2-6
Interactions With External CMS 2-7
Interactions with VuStats 2-8
3
System Access
3-1■ Logging In and Logging Off 3-1
BCMS Login 3-2
Log ging In 3-2
Logging In from a Local Terminal 3-2 Logging In from a Remote Terminal 3-3
Log ging Off 3-4
4
BCMS Report Generation
4-1■ Overview 4-1
Acceptable Service Level 4-1
Percent within Service Level 4-1 Acceptable Service Level Administration 4-2
BCMS Commands 4-3
Online Help 4-5
■ Real-Time Reports 4-5
Monitor Command 4-6
■ BCMS Split Status Report 4-6
Report Headers, Abbreviations,
and Their Definitions 4-7
Displaying the BCMS Split Status Report 4-10 Printing the BCMS Split Status Report 4-10
■ BCMS System Status Report 4-10
Report Headers, Abbreviations,
and Their Definitions 4-11
Displaying the BCMS System Status Report 4-14 Printing the BCMS System Status Report 4-14
■ BCMS VDN Status Report 4-14
Report Headers, Abbreviations,
and Their Definitions 4-15
Displaying the BCMS VDN Status Report 4-17 Printing the BCMS VDN Status Report 4-17
■ Historical Reports 4-18
List Commands 4-18
■ BCMS Agent Report 4-19
Report Headers, Abbreviations,
and Their Definitions 4-21
Displaying the BCMS Agent Report 4-23 Displaying an Hourly/Half-Hourly
Interval Report 4-23
Displaying a Daily Report 4-23
Printing the BCMS Agent Report 4-24
Printing an Hourly/Half-Hourly Interval Report 4-24
Contents
Scheduling the BCMS Agent Report to Print 4-25 Scheduling an Hourly/Half-Hourly
Interval Report to Print 4-25
Scheduling a Daily Report to Print 4-26
■ BCMS Agent Summary Report 4-28
Report Headers, Abbreviations,
and Their Definitions 4-29
Displaying the BCMS Agent Summary Report 4-31 Displaying an Hourly/Half-Hourly
Interval Report 4-31
Displaying a Daily Report 4-32
Printing the BCMS Agent Summary Report 4-32 Printing an Hourly/Half-Hourly Interval Report 4-32
Printing a Daily Report 4-33
Scheduling the BCMS Agent Summary
Report to Print 4-33
Scheduling an Hourly/Half-Hourly
Interval Report to Print 4-33
Scheduling a Daily Report to Print 4-35
■ BCMS Split Report 4-37
Report Headers, Abbreviations,
and Their Definitions 4-39
Displaying the BCMS Split Report 4-43 Displaying an Hourly/Half-Hourly
Interval Report 4-43
Displaying a Daily Report 4-44
Printing the BCMS Split Report 4-44
Printing an Hourly/Half-Hourly Interval Report 4-44
Printing a Daily Report 4-45
Scheduling the BCMS Split Report to Print 4-45 Scheduling an Hourly/Half-Hourly
Interval Report to Print 4-45
Scheduling a Daily Report to Print 4-47
■ BCMS Split Summary Report 4-49
Report Headers, Abbreviations,
and Their Definitions 4-51
Displaying the BCMS Split Summary Report 4-55 Displaying an Hourly/Half-Hourly
Displaying a Daily Report 4-56 Printing the BCMS Split Summary Report 4-56 Printing an Hourly/Half-Hourly Interval Report 4-56
Printing a Daily Report 4-57
Scheduling the BCMS Split Summary
Report to Print 4-57
Scheduling an Hourly/Half-Hourly
Interval Report to Print 4-57
Scheduling a Daily Report to Print 4-59
■ BCMS Trunk Group Report 4-60
Report Headers, Abbreviations,
and Their Definitions 4-62
Displaying the BCMS Trunk Group Report 4-64 Displaying an Hourly/Half-Hourly
Interval Report 4-64
Displaying a Daily Report 4-65
Printing the BCMS Trunk Group Report 4-65 Printing an Hourly/Half-Hourly Interval Report 4-65
Printing a Daily Report 4-66
Scheduling the BCMS Trunk Group
Report to Print 4-66
Scheduling an Hourly/Half-Hourly
Interval Report to Print 4-66
Scheduling a Daily Report to Print 4-68
■ BCMS Trunk Group Summary Report 4-70
Report Headers, Abbreviations,
and Their Definitions 4-71
Displaying the BCMS Trunk Group
Summary Report 4-73
Displaying an Hourly/Half-Hourly
Interval Report 4-74
Displaying a Daily Report 4-74
Printing the BCMS Trunk Group Summary Report 4-75 Printing an Hourly/Half-Hourly Interval Report 4-75
Printing a Daily Report 4-75
Scheduling the BCMS Trunk Group
Summary Report to Print 4-76
Scheduling an Hourly/Half-Hourly
Interval Report to Print 4-76
Contents
■ BCMS VDN Report 4-79
Report Headers, Abbreviations,
and Their Definitions 4-80
Displaying the BCMS VDN Report 4-83
Displaying an Hourly/Half-Hourly
Interval Report 4-83
Displaying a Daily Report 4-83
Printing the BCMS VDN Report 4-84
Printing an Hourly/Half-Hourly Interval Report 4-84
Printing a Daily Report 4-84
Scheduling the BCMS VDN Report to Print 4-85 Scheduling an Hourly/Half-Hourly
Interval Report to Print 4-85
Scheduling a Daily Report to Print 4-86
■ BCMS VDN Summary Report 4-88
Report Headers, Abbreviations,
and Their Definitions 4-89
Displaying the BCMS VDN Summary Report 4-91 Displaying an Hourly/Half-Hourly
Interval Report 4-91
Displaying a Daily Report 4-92
Printing the BCMS VDN Summary Report 4-92 Printing an Hourly/Half-Hourly Interval Report 4-92
Printing a Daily Report 4-93
Scheduling the BCMS VDN Summary
Report to Print 4-93
Scheduling an Hourly/Half-Hourly
Interval Report to Print 4-93
Scheduling a Daily Report to Print 4-95
5
System Printer and Report Scheduler
5-1■ System Printer 5-1
G3i System Printer Administration 5-1 G3r System Printer Administration 5-3 System Printer Data Link Operation
■ Report Scheduler 5-6
Print Intervals 5-6
Adding a Report to the Report Scheduler 5-6 Summary of the Steps for Printing Reports
on the System Printer 5-9
Listing Scheduled Reports 5-10
Change Command 5-11
Remove Command 5-13
6
Use of BCMS Reports for ACD Planning
6-1■ Planning/Engineering Objectives 6-1
BCMS System Status Report 6-2
BCMS Split Status Report 6-3
BCMS VDN Status Report 6-3
BCMS Trunk Group Report 6-4
BCMS Agent Report 6-4
BCMS Split or Skill Report 6-5
BCMS VDN Report 6-5
■ Engineering ACD Applications with
Data Obtained from the BCMS Reports 6-5 Agent Engineering/Optimizing Guidelines 6-6
Trunk Engineering Guidelines 6-34
A
Error Messages
A-1B
Data Module and Printer Options
B-1■ 7400A Data Module Switch Settings
for BCMS Terminals B-1
■ 7400A Data Module Switch Settings
Contents
■ AT&T 615 Terminal Options B-3
■ AT&T 572 Printer B-3
■ AT&T 475 Printer B-5
C
References
C-1■ Basic C-1
■ Call Center C-5
■ Networks C-6
■ Application Specific C-6
D
BMCS/CMS Report Heading Comparison
D-1■ Summary of Differences D-1
ABB
Abbreviations
ABB-1GL
Glossary
GL-1Overview
This document provides a comprehensive description of the Basic Call Management System (BCMS) feature, which is available with the DEFINITY. Communications System Generic 3 (G3). This document also describes the Report Scheduler feature, which is often used with BCMS.
Although intended primarily for the BCMS administrator, this document may prove useful to the system administrator, the Automatic Call Distribution (ACD) split supervisor, the ACD administrator, and ACD agents.
Organization
This guide is divided into the following chapters and appendices:
■ Chapter 1. "Introduction" is an introduction to this document.
■ Chapter 2. "BCMS Description and Applications" provides a brief
overview of the BCMS feature and lists the reports, feature capacity limits, relevant hardware considerations, and typical applications of the BCMS feature.
■ Chapter 3. "System Access" provides procedures on how to log in and
log off BCMS. This chapter also provides the procedures for changing the BCMS password.
■ Chapter 4. "BCMS Report Generation" describes the BCMS commands
that are available to the BCMS administrator followed by a display and a description of the various reports that the commands produce.
1
■ Chapter 5. "System Printer and Report Scheduler" describes the
optional Report Scheduler feature. Also included in this chapter is a description of the report scheduler commands and a display of the reports.
■ Chapter 6. "Use of BCMS Reports for ACD Planning" describes
desirable objectives and how the BCMS reports can be used to plan, engineer, and optimize ACD splits and trunk groups.
■ Appendix A, "Error Messages" contains a list of possible error
messages that may be encountered if a command is entered incorrectly.
■ Appendix B, "Data Module and Printer Options" lists the required
switch settings for the 7400A Data Module, the AT&T 572 serial printer, the AT&T 475 serial printer, and the 615 Data Terminal Equipment (DTE).
■ Appendix C, "References" lists other documents that may be used for
reference
■ Appendix D, "BMCS/CMS Report Heading Comparison" compares
reports and report headings between BCMS and CMS
■ "Abbreviations" contains definitions for abbreviations and acronyms
used throughout the DEFINITY documentation.
■ "Glossary" contains a list of frequently used terms and their definitions.
■ ‘’Index’’ contains a cross-referenced index.
Conventions Used in This Document
This manual uses the following conventions:
■ The names of commands are shown in the following typeface: change system-parameters feature
■ Information you type is shown in the following typeface: EIA
■ Information displayed on the screen is shown in the following typeface: login:
Overview
In order to monitor the operations of an ACD application, which automatically` distributes incoming calls to one or more groups of agents, AT&T offers the Call Management System (CMS) software. The CMS collects data regarding the calls on the switch and organizes the data into reports that help you manage ACD facilities and personnel. These reports may be displayed on a video display terminal in real time, printed immediately, or scheduled for printing at a later time.
AT&T offers two types of CMS: External CMS and BCMS. Although both of these options perform the same tasks, they are configured differently and have different capacities. This chapter presents the capacities for BCMS G3vs, BCMS G3s, BCMS G3i, and BCMS G3r.
In the External CMS arrangement, the CMS software resides in a computer (usually referred to as an ‘‘adjunct’’) that is connected to the system via a data link. In the BCMS arrangement, the CMS software resides within the system. A third arrangement exists in which both BCMS and External CMS report on a hunt group. For R2 CMS, if external CMS or ‘‘BOTH’’ is requested, measured hunt groups must begin with hunt group 1 and be consecutively assigned.
BCMS Reports
The BCMS feature provides the following reports:
1. Monitor Reports, which are real-time reports that present data on:
■ All splits, on a system basis, that have been administered for
internal measurements
2
■ Individual splits that have been administered for internal or both
measurements
■ VDNs that are being measured by BCMS.
2. List Reports, which provide historical information and can be printed immediately or scheduled for subsequent printing. These reports present data on:
■ Individual agents or a group of agents, based on the time of day ■ Individual agents or a group of agents, based on the day of the
week
■ Individual splits or a group of splits, based on the time of day ■ Individual splits or a group of splits, based on the day of the week ■ Individual trunk groups or a group of trunk groups, based on the
time of day
■ Individual trunk groups or a group of trunk groups, based on the
day of the week
■ Individual Vector Directory Numbers (VDNs) based on the time of
day
■ Individual VDNs based on the day of the week
The examples of reports throughout this manual illustrate BCMS reports as they appear in G3V4. If you have an earlier version of the switch, your reports may differ from the examples.
NOTE:
BCMS Reports
Feature Capacity Limits (Maximums)
The BCMS feature is designed to support ACD applications with requirements that do not exceed the capacity limits contained in Table 2-1.
NOTE:
In G3V3 and later releases, an agent can log into a maximum of four measured splits at any one time.
The important point regarding these capacity limits is that the system will only make internal measurements for parameters that are within these limits. If you want to measure one or more ACD parameters that exceed the BCMS capacity limits, you must use External CMS.
BCMS reports may be accessed from a G3 Management Terminal or on a dial-up basis. When dial-up access is used, two constraints can affect the number of terminals that can access BCMS data simultaneously:
■ The number of dial-up (Netcon) channels. The system provides four
Netcon channels.
■ The number of Terminal User IDs (TUIs). A TUI is a switch resource used
by:
— AT&T Technical Service Center (TSC) when log ged in
Table 2-1. BCMS capacities for V3 and V4
Item G3vs/s V3 G3i V3 G3r V3 G3vs/s V4 G3i V4 G3r V4 Measured Agents or Login IDs
75 200 600 75 400 2,000
Measured Splits 12/24* 99 99 12/24* 99 255
Measured Trunk Groups
16/32* 32 32 16/32* 32 32
Measured VDNs NA/24 99 512 NA/24 99 512
Historical Data Storage
Time Intervals 25 25 25 25 25 25
Daily Summaries 7 7 7 7 7 7
Historical (List) Reports
16 16 16 16 16 16
Real-Time Reports 3 3 3 3 3 3
— The G3 Management Terminal when powered up — A remote Management Terminal when logged in — A BCMS terminal when logged in
— The system printer while printing
NOTE:
BCMS data is stored in volatile switch memory; it cannot be saved to or retrieved from tape. The switch preserves historical data if a Reset System 1, Reset System 2, or Reset System Interchange (in a duplicated system) occurs. Real-time data is preserved if a Reset System 1 or Reset System Interchange occurs.
The switch loses all data (historical and real-time) during software upgrades.
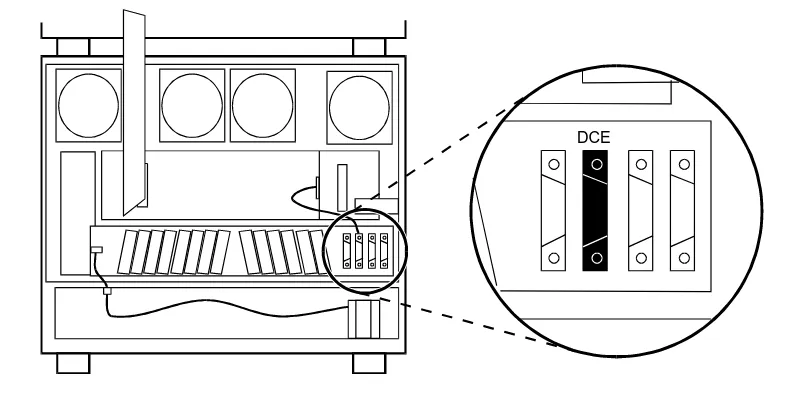
Hardware Configuration
The BCMS reports may be displayed via the G3 Management Terminal or printed on its associated printer. As a result, the BCMS feature does not require any new or additional hardware. As an option, the BCMS reports may be scheduled via the Report Scheduler and directed to its associated printer. The Report
BCMS Reports
Figure 2-1. BCMS Sample Configuration
The Report Scheduler is enabled on the System-Parameters Customer-Options form. Only an authorized AT&T representative can access and make changes to the System-Parameters Customer-Options form. The parameters of the system printer, which are used by the Report Scheduler feature, are administered on the Feature-Related System Parameters form. If the parameters for the system printer are not administered, scheduled reports cannot be printed. The system
administrator login may access this screen by entering the change
system-parameters features command. This command and the requirements "ACD" FEATURE
AGENT #1 AGENT #200
TN773 PROCESSOR TN754 DIGITAL LINE TN726 DATA LINE TN726 DATA LINE "BCMS" FEATURE "REPORT SCHEDULER" FEATURE PRINTER PERSONAL COMPUTER PRINTER OR PERSONAL COMPUTER PRINTER PRINTER OR PERSONAL COMPUTER ADU 7400A 615 WITH 513 EMULATION 615 WITH 513 EMULATION 7400B ADU SUPERVISOR TERMINALS (NOTE 2) EIA "OR" SYSTEM PRINTER PRINTER CONFIGURATION ARRANGEMENTS DEFINITY G3 SWITCH
TRUNK GROUP #1 TRUNK GROUP #99 (NOTE 1) NOTES:
1. THE ACD AND BCMS FEATURES WILL SUPPORT UP TO 400 TRUNKS (MAXIMUM) IN A MAXIMUM OF 32 MEASURED TRUNK GROUPS. 2. ALTHOUGH THE "REPORT SCHEDULER" FEATURE IS STANDARD WITH BCMS, OPTIONAL HARDWARE IS REQUIRED TO PRINT REPORTS.
for using the Feature-Related System Parameters for to set up the Report Scheduler are covered in Chapter 5, "System Printer and Report Scheduler".
The Report Scheduler should not be confused with and does not replace the journal, Call Detail Records (CDR), or Property Management System (PMS) dedicated printers. Consisting of virtually any asynchronous printer, the Report Scheduler is intended to print all DEFINITY Generic 3 reports and the output of virtually all list, display, and test commands. As an option, a personal computer (PC) or host computer may be used to store the reports and provide additional data manipulation capabilities. AT&T does not provide PC software for this application.
NOTE:
The BCMS software resides completely on the switch and does not include any special software or unique communications protocol for the PC/host computer application. Although AT&T does propose the use of a PC to collect, store, and print the reports, AT&T does not recommend an applications software package for the PC. Since AT&T does not install, administer, or control the PC application, AT&T does not guarantee correct operation of this arrangement. Customers using a PC to collect report data will need the following report output information for each report:
1. Begin with one-half page of line feeds.
2. Print a four-line banner containing the following information:
■ Print job ID ■ Command ■ Time of day ■ User
3. Provide a form feed.
4. Begin report data using 80 characters per line. Use spaces where there are no data, and a newline character at the end of each line.
5. Provide a form feed after each page of data. (The page length is defined in system parameters.)
6. Provide a form feed when the report is finished printing.
BCMS Applications
BCMS Applications
Determining the proper size for the ACD trunk groups and the number of agents that should be assigned to each split requires knowledge of the incoming call volume with respect to the following factors:
■ Each type of service provided ■ Time of day
■ Day of the week ■ Skill level of the agent
Generally, ACD ap plications are not preplanned because the types of traffic information that would be required are unavailable. Initially, ACD applications are engineered based on an estimated calling volume. Subsequently, the BCMS reports allow you to manage the hourly and/or daily operations of the ACD by:
■ Monitoring trunk group usage
■ Monitoring the calling volume for each split ■ Monitoring VDNs
■ Monitoring the work load of each agent ■ Comparing agents’ performances
Chapter 4, "BCMS Report Generation" describes each BCMS report in detail while Chapter 6, "Use of BCMS Reports for ACD Planning" describes how to plan and maintain an ACD based on the information provided by these reports.
NOTE:
Most BCMS measurement data is collected at the end of a call, whereas hunt group measurements count calls as soon as they begin. Therefore, calls spanning across a time interval boundary will be counted differently by the two. If comparing the measurements from BCMS with those from the hunt groups, there may be slight differences. However, both hunt group and BCMS measurements should indicate the same trends.
Interactions With External CMS
From the administration perspective, the ACD parameters associated with trunks groups, hunt groups, and VDNs are any of the following:
■ Not measured
■ Internally measured by BCMS
■ Externally measured by External CMS ■ Measured both internally and externally
application. In other words, the capacities shown for BCMS are additive to those of External CMS.
NOTE:
If both BCMS and External CMS are used simultaneously, switch performance may be degraded.
Interactions with VuStats
Logging In and Logging Off
BCMS provides one login ID and sup ports a maximum of five G3 Management Terminals log ged in simultaneously. (A BCMS terminal is considered to be a remote Management Terminal. You can access BCMS reports either from a Management Terminal (local) or on a dial-up (remote) basis. When dial-up access is used, the following two constraints affect the number of terminals that can access BCMS data simultaneously:
■ The number of dial-up (Netcon) channels. The system provides four
Netcon channels.
■ The number of Terminal User IDs (TUIs). A TUI is a switch resource used
by:
— TSC when logged in
— the Management Terminal when powered up — a remote Management Terminal when logged in — a BCMS terminal when log ged in
— the system printer while printing
When the switch is configured with more than one Management Terminal, you may use one of the following terminals to access the BCMS feature:
■ 4410 ■ 4425 ■ 513 ■ 610 ■ 615
3
■ 715 BCT
Typically, one terminal is dedicated to the administration and/or maintenance tasks, while the others are used for the ACD/BCMS features.
BCMS Login
The switch provides several different categories of login names. The login name identifies the user and his or her permitted capabilities to the system. Generally, each category permits unique capabilities (and restrictions). The BCMS login allows you to display, print, and schedule BCMS reports. The BCMS login is simply bcms, and the password is bcmspw. Since more than one user will typically log into the system with this same login, all the users must know the password.
NOTE:
A BCMS terminal is considered to be a remote Management Terminal.
Logging In
There are two types of terminal configurations for logging into BCMS: a remote terminal and a local terminal. Although both configurations use the same types of terminals, the remote terminal requires a data module for dialing up the system.
Logging In from a Local Terminal
To log into BCMS from a local terminal, perform the following steps: 1. Turn on the terminal (if required) and press BREAK (if no prompt is
displayed).
— The screen displays the following prompt:
Login:
2. Enter bcms and press RETURN.
— The screen displays the following prompt:
Password:
3. Enter your password and press RETURN. The default password is bcmspw. For security reasons, the password is not displayed as you type it. The system verifies that the login and password you entered are valid.
— If you entered an invalid login or password, the system displays the following message and prompt:
INCORRECT LOGIN
Login:
Logging In and Logging Off
— If you entered the correct login and associated password, the screen displays the following prompt:
Terminal Type (Enter 513, 4410, 4425): [513]
Proceed to Step 4.
4. Enter the appropriate terminal type:
■ If you are using a 4410 terminal, enter 4410 and press RETURN.
■ If you are using a 4425 terminal, enter 4425 and press RETURN.
■ If you are using a 513 terminal, just press RETURN. 513 (which is displayed in brackets on the screen) is the default.
■ If you are using a 610 or 615 MT terminal that has a 513 emulation
cartridge, just press RETURN.
■ If you are using a 610 or 615 MT that does not have the 513
emulation cartrid ge, enter 4410 and press RETURN.
■ If you are using a 715 BCT terminal, just press RETURN.
After you enter the appropriate terminal type, the system displays the following prompt:
enter command:
The system is now ready for you to enter a command to generate a BCMS report.
Logging In from a Remote Terminal
To log into BCMS from a remote terminal, perform the following steps: 1. Turn on the terminal (if required) and press BREAK (if no prompt is
displayed).
— The screen displays the following prompt:
Dial:
2. Enter the hunt group extension number for the Netcon channels and press
RETURN.
— The screen displays the following prompt:
Login:
3. Enter bcms and press RETURN.
— The screen displays the following prompt:
Password:
— If you entered an invalid login or password, the system displays the following message and prompt:
INCORRECT LOGIN
"Login:
Repeat Steps 3 and 4.
— If you entered the correct login and associated password, the screen displays the following prompt:
Terminal Type (Enter 513, 4410, 4425): [513]
Proceed to Step 5.
5. Enter the appropriate terminal type:
■ If you are using a 4410 terminal, enter 4410 and press RETURN.
■ If you are using a 4425 terminal, enter 4425 and press RETURN.
■ If you are using a 513 terminal, just press RETURN. 513 (which is displayed in brackets on the screen) is the default.
■ If you are using a 610 or 615 MT terminal that has a 513 emulation
cartridge, just press RETURN.
■ If you are using a 610 or 615 MT that does not have the 513
emulation cartrid ge, enter 4410 and press RETURN.
■ If you are using a 715 BCT, just press RETURN.
After you enter the appropriate terminal type, the system displays the following prompt:
enter command:
The system is now ready for you to enter a command to generate a BCMS report.
Logging Off
Whenever you are not using the terminal, log off the system. To log off the system, perform the following steps:
1. Type logoff. 2. Press RETURN.
How to Change the BCMS Password
How to Change the BCMS Password
To maintain the security of the system, the System Manager (or any user with special privileges) can change the password associated with the BCMS login. The BCMS login cannot be administered and does not change. Only the password for the BCMS login can change.
NOTE:
The BCMS login does not have the privilege to change the BCMS password.
The password should be changed:
■ When the system is installed (change the password from the default bcmspw)
■ Each time a new person takes over the associated login name ■ If an unauthorized person has discovered the password
Once the password is assigned, keep the following things in mind:
■ Do not give the password to anyone
■ Keep the written password in a locked place
To change a password, perform the following steps:
1. At the enter command: prompt, enter change password bcms and press RETURN.
— The system displays the Password Change screen (Screen 3-1). The cursor is positioned on the Your Current Password: field.
Screen 3-1. Password Change Screen
change password bcms Page 1 of 1 PASSWORD CHANGE
2. Enter your current password and press RETURN.
— The cursor is positioned on the New Password For Login Name: field.
3. Enter your new password and press RETURN.
NOTE:
Valid passwords contain four to seven alphabetic or numeric characters, or a combination of alphabetic and numeric characters.
— The cursor is positioned on the New Password (enter again):
field.
4. Re-enter your new password and press RETURN. — The system displays the following prompt:
command completed successfully
Overview
This chapter helps you understand the Acceptable Service Level and the Percent Within Service Level, and it provides information on generating BCMS reports. It also provides descriptions of each of the reports.
Acceptable Service Level
Before using BCMS, you must understand the concept of Acceptable Service Level and then set the acceptable service level field on various forms.
Acceptable Service Level is the desired time to answer for a given VDN or hunt group. Timing for a call begins when the call encounters a VDN or enters a hunt group queue. If the number of seconds to answer the call is equal to or less than the administered acceptable service level for the VDN or hunt group, the call is recorded as acceptable.
Percent within Service Level
A service level can be administered for each hunt group or VDN, if the customer option has been set to y and if the hunt group or VDN is administered by BCMS. The service level is the amount of time (number of seconds) allowed the switch to answer calls.
To calculate the percentage of calls within the acceptable service level, BCMS divides the number of acceptable calls by the calls offered.
4
For hunt groups, BCMS calculates the Percent Within Service Level as follows:
where
accepted — Is the number of calls answered for which the queue time was less than or equal to the administered service level for the split
dequeued — Is the number of calls that encountered t he split’s queue, but were NOT answered, abandoned, or outflowed. This occurs with multiple split queuing.
For VDNs, BCMS calculates the Percent Within Service Level as follows:
where
accepted — Is the number of answered calls (num ans) for which the answer time was less than or equal to the administered service level for the VDN. num ans here refers to the data item on the form of the same name.
calls offered — Is the total number of ended calls that accessed the VDN during the current interval.
Acceptable Service Level Administration
The Acceptable Service Level field is administered on the System-Parameters Customer-Options, VDN, and Hunt Group forms. On the System-Parameters Customer-Options form (only changeable by an AT&T technician) set the field BCMS Service Level to y to activate BCMS.
On the Hunt Group Form (user changeable) set the field BCMS Acceptable Service Level to a number between 0 and 9999. Set the Measured field to either
internal or both.
On the Vector Directory Number form set the field BCMS Ac ceptable Service Level to a number between 0 and 9999. Set the Measured field to either
internal or both
NOTE:
The column % IN SERV LEVL may be blank for one or more of the following reasons:
■ The BCMS Service Level field on the Customer Options form is set to n.
% IN SERV LEVL =
ACDcalls + abandons + out f lows + dequeued accepted * 100
_ ________________________________________
% IN SERV LEVL =
calls o ff ered accepted * 100
Overview
■ No service level is defined for the split or VDN (it cannot be set if BCMS
Service Level is set to n).
■ No call ended in the interval.
BCMS Commands
After you log into BCMS, the system prompts you to enter a command. BCMS commands consist of the following three components:
1. The ACTION to be taken
Table 4-1 lists all of the commands you can perform with the BCMS login.
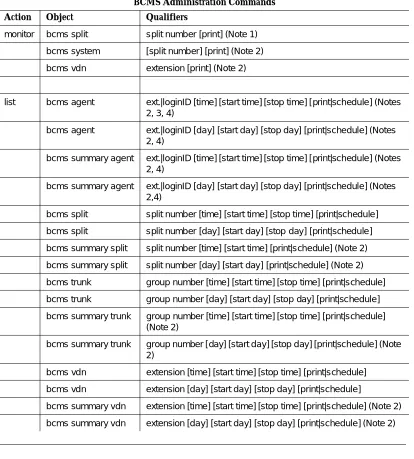
NOTES
1. Items depicted within brackets, such as [print], are optional.
2. You may enter a single number, a list of numbers, or a range of numbers (for example 100-200).
Table 4-1. Permitted BCMS Administration Commands
BCMS Administration Commands
Action Object Qualifiers
monitor bcms split split number [print] (Note 1)
bcms system [split number] [print] (Note 2)
bcms vdn extension [print] (Note 2)
list bcms agent ext.|loginID [time] [start time] [stop time] [ print|schedule] (Notes 2, 3, 4)
bcms agent ext.|loginID [day] [start day] [stop day] [print|schedule] (Notes 2, 4)
bcms summary agent ext.|loginID [time] [start time] [stop time] [ print|schedule] (Notes 2, 4)
bcms summary agent ext.|loginID [day] [start day] [stop day] [print|schedule] (Notes 2,4)
bcms split split number [time] [start time] [stop time] [print|schedule]
bcms split split number [day] [start day] [stop day] [print|schedule]
bcms summary split split number [time] [start time] [print|schedule] (Note 2)
bcms summary split split number [day] [start day] [print|schedule] (Note 2)
bcms trunk group number [time] [start time] [stop time] [print|schedule]
bcms trunk group number [day] [start day] [stop day] [print|schedule]
bcms summary trunk group number [time] [start time] [stop time] [print|schedule] (Note 2)
bcms summary trunk group number [ day] [start day] [stop day] [print|schedule] (Note 2)
bcms vdn extension [time] [start time] [stop time] [print|schedule]
bcms vdn extension [day] [start day] [stop day] [print|schedule]
bcms summary vdn extension [time] [start time] [stop time] [print|schedule] (Note 2)
Real-Time Reports
3. Whenever the command line qualifier [schedule] is initially executed, the system defaults the report for immediate printing (unless a day/time of day is scheduled) and generates a Job Id. The Job Id is required by the Report Scheduler feature for up dating and deleting the schedule of reports. The Report Scheduler (described in Chapter 6, "Use of BCMS Reports for ACD Planning") is used to administer a time/day schedule for each desired report.
4. If "BCMS/VuStats Login IDs" is enabled on the System-Parameters Customer-Options form, then you must enter an agent’s login ID or a range of login IDs in place of the physical extension or range of extensions.
Online Help
If you are unsure of a command, press HELP to obtain the list of permissible commands. For example, sup pose, you wanted to generate a BCMS Split Report. The command to generate this report is monitor bcms split #. However, you only know the beginning of the command (in this case, monitor bcms). To find out the rest of the command, you would perform the following steps:
1. At the command prompt, enter monitor bcms
2. Press HELP.
— The system displays the following list of secondary commands for the monitor command:
split system vdn
Real-Time Reports
BCMS provides three real-time reports:
■ BCMS Split Status Report
■ BCMS System Status Report
■ BCMS VDN Status Report
The BCMS Split Status Report provides the current (real-time) status and cumulative measurement data for those agents assigned to the split you specify. The BCMS System Status Report provides current (real-time) status information for either all BCMS splits or selected splits. The BCMS VDN Status Report provides the current (real-time) status and cumulative measurement data for VDNs monitored by BCMS.
Monitor Command
The monitor command is used to display real-time status reports for splits and split agents. These reports display data accrued since the last interval boundary. The time intervals may be in one-hour or half-hour increments. (To select the desired increment, access the Feature-Related System Parameters screen and enter hour or half-hour in the Measurement Interval field. Consult Chapter 6, "Use of BCMS Reports for ACD Planning" for more information.)
There are three monitor commands, one to print each real-time report:
■ bcms split
■ bcms system
■ bcms vdn
The bcms split command generates the BCMS Split Status Report. The bcms system command generates the BCMS System Status Report. The bcms vdn command generates the BCMS VDN Status Report.
Whenever a status report is displayed on the G3 Management Terminal, it is updated automatically approximately every 30 seconds. You can immediately update the on-screen status report by pressing UPDATE. To cancel the monitor command and return to the command prompt, press CANCEL. If the status report consists of more than one page, press NEXTPAGE to display any subsequent pages and PREVPAGE to display any previous pages.
If you incorrectly enter the command, or if the qualifier is not ap plicable or cannot be measured, a descriptive error message appears on the message line, located on the bottom of the screen. Usually, the error message descriptions provide enough information about the problem so that you will not need to research it. However, if you require more information about the error message, press HELP. Some examples of error messages are listed below:
■ ??invalid report type for specified time or day
■ ?? number of BCMS measured agents exceeds maximum ■ Split not measured by BCMS
Appendix A lists all possible BCMS error messages.
BCMS Split Status Report
BCMS Split Status Report
can immediately update the information on the screen by pressing UPDATE. At the beginning of the next interval, the report resets. Screen 4-1 shows the BCMS Split Status Report.
Screen 4-1. BCMS Split Status Report Screen
Report Headers, Abbreviations,
and Their Definitions
The header information at the top of each page includes the command entered to generate the report, the page number and the total number of pages in the report, the title of the report, and the time and date the report was generated. If there are more than nine agents in the split, the remaining agent information appears on subsequent pages.
Split — The split number specified with the command line.
* An asterisk precedes the Call Waiting field if any of the calls are Direct Agent calls.
& The LOGIN ID column is empty if the BCMS login system parameter is set to no.
$ If name is not administered, this column is blank for the agent. Split is displayed as "Skill" when EAS is optioned.
monitor bcms split 30
BCMS SPLIT (AGENT) STATUS
Split: 30 Date: 12:13 pm MON MAY 15, 1995
Split Name: headquarters
Calls Waiting: 5 Acceptable Service Level: xxx Oldest Call: 1:39 % Within Service Level: xxx
Staffed: 7 Avail: 1 ACD: 1 ACW: 1 AUX: 1 Extn Calls: 2 Other: 1
ACD EXT IN EXT OUT AGENT NAME LOGIN ID EXT STATE TIME CALLS CALLS CALLS
NOTE:
With BCMS, splits do not have to be numbered from 1, and split numbers do not have to be consecutive.
Split Name — The administered name of the split. This name usually describes the purpose or service of the split (for example, sales, service, or help line). If no name exists, BCMS displays the split extension (for example, EXT 65222).
NOTE:
The split name is limited to a maximum of 11 characters. If you enter more than 11 characters, the additional characters are not printed on the System Printer.
Calls Waiting — The number of calls currently queued and calls ringing at an agent’s phone. If any of the calls in the queue are Direct Agent calls, an asterisk appears before the value in this field. The Glossary describes the Direct Agent feature.
Oldest Call — The number of minutes and seconds that the oldest call in queue has been waiting to be answered. This includes calls ringing at an agent’s phone.
Acceptable Service Level — The desired time to answer for a given hunt group or VDN. Timing for a call begins when the call enters the hunt group queue.
% Within Service Level — The percentage of calls answered within the administered service level. This field is blank if no calls have been recorded for this time interval or if there is no Acceptable Service Level administered on the Hunt Group form.
Staffed — The number of agents currently logged into the split.
Avail — The number of agents in this split currently available to receive an ACD call. In order to be counted as being available, agents must either be in the Auto-In or Manual-In work mode. Refer to the Glossary for a description of work modes. If the agent is on another split’s call or is performing After Call Work for another split, the agent is not considered available and is not recorded here. If a call is ringing at the agent’s phone or a call is on hold, the agent is not
considered available unless Multiple Call Handling is active and the agent selects AI/MI with a call on hold.
ACD — The number of agents who are currently on an ACD call for this split. This value also includes Direct Agent calls and those agents who are currently on ACD calls that flowed in from another split.
BCMS Split Status Report
state count for this split. Also, if an agent is on a call while in ACW mode, the agent appears in the Extn state count, and not in the ACW state.
AUX — The number of agents in this split who are currently in the AUX work mode for this split. If an agent is answering a call from another split or is in ACW work mode for another split, that agent is not considered in AUX work mode for this split and is not included in this number. The agent is included in the Other state count.
Extn — The number of agents in this split who are currently on non-ACD calls. These non-ACD calls may be either incoming (direct to the extension) or
outgoing (direct from the extension). Those agents receiving or making extension calls while in Avail, ACW, or AUX work mode is recorded as being on extension calls.
Other — The number of agents in this split who:
■ Are on a call from another split
■ Are in ACW work mode for another split
■ Have placed a call on HOLD and made no other state selections ■ Have a call ringing at their voice terminals
■ Are dialing a number (to place a call or activate a feature)
All of the agents in the Other state are unavailable for ACD calls.
AGENT NAME — The name of the agent. Generally, this is the agent’s first or last name. However, if no name is administered on the station form, this field is left blank. When the field is blank, the data can be identified by the extension.
LOGIN ID — The BCMS login ID(s) (taken from the BCMS Login ID form or EAS Login form) for which you requested the report. This column does not appear if BCMS logins are not optioned.
EXT — The 2-, 3-, 4-, or 5-digit extension number for the agent.
STATE — The current work state for the agent. Possible work states are Avail, ACD, ACW, AUX, Extn, and Other. (The sum of the time the agent spends in the possible work states is the agent’s staffed time.) Unstaffed agents do not appear on the report. When the system time is changed, agents are in the INIT state. Each agent remains in the INIT state until he or she takes a call or pushes a work button.
NOTE:
Refer to the Glossary for a description of the term work state.
ACD CALLS — The number of ACD calls that the agent has completed since the beginning of the current interval. This value includes any calls that flowed in from other splits. (Calls in process are not counted until they are completed.)
EXT IN CALLS — The number of non-ACD calls that the agent has received (incoming) since the beginning of the current interval. (Calls in process are not counted until they are completed.) The maximum value is 255.
EXT OUT CALLS — The number of non-ACD calls that the agent has made (outgoing) since the beginning of the current interval. (Calls in process are not counted until they are completed.) The maximum value is 255.
Displaying the BCMS Split Status Report
To display this report, perform the following steps:
1. Enter monitor bcms split ## (where ## is the number of an administered split that is measured by BCMS) and press RETURN. If the split number is only one digit (for example, split 5), just enter the single digit.
— The BCMS Split Status Report appears on your screen.
2. If the report consists of more than one page, press the NEXTPAGE key to display subsequent pages and the PREVPAGE key to display previous pages.
3. If you want to immediately update the report data, press UPDATE. 4. To exit the BCMS Split Status report, press CANCEL.
— The enter command: prompt appears.
Printing the BCMS Split Status Report
To print the BCMS Split Status report, enter monitor bcms split ## print
(where ## is the number of an administered split that is measured by BCMS) and press RETURN. If the split number is only one digit (for example, split 5), just enter the single digit.
— The report immediately prints on the printer attached to your terminal, and the system displays the enter command: prompt.
BCMS System Status Report
BCMS System Status Report
the information on the screen by pressing UPDATE. This report is reset at the beginning of the time interval (for example, hour or half-hour). Screen 4-2 shows the BCMS System Status Report.
NOTE:
When analyzing this report, keep the following things in mind:
■ All averages are for completed calls only.
■ A completed call may span more than one time interval. ACD calls that are
in process (have not terminated) are counted in the time interval in which they terminate. For example, if an ACD call begins in the 10:00 to 11:00 time interval, but terminates in the 11:00 to 12:00 time interval, the data for this call is counted in the 11:00 to 12:00 time interval.
■ Asterisks indicate that the maximum for the associated field has been
exceeded.
Screen 4-2. BCMS System Status Report Screen
Report Headers, Abbreviations,
and Their Definitions
This report presents header information at the top of each page. This information includes the command entered to generate the report, the page number and the total number of pages in the report, the title of the report, and the time and date the report was generated. If more than 14 splits are being measured by BCMS, the remaining splits are displayed on multiple pages.
& Split name is not administered (em default is EXT xxxx, where xxxx is the extension administered for the split.
SPLIT is displayed as "SKILL" when EAS is optioned.
monitor bcms system
BCMS SYSTEM STATUS
Date: 12:53 MON MAY 15, 1995
AVG AVG AVG AVG % IN
CALLS OLDEST SPEED AVAIL ABAND ABAND ACD TALK AFTER SERV SPLIT NAME WAIT CALL ANS AGENT CALLS TIME CALLS TIME CALL LEVL
SPLIT NAME — The name of the split (for example, sales, service, or help line). If no name exists, the split extension (for example, EXT 12345) is displayed.
CALLS WAIT — The number of calls in the split’s queue that are currently waiting to be answered and calls ringing at an agent’s phone. If any of the calls in the queue are Direct Agent calls, an asterisk appears before this field. Consult the Glossary for a description of the Direct Agent feature.
OLDEST CALL — The number of minutes and seconds the oldest call in queue has been waiting to be answered. This includes calls ringing at an agent’s phone.
AVG SPEED ANS — The average amount of time it takes before the calls are being answered. This value includes time waiting in the queue and time ringing at the agent’s voice terminal. The calculation is:
NOTE:
Keep the following things in mind:
■ Calls that flow in from other split(s) do not include time in queue
from the other splits in this calculation. Also, the AVG SPEED ANS does not include time spent listening to a forced first
announcement.
■ A completed call may span more than one time period. ACD calls
that are in process (have not terminated) are counted in the time period in which they terminate. For example, if an ACD call begins in the 10:00 to 11:00 time period, but terminates in the 11:00 to 12:00 time period, the data for this call is counted in the 11:00 to 12:00 time period.
■ Asterisks indicate that the maximum for the associated field has
been exceeded.
AVAIL AGENT — The number of agents in this split who are currently available to receive an ACD call directed to this split.
ABAND CALLS — The total number of ACD calls that have hung up while waiting to be answered. This includes those calls that have abandoned while in queue or while ringing. Calls that are not queued (for example, because the queue is full, the caller receives a forced first announcement and abandons during the announcement, or no agents are staffed) are not counted as abandoned for the hunt group.
AVG SPEED ANS =
The Total Number o f ACD Calls Answered
Sum o f Each Completed Call′s Time In Queue + Time Ringing
BCMS System Status Report
AVG ABAND TIME — The average time before an ACD call abandons. This does not include any time spent in another split’s queue before intraflowing to this split. The calculation is:
NOTE:
This value does not include time spent listening to a forced first announcement or calls that abandon while listening to a forced first announcement.
ACD CALLS — The number of ACD calls completed during the current interval. This number also includes those calls that flow in from other splits.
AVG TALK TIME — The average duration of ACD calls for each split. This calculation includes the time each agent spent talking but does not include ring time at an agent’s voice terminal. The calculation is:
AVG AFTER CALL — The average ACW time for call-related ACW time
completed by agents in this split during this time interval. Call-related ACW is the time that occurs immediately after an ACD call (that is, when an agent was in Manual mode and an ACD call ended, or when the agent presses the ACW button during an ACD call). AVG AFTER CALL does not include time spent on direct incoming or outgoing calls while in ACW or time that immediately follows an EXTN call. The calculation is:
NOTE:
The average is for ACW sessions, which may not correspond to the number of ACD calls either because some ACD calls did not have ACW time or because the call was recorded in another interval.
% IN SERV LEVL — The percentage of calls answered with in the administered service level for this split. Calculation is based on the following:
where
accepted is calls answered whose queue time was less than or equal to the administered service level for the split.
AVG ABAND TIME =
Total Number o f Abandoned Calls Total Abandon Time
_ ______________________________
AVG TALK TIME =
Total Number o f ACD Calls Answered Total ACD Talk Time
_ _________________________________
AVG AFTER CALL =
Number o f Call Related ACW Sessions Total Call Related ACW Time
_ _________________________________
% IN SERV LEVL =
ACD calls + Abandons + Out f lows +dequeued Accepted * 100
dequeued is a call that encountered the split’s queue, but which was NOT answered, abandoned, or outflowed. This occurs with multiple split queuing.
Displaying the BCMS System Status Report
BCMS allows you to generate a BCMS System Status Report on all the BCMS splits or selected BCMS splits. To generate a report on all the BCMS splits, enter the monitor bcms system command. The report produced by this command presents information on all BCMS splits that had agents staffed when you entered the command. To generate a report on selected BCMS splits, you must include the split number(s) or split ranges at the end of the command. For example, if you wanted to generate a BCMS System Status Report on split 4, you would enter: monitor bcms system 4. If you wanted to generate a BCMS System Status Report on splits 1, 2, 3, 4, and 5, you would enter: monitor bcms system 1-5. BCMS also allows you to specify a range of splits and individual splits in a command. For example, if you have 8 splits (numbered 1 through 8) and wanted to generate a BCMS System Status Report on splits 1, 2, 3, 4, 6, and 8, you would enter: monitor bcms system 1-4 6 8.
To display the BCMS System Status Report, perform the following steps: 1. Enter monitor bcms system and press RETURN.
— The BCMS System Status Report appears on your screen. 2. If the report consists of more than one page, press the NEXTPAGE key to
display subsequent pages and the PREVPAGE key to display previous pages.
3. If you want to immediately update the report data, press UPDATE. 4. To exit the BCMS System Status report, press CANCEL.
— The enter command: prompt appears.
Printing the BCMS System Status Report
To print the BCMS System Status report, enter monitor bcms system print
and press RETURN.
— The report is immediately printed on the printer attached to your terminal, and the system displays the enter command: prompt.
BCMS VDN Status Report
BCMS VDN Status Report
Screen 4-3. BCMS VDN Status Report Screen
Report Headers, Abbreviations,
and Their Definitions
Date — The current date and time (updated every 30 seconds or when the update key is pressed).
VDN NAME — The name of the VDN being reported. If the VDN does not have a name administered, this field displays EXT XXXXX where "XXXXX is the VDN’s extension.
CALLS WAIT — The number of calls that encountered this VDN and have not been answered, abandoned, outflowed, or forced busy/disc. Includes calls in queues in vector processing, and ringing at an agent’s station.
OLDEST CALL — The time the oldest call currently waiting has waited in the VDN. Timing starts when the call enters the VDN.
ACD CALLS — The number of completed ACD calls answered in a
BCMS-measured split. The split may have been reached via the queue-to-main, check backup, route-to, messaging split, or adjunct routing commands. Includes Direct Agent calls.
* Indicates that the VDN name is not administered for the VDN; default extension is as shown.
monitor bcms vdn 12345-12349
BCMS VECTOR DIRECTORY NUMBER STATUS
Date: 15:30 Mon May 15, 1995
AVG AVG AVG CALLS % IN CALLS OLDEST ACD SPEED ABAND ABAND TALK/ CONN FLOW BUSY/ SERV VDN NAME WAIT CALL CALLS ANS CALLS TIME HOLD CALLS OUT DISC LEVL
AVG SPEED ANS — The average speed of answer for ACD and connect calls that have completed for this VDN during the current period. This includes the time in vector processing, in a split’s queue, and time ringing. The calculation is:
NOTE:
Answer time for a call is recorded when the call ends. If a call originates in interval x, is answered in interval y, and ends in interval z, the associated answer and talk times are recorded in interval z.
ABAND CALLS — The number of calls to this VDN that have abandoned before being answered during the current period. This includes VDN calls that were routed to an attendant, station, or announcement, and abandoned before being answered.
AVG ABAND TIME — The average time abandoned calls waited before abandoning during the current period. The calculation is:
AVG TALK/HOLD — The average talk time for ACD calls completed by this VDN during the current period. This does not include ring time, but it does include any time the caller spent on Hold. The calculation is:
CONN CALLS — The number of calls that were routed to a station (agent or non-ACD), attendant, or announcement, and were answered there.
FLOW OUT — The number of calls that were routed to another VDN or to a trunk, including successful look-ahead attempts.
CALLS BUSY/DISC — The number of calls that encountered a busy or disconnect step (and the announcement ends).
% IN SERV LEVL — The percent of calls offered that completed and were answered within the acceptable service level defined on the VDN form. The calculation is:
Offered is defined as:
acdcalls + flowout calls + abandoned + connect + busy/disc
AVG SPEED ANS =
Total ACD Calls + Total CONNect CALLS Total Answer Time
_ _____________________________________
AVG ABAND TIME =
Total Calls Abandoned Total Abandon Time
_ ___________________
AVG TALK / HOLD =
ACD Calls Total Talk Time
_ ______________
% SERV LEVL =
O ff ered Acceptable * 100
BCMS VDN Status Report
Acceptable is the number of ACD and CONNect calls that were answered within the administered service level. This field is blank if no calls were recorded for this time interval. This field is also blank if no Acceptable Service Level has been administered on the VDN form.
Displaying the BCMS VDN Status Report
BCMS allows you to generate a BCMS VDN Status Report on all the BCMS VDNs or selected BCMS VDNs. To generate a report on all the BCMS VDNs, enter the monitor bcms vdn command. The report produced by this command presents information on all BCMS VDNs that had agents staffed when you entered the command. You may include up to 30 VDNs at a time. To generate a report on selected BCMS VDNs, you must include the VDN number(s) or VDN ranges at the end of the command. For example, if you wanted to generate a BCMS System Status Report on VDN 8250, you would enter: monitor bcms vdn 8250. If you wanted to generate a BCMS System Status Report on VDNs 8251, 8252, 8253, 8254, and 8255, you would enter: monitor bcms vdn
8251-8255. BCMS also allows you to specify a range of VDNs and individual VDNs in a command. For example, if you have eight VDNs (numbered 51 through 58) and wanted to generate a BCMS VDN Status Report on these eight VDNs, you would enter the following command: monitor bcms vdn 51-58.
To display the BCMS VDN Status Report, perform the following steps: 1. Enter monitor bcms system and press RETURN.
— The BCMS VDN Status Report appears on your screen.
2. If the report consists of more than one page, press the NEXTPAGE key to display subsequent pages and the PREVPAGE key to display previous pages.
3. If you want to immediately update the report data, press UPDATE. 4. To exit the BCMS VDN Status report, press CANCEL.
— The enter command: prompt appears.
Printing the BCMS VDN Status Report
To print the BCMS VDN Status report, enter monitor bcms vdn print and press RETURN.
Historical Reports
BCMS provides eight historical reports. These reports give you information for an interval of time. You can print the reports for a period time measured in minutes or hours, or a period of time measured in days. The BCMS historical reports are:
■ Agent Report
■ Agent Summary Report ■ Split and Skill Report
■ Split and Skill Summary Report ■ Trunk Group Report
■ Trunk Group Summary Report ■ VDN Report
■ VDN Summary Report
You are able to print the historical reports using the list commands, which are discussed below.
List Commands
The list commands are used to display historical information for agents, splits, system, trunk groups, and VDNs. There are eight secondary list commands:
■ bcms agent
■ bcms summary agent
■ bcms split
■ bcms summary split
■ bcms trunk
■ bcms summary trunk
■ bcms vdn
■ bcms summary vdn
With these commands, you can specify:
■ Whether you want the data in the reports to be displayed in
hourly/half-hourly or daily intervals
■ The times or days for which you wish to see data
■ The system to immediately display the report on your terminal ■ The system to print the report. If you include print at the end of the
BCMS Agent Report
you to schedule the report to print to the system printer immediately (immediate), at a later time (deferred), or routinely at specified times (scheduled).
NOTE:
Time interval data may be collected in half-hour or one-hour increments. (To select the desired increment, access the Feature-Related System Parameters screen and enter half-hour or hour in the Measurement Interval: field. Consult Chapter 6, "Use of BCMS Reports for ACD Planning" for more information.) The switch stores time interval data in a time
database which holds a maximum of 25 intervals. Data for the 26th interval overwrites the first interval in the time database (and so on). Therefore, if the half-hour option is selected, care should be exercised to ensure that time interval reports are run while the data for the desired interval is still available in the time database. For example, if you select the half-hour option, print the report twice daily to ensure that you do not lose information.
BCMS Agent Report
The BCMS Agent Report provides traffic information for the specified agent. Depending on specifics from the command line, the information may be displayed as either a time interval or a daily summary. If neither time nor day is specified, time is the default. In this case, the report displays data accrued for the previous 24 time intervals (hour or half-hour), including data from the most recently completed time interval. To get information on the current time interval, you must use a monitor bcms command. Screen 4-4 shows the BCMS Agent Report — Hourly, and Screen 4-5 shows the BCMS Agent Report — Daily.
NOTE:
BCMS can track agents based on their phone numbers, or based on login IDs. If BCMS/VuStats Login IDs is optioned, BCMS tracks login IDs.
NOTE:
When analyzing this report, keep the following things in mind:
■ All averages are for completed calls only.
■ A completed call may span more than one time interval. ACD calls that are
in process (have not terminated) are counted in the time interval in which they terminate. For example, if an ACD call begins in the 10:00 to 11:00 time interval, but terminates in the 11:00 to 12:00 time interval, the data for this call is counted in the 11:00 to 12:00 time interval.
■ Asterisks indicate that the maximum for the associated field has been
Screen 4-4. BCMS Agent Report — Hourly
NOTE:
4222 could be a login ID or an extension, depending on whether BCMS/VuStats Login IDs is administered.
Screen 4-5. BCMS Agent Report — Daily
NOTE:
4222 could be a login ID or an extension.
list bcms agent 4222 8:00
BCMS AGENT REPORT
Switch Name: Lab Model Date: 11:05 am MON MAY 15, 1995 Agent: 4222
Agent Name: s-jones
AVG TOTAL TOTAL TOTAL AVG TOTAL TOTAL ACD TALK AFTER AVAIL AUX/ EXTN EXTN TIME HOLD TIME CALLS TIME CALL TIME OTHER CALLS TIME STAFFED TIME
8:00- 9:00 10 1:15 7:30 25:00 10:40 1 4:00 60:00 :20 9:00-10:00 18 1:40 18:00 4:20 :00 2 3:20 60:00 1:00 10:00-11:00 10 1:20 8:20 16:10 :00 0 :00 38:00 :10 --- --- - - - --- --- -- ---SUMMARY 38 1:28 33:50 45:30 10:40 3 3:33 158:00 1:30
list bcms agent 4222 day 5/17
BCMS AGENT REPORT
Switch Name: Lab Model Date: 11:05 am MON MAY 15, 1995 Agent: 4222
Agent Name: s-jones
AVG TOTAL TOTAL TOTAL AVG TOTAL TOTAL ACD TALK AFTER AVAIL AUX/ EXTN EXTN TIME HOLD DAY CALLS TIME CALL TIME OTHER CALLS TIME STAFFED TIME
BCMS Agent Report
Report Headers, Abbreviations,
and Their Definitions
This report presents header information at the top of each page. This information includes the command entered to generate the report, the page number of the report, the title of the report, and the time and date the report was generated. If this is a time report and there are more than 11 time intervals, this report is displayed on multiple pages. A daily summary report is displayed on the last page of the report.
AGENT NAME — The name of the agent. If no name is administered, the agent’s extension is displayed in the form EXT 65432.
TIME/DAY — The time or day interval specified in the command line.
Time is always expressed in 24-hour format. Start and stop times are optional. Reports always start at the earliest time interval (either hour or half-hour). If no start time is given, the oldest time interval is the default. A stop time requires an associated start time. If no stop time is given, the last completed time interval (hour or half-hour) is the default. If no start time or stop time is given, the report displays data accrued for the previous 24 time intervals. If you specify day in the command and do not include a start day or stop day, the report displays data accrued for the previous six days and data accrued through the most recently completed interval (hour or half-hour).
ACD CALLS — The number of ACD calls answered by this agent for all splits during the reporting interval. This value includes calls that flowed in from other splits and Direct Agent calls.
AVG TALK TIME — The average duration of ACD calls for all splits the agent was logged into. This value includes time spent talking but does not include the amount of time the agent was holding an ACD call or ring time at the agent’s voice terminal. The calculation is:
TOTAL AFTER CALL — The total amount of time that the agent spent in call-related or non-call-related ACW work states for all splits during the reporting interval. This does not include time spent on direct incoming or outgoing calls while in ACW. If an agent entered ACW in one interval, but ended ACW in another interval, the appropriate amount of ACW time is credited to each of the intervals.
TOTAL AVAIL TIME — The sum of the time that the agent was available to receive ACD calls during the current interval. During this time, the agent:
■ Was in Auto-In or Manual-In work modes for at least one split ■ Was not in ACW in any split
AVG TALK TIME =
Total Number o f ACD Calls Answered Total ACD Talk Time
■ Was not on any call or placing any call (unless MCH is active) ■ Did not have ringing calls
TOTAL AUX/OTHER — The sum of the time that the agent has the AUX button pressed and is not doing anything else for any of the other splits (that is, the sum of the time that the agent is in AUX work mode for all splits). This value does not include time the agent spent on an EXTN call or in Manual-In, Auto-In, or ACW mode for another split. Note that if the agent was in Other for all logged-in splits that time is reflected here. For example, ringing calls can cause several seconds of AUX time to accrue.
For the agent report, any non-ACD call time is totaled in the AVG EXTN TIME column. Two points of contrast are:
1. The measurement TOTAL AUX/OTHER is time-interval based, rather than being call related. For example, assuming that the previously identified stipulations are met, then if the agent is in AUX from 9:55 to 10:05, five minutes is pegged in the 9:00 to 10:00 time interval and five minutes is pegged in the 10:00 to 11:00 time interval.
2. The measurement AVG EXTN TIME is call related. For example, if an agent is on a non-ACD call from 9:55 to 10:05, the call and ten minutes of EXTN time is peg ged in the 10:00 to 11:00 time interval.
Because the agent report includes some call-related items, the sum of all items for a given hour may not exactly equal 60 minutes.
EXTN CALLS — The total number of non-ACD incoming and outgoing calls for this agent during the reporting interval. Only those non-ACD calls that are originated and/or received while the agent is logged into at least one split are counted.
AVG EXTN TIME — The average amount of time that the agent spent on non-ACD calls while logged into at least one split during the reporting interval. This average does not include time when the agent was holding the EXTN call. The calculation is:
TOTAL TIME STAFFED — The total time that the agent spent logged into at least one split during the reporting interval. Staff time is clocked for an agent who is in multiple splits as long as the agent is logged into any split. Concurrent times for each split are not totaled.
TOTAL HOLD TIME — The total time that the agent placed ACD calls on hold. This time is the caller’s hold time and is independent of the state of the agent. TOTAL HOLD TIME does not include the hold time for non-ACD calls.
SUMMARY — The total of each of the columns that do not contain averages.
AVG EXTN TIME =
Total Number o f Ext Calls Total Ext Time
BCMS Agent Report
Columns that do contain averages are the total time divided by the number of calls.
Displaying the BCMS Agent Report
BCMS allows you to collect data in either hourly/half-hourly intervals or daily intervals and display the report on your terminal.
Displaying an Hourly/Half-Hourly
Interval Report
To display this report, perform the following steps:
1. Enter list bcms agent ext time xx:xx xx:xx (where "ext" is a valid agent extension measured by BCMS). The first specified time is referred to as the start time, while the second time is referred to as the stop time. Time must be displayed in 24-hour format; however, the hours may be indicated as either a 1- or 2-digit number. Minutes are always expressed as two digits. If no start time is given, the report displays data accrued for the previous 24 time intervals (hour or half-hour).
NOTE:
Whether the system collects the data in hourly or half-hourly intervals depends on the Measurement Interval setting in the Feature-Related System Parameters screen.
2. Press RETURN.
— The BCMS Agent Report appears on your screen.
3. If the report consists of more than one page, press the NEXTPAGE key to display subsequent pages and the PREVPAGE key to display previous pages.
Displaying a Daily Report
To display this report, perform the following steps: