Programmer's
Trademarks
copyrighted by Wyse Technology. You may not reproduce, transmit, transcribe, store in a retrieval system, or translate it into any language or computer language, in any form or by any means, electronic, mechanical, magnetic, optical, chemical, manual, or otherwise, any part of this publication without the express written permission of Wyse Technology.
WYSE is a registered trademark of Wyse Technology. Wyseword, WyseWorks, WY-60, WY-50, WY-50+, WY-75, and WY-100 are trademarks of Wyse Technology.
ADDS Viewpoint is a registered trademark of Applied Digital Data Systems Inc.
DASHER D100, D200, and D210 are trademarks of Data General Corporation.
DEC is a registered trademark of Digital Equipment Corporation. VT52 and VT100 are trademarks of Digital Equipment
Corporation.
Hazeltine 1500 is a trademark of Hazeltine Corporation.
IBM and IBM PC are registered trademarks of International Business Machines. IBM Personal Computer AT, IBM 3101, IBM 3161, and IBM Enhanced PC are trademarks of
International Business Machines.
Hayes and Hayes Smartmodem 1200 are trademarks of Hayes Microcomputer Products, Inc.
Lear Siegler is a registered trademark of Lear Siegler, Inc. ADM 3A, ADM 5, and ADM 31 are trademarks of Lear Siegler, Inc.
TeleVideo is a registered trademark of TeleVideo Systems, Inc. TeleVideo 910, 910+, 912, 920, 925, 950, and 955 are
trademarks of TeleVideo Systems, Inc.
1 Introduction
Terminal Features ... 1
What You'll Find in This Guide ... 1
Entering Commands ... 2
Conventions and Syntax Notation . . . .. 2
2 Communicating With The Computer Selecting a Personality ... 4
Enhance Mode ... . . .. 5
Monitor Mode . . . .. 5
Communication Modes ... 5
Configuring the Ports . . . .. 5
Sending a Break ... 7
Identifying the Terminal ... 7
Loading the Time . . . .. 8
3 Controlling Keyboard Functions Editing Modes. . . .. 9
Wyseword Mode . . . .. 9
Application Key Mode ... 9
Terminal and Keyboard Controls ... 10
Redefining the Keys . . . .. 11
4 Controlling The Screen Display Controlling General Display Features . . . .. 15
Working in Display Memory ... 19
Assigning Display Attributes ... 26
Displaying Graphics Characters ... 30
Controlling the Cursor . . . .. 31
5 Editing Data Tab Stops . . . .. 34
Inserting Data . . . .. 34
.Deleting Data ... 35
Clearing Data ... 35
6 Sending Data Defining Print/Send Operations. . . .. 38
Sending Data in Block Mode ... 38
Printing Data . . . .. . . . .. 39
7 Displaying Character Sets Introduction . . . .. 42
Primary and Secondary Character Sets ... 42
Loading the Font Banks ... 44
Designing and Loading Characters ... 47
Appendixes Specifications ... " 53 Terminal Status Messages ... 55
Remote Key Functions ... 56
Control Codes and Escape Sequences . . . .. 59
ASCII Code Conversion Listing . . . .. 67
ASCII Personalities . . . .. 69
ANSI Personalities ... 74
ASCII Line and Column Codes ... . . . .. 87
Display Attributes . . . .. 90
International Keyboard Layouts ... 92
Terminal Features
What You'll Find In This Guide
Introduction
Terminal Features . ... 1
What You'll Find in This Guide ... 1
Entering Commands . ... 2
Conventions and Syntax Notation . ... 2
Control Codes and Escape Sequences ... 2
Key Functions ... 2
This terminal is a full-function ASCII and ANSI terminal with advanced display, communications, and keyboard features:
• Seventeen ASCII-based operating modes
• Three ANSI-based operating modes
• 26/44-line by 80/132-column display
•
•
•
•
Up to seven pages of display memory
Hidden or nonhidden, character/line/page-based display attributes, and double-high, double-wide line attributes
Eight predefined character sets and 512 user-definable characters
Multiple keyboard options, U. S. and international, all with programmable function and editing keys
This guide supplements the User's Guide, which contains the basic information necessary to set up and operate the terminal. Here you'll find more detailed information on how to take advantage of the terminal's programmable features in your computer programs.
Table 1-1 Summary of Command Descriptions
Entering Commands
Conventions and Syntax Notation
Control Codes and Escape Sequences
Section
Chapters 2-7
Appendix D
Appendix F
Appendix G
Descriptions
Commands supported by the terminal in the native mode.1
Native mode commands from Chapters 2-7 listed in ASCII order.
Supplementary information on commands supported by the terminal in nonnative ASCII personalities.2 (Supplements Table D-2 in User's Guide.)
Commands and key codes supported by the terminal in the ANSI personalities.
1. The term "native mode" refers to the terminal's normal operating mode.
2. The term "personality" refers to operating modes characteristic of one or more other
terminals.
The terminal responds to control codes and escape sequences received from the keyboard or from the computer.
• To send an escape sequence from the computer, preface it with the ASCII ESC character.
• To enter an escape sequence from the keyboard, press and release the ESC key before you press the next keyes) in the sequence. (The terminal must be in block mode to execute escape sequences entered from the keyboard.)
• Enter a control code by holding down the CTRL key together with another key.
o
Note When you enter commands that change the terminal's operating parameters, the changes aren't stored in nonvolatile memory unless you save them in setup mode .• Caution Execute only documented commands. Invalid commands
may cause unpredictable results, including loss of data.
Please note the following conventions.
Control codes are shown with the notation CTRL indicating the CTRL key.
Key Functions
When a space character is part of a command sequence, it's explicitly shown as
ESC SPACE
Variables within an escape sequence are shown in italicized letters. For example, the format for the ESC G command is
ESC G aftr
where attr represents a character display attribute value. The values
for the variables are listed either immediately after the command or in reference tables.
Key functions are described in the text as follows:
• The key name on the WY -60 ASCII keyboard is listed in the text, followed in parentheses by the key names on the other keyboards if they are different. For example,
I
SETUPI (I
RESETI, I
SYS REOI, I
SELECTI )
identifies the SETUP key on the WY-60 ASCII keyboard, the RESET key on the 316X-style keyboard, the SYS REQ key on the AT-style keyboard, and the SELECT key on the Enhanced PC-style keyboard.
• When a key name in the text refers to one of two names on a key on the keyboard, the action of other keys may be implied.
For example, reference to PRINT on the WY-60 ASCII
keyboard indicates that SHIFT is also pressed;
I
SENDI
wouldmean the same key by itself (unshifted). Similarly, reference to
I
BREAKI
on the 316X-style keyboard indicates thatI
CTRLI
isSelecting A Personality
Communicating With The
Computer
Selecting a Personality .•...•.•... 4
Enhance Mode ...•...•...••...••.... 5
Monitor Mode ...•...•....•.•.•... 5
Communication Modes ...•...•...•... 5
Configuring the Ports ...••...•...•....•... 5
Sending a Break •...•...••...••.... 7
Identifying the Terminal .•...•...•.•.•.••....• 7
Loading the Time ...•...••.•••••....••.•. 8
• caution The terminal may clear the display memory when executing this command.
Select terminal personality ESC - mode
where mode is the operating mode characteristic of the terminals listed.
mode
#
$ %
&
(
)
*
+
4
5 6
7
8 9
Personality WY50+ TVI 910+ TVI925 ADDS VPA2 HZ 1500 TVI912/920 TVI950 DG200 IBM 3101-1X ADM 31 TVI955 WY75 WY-60 PC Term VT 52 IBM 3101-2X ADDS VP-60 IBM 3161 DG210 VT 100
Terminals
Wyse WY-50, WY-50+, WY-100 TeleVideo 910/910+
Tele Video 925 ADDS Viewpoint A2 Hazeltine 1500 TeleVideo 912, 920 TeleVideo 950
Data General DASHER DI00/D200 IBM 3101, Model IX
Lear Siegler ADM 3A, ADM 5, ADM 31 TeleVideo 955
Wyse WY-75 Native mode
PC/AT/XT type
Digital Equipment VT 52 IBM 3101, Model2X ADDS Viewpoint 60 IBM 3161
Enhance Mode
Monitor Mode
Communication Modes
Configuring The Ports
Turn enhance mode off
Turn enhance mode on (default)
ESC - SPACE
ESC - !
In enhance mode, the terminal supports additional features in some
nonnative personalities (see Table D-2 in the User's Guide).
Turn monitor mode on
Turn monitor mode off (default)
ESC U
ESC u or ESC X
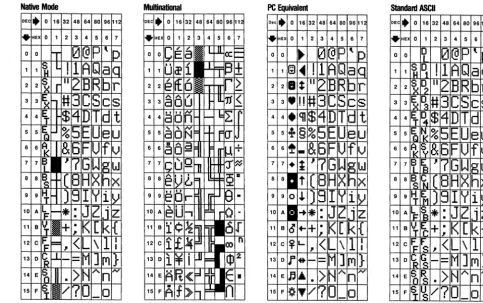
When monitor mode is on, the terminal displays symbolic
representations of received codes but does not execute the codes.
The symbols displayed depend on the terminal's current personality
and active character set (see WyseWorks ASCII Table). Table D-l
in Appendix D lists the symbols displayed in the native mode.
Turn full-duplex mode on (default) Turn half-duplex mode on
Turn block mode on
Turn balf-duplex block mode on
ESC C ESC D F
ESC C ESC D H
ESCB ESC D H ESC B
The only key codes automatically transmitted to the computer in block mode are those generated by the BREAK key, the FUNCT
key, and the function keys when their direction is remote.
Turn ACK mode off
Turn ACK mode on (default)
ESC e 6 ESC e 7
When ACK mode is on, the terminal sends the ASCII ACK character to the computer when it. receives a CTRL E, or after executing
• Commands that change a port's operating parameters
• Page print commands
• Font load or clear commands
Select MODEM port for data communications, AUX port as printer port
Select AUX port for data communications, MODEM port as printer port
ESC e 8
ESC e 9
Set MODEM port operating parameters
Set AUX port operating parameters
where baud is the baud rate.
stop is the number of stop bits. parity is the parity bit.
word is the number of bits in a data word.
MODEM Port AUX Port
baud Baud Rate baud Baud Rate
o 38400 o 19200
ESC c 0 baud stop parity word
ESC c 1 baud stop
parity word
1 19200 1 9600 (default)
2 9600 (default)
3 4800
4 2400
5 2000
6 1800
7 1200
8 600
9 300
150 134.5
< 110
75
> 50
stop Stop Bits
0 1 (default)
1 2
parity Parity Bit
0 None (default)
1 Odd
2 Mark
3 Even
2 7200
3 4800
4 3600
5 2400
6 2000
7 1800
8 1200
9 600
300 150
< 134.5 110
word Data Word
0 7 bits
1 8 bits (default)
o
Note Unless ACK mode is off, the terminal sends an ACK character to the computer after executing a change in operating parameters. No data should be sent to the terminal until the ACK is received. The ACK and all subsequent data are sent in the new data format.Set MODEM port receive handshaking protocol Set AUX port receive handshaking protocol Set MODEM port transmit handshaking protocol Set AUX port transmit handshaking protocol
ESC c 2 hndshk
ESC c 3 hndshk
ESC c 4 hndshk
Sending A Break
Identifying The Terminal
hndshk
o
1 2 3
Handshaking Protocol
Receive Transmit
None (default) None (default)
X-on/X-off X-on/X-off
DTR (MODEM port)* DSR (AUX port) Both
• DTR transmit handshaking is always active on the AUX port.
Set maximum data transmission speed ESC c 6 max
max Maximum Speed
1 60 characters per second
2 None (default)
3 150 characters per second
o
Note A separate command sets the transmission speed of the key definitions (see "Redefining the Keys" in Chapter 3).Pressing sends a break signal through the MODEM port. The effect of this will depend on how your computer interprets this condition.
o
Note You can't send a break through the AUX port even if it's configured as the data port.Send terminal ID ESC SPACE
The terminal returns to the computer the three-byte sequence
6 0 CR
Program answerback message Conceal answerback message
where answer is a string of up to 20 characters.
ESC c ; answer CTRL Y ESC c
=
CTRL Y is the delimiter that terminates the sequence.
The answerback message is displayed in setup mode unless you send the command to conceal it. Once concealed, the message can't be displayed again unless you reprogram it.
Loading The Time
Send answerback message ESC c <
The terminal responds to this command by returning the
answerback message to the computer, followed by the ASCII ACK
character. If no message has been defined, only the ACK is sent.
Turn answerback mode off Turn answerback mode on
ESC e SPACE
ESC e !
When the terminal receives an ENQ character (CTRL E), it returns an ACK character when answerback mode is off; when answerback mode is on, it sends the answerback message followed by an ACK character.
Load time of day ESC c 8 hh mm
where hh is a two-digit decimal number between 00 and 23 identifying
the hour.
mm is a two-digit decimal number between 00 and 59 identifying the minutes.
This sequence loads the time of day into the terminal's memory. The format requires a 24-hour (military) clock, beginning with
midnight (hh
=
00). However, the terminal displays the time in a12..,.hour format with a.m. and p.m. indicators. When the terminal is turned on, the time defaults to 08:00.
o
Note The time is accurate within about five seconds per day. Ifthe terminal is left on continuously, the clock may gain or lose up
Editing Modes
Wyseword Mode
Application Key Mode
Controlling Keyboard
Functions
Editing Modes ... 9
Wyseword Mode ... 9
Application Key Mode ... 9
Terminal and Keyboard Controls ... 10
Sounding the Bell ... 10
Controlling the Margin Bell ... 10
Locking the Keyboard ... 11
Miscellaneous Setup-Related Keyboard Commands ... 11
Redefining the Keys ... 11
Programming a Key ... 11
Reading Key Direction and Definition ... 14
Setting Function Key Transmission Speed ... 14
Qlearing Key Definitions ... 14
Turn local edit mode on, duplex edit mode off
Turn duplex edit mode on, local edit mode off (default)
ESC k ESC I
When the terminal is in local edit mode, editing key codes are sent only to the terminal regardless of the terminal's communication mode. (Refer to Table 3-3 for a list of the editing keys.)
Turn Wyseword mode off (default) Turn \Vyseword mode on
ESC - . ESC - /
When Wyseword mode is on, designated keys send
WordStar-compatible codes (listed in the User's Guide). These codes take precedence over any other key codes except application key codes.
Turn application key mode off (default) Turn application key mode on
ESC - 2 ESC - 3
Table 3-1 Key Codes in Application Key Mode*
Terminal and Keyboard Controls
Sounding the Bell
Controlling the Margin Bell
existing codes, including key redefinitions and Wyseword codes. An application program incorporating these unique codes can readily interpret what key has been pressed, regardless of user reprogramming.
Hex Value Hex Value
Key Unshifted Shifted Key Unshifted Shifted
Editing Keys
A- D3 D8 DEL CHARI DD F3
T D2 D7 LINE
~ D1 D6 ENTER BA BA
~ DO D5 HOME D4 D9
CLR LINEI DE F4 INS CHARI DC F2
SCRN LINE
REPLIINS DF F5
Function Keys
CTRL F1 80 90 CTRL F9 88 98
CTRL F2 81 91 CTRL FlO 89 99
CTRL F3 82 92 CTRL F11 8A 9A
CTRL F4 83 93 CTRL F12 8B 9B
CTRL F5 84 94 CTRL F13 8C 9C
CTRL F6 85 95 CTRL F14 8D 9D
CTRL F7 86 96 CTRL F15 8E 9E
CTRL F8 87 97 CTRL F16 8F 9F
Numeric Keypad Keys
0 BO BO 7 B7 B7
1 B1 B1 8 B8 B8
2 B2 B2 9 B9 B9
3 B3 B3 CC CC
4 B4 B4 CD CD
5 B5 B5 CE CE
6 B6 B6
WY-60 ASCII keyboard only. The terminal and the computer must be in 8-bit data configuration.
Sound bell
Set margin bell at cursor position Turn margin bell off
Turn margin bell on
CTRL G
ESC' J
Locking the Keyboard
Miscellaneous Setup-Related Keyboard Commands
Redefining The Keys
Programming a Key
These commands set the margin bell at the current cursor column and control whether or not the bell sounds when the cursor reaches the column setting. (Default settings are column 72 in SO-column mode and column 124 in 132-column mode.)
Lock keyboard
Unlock keyboard
CTRLO or ESC # CTRLN or ESC"
When the keyboard is locked, all keys are ignored except
I
BREAKI,
I
SETUPI( I
SYS REOI, I
SELECTI ), I
FUNCTI (I
HOLDI, I
SCROLL LOCKI ),
and the function keys.Turn keyclick off
Turn keyclick on (default) Turn CAPS LOCK on
Turn CAPS LOCK off (default) Turn key repeat off
Turn key repeat on (default)
ESC e $ ESC e %
ESC e &
Define CAPS LOCK key as CAPS LOCK (default) Define CAPS LOCK key as REV
ESC e' ESC e, ESC e-ESC eT ESCe U
You can redefine the function keys and editing keys from the computer with the following escape sequences:
• ESC z redefines a function key (shifted and unshifted); the direction defaults to "remote."
• ESC Z redefines a function key or programmable editing key and redefines its direction.
Key definitions share approximately 350 bytes of nonvolatile memory with the function key labels and answerback message. The definitions can be saved in nonvolatile memory by putting the terminal in setup mode and exiting with the SAVE ALL option.
o
Note If you connect another keyboard to the terminal after you've saved key redefinitions in nonvolatile memory, clear the definitions to their default values.Program function key definition Program key direction and definition
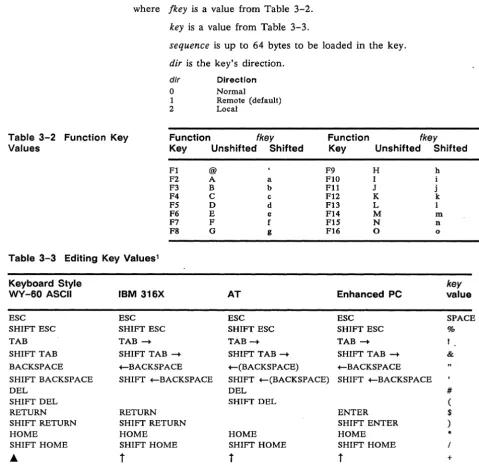
where Jkey is a value from Table 3-2.
key is a value from Table 3-3.
sequence is up to 64 bytes to be loaded in the key.
dir is the key's direction.
dir Direction
o Normal
I Remote (default)
2 Local
Table 3-2 Function Key Values
Function (key
Key Unshifted Shifted
Function Key
(key
Unshifted Shifted
FI @ F9 H h
F2 A a FlO I
F3 B b Fll J j
F4 C c Fl2 K k
F5 D d F13 L I
F6 E e F14 M m
F7 F f F15 N n
F8 G g F16 0 0
Table 3-3 Editing Key Values1
Keyboard Style key
WY-60 ASCII IBM 316X AT Enhanced PC value
ESC ESC ESC ESC SPACE
SHIFT ESC SHIFT ESC SHIFT ESC SHIFT ESC %
TAB TAB ~ TAB~ TAB~
SHIFT TAB SHIFT TAB ~ SHIFT TAB ~ SHIFT TAB ~ &
BACKSPACE +-BACKSPACE +-(BACKSPACE) +-BACKSPACE
SHIFT BACKSPACE SHIFT +-BACKSPACE SHIFT +-(BACKSPACE) SHIFT +-BACKSPACE
DEL DEL #
SHIFT DEL SHIFT DEL (
RETURN RETURN ENTER $
SHIFT RETURN SHIFT RETURN SHIFT ENTER )
HOME HOME HOME HOME *
SHIFT HOME SHIFT HOME SHIFT HOME SHIFT HOME
A
t
t
t
+Table 3-3 Editing Key Values,1 Continued
Keyboard Style key
WY-60 ASCII IBM 316X AT Enhanced PC value
SHIFT A SHIFT
t
SHIFTt
SHIFTt
0...
t
t
t
SHIFT ... SHIFT
t
SHIFTt
SHIFTt
....
+- +-+-SHIFT .... SHIFT +- SHIFT +- SHIFT +- 2
~ - t - t - t
SHIFT ~ SHIFT - t SHIFT - t SHIFT - t 3
ENTER ENTER ENTER ENTER2 s
SHIFT ENTER SHIFT ENTER SHIFT ENTER SHIFT ENTER2 4
INS CHAR INSERT INS INSERT q
INS LINE SHIFT INSERT SHIFT INS SHIFT INSERT P
NEXT PAGE PAGE PGDN PAGE DOWN r
PREY PAGE SHIFT PAGE SHIFT PG DN SHIFT PAGE DOWN w
SEND SEND u
PRINT SHIFT SEND
CLR LINE CLEAR
CLR SCRN SHIFT CLEAR z
DEL CHAR DELETE DELETE 5
DEL LINE SHIFT DELETE SHIFT DELETE 6
REPL 7
INS 8
ERASE EOF Q
SHIFT ERASE EOF W
JUMP v
SHIFT JUMP x
PRINT PRT SC PRINT SCREEN R
SHIFT PRINT SHIFT PRT SC SHIFT PRINT SCREEN X
SEND LINE S
SHIFT SEND LINE Y
PRINT LINE T
SHIFT PRINT LINE Z
+-TAB P
SHIFT +-TAB V
END END
+2
SHIFT END SHIFT END
Table 3-3 Editing Key Values,1 Continued
Keyboard Style
WY-60 ASCII IBM 316X AT Enhanced PC
key
value
Reading Key Direction and Definition
Setting Function Key Transmission Speed
Clearing Key Definitions
SHIFT J
PGUP PAGE UP
-I
y
SHIFT PGUP S2
SHIFT PAGE UP
<
SHIFT S2 =
Read key direction and definition ESC Z - key
The terminal shows the key's definition and direction in the format
dir (key/key sequence DEL
(Refer to dir values and to Tables 3-2 and 3-3 for /key and key
values.) If the key has not been redefined, the terminal sends
dir key DEL
Set maximum function key transmission speed ESC c 7 max
max Maximum Speed
1 60 characters per second
2 None (default)
3 150 characters per second
This sequence applies to any key that has been redefined. If the
key hasn't been redefined, the rate of transmission is determined by the speed of transmission for the the data port.
Clear key definition
Clear all programmable key definitions
where /key is a value from Table 3-2.
key is a value from Table 3-3.
ESC z/key DEL
or ESC z key DEL
ESC c U
Controlling General Display Features
Controlling The Screen
Display
Controlling General Display Features ... 15
Controlling Display Visibility ...•.. 16
Reversing the Screen ... 16
Controlling Scrolling Speed and Type ... 16
Displaying the Cursor ... 16
Displaying the Status Line ... 16
Programming a: Status Line Message ... 1 6 Programming a Label Line Message ... 17
Programming a Function Key Label ... 17
Saving Function Key Labels ... 18
Defining the Data Area ... 18
Working in Display Memory ... 19
Defining a Page ... 19
Moving from Page to Page ... 20
Splitting the Screen ... 20
Restoring a Full Screen Format ... 26
Assigning Display Attributes ... 26
Assigning a Display Attribute to a Message Field ... 26
Assigning Character Display Attributes ... 27
Assigning Line Attributes ... 28
Protecting Data ... 29
Writing Data to be Protected ... 29
Write-Protecting a Column ... 29
Protecting Data ... 30
Displaying Graphics Characters ... 30
Controlling the Cursor ... 31
Cursor Movement ... 31
Cursor Modes ... 31
Locking the Cursor Line ... 32
Addressing/Reading the Cursor ... 32
Controlling Display Visibility
Reversing the Screen
Controlling Scrolling Speed and Type
Displaying the Cursor
Displaying the Status Line
Programming a Status Line Message
Turn screen display off
Turn screen display on (default) Turn screen saver off
Turn screen saver on (default)
Reverse screen
Restore normal screen
Set scrolling speed and type
scroll Scrolling Type
@ Jump scroll (default)
< Smooth scroll Smooth scroll
> Smooth scroll
? Smooth scroll
Speed (Lines per Second)
1
2 4 8
ESC' 8 ESC' 9 ESC eP ESCeQ
ESC A 1 ESC A 0
ESC 'scroll
If you choose smooth scrolling, select some type of receive handshaking for the data port.
Set cursor display features
cursor
o
1
2 5 4 3
Cursor Display
Orf
On (default)
Steady block (default) Blinking block Steady line Blinking line
Turn on extended status line
Turn on standard status line (default) Turn off status line display
ESC' cursor
ESC' a ESC' b ESC' c
The standard status line displays the time according to the terminal's clock (default 8:00 a.m.) and cursor line and column indicators. The extended status line displays editing status messages
(see Appendix B). Computer messages can be displayed on either the standard or extended status line.
Program and display computer message on status line
ESC F message CR
Programming a Label Line Message
Programming a Function Key Label
Table 4-1 Function Key Field Codes
Program and display computer message on unshifted label line
ESC z ( text CR
Program computer message on shifted label line Display shifted label line
ESC z ) text CR ESC z P CR ESC z DEL ESC z ( CR ESC z ) CR Turn off shifted label line display
Clear unshifted label line message Clear shifted label line message
where text is a string of up to 78 characters for an 80-column screen or 130 characters for a 132-column screen.
The unshifted label line message is displayed automatically. Unless you turn off the display of the shifted label line, it's displayed when the SHIFT key is pressed.
o
Note You can prevent the display of the unshifted label line by assigning the invisible display attribute (ESC All) to the label line. The assigned attribute will apply to both the unshifted and shifted label lines.Program and display a function key label Clear a function key label
ESC z field label CR ESC z field CR
where field is a field code from Table 4-1. You can label up to
8 fields (shiftable to 16) on an 80-column screen
16 fields (shiftable to 32) on a 132-column screen
and label is a character string of up to 9 characters for an 80-column screen
7 characters for a 132-column screen
Field Code
Key Unshifted Shifted Key
FI 0 P F9
F2 I Q FlO
F3 2 R Fll
F4 3 S Fl2
F5 4 T F13
F6 5 U F14
F7 6 V Fl5
F8 7 W F16
Field Code
Unshifted Shifted
8 X
9 Y
Z
[
< \
]
>
Saving Function Key Labels
Defining the Data Area
Don't save function key labels Save function key labels
ESC e J
ESC e K
These commands determine whether or not function key labels are saved in nonvolatile memory, where they share approximately 350 bytes of memory with key definitions and the answerback message.
You can change the line and column display either in setup mode or from the computer.
Changing the Number of Displayed Columns
Before you change the number of displayed columns, clear the function key labels. You can program them again for the new display width.
Select SO-column display (default) Select I32-column display
ESC' . ESC •
Allow for a delay of 150 ms before sending data to the terminal.
Unless width-change-clear mode is on, the screen isn't cleared when the terminal executes these commands. The commands are ignored when economy 80-column mode is on.
Width-Change-Clear Mode
Turn width-change-c1ear mode off (default) Turn width-change-clear mode on
ESC e.
ESC e I
When width-change-clear mode is on, the terminal clears the screen when executing a command to change the number of columns.
D
Note When entering or leaving economy 80-column mode, the terminal clears the screen regardless of the status ofwidth-change-clear mode.
Economy SO-Column Mode
Turn off economy 80-column mode (default) Turn on economy 80-column mode
ESC e F ESC e G
• Caution When executing these commands, the terminal clears the entire display memory, including the status line.
Changing the Number of Data Lines
This mode must be off if you want to select the standard 80-column or the 132-column display.
Display 24 data lines (default) Display 25 data lines
Display 42 data lines Display 43 data lines
ESC e ( ESC e)
ESC e
*
ESC e +
• Caution The terminal clears the display memory when executing these commands.
When you display 25 or 43 data lines, commands to display function key labels or a label line message are ignored.
o
Note The terminal supports only 24 lines to a page in allnonnative terminal personalities except WY-SO+, DG200, DG210, and PC Term modes.
Working In Display Memory With the commands in this section you can define and display different configurations of the terminal's display memory.
Defining a Page Divide memory into pages ESC w length
where length is a value that defines the length of the page by a multiple
of the number of data lines displayed on the screen at the time this command is executed.
length
G H I J
o
NoteMultiple
1 x lines 2 x lines 4 x lines
*
Length of Page
Equal to the number of data lines (default) Double the number of data lines
Four times the number of data lines
One page contains the number of data lines; a second page contains the rest of the lines remaining in memory
ESC w I is available only in the WY50+ personality.
• Caution Executing these page definition commands clears the display memory.
Not all length values are valid for the data lines in effect. Table
4-2 summarizes the number of pages of each page length available for 24, 25, 42, or 43 lines in the terminal's native mode. (See Table F-3 in Appendix F for additional page configurations
available in some of the nonnative personalities.) If you select an
Table 4-2 Valid Page Configurations
Moving from Page to Page
80/132 Column Economy 80 Column
Data Lines No. of Lines No. of
Lines Multiplier Per Page Pages Per Page Pages
24 1 x lines 24 2 24 3
2 x lines 48 1 48 1
* 24 and 2 24 and 2
24 56
25 1 x lines 25 1 25 3
2 x lines NA 50 1
* NA 25 and 2
55
42 1 x lines 42 1 42 1
43 1 x lines 43 1 43 1
When executing any of the page definition commands, the terminal
• Clears all pages to null characters
• Displays page 0 with the cursor at the home position • Restores a previously split screen to a full screen format
(clearing the pages)
Display previous page Display next page Display specific page
ESCwB ESCw C
ESC w page
where page is the number of the page to be displayed.
page Page
o
01 1
2 2 (when economy 80-column mode is on)
o
Note page values 3, 4, 5, and 6 are available in nonhidden attribute modes (see "Nonhidden Attributes" in Appendix F).As you display the pages,
• The cursor maintains its previous position on each page
• The status of protect mode on each page is preserved
• Assigned display attributes on each page are preserved
Splitting the Screen
Although all pages share the same display characteristics (for example, number of columns and type of cursor display), each page's relative independence makes it a separate workspace where data entered is independent of the data on other pages.
You can simulate workspace areas in a single long page by means of the same command that displays a specific page (ESC w page).
1. Before entering data in an area of the page, send the command to display a specific page, for example, ESC w O.
2. Before entering data in another area of the page, send the command to display a different page, for example, ESC w 1.
3. Send the commands again when you want to return to those areas of the page.
These areas of the same page aren't really independent, but they'll be displayed as if they were separate pages-each area will move instantly onto the screen, with the cursor in its previous position.
The following section describes the workspaces you can create when you split the screen.
By dividing the screen's data area into two horizontal segments (windows), you can view selected areas of two pages at the same time-or two areas of the same page if only one page is defined. You can work in the active window while the data in the other window remains fixed.
From the page in the active window you can move the cursor through all other pages (including the page that's fixed in the inactive window). Or you can display pages in the active window, with the cursor maintaining its position in each.
Table 4-3 Split Screen Commands
Split Screen Restore Full Screen
Save Clear Save
Workspaces Data Pages Data
Two pages only ESCxA ESC x 1 ESCx@
line line
Single page longer ESCxC ESC x 3 ESCx@
than 24 lines or line line
multiple pages
Split Screen Workspaces in Two Pages Only
Split screen horizontally
Split screen horizontally and clear pages
Clear Pages
ESCxO
ESCxO
ESC x A line
ESC x lUne
where line is a line code corresponding to the line number on the screen
that you want to become the top line in the lower (inactive)
window. The values for line are in Table H-1 in Appendix H.
Executing these commands
• Homes the cursor on all pages
• Displays the top of the current page in the upper window and makes this the active window
• Displays the top of the following page in the lower window
• Either saves the data (ESC x A) or clears all pages to space
characters and turns off protect mode (ESC x 1)
When you split the screen with these commands, you're confined to the two workspaces displayed on the screen-you can't move the cursor to other areas of the page in either window, display another page, or adjust the windows.
Example
If you want the first line of the lower window to be line 16 of the
screen's data area, send
ESC x A I
where I is the value for line 16.
Figure 4-1 Workspaces Created with ESC x A Command
~ ... ~ ... f4"""""""""" ~ ... ~ ~ ... 55 5 ... 5 5 5 5 5 ... 5 5 5 5 ... '" 5 5 ... 5 ... S"'''' 5!1S.5 H ... 5 55 S 5 S"'''' 5 ... 5 S'" 5!> 5 5 ... 5 6666666666666666666666666666666666666666666666666666666666
{
l l l l l l l l l l l l l l l ! l l l l l l l l l l l l l l ! l l l l l l l l l l ! I ! 1 1 1 1 1 1 1 1 1 1 1 1 1 1
22l!22222222222222222222222222222222222222222222't2222't22222 j~B~jj~",~""""",':n"""""'S"BB"""'S:B""
Page 0
:::::::::::::::::::::::::::::::::::::::::::::::::::::H:::
IOIOIOIOIOIOIOIOIOJOIOIOIOIOIOW\OIOIOIOIOIOIOIOIOIOtOIOlOWIOIOI010 II II II 111I1l 1111 II II 1111 II 1111111111 II 1I1111L1111111 11111111 1111 1111 12121212121212121212121212121212121212121212121212121212121212121212 1'131"S\'I'I'131'1'151'1'1'1'1'1'1'1'1'151'1'1'1'1'1''SI'I'I'I'I'I' 141414'41414\4141414141414141414141414141414141414141414141414141414 1515151515151515151515151'151515151515151515151515151515151515151515
{
111111I111111111111111111111111111111111111111111111111111 22222222222222222222222222222222U222222222222222222222222
""" s,"'" s,'"'''' S,,,,,, 5""", S "'" s"""",,,,,,,,,,,
Page 1
::HiH:i:!::::::iiiiHiiii:HiiiiiiiHiiiiHHH,iiiiiiiii
7777777777777777777717777777777777777777777777177771777177 8888888888888888888888888888888888888888888888888888888888 9999999999999999999999999999999999999999999999999999999999
Line 1
~L1ne 15
- - - L 1 n e 1
Line 9
Split Screen Works paces in Multiple Pages Split screen horizontally
Split screen horizontally and clear pages
ESC x Cline
ESC x 3 line
where line is the line code (from Table H-1) corresponding to the line number of the line you want to become the top line in the lower (inactive) window.
o
Note The line you choose for the split is a reference point on the data area of the screen-it has no relation to the length of the page.Executing these commands
•
•
•
Either saves the data on all pages (ESC x C), retaining the cursor's previous position on each page, or clears all pages to space characters and homes the cursor (ESC x 3)
Displays a portion of the current page in the upper window
Displays a portion of the following page in the lower window if more than one page is defined, or a portion of the same page if only one page is defined
Example
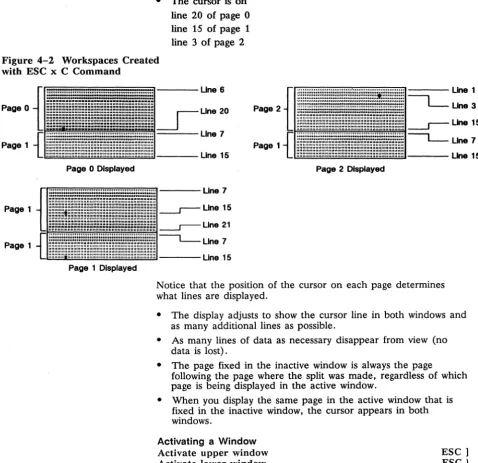
Figure 4-2 illustrates the workspaces created on each page when you split the screen at line 16 with the ESC x C command, and
• You send the command from page 0
• The cursor is on line 20 of page 0 line 15 of page 1 line 3 of page 2
Figure 4-2 Workspaces Created with ESC x C Command
Page 0
Page 1
Page. 1
Page 1
==""'----Une 6
Une 20
~~I==Une7
L~
Une15~Llne15
page2t.l~
~LIne7Page 1
line 15
Page 0 Displayed
Page 1 Displayed
- - - - U n e 7
. - r - Une15 .-r-Une21 ~Une7 ----Une15
Page 2 Displayed
Notice that the position of the cursor on each page determines what lines are displayed.
• The display adjusts to show the cursor line in both windows and as many additional lines as possible.
• As many lines of data as necessary disappear from view (no data is lost).
• The page fixed in the inactive window is always the page
following the page where the split was made, regardless of which page is being displayed in the active window.
• When you display the same page in the active window that is fixed in the inactive window, the cursor appears in both windows.
Activating a Window
Activate upper window Activate lower window Activate the other window
When you activate the other window, the cursor appears in the position it last occupied on the page in that window. The data in the original window becomes fixed.
o
Note When the screen has not been split, the ESC J or ESC K commands display the other page when two pages are defined.Adjusting the Windows
You can adjust the windows of a split screen by one line at a time in two ways:
• By raising or lowering the split in the screen, you can enlarge either the active or inactive window at the expense of the other. The display of the page in each window adjusts accordingly.
• By rolling the active window up or down, you can see a new line of the page in that window. As a new line appears at the bottom of the window, a line disappears from the top of the window, and vice-versa.
Both these adjustments are nondestructive.
Lower horizontal split Raise horizontal split
ESC x P ESC x R
Lowering the split displays one more line of the page in the upper window and one less line of the page in the lower window.
Raising the split displays one more line of the page in the lower window and one less line of the page in the upper window.
The cursor doesn't move when these commands are executed. If
the split is raised or lowered to the last line remaining in the window, the commands have no further effect.
Roll window up in page Roll window down in page
ESC w E ESC w F
These commands move the active window up or down in the current page. The data in the inactive window isn't affected.
Restoring a Full Screen Format
Assigning Display Attributes
Assigning a Display Attribute to a Message Field
Redefine screen as one window
Redefine. screen as one window and clear pages
The ESC x @ command
ESC x@
ESC x 0
•
Homes the cursor if you have split the screen with the ESC x Acommand
•
Preserves the cursor's position on all pages if you have split thescreen with the ESC x C command
The ESC x 0 command clears the data from all pages, homes the
cursor, and turns off protect mode.
The terminal has five character display attributes that you can
assign individually or in combination: dim, reverse, underline, blink, and invisible. See Appendix I for the available combinations of these attributes.
The display attributes are hidden, i.e., they don't occupy a character space on the screen. See "Nonhidden Attributes" in
Appendix F for information on display attributes in the terminal
personalities that have nonhidden attributes.
You can assign character display attributes to areas of the screen, to a page, a line, or a character position. You can also assign them specifically to protected characters.
Assign display attribute to a message field
ESC A field attr
where attr is a character display attribute value from Table 1-1 in
Appendix I.
field is one of the message fields shown in Figure 4-3.
field Message Field
o Data area
1 Label line
2 Terminal message field on status line
3 Computer message field on status line
o
Note In the terminal's native mode, only the reverse attribute canFigure 4-3 Message Fields
Assigning Character Display Attributes
r - - - -
Terminal Message Field, . . - - - Computer Message Field
c:_:-:_:-':"_-::_:-:_:r,=_-::_:-:_=-=_-:_~_=-=_-::_:-::J.----Status Line
1 - - - - Data Area
c.::-:...,:-:....:.-..:-:...,:-:....:.-..:-:...,:-:....:.-..:-:...,:-:....:.-..:-:_:l----
Label LineAssign character display attribute ESC G attr
where attr is a character display attribute value from Table 1-1 in
Appendix 1.
This command assigns the attribute according to the attribute mode in effect.
Defining the Attribute Mode
Turn character attribute mode off
Turn character attribute mode on (default) Turn page attribute mode on
Turn line attribute mode on
ESC e 0
ESC e 1
ESC e 2
ESC e 3
When the terminal is in character attribute mode, sending ESC G assigns the attribute to the next character entered and each succeeding character on the page.
In page or line attribute mode, the assigned attribute extends to all character positions from the cursor to the end of the page or line, or until another attribute is encountered.
Turning off character attribute mode turns on either page or line
attribute mode, whichever was last active. If neither was previously
Assigning Line Attributes
Assigning Attributes to Write-Protected Characters
Assign display attribute to write-protected ESC ' wpca
characters
where wpca is the attribute value for write-protected characters.
wpca Display Attribute
6 Reverse
7 Dim (default)
A Normal
B Blink on
C Invisible on
E Underline on
F Reverse on
G Dim on
This command assigns a display attribute to subsequently received characters when write-protect mode is on.
The last five values (B through G) enable you to combine attributes. Assigning any of the first three values (6, 7, A) clears all other write-protected character attributes.
Assign line attribute ESC G Laur
lattr Line Attribute
@ Single-high, single-wide characters (default)
A Single-high, double-wide characters
B Top half of double-high, single-wide characters
C Bottom half of double-high, single-wide characters
D Top half of double-high, double-wide characters
E Bottom half of double-high, double-wide characters
G Normal background
H Bold background
I Invisible background (default)
J Dim background
This command lets you change the height and width of the characters, and the background intensity of the line, on a line by line basis. The line attributes can be combined with the character display attributes.
Entering Double-Wide Characters
To display a line with characters twice as wide as normal,
1. Send ESC GA.
Protecting Data
Writing Data to be Protected
Write-Protecting a
Column
Entering Double-High Characters
To display a line with characters twice as high as normal,
1. Send ESC G B to tell the terminal to display the top half of characters entered on the line.
3. Move to the next line.
4. Send ESC G C to tell the terminal to display the bottom half of characters entered on the line.
5. Enter exactly the same characters again.
Entering Double-High, Double-Wide Characters
To display a line with characters twice as wide and twice as high as normal,
1. Send ESC G D to display the top half of the characters entered on the line.
2. Enter a maximum of half the number of characters permitted on a normal line.
3. Send ESC G E to display the bottom half of the characters entered on the line.
4. Enter exactly the same line of characters entered in Step 2.
To protect data,
1. Turn on write-protect mode, then enter the data to be protected.
2. Turn on protect mode to protect the write-protected data.
Turn write-protect mode off (default) Turn write-protect mode on
When write-protect mode is on, all subsequently received characters are displayed and stored with the display attribute selected for write-protected characters.
Clear cursor column to write-protected spaces
ESC ( ESC)
ESC V
Protecting Data
Displaying Graphics Characters
Turn protect mode off (default)
Turn pr~tect mode on
When protect mode is on,
ESC' ESC &
• The cursor can't be moved into a protected area. If addressed there, it will jump to the first unprotected position when data is entered.
• Tabulating commands move the cursor to the first unprotected character position beyond a protected tab stop.
• No data can scroll off the screen.
• A protected line cannot be deleted, nor can a line be inserted at a protected line.
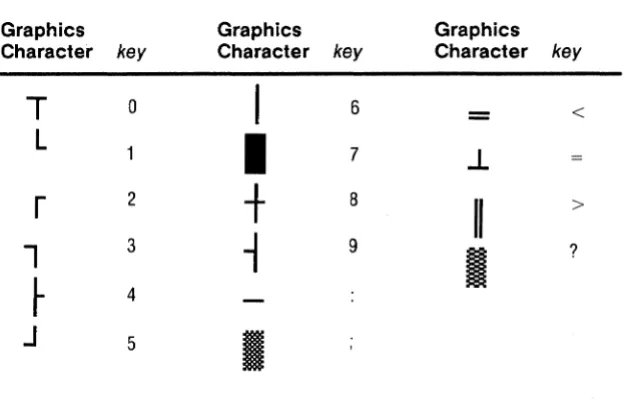
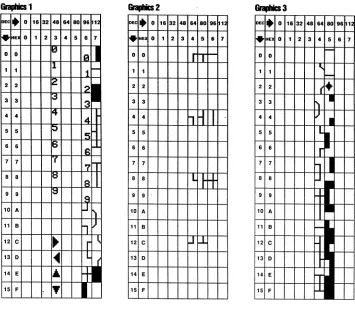
The terminal's default character set contains 16 line-drawing graphics characters. You can control these as a group in graphics mode, or individually with an escape sequence that allows the characters to be entered one at a time in the normal operating mode.
Turn graphics mode on Turn graphics mode off
Display one graphics character
where key is the key shown in Table 4-4.
ESC H CTRL B
ESC H CTRL C
ESC H key
Table 4-4 Graphics Character Codes
Controlling The Cursor
Cursor Movement
Cursor Modes
Graphics Character key
T
0L
r
21
3~
4J
5Move cursor left Move cursor right
Graphics Character
I
I
+
-1
I
Move cursor up; no scroll
key
6
7
8
9
Move cursor up; scroll (reverse linefeed) Move cursor down; scroll (linefeed) Move cursor to start of line
Move cursor to start of next line
Move cursor to home position in current page
Turn end-of-line wrap mode off
Turn end-of-line wrap mode on (default) Turn received CR mode off (default) Turn received CR mode on
Turn autopage mode off (default) Turn autopage mode on
Turn autoscrolling mode off
Turn autoscrolling mode on (default)
Graphics Character key
-.1
II
I
<
>
?
CTRL H CTRLL CTRLK ESCj CTRLJ CTRLM
CTRL ESC{ or CTRL A
ESC d.
ESC d I
ESC e 4 ESC e 5 ESC d
*
ESC d +Locking the Cursor Line
Addressing/Reading the Cursor
Turn line lock mode on
Turn line lock mode off (default)
ESC' H ESC'I
The ESC ' H command locks the cursor line (so that the line
remains fixed when the display scrolls) and moves the cursor down
to the next unlocked line. If there is no unlocked line below, the
cursor moves up to the nearest unlocked line. The cursor cannot move into a locked line. Turning off line lock mode unlocks all the lines on the page.
D
Note When line lock mode is on, smooth scrolling is inhibited.In all the commands in this section,
• III is a one- to three-digit decimal value of the line, relative to home, that corresponds to the line where you want to position the cursor
• eee is a one- to three-digit decimal value of the column, relative to home, that corresponds to the column where you want to position the cursor
• line is the line code (Table H-l in Appendix H) that
corresponds to the line on the page where you want to position the cursor
• col is the column code (Table H-2 in Appendix H) that
corresponds to the column where you want to position the cursor
• page or wnd is the number of the page or the window of a split screen where the cursor will be moved
wnd/page Window or Page
o Page 0 or upper window
1 Page 1 or lower window
2 Page 2 (when economy SO-column mode is on)
D
Note wnd/page values 3, 4, 5, and 6 are available in nonhidden attribute modes (see Table F-2 in Appendix F). • The cursor can be addressed to a protected position but it can'tAddressing the Cursor
Address cursor in current SO-column page Address cursor in specific SO-column page Address cursor in specific SO-column window/page
Address cursor in current SO/132-column page
ESC = line col
ESC w @ page line col
ESC - wnd line col
ESC - page line col
ESC a III R ccc C
where R is the ASCII character "R."
C is the ASCII character "C."
Reading the Cursor's Address
Read cursor address in current SO-column page Read SO-column page number and cursor address Read SO-column window (or page) number and cursor address
ESC? ESCw' ESC/
In SO-column mode, the terminal returns the cursor's address in the following formats:
line col CR page line col CR
wnd line col CR (if screen is split) page line col CR (if screen is not split)
CR is the carriage return that terminates the sequence.
Read cursor address in current SO/132-column page
The terminal returns an eight-byte address in the format
11/ R ccc C
No CR character is sent after the coordinates.
Tab Stops
Inserting Data
Editing Data
Tab Stops ... 34 Inserting Data ... 34 Inserting Space Characters ... 35 Inserting a Column ... 35 Deleting Data ... 35 Clearing Data ... 35 Clearing a Page ... 35 Clearing to the End of a Page or Line ... 36 Clearing a Column ... 36 Boxing and Clearing a Rectangle ... 36
Clear all tab stops
Set tab stop at cursor position Clear tab stop at cursor position Tabulate cursor
Backtab
ESC 0 ESC 1 ESC 2 ESC i ESC I
If the tab stop is at a protected position, the cursor moves to the
next or previous unprotected position.
Don't initialize tabs ESC e:
Initialize tabs from nonvolatile memory ESC e :
These commands determine whether tab stops saved in nonvolatile memory are active when the terminal is turned on or reset.
Turn insert mode on, replace mode off
Turn insert mode off, replace mode on (default) Turn page edit mode off (default)
Turn page edit mode on
ESC q ESC r ESC e" ESC e #
When insert mode is off, each character entered replaces the existing character at the cursor position. When insert mode is on, the character at the cursor position and any characters to the right on the same line move right for each character entered.
When page edit mode is off, the data that moves beyond the end
Inserting Space Characters
Inserting a Column
Deleting Data
Clearing Data
Clearing a Page
When page edit mode is on, the data wraps to the next (unlocked) line; only data that moves past the end of the page is lost.
If protect mode is on, the page edit command is ignored. Turning
on protect mode turns off page edit mode.
Insert space character at cursor position Insert line of space characters
ESC Q
ESC E
When a line of space characters is inserted, the line that moves off
the bottom of the page is lost. If protect mode is on, the command
is ignored.
Insert column of null characters ESC c M
Data following the inserted column moves right one column. The command is ignored if a line is locked.
Delete cursor character ESCW
This command deletes the cursor character, pulling the following characters on the line back toward the cursor position. A space character is added at the end of the line or in the last position
before a protected field. If page edit mode is on, data wraps onto
the line from the following lines.
Delete cursor line ESC R
This command deletes the entire cursor line, moving all following
lines up one line and moving the cursor to the start of the line. If
protect mode is on, the command is ignored.
Delete cursor column ESC c J
This command deletes the cursor column, pulling the following columns left one column. The command is ignored if a line is locked.
The following commands replace characters with nulls, spaces, or specified characters.
Clear page to null characters Clear page to space characters
Clear page to write-protected space characters
ESC
*
ESC +
Clearing to the End of a Page or Line
Clearing a Column
Boxing and Clearing a Rectangle
Clear unprotected page to space characters
Clear unprotected page to null characters Clear unprotected page to a specific character
ESC; or CTRL Z ESC:
ESC. char
where char is the character that replaces unprotected characters.
Executing these commands also homes the cursor and turns off
protect mode. Executing ESC
*
or ESC + or ESC, also turns offwrite-protect mode and insert mode.
Clear unprotected page to space characters from cursor Clear unprotected page to null characters from cursor Clear unprotected line to space characters from cursor Clear unprotected line to null characters from cursor Clear unprotected page foreground to space characters Clear unprotected page foreground to null characters Clear unprotected line foreground to space characters Clear unprotected line foreground to null characters
ESCY
ESC Y
ESCT
ESC t
ESC c P
ESC c Q
ESCcR ESC c S
These commands replace unprotected characters from the cursor position to the end of the page or line, or the start of a protected field.
Clear unprotected to end of line with null characters Clear unprotected to end of line with space characters
ESC cL ESC cO
These commands replace all unprotected characters from the cursor to the end of the line (skipping over protected fields).
Clear unprotected column to null characters Clear unprotected column to specific character
ESC c K
ESC c I char
where char is the character that replaces the unprotected characters in the
cursor column.
These commands clear the cursor column on the entire page. They are ignored if a line is locked.
In the following commands for boxing and clearing a rectangle,
• The rectangle is limited to the current page
• The command is ignored if the defined rectangle encompasses a locked line
Boxing a Rectangle
Box rectangle in SO-column page Box rectangle in 132-column page
ESC c G line col
ESC c G line - col
where line and col are line and column codes (Appendix H) that define
the dimensions of a rectangle extending in any direction from the cursor position.
These commands draw a rectangle around an area of the page defined by a horizontal line between the cursor position and the specified column and by a vertical line between the cursor position and the specified line.
Box rectangle to right of cursor ESC c N width height
where width and height are line and column codes from Appendix H that
define the dimensions of a rectangle extending to the right and down from the cursor position. In this command the line and
column codes represent the number of character positions, not
screen coordinates. The column code defines the number of
columns in the width of the horizontal line; the line code defines
the number of lines in the height of the vertical line.
For example, specifying ESC c N ! $ draws a rectangle that extends two columns to the right of the cursor position and five lines down from the cursor position.
Clearing a Rectangle
Clear unprotected rectangle in ESC c F line col char
SO-column page
Clear unprotected rectangle in ESC c F line - col char
132-column page
Clear entire rectangle in ESC c H line - col char
132-column page
Clear entire rectangle in ESC c H line col char
SO-column page
where line is a line code from Table H-l in Appendix H.
col is a column code from Table H-2 in Appendix H.
char is the character that replaces the characters within the area of
Defining Print/Send Operations
Sending Data In Block Mode
Sending Data
Defining Print/Send Operation ... 38 Sending Data in Block Mode ... 38 Sending a Character or Line ... 39 Sending a Page ... 39 Sending a Block ... 39 Printing Data ... 39 Page Print Commands ... 40 Print Modes ... 41 Bidirectional Communication ... 41
Begin print/send operations at top of page (default) Begin print/send operations at top of screen
ESC d' ESC d &
These commands define whether the print and send commands described in this chapter affect data from home through the cursor position or from the top of the screen's data area through the cursor position.
When you send data in block mode to either the computer or the printer,
• The terminal automatically includes end-of transmission delimiters (terminators) according to the value selected for the BLOCK END parameter in setup mode
• If protect mode is on, graphics characters are sent as space
characters
• Null characters are not sent .
• Unless the beginning or end point is otherwise defined, data is
Sending a Character or Line
Sending a Page
Sending a Block
Printing Data
Send cursor character Send entire cursor line Send unprotected cursor line
ESC M ESC 6 ESC 4
No delimiter is sent after the cursor character is sent.
Send entire page Send unprotected page
ESC 7 ESC 5
If you've split the screen horizontally, only data from the active
window is sent.
To send a block of data,
1. Mark the beginning and end of the block with STX and ETX characters.
2. Send the block to the computer.
Mark block beginning with STX character Mark block end with ETX character
ESC 8 ESC 9
These sequences place a visible STX or ETX character at the cursor location.
Send entire block
Send unprotected characters
ESC s ESC S
These commands send the data between the first STX character left of the cursor and the first ETX character. (The STX and ETX characters are not sent.)
When the entire block is sent, protected fields are bracketed with the ESC) code (write-protect on) and the ESC ( code
(write-protect off).
When only unprotected characters are sent, each protected field is replaced by the field separator code FS (CTRL \).
To send data to the terminal's printer port, either
• Send a page print command to print data from the terminal's display memory, or
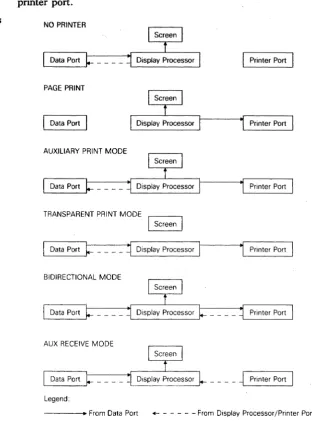
Figure 6-1 Communications through the Printer Port
Page Print Commands
Figure 6-1 shows how the terminal handles data through the printer port.
NO PRINTER
Printer Port
PAGE PRINT
Data Port
AUXILIARY PRINT MODE
TRANSPARENT PRINT MODE
I
ScreenDisplay Processor
BIDIRECTIONAL MODE
AUX RECEIVE MODE
____ ~ Printer Port
Legend:
- - - - " From Data Port +- - - From Display Processor/Printer Port
When you print from the terminal's display memory,
Print Modes
Bidirectional Communication
• A formatted page includes the end-of-line delimiters CR, LF, and a null character
• And ACK mode is on, the terminal sends an ACK to the computer at the end of the print operation
Print entire formatted page Print formatted unprotected page Print unformatted page
ESC P ESC@ ESCp or ESC L
No line terminators are sent with the unformatted page.
When one of the terminal's two buffered print modes is on, the terminal sends all data received from the computer to the printer port.
Turn print modes off (default) Turn auxiliary print mode on Turn transparent print mode on
CTRLT CTRL R ESC d #
In auxiliary print mode, the data is displayed on the screen; in transparent print mode, the data isn't displayed.
Data can flow in both directions between devices attached to the terminal's data port and printer port.
Turn secondary receive mode off (default) Turn secondary receive mode on
ESC d SPACE ESC d!
In secondary receive mode, data received by the terminal from a device connected to the printer port (such as a printer with a keyboard, or a bar-code reader) is sent directly to the data port without affecting the screen display. Data received from the data port is displayed on the screen but is not sent to the printer port.
Turn bidirectional mode off (default) Turn bidirectional mode on
ESC d $
ESC d %
Turning on bidirectional mode automatically turns on both
secondary receive and auxiliary print modes. Data received by the data port is displayed on the screen and sent to the printer port. Data received by the printer port is sent directly to the