4.1 Introduction: Using queries to
get the information you need
At first glance, it appears that splitting information into multiple tables and relationships creates more of a headache than it is worth. Many people like to have all the information they need on one screen (like a spreadsheet, for instance); they do not want to have to know about foreign keys and relationships and so on.
Queries address this problem. They allow the user to join data from one or more tables, order the data in different ways, calculate new fields, and specify cri-teria to filter out certain records.
The important thing is that the query itself contains no data—it merely reorganizes the data from the
table (or tables) on which it is built without changing the “underlying tables” in any way.
Once a query is defined, it can be used in exactly the same way as a table. Because of this, it is useful to think of queries as “virtual tables”. Similarly, in some DBMSes, queries are called “views” because they allow different users and different applications to have different views of the same data.
4.2 Learning objectives
Do queries contain any data? How do I create a query? What can I do with a query?How do I create a calculated field? Why does Access add square brackets
around field names?
What names should I give the queries I create?
What is a non-updatable recordset? How do I tell whether a query results in a
non-updatable recordset?
4.3 Tutorial exercises
4.3.1
Creating a query
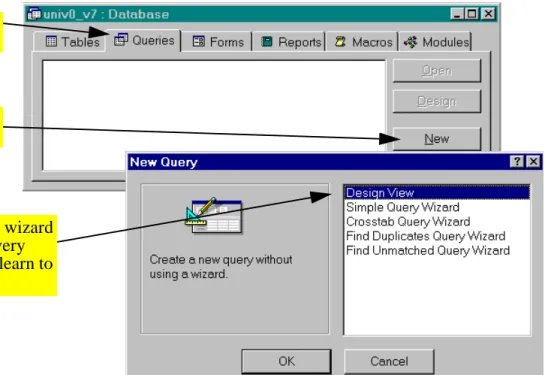
• Use the New button in the Queries pane of the
database window to create a new query as shown in Figure 4.1.
• Add the Courses table to the query as shown in
Figure 4.2.
• Examine the basic elements of the query design screen as shown in Figure 4.3.
• Save your query (Control-S) using the name
qryCourses.
4.3.2
Five basic query operations
4.3.2.1 Projection
Projecting a field into a query simply means includ-ing it in the query definition. The ability to base a query on a subset of the fields in an underlying table (or tables) is particularly useful when dealing with tables that contain some information that is confiden-tial and some that is not confidenconfiden-tial. For instance, the Employees table you created in Tutorial 2 con-tains a field called Salary. However, most of the queries seen by end-users would not include this information, thereby keeping it private.
• Perform the steps shown in Figure 4.4 to project the DeptCode, CrsNum, and Title fields into the query definition.
• Select View > Datasheet from the menu to see
the results of the query. Alternatively, press the datasheet icon ( ) on the tool bar.
FIGURE 4.1: Create a new query.
Select the Queries tab in the database window.
Press the New button to create a new query.
Avoid the use of the query wizard at this point. Queries are very important and it is best to learn to create them from scratch.
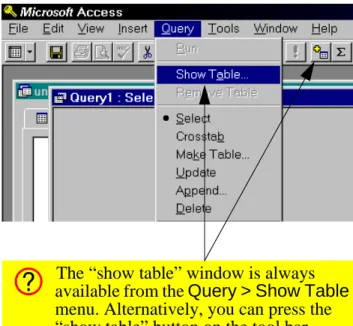
FIGURE 4.2: Add tables to your query using the “show table” window.
Add the Courses table to the query by selecting it and pressing Add
(alternatively, you can simply double-click on the table you want to add).
The “show table” window is always available from the Query > Show Table
menu. Alternatively, you can press the “show table” button on the tool bar. Press Close when done (the “show
table” window is “modal”—you can not do anything else in Access until a modal window is closed).
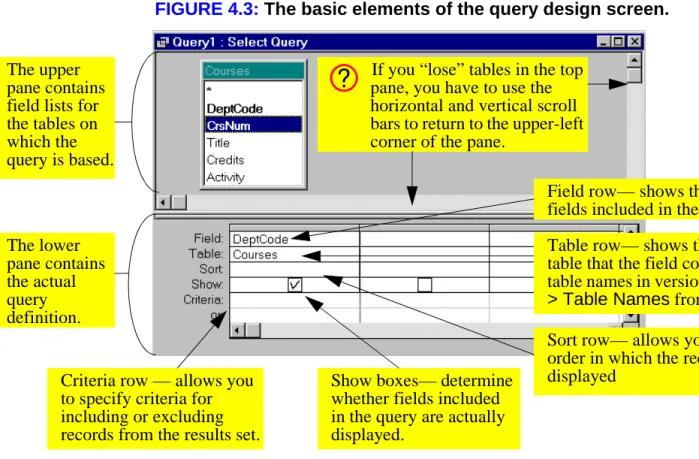
FIGURE 4.3: The basic elements of the query design screen.
The upper pane contains field lists for the tables on which the query is based.
If you “lose” tables in the top pane, you have to use the horizontal and vertical scroll bars to return to the upper-left corner of the pane.
The lower pane contains the actual query definition.
Field row— shows the name of the fields included in the query.
Table row— shows the name of the table that the field comes from. To get table names in version 2.0, select View > Table Names from the menu.
Sort row— allows you to specify the order in which the records are displayed
Criteria row — allows you to specify criteria for including or excluding records from the results set.
Show boxes— determine whether fields included in the query are actually displayed.
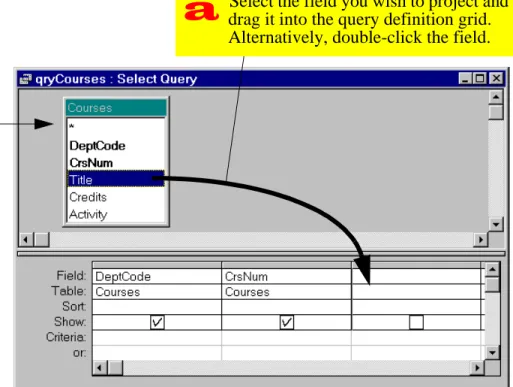
FIGURE 4.4: Project a subset of the available fields into the query definition.
Select the field you wish to project and drag it into the query definition grid. Alternatively, double-click the field.
To project all the fields in the
Courses table (including any that might be added to the table after this query is created) drag the asterisk (*) into the query definition grid.
To save time when
projecting fields, select more than one field at once (by holding down the Control
key) and dragging all the fields as a group.
• Select View > Query Design to return to design
mode. Alternatively, press the design icon ( ) on the tool bar.
4.3.2.2 Sorting
When you use a query to sort, you do not change the physical order of the records in the underlying table (that is, you do not sort the table). As a result, differ-ent queries based on the same table can display the records in different orders.
• Perform the steps shown in Figure 4.5 to sort the results of qryCourses by DeptCode and
CrsNum.
Since a query is never used to display data to a user, you can move the fields around within the query definition to get the desired sorting precedence. You then reorder the fields in the form or report for presentation to the user.
4.3.2.3 Selection
You select records by specifying conditions that each record must satisfy in order to be included in the results set. In “query-by-example” you enter exam-ples of the results you desire into the criteria row.
• Perform the steps shown in Figure 4.6 to select only those courses with a DeptCode = “COMM”. 4.3.2.4 Complex selection criteria
It is also possible to create complex selection criteria using Boolean constructs such as AND, OR, and NOT.
• Project the Credits field into the query.
• Perform the steps shown in Figure 4.7 to create a query giving the following result:
“Show the department, course number, and title of all courses in the Commerce department for which the number of credits is greater than three.”
FIGURE 4.5: Sorting the results set on one or more fields.
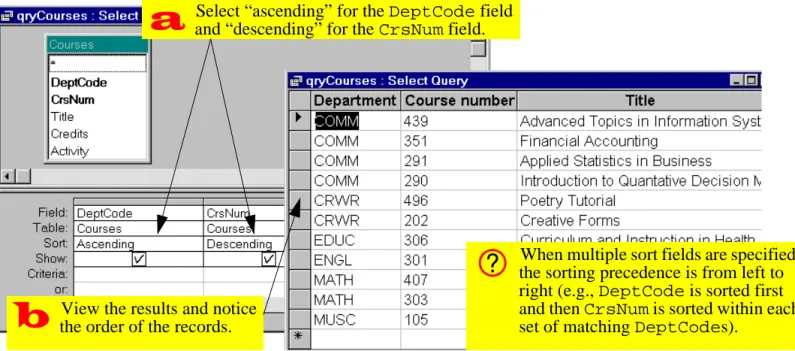
Select “ascending” for the DeptCode field and “descending” for the CrsNum field.
View the results and notice the order of the records.
When multiple sort fields are specified, the sorting precedence is from left to right (e.g., DeptCode is sorted first and then CrsNum is sorted within each set of matching DeptCodes).
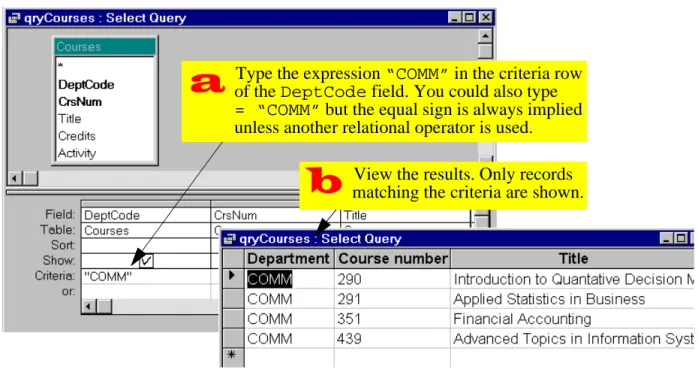
FIGURE 4.6: Select a subset of records from the Courses table matching a specific criterion.
Type the expression “COMM” in the criteria row of the DeptCode field. You could also type
= “COMM” but the equal sign is always implied unless another relational operator is used.
View the results. Only records matching the criteria are shown.
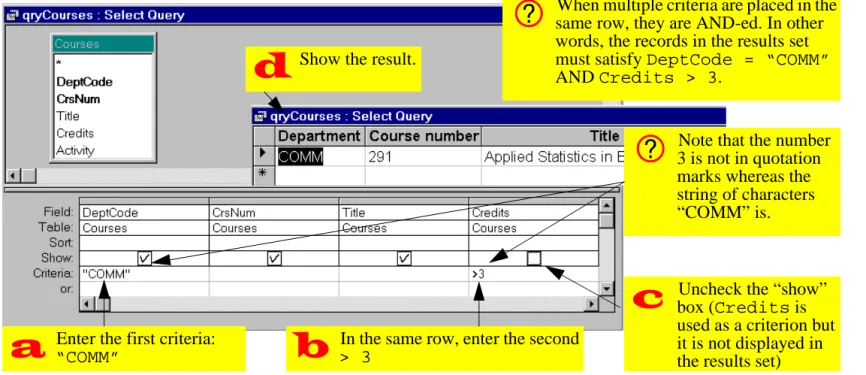
FIGURE 4.7: Select records using an AND condition.
Enter the first criteria:
“COMM”
In the same row, enter the second> 3
Uncheck the “show” box (Credits is used as a criterion but it is not displayed in the results set)
Show the result.
When multiple criteria are placed in the same row, they are AND-ed. In other words, the records in the results set must satisfy DeptCode = “COMM”
AND Credits > 3.
Note that the number 3 is not in quotation marks whereas the string of characters “COMM” is.
• Perform the steps shown in Figure 4.8 to create a query giving the following result:
“Show the department, course number, and title of all courses from the Commerce department
and also show those from the Creative Writing department for which the number of credits is greater than three.”
4.3.2.5 Joining
In Tutorial 3, you were advised to break you informa-tion down into multiple tables with relainforma-tionships between them. In order to put this information back together in a usable form, you use a join query.
• Close qryCourses.
• Open the relationships window and ensure you have a relationship defined between Courses
and Sections. If you do not, create one now (do not forget to enforce referential integrity).
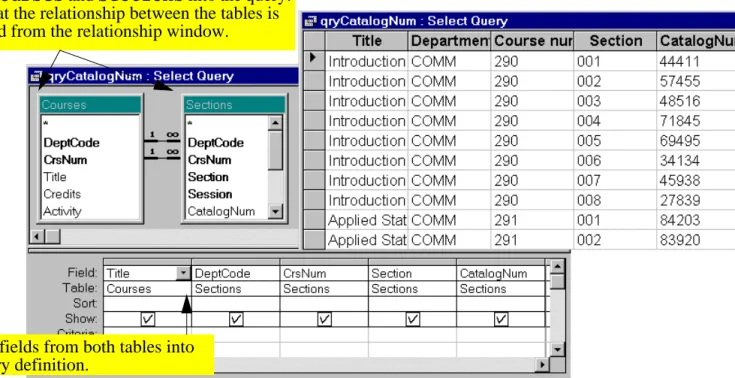
• Create a new query called qryCatalogNum
based on the Courses and Sections tables.
• Project Title from the Courses table and
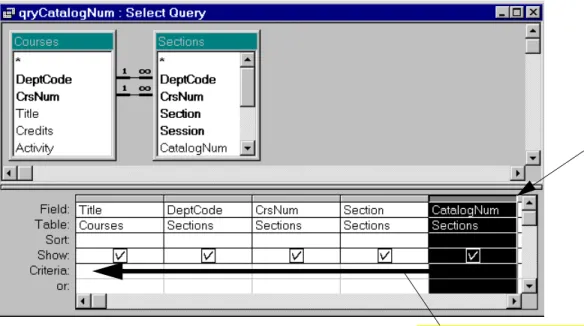
DeptCode, CrsNum, Section and Catalog-Num from the Sections table (see Figure 4.9). • Follow the instructions in Figure 4.10 to move
CatalogNum to the far left of the query definition grid.
Access performs an automatic lookup of information from the “one” side of the relationship whenever the a valid value is entered into the foreign key of the “many” side of the relationship. To see how this works, create a new section of “MUSC 105”:
• Scroll to the bottom of the query in datasheet mode and click on the department field. • Enter “MUSC”.
• Enter “105” in the course number field.
Once Access knows the DeptCode and CrsNum of a section, it can uniquely identify the course that the section belongs to (which means it also knows the values of Title, Credits, Activity, etc.)
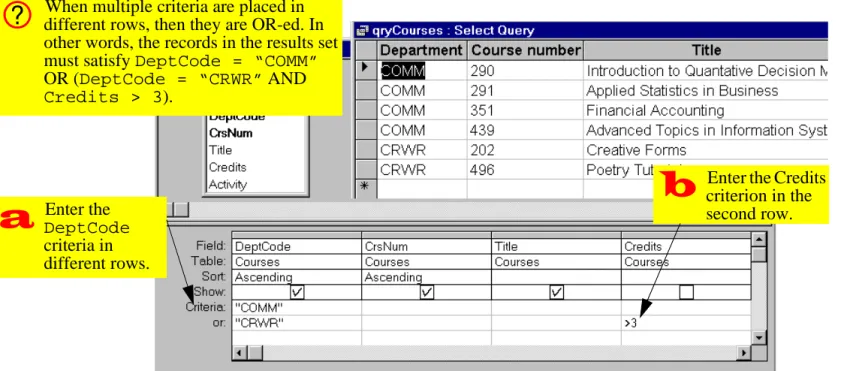
FIGURE 4.8: Select records using an AND and an OR condition. Enter the DeptCode criteria in different rows.
Enter the Credits criterion in the second row.
When multiple criteria are placed in different rows, then they are OR-ed. In other words, the records in the results set must satisfy DeptCode = “COMM”
OR (DeptCode = “CRWR” AND
FIGURE 4.9: Create a query that joins Courses and Sections.
Bring Courses and Sections into the query. Note that the relationship between the tables is inherited from the relationship window.
Project fields from both tables into the query definition.
FIGURE 4.10: Move a field within the query definition grid.
Click once on the grey “column selector” above the field you want to move (if properly selected, the column turns black).
Drag the selected column to its new location.
To delete a field from the query definition, select it and press the
4.3.3
Creating calculated fields
A calculated field is a “virtual field” in a query for which the value is a function of one or more fields in the underlying table. To illustrate this, we will create two calculated fields:
1. one to combine DeptCode and CrsNum into one field,
2. one to translate the Credits field into a dichoto-mous string variable (full year or half year).
The syntax of a calculated field is always the same:
<calc field name>: <definition>
For example, the syntax for the calculated field called Course is:
Course: DeptCode & CrsNum
The calculated field name can be just about any-thing, as long as it is unique. The definition is any expression that Access can evaluate. In this case,
the expression involves two fields from the Courses
table (DeptCode and CrsNum) and the ampersand operator (see Section 4.4.2 for more information on using the ampersand operator).
• Create a new query called qryCourseLengths
based on the Courses table.
• Follow the instructions in Figure 4.11 to create the calculated field Course
• Run the query to verify the results, as shown in
Figure 4.12.
When you use field names in expressions, Access normally adds square brackets. This is not cause for concern because in Access, square brackets simply indicate the name of a field (or some other object in the Access envi-ronment). However, if your field name con-tains blank spaces (e.g., Dept Code), the square brackets are NOT optional—you must
FIGURE 4.11: Create a calculated field based on two other fields.
Put the cursor in the Field row of the first column and invoke the zoom window.
Type in the name and the definition of the calculated field. The name cannot be the same as that of an
The zoom window provides more room to type than the tiny space in the query definition grid. Invoke the zoom window by moving to the area of the grid in which you wish to type and either right-click or press the Shift-F2 keys.
Press OK when you have finished typing the expression.
FIGURE 4.12: The resulting calculated field.
When the zoom window is closed, Access adds square brackets to the field names. Since the field names in this example do not contain spaces, the brackets are optional.
The ampersand operator (&) simply tacks
CrsNum onto the end of DeptCode. The name of the
calculated field shows in the field selector.
type them every time you use the field name in an expression.
4.3.3.1 Refining the calculated field Instead of having DeptCode and CrsNum run together in the new Course field, you may prefer to have a space separating the two parts.
• Edit the Courses field by clicking on the field row and invoking the zoom box.
• Add a space (in quotation marks) between the two constituent fields:
Course: DeptCode & ” ” & CrsNum
• Switch to datasheet mode to see the result. 4.3.3.2 A more complex calculated field
To create a calculated field that maps Credits to a dichotomous string variable, we need a means of testing whether the value of Credits exceeds a certain threshold (e.g., any course with more than
three credits is a full-year course). To do this, we will use the “immediate if” (iif) function.
• Search on-line help for information about the
iif() function.
Basically, the function uses the following syntax:
iif(<expression>, <true part>, <false part>)
to implement the following logic:
IF <expression> = TRUE THEN RETURN <true part>
ELSE
RETURN <false part> END IF
• Create a new calculated field called Length:
Length: iif(Credits > 3, “full year”, “half year”)
FIGURE 4.13: Create a calculated field using the “immediate if” function
Create a calculated field called Length with the following expression:
Length: iif(Credits>3, “full year”, “half year”)
4.3.4
Errors in queries
It may be that after defining a calculated field, you get the “enter parameter” dialog box shown in
Figure 4.14 when you run the query. This occurs when you spell a field name incorrectly. Access can-not resolve the name of the misspelled field and thus asks the user for the value. To eliminate the problem, simply correct the spelling mistake.
4.4 Discussion
4.4.1
Naming conventions for database
objects
There are relatively few naming restrictions for data-base objects in Access. However, a clear, consistent method for choosing names can save time and avoid confusion later on. Although there is no hard and fast naming convention required for the assignment, the following points should be kept in mind:
• Use meaningful names — An object named
Table1 does not tell you much about the con-tents of the table. Furthermore, since there is no practical limit to the length of the names, you should not use short, cryptic names such as
s96w_b. As the number of objects in your data-base grows, the time spent carefully naming your objects will pay itself back many times.
FIGURE 4.14: A spelling error in a calculated field.
Access cannot find the field named Creditz
• Use capitalization rather than spaces to separate words — Unlike many database systems, Access allows spaces in object names. However, if you choose to use spaces, you will have to enclose your field names in square brackets whenever you use them in expressions (e.g., [Back Orders]). As such, it is slightly more efficient to use a name such as BackOrders than Back Orders.
• Give each type of object a distinctive prefix (or suffix) — This is especially important in the con-text of queries since tables and queries cannot have the same name. For example, you cannot have a table named BackOrders and a query named BackOrders. However, if all your query names are of the form qryBackOrders, then distinguishing between tables and queries is straightforward.
• Stick to standard alphanumeric characters — You should limit yourself to the characters [A...Z], [a...z], [0...9], and perhaps underscore (_) and dash (-). Although Access allows you to use virtu-ally any character, undocumented problems have been encountered in the past with non-alphanu-meric characters such as the pound sign (#).
Table 4.1 shows a suggested naming convention for Access database objects (you will discover what these objects are in the course of doing the tutorials).
4.4.2
The ampersand (&) operator
The ampersand operator is like any other operator (e.g., +, -,
×
,÷
) except that it is intended for use on strings of characters. What the ampersand does is simply add one string on to the end of another string (hence its other name: the “concatenation” operator). For example, the expressionyields the result
First stringSecond string
However, if a space is include within the quotation marks of the second string (“ Second string”), the result is:
First string Second string
4.4.3
Using queries to populate tables
on the “many” side of a
relationship
In Section 4.3.2.5, you added a record to the Sec-tions table to demonstrate the automatic lookup feature of Access. However, a common mistake when creating queries for entering data into tables on the “many” side of a relationship is to forget to project the table’s foreign key. That is, faced with two tables containing the fields DeptCode and CrsNum, you project the fields from the wrong table (the “one”
Table 4.1: A suggested naming convention for Access database objects.
Object type Prefix Example
table (none) OrderDetails
query qry qryNonZeroBackOrders
parameter query
pqry pqryItemsInOrder
form frm frmOrders
sub form sfrm sfrmOrderDetails
switchboard form
swb swbMainSwitchboard
report rpt rptInvoice
sub report srpt srptInvoiceDetails
macro mcr mcrOrders
Visual Basic module
To illustrate the problem, do the following:
• Open the qryCatalogNum query and make the changes shown in Figure 4.15.
• Attempt to save the new section of “MUSC 105” as shown in Figure 4.16.
There are two ways to avoid this error when deciding which fields to project into your join queries:
1. Always show the table names when creating a query based on more than one table. That way, you can quickly determine whether the query makes sense.
2. Always ask yourself: “What is the purpose of this query?” If the answer is: “To add new records to the Sections table,” you automatically have to include all the fields from the Sections table. Fields from the Courses table are only shown for validation purposes.
4.4.4
Non-updatable recordsets
Another problem that sometimes occurs when creat-ing join queries is that the query is not quite right in some way. In such cases, Access will allow you to view the results of the query, but it will not allow you to edit the data.
In this section, will look at a nonsensical query that results from an incompletely specified relationship. As you will probably discover, however, there are many different way to generate nonsensical queries.
• Create a new query called qryNonUpdate
based on the Courses and Sections tables. • Delete the CrsNum relationship but leave the
DeptCode relationship intact, as shown in
Figure 4.17.
The result of this query is that every section in a Commerce course will be associated with every Commerce course. Since allowing the user to update
FIGURE 4.15: Create a data-entry query without a foreign key.
Reorder the fields (by dragging and dropping) so that DeptCode and
CrsNum are on the far left.
Change the source table for
DeptCode and CrsNum
from Sections to
Courses.
In version 2.0 you have to select View > Table Names to display the table row.
Switch to datasheet mode and attempt to add a new section of “MUSC 105”.
FIGURE 4.16: The result of attempting to save a record in which the foreign key is missing
Attempt to save the new section by clicking its record selector.
Since the fields are bound to the
Courses table, you are attempting to replace the current record in the Courses
table with “MUSC 105”. But since a “MUSC 105” already exists, you get an error.
FIGURE 4.17: Create a non-updatable recordset.
To create a nonsensical query, delete the
CrsNum relationship by clicking on it and pressing the Delete key. Leave the
Note the absence of the asterisk and the “new record” row. This is a sure sign that the recordset is non-updatable.Project fields from both tables and view the query in datasheet mode (i.e., view the “recordset”).
Attempt to change a value in the recordset.
the values in this recordset would create anomalies, Access designates the recordset as non-updatable.
A common mistake is to build data entry forms on nonsensical queries and to assume that there is a mistake in the form when the forms do not work. Clearly, if a query is non-updatable, a form based on the query is also going to be non-updatable. A quick check for a “new record” row in the query can save time and frustration.
4.5 Application to the assignment
• Create a query to sort the Products table by
ProductID.
• Create a query that joins the OrderDetails
and Products tables. When you enter a valid
ProductID, the information about the product (such as name, quantity on hand, and so on)
should appear automatically. If they do not, see
Section 4.4.3.
• Create a calculated field in your qryOrderDe-tails query that calculates the extended price (quantity shipped × price) of each order detail. • Enter the first order into your system by entering
the information directly into tables or queries. This involves creating a single Orders record and several OrderDetails records. You must also consult the Products and BackOrders
tables to determine the quantity of each item to ship.
Entering orders into your system will be much less work once the input forms and triggers are in place. The goal at this point is to get you thinking about the order entry process and ways in which it can be automated.