1951 Data Entry Manual
Canadian Century Research Infrastructure Infrastructure de recherche sur le Canada au 20e siècle
Prepared by: Rick Smith Mirela Matiu CCRI – IRCS
Institute of Canadian Studies 52 University Street
Ottawa, Ontario Canada K1N 6N5
Phone (613) 562-5800 ext. 3657 ♦ Fax (613) 562-5216 [email protected] ♦ www.canada.uottawa.ca/ccri
CHAPTER 1:INTRODUCTION 4
1.1.1951POPULATION FORM ... 4
1.2.1951IMAGES ... 6
1.3.DATA ENTRY SOFTWARE COMPONENTS ... 6
i. The Image Reader Window ... 6
ii. The Data Grid Window ... 6
1.4.CONCEPTS ... 7
i. Answer Types ... 7
ii. Template ... 9
Chapter 2: Data Capture 10 2.1.DATA ENTRY GRID ... 10
i. DEO Suggestions ... 10
II.COMMAND BUTTONS ... 10
iii. Tab Buttons ... 11
iv. Completed Indicator ... 11
2.2.IMAGE READER ... 12
i. Status Line ... 12
ii. Templates ... 13
2.3.METHODS OF DATA CAPTURE ... 21
i. Mark-sense Answers ... 21
ii. Text Answers ... 21
iii. Stamped Answers ... 21
2.4.MENU BAR ... 21
i. Read Menu ... 22
ii. Image Menu ... 23
iii. Template Menu ... 24
iv. Tools Menu ... 25
2.5.TEXT-FIELD WINDOWS ... 26
i. Questions 1 to 3 ... 26
ii. Questions 23 to 26 ... 27
Chapter 3: Appendix A 28 Chapter 4: Appendix B – Typical DEO Session 31 4.1OPEN DATA ENTRY TASK ... 31
4.2.COMPLETE WINDOW Q1-Q3 ... 32
4.3.ADJUST THE ZOOM FACTOR ... 32
4.4.LOCK ZOOM ... 32
4.5.POSITION THE TEMPLATE ... 32
4.6.HORIZONTAL LEVELING ... 33
4.7.READ CURRENT ... 33
4.8.VERIFY AUTOMATIC READING ... 33
4.9.ADVANCE TO QUADRANT 2 ... 33
4.10.ADJUST TEMPLATE ... 33
4.11.READ CURRENT ... 33
4.12.VERIFY AUTOMATIC READING ... 33
4.14.COMPLETE WINDOW Q23-26 ... 34
4.15.ADJUST THE TEMPLATE ... 34
4.16.READ CURRENT ... 34
4.17.VERIFY AUTOMATIC READING ... 34
4.18.ADVANCE TO QUADRANT 4 ... 34
4.19.ADJUST THE TEMPLATE ... 34
4.20.READ CURRENT ... 34
4.21.VERIFY AUTOMATIC READING ... 34
4.22.SAVE ... 34
4.23.NEXT IMAGE ... 34
Chapter 5: Appendix C – Special Cases 35 5.1.NO ANSWER DETECTED ... 35
5.2.PARTIAL RESPONSE DETECTED ... 35
5.3.SUGGESTIONS ... 36
i. Data Grid ... 36
ii. Text Input Fields ... 36
iii. Question Context Menu ... 37
5.4.UNLISTED ANSWERS ... 37
5.5.MULTIPLE ANSWERS ... 38
5.6.LARGE DWELLINGS ... 39
5.7.DAMAGED IMAGES ... 39
5.8SAMPLE POINT SUBSTITUTION ... 40
5.9.BAD ALIGNMENT OF IMAGE WITH TEMPLATE ... 45
5.10.HOUSEHOLD NUMBER NOT MARKED... 45
5.11.CHANGING FORM TYPES ... 45
5.12.CORRECTING VALIDATION ERRORS ... 46
5.13.WARNINGS ... 47
C
HAPTER1:
I
NTRODUCTIONThis manual explains how to capture 1951 census data from digital images using SPIDER 6.x. For the 1951 census, enumerators could use mark-sense technology to record most of the answers given by the respondent. Very few questions actually required a hand written response. Unlike the traditional data sheet used in previous censuses for handwritten responses, the mark-sense card on which the 1951 answers were recorded was designed to hold the data for a single individual. These important changes lead to a version of SPIDER that is significantly different from its predecessors.
1.1. 1951 Population Form
For the 1951 exercise, the CCRI will be capturing information from the 1951 Population form, an example of which is shown in figure 1. The form is double-sided: questions 1 to 13 appear on the front of the card and questions 14 to 29 appear on the back of the card.
Each population form can hold the data for a single individual. Consequently, in most cases, several cards are required to record a single household.
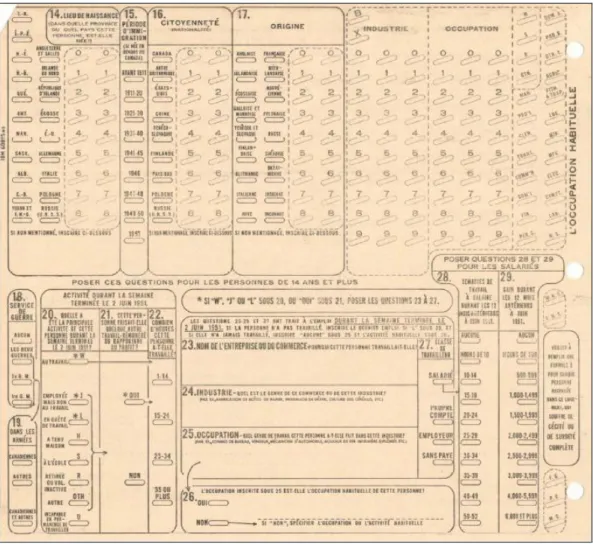
Figure 2 – The back side of Population form 2
There are two versions of the Population form. The most common form, called form 2, was used to record individuals who were enumerated at their regular residence. The second form, called form 2A, was used to record individuals who were not enumerated at their usual residence. The two forms are identical except for the following:
- Form 2A has a narrow stripe across the top of its front.
- Form 2A has supplemental questions that were used to record the district and sub-district of the individual’s usual residence.
- Form 2A has a supplemental question to record the name of the head at the individual’s usual residence.
- Question 4 (Household Number) on form 2A was not completed by the enumerator. This question was completed by Statistics Canada based on the answers given to the supplemental questions on form 2A.
1.2. 1951 Images
Each 1951 image file contains the digital representation of both the front and back of the 1951 population form. The front of the form appears on the left-hand side of the image and back of the form is depicted on the right-hand side.
Figure 3 – Both the front and the back of the population card are represented in the 1951 image file
1.3. Data Entry Software Components
The data capture software for 1951 uses two computer screens. While the 1951 windows are visually similar to those used in previous versions of the software their relative importance is very different. For 1951, the bulk of the DEO’s work will take place in the Image Reader window while the Data Grid window will be used simply to summarize the data captured for a sample point.
i. The Image Reader Window
The main data capture window in SPIDER 6.x is the Image Reader window. The window serves, as in previous versions, to display the digital image of the census form. Additionally, the Image Reader window includes features that allow data to be captured directly from the image.
ii. The Data Grid Window
This window is used to summarize the sample point data that was captured in the Image Reader. This version of the data grid is read-only: unlike previous versions of this window, the DEO cannot type data directly into the grid.
The layout of the data grid is exactly as it was in previous years with the columns customized for the 1951 variables.
1.4. Concepts
This section presents new concepts introduced with SPIDER 6.0. i. Answer Types
The questions of the 1951 census can be grouped into categories, or types, based upon how the answers were recorded on the form. There are three types of answers:
1) Mark-sense
2) Text
3) Stamped
A complete list of all the 1951 questions to be captured, along with their types, appears in Appendix A.
1) Mark-sense
Most of the answers on the 1951 population form were recorded by the enumerator using mark-sense technology. For each mark-mark-sense question the enumerator placed a special mark on the census form to indicate which of several listed answers was given by the respondent.
Figure 4 – The mark-sense Sex question
Bubble
The bubble is the oval area beside a mark-sense answer in which the enumerator would place a mark to indicate that the answer was given by the respondent.
Listed/unlisted answers
The answers provided for each mark-sense question are called the listed answers. Each listed answer has a corresponding bubble.
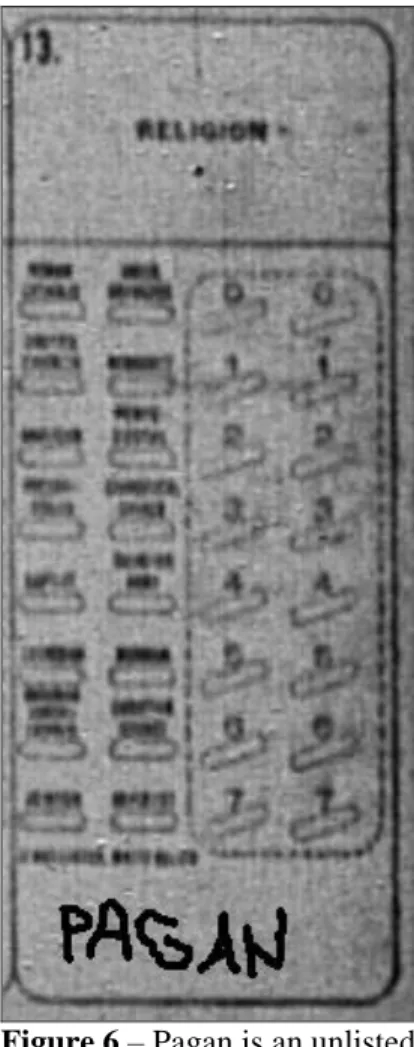
Some mark-sense questions (e.g. Q12 and Q13) have a space below them in which a value that is not among the listed answers may be hand-written. A response to a mark-sense question that does not appear in the listed answers is called an unlisted answer.
Figure 6 – Pagan is an unlisted answer for Religion
2) Text
Questions that had to be answered with a handwritten response (such as Q3 - Relationship to head) are called text questions.
Figure 7 – Q3 – Relationship to head is a text type question
3) Stamped
Stamped answers are answers that were not written by the enumerator but stamped on the form by Stats Can.
If the person being enumerated was in Korea at the time of the enumeration, the schedule will be stamped “Korea” near the individual’s name.
Figure 8 – The word 'Korea' is sometimes stamped on the form
Sometimes question 4 – Household Number is left blank by the enumerator. Stats Canada later stamped the household number above the question.
Figure 9 – The Household number 227 stamped above empty question 4
ii. Template
A template is a moveable transparent window that floats above the image in the Image Reader window. The template indicates the relative bubble positions of a group of mark-sense questions (see 2.2. section ii.)
Chapter 2: Data Capture
2.1. Data Entry GridThe data entry grid displays all the data that has been captured for the current sample point. A new row is added to the grid for every individual in the household. The columns correspond to the questions of the 1951 population form.
Values appear in the grid as a result of DEO actions in the data capture windows: the grid itself is read-only.
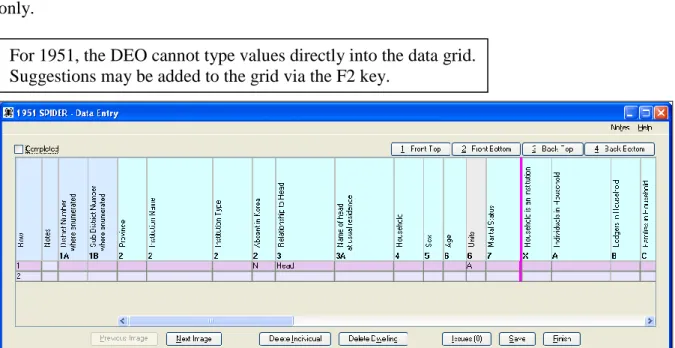
Figure 10 – Data Entry grid
The row of the grid that is highlighted represents the individual whose census form is displayed in the Image Reader window. When the Next Image or Previous Image command buttons are pressed to change the image in the Image Reader window, the highlight bar in the grid will be adjusted accordingly. Similarly, when the DEO selects a row of the data grid, the Image Reader window is refreshed to display the schedule that corresponds to the selected individual.
i. DEO Suggestions
As was the case in previous versions of SPIDER, the DEO may add a suggestion to any cell of the data grid. When a cell is selected, pressing the F2 key will cause the suggestion window to appear. An orange border is added to the cell for which a suggestion has been created.
ii. Command Buttons
The command buttons in the data grid window are documented below. For 1951, the DEO cannot type values directly into the data grid. Suggestions may be added to the grid via the F2 key.
1) Previous Image: Prompts the user to save any unsaved changes then replaces the image shown in the image reader window with the previous image in the series of images belonging to the current task.
2) Next Image: Prompts the user to save any unsaved changes then replaces the image shown in the image reader window with the next image in the series of images belonging to the current task.
3) Delete individual: Deletes the selected individual from the data grid. When an individual is deleted, the template displayed in the Image Reader window is reset.
4) Delete Household: Deletes all individuals from the data entry grid. Also resets the template of the Image Reader window.
5) Issues: Opens the Issue sub-system so that the DEO can create a new issue for the sample point or view an existing issue.
6) Save: Performs validation of the captured data. If there are non validation errors, writes any unsaved changes to the data base. If there are validation errors nothing is written to the database but a message explaining the error is displayed.
7) Finish: Prompts the user to save any unsaved changes then closes the data entry components and returns the user to the Task List window.
iii. Tab Buttons
There are four tab buttons above the grid that can be used to quickly expose specific sections of the grid.
Figure 11 – Tab Buttons
1) Front Top: aligns the data grid so that the answers to the front top questions of the form are visible.
2) Front Bottom: aligns the data grid so that the answers to the front bottom questions of the form are visible.
3) Back Top: aligns the data grid so that the answers to the back top questions are visible.
4) Back Bottom: aligns the data grid so that the answers to the back bottom questions are visible. iv. Completed Indicator
The Completed indicator checkbox, located above the data grid on the left-hand side, is selected automatically by SPIDER when the number of rows in the grid equals the number of image files for the sample point.
For sample points that do not contain ‘extra’ images, there is no need for the DEO to select the Completed indicator. SPIDER manages this value automatically. See section 5.14 for how the completed indicator must be used when the sample point contains ‘extra’ images.
2.2. Image Reader
The image reader window displays the contents of the 1951 image files and provides templates for capturing the mark-sense answers. A description of this window and its features are provided in the following section.
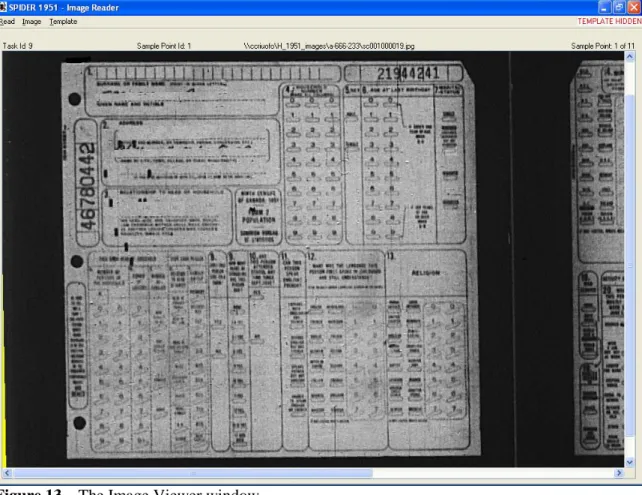
Figure 13 – The Image Viewer window
i. Status Line
The Status line provides information about the image displayed in the Image Reader.
Figure 14 – The status line
The following information is provided on the status line: 1) Task Id: the id of the current task
3) Reel and Image id: the directory path to the displayed image
4) Sample Point order: the ordinal position of the current sample point within the task. ii. Templates
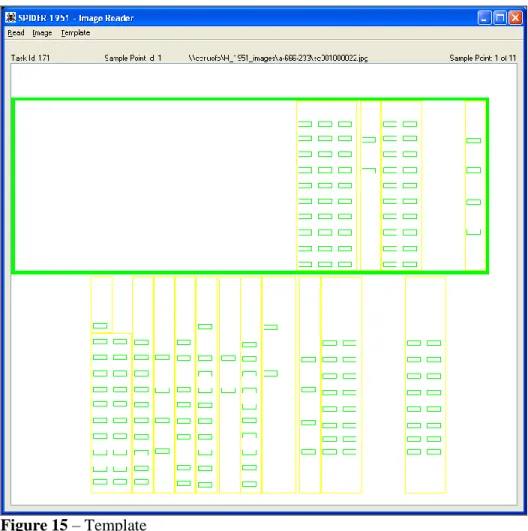
A template is a moveable transparent window that represents a group of mark-sense questions. The template window contains markings that indicate the relative position of the question’s bubbles. The software uses the position of the template to know how to read the questions that it represents.
Figure 15 – Template
Vertical lines separate the questions that are represented on the template. The answer bubbles of each question on the template are represented by small rectangles.
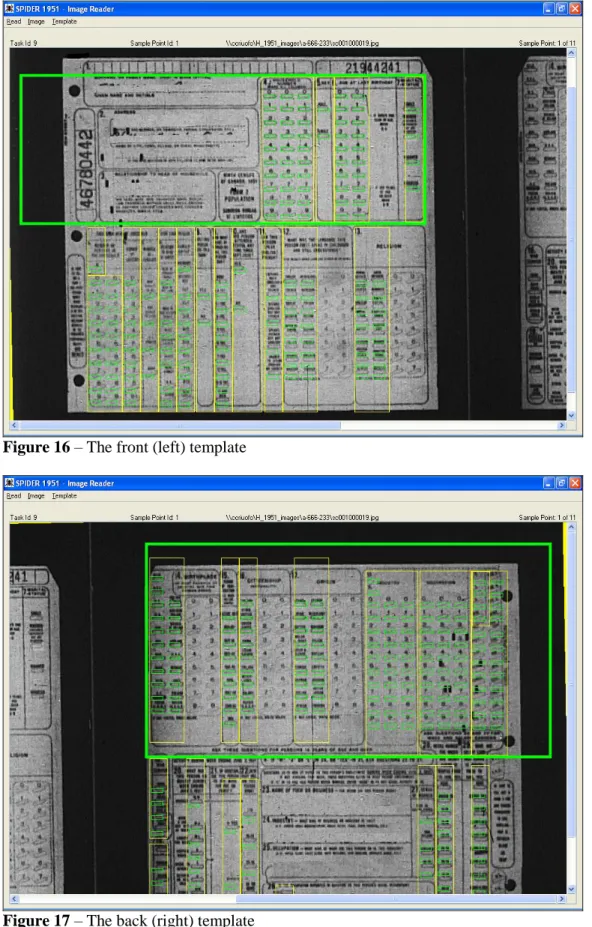
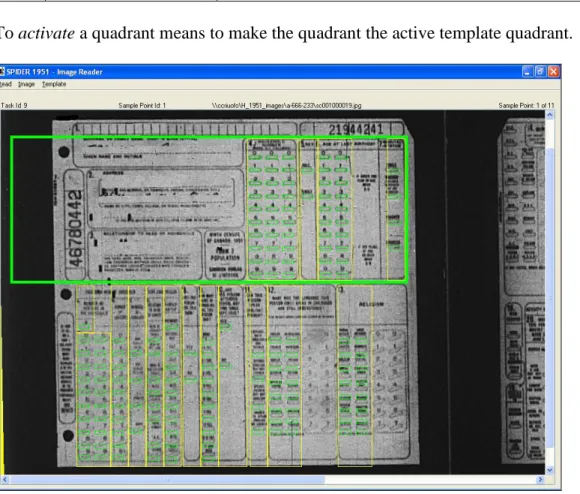
1) Front and Back
Two templates are used to cover the 1951 population card. One template covers the front of the card (the left-side of the image, Q4-Q13) and a different template is used to cover the back of the card (the right-side of the image, Q14-Q29). We will refer to the template that covers the front of the image as the front (or left) template. The template that covers the back of the card is referred to as the back (or right) template.
Figure 16 – The front (left) template
Figure 17 – The back (right) template
2) Active Template
3) Template Quadrants
We often need to refer to the upper or lower half of the template. Since there are 4 possible template halves we refer to the active half as the active template quadrant. A green box is drawn around the active template quadrant.
4) Changing the Active Quadrant
To change the active template quadrant use the + (plus) and – (minus) keys of the numeric keypad. The + key makes the next quadrant active while the – key makes the previous quadrant active. The cycle order for the quadrants is:
1 Front Top Questions 1 - 7
2 Front Bottom Questions 8-13
3 Back Top Questions 14- Usual Occupation Code 4 Back Bottom Question 18 - 29
To activate a quadrant means to make the quadrant the active template quadrant.
Figure 19 – The green box borders the active quadrant of the active template.
Figure 21 – The green box borders the active quadrant of the active template.
5) Positioning the Template
Because of variations between the images, the default position of the template in the image reader window will not be perfect for every image. There are two different ways to align the template over the image.
Dragging the Template
To move the template using the mouse, position the mouse over a clear area of the template, then press and hold down the left mouse button. While the mouse button is depressed, the template may be moved by moving the mouse. Release the mouse button to anchor the template in a new position.
Using the Arrow Keys
Often the template will be very close to the desired position and only a fine adjustment will be required. In such cases it is more convenient to use the arrow keys to move the template within the image reader. Each of the arrow keys nudges the template in a different direction.
Also, ensure the Image Reader window has focus1: if the focus is in the Data Grid window the shortcut keys will not work. If the Data Grid window has focus, click the Image Reader window to give it focus and to enable the template shortcut keys.
Figure 22 – keyboard shortcuts
Delete key – Hide/Show Template
This key toggles the visibility of the active template. If the template is visible, this key will hide the template. If the template is hidden, this key will expose the template.
A small notice appears in the top right corner of the Image Reader window while the template is hidden.
Figure 23 – A reminder is displayed while the template is hidden.
Insert key - Read Current
Reads the mark-sense questions of the active template quadrant. The answers that are detected are copied automatically to the data grid.
+ (plus) key – Next Quadrant
Cycles forward through the template quadrants.
(minus) key – Previous Quadrant
Cycles backwards through the template quadrants. 7) Question context menu
The user can position the mouse on any template question and right-click to display the question’s context menu, which offers a series of options available for the chosen question. The options available may vary according to the selected question.
Figure 24 – The context menu for Q13
Input
Puts the current question into input mode. In input mode the DEO can click on the question’s bubbles to force a response. The bubbles are displayed in red when the question is in input mode. When the user clicks on a bubble in input mode, a white circle is drawn around the bubble to indicate that the software has registered the action. The answer corresponding to the manually selected bubble(s) is copied automatically to the data grid.
in figure 25, if the DEO clicks on the red bubbles that are circled in green then 47 will be recorded as the age.
Figure 25 – The template alignment does not have to be perfect in input mode
Reset
Clears all marked bubbles for the current question. The corresponding data is erased in the data grid. Resetting a question puts it into Read mode. The question’s bubbles are displayed in green in Read mode.
Suggestion
Opens the Suggestion window so that a suggestion can be defined for the current question. Text
Opens a window that allows the user to enter an unlisted answer for a mark-sense question. This option is only available for questions where an unlisted answer was allowed on the population form. For example, question 13 (Religion) allows an unlisted answer; question 5 (Sex) does NOT allow an unlisted answer.
2.3. Methods of Data Capture
There are three different ways a DEO can use SPIDER to record the answers to the 1951 census questions. The method to use for each question varies depending on the question type.
i. Mark-sense Answers
SPIDER is designed to detect the special markings made by the enumerator inside the mark-sense bubbles. The DEO’s job is to position a template over the image of the census form. Once the template is positioned, the DEO instructs the software to ‘read’ all the special markings beneath the template. The software will then automatically enter the corresponding answers into the data grid. The DEO must then complete any questions that the software was unable to read. To complete a question the DEO simply clicks on the answer bubble(s) that correspond to the correct answer. The software automatically records the corrections in the data grid.
Section 2.2. explains how to work with templates.
Listed answers can be captured automatically by using templates or manually by clicking on bubbles while the question is in input mode. Unlisted answers can only be captured by using the Text option of the question context menu.
ii. Text Answers
Answers that were hand-written by the enumerator (such as Q3 - Relationship to head) must be typed into a text field by the DEO. The text fields are grouped in two windows: a first window allows the capture of Relationship and Institution information; the second allows the capture of Occupation information.
Section 2.5. explains how to work with the two text-field windows. iii. Stamped Answers
If the person being enumerated was in Korea, the schedule will be marked with a stamp “Korea”. The DEO must indicate the presence of the Korea stamp by selecting the Korea checkbox that appears in the Questions 1 to 3 window - See 2.5 section i. page 26. This checkbox must be left unchecked when the schedule is not stamped with the “Korea” notice.
2.4. Menu Bar
This section describes the four menus that are located in the menu bar across the top of the Image reader window.
i. Read Menu
The automatic reading of mark-sense questions may be controlled from the Read menu. When a template is read, the software evaluates the darkness of the bubbles beneath the template and attempts to determine the selected answer for each question. If the software detects unambiguous markings for a mark-sense question then the question is evaluated and its answer is automatically entered into the data grid. The software will indicate a successful read by circling the bubbles that contributed to the evaluated answer.
Figure 27 – Read Menu
1) Read Current
Forces the software to evaluate (read) the questions located beneath the current active template quadrant. The corresponding values of the data grid are erased and all answers detected by the software beneath the active quadrant are written to the data grid.
2) Read Top
Forces the software to evaluate (read) the questions located in the top half of the active template. The corresponding values of the data grid are erased and all answers detected beneath the top half of the active template are written to the data grid.
3) Read Bottom
Forces the software to evaluate (read) the questions located in the bottom half of the active template. The corresponding values of the data grid are erased and all answers detected beneath the bottom half of the active template are written to the data grid.
4) Read All
Forces the software to evaluate (read) the questions located in the active template (in both the upper and lower halves). The corresponding values of the data grid are erased and all answers that are detected beneath the active template are written to the data grid.
ii. Image Menu
The options of the Image menu affect the image that is displayed in the Image Reader window.
Figure 28 – Image Menu
1) Rotate Left
Rotates the image left around its center. The upper left corner of the image is raised and the upper right corner is lowered.
2) Rotate Right
Rotates the image right around its center. The upper right corner of the image is raised and the upper left corner is lowered
3) Zoom In
Enlarges the image displayed in the Image Reader.
4) Zoom Out
Reduces the image displayed in the image reader window.
5) Default Zoom
Displays the current image using the programs default zoom level.
6) Lock Zoom
Sets the current zoom level as the locked zoom level.
7) Use Locked Zoom
Displays the current image using the locked zoom level. If no locked zoom has been explicitly set then the default zoom is used.
8) Explode
iii. Template Menu
The template menu options affect the active template.
Figure 29 – Template Menu
1) Show
When the active template is hidden, this option will make the template visible. This option is only visible while the template is hidden.
2) Hide
When the active template is visible, this option will hide the template. This option is only visible while the template is visible. A small notice appears in the top right corner of the Image Reader window while the template is hidden.
Figure 30 – Template hidden
3) Enable Input Mode
Sets all the questions of the template to Input Mode. While a question is in input mode the DEO can manually set the question’s answer. The automatic reading functionality continues to be enabled while the template is in input mode. The question bubbles are displayed in red when the question is in input mode. This option is only available when the template is in Read mode.
IMPORTANT! An answer entered manually using INPUT MODE will override any marking that might be present on the card image.
4) Read Mode
Sets all the questions of the active template in Read mode. While a question is in Read mode its bubbles may not be selected manually. The question bubbles are displayed in green when the question is in Read mode. This option is only available while when the template is in input mode.
5) Reset
Clears all the questions of the active template and puts the template into Read mode. The corresponding answer values are erased from the data grid.
6) Text Questions
Displays a dialog window to capture the text answers for the questions in the range covered by the active template. When the left template is active this option displays the Question 1 to 3 window. When the right template is active this option displays the Questions 23 to 26 window.
iv. Tools Menu
Figure 31 – The Tools Menu 1) Irfanview
Starts the Irfanview image viewing program with the currently displayed image. Irfanview can be used to view the images on the current reel without affecting the contents of Spider’s Image Reader window.
2) Summary of Images
Opens a window that displays a summary of all the image files that are defined for the current sample point. The name of each file is displayed along with a note that indicates whether or not data has been captured from the file. The information for images that have data is displayed in a black font while the information for images that do not yet have data is displayed in an orange font (See Figure 32)
The image summary screen allows direct navigation to any image listed in the window. This feature is particularly useful for navigating within large households. To navigate to a listed image, select the row that corresponds to the target image then press the OK button: the Image Summary window will be closed and the Image Reader window will be refreshed to display the selected image.
2.5. Text-Field Windows
Two windows are available to capture the responses to text questions. Both windows contain text-input fields in which the DEO can type the hand written responses entered by the enumerator. In addition, the DEO may create a suggestion for any of these text-input fields (while the field has focus) by using the F2 key.
Each of these windows has an OK and a Cancel button. The former closes the window and saves any data entered in the text-input fields. The latter closes the window but ignores any changes made to the text-input fields.
i. Questions 1 to 3
This window allows the capture of the text responses to questions 1 through 3. The window is displayed automatically the first time the left template is presented.
The Text Questions option of the Template menu can be used to display this window at any time the left template is active.
Changing The Form Type
The title of this window indicates which form type is associated with the displayed census image. If the form type displayed in the title bar is incorrect, the form type may be changed by using the New Form Type button in the middle of the window.
The New Form Type drop–down box allows the DEO to change the recorded value of the census form type. This button is used to change a form (say, for example form 2) to any other form type.
Figure 34 – Text-Field Window – Questions 1 to 3, Form 2 A
On form 2A, the district and sub-district numbers are located in the upper right-hand corner of the form.
ii. Questions 23 to 26
This window allows the capture of the text responses to questions 23 through 26. These questions all relate to occupation. The window is displayed automatically the first time the right template is presented. The Text Questions option of the Template menu can be used to display this window at any time the right template is active.
Chapter 3: Appendix A
The table below describes which 1951 variables are being captured.Number Question Form Type
1a District Number 2A Text
1a Sub-district Number 2A Text
2 Institution Name 2 & 2A Text
2 Institution Type 2 & 2A Text
In Korea 2 & 2A Stamp
3 Relationship to head of
household
2 & 2A Text
4 Household Number 2 & 2A
Mark-Sense
5 Sex 2 & 2A
Mark-Sense
6 Age 2 & 2A
Mark-Sense
7 Marital Status 2 & 2A
Mark-Sense
A Persons in Household 2 & 2A
Mark-Sense
B Number of Lodgers 2 & 2A
Mark-Sense
C Number of Families 2 & 2A
Mark-Sense D Relationship to head of family 2 & 2A Mark-Sense
E Family Number 2 & 2A
8 Lives on Farm 2 & 2A Mark-Sense
9 Years of Schooling 2 & 2A
Mark-Sense 10 At School since Sept. 1950 2 & 2A Mark-Sense 11 Speaks English French 2 & 2A Mark-Sense 12 Language First Spoken 2 & 2A Mark-Sense
13 Religion 2 & 2A
Mark-Sense
14 Birthplace 2 & 2A
Mark-Sense 15 Period of Immigration 2 & 2A Mark-Sense
16 Citizenship 2 & 2A
Mark-Sense
17 Origin 2 & 2A
Mark-Sense
IND Industry Code 2 & 2A
Mark-Sense
OCC Occupation Code 2 & 2A
Mark-Sense UOC Usual Occupation Category Code 2 & 2A Mark-Sense USUB Usual Occupation Sub-category
code
2 & 2A Mark- Sense
18 War Service 2 & 2A
Mark-Sense
19 Forces Served In 2 & 2A
Mark-Sense 20 Activity June 2, 1951 2 & 2A Mark-Sense
21 Work for Pay 2 & 2A
23 Name of Firm 2 & 2A Text
24 Industry 2 & 2A Text
25 Occupation 2 & 2A Text
26 Usual Occupation Indicator 2 & 2A Mark-Sense
26a Usual Occupation 2 & 2A Text
27 Class of worker 2 & 2A
Mark-Sense
28 Weeks Worked 2 & 2A
Mark-Sense
29 Annual Earnings 2 & 2A
Chapter 4: Appendix B – Typical DEO Session
This section describes the typical sequence of steps a DEO will follow when processing the first image of a reel. For the second and subsequent images the DEO will repeat these same steps but will likely be able to skip the template/image calibration steps.
4.1 Open Data Entry Task
Select a Data Entry task from the Task List and press the Open button.
Figure 36 – Task list
By default, the first sample point of the selected task will be displayed in the data entry component. To begin working on a sample point other than the first, select the desired sample point on the Task List window before pressing the Open button.
The data entry screens will be displayed. The data grid will appear in one monitor and the Image Reader will appear in different monitor.
4.2. Complete Window Q1-Q3
When the Image Reader opens and displays the front template over the left side of the image, the corresponding Text Question window will open automatically.
1) Enter the Relationship to Head value. If the value is missing, use the F2 to add a suggestion with reason code Missing.
2) Confirm the form type
3) Change the form type if required
4) Complete any other variables required by the text question window. 5) Press OK to close the window.
Figure 37 – Text-Field Window for Question 1 to 3
4.3. Adjust the Zoom Factor
If the image in the Image Reader window is displayed too large or too small for the template, use the Zoom options of the Image Menu to adjust the zoom.
4.4. Lock Zoom
If the default zoom was incorrect and had to be changed. Use the Lock Zoom option of the Image Menu to inform the software to remember the changed zoom factor. Once the zoom factor has been locked, the saved setting can be quickly restored by using the Use Locked Zoom option of the Image menu.
4.5. Position the Template
Use the mouse or the arrow keys to align the active template quadrant (Q1 - upper left) over the corresponding mark-sense bubbles.
4.6. Horizontal Leveling
If the image in the viewer is tilted significantly, use the Rotate options of the Image Menu to adjust the horizontal level of the image.
4.7. Read Current
Once the active template quadrant is aligned with the image, use the Read Current key to read the mark-sense questions of the first quadrant.
4.8. Verify Automatic Reading
Verify the accuracy of the automatic read. It is often helpful to hide the template during verification. To hide the template use the Hide/Show key, see 2.2. section ii. item 6).
If a question was left unread (either because no answer or multiple answers were detected by the software) but does indeed have a listed answer, the DEO must click on the marked bubbles to record the answer.
If a question was left unread (either because no answer or multiple answers were detected by the software) but does have an unlisted answer, the DEO must use the Text option of the question context menu to enter the unlisted answer.
If the software read an answer when none was provided, the DEO must clear the incorrect response by selecting the Reset option of the question context menu.
If the software read a bubble that was not marked (instead of the marked bubble), then the DEO must manually indicate the correct response. Use the Input option of the question context menu to put the question into input mode. Click on the marked bubbles to register the correct response.
4.9. Advance to Quadrant 2
After having processed the first (front Top) quadrant, the DEO can press the Advance Quadrant button to activate the front-bottom quadrant - See 2.2. section ii. item 4).
4.10. Adjust template 4.11. Read Current
4.12. Verify Automatic Reading 4.13. Advance to Quadrant 3
After having processed the second (front-bottom) quadrant, the DEO can press the Advance Quadrant button to activate the back-top quadrant. The first time the back template is displayed (for each image) the Questions 23 to 26 window is automatically displayed.
4.14. Complete Window Q23-26
Enter the required occupation information then press OK. If there is no occupation data for the individual press the Cancel button.
Figure 38 – Text- Field Window for Question 23 to 26
4.15. Adjust the Template 4.16. Read Current
4.17. Verify Automatic Reading 4.18. Advance to Quadrant 4
After having processed the third (back-top) quadrant, the DEO can press the Advance Quadrant button to activate the back-bottom quadrant.
4.19. Adjust the Template 4.20. Read current
4.21. Verify Automatic Reading 4.22. Save
After the data for the four quadrants has been entered press the Save button in the data grid to save the captured data in the database. The software will perform validations on the data collected and will display a message if an error or warning(s) is detected.
4.23. Next Image
To enter the data for the next individual, the DEO must first display the next image. Press the Next Image button in the data grid window.
Chapter 5: Appendix C – Special Cases
5.1. No Answer DetectedIf the software does not detect an answer for a mark-sense question during the read operation, then the question will be converted to input mode (the bubble/rectangles will be displayed in red). The DEO must then inspect the markings of the underlying question.
If there are no marked bubbles for the question, then the DEO does not need to take any action. If there are marked bubbles then the DEO must click on them to register the response to the question. As the bubbles are clicked they will be circled by the software. Once a complete answer has been registered, the answer is automatically entered into the data grid.
5.2. Partial Response Detected
When the software is analyzing a mark-sense question during the automatic read, the evaluation will stop as soon as ambiguity is detected in a bubble column. If the bubble evaluation process is interrupted because of bubble ambiguity, a multiple-column question may be left partially answered. Examples of partial responses are shown in figures 39 and 40.
Figure 39
The software could not determine the selected bubble for the third column in figure 39. Notice that the third column is in input mode (displayed in red). In this case the DEO must click on a bubble (the third bubble must be selected in this case) in the last column to complete the answer.
Figure 40
In figure 40 the software was unable to detect the best bubble for the first column and therefore did not attempt to evaluate the second column. The first column is in Input mode but the second column is not. In such a case, the DEO must right-click the question to summon the context menu and select the Input option to place the question in Input mode. Once the question is in Input mode both columns will be displayed in red. The DEO must then click on the best bubble for each column.
5.3. Suggestions
Suggestions are markers created by the DEO that help document a data entry variable. Suggestions can be created from either the Data Grid, Text Input Field or from the template’s Question Context Menu. i. Data Grid
Place the cursor in a cell of the data grid then press the F2 key. The Suggestion window will be displayed. Specify a suggestion reason and, optionally, an alternate value. Press the Override button in the Suggestion window to confirm the suggestion and close the window. The cell for which the suggestion was defined will be drawn with an orange border.
ii. Text Input Fields
Place the cursor in any input field in the text input windows (Questions 1 to 3 and Questions 23 to 26) then press the F2 key. The Suggestion window will be displayed. Specify a suggestion reason and, optionally, an alternate value. Press the Override button in the Suggestion window to confirm the
suggestion and close the window. The input field for which the suggestion was defined will be drawn with an orange border.
iii. Question Context Menu
From the Image Reader window, place the cursor over a question then right-click the mouse to display the question context menu. The option Suggestion will display the Suggestion window. Specify a suggestion reason and, optionally, an alternate value. Press the Override button in the Suggestion window to confirm the suggestion and close the window. The cell in the data grid that corresponds to the question for which the suggestion was defined will be drawn with an orange border.
5.4. Unlisted Answers
To enter an unlisted answer for a mark-sense question, use the Unlisted option of the question context menu.
Figure 41 – Select the Unlisted option of the question context menu
Figure 42 – The Unlisted Answer input window
5.5. Multiple Answers
There are two ways a multiple answer can appear for a mark-sense question: Multiple bubbles are marked indicating multiple answers.
Figure 44 – Multiple Response - both the Male and Female bubbles are selected
A single (unique) answer is indicated with marked bubbles but there is an additional unlisted answer specified at the bottom of the question.
Figure 45 – multiple response - both a listed and an unlisted answer have been specified
The software is unable to register more than one answer to a mark-sense question. When more than one answer is present for a mark-sense question, a suggestion must be used to store the ‘secondary’ responses. In the case of the multiple marked bubbles indicating a multiple response (as in figure 44):
1) Use Input mode and use the mouse to indicate the first answer as the primary answer;
2) Create a suggestion for the question specifying the second response in the suggestion’s Alternate Value field. The reason for the suggestion must be Multiple Response.
For the case where both a listed and unlisted answer are present (as in figure 45):
1) Allow the software to read the listed response automatically. If the listed answer cannot be read automatically then use Input Mode to set the answer.
2) Create a suggestion for the question specifying the unlisted response (PAGAN in figure 45) in the suggestion’s Alternate Value field. The reason for the suggestion must be Multiple Response.
5.6. Large Dwellings
The 1951 version of SPIDER does not require (as was the case in previous versions) that the DEO sample within large dwellings. SPIDER will only display the individuals that must be captured. The DEO must capture all individuals in a large dwelling that are presented by the software.
If the head of household was not selected for the sample by the sampling software then SPIDER will prompt the DEO to collect the household number and head data if the head exists. The image containing the head will be displayed and the DEO will be prompted by warning number 1173 to capture only the head-related variables.
Figure 46 – Warning message
If the DEO receives this message then use the front template to capture the household number and head fields for the displayed image.
When message 1173 is displayed the DEO must ensure that the household number and head fields are correctly captured. These fields will typically be captured using the front template. There is no need to process the back template in this situation.
ANY OTHER DATA CAPTURED ALONG WITH THE HOUSEHOLD NUMBER AND HEAD FIELDS WILL BE IGNORED. THERE IS NO NEED FOR THE DEO TO CLEAR OR ERASE THE UNNEEDED A DATA.
5.7. Damaged Images
Damaged images were supposed to be screened out during indexing. If an image is encountered during data entry that has damage that prevents a question from being read:
5.8 Sample Point Substitution
Regular households that do not have a complete set of images can be marked for substitution by a supervisor. Incomplete households are usually a manifestation of a problem with the order of the images on the reel. If the images representing two families were accidentally shuffled together and scanned out of order then the indexing/sampling process would result in more than 2 sample points for the two households. Each of the sample points generated for the out-of-order households would be incomplete. The most common clues to the DEO that the household is incomplete are:
a) The household contains a single individual that is not a head
b) The number of individuals (image files) in the household is less than the number given by the head of household in response to question A (bottom left corner of front card).
When the DEO encounters an incomplete household he/she should notify his supervisor via a communication task. The DEO can use the Issues button of the data entry window to document his findings.
Figure 47 The DEO creates an issue to advise the supervisor of a probable substitution case
The supervisor who receives the communication task will decide whether or not the sample point must be replaced.
Figure 48 - Task 225 documents a single sample point that is a substitution candidate
The supervisor must use the Manage Sample Point option of the Manage menu on the Task List window to request a substitution. This option is only enabled when a sample point representing a regular
The Substitute Sample Point option will prompt the user to specify the reason for the request. The reason is mandatory. The reason is stored in the Substitution log and will appear in the Substitution log report.
Figure 50 - A reason for the substitution action must be specified
Once the Substitution reason window has been closed, the Task List window is updated to reflect the result of the action. Note the column labeled Substitution in the sample point table in the bottom half of the task List window.
The substitution request be canceled by a supervisor by using the Cancel Substitution Request option of the Manage Sample Point menu on the Task List.
Background on Sample Point Substitution.
Every sample point has a substitution status property. There are 4 possible values for this status:
a) ORIGINAL: indicates that the sample point was chosen by the last execution of the sampling program. There has been no substitution activity on the sample point.
b) REQUESTED: indicates that the sample point is scheduled to be replaced with a substitute. The actual replacement will be performed by a batch process that will be executed by the IT group at a later date.
c) SUBSTITUTE: indicates that the sample point was chosen by the substitution program. d) ABANDONED: indicates that a substituted sample point is incomplete. SPIDER will not
allow a substitute sample point to be replaced. The abandoned status is used to indicate that SP returned by the substitution process was deemed to be unacceptable.
The type of substitution requests that can be made are:
a) SUBSTITUTE: requests that an original sample point be replaced by a substitute. A substitution does not actually take place until the substitution process is executed. A substitute request may be canceled before the substitution process is run.
b) ABANDON: requests that a substitute sample point be discarded. The user will be prompted to confirm an Abandon request. Once the user confirms the request takes effect immediately: the substitute sample point is deleted.
c) CANCEL: requests that a substitute request be undone.
The Supervisor can obtain a summary of the substitution activity by generating the Substitution log report.
The parameter window for the Substitution Log report allows the supervisor to specify the type of log activity he/she wishes to view.
Figure 53 There are 3 parameters to customize the Substitution Log report.
5.9. Bad Alignment of Image with Template
The success rate of the automatic reading of mark-sense questions depends on the proper alignment of the template with the underlying image. If the template does not align properly with image try the following options:
1) Adjust the horizontal and/or vertical position of the template.
2) Adjust the image zoom. Experiment with different zooms is the current zoom setting is incorrect.
3) Rotate the image. If the horizontal alignment is uneven: the bubbles on one side are too high and the bubbles on the opposite side are too low, use the Rotate options from the Image menu to level the image.
4) If the template cannot be satisfactorily aligned with the image, put the template into input mode then use the mouse cursor to click on the template bubbles that correspond the answers on the form.
Sometimes a combination of the above will be required. 5.10. Household Number Not Marked
If no answer is detected by the software for question 4 (Household Number) because none of the bubbles for that question are marked, check above the question to see whether or not a number was stamped by Stats Can. If a number was stamped above Q4 then:
1) Use the Input option of the question context menu to place the question in input mode. 2) Click on the bubbles that correspond to the stamped number.
If no household number was stamped:
1) Use the Suggestion option of the question context menu to indicate that the value is Missing. 5.11. Changing Form Types
5.12. Correcting Validation Errors
When the Save button of the data grid window is pressed, the values in the grid are validated. If an error is detected the Suggestion window is displayed with a message – See Figure 55.
Figure 55 – Suggestion window
To override the error, select a reason from the Suggestion window, specify an alternate value (if one is available) then press the Override button. The Suggestion window will be dismissed and the cell that was in error in the data grid will be displayed with an orange border to indicate the presence of a suggestion (See figure 56)
Figure 56 An orange border indicates the cell has a suggestion
To correct the error, press the Correct button in the Suggestion window. The Suggestion window will be dismissed and the cell in error will have the focus in the data grid (See figure 57).
If the error to be corrected pertains to a mark-sense question then activate the template quadrant that contains the question. Use the template options to specify the correct answer to the question: use the template to automatically read the question or use input-mode to manually specify the answer.
If the error pertains to a text answer then summon the appropriate input window by selecting the Text Questions option from the Template menu. Recall that when the left/front template is active the Text Questions option will display the Questions 1 to 3 window. When the right/back template is active the Text Questions option will display the Questions 23 to 26 window.
5.13. Warnings
If no validation errors are detected when the values of the data grid are being saved, the software will perform a check for ‘suspicious’ answers. An answer is suspicious when it is unexpectedly present or unexpectedly absent in the context of a cross-field validation.
For example, if RELATIONSHIP_TO_HEAD is “head” then answers are expected for questions A
(NUMBER_OF_PERSONS_IN_HOUSEHOLD), B (NUMBER_OF_LODGERS), and C
(NUMBER_OF_FAMILIES). Conversely, if RELATIONSHIP_TO_HEAD is “wife” then no answers are expected for questions A, B and C.
SPIDER will display warning messages when it detects suspicious answers. All warnings will be displayed at once in a message window similar to figure 58.
Figure 58 a Sample data entry warnings window
When warnings are presented, the DEO must select ‘Yes’ to make changes to the data or select ‘No’ to ignore the warnings. Suspicious answers are surrounded by an orange circle in the Image Reader window. Figure 59 is an example where questions 19, 22, 26a, 28 and 29 are suspicious.
5.14. Extra Images
The DEO must ignore any image that is neither a form 2 nor a form 2A population schedule. Do not capture any information for images that are blank or that do not contain census data. If such an image is displayed in the image reader window, simply advance to the next image.
When a sample point contains an extra image, the number of images that have captured data will be less than the total number of images for the sample point. In such cases SPIDER will not automatically set the completed checkbox above the data entry grid. The DEO must manually set the completed checkbox once he/she has captured the last individual for the sample point.