Using Web Jetadmin to Back Up and Restore the HP Print Server Appliance
(Web Jetadmin version 7.2 and above; PSA Firmware version 2.4.x and above)Overview
The HP Print Server Appliance (PSA) Management plug-in for Web Jetadmin enables administrators to perform numerous tasks for one or multiple PSA in a batch environment. This whitepaper
discusses how to back up and restore the PSA using Web Jetadmin. Other features in the Management plug-in are:
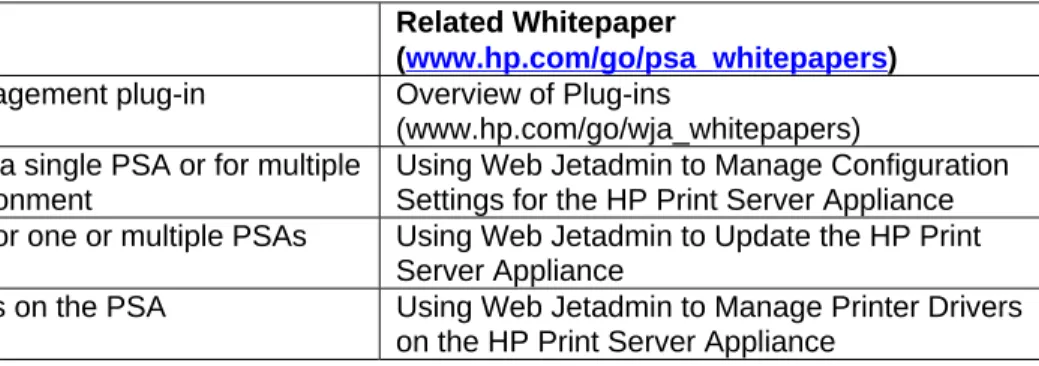
Feature Related Whitepaper
(www.hp.com/go/psa_whitepapers)
Install the PSA’s Management plug-in Overview of Plug-ins (www.hp.com/go/wja_whitepapers) Configure settings for a single PSA or for multiple
PSAs in a batch environment
Using Web Jetadmin to Manage Configuration Settings for the HP Print Server Appliance Update the firmware for one or multiple PSAs Using Web Jetadmin to Update the HP Print
Server Appliance
Manage printer drivers on the PSA Using Web Jetadmin to Manage Printer Drivers on the HP Print Server Appliance
Description of the HP Print Server Appliance
The PSA is a network device used to manage and monitor printing (Figure 1). It has been designed to provide a quick and easy way to add print capacity and off-load print spooling and services from the general-purpose servers. The latest firmware version is 2.4.x, which includes support for Web Jetadmin plug-ins that provide centralized management of the printing environment and
infrastructure.
Figure 1 – HP Print Server Appliance 4250
HP Print Server Appliance 4250
July 2003 white paper
Installing the PSA’s Management Plug-in
The PSA’s Management Plug-in is available from hp.com, using Web Jetadmin’s automated
download facility. Before installing the plug-in for Web Jetadmin 7.2, the HP Service Patch 2 must be installed. This patch can be installed using Product Update in HP Web Jetadmin for Microsoft Windows NT/2000/XP. If HP Web Jetadmin is configured for internet access, the patch will already appear under the list of available updates in Product Update. Otherwise, the package can be manually downloaded from www.hp.com/go/wja_components and uploaded into Product Update. For more information about the plug-ins, see the Web Jetadmin whitepaper Overview of Plug-ins (www.hp.com/go/wja_whitepapers).
Accessing the PSA’s Management Plug-in from Web Jetadmin
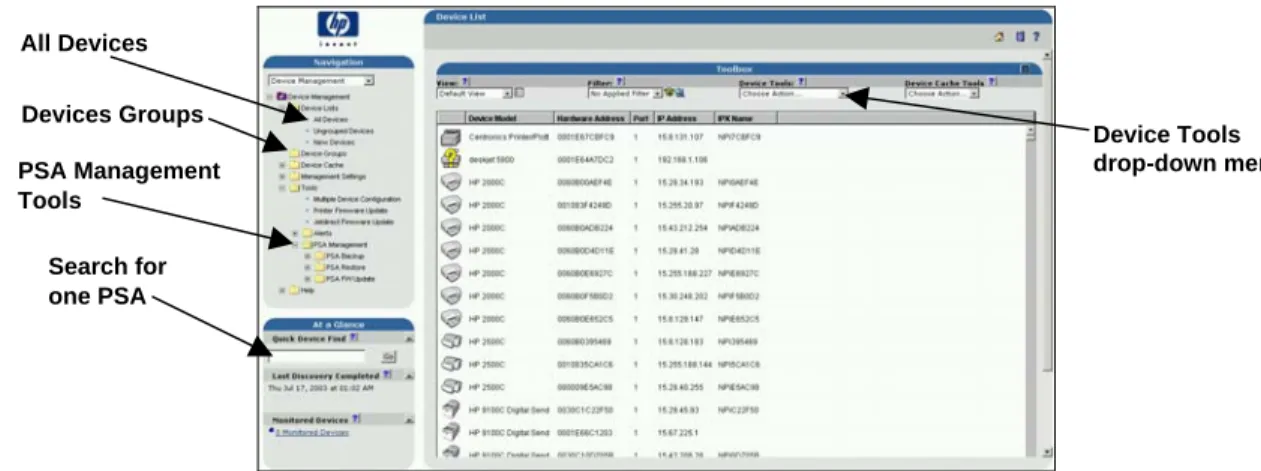
After the PSA’s Management plug-in is installed, there are several ways to access the features (Figure 2).
Figure 2 – PSA Management Tools Option in Web Jetadmin
• To back up multiple PSAs, use one of these methods:
1. Under Navigation on the left, select Device Management Tools PSA Management.
2. Select PSA Backup.
or
1. Under Navigation on the left, select Device List All Devices.
2. Highlight the desired PSAs.
3. From the Device Tools drop-down menu at the top of the page, select PSA Backup.
or
1. Under Navigation on the left, select Device Management Device Groups.
2. Select the desired PSAs’ group and then highlight the desired PSAs within the group. 3. From the Device Tools drop-down menu at the top of the page, select PSA Backup. • To manage one PSA at a time through Quick Device Find (under At a Glance):
Search for one PSA PSA Management Tools All Devices Device Tools drop-down menu Devices Groups
1. On the left side of the page in Quick Device Find, type the PSA’s name or IP address. Then click Go. The Device Properties page for that PSA is displayed.
2. From the drop-down menu at the top of the page, select PSA Backup.
Backing Up the Configuration Settings for the PSA
Backing up the configuration settings for the PSA is simply making a copy of the settings and storing it in a safe place (for example, a network share). Conversely, restoring the software is taking a copy of the settings from this “safe” place and putting it back on the PSA.
When backing up a PSA the backup file is a binary file that will contain a copy of the PSA’s
administrative accounts, network settings, and print shares along with their drivers. This file will have the extension of “.hp”.
The backup functionality within the PSA‘s Management plug-in for Web Jetadmin maintains copies of multiple PSA configurations. This feature provides a way to restore the PSA to working order, just in case a firmware problem has occurred on the PSA.
A scheduled backup option allows you to set a repeatable scheduled backup, further reducing direct administrator intervention. In addition, you can use a backup file to replicate a default image to a new PSA. To save time, you can schedule multiple PSAs at the same time.
PSAs are backed up one at a time even if multiple PSAs are selected. After the first selected PSA has been backed up, the second selected PSA will be backed up, and so forth.
PSA Configuration Backup for One PSA or Multiple PSAs at the Same Time
To back up the configuration for one or multiple PSAs, follow these steps:
1. To back up the configuration for one PSA, access the Device Page for the PSA and then select
PSA Backup from the drop-down list in the toolbar at the top of the page. Go to Step 2.
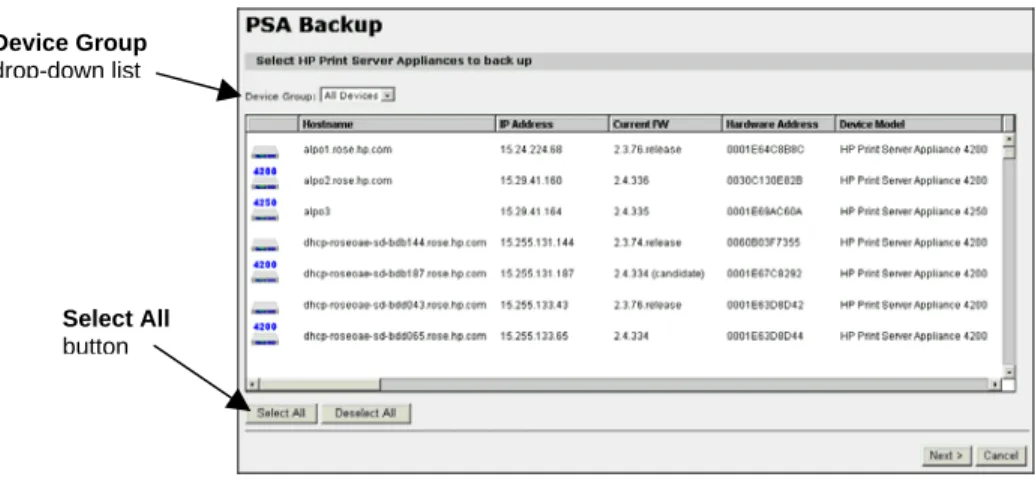
To back up the configuration settings for multiple PSAs in a batch mode, in the navigation frame drop-down box select Device Management Tools PSA Management PSA Backup. The PSA Backup page is displayed (Figure 3).
Figure 3 – PSA Backup Page
Device Group drop-down list
Select All button
To view PSAs in a group, click on the right side of the Device Group drop-down list. A list of device groups will be displayed. Click a device group to display a list of PSAs found in that group. A quick way to select all PSAs shown is to click Select All under the left-hand side of the selection table. Multiple PSAs can be selected using Shift/Ctrl.
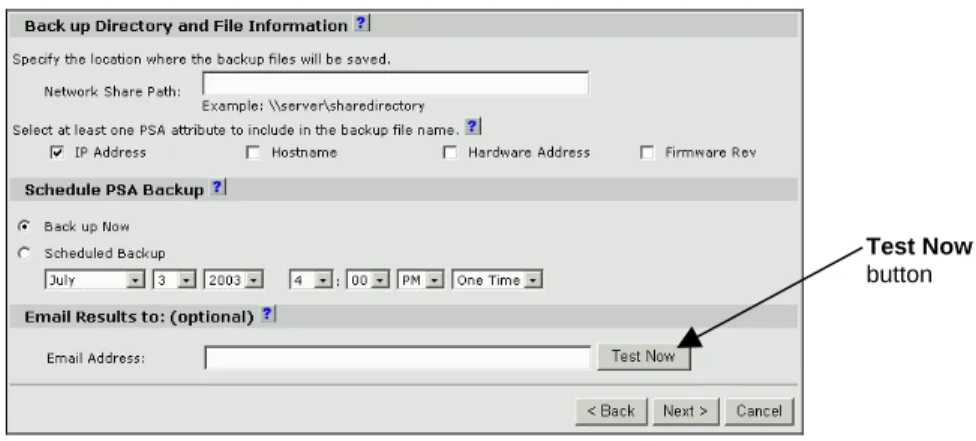
2. Click Next. The PSA Backup Options page is displayed (Figure 4).
Figure 4- PSA Backup Options Page
This page is used to specify:
• The location of the backup file about to be created in Network Share Path. To change the directory for the backup file to be saved in, type the directory you wish to save the backup file in. You can specify network shares with \\ (for example, \\server\share).
Note: You must have appropriate access on any system on which you are trying to save a
file (for example, for backups). If you do not, you will be prompted for appropriate authentication information. Also, make sure that the share is not read-only.
• The format of the backup file name (IP Address, Hostname, Hardware Address, and
Firmware Rev). Check one or all boxes to include that value in the file name. All file names
begin with the backup date and end with “.hp”. Some examples are:
Checking IP Addr and Hostname:
3-15-02_10.15.212.16_PSA1.somewhere.com.hp Checking Hardware Addr:
3-15-02_0001E63B5E5A.hp Checking all options:
3-15-02_10.15.212.16_PSA1.somewhere.com_0001E63B5E5A_2.3.37.omega.hp
• The schedule for the backup (Back up Now, which is the default, or Scheduled Backup). You can also specify the schedule to be recurring on a daily, weekly, monthly, or yearly basis. If you select Backup Now, when you click Confirm on a subsequent page the backup will begin. The date and time fields have no significance.
Make sure the time scheduled is in the future. No schedule will be made for a time prior to the current time. The current time is based on the Web Jetadmin server, not your local browser.
Test Now button
• One or more email addresses to send a message to providing information about the backup, detailing the status of the backup and whether or not it completed (Email Address). This is optional. Type the full email address. Multiple email addresses may be specified using the ';' as a delimiter. To send a test email to the specified email address, click Test Now.
If an SMTP server has not been configured, then an alert message is displayed asking if you want to set the SMTP settings now.
To remove the email addresses entered earlier, click Cancel in the alert message box and proceed with the backup process. No notifications will be sent.
To set SMTP settings, click OK in the message box. The Network Settings – SMTP page is displayed. Type a mail server in SMTP Server and click Apply. A second page is displayed asking you to test the email connection. After the connection has been tested, go to Step 3. 3. Click Next to proceed with the backup.
4. Your access rights to the system on which you have identified to store the backup file are
checked. If you do not have appropriate access rights on the system on which you are saving the backup file, the Authorization page is displayed (Figure 5). Type your user name, domain, and password. Or, click Back and specify a different file location on the PSA Backup Options page.
Figure 5 – Authorization Required to Access Directory Page
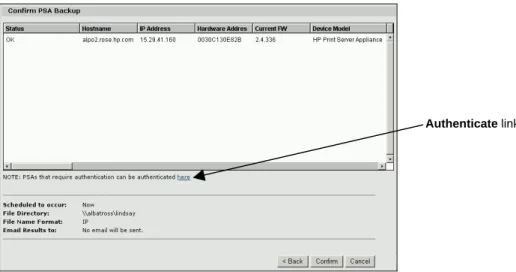
5. The PSA Backup Confirmation page is displayed (Figure 6). This page summarizes the
settings made about the backup just created. Click Back to change any of the settings.
Figure 6 – PSA Backup Confirmation Page
Valid statuses for this page are:
OK: Authentication on the corresponding PSA was successful. The backup can continue. Unreachable: The corresponding PSA could not be contacted. The backup will not be
performed on any PSA with this status.
Not a PSA: The device is not a PSA. The backup will not be performed on this device. Bad URL: The URL for the corresponding PSA is incorrect. The backup will not be
performed for this PSA.
PSA Authentication Error: The credentials provided were not accepted by the
corresponding PSA. Click on the authentication link below the confirmation window to authenticate on the PSA. Once authenticated, the backup can be performed.
Unknown Error: Any other error.
To authenticate to the PSA you are trying to back up, click the authentication link on the Confirm
PSA Restore page (Figure 6 displayed earlier). The PSA Authentication page is displayed
(Figure 7). Type your user name and password and then click Add/Replace.
Figure 7 – PSA Authentication Page
6. If the settings are acceptable, click Confirm. If the backup was not scheduled for now, the PSA
Backup Schedules page is displayed (Figure 8). (If the backup was scheduled for now (Backup Now), the PSA Backup Status page is displayed (Figure 9 displayed later).)
Figure 8 - PSA Backup Schedules Page (displayed if not scheduled for “Now”)
The PSA Backup Schedules page displays all of the backups scheduled to occur. It also shows relevant data for each schedule. Schedules can be modified or removed as needed.
To change a scheduled backup, click Modify for the corresponding schedule and repeat the entire backup process again. When modifying a backup:
Remove button Modify button
• If you abandon this rescheduling process before it has completed, the original schedule will not be modified.
• If the time the schedule is supposed to run occurs while it is being modified, the original backup schedule will occur and, upon completion, the new schedule will be added for an additional backup in the future.
The fields on this page are:
• Date/Time: The date and time that the backup will start. • PSAs: Lists the PSAs to be backed up.
• Options: Lists the options selected on the PSA Backup Options page (Figure 4 displayed
earlier).
• Email Results to: Lists the email address hat will receive a message detailing the results of
the backup after the backup process has completed for the group of PSAs displayed.
Note: This page can also be displayed by choosing Device Management PSA FW Backup FW Backup Schedule.
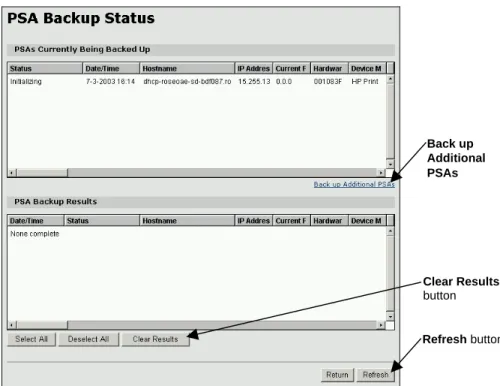
If the configuration backup was schedule for now (Backup Now), the PSA Backup Status page is displayed (Figure 9).
Figure 9 - PSA Backup Status Page (displayed if scheduled for “Now”)
To sort the tables, click the column heading to sort by that column. Click the same heading again to invert the sorting.
To increase the width of a column, click and drag the edge of the column for the desired column width and then release the mouse button.
There are two sections to this page:
Clear Results button Back up Additional PSAs Refresh button
• The top half, PSAs Currently Being Backed Up, shows the status of the PSAs being backed up. (This section cannot be modified.) To back up additional PSAs, click that link in this half.
Possible statuses are:
Initializing: The PSA is being prepared the PSA for the backup to take place. Creating File: The backup file is being created.
Transferring File: The backup file has been created and is being transferred to the
destination.
• The lower half, PSA Backup Results, shows the results of recent backups that were scheduled to run and have run. To remove entries, select entries to remove and click Clear
Results.
Possible statuses are:
Successful: The backup was completed and transferred successfully.
PSA Authentication Error: A problem with access permissions to the PSA was
encountered.
Invalid Save Directory: The directory where the backup file is to be saved is invalid. Connection Error: A network error occurred while trying to contact the PSA.
Duplicate Backup: There is already a backup running for this PSA.
Unknown Error: The PSA responded to the plug-in with an undefined response. Invalid PSA: The backup feature is not supported on this version of PSA (a firmware
version earlier than 2.3.x).
File Authentication Error: A problem with access permissions to the backup file was
encountered.
Restore Already Processing: There is a restore in progress. The backup cannot run. FW Update Already Processing: There is a firmware update in progress. The backup
cannot run.
File Write Error: A problem occurred while writing the backup file to the destination
directory.
File Size Limit Exceeded: The maximum size for the backup file was exceeded. The
backup cannot continue.
Restoring a Backup File for the PSA
This feature provides the user with the ability to restore a PSA to a saved backup configuration. One PSA can be restored at a time.
1. To restore a backup file for one PSA, double-click on the desired PSA. Or, type that PSA’s name in Quick Device Find and click Go. Then select PSA Restore from the drop-down list in the toolbar at the top of the page. The PSA Restore page is displayed (Figure 10).
Or, in the navigation frame drop-down box select Device Management Tools PSA Management PSA Restore. The PSA Restore page is displayed (Figure 10).
Figure 10 – PSA Restore Page
To view PSAs within in a group, click the checkmark on the right side of the Device Group drop-down list. A list of device groups will be displayed. Click one of the groups to display a list of PSAs within that group.
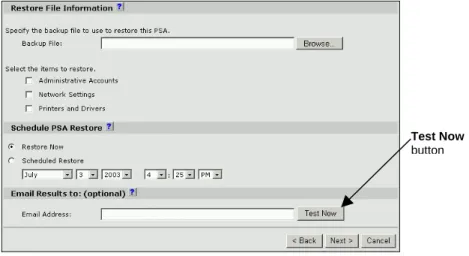
2. Click Next. The PSA Restore Options page is displayed (Figure 11).
Figure 11 - PSA Restore Options Page
This page is used to specify:
• Restore File Information: Identify the exact path for the backup file to be restored for the
PSA, and also the parts to be restored: Administrative Accounts, Network Settings, and
Printers and Drivers. (Please note that any drive letter, such as “C:”, refers to the local PC
where the browser is running, and not to the Web Jetadmin server). Device Group
drop-down list
Test Now button
• Schedule PSA Restore: Select the time that the restore process should start for the PSA:
now (default) or in the future. This can be important due to normal use of the PSA or network traffic. PSA outages due to restores can be kept to a minimum by scheduling a PSA restore to occur during non-peak hours. if you select Restore Now, the date and time fields are ignored.
• Email Results to: (optional) One or more email addresses to send a message with
information about the restore, detailing the status of the restore and whether or not it
completed (Email Address). Type the full email address. Multiple email addresses may be specified using the ';' as a delimiter. Send a test email to the email address, click Test Now. If an SMTP server has not been configured, then an alert message is displayed asking if you want to set the SMTP settings now.
To remove the email addresses entered earlier, click Cancel in the alert message box and proceed with the restore process. No notifications will be sent.
To set SMTP settings, click OK in the message box. The Network Settings – SMTP page is displayed. Type a mail server in SMTP Server and click Apply. A second page is displayed asking you to test the email connection. After the email connection has been tested, go to the next step.
3. Click Next to proceed with the restore. The configuration backup file specified is checked to
make sure it is valid (with an extension of “.hp” and that you have proper access to the system on which you are accessing the file.
4. The PSA Restore Confirmation page is displayed (Figure 12). This page displays information
about the restore just scheduled. It summarizes the settings made. Any problems are highlighted in red with a brief description. Click Back to change any of the settings.
Figure 12 – PSA Restore Confirmation Page
Valid statuses for this page are:
OK: Authentication on the corresponding PSA was successful. The restore can continue. Unreachable: The corresponding PSA could not be contacted. The restore will not be
performed on any PSA with this status.
Not a PSA: The corresponding device is not a PSA. The restore will not be performed. Bad URL: The URL for the PSA is incorrect. The restore will not be performed for this PSA. PSA Authentication Error: The credentials provided were not accepted by the
corresponding PSA. Click on the authentication link below the confirmation window to authenticate on the PSA. Once authenticated, the restore can be performed.
Unknown Error: Any other error.
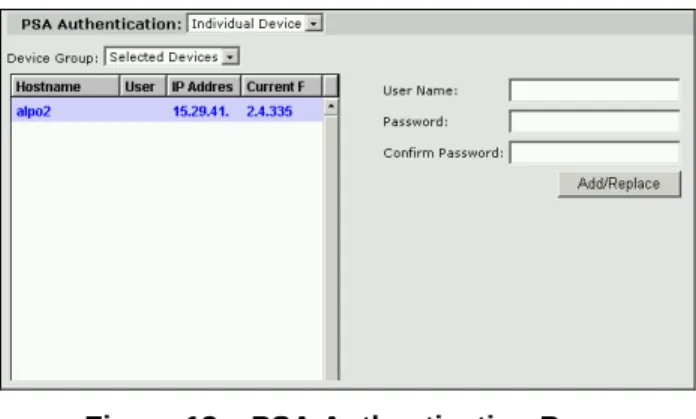
To authenticate to the PSA you are trying to restore, click the authentication link on the PSA
Restore Confirmation page (Figure 12 displayed earlier). The PSA Authentication page is
displayed (Figure 13). Type your user name and password and then click Add/Replace.
Figure 13 – PSA Authentication Page
5. If the settings are acceptable, click Confirm. If the restore was not scheduled for now, the PSA
Restore Schedules page is displayed (Figure 14). (If the restore was scheduled for now
(Restore Now), the PSA Restore Status page is displayed (Figure 15 displayed later).)
Figure 14 - PSA Restore Schedules Page
The PSA Restore Schedules page displays any restore schedules that have not yet been run. It displays the date and time for the scheduled restores, as well as which PSA is being restored, which options were chosen, and who will receive the results email. It also provides buttons to either remove or modify the restore schedule.
The fields on this page are:
• Date/Time: The date and time that the restore will start.
Remove button Modify button
• PSAs: Lists the PSAs to be restored.
• Options: Lists the options selected on the PSA Restore Options page (Figure 10 displayed
earlier).
• Email Results to: Lists the email address hat will receive a message detailing the results of
the restore after the restore process has completed for the PSAs displayed.
Note: This page can also be displayed by choosing Device Management PSA Restore Restore Schedule.
If the restore was scheduled for now (Restore Now), the PSA Restore Status page is displayed (Figure 15).
Figure 15 - PSA Restore Status Page
To sort the tables, click the column heading to sort by that column. Click the same heading again to invert the sorting.
To increase the width of a column, click and drag the edge of the column for the desired column width and then release the mouse button.
There are two sections to this page:
• The top half, PSAs Currently Being Restored, shows the status of the PSAs being restored. (This half cannot be modified.) To restore additional PSAs, click that link in this half.
Possible statuses displayed in PSAs Currently Being Restored are:
Reading File: Reading the backup file to be restored. Creating Request: Creating the restore request. Sending Request: Sending the restore request.
Processing Request: The backup file has been uploaded and the restore is in process.
Clear Results button Restore Additional PSAs link Refresh button
• The bottom half, PSA Restore Results, shows the results of previous restores. To clear this section, select some or all of the entries and then click Clear Results.
Possible statuses displayed in PSA Restore Results are:
Successful: The restore was successful.
Invalid Restore File: The file specified for restore to the PSA is invalid. Connection Error: A network error occurred while trying to contact the PSA. Duplicate Restore: There is already a restore running for this PSA.
Invalid PSA: The restore is not supported on this version of PSA (a firmware version
earlier than 2.3.x).
File Authentication Error: A problem with access permissions to the backup file (which
is used for the restore) was encountered.
PSA Authentication Error: A problem with access permissions to the PSA was
encountered.
Unknown Error: The PSA responded to the plug-in with an undefined response.
Backup Already Processing: There is a backup in progress. The restore is not allowed
until it has completed.
FW Update Already Processing: There is a firmware update in progress. The restore is
not allowed until it has completed.
File Size Limit Exceeded: The maximum size for a backup file (which is used for the
restore) was exceeded. The restore cannot continue.
Summary
Using the PSA’s Device Management plug-in for Web Jetadmin enables administrators to manage one or multiple PSAs in a batch environment, including backing up and restoring configurations settings. Backups and restores and can be easily scheduled to occur immediately (and
simultaneously) or at a time that ensures minimal impact on end users.
For More Information
http://www.hp.com/support/printappliance http://www.hp.com/go/psa_whitepapers http://www.hp.com/go/webjetadmin http://www.hp.com/go/wja_whitepapers hppt://www.hp.com/go/wja_components