Rochester Institute of Technology
RIT Scholar Works
Theses Thesis/Dissertation Collections
2006
A dynamic web server based appointment calendar
Jane Zhong
Follow this and additional works at:http://scholarworks.rit.edu/theses
This Master's Project is brought to you for free and open access by the Thesis/Dissertation Collections at RIT Scholar Works. It has been accepted for inclusion in Theses by an authorized administrator of RIT Scholar Works. For more information, please [email protected].
Recommended Citation
A Dynamic Web Server Based Appointment Calendar
Graduate Project Report for MS Degree of Computer Science
Jianxia Zhong
Committee:
Chairman:
Prof. Axel Schreiner
Reader:
Prof. Hans-Peter Bischof
Acknowledgments
I would like to express my sincere gratitude to my advisor Professor Axel Schreiner for his inspiration,
encouragement and guidance during the whole period of this project at Rochester Institute of Technology.
I would also like to thank Professor Hans-Peter Bischof, Professor Stanislaw P. Radziszowski for their
Abstract
A dynamic web server based calendar has been developed. It is capable of scheduling meetings at a
level compared to that of the best commercially available tools, such as Outlook and MeetingMaker, for
managing calendar. It is a dynamic web application. A user can use a web browser like Internet Explorer
to access the calendar services and the communication between the client and the server is dynamic and
secure.
In this project, the advanced server side technology, Microsoft 2003 .NET Framework has been used.
It runs on the Windows operating system built with IIS (Internet Information Services). Also, Microsoft
SQL Server 2000 has been used as the database server for the persistence layer to handle appointment and
meeting scheduling. It has many new features in architecture and functions, compared to the traditional
calendars.
This project has been implemented using a logical, 3-tier architecture, namely, Presentation Layer,
Business Logic Layer and Data Access Layer. One benefit of using such architecture is a clear separation
between user interface, business logic, and data access layers. And it would make the business logic code
Table of Contents
Acknowledgements 1 Abstract 2
1. Introduction 5
1.1 The Existing Calendars 5
1.2 The Dynamic Web Server Based Calendar 9 1.3 The Technology Used in This Project 10
2. User Manual 12
2.1 Login 12
2.1.1 Administrator Login 12 2.1.2 Login as a Regular User 14 2.1.3 Logout the calendar System 15
2.2 User Information 16
2.2.1 Changing Password 16
2.2.2 Editing User Information 16 2.2.3 Viewing Other Users’ Information 17 2.3 Navigating the Calendar 19 2.4 Scheduling Appointments and Meetings 21 2.4.1 Scheduling an Appointment 21 2.4.2 Scheduling a Meeting 22 2.4.3 Responding a Meeting 25 2.4.4 Check Meeting Responses 26
2.5 Set Recurrent Events 27
2.6 Proxy 29
2.6.1 Assigning a Proxy 29
2.6.2 Acting as a Proxy 30
3.2.2 Scheduling Meetings 33
3.2.3 Show Message List 33
3.2.4 Management of Proxies 34
3.2.5 Security Login 34
4. Architecture Overview 35
5. Implementation of the Web Calendar 37
5.1 The Database Design 37
5.2 Implementation of the Architecture of Three Layers 44 5.2.1 The Data Access Layer 44 5.2.2 The Business Layer 44 5.2.3 The Presentation Layer 47 6. Comparisons with Some Existing Calendar Systems 58 6.1 Overall Technique and Functionality 58 6.2 Data Communication and Storage Model 59 6.3 Client Software and Multi Platforms 61
6.4 Calendar Sharing 61
6.5 Most Useful Features 62
6.5.1 Viewing the Availability of Attendees when Scheduling Meeting 62 6.5.2 Auto Updating Meeting Status 62
6.5.3 Event Reminder 63
6.5.4 Set Event as Recurrent Event 63 6.5.5 PDA Synchronization 64 6.6 Friendly User Interface 64
6.7 Ease of Learning 65
6.8 Secure Communication 65
7. Summary of Comparisons 66
8. References 68
1. Introduction
In the real world today, people rely on email and e-calendar more and more. It happens not only in
companies, universities, and government departments, but also in all kinds of private societies and
organizations. It is very convenient to track appointments and meetings by using e-calendar. It is
especially efficient in scheduling meetings when it is possible to get online access of the availability of the
attendees and resources. The responses from the attendees update the meeting attendance table
automatically to let the meeting organizer know who is planning to attend the meeting. The reminder
function of the e-calendars prevents the users from overlooking any events.
1.1 The existing calendars
Several commercial e-calendars are available, such as Outlook calendar, iCal and MeetingMaker.
These traditional calendars are widely used today. Although it is made easy to set appointments and
meetings, these calendars require unique software be installed in the users’ computers. It is sometimes
very inconvenient, such as in travel and in remote access.
Outlook calendar [1] is an application of Microsoft Office Suite. It has the largest user population because over 90% of personal computers have Microsoft Office Suite as the major office software. Both
the Outlook exchange server and clients are running in local intranet. Outlook exchange server and
database server must be installed to provide email service and calendar service; they can be in the same
machine or different machine; Users in the same intranet can use Microsoft Outlook as the clients to
access these services. Users outside the intranet can remote access the Outlook Exchange server through
Virtual Private Network or by using a web browser if the server is configured as an OWA (Outlook Web
Fig. 1.1 Outlook calendar in Day View layout
Fig. 1.1 shows a typical User Interface (UI) of Outlook calendar. In Outlook calendar, a user can set
appointments, schedule meetings, set reminders, check the availability of others, check the responses of
meeting requests.
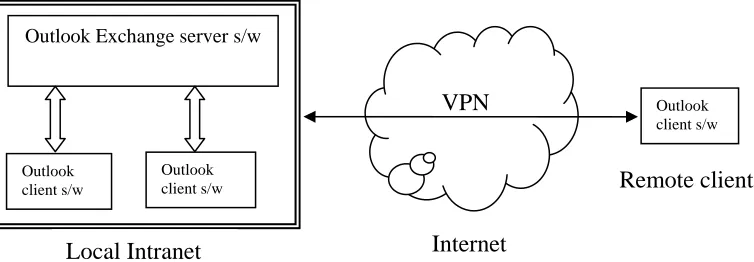
Fig. 1.2 schematically shows how Outlook calendar works.
[image:8.612.95.472.516.647.2]Outlook Exchange server s/w
Fig. 1.2 Illustration of how Outlook calendar works VPN
Outlook client s/w
Outlook client s/w
Outlook client s/w
Remote client
An Outlook exchange server is running in the local intranet, and Outlook client software is running in
the client computers. The clients and the server have interactions to exchange information. A remote
Outlook client can also exchange information with the server through Internet by Virtual Private Network
(VPN). VPN software must also be installed in the remote client to access the exchange server.
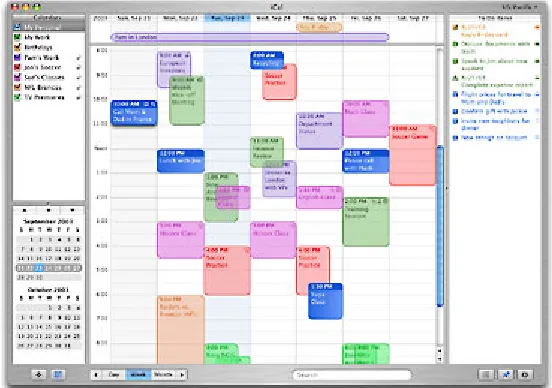
While Outlook Calendar running in Microsoft Windows platform, iCal calendar is running in
Macintosh OS platform [2]. Even though their functionalities are similar, they are built on different architectures. Fig. 1.3 shows a typical UI of iCal calendar. In iCal, different calendars are color coded and
displayed all together. The calendars of other users can also be displayed together with the user’s own
calendars. It has similar functions as those of Outlook, i.e., setting appointments, meetings, inviting
attendees, setting reminders. iCal is a stand-alone application that must be installed in the local computer.
A user’s calendar can not be accessed by other users unless it was published on the web. That means
others do not know when you are available unless you have published your calendars on the web. iCal
publishes calendars on .Mac or local WebDAV server, so others can access those calendars using web
browsers. If they are iCal users, they can even subscribe to your calendar and have immediate access to it
[image:9.612.181.457.385.579.2]from iCal.
Fig. 1.3 iCal Calendar in Day View layout
Fig. 1.4 shows two working models of iCal to share calendars. iCal publishes calendars on a local
WebDAV server, so the users in the local intranet can share the published calendars, as shown in Fig.
1.4(a). iCal publishes calendars on .Mac through internet, so users on the internet can access those
Fig. 1.4 iCal sharing calendar models
When a user requests a shared calendar using web browser, the .Mac or local WebDAV server delivers
the shared calendar to the client’s web browser. But the interaction model between the web browser and
the .Mac or WebDAV server is static, one-way traffic web pages.
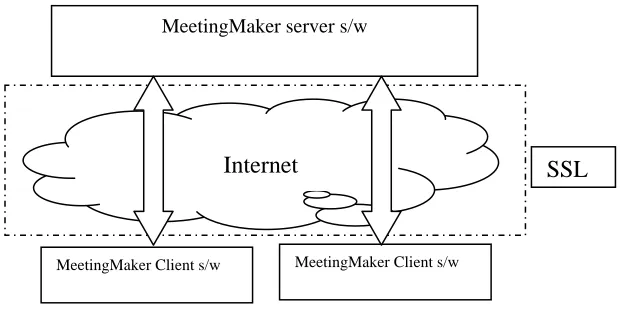
MeetingMaker is copyrighted by Meeting Maker Inc., which is running across platforms, such as
Windows, Macintosh, and Solaris [3]. The secure communication across the internet between the clients and server is through SSL (Security Sockets Layer) protocol. Fig. 1.5 schematically shows the working
model of MeetingMaker.
Fig. 1.5 Illustration of how MeetingMaker works
The MeetingMaker client software must be installed in each client computers. The client computers
can be a mixture of different OS platforms. A MeetingMaker server is running to provide services to the Internet
MeetingMaker server s/w
MeetingMaker Client s/w MeetingMaker Client s/w
SSL iCal s/w WebDAV server iCal s/w Internet P u b lis h D o w n lo ad .Mac iCal s/w iCal s/w
Local Intranet model Internet model
[image:10.612.140.450.472.627.2]clie
ity of scheduling meetings was very low when I
star
e dynamic web server based calendar
A new calendar model was proposed in this project to overcome some weakness of the existing
a web server and a user can use a web browser to
acc
nts. The clients communicate with the server interactively through the internet. The SSL protocol is
used to provide secure communication. MeetingMaker can also publish calendars on the web, so other
users can access the shared calendars using any web browsers, but the interaction between MeetingMaker
server and the client’s web browser is also one-way traffic, i.e., the web server can only provide static web
pages.
Yahoo calendar [4] is a web server calendar, which does not require any client software and can be accessed wherever a web browser exists. But its capabil
ted the proposal of this project. For instance, the server can not take the response from the meeting
attendees automatically, because of which the meeting organizer did not know who accepted and who
rejected the meeting request; the meeting organizer could not check the availability of the attendees. These
two shortages kept Yahoo calendar off the effective meeting scheduling tools. Yahoo calendar was too
simple to be used in the places where functions and efficiency were critical. Yahoo calendar made
improvement in meeting scheduling recently. Now the server will take the responses from the meeting
attendees to update the meeting status, so that the organizer can monitor the responses of the meeting
attendees. But the meeting request will not get written into the attendees’ calendars, so the invited
attendees can not see the meeting request in their calendars. There are also security issues of data
communication between the browser and Yahoo server that will be discussed in the last chapter of this
report
1.2 Th
calendars. The web server based calendar is running in
ess it if the user has the access permission. The web server based calendar can ‘perceive’ the client
behaviors and take correspondent actions. Fig. 1.6 shows the working model of the dynamic web server
Dynamic web server s/w
Fig. 1.6 Illustration of the dynamic web calendar model
This dynamic web server based calendar is very convenient to use since it can be accessed wherever
there is the Internet Explorer. It is also a powerful appointment and meeting scheduling tool. The meeting
organizer can view the availability of the meeting candidates graphically so he (or she) can pick the best
meeting time to fit most attendees’ schedules. The meeting request is marked in the attendee’s calendar as
a meeting event. The response from the attendee updates the meeting status database table automatically
through the web server so that the meeting organizer or the attendees can monitor the meeting attendance.
1.3 The technologies used in this project
To implement the dynamic web server based calendar model in Fig. 1.6, ASP.NET is the right tool for
creating feature-rich and dynamic Web sites. The .NET Framework is a platform for building and running
applications, its chief components are the Common Language Runtime (CLR) and the .NET Framework
Class Library (FCL). The CLR abstracts operating system services and serves as an execution engine for
managed applications. The FCL provides the object-oriented API that managed applications write to.
ASP.NET is a web development platform that provides the programming model and software
infrastructure necessary to build enterprise-class applications. As part of the Microsoft .NET platform,
ASP.NET provides a component based, extensible, and easy-to-use way to build, deploy, and run web
application [5]. ASP.NET is a compiled .NET Framework based environment where applications can be authored in any .NET Framework compatible language including Visual Basic, C#, J#, C++, and JScript.
So unlike classic ASP, in which you had to depend on interpreted VBScript and Jscript languages,
ASP.NET provides a wide choice of programming languages.
Internet SSL
In addition to the usual web applications, ASP.NET allows developers to create other types of
applications, which enables you to extend your applications’ reach to new customers and business
partners. For example, XML Web Services enable sharing of data across the Internet regardless of the
operating system and the programming language, also ASP.NET provides lots of mobile controls that
enable an application to target a large number of mobile web devices.
Besides the advantages mentioned above, the .NET Framework also provides another benefit to
developers: Direct Support for Security. Window NT, Windows 2000, and Windows XP have a number of
security features based on Access Control Lists (ACLs). An ACL contains a number of entries that specify
which users may access, or are explicitly denied access, to resources such as files and printers. ACLs are a
great way of protecting executable files (applications) from unauthorized access. But they do not secure
all parts of the file. The .NET Framework enables both developers and system administrators to specify
method-level security. The .NET Framework uses industry-standard protocols such as TCP/IP and means
of Communications such as the Extensible Markup Language (XML), Simple Object Access Protocol
(SOAP), and HTTP to facilitate distributed application communications. This makes distributed
computing more secure.
ASP.NET uses the Common Language Runtime (CLR) provided by the .NET Framework. The CLR is
the .NET runtime, which manages the execution of code. The CLR allows the objects, which are created
in different language, to interact with each other and hence removes the language barrier. CLR thus makes
web application development more efficient.
Microsoft made most ActiveX controls available in the ASP.NET [6]. The ASP.NET supports several kinds of language, such as Visual Basic, Visual C#, Visual C++, Visual J++, and Visual J# [7]. Basically, any of the language can do the same implementation. Visual Basic and Visual C# are the most popular
language among them for they are simple to use. C# .NET will be used as the coding language in this
project.
Databases often play an integral part in storing the information, and the scripting language query of the
database to create the dynamic web page. Some popular relational databases which are used for the
persistence layer are Oracle, DB2, Microsoft SQL Server, Sybase, MySQL, Postgre, and MS Access. The
choice of technology depends on the target environment. For ASP.NET, the two most popular databases
used are Microsoft SQL Server and Oracle. In this project, Microsoft SQL Server 2000 has been used as
2. User Manual
This dynamic web server based calendar provides some functionality that enables a calendar user to
schedule meetings, plan activities, coordinate his (or her) calendar with other users’ calendars and let other
users track his (or her) own calendar. This user manual provides a guide to use this calendar system.
2.1 Login
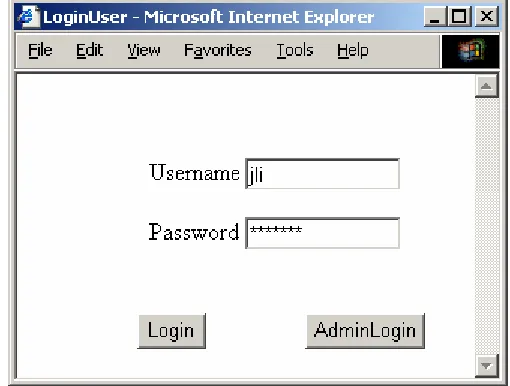
When a user tries to access this calendar, the first page the user gets is the ‘Login Page’, as shown in
Fig. 2.1. There are two different kinds of users. One is the regular users and the other is the administrative
[image:14.612.167.422.288.481.2]users.
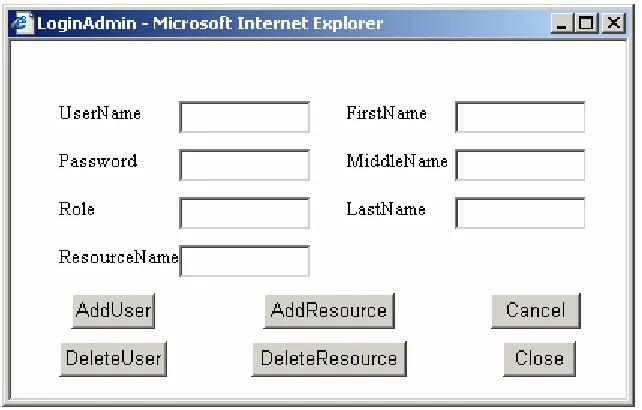
Fig. 2.1 the Login Page
2.1.1 Administrator login
After installation of the web calendar in .NET web server, the administrator should login by using
“administrator” as both username and password. The administrator needs to create the first account for
himself (or herself). Since it is the first user account, it must be set as an administrative type of account.
Type the string of “administrator” in both username and password fields in the ‘Login Page’ as shown
Fig. 2.2 the Administrator Page
Type a username and a password in the UserName and Password fields.
Type the string of “administrator” in the Role field (“administrator” for an administrator account and
“user” for a regular user account).
Type FirstName, MiddleName(this is optional), and LastName in the correspondent fields.
Click the button to add an administrator account.
After created an administrator account, the administrator may add more user accounts. The Role for a
regular user is “user”. The username for each user should be unique. The steps for creating a regular user
account is the same as that for creating an administrator account.
An administrator can delete a user account in the AdminLogin page.
For doing so, type a username in the UserName field,
Clicking button.
An administrator can also use this page to manage the resources.
Add a resource by typing a resource name in the ResourceName field, and then clicking the
button.
Delete a resource by typing a resource name in the ResourceName field, and then clicking the
button.
2.1.2 Login as a regular user
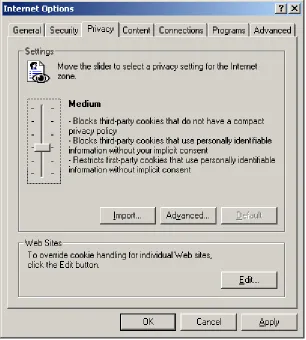
A user needs to login to use this calendar system. ‘Cookies’ need to be temporally allowed when a
regular user logins in the first time or logins right after changing the password. To enable ‘Cookies’ in
‘Internet Explorer’, follow the procedures as: in IE menu bar, click ‘Tools’ -> ‘Internet Options …’ ->
‘Privacy’, and then move the slider to ‘medium’, as shown in Fig. 2.3.
[image:16.612.171.477.179.519.2]
Fig. 2.3 Change the Privacy Level to Enable Cookies
For other browser users, refer to the browser user manuals to enable the ‘Cookies’.
Type the username and password in the Login page, as shown in Fig. 2.1 and click the button
Fig. 2.4 Calendar Layout of ‘by Day’
2.1.3 Logout the calendar system
The user can logout at any time when he finishes the tasks.
Click the linkButton of Logout logouts the calendar system. The user needs to login again to use the
calendar system.
2.2 User Information
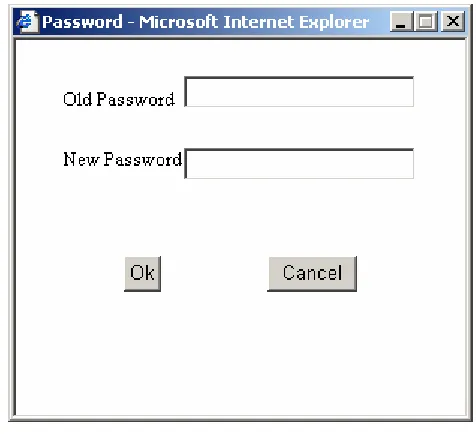
2.2.1 Changing Password
After the administrator created an account for a user, the user can change the password at any time.
In the calendar page, as shown in Fig. 3.4, click the linkButton of ChangePassword to open the
[image:18.612.167.405.184.401.2]‘Changing Password’ page, as shown in Fig. 3.5.
Fig. 2.5 the Change Password Page
Type the old password in the Old Password field.
Type a new password in the New Password field.
Click the button to change the password.
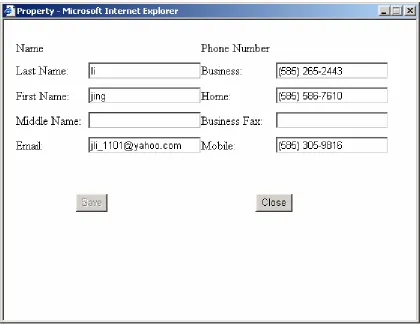
2.2.2 Editing User Information
The user can edit his (or her) information at any time after login the calendar system. Except the user’s
name that is not editable, all other fields are editable. The fields may be left empty if no information is
available.
In the calendar page (such as Fig. 2.4), click the linkButton of EditUserInfo to open the Property page
Fig. 2.6 the Property Page for Editing User Information
Add the information in the correspondent fields.
Click the button to finish the modification.
2.2.3 Viewing other Users’ Information
A user can view other users’ information at any time if the information is available. But all the fields
are read-only.
Fig. 2.7 Contact Information Page
Click a user name in the left side Listbox.
Click the button to open the Property page, as shown in Fig. 2.6.
Click button to close the Property window.
A user can also view other users’ information when scheduling a meeting.
Fig. 2.8 Meeting Scheduling Page
Click the linkButton To to open the Contact page (as shown in Fig. 2.7) and follow the steps as described
above.
2.3 Navigating the Calendar
After a user logins the calendar system, the default calendar layout is the ‘ByDay’ layout, as shown in
Fig. 2.4. This layout has three components. In the top is the linkButtons for different tasks, in the middle
of right side is a Date Navigator, and the main part is the scheduling area for displaying the events
(including appointments and meetings) that is in the middle of the page.
Select a date from the date navigator to display that day’s events.
Click the event shown in the scheduling area to open that event for viewing or editing.
Click the GoToToday linkButton to quickly go to today’s calendar.
Click the ByMonth linkButton to open the ‘ByMonth’ layout that displays the events of a whole
[image:22.612.104.537.173.698.2]month, as shown in Fig. 2.9.
Click a date in the ‘ByMonth’ layout goes to the ‘ByDay’ layout of that date.
Click the linkButton ByDay in ‘ByMonth’ layout goes to ‘ByDay’ layout.
2.4 Scheduling Appointments and Meetings
2.4.1 Scheduling an Appointment
Appointments are activities that do not involve other people or resources. Scheduling appointments is
easy using this calendar.
In the calendar page, such as in Fig 2.4, select a date in the date navigator.
[image:23.612.123.514.257.645.2]Click the Appointment linkButton to open the Appointment page, as shown in Fig. 2.10.
Fig. 2.10 Scheduling Appointment Page
In the Appointment page, type a subject and location in the correspondent fields, click the date selector
‘ShowTimeAs’ option that tells other users of this user’s availability in the period of the appointment, type
the details about the appointment in the ‘Notes’ text area, and click the linkButton SetUp.
2.4.2 Scheduling a Meeting
A meeting is an appointment to that a user can invite people and reserve resources. Resources include
objects that a user may typically use in a meeting, such as conference rooms, overhead projectors, or
laptop computers. Both people and resources may or may not be available for a meeting, but a user can
use the ‘AttendeeAvailability’ page to check the availability of the people and resources and choose a
time for a meeting that best fits all attendees’ and resources’ schedule.
In the calendar page, such as Fig. 2.4, select a date in the date navigator.
Click the Meeting linkButton to open the meeting page, as shown in Fig. 2.8.
[image:24.612.153.488.333.644.2]Click the To linkButton to open the Contact page to invite people and reserve resources, as shown in
Fig. 2.11.
Fig. 2.11 Contact Page shows How to Invite People and Reserve Resources
Select a name from the List box in the left side and click the or button
based on the person the user selected is required or optional to this meeting. The selection can be repeated
many times, but only allowed once a time.
Select ‘Resource’ from the ‘From Group’ Dropdown list to reserve resources for the meeting.
Select a resource name from the List box in the left side and click the button. The
selection can be repeated many times, but only allowed once a time.
Click to save the invitation and close the contact page.
In the Meeting page, as shown in Fig. 2.8, click the Availability linkButton to open the
[image:25.612.62.560.285.658.2]‘AttendeeAvailability’ page, as shown in Fig. 2.12.
Fig. 2.12 Attendees Availability Table
Choose a time slot which is best fit to all the attendees and resources, and then select the starting and
through different dates by clicking the scroll buttons or at the top of the
‘AttendeeAvailability’ page.
Click the button to accept the chosen meeting time and close the ‘AttendeeAvailability’ page.
Give a subject and location for the meeting, select the ‘ShowTimeAs’ option to tell other users of this
user’s availability in the period of the meeting, type the details about the meeting in the ‘Notes’ text area.
[image:26.612.122.514.229.621.2]At last, click the linkButton Send to setup the meeting and close the meeting scheduling windows. See
Fig. 2.13.
2.4.3 Responding a Meeting
As other users scheduled meetings and this user is invited to the meetings, the meeting messages are
shown in the ‘Message List’ page, these meetings are shown in the calendar page too. The user can view
and reply the meetings from the ‘Message List’ page or calendar page.
In the calendar ‘ByDay’ or ‘ByMonth’ layout, click the linkButton Message to open the ‘Message
[image:27.612.86.552.196.529.2]List’ page, as shown in Fig. 2.14.
Fig. 2.14 Message List Window
Click the linkButton in the ‘Subject’ column to open the meeting for viewing and replying, as shown
in Fig. 2.15.
Click the linkButton Accept, Tentative, or Decline to send the response or just close this window to
ignore this meeting.
The user can also view or reply meetings from the calendar. In the ‘ByDay’ layout, Click a meeting in
Click the linkButton Accept, Tentative, or Decline to send the response or just close this window to
[image:28.612.127.512.105.515.2]ignore this meeting
Fig. 2.15 Response a Meeting Invitation
2.4.4 Check Meeting Responses
After scheduling a meeting, the meeting organizer sends messages to attendees and then waits for
other users’ responses. After the attendee receives the meeting request, the attendee may respond to the
organizer by indicating whether or not this attendee will attend this meeting. The organizer can monitor
the responses to know who will attend and who will not. Users can check the responses of a meeting
request in the ‘AttendeeStatus’ page. The ‘AttendeeStatus’ tabulates the people and resources who were
invited, their status (meeting organizer, Required, Optional, or Resource), and their response to the
In the calendar page, click the linkButton Message to open the ‘Message List’ page, as shown in Fig.
2.14.
Click the linkButton in the ‘Subject’ field for the meeting you want to check the responses to open the
meeting viewing page, as shown in Fig. 2.15.
Click the linkButton of Status to open the AttendeeStatus window to check the attendees’ responses,
[image:29.612.125.516.194.517.2]as shown in Fig. 2.16.
Fig. 2.16 Attendee Status
The user can also check the attendees’ responses for a meeting from the calendar page. In the ‘ByDay’
layout, click the meeting that the user wants to check, and then click the linkButton Status to open the
‘AttendeeStatus’ window.
2.5 Set Recurrent Events
Appointments or meetings can be set as recurrent events. Recurrent events occur at the same time on
When creating a recurrent event, the user must give a recurrence pattern. There are two types of
recurrence patterns to be chosen from. Each recurrence pattern has its own options. Every pattern requires
a starting day. It could have an ending day or be endless.
In ‘Appointment’ page or ‘Meeting’ page, as shown in Fig 2.8 or Fig. 2.10, click the Recurrence
[image:30.612.126.512.170.540.2]linkButton to open the ‘Recurrence’ page, as shown in Fig. 2.17.
Fig. 2.17 Recurrence Pattern
Select the radio button beside ‘Recur’ or ‘Recur on’ to choose the recurrence pattern.
Select additional recurrence pattern options as desired.
In the ‘Range of Recurrence’ area, click the date selector beside the starting date to open a
calendar for selecting a starting date.
Select other Range of Recurrence options as desired.
After setting recurrence for an event, the user can delete the recurrence at any time by clicking the
[image:31.612.126.515.109.484.2]linkButton DeleteRecurrence, as shown in Fig. 2.18.
Fig. 2.18 A Recurrent Appointment Set-up
2.6 Proxy
2.6.1 Assigning a Proxy
A proxy is someone to whom a user gives access permission to the user’s calendar. A user can add
proxies to, or delete them from a user's proxy list.
In the calendar page, click the linkButton Proxy to open the Proxy page.
Select the desired user as a proxy from the ‘All Users’ Listbox and click either or
button to assign the access permission, as shown in Fig. 2.19. The user can change the access
Fig. 2.19 Proxy Operation
If the user wants to remove a proxy from ‘Read/Write’ or ‘Read’ Listbox, select the proxy name from
the ‘Read/Write’ or ‘Read’ Listbox and then click the button.
Click the button to save the changes of proxy.
Click the button to go back to the calendar page.
2.6.2 Acting as a Proxy
If a user assigns another user as his proxy, then the second user can access the first user’s calendar.
Based on the access permission that the first user assigns to the second user, the second user can either just
view the first user’s calendar or view and modify the first user’s calendar. But as a proxy, the second user
can not access the events marked as ‘private’ in the first user’s calendar.
In the calendar page, click the linkButton Proxy to open the Proxy page, as shown in Fig. 2.19.
Click the button to display the selected user’s calendar. If the selected user did not assign
any permission to this user, then the selected user’s calendar can not be opened and an error message
window popup: ‘Sorry, No Permission to Act Proxy!’
Click the linkButton My Calendar to return to the user’s own calendar.
3. Functional Specifications
This web calendar can be used to enter and track appointments and meetings for the user. It can also
be used for the user to access other user’s calendar based on what permission the other user assigns to
this user. The following sections show all the functionalities of this web calendar in the detail.
3.1 Overview of the Functionalities of the Dynamic Web Based Calendar
This web calendar can be displayed in two layouts: By Day and By Month, as shown in Fig. 2.4 and
2.9. There are two rows of LinkButtons. The top row consists of some Linkbuttons that are for the
different tasks. The first button, Appointment, opens the appointment scheduling page. The second button,
Meeting, opens the meeting scheduling page which is used for the user to propose meetings. The third
button, Message, opens a page to show the list of incoming meeting requests. The fourth button, Go to
Today, displays today’s calendar. The fifth button, Contacts, opens a page to display the accessible users.
The Proxy button opens a page for giving privilege to other users to access the user’s calendar. The user
can also access other user’s calendar from there. The My Calendar button displays the current user’s
calendar. The EditUserInfo button lets the user to edit his (or her) information such as phone number and
email address, etc. The ChangePassword button lets the user to change his (or her) login password at any
time. The Logout button lets the user to logout this calendar system.
The second row has two Linkbuttons which are used for different display layout. These two
Linkbuttons are the Linkbutton of By Day and the linkButton of By Month. Clicking the By Day button
opens the day layout calendar. Clicking the By Month button opens the month layout calendar.
On the right side of the layout buttons, a text box displays today’s date.
A calendar control is on the right side of the calendar with the current month displayed by default. The
days in the calendar control are clickable. It opens the correspondent calendar of that day by clicking on a
day in the calendar control. Two navigation buttons are on the top of the calendar control to let the user to
All The buttons and features are common to the two layouts. The only difference between the two
layouts is the scheduling field. The calendar control is used only for the day layout, because the month
layout does not need a calendar control to navigate the date. In the day layout calendar, the scheduling
field displays the appointments and meetings for a chosen day. The scheduled appointments and meetings
are displayed in the table as blocks that occupy the first half hour time range of those events. They are
clickable for viewing details or modifying. The month layout displays a whole month appointments and
meetings, each day’s events occupy a table cell. The appointments and meetings are listed in the table
cells. The users can distinguish the meeting events from the appointment events by the color. The meeting
events are shown as red color and the appointment events are shown as blue color in both the day layout
and the month layout. In the month layout, clicking on a date in a cell opens the day layout calendar for
that day.
3.2 A Close Look of Some Functionalities of the Calendar
Some calendar features require a more detailed explanation. They are listed in the following sections.
3.2.1 Scheduling Appointments
Appointments are activities that do not involve other people or resources. Scheduling appointments
can be done by the steps described as the following:
By clicking the Appointment button from the day or month layout page, the appointment scheduling
page popup, as shown in Fig. 2.10.
By clicking the Setup button, all the information about the Appointment is saved in the database.
By clicking the Recurrence button, the recurrence page popup. The user can set an event as recurrent
event by clicking on the Recurrence button and setting up various recurrent patterns from there.
By clicking the Delete button in the appointment scheduling page just deletes the scheduling
appointment and all the information is not saved in the database.
By clicking the DeleteRecurrence button deletes the recurrence which is already set up for this
appointment.
The Subject and Location fields are required. The starting and ending date of the appointment can be
selected by clicking the date selector above the starting date. The ‘Show time as’ Dropdown list has four
options: Free, Tentative, Busy and Out of office. It shows the user’s availability in that time period to
In the Appointment page, there is a Private check box for the user to determine if this appointment is
shown hidden or not when other users view his (or her) calendar. If this box is checked, this appointment
will not be displayed when other users view his calendar.
3.2.2 Scheduling Meetings
A meeting is an appointment to that a user can invite people and reserve resources. Scheduling
meetings can be done by the steps described as the following:
By clicking the Meeting button from the day or month layout page, the meeting scheduling page
popup, as shown in Fig. 2.8.
By clicking the Send button, all the information about the meeting is saved in the database.
By clicking the To Linkbutton, the contact page is opened for the meeting organizer to invite attendees
and reserve resources, as shown in Fig. 2.11. An attendee can be marked either as required person or as
optional person.
By clicking Availability button in the meeting scheduling page, the Attendee Availability page popup,
as shown in Fig. 2.12. This page shows the availability of the meeting attendees and resources graphically.
Two navigator buttons above the availability table help the organizer to see the availability of the
attendees in any day. The meeting organizer can set the starting and ending time for the meeting from this
page also.
By clicking Status button in the meeting scheduling page, the attendee status page popup, as shown in
Fig. 2.16. This page is a read only page. It shows the attendee status and responses and also shows if the
reserved resources are available or not. The attendee status could be Organizer, Required or Optional. If
the attendee is a resource, the status is Resource. During planning a meeting, the ‘Response’ column is
None for all the attendees, but shows Rejected or Accepted for the reserved resources.
The functionality of the Recurrence button, Delete button and DeleteRecurrence button is the same as
the Appointment page.
3.2.3 Show Message List
By clicking the Message button in the day or month layout page, The Message List page popup, as
shown in Fig. 2.14. This page displays all the coming meeting events for this user. When a user schedules
a meeting, the user needs to invite some attendee to attend the meeting. When an invited attendee receives
the meeting request, this attendee’s calendar is automatically marked by that meeting request and that
only meeting scheduling page is opened for the attendee to view the meeting details and reply from there,
as shown in Fig. 2.15. If the attendee does not want to reply, he can simply close this page. He can also
click the Delete button, by doing so and if he is not the organizer for this meeting, then this piece of event
is deleted from his calendar and the ‘Message list’ table. If he is the organizer for this meeting, then this
event still remains in his calendar and the Message list table, but the Subject field is appended the word
“Cancel” in the beginning to let all the attendees know that this meeting has been canceled. If an attendee
reply the message, the response (Accept, Tentative or Decline) updates the ‘Attendee Status’ page and the
‘Message list’ page automatically.
3.2.4 Management of Proxies
A user can let other users to access his or her calendar by assigning proxy privilege to them. By
clicking the Proxy Linkbutton in the calendar layout, the Proxy page popup, as shown in Fig. 2.19. Firstly,
select a name from the All Users ListBox. Secondly, if click on the ‘Read/Write->’ button, then the
selected name goes to the Read/Write ListBox and assigns the proxy with Read and Write permission to
this user. The user with this permission can not only view the assigning user’s calendar, but also create
events for that user. If clicking on the Read-> button, then the selected name goes to the Read ListBox and
assigns the proxy with Read only permission to this user. The user with this permission can only view the
assigning user’s calendar, but can not modify or create events for that user. A proxy can be removed By
selecting the name from Read/Write or Read ListBox and then clicking the <-Remove button, the assigned
proxy for this user is removed. Clicking the button of Save Proxy saves the names along with the assigned
permission in the database. By selecting a user’s name from the All Users ListBox and clicking the
ActAsProxy button, then the user can view the selected user’s calendar or create events for the selected
user if the user has the correspondent permission.
3.2.5 Secure Login
ASP.NET provides two kinds of authentication methods: Windows Authentication and Form
Authentication [8]. In Windows Authentication, the user submitted credentials are compared to the operating system’s identities through IIS. In the Form authentication, the user submitted credentials are
compared to the permissions in a database, which gives more flexibility. This web server based calendar is
assumed to be used by a large user poll, so Form Authentication is used to secure the login process. The
user credentials are stored in a MS SQL server. SSL could be used to encrypt the data transportation
4. Architecture Overview
This project is implemented with a logical, 3-tier architecture, namely, Presentation Layer, Business
Logic Layer and Data Access Layer. One benefit of using such architecture is a clear separation between
user interface, business logic, and data access layer. And also this makes the business logic code more
reusable.
Implementation using this architecture is based on the basic steps:
1. Data Access Layer: create all needed tables which models all required data for this project and
build stored procedures to encapsulate database access.
2. Business Logic Layer: build some custom classes which are responsible for connecting to the
database to access data, and also for applying business logic if needed.
3. Presentation Layer: build a user interface to access the system.
Some examples of these three layers are shown below:
Data Access Layer:
CREATE PROCEDURE GetUserIDByName (
@UserID int OUTPUT, @FirstName varchar(50), @MiddleName varchar(50),
@LastName varchar(50) )
AS
SELECT @UserID=UserID FROM UserInfo WHERE
LastName= @LastName AND FirstName=@FirstName AND MiddleName =@MiddleName
This is a stored procedure which is used to retrieve the userID of the calendar user and is called from
the business logic layer.
Business Logic Layer:
The purpose of business logic layer is to separate the User Interface from the Data Layer. The
namespace MSCalendar.BusinessLogicLayer {
public class UserDetails {
public int UserID;
public String UserName;
public String Password;
public String Role;
public String FirstName;
public String MiddleName;
public String LastName;
public String Email;
public String BPhone;
public String HPhone;
public String BFax;
public String Mobile; }
public class Calendar_User {
public UserDetails getUserByUserName(string userName)
public UserDetails getUserByUserID(int UserID)
public string getPasswordByUserID(int UserID)
public int getUserIDByName(UserDetails _userDetails)
public DataSet GetAllUser()
public int CheckUserTable()
public UserDetails GetUserInfo(UserDetails _userDetails)
public void UpdateUserInfo(UserDetails _userDetails)
public void UpdatePassword(UserDetails _userDetails)
public UserDetails Save (UserDetails userDetails)
public int Remove (String userName)
public UserDetails Login(UserDetails userDetails)
}
}
This is one of the classes in the business logic layer, which includes all the operations to access the
user’s information in the database. The class of UserDetails does not contain any operations, it is just a
Besides the classes used to access the database, the business logic layer also includes some classes that
have the functions needed by the implementation of event handlers in the presentation layer. The classes
of CalendarSecurity and DateTimeInfo are such classes.
Presentation Layer
The presentation layer is the layer that is used to display the user interface. This layer consists of some
ASP.NET pages that have some ASP.NET Server Controls or user-defined Controls and also some event
handlers. The Visual Studio .NET environment let the developer work on the pages using the ‘Web Forms
Designer’ and write code using Code-behind module. This separation makes the UI design, code
implementation and maintenance much easier.
5. Implementation of the Web Calendar
5.1 The Database Design
To implement the web calendar, a database is needed to hold all the required information. For example,
we need information of the users, and information of the attendees and resources for a meeting, we also
need information of an event, etc. In this project, Microsoft SQL Server 2000 was used as the database
server that can be in the same IP address or different IP address as the web server machine. In this project,
the web server and the database server are in the same machine. When a connection request to the web
server is made, ASP.NET authenticates the user provided credentials with the user information stored in
the MS SQL server. If the connection is authenticated, the MS SQL server will trust this connection and a
default account ASP.NET is used by the user to access the database.
Nine tables are created for implementing the web calendar system. The primary key for each table is
underlined in the Name column. If the primary key is the combination of several variables, all the names
of there variables are underlined. Each table is described in details as below and following the nine tables
is a Diagram of Database Entity-Relationship.
Table 5.2 Resource
Column Name Data Type .NET Data Type Description
ResourceID Int(4) Int Auto increment field, uniquely identifies a resource
ResourceName Varchar(50) String The resource name which will be used in a meeting
Table 5.1 Event
Column Name Data Type .NET Date Type Description
EventID Int(4) Int Auto increment field, Uniquely identifies an event FirstName Varchar(50) String User’s First Name
LastName Varchar(50) String User’s Last Name MiddleName Varchar(50) String User’s Middle Name Subject Varchar(50) String The subject for an event Location Varchar(50) String The location for an event
StartDate Varchar(50) String Start date for an event(10/27/2004)
StartTime Varchar(50) String Start time in that start date for an event(8:00am) EndDate Varchar(50) String End date for an event(10/27/2004)
EndTime Varchar(50) String End time in that end date for an event(9:00am) ShowTimeAs Varchar(50) String Used to show others your availability in the time
period when they plan meetings. Possible values are: Busy, Free, Tentative and Out of office. Private Varchar(50) String Label this event is private or not. Possible values
are: True and False. If Private is true, this event is not allowed to be viewed by other people.
Recurrence Varchar(50) String Label this event is recurrence or not. Possible values are: True and False. If Recurrence is true,
this event is a recurrence event, and the recurrence information will be retrieved from Recurrence table. Note Varchar(50) String Some description for this event
Meeting Varchar(50) String Label this event is a meeting or just an appointment. Possible values are: True and False. If Meeting is true, that means this is a meeting event, and the attendee information will be retrieved from MeetingAttendee table.
This table is used to record all the event information. Each event is identified by EventID. The user’s
name is used to identify the user who created this event. The User’s name is also acted as a foreign key
which relates to the UserInfo table (Table 5.4).
Table 5.3 ResourceUsed
Column Name Data Type .NET Data Type Description
EventID Int(4) Int The EventID is the same EventID as in the table of Event.
ResourceName Varchar(50) String The resource which will be used for this event. StartDate Varchar(50) String The start date for this event.
StartTime Varchar(50) String The start time in that starting date for this event. EndDate Varchar(50) String The end date for this event.
EndTime Varchar(50) String The end time in that ending date for this event.
This table is used to reserve resources for the meeting event. The primary key is the combination of
Table 5.4 UserInfo
Column Name Data Type .NET Data Type Description
UserID Int(4) Int Auto increment field, Uniquely identifies a user
FirstName Varchar(50) String User’s First Name
LastName Varchar(50) String User’s Last Name
MiddleName Varchar(50) String User’s Middle Name
Email Varchar(50) String Email address for the user.
BPhone Varchar(50) String Business phone number
HPhone Varchar(50) String Home phone number
BFax Varchar(50) String Business fax number
Mobile Varchar(50) String Cell phone number
UserName Varchar(50) String User’s Username, should be unique for each user
Password Varchar(50) String Password for the user to login in the system
Role Varchar(50) String Role for the user to use the calendar
Possible values are: administrator or user. In the
Login page, only the users in the Role of
administrator can open the page of AdminLogin by
click the AdminLogin button.
This table is used to store all the information of each user (identified by UserID).
Table 5.6 Recurrence
Column Name Data Type .NET Data Type Description
EventID Int(4) Int The EventID is the same as that in the Event table. StartDate Varchar(50) String The recurrence start date for this event.
RangePattern Varchar(50) String There are two range pattern value: 1. “No End”. This means the recurrence will last forever. 2. “End Until”. This means the recurrence will end by a date.
RangeValue Varchar(50) String This value is the recurrence event ending date when RangePattern value is “End Until”.
This table is used to record the recurrence event’s information. If the Recurrence field value for an
EventID is true in Event table, the recurrence information can be retrieved from this table by the condition
of Recurrence.EventID=Event.EventID.
Table 5.7 FreqRecurPatn
Column Name Data Type .NET Data Type Description
EventID Int(4) Int The EventID is the same EventID as in the table of Recurrence when RecurPattern in Recurrence table is “FreqRecur”.
Frequency Varchar(50) String There are four different values for the Frequency: Every, Every other, Every third and Every fourth. RepeatRange Varchar(50) String There are eight different values for the RepeatRange:
1. Day. 2. Week. 3. Month. 4. Year. 5. Mon, Wed, Fri. 6. Tue & Thu. 7. Mon Thru Fri. 8. Sat & Sun.
This table is used as connection with the table of Recurrence to record the needed information when
RecurPattern value in Recurrence table equals to “FreqRecur”.
Table 5.8 WkdayRecurPatn
Column Name Data Type .NET Data Type Description
EventID Int(4) Int The EventID is the same EventID as in the table of Recurrence when RecurPattern in Recurrence table is “WkdayRecur”.
WeekNumber Varchar(50) String The possible WeekNumber values are: First, Second, Third, Fourth and Last.
WeekdayValue Varchar(50) String The possible Weekday Values are: Sun, Mon, Tue, Wed, Thu, Fri and Sat.
RepeatRange Varchar(50) String The possible RepeatRange values are: month, other month, 3 months, 4 months, 6 months and year.
This table is used in connection with the table of Recurrence to record the needed information when
Table 5.5 MeetingAttendee
Column Name Data Type .NET Data Type Description
EventID Int(4) Int This EventID is the same as the EventID in Event
[image:43.612.59.561.78.300.2]table
FirstName Varchar(50) String First Name of the meeting attendee
LastName Varchar(50) String Last Name of the meeting attendee
MiddleName Varchar(50) String Middle Name of the meeting attendee
Status Varchar(50) String The status of the meeting attendee, possible value
are: Meeting organizer, Required and Optional
Response Varchar(50) String The response of the meeting attendee, possible value
are: None, Accepted, Tentative and Declined
This table is used for the meeting events. FirstName, LastName and MiddleName are used to identify
the attendee who will attend to the meeting. EventID is used to retrieve the information from the Event
Table (Table 5.1). The primary key is the combination of EventID and the first, last and middle name of
the attendee. There may be several attendees to attend a meeting.
Table 5.9 Proxy
Column Name Data Type .NET Data Type Description
AssigningFirstName Varchar(50) String The First Name of the person who assigned
a proxy to another person
AssigningLastName Varchar(50) String The Last Name of the person who assigned
a proxy to another person
AssigningMiddleName Varchar(50) String The Middle Name of the person who
assigned a proxy to another person
AssignedFirstName Varchar(50) String The First Name of the person who was
assigned a proxy by another person
AssignedLastName Varchar(50) String The Last Name of the person who was
assigned a proxy by another person
AssignedMiddleName Varchar(50) String The MiddleName of the person who was
assigned a proxy by another person
Permission Varchar(50) String The permission for a proxy, possible values
[image:43.612.61.562.391.717.2]This table is used to record the information for the functionality of proxy. The primary key is the
combination of the assigning name and assigned name variables.
The calendar information is stored in these nine major tables that can be accessed by the stored
procedures using SQL language. In the three layers of architecture, the database layer is responsible for
implementing all the stored procedures. There are 59 store procedures. And it is the business layer to be
Proxy User MeetingAttendee
AssigningFirstName UserID EventID
AssigningMiddleName FirstName AttendeeUserID
AssigningLastName LastName Status
AssignedFirstName MiddleName Response
AssignedMiddleName Email
AssignedLastName BPhone
HPhone
BFax
Resource Event
Mobile
ResourceID EventID
UserName
ResourceName UserID
[image:45.612.114.522.68.669.2]Password Subject Role Location StartDate StartTime Recurrence EndDate EventID ResourceUsed EndTime StartDate EventID ShowTimeAs RangePattern ResourceName Private RangeValue StartTime Recurrence RecurPattern EndTime Note Meeting Display WkdayRecurPatn EventID FreqRecurPatn WeekNumber EventID WeekdayValue Frequency RepeatRange RepeatRange (0, n) (1, 1) (0, 1) (1, n)
5.2 Implementation of the Architecture of Three Layers
5.2.1 The Data Access Layer
There is a lot of information needed to be stored for the calendar system. These include information
about the users, and information about the events created by the users for their calendars. Throughout the
whole implementation of the calendar system, all the tasks for accessing or manipulating the database is
performed by stored procedures.
Stored procedures are compiled batches of T-SQL statements. Using stored procedures can speed up
the accessing of the database, because the same T-SQL statements do not need to be compiled again each
time to access the database. Another major advantage of the stored procedures is that they can package
T-SQL statements for reusing. 59 stored procedures have been created for implementing the web calendar
system. Together, these stored procedures comprise the data access layer.
5.2.2 The Business Logic Layer
The business logic layer is the middle layer of the three architectural layers. It connects the
presentation layer and the data access layer. This layer comprises some custom classes, which are
responsible for connecting to the database to access the data, and some operations, which are needed for
implementing the web calendar system.
To implement the business logic layer, eight classes are defined. Along with them there are eight data
classes defined. All these classes definition are shown as below:
RecurrenceInfo AddRecurrenceEvent():int DeleteRecurrence():void GetRecurrence():RecurrenceDetails GetRecurPattern():string GetWkdayRecurPattern():RecurrenceDetails GetFreqRecurPattern():RecurrenceDetails UpdateRecurrence():int UpdateRecurrenceAndEvent():int
UpdateRecurrenceTable():int UpdateRecurrenceTable():int SetRecurrenceEvent():int
getAllRecurrenceEvent():ArrayList getAllRecurrenceMeetingEvent:ArrayList getAllRecurrenceEventByProxy():ArrayList getRecurrenceEvent():bool
ResourceInfo AddResource():int GetResourceIDByResourceName():int DeleteResource():int GetAllResource():DataSet GetResourceID():ResourceDetails[] SaveResource():void UpdateResource():void DeleteResourceUsed():void
getResourceNameByEventID():string[]
loadResourceEvent():ArrayList
loadResourceRecurrenceEvent():ArrayList getResourceUsedTime():ArrayList
checkResourceUsed():bool RecurrenceDetails EventID:int StartDate:string RangePattern:string RangeValue:string RecurPattern:string Frequency:string RepeatRange1:string WeekNumber:string WeekdayValue:string RepeatRange2:string ResourceDetails ResourceName:string StartDate:string StartTime:string EndDate:string EndTime:string ResourceID:int EventID:int DateTimeInfo DayMonthYearDetails getDayMonthYearDetails( compare():int equals():bool getTimeSpan():TimeSpan getFirstWeekdayValueInMonth():int getLastWeekdayValueInMonth():int DayMonthYearDetails Month:int Day:int Year:int DayOfWeek:int DayOfYear:int CalendarSecurity
[image:48.612.86.491.67.608.2]Encrypt():static string
Except for the two classes of CalendarSecurity and DateTimeInfo which are not related to access
anydatabase tables, all other six classes are defined as to encapsulate all the related operations in one class.
That means all the operations that access the related tables are included in the same class. For example,
the EventInfo class includes all the necessary methods to access and manipulate the variables in the Event
table, such as the methods of AddEvent, DeleteEvent, UpdateEvent and LoadEvent etc. All these methods
either return some data to the presentation layer or do some operations that are needed for the presentation
layer’s EventHanddlers.
Each main class, except for the class of CalendarSecurity, has at least one correspondent data class
which encapsulates all the data in the related tables. For instance, the EventDetails data class includes all
the data members that encapsulate all the data in the Event Table. The design of including all the related
data in one class satisfies the design concept of Object Oriented Programming.
The CalendarSecurity class only contains one static method of Encryption that is used to encrypt the
password string and save the encrypted string in the database table.
The DateTimeInfo class contains some methods that are similar to those in the class of DateTime in
.NET Framework, but they take the parameter of string that is in the short string format of the date (like
10/30/2004). This short string format of the date is used in the whole web calendar system. So it is
convenient to have a class to take care of comparing the date, retrieving the day, month and year from this
kind of string.
5.2.3 The Presentation Layer
All the features that can be accessed by the users are in the presentation layer. This layer contains the
major part of the web calendar system. By using Microsoft Visual Studio .NET, it is possible to develop
the web applications in much the same way as to develop the Windows-based applications that have
Windows-look-and-feel GUI. The Integrated Development Environment in Visual Studio .NET allows the
developers to create rich, interactive applications by dragging and dropping the controls into web forms
and then write some behind codes to handle user interaction, events and so on.
There are 20 pages (web forms) and two User Control files in total in this layer. The extension name
of page files is .aspx and user control files .ascx. So there are 20 files whose extension is .aspx and two
files .ascx. Each file has its correspondent Code-behind file whose extension is .aspx.cs or .ascx.cs. All the
server controls reside in the page files and all the event handlers reside in the Code-behind files. All these
1. UserLogin.aspx and UserLogin.aspx.cs
This is the first page shown to any users who try to access the calendar. It is responsible for taking the
user credentials, encrypting the password, and then comparing them with the user credential information
stored in the UserInfo table. The user can login whether as a regular user or as a calendar administrator. If
the user tries to login as an administrator, it checks the role of this user. If the role of the user is
‘administrator’, the AdminLogin.aspx Page is sent to the user to manage the accounts of the users and the
resources. If the user tries to login as a regular user by click the Login button and the username and
password match those stored in the SQL database, the user is authorized to use this calendar system.
Meanwhile, the UserID is returned from the UserInfo table, and the system redirect the user to
MainPage.aspx page automatically. This UserID is saved in a Session variable for retrieving the user
information when the user interacts with the calendar system until the user logouts. Both the administrator
and the user can login as a regular user.
2. AdminLogin.aspx and AdminLogin.aspx.cs
This page is only used by the administrators to manage the resources and user accounts. It popup when
the user logins as a calendar administrator by submitting correct credentials. An administrator can add or
delete user accounts and resources in this page. The information of user accounts is saved in the UserInfo
table and the information of resources is saved in the Resource table.
3. MainPage.aspx and MainPage.aspx.cs
This page is the main page of the calendar system. It can be displayed in the layout of ‘By Day’ or ‘By
Month’. The user control of ByDay.ascx or ByMonth.ascx is loaded dynamically. There is a panel to hold
these user controls. Clicking the ByDay button clears the panel, loads the ByDay.ascx user control and
adds it to the panel; clicking the ByMonth button clears the panel, loads the ByMonth.ascx user control
and adds it to the panel. There is a Calendar control inside the ByDay.ascx user control, which is used to
select the date of calendar displaying in the ‘By Day’ layout. The default selected date is today’s date in
the web calendar server.
In the top of this page is a row of LinkButtons which are used for different tasks. Clicking them opens
new windows for the correspondent tasks. The JavaScript function of window.open() is used to open a
new window. All the pop up windows are implemented by this JavaScript function.
There are two ways to pop up a window by using the JavaScript function in ASP.NET and C#.NET
The first way is to construct a string and register it as the attribute’s value of “OnClick” event and then
add codes to the Page_Load event handler:
String showAppointmentWindow="window.open('Appointment.aspx','AppointmentPopUp',"
+"'width=750, height=700, left=200, top=150, fullscreen=no, resizable=no')";
Appointment.Attribute.Add(“onClick”, showAppointmentWindow);
The second way is to create a function that calls the JavaScript function window.open(), and this
function is called by the Appointment OnClick event handler:
privatevoid ShowAppointment()
{
String showAppointmentWindow = "<Script Language = 'javaScript'>"+
"window.open('Appointment.aspx','AppointmentPopUp',"
+"'width=750, height=700, left=200, top=150, fullscreen=no, resizable=no');</Script>";
Page.RegisterStartupScript("ShowAppointment", showAppointmentWindow);
}
private void appointment_Click(object sender, System.EventArgs e)
{
ShowAppointment();
}
In this project, the second way is used. The same technique is also used to call the JavaScript
functions of window.alert() to show a message window and window.close() to close a window.
4. ByDay.ascx and ByDay.ascx.cs
ByDay.ascx is a user control that is dynamically added to the main page when the user clicks the
ByDay button. This user control consists of one Table server control and one Calendar server control. The
Table control is used to display the events on a selected date, and the Calendar control is used to select a
date. The default selected date is the date of today. When the user selects another date, the events of that
date are loaded from the Event table and displayed in the Table server control. The event locations in the
ByDay layout are determined by the starting time of the events. The selected date is saved in a Session
variable which is used in many places, such as scheduling an appointment, organizing a meeting, showing
The LinkButtons are used to display events in the web calendar, i.e., a LinkButton is created when an
event is loaded and displayed in the calendar. Different background color is used to show whether an
event is a meeting or an appointment. If the event is a meeting, the background color of that LinkButton is
red, otherwise it is blue. The Linkbutton’s Text is used to display the subject of the event and the
CommandArgument is used to hold the EventID of the event and the information of whether this event is
an appointment or a meeting. These information is needed when a user click this LinkButton to show the
details of that event. The information of whether the event is a meeting or an appointment is used to
determine using whether meeting page or appointment page to display the event. The EventID is used to
retrieve the event details from the Event table and the Recurrence table if the event is a recurrence event.
5. ByMonth.aspx and ByMonth.aspx.cs
ByMonth.ascx is another user control which is loaded to the main page dynamically when a user clicks
the ByMonth button in the main page. This user control just consists of one server control, the Calendar
server control, which is used to display the events of a whole month. Each day of the Calendar control is a
table cell and the events of every day are listed in the correspondent table cell by their subjects. Different
colors are used to show whether an event is a meeting or an appointment. If the event is a meeting, the
subject is shown in red color; otherwise, the subject is shown in blue color. There are two navigating
buttons to let the user to select the calendars of other months to display.
Showing the events in the calendar table cell is implemented in the calendar DayRendar event handler.
For each calendar table cell, it gets all the events for that day and create a linkbutton for each event and
add the linkButton to that table cell. For some reasons, the linkButton can not be clicked. So a user can not
view an event detail by clicking the linkButton in the ByMonth layout. But a user can do that by clicking
the date in the table cell of the Calendar control to load the ByDay user control in the panel. In this way,
that date’s events are displayed in the ByDay layout. From there, a user can view the event details by
clicking the correspondent LinkButton. Loading the ByDay user control from the ByMonth user control is
implemented in the calend