Follow this and additional works at:
http://scholarworks.rit.edu/theses
This Thesis is brought to you for free and open access by the Thesis/Dissertation Collections at RIT Scholar Works. It has been accepted for inclusion in Theses by an authorized administrator of RIT Scholar Works. For more information, please [email protected].
Recommended Citation
1/30 By
Ihab Mardini
Submitted in partial fulfillment of the requirements for the degree of Master of Fine Arts
School of Film and Animation – College of Imaging Arts and Sciences Rochester Institute of Technology - August 2014
___________________________________
Professor Stephanie Maxwell, Committee Chair School of Film and Animation
___________________________________
Professor Brian Larson, Committee Advisor School of Film and Animation
___________________________________
2/30
Abstract ……….……….……… 3
Introduction ……..………. 4
Pre-Production ………..….. 5
Story ---7
Concept ……….………. 7
Inspiration --- 7
Character Design --- 8
Color Palette --- 11
Symbolism and Metaphors --- 12
Production ………….……… 13
Character Design and Rigging --- 14
Materials, Texturing and Lighting--- 16
Rendering --- 17
Post-Production --- 19
Sound and Music --- 21
Credits --- 22
Screening and Critiques --- 23
Online
Plastic Glory
link --- 24
3/30
Abstract
In ancient times, humans used drawing on walls as a way to express their emotions and thoughts. Then, cameras were invented to pursue that purpose through photos and videos in sharper images. And now we do animation, not just because it is pretty, but also because it is the tool that allows us to freely speak our minds, without being bothered by what we can and what we cannot do in film!
There is a Lebanese thinker, poet, artist and writer named Jubran Khaleel Jubran, who has always inspired me with his artworks and specifically his poems. Mysteriously, there was something about his writings that I did not like so much. His thoughts were astonishing, but what made his thoughts less amazing to me was the fabulous poetic writing he descried his thoughts with. My feeling about his style eventually taught me that when we have strong ideas, simplicity in expressing them becomes the best vessel that delivers the thoughts, which leads to success. However, failure is certain when the ideas are too simple. Filmmakers should think big, plan bigger and act simple. I might have passed the simplicity line in my thesis, but I kept that idea of simplicity in my mind and I am sure it helped me making my film go as simple as possible, rather than ending up with a film that is impossible to accomplish.
Plastic can mean either the material of toys or other objects, or the meaning of the word “fake”. The main story of Plastic Glory is about “plastic” soldiers who die for a “glory” that is “fake”. It is fake because it promises that soldiers die only when necessary, for the glory of their country. But what happens is that soldiers always die, unfortunately only for the glory of those who control them and, in the most cases, care more about getting promoted than choosing to keep their troops alive. The film is about plastic toy soldiers in battle, firing at each other, bombing each other in a way that mimics real battles and wars, only without blood, smoke or fire. Such an approach makes more room for the imagination of the audience where they can fill in what they do not see with what they know and perceive. It also makes the film appropriate for kids to watch, while safely passing the idea to them that war is merely a mean killing machine. And the most unfortunate victims of the violence that is delivered through the toy soldiers are the kids.
Acknowledgement:
I planned to make the film with mixed media of 3D, 2D and stop-motion. Primarily because I wanted to get the best features of each media, while avoiding the difficulties that I would have to deal with if I limited myself to only one medium. But when I pitched my story with my thesis chair Stephanie Maxwell to the proposal review committee, one of the suggestions was to only use 3D for such a story, which encouraged me more to go for 3D. So I decided to use 3D, knowing that I could rely on the help of the faculty members, especially Mark Reisch, who has helped me so much in my two previous films. I also leaned toward the 3D idea because I wanted to enrich my 3D portfolio which will help my future career.
4/30 artistic background in filmmaking, each of them has a different artistic touch and taste. For that reason meeting with each one of them was incredibly helpful, rich and different from one another, which helped me along the way to have an objective eye over the film. And apart from the overall help, each advisor had a major role in my thesis:
Brian Larson was the one who helped me in constructing the concept. He showed me the way to evolving ideas into deep concepts that deliver, while giving his sharp critiques that helped me in cutting out any ideas that weakened my story. His help during the summer was priceless. I met with him many times to make sure that I could end up with a solid pre-production plan, because I really needed a well done plan. Brian was an incredible eye-opener for me to things I could not have ever seen.
Mark Reisch was just like he was on my 2-Quarter film, the backbone of my thesis. Plastic Glory was a relatively complex short-film for one student, and I therefore had an enormous amount of technical problems, issues, errors and all other sorts of Murphy’s Law candies. I always had technical problems, just because it is the nature of CG and also because I was exploring new avenues far away from my comfort zone. In addition, Mark has a sharp approach in storytelling that was another very helpful feature that he always offered.
Stephanie Maxwell, for the second time she was my thesis advisor, after my 2-Quarter film. She and I had these two visions of our filmmaking perspective, where we both see things similarly but from different angles. So even when we did not have thesis meetings, she could tell if I was on the right track or not. This trust gave me the freedom of the artist while not putting me under the student thesis pressure. Stephanie knows how to help me organize my thoughts. She taught me how to make films with full passion. And, above all she has the uniqueness of helping me create the films that I want to create, without forcing her perspectives or opinions on me, and that is hard to find in teachers like her with her amazingly rich artistic background.
5/30
Pre-Production
In my mind I did not have a story that I was after. Instead, I had a concept. A big concept that I was very worried not to be able to deliver in a short film. And essentially, approaching a film from a concept point of view increases the challenge since the pre-production phase duration will be unpredictable and highly taxing. This is why it took four different storyboards to be able to finally reach one that illustrated my concept successfully.
I think that conceptual filmmaking is like making wine, aging it is the key.
For that reason, one very important element of creating a film out of a concept is buying time. The more time one has, the better the result, because conceptual storytelling is all about vision, the element that thrives on time. And, I found that envisioning a concept can be broken down into the following steps:
- Realizing the concept, absorbing it and taking time visualizing it in different styles.
- Making a film out of a straightforward story is like chasing a goal that one can see, while conceptual stories are to be chased on a vanishing point basis, rather than by direct tactics. - Maintaining a high flexibility to apply changes and flexibility to any part of the story at any time
when necessary. Because the goal is not about the details, it is about the body of the work. In other words, it is about working on the gestalt of the film.
I had plenty of messages in my story, and each message required me to design a designated vessel. Thus, my main concern in making Plastic Glory was making the time to do the complicated thinking part. Making the time was all that mattered, because such types of films must be cooked well-done, or otherwise the whole message could be lost.
The pre-production started with brainstorming ideas, and sometimes when I think about a specific subject, I went online to search for images about the subject. I shuffle between the images very quickly in a way that charges my subconscious. Then, I free my mind away from what I have seen, and after that point my thoughts become more focused, very rich, and most importantly without getting too inspired by other people’s work. I have seen many students getting inspired by other artists, and in some cases it reaches the point where the student’s taste or touch fades away from their work and blends with somebody else’s, which is something I do not like to have in my work. Then, after my brain absorbs what my subconscious bakes, I decide what I want to do. Then, I either get references from the internet such as the images below, or I create/design them from scratch.
6/30
Figure 1 Figure 2
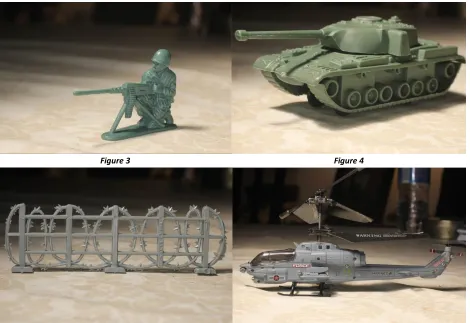
[image:7.612.74.544.362.685.2]I got other references by photographing and/or videotaping, as references for modeling or animation. Some images were available online, but for the sake of reaching the proper level of details, I used a macro photography camera and lens and some fine props, especially for the toy soldiers that I bought specifically for that reason (Figures 3-6 below). After all, having detailed characters and props made the film more believable and effective.
Figure 3 Figure 4
7/30
Story:
I believe that whether plastic or flesh, all soldiers are merely pawns!
The main idea of the film did not take a long time for me to come up with. It was almost spontaneous to me even though developing it took quite a long time. Plastic Glory is a story from real life that I have been witnessing and living for a long time. It does not even need a second thought that soldiers are used just to financially feed the commanders and upper hands, and blinded by their emotions and patriotism the soldiers do exactly what they are ordered to. Fooled into thinking that they are saving their country, they end up being used like pieces of char in the oven of war that warms the cold-hearted, greedy and heartless generals, who at the end take all the credits.
I served in the military for two years and a half back home in Syria (mandatory service), and, I have traveled to 10 countries around the world so far, which has given me a great perspective on to other cultures and societies. On top of that there is a war in the Middle East, where my home has been under the war-fire since the beginning of my MFA studies at RIT. That being said, I have seen so many miserable details in my life that are not limited to where I was born or how I was raised, but is internationally spread across humankind. And, having that international experience for me was an advantage to understand more, and most importantly to know how to deliver my story, without a single word and irrespective of any particular nationality. At least I hope to be able to do this. Frankly, I did not need too much life experience to finally write my war story. If one cares enough to watch the news nowadays, they will be touched by the same depression that I feel down deep.
One thing that Brian Larson told me once during one of our meetings in the early stages of my thesis, was that “what I know, what I have experienced, and what I have to share with the world were things that few students have. My situation is unique and I should not easily underestimate it, and it would be a disservice to myself if I were to ignore that”. Those words were one of the most motivational thoughts that I had during my thesis. And for me, that wisdom from Brian is what makes the difference between a talented instructor who just mentors and an artist who teaches. We can meet a talented instructor any time, but rarely do we get such inspiration that keeps us dreaming ambitiously.
Concept
Inspiration:
8/30
Figure 7: A screenshot from the game Army Men
Overall, the inspiration that I got from the “Army Men” game was very simple, yet very precious. The memory that I recall from this game has been imprinted in my sharp memory ever since:
- I learned from it that toy soldiers can be brought to life and tell amazing stories.
- Simplicity of the designs not only can deliver messages, but also make the delivery sharper.
- Sound design can make things a lot more believable.
These were keys that I learned at the time, and then RIT gave me the keys to professionally pursue those keys. Of course, it was just an inspiration, and my work is radically different than the game. I developed what I had in my memories in a way that satisfies my imagination, to a point.
Character Design:
[image:9.612.74.569.554.693.2]9/30 Based on the look of toy soldiers, it was not a hard job to design the basic look of my soldiers. It was an advantage that reduced how much time it took to design the characters, but it also required more time since the final result should look exactly like actual toy soldiers, with all the details. And the fact that it was based on my childhood toys, it made every hour I spent on this project super fun.
On the other hand, there were some things that I had to tweak, change or design from scratch. Things like the environment props, such as the barrels, stone blocks, and tents, etc. And, being capable of designing really anything I desire to see and film was very exciting to me, because I managed to create them in the way I pictured them in my mind during my childhood. In one way or another, I was just a child playing with 3D, using his imagination to create the world of the kid that satisfies the perspective of the adult in me, with all my political perceptions and humanitarian abuse rejections that I believe in. For the weapons, I made sure to design multiple weapons that are not only available or made for toy soldiers. Not just to make the work more challenging and enjoyable, but to make sure that the message would not be perceived as a story about a particular country. So, instead of making weapons that are as vague as those made for the real toy-soldiers, I mimicked the real weapons that are produced by different countries. Although few people know about the details of warfare, the AK Assault Rifle is famously Russian, while the M-16 Automatic Rifle is known to be American, and there are some country-specific designs in my film, for the jeeps, tanks, choppers, etc. So, I was very careful not to show anything that leads to stereotyping and wrong assumptions.
Another “character” in my film is the Transforming Harvester. A Transforming Harvester is a combination between two different war machines, the tank and the helicopter. These two machines merge and transform into a harvester. The harvester took me about six months to build and finally rig and polish. The reason why it took me that long is because I needed to do the following to be able to finally use it in the film, with the confidence that it will carry the big weight of the story ending:
- I modeled the harvester with all the details of both the chopper and the tank.
- I came up with the design of that war machine, because the harvester is a great metaphoric element that illustrates the harvesting of soldiers, for financial results.
- I found the link between the chopper, the tank and the harvester and designed the mechanism
of the transformation.
- I created a different version of the tank that would work for the updated design of the harvester, which required more tweaks of the texturing as well.
10/30
[image:11.612.104.512.280.427.2]Figure 9: The Harvester on the right side shows one of the first designs, which had a different mechanism and approach. On the left is the transformation details and functionality study.
Figure 10: On the left, the pre-visualization of enslaved soldiers, who were designed to be hammered with a middle finger. The image on the right side is the study of the transformation steps and chopper body parts.
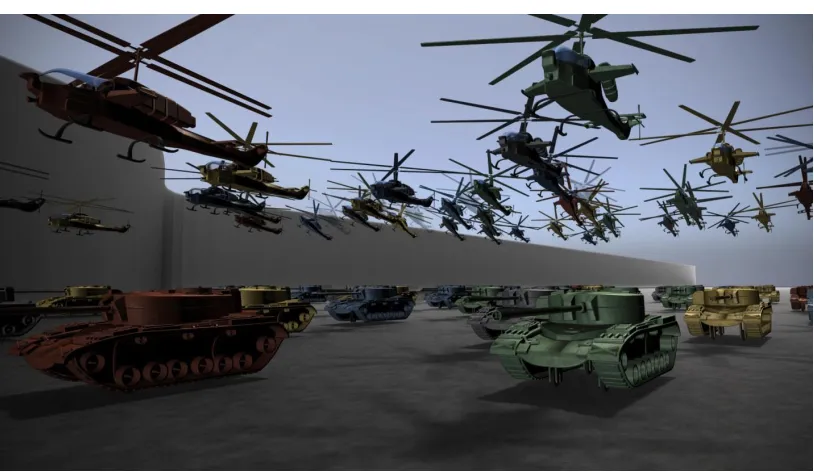
[image:11.612.103.510.462.698.2]11/30 In the case of a crowded scene, designing what I would like to call “hassle-free rigging” (the rigging that allows the animator to create the transformations using simple attributes), takes a lot more time to design than using a simple design that consumes a lot of time at the animation phase, especially in the case of having about 40 harvesters at the end of the film in one long shot. Therefore, the animation using a simple attribute becomes worth all the time that it took to build the transformation. After all, it is a matter of planning the scenes and also a matter of figuring out the shortest ways to do things. Although it took me about six months to build the Harvester, which is relatively a long time considering that I had only one year for the thesis, but without RIT faculty support, it could have taken me a lot longer time, and the result would not have been as good. I built everything from scratch, Just knowing that I could, at any second, email or even text the 3D instructor Mark Reisch, or one of my highly talented fellow students from RIT, like Meghdad Asadi Lari, who has been my emergency troubleshooting assistant, and people like Raymond McCarthy-Bergeron, made the huge weight of the technical problems not as heavy as it is usually, and it helped me to keep my ambitious goals attainable. Figures 9, 10 (below) illustrate the evolution in the design of the Harvesters.
Color Palette Reasoning
Although the colors of the troops were meant to suggest certain countries, later on I realized that what was driving the choice of colors was not the conflict level between the troops or armies, since I did not have a specific storyline to stick to, but the philosophical effect that comes from the relationship between colors. So according to color theories and concepts, which I studied as a graphic designer and practiced as a photographer, using complimentary colors between two groups leads to the conclusion of contrast and conflict. While using clashing colors feels like we are cutting from a group of soldiers to another, it is perceived to be not in as much conflict as it is when using a complimentary color scheme.
The Sequence of Color Choices:
1- The firing begins with the green attacking the yellow-brown: It is the usual colors of toy soldiers included in one box/bag (if one is looking for a bag of more than one color). It is a similar case with blue and grey, especially in the American design of toy-soldiers (which represents the colors of the Civil War that took place in the USA).
2- Red attacks the green: Complementary color.
3- Blue attacks the red: The complement of blue is orange, but in toy soldiers there are no orange troops usually. So the red color was the closest complement of blue. In the meantime, blue is not in conflict with green. So it made sense that the red that kills the green will be killed by blue, and especially that the blue can be a friend of the green, in addition to the blue being complementary to the red, relatively.
4- Then the blue gets hit by the yellow-brown:
12/30
Figure 12: On the left, the soldiers are in the chamber of a machine gun. They get dragged into the firing room where they all get harshly slammed on the head with a hammer. This shows how they unite in death only, instead of uniting peacefully. On the
right, Harvesters of death have united colors – so uniting is an option when it is involved in killing.
Symbolism and Metaphors:
During my fine arts, graphic design and photography studies, I learned how to artistically think of symbols and illustrate them. Especially since this is the heart of graphic design. However, symbolic messages are approached differently in animation and this was something that I needed to develop before coming to RIT. With the classes that I took in RIT, especially the classes with Charles Bandla, I learned more about symbolism and metaphors in animation than I thought I knew. And during the making of my thesis film, I realized that studying at RIT educated me more about how to deliver concepts through the use of metaphors and symbolism.
Symbols and Metaphors in
Plastic Glory:
- Risk board game: A symbol of the global-political war situation that is going on in the world right now. Having a smooth camera panning over all the countries with no focal points or stops helps to generalize this reality.
- Toy soldiers involved in a war: Illustrates that human soldiers are toys and pawns that are played with and it is their destiny to die.
- Soldiers do not leave the platforms attached to their feet: Soldiers are forced to be where they are ordered to be.
- Soldiers are moved on a conveyer belt, and then used as bullets: Dehumanization of the soldiers and using them as objects.
- Coffin-shaped firing chamber: Certain death to the soldiers who are being fired on.
13/30 - Melting the Soldiers (plasma shot): Some soldiers die brutally, and almost inconceivably for its
horror
- The falling soldiers at the time when the tank should have fired: One shot, one order, or one decision can cause a huge number of fatalities.
- Soldiers falling from boxes that are shaped like shipping containers: There are commercial reasons behind warfare and the soldiers’ deaths. Soldiers are disposed of like garbage.
- Containers hold soldiers of multiple colors, rather than one special container for each color: In death, all humans become equal and our differences are gone, for all humans are brothers in death.
- Harvesters are the construction of two war vehicles: War and its vehicles are merely machines that harvest dead soldiers.
- Dead soldiers are the military ribbon rack itself: Soldiers die for the sake of the glory of the higher ranks.
I believe that the uses of these symbols and metaphors work well in my film. At first, I was not sure that their meanings and messages would be clear and understandable, but all the work I put into the film has paid off. I know that the film communicates the intended ideas. This was my first conceptual film using abstraction and symbolism. Not being afraid of trying, and working hard and taking advantage of the support of the people around me are factors in the success of Plastic Glory.
Production
I could not be sure where I was heading in the film, and that is the nature of the conceptual filmmaking beast. However, realizing the risk behind that beast allowed me to see clearly what I should do. Because if I have not managed to predict where the film was heading, far ahead, I would have ended up with a lot of wasted time and eventually fail. So I had to design a strategy, which in a nutshell was:
- Realizing the film’s infra-structure: what are the things that will not be changed by the end of the film, such as the character design, the props, some parts of the environment if not all. - Beginning to work on the infra-structure: Which will allow me to buy time to think about the
next steps, and it will definitely help reducing the uncertainty pressure off of my head.
- Analyzing the progress while planning maintains a harmony: Planning the progress of films is easier to decide if there were some materials to look at, and get inspired from. Therefore, the workflow becomes smoother as I rely on the very little steps that I had in the infra-structure.
14/30 body rigging with all the possibilities of wasting time on technical problems. Especially since I had never before rigged a full body. So I “posed” the soldiers instead of rigging them, and planned to use them as inanimate toys. But then, my fellow student Meghdad encouraged me to make the rigging, and he taught me some things that eased me into the process and made things easier for me. And furthermore, the new version of Maya has a new feature for the smooth binding (binding the geometry to the skeleton) that means that a less time-consuming rig results after applying the binding. (Thanks to my fellow animator, Vijay who pointed out this feature to me.) But I still had to work on the weight-painting (giving each joint created its territorial geometry to control). And finally I rigged the character fully with the great help from Mark. The character of the soldier taught me so much technical aspects, especially because I had lots and lots of issues with it. Later in the paper I mentioned an example of the technical issues I had in the project.
I sculpted the character in high resolution mesh, which means that the mesh that forms the geometry of the character has a high count of faces, which evidently gives a finer definition. And considering how many characters I needed in my scenes for my film, I had to find a way to make the visuals look nice and smooth in the lowest possible resolution, thus I used what is called “Displacement map”. Basically there are 3 different ways to fake a high-res geometry using a Low-res one. And I used the three of them in my film. The use of each of them was determined by how important the quality of the details on the soldiers for those shots. Below are the three techniques, when and how I used them:
- Bump map: It creates fake deep details by making a contrasting color like a shadow that makes the geometry look bumped out. Cheapest in render time, and quality. I used them when the characters are far away, or when I had so many characters. The very final shot, I had no other way but going for the bump map due to the very high number of soldiers.
- Normal maps: Instead of faking the shadows of what looks like a bump, it creates those shadows too, but according to the camera projection. That means that wherever the camera is directed at, the shadows will follow along to make it more believable. Normal maps take about 2 times more render time, but the result is worth it. (I used the normal maps in the shots on the pilots where I had so many choppers in the final scene. Because the details of the pilots did not show so much due to the crowd and since the shot was very wide).
15/30 image or effect using that map), instead the displacement map would render the geometry as being extruded from the plane as if it has those details in the original sculpting, in relation to the data that are in the image/map that is used as a displacement map. So during the animation, the Maya user animates and plays with what seems to be the low resolution. However, when rendered, the objects will show a high level of details. I used this technique in every close up on the soldiers where the visual appearance of their details does matter. But when rendering a job that takes 7 seconds using bump maps, it would take about 80 seconds when using displacement (on this particular character).
[image:16.612.82.533.278.425.2]Ffigure13 (below) is one of the issues that I had when I changed the scale of the geometry, which turns out to render a disastrously-looking piece of geometry. Fortunately Mark Reisch was there for the rescue, he recorded a video that shows why it happened and how to fix it. Briefly it happened because when I scaled up the geometry, the displacement map was not changing its scale accordingly, and they should have been connected.
Figure 13: On the left, before and after the issue – On the right the screenshot that shows the proper connection
[image:16.612.86.528.450.702.2]16/30 Having different colors of the plastic was not hard; however mimicking a believable color that relates to the colors used in the toy-soldiers was a tricky part.
Texturing:
It is one of the parts in 3D filmmaking that should not be rushed nor neglected, especially that the result becomes far, far better with textures than what it could be without them. It is also one of the highly taxing features when working solely because once a problem rises during the workflow of the project or during the rendering process, the filmmaker has to stop every process and jump back to the textured geometry and fix it. And in some cases a little fix turns out to take much longer than expected.
Lighting:
While my one-quarter BioLEGO film had no lights in Maya, my two-quarter film Dark Mechanism had an intensive amount of lights, the lighting in Dark Mechanism was not just needed for the visual beauty, but also it was a part of the storytelling. So basically BioLEGO was the first block that I built toward my 3D filmmaking experience, and then in Dark Mechanism I took my 3D lighting skills to the next level as I had more time to study and work on experimenting with lighting. Another factor that helped me to become stronger in 3D lighting is the dedicated 3D lighting class that I took with the teacher “Dan Deluna” from 3DDG right at the time of the production phase. And due to the experience I gained from
Dark Mechanism, I became a lot more advanced in lighting, but that was not enough for my thesis film. Not just because I did not have enough time to experiment and test the lighting, but basically I was concerned because I had so many shots in the film and many of them were completely different from one another. On top of that, I was not sure what kind of lighting themes I am going to use. The themes that I considered were the following:
- My first thought was to create simple lighting, well-lit visuals, balanced and clear.
- I thought of using sepia, as a way to give a richer feeling of the war. But due to the need of colors, it did not seem to be the best idea.
- I considered using contrasting lighting and harsh shadows for a cinematic approach.
17/30 that were grasping my feet, and did not allow me to fix any of the rendering problems that I had. So I made my decision to go for whatever results I managed to make within my time. Even though I had some issues having circular bows in the horizon, but I had to be ok with it.
The main lighting theme in my film was the way I lit the soldiers, they were darkly shadowed all the time, unless when it comes to the superior soldiers. That visual look was my way to deliver how ignored the soldiers are and to give the feeling that soldiers are merely pawns of plastic that are played with.
Rendering:
Seventy days before the due date of my thesis, I estimated that I could be done rendering and compositing about 25-30 days prior to the submission due date. And that expectation was what I managed to calculate / expect after rendering two long and major shots!
I was the first person to render complete and polished shots for the thesis among the other theses students, and the reason why I pushed myself to be done soon, was because of two main reasons:
1- I managed my files and my scenes in a way that while I begin rendering a shot, I would be able
to use the time to finalize or polish another one that will be the next in my rendering sequence. It is something I learned from my two-quarter film, which was my only way to get my two films rendered. I had so many shots, lots of objects to render and the total length of the film is a bit longer than usual, it was even longer than my original plan.
2- Because there were many thesis students and I knew that the render farm will be crowded.
Unfortunately, we had so many issues in the render farm, even though the efforts on fixing it were constant. In general, we have about 110 stations available for the render farm (if they were not logged in and used by students at the time). But there are some factors that make the effectiveness of the farm very low sometimes.
Render Farm technical causes and effects:
Keeping in mind that the rendering takes place by the end of the semester, when the projects are ready to be rendered, ideally. Here are what I found to be big issues for every 3D student, regarding the rendering:
1- The stations that are connected to the render-farm network are not dedicated to it, and during
the day there are very few computers available. Thus, if a student needs to render, they will have to wait until the rendering computers are available.
2- The computers that render the fastest, such as the ones in the 1212-3D Lab are usually the last computers to be logged off of, since they are the computers with better performance, and therefore the students prefer to work on those.
3- If a computer is scheduled to render 4 frames, for example, and someone logged in to that computer (which happens on a regular basis):
A- All the frames that were being rendered will crash and get corrupted.
18/30 rendering time, students are very tired and they usually lack the patience to such micro management, especially when a project is run by only one student. Not to mention that rendering is one of the most frustrating processes of 3D.
D- Missing one or 3 or even 10 frames might not sound a big deal, but what happens is that the broken frames will not be usually broken in a sequence. For instance, it would not be a case such as 1-5 rendered 6-15 broken, and then 16-20 are rendered. In the most cases it would be something like: Broken frames are 3, 7, 9-14, 18 … etc. Therefore the final result is that it would take more time to fix the very few broken frames than how long it took to render 500 frames, because the student has to search and finally find the broken frames, write them down then re-render them. Worse yet, if the render farm is going on the basis of First Come First Served, then re-rendering 10 frames might take a whole day of waiting, leaving no choice but rendering locally (using a computer and render manually). But that still does not solve the issue! Because student are not allowed to use more than one computer, which means the universe of the student has to stop, then start spending the time to locate and render each missing frame… and some frames might take more than 15 min.
E- If there was a compositing job with rendering layers (which means rendering more than one
image for each frame such as “shadow layer”, “reflection layer”, “glow layer”…etc) thus if you are missing four frames, then you are missing the same number of frames multiplied by how many rendering layers the scene needs. And that is not the biggest problem though. The missing frame from one of the rendering layers is not necessarily the same one from the other rendering layer. For example, missing the “Beauty layer” (the basic / original look layer) render of frame #5, might have the shadow layer of that frame, but could have a corrupted shadow of frame #7.
19/30 I ended up spending the 25 days that I thought I would be able to work on the credits, and other things. I spent them only on rendering the broken frames, and the extra compositing job that were not needed originally. I had to change my rendering strategy from 2 layers to 10 layers in average. And spending that much time on rendering what should have been rendered a lot easier, was just stressful and drained my energy ENTIRELY. I had to render on individual computers, 10 frames here, 20 there, a single frame there… and I was not the only one who needed to render this way. I know that my fellow thesis student Rudy, was only able to render a single frame at a time, which means that each frame cost him 15-40 sec additional time only to process. He lost days on trying to render individual shots, under my daily watch.
Before the beginning of my thesis semester, I reported my concerns about the farm and how it was not working fine even before the crowded time. I also mentioned the unusual number of thesis students, months before our rendering crisis in SOFA. Unfortunately, there are were only few things that the rendering managers and technical directors can do when it comes to the need of funding for more or better, or at least some dedicated computers. Jay Sullivan, Bill Landers and Mark Reisch are three people that have been doing their very best to maintain the rendering services in the best shape.
I want to add that SOFA could have avoided such a big issue of rendering failure (which affected many of the 3D students if not all of them) by renting a 3rd party rendering farm. Yes it costs money, but honestly the students deserve to be treated fairly, especially that the tuition in RIT is very expensive. Plus it is not the students’ mistake. Me, Vijay, Rudy and I am not sure how serious the others were, we considered renting a 3rd party render farm… but it was a little bit too much and we could not get any guarantees that they will treat us fairly if some frames were broken. However, what saved me and the other 3D artists who were affected by the rendering issues is that the Chair of Film & Animation Malcolm Spaull, and the Chair of Animation Stephanie Maxwell were very understanding and flexible, and allowed an extension of few days, which bought us more time to render. And considering the fact that within the extension we were allowed to take, the rendering farm was not as busy as it was before the submission date, since the usage of stations on campus was a lot lower due to the fact that the big majority of students were done with their classes. Few days might not sound helpful, but at the end of the filmmaking, every minute counts.
Post-Production
20/30 process. Thus, breaking the rendered scenes into multiple rendering layers was my only way to avoid screening a “Playblast” render (The term that Maya uses to name the screen capture – which provides animation .MOV files too. I already had a File-B ready just in case. Going for more compositing work changes the workflow scenario. It is powerful if well-calculated, and risky if was not planned properly. Below is what I can think of as a comparison between rendering with render layers or a single layer:
Rendering A Single Layer
Breakdown of multiple layers
Biggest Advantage
A peace of mind -The possibility to adjust certain layers without necessarily
affecting the other layers.
- Creating rack focus between foreground and background
Biggest disadvantage
-Render time is longer. -Fixing little things
require re-rendering
the whole image/s.
-If using a rendering farm, a single render crash might lead to an average of 10 broken frames.
(in my last scene, one broken frame cause 20 broken frames – each frame would take at least 20 seconds to be placed to be rendered)
Artistic Potential
It allows compositing rendering layers, but if there was a tiny color adjustment to a piece of the composition, it
requires doing the
adjustment in the
production, which
takes too long rather than in post
Having multiple layers opens many editing options. It is possible to apply an effect on one of the objects (if rendered in a dedicated layer) while keeping the rest of the objects different and less affected. And just trying different blending modes on each object/character or chunk of them unleashes huge artistic potentials.
Evil
disadvantage
-Heavy scenes tend to crash.
-Making the depth of field can only be made the long way.
-Broken frames are bad company, a couple of broken frames cause an avalanche of trouble that might take a whole day just to fix one minor thing.
21/30
[image:22.612.72.545.230.367.2]Figure 15: comparison between the AO pass and the Beauty pass
Figure 16
Sound:
In my one-quarter film BioLEGO, I only had music. Then I took it to the next level in my two-quarter film
Dark Mechanism and made the sound mix with a piece of music composed by Michael Pierattini who composed the music for BioLEGO as well.
Then with the overload of work that I needed to dedicate my time for, and with my standards and ambitions going higher, I wanted to get a finer quality for sound so I hired my fellow animator from SOFA Alex Montoya.
Not only did he do an astonishing job in the sound mix, but also he shared his animation visions and even discussing with me some parts of the animation and concept design. I worked with him on the second half of the sound mix because I wanted to make sure he would not have to do things twice, and to make sure that he and I approach the sound artistically and purposefully simultaneously.
Alex brought a believable sense of reality with a rich atmosphere. And when we got the music from the composer, he went back and applied some fixes to the sound that made the sound go even better in correlation with the final version of the music.
Music:
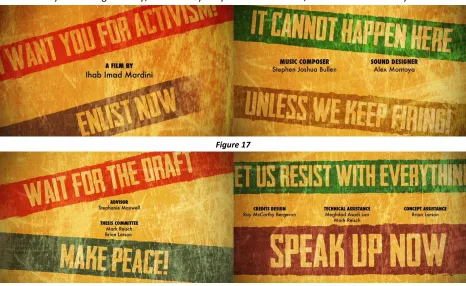
22/30 And it happened that my very creative peer Raymond Bergeron offered to design the credits for my film (Figures 17, 18 - below). I did not accept the generous offer initially, but then as I figured that I was getting cornered by the time I had left and I lost my last hope to make the time to make the credits. So I took Ray’s offer very gladly, especially that anything Ray does is artistic, creative and awesome. And without any suggestions from me, he improvised the design. Then very shortly we met and the result was even better than what I expected, but his design of the credits was fabulous. Although it was slightly off, but a little change made it better. He brought back the concept of the posters back in the day at the American call for enlistment, at the beginning of strong propaganda. The only thing that I asked him to change was that the writing he made was very close to the original propaganda posters, which is encouraging for enlisting. However, that was the opposite of my goal. So he reversed the writing in a very creative way while maintaining the same writing style. When lead to the result that the writings look like they are calling for duty, but actually they do the otherwise, which I think was very smart.
Figure 17
23/30
Critique Reception
Although I wanted many of my RIT teachers to be my thesis defendant, my film was conceptual and rich of metaphors, which seems to be a reflection of what the instructor Charles Bandla always taught me during my years in RIT. It felt like a hand in glove to have Charles representing Plastic Glory, for he is the instructor who was the first who started teaching me all about metaphors, and expressing the thoughts freely through animation. Charles kept us interested in the conceptual side of animation, and he always showed us very inspirational examples that taught us, along the way, how to deliver a concept using animation.
Screening and Critiques:
1- When the machine gunner fires, the bullets do not go inside, they are frozen which takes away from the reality of it.
2- Maybe having more acting of the soldiers would make us care more for them.
3- The final scene where we move from the abstract scene of the dying soldiers to the choppers scene, there is a gap between them. It feels like they are not very connected.
4- The camera movement in the submarines shot is too shaky. Maybe less shaking.
5- It would be better if we see the racket/pin/medal at the end for a longer time. (I totally agree).
I did not respond to the questions in details, because I wanted to give more time to the audience to give me more feedback, but my thoughts on the feedback would have been:
1- Although it is a valid point, but I want to keep the feeling that those soldiers should maintain the look of a toy, while feeling they are alive through the actions.
2- My intention is that the experience that the audience gets is: “Wow! I just realized that I watched them dying and I did not care” – Which delivers the lack of compassion that a lot of people do now in real life. It became a reality to see people dying while we root for whatever side on that battle, subconsciously. And that is a feeling that I wanted to deliver, as a reminder of the real world incidents.
3- I agree that there is a little bit of a gap between the two scenes mentioned in that point. However, I believe I did a good job solving by blending the two shots visually very smoothly. It is something that a lot of films have to go through and I am happy with the result I ended up with. 4- I did not have a camera shake in the submarines scene originally, and it felt a bit plain. So I
figured that the camera shake would add more reality to the scene and would make it more interesting. I have seen the two versions and I personally think that the camera shake works better, after making the comparison between the two.
Compliments and feedback:
24/30 message I want, and that skill is the magic of RIT. RIT faculty members and chairs will always be in my sweet memories, I will always remember the great times I had with them.
Figure 19 (below) Below I proudly present the festivals official selection, and awards that Plastic Glory
[image:25.612.73.542.288.568.2]gained so far.
Figure 19
Stephanie, Brian and Mark, you made this film presentable, with your guidance, support and with all the inspiration you gave me along the way. Thank you so much.
Stephanie, additionally, I would like to thank you for preventing my thesis paper from becoming a bigger nightmare. Your proofreading was priceless.
Online Link to
Plastic Glory
:
25/30
Password:
plastic
----Appendix----
An Animated Graduate Thesis Production Proposal by
Ihab Mardini
Approved for Submission
____________________________
Professor Stephanie Maxwell, Committee Chair
School of Film and Animation
Thesis Committee:
26/30
Treatment
Act I - 2D Hand-drawn
A slender guy, Goodman, packs up his big bags, and gets ready to leave his
home. He hugs his mother, while his kids are clinging to his legs. His wife is a
bit far from him watching him. She turns her head away from him and cries.
Later on, Goodman reaches a military recruiting center that has a large
silhouette drawing of a soldier saluting on its window front. He signs an
enlistment contract and goes to a military base. Then, he meets
Stonejaw
,
his trainer, in a shooting arena.
Stonejaw
pushes a button that brings shooting targets up from the ground.
He gives Goodman the order to fire. Goodman fires inexpertly all around
and nearly shoots
Stonejaw
.
Stonejaw
corrects Goodman’s shooting
technique. Goodman gets better at firing and hitting targets. After observing
Goodman’s improved shooting skills for a while,
Stonejaw
reaches to
Goodman’s face and stretches open his jaw. Then he brings a conveyor belt
to Goodman’s face and pushes a button. The conveyor belt begins to beep
and lights along the conveyor belt flash on.
27/30
Some of the kids run to another room to look out a window at the food
traveling away on the conveyor belt. When the food reaches Goodman, the
food pops out of their boxes and into Goodman’s mouth, who is still
shooting at the targets. Goodman becomes a better shooter, his body
becomes muscular. Then Goodman turns into a shooting machine, with a big
funnel on top where it consumes more food, as well as bullets, and
surrounding objects and people. Suddenly he transforms back to his soldier
form and he has a bird nest on his helmet. His beard and facial hair grow
long. Two side-eye-folds come out, and the snow falls and sticks to his head
and shoulders. Green cactus then grows from the snow. The green cactus
penetrates Goodman’s body and turns him green. He becomes a toy-soldier.
Then a giant hand from above picks him up. While Goodman is up in the air,
he keeps shooting.
Act II -- Stop Motion
Officer1 is a fat guy, who is wearing green, and Officer2, who is dressed in
brown are playing the board game
Risk
. The two of them sit at a table, and
next to each is a safe where they each keep their game soldiers. The officers
move the soldiers to different positions on the continents located on the
Risk
board. As the officers move the soldiers, the soldiers’ orientation
changes accordingly. Therefore it affects their shooting direction, while the
soldiers are fixed to their position.
Between the two officers, there is a little kid watching the game, with his
thumb in his mouth. He keeps taking soldiers out of Officer1’s Safe, and
places them on random areas (countries according to the risk game) on the
board. The behavior of the little kid annoys officer2.
Act III - 3D CG:
28/30
hand with his eyes open, then Looks at Officer1 while pointing his finger at
the kid. Officer2 attempts to talk, but Officer1 zips his mouth with a zipper.
While the little boy continues to play with the drone, the soldiers shoot back
and forth. Then a missile falls down and makes an explosion that kills all the
soldiers.
With no sign of any soldiers alive, a little girl (colored with a mixture of
green and brown) approaches the war scene. Takes a couple of bullets and
plastic pieces then quickly gets back to her little hideout. Her brother is
waiting in a little room that has a small window. His stomach grumbles so
hard, by the time his sister arrives. He cheers up when he sees her coming
with the plastic. She takes the bullets to her brother, puts one of them on
his grumbling stomach then she grabs a magnifier. She uses the light coming
from the window, to concentrate it, with the magnifier, on the bullet.
As the bullet melts, the grumbling stops, and the boy taps on his stomach
with a big smile on his face. The two brothers sit together and start melting
down the plastics. Then outside the hideout room, there is a water mill that
is made of rifles, tank belt and soldiers helmets. The two kids go to the mill
and start working on the plants that the mill waters. The two kids change
shape to become the two little children of Goodman.
Techniques
War Inc.
will be a mixture of three art media. The first part will start with 2D,
then transitions into stop motion, and ends with 3D CG.
29/30
-
The first Act would require metamorphosis, many characters, smooth
transitions in shape and style.
2D
Would be a suitable choice for that.
-
The second Act is where the two officers play the game.
Stop motion
is capable of giving the feeling of reality of actions.
-
The third Act would require duplicated characters, particles work,
organic morphing of the objects (especially when the soldiers melt),
plastic-looking materials. Which seems to be ideal in
CG
.
-
I am going to
3D-Printout
the soldiers, and use them in the stop
motion part. Which will help in enriching the stop motion visuals, and
also will allow a smoother transitioning between stop motion and 3D.
Do-ability
:
2D Part
My experience in TVPaint shall make the good quality work achievable in a
reasonable time. Keeping in mind that the limited animation might
3D Part
Using what I have learned so far from my quarter films will reduce the challenges
of CG. And because my soldiers are going to be frozen, I will only need to rig the
little girl and her brother (in the last scene). It is not going to be easy, but easier
than rigging an army… literally.
Stop Motion
I took classes for building basic puppets, and for advanced animation. And in the
summer I am going to make research studies on how to build a Ball & Socket
puppet
(the high-end type of puppets where the joint are balls which would allow
a big neat range of movement for the puppets). I already ordered 4 books for
learning how to professionally build an armature.
Plan B for the armature would
be by buying a good armature, which ranges from $80-200. This could save me
the building time, if I figured that I am losing time on the armature.
Sound
30/30
Preproduction
Item
Description
In-Kind
Cost
Qnt
y
Actual
Computer
Main engine
Yes
Dragonframe
Stop-Mo Software
300
1
300
Ball&socket
armature
Stop-Mo Characters
90-200
3
270-500
Stop Motion books
To learn how to build armatures,
and to educate me deeper in
animating puppets
25-60
>3
100-250
3D printing
Props for Stop-Mo
20- 100
>10
200-1000
Composer
Music Composer
100 to
300
1
100 to 300
Sound mixing
talent
A person to mix the sound
0 to 250
1
0 to 250
Puppets materials
Fabrics, plastecine clay, sculpey,
wires…etc.
50 to
150
Many
50 to 150
RC chopper
Reference for 3D animation
Yes
3 Hard Drives
1 for daily use, 2 for backups.
2/3
150
1
150
Festivals Fee
35-65
25
875-1625
Total
$2045 – 4525