One Microsoft Way
Redmond, Washington 98052-6399
Copyright © 2004 by Craig Stinson and Mark Dodge
All rights reserved. No part of the contents of this book may be reproduced or transmitted in any form or by any means without the written permission of the publisher.
Library of Congress Cataloging-in-Publication Data Stinson, Craig,
1943-Microsoft Office Excel 2003 Inside Out / Craig Stinson, Mark Dodge. p. cm.
Includes index. ISBN 0-7356-1511-X
1. Microsoft Excel (Computer file) 2. Business--Computer programs. 3. Electronic spreadsheets. I. Dodge, Mark. II. Title.
HF5548.4.M523S753 2003
005.369--dc21 2003052673
Printed and bound in the United States of America. 1 2 3 4 5 6 7 8 9 QWT 8 7 6 5 4 3 Distributed in Canada by H.B. Fenn and Company Ltd.
A CIP catalogue record for this book is available from the British Library.
Microsoft Press books are available through booksellers and distributors worldwide. For further informa-tion about internainforma-tional ediinforma-tions, contact your local Microsoft Corporainforma-tion office or contact Microsoft Press International directly at fax (425) 936-7329. Visit our Web site at www.microsoft.com/mspress. Send comments to [email protected].
AutoSum, FrontPage, IntelliMouse, Microsoft, Microsoft Press, MS-DOS, PivotChart, PivotTable, SharePoint, Visual Basic, Windows, and Windows NT are either registered trademarks or trademarks of Microsoft Corporation in the United States and/or other countries. Other product and company names mentioned herein may be the trademarks of their respective owners.
The example companies, organizations, products, domain names, e-mail addresses, logos, people, places, and events depicted herein are fictitious. No association with any real company, organization, product, domain name, e-mail address, logo, person, place, or event is intended or should be inferred.
Acquisitions Editor: Alex Blanton Project Editor: Sandra Haynes Series Editor: Sandra Haynes
iii
Contents at a Glance
Part 1
Examining the Excel
Environment
Chapter 1
What’s New in Microsoft
Office Excel 2003 . . . 3
Chapter 2
Excel Fundamentals . . . .13
Chapter 3
Custom-Tailoring the Excel
Workspace . . . .65
Part 2
Building Worksheets
Chapter 4
Worksheet Design Tips . . . .93
Chapter 5
How to Work a Worksheet . . . .101
Chapter 6
How to Work a Workbook . . . .133
Part 3
Formatting and Editing
Worksheets
Chapter 7
Worksheet Editing Techniques . . .147
Chapter 8
Worksheet Formatting
Techniques . . . .195
Chapter 9
Advanced Formatting and
Editing Techniques . . . .241
Part 4
Adding Graphics
and Printing
Chapter 10
Creating Spiffy Graphics . . . 283
Chapter 11
Printing and Presenting . . . 331
Part 5
Creating Formulas and
Performing Data
Analysis
Chapter 12
Building Formulas . . . 351
Chapter 13
Using Functions . . . 401
Chapter 14
Everyday Functions . . . 411
Chapter 15
Formatting and Calculating
Date and Time . . . 435
Chapter 16
Functions for Financial
Analysis . . . 449
Chapter 17
Functions for Analyzing
Statistics . . . 463
Chapter 18
iv
Collaboration and
the Internet
Chapter 19
Collaborating with Excel . . . .521
Chapter 20
Transferring Files to and
from Internet Sites . . . .553
Part 7
Integrating Excel with
Other Applications
Chapter 21
Linking and Embedding . . . .569
Chapter 22
Using Hyperlinks . . . .581
Chapter 23
Using Excel Data in Word
and PowerPoint Documents . . . . .589
Part 8
Creating Charts
Chapter 24
Basic Charting Techniques. . . .609
Chapter 25
Enhancing the Appearance
of Your Charts . . . .623
Chapter 26
Working with Chart Data . . . .667
Chapter 27
Advanced Charting Techniques . .683
Managing Databases
and Lists
Chapter 28
Managing Information in Lists . . . 701
Chapter 29
Working with External Data . . . . 757
Chapter 30
Analyzing Data with PivotTable Reports . . . 797
Part 10
Automating Excel
Chapter 31
Recording Macros . . . 841
Chapter 32
Creating Custom Functions. . . 859
Chapter 33
Debugging Macros and
Custom Functions . . . 869
Part 11
Appendixes
Appendix A
Installing Microsoft Excel . . . 883
Appendix B
Using Speech and Handwriting Recognition . . . 889
Appendix C
Keyboard Shortcuts . . . 903
Appendix D
v
Table of Contents
Acknowledgments . . . xxv
We’d Like to Hear from You! . . . .xxvii
About the CD . . . xxix
What’s on the CD . . . xxix
Using the CD . . . xxix
System Requirements . . . xxx
Support Information . . . xxx
Conventions and Features Used in This Book . . . xxxi
Text Conventions . . . xxxi
Design Conventions . . . xxxi
Part 1
Examining the Excel Environment
Chapter 1What’s New in Microsoft Office Excel 2003
3
New and Improved for 2003 . . . 3Online Assistance . . . 3
Comparing Worksheets Side by Side . . . 4
Improved Statistical Functions. . . 5
New Task Panes . . . 5
Document Workspaces . . . 6
Information Rights Management . . . 7
Improved List Management . . . 7
If You Missed the Last Upgrade . . . 8
Onward . . . 11
Chapter 2
Excel Fundamentals
13
What Happens After You Install Excel? . . . 13Registering Excel . . . 13
Subscribing to Excel . . . 13
Recovering from Crashes . . . 15
Using AutoRecover . . . 16
Heroic Measures . . . 17
Examining the Excel Workspace. . . 18
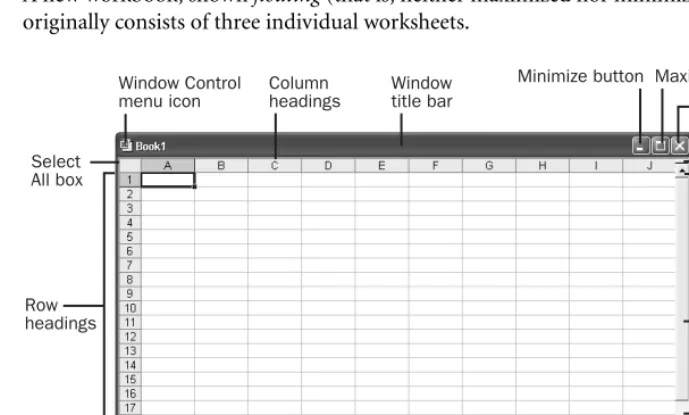
Facts About Worksheets . . . 18
Using the Workbook Window . . . 19
Exploring Menus and Dialog Boxes . . . 23
Understanding the Formula Bar . . . 27
vi
File Management Fundamentals . . . 29
Creating and Opening Workbooks . . . 29
Saving Files . . . 34
Opening Files . . . 41
Searching for Files . . . 46
Importing and Exporting Files . . . 48
Using the Open and Save As Commands to Import and Export Files. . 48
Importing and Exporting Text Files . . . 49
Sharing Data with Excel for the Macintosh . . . 50
Online Help Works—Really!. . . 51
The Best Way to Use Help. . . 51
Managing the Assistant . . . 55
Using the Assistant . . . 56
Browsing the Help System . . . 59
Customer Feedback Options . . . 60
What’s on the Help Menu? . . . 62
Chapter 3
Custom-Tailoring the Excel Workspace
65
Customizing Toolbars and Menus . . . 65Managing Buttons and Commands . . . 65
Customizing Toolbars on the Fly. . . 66
Changing the Face of Buttons . . . 74
Managing Toolbars . . . 76
Positioning Bars on Your Screen . . . 77
Creating New Toolbars and Menus . . . 78
Creating New Toolbars . . . 78
Attaching Custom Toolbars to Workbooks. . . 79
Creating New Menus . . . 80
Restoring Toolbars and Menus . . . 82
Other Toolbar and Menu Options . . . 83
Controlling Other Elements of the Excel Interface . . . 83
Displaying Underlying Formulas . . . 85
Hiding Zeros . . . 86
Changing the Color Palette . . . 87
Enhancing Accessibility. . . 89
Part 2
Building Worksheets
Chapter 4Worksheet Design Tips
93
Which Data Should Be in Rows, and Which in Columns? . . . 93vii
Would Your Worksheet Survive Without You? . . . 97
Does the Worksheet Rely on Imported Data? . . . 97
Do You Need More Than One Worksheet? . . . 98
Have You Allowed Room to Insert New Rows and Columns? . . . 99
Chapter 5
How to Work a Worksheet
101
Moving Around . . . 101Navigating Regions . . . 101
Selecting Stuff . . . 104
Selecting with the Mouse . . . 104
Selecting with the Go To Command . . . 107
Entering Stuff. . . 109
Making Entries in Cells and in the Formula Bar . . . 109
Making Entries in Ranges . . . 116
Editing and Undoing Entries . . . 116
Managing Worksheets . . . 118
Inserting and Deleting Sheets . . . 118
Naming and Renaming Sheets . . . 119
Moving and Copying Sheets . . . 120
Looking at Worksheets . . . 121
Splitting Sheets into Panes . . . 122
Zooming Worksheets . . . 125
Protecting Worksheets . . . 127
Unlocking Individual Cells . . . 128
Protecting Workbooks . . . 128
Hiding Cells and Sheets . . . 132
Chapter 6
How to Work a Workbook
133
Managing Multiple Workbooks . . . 133Navigating Between Open Workbooks . . . 134
Arranging Workbook Windows . . . 134
Getting the Most Out of Your Screen . . . 136
Comparing Sheets Side-by-Side . . . 136
Opening Multiple Windows for the Same Workbook . . . 138
Useful Inconsistencies of New Windows. . . 140
Hiding and Protecting Workbooks . . . 141
Hiding Workbooks . . . 141
Protecting Workbooks . . . 142
Saving Workbooks or Windows as Hidden . . . 143
viii
Formatting and Editing Worksheets
Chapter 7
Worksheet Editing Techniques
147
Copying, Cutting, and Pasting . . . 147
Copying and Pasting . . . 148
Cutting and Pasting . . . 150
Pasting Hyperlinks . . . 156
Moving and Copying with the Mouse . . . 157
Inserting and Deleting . . . 158
Inserting Columns and Rows. . . 158
Inserting Cells . . . 160
Deleting Cells, Columns, and Rows . . . 161
Inserting, Deleting, and Clearing Cells with the Mouse . . . 163
Undoing Previous Actions . . . 166
Redoing What You’ve Undone . . . 167
Repeating Your Last Action . . . 167
Editing Cell Contents . . . 167
Editing in the Formula Bar . . . 167
Editing Directly in Cells . . . 168
Editing Options . . . 169
Clearing Cell Contents and Formats . . . 170
Filling and Creating Data Series. . . 171
Extending Existing Formatting . . . 178
Finding and Replacing Stuff. . . 179
Specifying Variables Using Wildcard Characters . . . 182
Replacing What You Find. . . 183
Editing Multiple Worksheets . . . 183
Grouping Sheets for Editing. . . 184
Filling a Group . . . 187
Getting the Words Right . . . 187
Fixing Errors as You Type. . . 187
Letting Excel Help with Typing Chores. . . 191
Cheking Yer Speling . . . 193
Chapter 8
Worksheet Formatting Techniques
195
Formatting Fundamentals . . . 195Painting Formats . . . 197
Turbo Formatting with AutoFormat . . . 198
Formatting in Cells . . . 200
Formatting Individual Characters . . . 201
ix
Formatting Numbers . . . 203
Formatting Currency . . . 203
Using the Euro Currency Tools Add-in . . . 204
Using Accounting Formats. . . 207
Using Accounting Underlines . . . 208
Formatting Percentages . . . 208
Formatting Fractions . . . 208
Formatting Scientific (Exponential) Values . . . 209
Understanding the Text Format . . . 210
Using the Special Formats . . . 210
Creating Custom Formats . . . 211
Creating New Number Formats . . . 211
Creating Four-Part Formats . . . 215
Adding Color to Formats . . . 216
Using Custom Format Condition Operators . . . 218
Aligning Data in Cells . . . 219
Aligning Text Horizontally . . . 220
Aligning Text Vertically. . . 222
Shrinking Text to Fit in Cells . . . 225
Selecting Alignment Using Toolbars . . . 225
Using Fonts . . . 226
Formatting Fonts with Toolbar Buttons . . . 227
Customizing Borders . . . 228
Applying Border Formats with Toolbar Buttons. . . 229
Applying Colors and Patterns. . . 231
Adding Colors with Toolbars . . . 233
Adding Graphic Backgrounds to Worksheets . . . 233
Controlling the Size of Cells . . . 234
Changing Column Widths . . . 234
Changing Row Heights . . . 235
Merging and Unmerging Cells . . . 237
Chapter 9
Advanced Formatting and Editing Techniques
241
Applying Conditional Formats . . . 241Formatting with Styles . . . 243
Applying a Style . . . 245
Defining Styles. . . 245
Defining Styles from Scratch . . . 246
Modifying a Style . . . 247
Overriding a Style with Direct Formatting Changes. . . 248
Merging Styles from Different Workbooks . . . 248
x
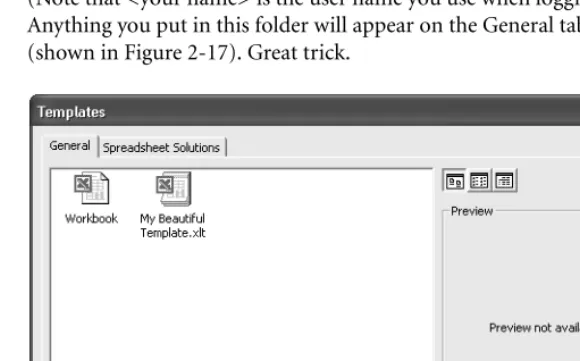
Adding Templates to the XLStart Folder . . . 250
Auditing and Documenting Worksheets . . . 251
Tracing Cell References . . . 256
Adding Comments to Cells . . . 261
Using Go To Special . . . 263
Outlining Worksheets . . . 268
Hiding or Clearing an Outline . . . 271
Collapsing and Expanding Outline Levels . . . 272
Displaying a Specific Outline Level. . . 273
Selecting Only Visible Cells . . . 273
Ungrouping and Grouping Columns and Rows . . . 273
Consolidating Worksheets. . . 274
Consolidating by Position . . . 275
Consolidating by Category. . . 277
Part 4
Adding Graphics and Printing
Chapter 10Creating Spiffy Graphics
283
Using the Drawing Tools . . . 283Drawing Constrained Objects. . . 284
Using Tear-Off Palettes . . . 286
Creating Graphic Objects . . . 287
Drawing Freehand Lines and Polygons . . . 287
Working with Text Boxes . . . 290
Working with AutoShapes . . . 292
Creating WordArt . . . 294
Working with Graphic Objects . . . 297
Selecting and Grouping Objects . . . 297
Formatting Objects . . . 298
Positioning Objects. . . 305
Protecting Objects . . . 308
Inserting Other Objects . . . 308
Using Clip Art and Other Media . . . 310
Importing Graphics . . . 314
Inserting Pictures . . . 315
Formatting Pictures . . . 318
More Tricks with Objects . . . 321
Assigning Macros to Objects . . . 321
Taking Pictures of Your Worksheets . . . 322
xi
Printing and Presenting
331
Controlling the Appearance of Your Pages . . . 331
Setting Page Options . . . 331
Setting Margins . . . 333
Creating a Header and Footer . . . 334
Setting Sheet Options . . . 338
Adjusting Page Breaks . . . 341
Inserting and Removing Manual Page Breaks . . . 342
Using Print Preview . . . 343
Specifying What and Where to Print . . . 344
Defining a Default Print Area . . . 346
Setting Printer Driver Options . . . 347
Part 5
Creating Formulas and Performing Data Analysis
Chapter 12Building Formulas
351
Formula Fundamentals . . . 351Understanding the Precedence of Operators. . . 351
Using Cell References in Formulas . . . 352
Editing Formulas . . . 359
Using Functions: A Preview . . . 361
Using the AutoSum Button . . . 362
Inserting Functions. . . 363
Creating Three-Dimensional Formulas . . . 364
Formula-Bar Formatting . . . 364
Creating Natural-Language Formulas . . . 364
Naming Cells and Cell Ranges. . . 368
Using Names in Formulas . . . 369
Defining and Managing Names . . . 370
Editing Names . . . 371
Workbook-Wide vs. Worksheet-Only Names. . . 372
Creating Names Semiautomatically . . . 373
Naming Constants and Formulas . . . 374
Creating Three-Dimensional Names . . . 374
Pasting Names into Formulas . . . 375
Creating a List of Names . . . 375
Replacing References with Names. . . 376
Using Go To with Named Ranges . . . 377
xii
Recalculating Manually . . . 379
Copying Formulas and Pasting Only Their Resulting Values . . . 380
Evaluating Part of a Formula . . . 381
Using Circular References . . . 382
Understanding the Precision of Numeric Values . . . 384
Using Arrays . . . 385
One-Dimensional Arrays . . . 385
Array Formula Rules . . . 386
Two-Dimensional Arrays . . . 386
Single-Cell Array Formulas . . . 387
Using Array Constants . . . 388
Understanding Array Expansion . . . 389
Linking Workbooks . . . 389
Saving Linked Workbooks . . . 390
Opening a Dependent Workbook . . . 390
Editing Links . . . 391
Copying, Cutting, and Pasting in Linked Workbooks. . . 392
Creating Conditional Tests . . . 393
Using the Conditional Sum and Lookup Wizards . . . 394
Creating Conditional Sum Formulas . . . 394
Creating Lookup Formulas. . . 397
Chapter 13
Using Functions
401
Using Excel’s Built-In Function Reference . . . 401Installing the Analysis ToolPak. . . 403
Exploring the Syntax of Functions . . . 404
Expressions as Arguments . . . 405
Types of Arguments . . . 405
Inserting Functions. . . 406
Inserting References and Names. . . 409
Chapter 14
Everyday Functions
411
Understanding Mathematical Functions . . . 411Using the SUM Function . . . 411
Using Selected Mathematical Functions . . . 412
Using the Rounding Functions . . . 414
Understanding Text Functions . . . 416
Using Selected Text Functions . . . 416
Using the Substring Text Functions . . . 419
Understanding Logical Functions . . . 421
xiii
Using Selected Information Functions . . . 424
Using the IS Information Functions . . . 425
Understanding Lookup and Reference Functions. . . 426
Using Selected Lookup and Reference Functions . . . 426
Chapter 15
Formatting and Calculating Date and Time
435
Understanding How Excel Records Dates and Times . . . 435Entering Dates and Times . . . 436
Entering a Series of Dates . . . 437
Formatting Dates and Times . . . 440
Creating Your Own Date and Time Formats . . . 441
Calculating with Date and Time . . . 444
Working with Date and Time Functions . . . 445
Working with Specialized Date Functions . . . 447
Chapter 16
Functions for Financial Analysis
449
Calculating Investments . . . 449The PV Function . . . 450
The NPV Function . . . 451
The FV Function . . . 451
The PMT Function. . . 452
The IPMT Function . . . 453
The PPMT Function . . . 453
The NPER Function . . . 453
The RATE Function . . . 453
The IRR Function . . . 454
The MIRR Function . . . 455
Calculating Depreciation . . . 455
The SLN Function . . . 455
The DDB and DB Functions . . . 456
The VDB Function . . . 456
The SYD Function . . . 457
Analyzing Securities . . . 457
The DOLLARDE and DOLLARFR Functions. . . 458
The ACCRINT and ACCRINTM Functions . . . 459
The INTRATE and RECEIVED Functions . . . 459
The PRICE, PRICEDISC, and PRICEMAT Functions . . . 459
The DISC Function . . . 460
The YIELD, YIELDDISC, and YIELDMAT Functions . . . 460
The TBILLEQ, TBILLPRICE, and TBILLYIELD Functions . . . 461
The COUPDAYBS, COUPDAYS, COUPDAYSNC, COUPNCD, COUPNUM, and COUPPCD Functions . . . 461
xiv
Functions for Analyzing Statistics
463
Analyzing Distributions of Data . . . 464
Using Built-In Statistical Functions . . . 464
Using Functions That Analyze Rank and Percentile . . . 465
Using Sample and Population Statistical Functions . . . 468
Understanding Linear and Exponential Regression . . . 469
Calculating Linear Regression . . . 470
Calculating Exponential Regression . . . 476
Using the Analysis Toolpak Data Analysis Tools . . . 477
Using the Descriptive Statistics Tool . . . 477
Creating Histograms . . . 479
Using the Rank and Percentile Tool . . . 482
Generating Random Numbers . . . 484
Sampling a Population of Numbers . . . 488
Calculating Moving Averages . . . 489
Chapter 18
Performing What-If Analysis
493
Using Data Tables . . . 493Data Tables Based on One Input Variable . . . 493
Single-Variable Tables with More Than One Formula . . . 495
Data Tables Based on Two Input Variables . . . 495
Editing Tables . . . 497
Using the Scenario Manager . . . 498
Defining Scenarios . . . 499
Browsing Your Scenarios. . . 501
Adding, Editing, and Deleting Scenarios . . . 501
Routing and Merging Scenarios . . . 502
Creating Scenario Reports . . . 504
Using the Goal Seek Command . . . 507
Precision and Multiple Solutions . . . 509
Using the Solver. . . 509
Stating the Objective . . . 511
Specifying Variable Cells . . . 512
Specifying Constraints . . . 512
Saving and Reusing the Solver Parameters. . . 514
Assigning the Solver Results to Named Scenarios . . . 515
Other Solver Options . . . 515
xv
Collaboration and the Internet
Chapter 19
Collaborating with Excel
521
Saving and Retrieving Files on Remote Computers . . . 521
Sharing Workbooks on a Network . . . 522
Using Advanced Sharing Options . . . 525
Tracking Changes . . . 526
Reviewing Changes . . . 529
Canceling the Shared Workbook Session . . . 530
Combining Changes Made to Multiple Workbooks . . . 530
Merging Workbooks . . . 531
Distributing Workbooks and Worksheets by E-Mail . . . 532
Sending an Entire Workbook as an E-Mail Attachment . . . 533
Sending the Current Sheet as the Body of an E-Mail Message . . . 533
Sending a Workbook for Review. . . 535
Routing Workbooks to a Workgroup . . . 536
Controlling Document Access with Information Rights Management . . . 538
Protecting a Document with IRM . . . 538
Using a Protected Document . . . 541
Using a SharePoint Team Services Site . . . 541
Downloading and Uploading Documents. . . 542
Checking Documents In and Out . . . 544
Using the Shared Workspace Task Pane. . . 544
Creating a New Document Workspace . . . 548
Using Web Discussions . . . 550
Chapter 20
Transferring Files to and from Internet Sites
553
Working with FTP Sites . . . 553Adding a Site to Your My Places Bar . . . 555
Saving and Publishing Excel Files in HTML . . . 556
Considering the Options . . . 556
Saving an Entire Workbook Without Interactivity . . . 561
Publishing Without Interactivity . . . 562
Publishing with Interactivity . . . 563
xvi
Integrating Excel with Other Applications
Chapter 21
Linking and Embedding
569
Embedding vs. Linking . . . 569
Embedding vs. Static Pasting . . . 570
Embedding and Linking from the Clipboard . . . 571
Embedding and Linking with the Object Command . . . 574
Manipulating Embedded Objects . . . 576
Managing Links . . . 577
Choosing Automatic or Manual Update . . . 578
Updating on File Open . . . 578
Fixing Broken Links . . . 579
Linking vs. Hyperlinking . . . 579
Chapter 22
Using Hyperlinks
581
Creating a Hyperlink in a Cell . . . 582Turning Ordinary Text into a Hyperlink. . . 583
Linking to a Web Site or Local File . . . 583
Linking to a Location in the Current Document . . . 585
Linking to a New File . . . 585
Linking to an E-Mail Message . . . 586
Assigning a Hyperlink to a Graphic, Toolbar Button, or Menu Command . . 587
Editing, Removing, and Deleting a Hyperlink . . . 587
Formatting a Hyperlink . . . 588
Using the HYPERLINK Function . . . 588
Chapter 23
Using Excel Data in Word and PowerPoint
Documents
589
Using Excel Tables in Word Documents . . . 589Pasting an Excel Table from the Clipboard . . . 589
Using Paste Special to Control the Format of Your Table . . . 591
Using the Object Command. . . 597
Using Excel Charts in Word Documents . . . 598
Using Excel to Supply Mail-Merge Data to Word . . . 600
Using Excel Data in PowerPoint . . . 603
Paste-Linking Excel Data into PowerPoint . . . 605
xvii
Creating Charts
Chapter 24
Basic Charting Techniques
609
Creating a New Chart . . . 609
Step 1: Choosing a Chart Type . . . 610
Step 2: Specifying the Data to Plot . . . 611
Step 3: Choosing Chart Options . . . 613
Step 4: Telling Excel Where to Put Your Chart . . . 618
Creating Combination (Overlay) Charts . . . 618
Changing a Chart’s Size and Position . . . 618
Plotting Hidden Cells . . . 619
Handling Missing Values . . . 619
Changing the Default Chart Type . . . 620
Printing Charts . . . 620
Saving, Opening, and Protecting Charts . . . 621
Working with Embedded Chart Objects . . . 621
Chapter 25
Enhancing the Appearance of Your Charts
623
Working with the Chart Menu and Chart Toolbar . . . 623Selecting Chart Elements . . . 625
Copying Formats from One Chart to Another . . . 625
Adding a Customized Chart to the Chart Wizard Gallery . . . 625
Repositioning Chart Elements with the Mouse . . . 626
Moving and Resizing the Plot Area . . . 626
Working with Titles . . . 627
Creating a Two-Line Title . . . 627
Formatting a Title . . . 627
Formatting Individual Characters in a Title . . . 630
Adding Text Annotations . . . 631
Working with Data Labels . . . 631
Label Positioning and Alignment Options . . . 631
Numeric Formatting Options for Data Labels. . . 633
Font and Patterns Options for Data Labels . . . 633
Editing Data Labels . . . 633
Positioning and Formatting Data Labels Individually . . . 634
Generating Useful Data Labels on XY (Scatter) Charts. . . 634
Working with Axes . . . 636
Specifying the Line Style, Color, and Weight . . . 637
Specifying the Position of Tick Marks and Tick-Mark Labels . . . 637
Changing the Numeric Format Used by Tick-Mark Labels . . . 638
Scaling Axes Manually . . . 639
xviii
Assigning a Series to a Secondary Value Axis . . . 647
Using Two or More Chart Types in the Same Chart . . . 647
Changing the Series Order . . . 648
Toggling the Column/Row Orientation . . . 649
Changing Colors, Patterns, Fills, and Borders for Markers . . . 649
Adjusting Spacing in Two-Dimensional Column and Bar Charts . . . 650
Adjusting Data Point Spacing in Three-Dimensional Charts . . . 652
Adding Series Lines in Stacked Column and Bar Charts . . . 653
Changing Shapes in Three-Dimensional Column and Bar Charts. . . . 653
Smoothing the Lines in Line and XY (Scatter) Charts. . . 654
Changing Line and Marker Styles in Line, XY (Scatter), and Radar Charts . . . 654
Adding High-Low Lines and Up and Down Bars to Line Charts . . . 654
Adding Drop Lines to Area and Line Charts. . . 655
Exploding Pie Slices and Doughnut Bites . . . 655
Using Formatting and Split Options in Pie-Column and Pie-Pie Charts . . . 656
Changing the Angle of the First Pie Slice or Doughnut Bite. . . 657
Working with Data Tables . . . 657
Formatting Background Areas . . . 658
Filling an Area with a Color Gradient . . . 658
Filling an Area with a Pattern . . . 659
Filling an Area with a Texture or Picture . . . 660
Changing Three-Dimensional Viewing Angles . . . 664
Adjusting the Elevation . . . 664
Changing the Rotation . . . 664
Changing the Height . . . 665
Changing the Perspective . . . 665
Changing the Axis Angle and Scale . . . 665
Chapter 26
Working with Chart Data
667
Adding Data . . . 667Using Copy and Paste. . . 668
Adding Series . . . 669
Using List Features to Create Expanding Charts . . . 670
Removing Data. . . 671
Changing or Replacing Data . . . 671
Plotting or Marking Every nth Point . . . 672
Changing the Plot Order . . . 675
Using Multilevel Categories . . . 675
Adding Trend Lines . . . 678
Adding Error Bars . . . 679
xix
Advanced Charting Techniques
683
Using Named Ranges to Create Dynamic Charts. . . 683
Plotting New Data Automatically . . . 685
Plotting Only the Most Recent Points . . . 686
Using Arrays to Create a Static Chart . . . 687
Using Bubble Charts. . . 687
Using Radar Charts . . . 689
Creating Gannt Charts . . . 692
Assorted Formatting Issues . . . 693
Tick-Mark Labels Without Axes . . . 694
Tick-Mark Labels on the Plot Area . . . 694
Formatting Selected Gridlines or Tick-Mark Labels . . . 695
Staggered Tick-Mark Labels . . . 695
Plotting Your Own Projection (Extrapolation) Line . . . 696
Part 9
Managing Databases and Lists
Chapter 28Managing Information in Lists
701
Building and Maintaining a List . . . 701Using Label-Based Formulas in Calculated Columns . . . 703
Using (or Disabling) Other List-Building Aids . . . 705
Custom Lists . . . 707
Working with List Objects . . . 707
Publishing a List Object . . . 709
Toggling the Total Row . . . 717
Resizing a List Object . . . 718
Inserting and Deleting Rows and Columns within a List Object. . . 718
Validating Data Entry . . . 719
Specifying Data Type and Acceptable Values. . . 720
Specifying an Input Message (Prompt) . . . 721
Specifying Error Alert Style and Message . . . 721
Using Excel’s Form Command to Work with Lists. . . 721
Adding Rows . . . 722
Finding Records . . . 722
Sorting Lists and Other Ranges . . . 723
Sorting on a Single Column. . . 723
Sorting on More than One Column. . . 724
Sorting Only Part of a List . . . 725
Sorting by Columns . . . 726
Sorting Cells That Contain Formulas . . . 727
Sorting Months, Weekdays, or Custom Lists. . . 728
xx
Using the AutoFilter Command . . . 730
Using the Advanced Filter Command . . . 734
Using Subtotals to Analyze a List. . . 742
Subtotaling on More Than One Column . . . 745
Subtotaling with More Than One Aggregation Formula . . . 745
Using Automatic Page Breaks . . . 745
Removing or Replacing Subtotals . . . 746
Grouping by Date . . . 746
Using the SUBTOTAL Function . . . 746
Using Functions to Extract Details from a List. . . 747
The Database Statistical Functions . . . 747
COUNTIF and SUMIF . . . 749
COUNTBLANK . . . 750
VLOOKUP and HLOOKUP. . . 750
MATCH and INDEX . . . 752
Chapter 29
Working with External Data
757
Using File, Open to Import External Data Files . . . 757Opening Text Files . . . 757
Opening Microsoft Access Tables in Excel . . . 761
Opening dBase Files. . . 762
Working with XML Files . . . 762
Opening or Importing an XML List . . . 763
Exporting an XML List . . . 767
Using a Query to Retrieve External Data . . . 767
Reusing an Existing Query. . . 767
Creating a New Database Query . . . 769
Working Directly with Microsoft Query . . . 779
Using a Web Query to Return Internet Data . . . 791
Using an Existing Web Query . . . 792
Creating Your Own Web Query . . . 793
Chapter 30
Analyzing Data with PivotTable Reports
797
A Simple Example . . . 797Creating a PivotTable . . . 800
Starting the PivotTable And PivotChart Wizard. . . 800
Step 1: Specifying the Type of Data Source . . . 801
Step 2: Indicating the Location of Your Source Data . . . 801
Step 3: Telling the Wizard Where to Put Your PivotTable . . . 802
Laying Out the PivotTable . . . 803
Pivoting a PivotTable . . . 804
xxi
Moving Page Fields to Separate Workbook Pages . . . 806
Selecting Items to Display on the Row and Column Axes . . . 806
Creating a PivotChart . . . 806
Refreshing a PivotTable. . . 808
Refreshing on File Open . . . 808
Selecting Elements of a PivotTable . . . 808
Formatting a PivotTable. . . 809
Using AutoFormat with PivotTables. . . 809
Changing the Numeric Format for the Data Area . . . 809
Changing the Way a PivotTable Displays Empty Cells . . . 809
Changing the Way a PivotTable Displays Error Values. . . 810
Merging Labels . . . 810
Using Multiple Data Fields . . . 811
Renaming Fields and Items . . . 812
Sorting Items . . . 812
Using AutoSort. . . 812
Rearranging Items by Hand . . . 813
Showing the Top or Bottom Items in a Field . . . 814
Hiding and Showing Inner Field Items . . . 814
Displaying the Details Behind a Data Value . . . 815
Grouping and Ungrouping Data . . . 816
Creating Ad Hoc Item Groupings . . . 816
Grouping Numeric Items . . . 817
Grouping Items in Date or Time Ranges . . . 818
Removing Groups (Ungrouping) . . . 819
Using Grand Totals and Subtotals . . . 819
Grand Totals . . . 819
Subtotals. . . 820
Subtotals for Innermost Fields . . . 821
Changing a PivotTable’s Calculations . . . 821
Using a Different Summary Function . . . 821
Applying Multiple Summary Functions to the Same Field . . . 822
Using Custom Calculations . . . 822
Using Calculated Fields and Items . . . 824
Referencing PivotTable Data from Worksheet Cells . . . 827
Creating a PivotTable from External Data . . . 827
Refreshing PivotTable Data from an External Source . . . 829
Using a PivotTable to Consolidate Ranges . . . 830
Building a PivotTable from an Existing PivotTable. . . 835
Printing PivotTables . . . 835
Using Row and Column Headings as Print Titles . . . 835
Repeating Item Labels on Each Printed Page . . . 835
Printing Each Outer Row Field Item on a New Page . . . 836
xxii
Automating Excel
Chapter 31
Recording Macros
841
Using the Macro Recorder. . . 841 Running a Macro Without Using a Keyboard Shortcut . . . 843 Behind the Scenes: The VBA Environment . . . 843 Getting Help on VBA Keywords . . . 844 Objects, Methods, and Properties . . . 845 Manipulating an Object’s Properties Without Selecting the Object . . 849 Naming Arguments to Methods . . . 850 Adding Code to an Existing Macro . . . 850 Using Absolute and Relative References . . . 853 Macro Subroutines . . . 855 Using the Personal Macro Workbook . . . 856 Going On from Here . . . 857 Chapter 32
Creating Custom Functions
859
Using Custom Functions . . . 861 What’s Happening . . . 862 Understanding Custom Function Rules. . . 863 Using VBA Keywords in Custom Functions . . . 863 Documenting Macros and Custom Functions . . . 864 Creating Custom Functions with Optional Arguments. . . 865 Making Your Custom Functions Available Anywhere . . . 867 Chapter 33
Debugging Macros and Custom Functions
869
Using Design-Time Tools . . . 869 Catching Syntax Errors . . . 870 Catching Misspelled Variable Names . . . 871 Stepping Through Code. . . 872 Setting Breakpoints with the Toggle Breakpoint Command . . . 873 Setting Conditional Breakpoints Using Debug.Assert. . . 873 Using the Watch Window to Monitor Variable Values
xxiii
Appendixes
Appendix A
Installing Microsoft Excel
883
System Requirements . . . 883 Additional Requirements and Recommendations . . . 884 Installing Office . . . 884 Uninstalling Office . . . 885 Installing Additional Components. . . 885 Installing International Features . . . 886 Using the On-Screen Keyboard . . . 886 Repairing Your Office Installation . . . 887 Appendix B
Using Speech and Handwriting Recognition
889
Using the Language Bar . . . 889 Controlling the Language Bar . . . 893 Using Speech Recognition . . . 895 Training Your Computer and Your Voice . . . 895 Issuing Verbal Commands. . . 896 Using Your Voice to Input Text . . . 896 Using Handwriting Recognition . . . 899 Appendix C
Keyboard Shortcuts
903
xxiv
Move and Scroll—Worksheets. . . 914 Move Within a Selected Range . . . 914 Open, Save As, and Insert Picture Dialog Boxes . . . 915 PivotTable and PivotChart Wizard Layout Dialog Box . . . 915 PivotTable—Display and Hide Items . . . 916 PivotTable—Change the Layout . . . 916 Print . . . 916 Print Preview . . . 916 Select Cells, Rows, Columns, and Objects . . . 917 Select Cells with Special Characteristics . . . 917 Send E-Mail Messages . . . 918 Show, Hide, and Outline Data . . . 918 Smart Tags . . . 919 Speech Recognition and Text-To-Speech . . . 919 Task Panes . . . 919 Windows and Office Interface . . . 920 Worksheets . . . 920 Appendix D
Function Reference
921
Index of Troubleshooting Topics . . . 969
xxv Software books are not products of inspiration, but of perspiration. However, the work done by the authors is just the tip of the iceberg. Producing books like this requires a sort of “alter-nate sanity” on the part of all involveda combination of childlike curiosity, skepticism, stubbornness, and anger management skills for dealing with the idiosyncrasies of unfinished software and unruly authors. Our hats are off to Sandra Haynes, Kristen Weatherby, Bill Teel, Alex Blanton, Beth Fuller, Stephanie English, Jan Cocker, J.J. Andrews, Don Lesser, Mannie White, and Brenda Silva and the rest of nSight’s desktop team. Thanks to all for doing a great job. Musical thanks to guitar maestro Gary Moore for keeping the bar set higher than most other blues-rock mortals could possibly hope to leap.
xxvii Our goal at Microsoft Press is to create books that help you find the information you need to get the most out of your software.
The INSIDE OUT series was created with you in mind. As part of our ongoing effort to ensure that we’re creating books that meet your learning needs, we’d like to hear from you. Let us know what you think. Tell us what you like about this book and what we can do to make it better. When you write, please include the title and author of this book in your e-mail, as well as your name and contact information. We look forward to hearing from you!
How to Reach Us
E-mail: [email protected] Mail: Inside Out Series Editor
Microsoft Press One Microsoft Way Redmond, WA 98052
xxix
About the CD
The companion CD that ships with this book contains many tools and resources to help you get the most out of your Inside Out book.
What’s On the CD
Your INSIDE OUT CD includes the following:
● Complete eBook. In this section you’ll find the electronic version of Microsoft Office Excel 2003 Inside Out. The eBook is in PDF format.
● Insider Extras. This section includes sample files referenced in the book. Copy these files to your hard disk and use them to follow along with the books examples or as a starting point for your own work.
● Microsoft Tools and Information. In this section you’ll resources, demos, and tools for the following applications: Excel, InfoPath, OneNote, and Publisher.
● Extending Excel. In this section you’ll find great information about third-party utili-ties and tools you use to further enhance your experience with Excel. A copy of a pro-gram named Spreadsheet Assistant is also included in this section. Details about how you might use this application are included in relevant sections of the book.
● Microsoft Computer Dictionary, Fifth Edition, eBook. Here you’ll find the full elec-tronic version of the Microsoft Computer Dictionary, Fifth Edition.
The companion CD provides detailed information about the files on this CD, and links to Microsoft and third-party sites on the Internet.
Note Please note that the links to third-party sites are not under the control of Microsoft Corporation and Microsoft is therefore not responsible for their content, nor should their inclusion on this CD be construed as an endorsement of the product or the site.
Using the CD
About the CD
xxx
System Requirements
Following are the minimum system requirements necessary to run the CD:
● Microsoft Windows XP or later or Windows 2000 Professional with Service Pack 3 or later
● 266-MHz or higher Pentium-compatible CPU
● 64 megabytes (MB) RAM
● 8X CD-ROM drive or faster
● Microsoft Windows–compatible sound card and speakers ● Microsoft Internet Explorer 5.01 or higher
● Microsoft Mouse or compatible pointing device
Note Individual add-in system requirements are specified on the CD. An Internet connec-tion is necessary to access the some of the hyperlinks. Connect time charges may apply.
Support Information
Every effort has been made to ensure the accuracy of the book and the contents of this com-panion CD. For feedback on the book content or this comcom-panion CD, please contact us by using any of the addresses listed in the “We’d Like to Hear From You” section.
Microsoft Press provides corrections for books through the World Wide Web at http:// www.microsoft.com/mspress/support/. To connect directly to the Microsoft Press Knowledge Base and enter a query regarding a question or issue that you may have, go to http:// www.microsoft.com/mspress/support/search.htm.
xxxi
Used in this Book
This book uses special text and design conventions to make it easier for you to find the infor-mation you need.
Text Conventions
Design Conventions
This icon identifies a new or significantly updated feature in this version of the software.
Inside Out
This statement illustrates an example of an “Inside Out” problem statement.
These are the book’s signature tips. In these tips, you’ll get the straight scoop on what’s going on with the software—inside information about why a feature works the way it does. You’ll also find handy workarounds to deal with software problems.
Convention Meaning
Abbreviated menu commands For your convenience, this book uses abbreviated menu commands. For example, “Click Tools, Track Changes, Highlight Changes” means that you should click the Tools menu, point to Track Changes, and click the High-light Changes command.
Boldface type Boldface type is used to indicate text that you enter or
type.
Initial Capital Letters The first letters of the names of menus, dialog boxes, dialog box elements, and commands are capitalized. Example: the Save As dialog box.
Italicized type Italicized type is used to indicate new terms.
Plus sign (+) in text Keyboard shortcuts are indicated by a plus sign (+) sep-arating two key names. For example, Ctrl+Alt+Delete means that you press the Ctrl, Alt, and Delete keys at the same time.
xxxii
task being discussed.
Troubleshooting
This statement illustrates an example of a “Troubleshooting” problem statement.
Look for these sidebars to find solutions to common problems you might encounter. Trou-bleshooting sidebars appear next to related information in the chapters. You can also use the Troubleshooting Topics index at the back of the book to look up problems by topic.
Cross-references point you to other locations in the book that offer additional information about the topic being discussed.
This icon indicates information or text found on the companion CD.
Caution Cautions identify potential problems that you should look out for when you’re completing a task or problems that you must address before you can complete a task.
Note Notes offer additional information related to the task being discussed.
Sidebars
The sidebars sprinkled throughout these chapters provide ancillary information on the topic being discussed. Go to sidebars to learn more about the technology or a feature.
1
Examining the Excel
Environment
1 What’s New in Microsoft Office Excel 2003
3
2 Excel Fundamentals
13
3
Chapter 1
What’s New in Microsoft
Office Excel 2003
New and Improved for 2003. . . .3 If You Missed the Last Upgrade . . . .8
Onward . . . 11
Sometimes new versions of software just don’t seem compelling enough for you to take the upgrade plunge. You wonder how many more big leaps can really be made in usability and functionality. Microsoft Excel has certainly evolved into a “mature” program. This release is more than just cosmetic, however; many of the new features are “under the hood,” and might not be apparent to the typical user. Foremost of the apparent enhancements: the new look of Microsoft Office that is, as Microsoft describes it, “more open and energetic.” In addition, new and improved task panes are available, including Help, Shared Workspace, and Research. And Tablet PC support now allows you to provide input directly into Office documents using a Tablet PC.
Microsoft Office Excel 2003 includes a few improvements to existing features and a few major new features that facilitate easier and more secure sharing of documents, efficient communi-cation and collaboration with others, more comprehensive and up-to-date online assistance, and enhanced programmability and extensibility. Here’s an overview of the new features you’ll find in Microsoft Office Excel 2003 and Microsoft Office 2003 Edition.
New and Improved for 2003
First, we’ll highlight the new features in the 2003 release of Microsoft Office and Microsoft Excel, and later, we’ll summarize the features that are as good as new to you if you skipped the last upgrade.
Online Assistance
C
h
apter 1
4
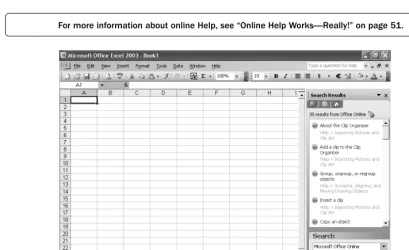
For more information about online Help, see “Online Help Works—Really!” on page 51.
[image:36.612.63.473.63.313.2]f01ie01
Figure 1-1. When you query the online Help system while connected to the Internet, the
Search Results task pane displays relevant online and offline topics.
Controlling Web Interaction
The Help, Customer Feedback Options command offers control over the new “Web-active” features of Excel. You can choose to enlist in the voluntary “Customer Experience Improve-ment Program” to help make future versions of Microsoft Office more user friendly; to con-trol whether Excel automatically connects to the Microsoft Web site for available online content; and learn how to handle updates when changes are made to shared documents.
For more information about customer feedback options, see “Customer Feedback Options” on page 60.
Getting Software Updates
It’s now easier to keep your software current by simply clicking Check for Updates on the Help menu. This brings up the Office Update page in your Internet browser, where you will find any available downloads, making those inevitable Service Releases all the more accessible.
For more information about software updates, see “Getting Updates,” on page 15.
Comparing Worksheets Side by Side
Chapter 1
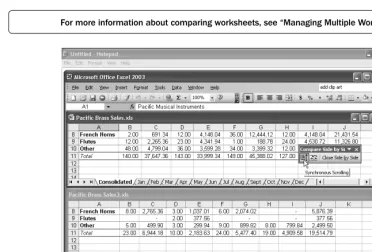
5 For more information about comparing worksheets, see “Managing Multiple Workbooks” on page 133.
[image:37.612.61.433.66.318.2]f01ie02
Figure 1-2. Use Compare Side By Side to scroll two worksheet windows simultaneously.
Improved Statistical Functions
A number of Excel’s built-in worksheet functions that deal with statistical analysis have been made more accurate; past versions of these functions produced slightly different rounding results. The ultimate precision of these functions has also been increased. The list of enhanced functions is as follows: BINOMDIST, CHIINV, CONFIDENCE, CRITBINOM, DSTDEV, DSTDEVP, DVAR, DVARP, FINV, FORECAST, GAMMAINV, GROWTH, HYP-GEOMDIST, INTERCEPT, LINEST, LOGEST, LOGINV, LOGNORMDIST, NEGBINOM-DIST, NORMNEGBINOM-DIST, NORMINV, NORMSNEGBINOM-DIST, NORMSINV, PEARSON, POISSON, RAND, RSQ, SLOPE, STDEV, STDEVA, STDEVP, STDEVPA, STEYX, TINV, TREND, VAR, VARA, VARP, VARPA, and ZTEST.
For more information about statistical analysis, see Chapter 17, “Functions for Analyzing Statistics,” on page 463.
New Task Panes
C
h
apter 1
6
In conjunction with SharePoint Team Services version 2, Excel 2003 provides more robust support for collaborative projects. The new Shared Workspace task pane shows which of your collaborators are currently online and provides easy access to contact information for your teammates. With a single click you can begin an e-mail message to any or all, or initiate a Windows Messenger conversation with an online collaborator. The new task pane also lets you assign tasks to team members and monitor completion status.
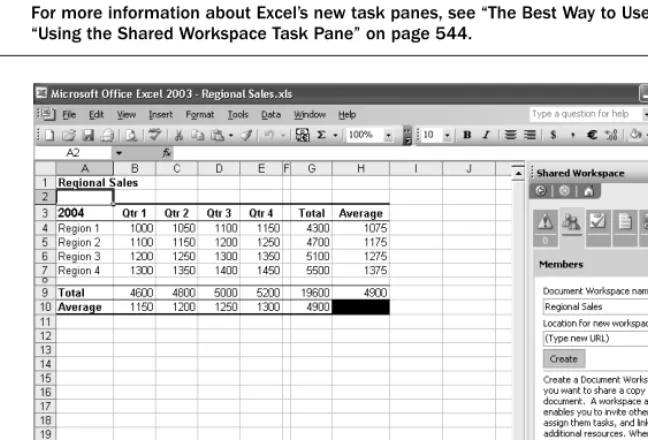
For more information about Excel’s new task panes, see “The Best Way to Use Help” on page 51 and “Using the Shared Workspace Task Pane” on page 544.
[image:38.612.106.430.172.392.2]f01ie03
Figure 1-3. The Shared Workspace task pane allows you to create centralized document
workspaces for group collaboration using user-level permissions.
Document Workspaces
Users with SharePoint sites can create subwebs of those sites called document workspaces. All Office documents associated with a particular project can be assembled into a project-focused document workspace, and access to the workspace can be limited to those colleagues who are involved with that project.
Chapter 1
7
Information Rights Management
The new information rights management (IRM) features allow you to control unauthorized access to your Excel workbooks. You can assign either read or read/write access permission to individuals or groups of individuals using a robust server-based or .NET Passport-based authen-tication system, and you can set expiration dates that make documents inaccessible to others after a specified period of time. IRM protection remains with the file wherever the file resides.
For more information about IRM, see “Controlling Document Access with Information Rights Management,” on page 538.
Improved List Management
New list-management features help ensure list integrity and make it easy to upload list ranges to SharePoint sites. A new List and XML toolbar lets you refresh list ranges with a single click, toggle total rows on and off, and more.
For more information about managing lists, see “Working with List Objects,” page 707.
Support for User-Defined XML Structures
Excel now lets you import and export XML data in any schema. A new XML Source task pane lets you map XML elements to list columns on your worksheet.
For more information about importing and export XML data, see “Working with XML Files,” page 762.
Introducing The Spreadsheet Assistant™
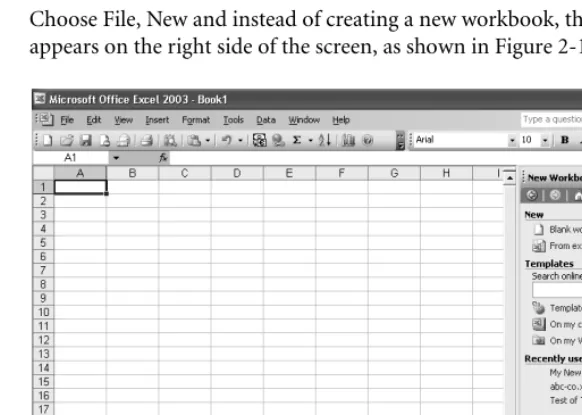
Included on the companion CD is a nifty set of tools called the Spreadsheet Assistant, cour-tesy of Macro Systems. There are dozens of useful, time-saving features included with the Spreadsheet Assistant, including many that you probably didn’t even know you needed. We encourage you to install the add-in and check it out as you work through this book. The ver-sion of the Spreadsheet Assistant that is included with this book is a fully functional demo which is good for 30 days after you install it—time enough to evaluate its usefulness to you. We think you’ll be hooked after just a few days. If so, see the Spreadsheet Assistant Help file for ordering information.
C
h
apter 1
8
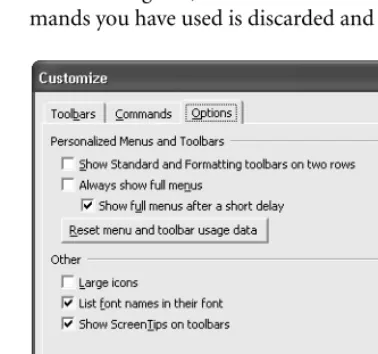
The Spreadsheet Assistant adds a number of commands to existing menus, a new Assis-tant menu, and a toolbar, providing quick access to many of Excel’s most useful functions and features that are otherwise buried in dialog boxes. The add-in also adds appropriate commands to a number of shortcut menus. (Menu commands added by the Spreadsheet Assistant are preceded by a chevron (>>).)
With the Spreadsheet Assistant, you can create “bookmarks,” save multiple files, paste special and “select special” using menu commands, trim blanks, apply superscript and subscript formats, create hyperlinked multi-sheet indexes, create sheets of statistics about selected workbooks, create sheet-level range names, and do quick calculations off the worksheet, among dozens of additional time-saving functions.
To install the Spreadsheet Assistant, refer to the StartCD page on the companion CD and follow the instructions on your screen.
If You Missed the Last Upgrade …
Just in case you “leapfrogged” a software upgrade and missed the last big Microsoft Office release, here is a concise list and brief description of features that are essentially new to you, but were actually introduced in the previous release.
The Task Pane. The task pane radically repackages a few existing features and helps make
them smarter, more responsive, and less intrusive than dialog boxes. Discussions of task panes appear throughout the book, including “Recovering from Crashes” on page 15, “Creating and Opening Workbooks” on page 29, “Using Template Files to Store Formatting” on page 249, “More AutoShapes” on page 294, and “Using Clip Art and Other Media” on page 310.
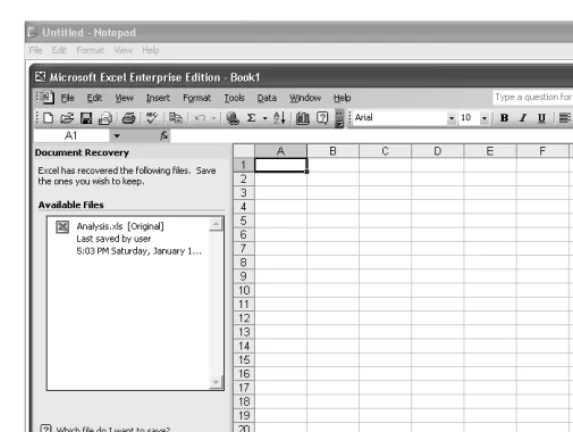
Crash recovery. If Excel encounters a problem, it attempts to save any files that were open at
the time the problem occurred and make them available when you restart Excel. See “Recovering from Crashes” on page 15.
AutoRecover. This feature saves recovery information at specified intervals, making the
new Office-wide crash recovery feature more effective. See “Using AutoRecover” on page 16.
Open And Repair. This command can either repair a corrupted file, or extract the data from
it, offering a powerful recovery feature and a little extra peace of mind. See “Recovering Corrupted Files” on page 45.
Opening and saving files. The Open and Save As dialog boxes have been redesigned,
allow-ing you to resize them by draggallow-ing the resize handle in the lower right corner of the dia-log box. See “Saving Files” on page 34 and “Opening Files” on page 41.
Searching for files. The Search feature has a new interface and a new Basic Text Search
Chapter 1
9
Smart Tags. These pop-up menus give you instant access to commands and actions that are
relevant to the task at hand. For examples, see “Understanding Numeric Text Entries” on page 113, “Tracing Errors” on page 259, “Copying Formulas and Pasting Only Their Resulting Values” on page 380, and “Entering a Series of Dates” on page 437.
Color-coding sheet tabs. Sheet tabs can be colored, offering more organizational flexibility
in your workbooks. See “Coloring Sheet Tabs” on page 120.
Inserting symbols. Excel now provides access to the complete character set of all fonts
installed on your computer, allowing you to enter characters with diacritical marks, symbols, and other “hidden” characters beyond those visible on the keyboard. See “Entering Symbols” on page 115.
Password-protected cell ranges. These ranges provide access to specific areas of a protected
worksheet and even specify individual permissions. See “Allowing Password Access to Specific Cell Ranges” on page 129.
Copying multiple items. The newly redesigned Collect And Copy feature lets you post twice
as many items (24) to the Office Clipboard and uses the new Clipboard task pane. See “Collecting Multiple Items on the Clipboard” on page 148.
Finding and replacing. Find and replace formatting, and search the entire workbook, not
just the current sheet. See “Finding and Replacing Stuff ” on page 179.
Cell formatting. In the Format Cells dialog box, the Number tab now offers Locale options,
with more than 120 worldwide formats for phone numbers and postal codes. The Alignment tab allows text to be displayed right-to-left under certain conditions, and also features Right Indent and Distributed options. See “Using the Special Formats” on page 210 and “Aligning Data in Cells” on page 219.
Border drawing. A pencil-shaped tool can draw borders wherever you want them. See
“Drawing Borders” on page 231.
Merge And Center. This button is now a toggle; unmerge cells by clicking Merge And
Cen-ter again. See “Selecting Alignment Using Toolbars” on page 225.
The Evaluate Formula command. The Evaluate Formula command helps debug complex
formulas by stepping you through each calculation and showing you the results. See “Auditing and Documenting Worksheets” on page 251.
The Formula Watch Window. If you need to keep an eye on remote cells as you make
changes to other parts of a worksheet, the Formula Watch Window provides remote viewing of multiple cells on any open worksheet and provides dynamic data about each formula, including its location, its resulting value, and more. See “Watching Formulas” on page 255.
Text To Speech. Excel can now “read” the contents of cells to you as you visually check the
original document, making auditing and proofreading chores a little easier. See “Hav-ing Excel Read Cells to You” on page 266.
The Trace Error button. Excel detects anomalies after editing a formula and displays a smart
C
h
apter 1
10
Error Checking. This command quickly finds error values in the current worksheet. See
“Checking for Errors” on page 252.
Picture formatting. The new Washout option creates images similar to watermarks; the
new Compress option reduces the amount of disk space used by images. See “Format-ting Pictures” on page 318.
Using clip art. The Insert Clip Art button now displays a task pane, and the new Media
Gal-lery represents a major overhaul of the old Clip GalGal-lery. See “Using Clip Art and Other Media” on page 310.
Full-featured diagrams. You can now add full-featured, editable organizational charts, Venn
diagrams, and other diagram types into your documents. See “Inserting Organization Charts” on page 315, and “Inserting Diagrams” on page 316.
AutoShape rotation. All two-dimensional objects now display a handle you can drag to
rotate the object. See “Working with AutoShapes” on page 292.
Find Printer button. Search for any printer available on your network from the Print dialog
box. See Chapter 11, “Printing and Presenting” on page 331.
No More Blank Page Printing. Excel now looks at the content of the current worksheet
before sending it to the printer. See Chapter 11, “Printing and Presenting” on page 331.
Header Graphics. You can now add graphics to Headers and Footers. See Chapter 11,
“Printing and Presenting” on page 331.
AutoSum. Now it is possible to enter other popular functions, including Average, Count,
Max, or Min instead of just the SUM function. See “Using the AutoSum Button” on page 362.
The Function Wizard. This is a major step forward in usability and includes a function
search feature that allows you to find the right function by entering a plain language description of what you’re trying to do. See “Inserting Functions” on page 363.
Function ScreenTips. Now when you enter or edit a function, Excel displays a pop-up box
showing the function syntax. See “Using Excel’s Built-In Function Reference” on 401.
Workbook Review. A new command on the File, Send To menu provides an easy way to
cir-culate workbooks for comments and edits by other members of your workgroup. See “Sending a Workbook for Review” on page 535.
Microsoft SharePoint Team Services. This is an Internet-based technology for team
com-munications and collaboration. “Using a SharePoint Team Services Site” on page 541.
Web archives. In previous versions of Excel, saving an entire workbook to HTML generated a
Chapter 1
11
AutoRepublish. A new AutoRepublish option makes it easier than ever to keep Web pages
up to date with Excel material. If you use this option, Excel updates an HTML copy of your file every time you save changes to the original. See “To Save or To Publish?” on page 560.
Accessing FTP Sites. If you regularly save files to or retrieve them from a particular FTP
site, you can add that site to the My Places bar. The My Places bar is a navigational panel that appears at the left edge of Excel’s Open and Save As dialog boxes. See “Add-ing a Site to Your My Places Bar” on page 555.
My Places. Add any folder or FTP site to your My Places bar—the navigation panel on the
left in the Save As and Open dialog boxes. See “Adding a Site to Your My Places Bar” on page 555.
Support for XML. Open and save Excel documents in Extensible Markup Language (XML)
and create queries to XML source data. See “Working with XML Files” on page 762.
Editing hyperlinks. Hyperlinks used to be tricky to edit. Not any more. See the tip “Edit
hyperlinks easily” on page 582.
Web queries. You can now create queries to retrieve data from Web sites, without knowing
anything about HTML or how those Web sites are constructed. See “Using a Web Query to Return Internet Data” on page 791.
The PivotTable toolbar. This has been redesigned so that it no longer includes the names of
fields in the current table. These now appear in a separate PivotTable Field List window that can be toggled in and out of view. See Chapter 30, “Analyzing Data with PivotTable Reports” on page 797.
PivotTable data reference. Any time you point to a PivotTable cell while building a formula
outside the table, Excel creates the GETPIVOTDATA function for you. See Chapter 30, “Analyzing Data with PivotTable Reports” on page 797.
PivotTable properties. Users who build PivotTables from Online Analytical Processing
(OLAP) data sources can take advantage of a new feature that allows annotation of Piv-otTable data with item properties. See Chapter 30, “Analyzing Data with PivPiv-otTable Reports” on page 797.
Voice recognition. It is now possible to use your own voice to issue commands, navigate,
and dictate text into Excel and other Office programs. See Appendix B, “Using Speech and Handwriting Recognition” on page 889.
Handwriting input. If you have a drawing pad and stylus (and even if you don’t) you can
now enter text directly into Excel and other Office programs using your own handwrit-ing. See Appendix B, “Using Speech and Handwriting Recognition” on page 889.
Onward …
13
Chapter 2
Excel Fundamentals
What Happens After You Install Excel?. . .13 Recovering from Crashes . . . .15 Examining the Excel Workspace . . . .18
File Management Fundamentals . . . 29 Importing and Exporting Files . . . 48 Online Help Works—Really! . . . 51
Before you can get the feel of the controls, you need to know where they are. This chapter tells you where to find Microsoft Excel’s tools and accessories.
What Happens After You Install Excel?
OK, this is really basic, but we have a moral obligation to briefly mention it anyway. There are two principal ways to start Excel:
● In Microsoft Windows XP, click the Windows Start button, and click Microsoft Office Excel 2003 (or All Programs, Microsoft Office Excel 2003). In Microsoft Windows 9x, Windows Me, or Windows 2000, click the Windows Start button, point to Programs, and then click Microsoft Office Excel 2003.
● In Windows Explorer, double-click any Excel file or shortcut.
Registering Excel
When you start Excel for the first time, you will be asked to register, or “Activate,” the pro-gram. The easiest way to do this is by allowing Excel to register online, assuming that your computer is connected to the Internet. Online registration is fast and painless and a lot easier than taking a postcard to the mailbox. It is also highly recommended.
You may have qualms about any kind of owner registration, but with software, it’s really a good idea—trust us. When you register, you’ll automatically be in the loop for bug fixes (there will certainly be a Service Release [SR] or Service Pack [SP] available within a year or so), updates, and “special offers.” Maybe registering a garden tool, for example, is not worth the annoyance of “special offers,” but if you essentially got a new tool for free in a few months, you just might go for it. You won’t see too many upgrades for weed whackers, of course, but with software you can rely on getting an upgrade at some point.
Subscribing to Excel
Chapter 2
14
A major software application is a living thing—the moment one version is completed, teams of developers begin working on the next version, while other teams work on bug fixes for the version they just shipped. When you buy a box of software off the shelf, it’s not so much a fin-ished product as a work in progress. If you update your software semi-regularly, it becomes more like a magazine subscription than a weed whacker you buy once and throw away when it dies. So, the idea is, why not make software just like a subscription? You make smaller, more regular payments, and you get automatic, periodic updates. Subscription might make excel-lent sense for frequent updaters, depending, of course, on the fee.
If you purchased a standard shrink-wrapped retail version of Office or Excel, your product doesn’t “expire” at all. But you can still purchase a subscription, which will transform yours into a subscription installation. Once you subscribe, you can always buy more time, just like you can with magazine subscriptions. Helpfully, the Microsoft Office Activation Wizard will remind you within 60 days of your subscription’s expiration that it’s time to renew.
Why Are There So Many Bugs?
There are probably not as many bugs as you think that actually affect your daily work. Such bugs are called “showstoppers.” Software almost never ships with showstoppers anymore; rigorous Beta-testing generally takes care of these problems. That said, all companies rou-tinely ship software that is riddled with bugs—it’s the way of the software marketing world. Microsoft and every other software company are equally guilty. But why?
As the battle for market share raged among application developers in the 1980s and 1990s, the mantra among developers was “Ship, ship, ship!” They raced to see how fast they could release the next version of their product for two main reasons.
First, all the other companies were moving at the same torrid pace, and everybody had to keep up. Applications lived or died because of feature checklists published in major com-puter magazines. If your product was in any way ill-represented in the published feature comparisons, your product was simply going to lose market share. If the new version of your program didn’t make it into, for example, the “Big Spreadsheet Showdown Issue,” you and your development group were in deep doo-doo.
Second, releasing an upgrade—that is, a new version of an existing program offered for sale rather than being free—represents a large infusion of income to software companies. This is where most of the money comes from for “mature” software products like Excel. Thus, the marketing folks would love to ship a new version every year, or even every six months!
15
Ch
apt
er 2
One final but very important problem—technology may evolve, but these complex, bloated programs nonetheless had to remain compatible with “legacy” systems. This means not only that programs had to be able to recognize their own files even if they were created sev-eral versions ago, but also that commands and features that may have been rendered essentially obsolete had to be reconciled with new features. In some cases, this required continued support for old but often-used commands and keystroke shortcuts.
Completely debugging a program as complex as Excel could take years. Some think that it is impossible to absolutely eliminate all potential malfunctions in any program. Just as the FDA certifies that it’s OK for a certain small percentage of rat droppings to appear in hot dogs, software companies had to devise an acceptable threshold and severity of bugs that were acceptable to ship in a “finished” product. The good news is that these leftover bugs are usually so esoteric that most folks will never have to deal with them.
Getting Updates
Microsoft releases free updates called Service Releases (SRs), which begin to appear a year or so after the most recent version of Office is released. There will probably always be at least one SR for each new version of Office/Excel. SRs comprise good bits of software code that replace bad bits, circumvent errors, or otherwise intercept known problems. They are commonly called patches, a euphemism borrowed from the colorful lexicon of emergency tire repair. SRs might even activate new features that were “hidden” because they were only partially imple-mented when the software finally had to ship.
Service Releases are always free, but they are not very well advertised. If your computer is connected to the Internet, the easiest way to keep your software current is to click Check For Updates on the Help menu. This brings up the Office Update page in your Internet browser, where you can find links to any available patches.
The Microsoft Office Online link, also on the Help menu, connects you to a related Web location, a sort of central clearinghouse for templates, general assistance, news, and lesser patches that might be available for individual programs or add-ins. You should definitely check it out.