CONTENTS
INTRODUCTION
WHO THIS BOOK IS FOR WHAT THIS BOOK COVERS
HOW THIS BOOK IS STRUCTURED WHAT YOU NEED TO USE THIS BOOK CONVENTIONS
SOURCE CODE ERRATA
P2P.WROX.COM
PART I OPENSTACK OVERVIEW 1 INTRODUCING OPENSTACK
WHAT IS CLOUD COMPUTING? WHY SHOULD I CARE?
UNDERSTANDING THE ARCHITECTURE SUMMARY
2 UNDERSTANDING THE OPENSTACK ECOSYSTEM: CORE PROJECTS IDENTITY
COMPUTE STORAGE IMAGING DASHBOARD NETWORKING
BRINGING IT ALL TOGETHER SUMMARY
3 UNDERSTANDING THE OPENSTACK ECOSYSTEM: ADDITIONAL PROJECTS
OPENSTACK HEAT
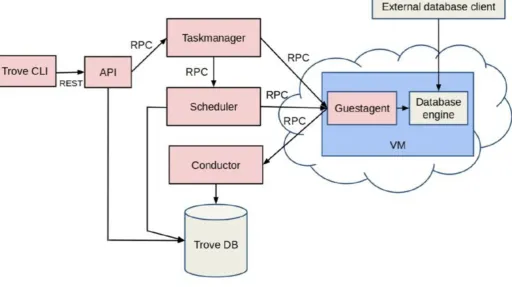
OPENSTACK DATABASE AS A SERVICE: TROVE DESIGNATE: DNS AS A SERVICE
MAGNUM
MURANO: APPLICATION AS A SERVICE CEILOMETER: TELEMETRY AS A SERVICE SUMMARY
OPENSTACK
4 APPLICATION DEVELOPMENT
CONVERTING A LEGACY APP TO AN OPENSTACK APP BUILDING APPS FROM SCRATCH
OPENSTACK APP DESCRIPTION AND DEPLOYMENT STRATEGIES SUMMARY
5 IMPROVING ON THE APPLICATION FAILURE SCENARIOS
HOSTNAME AND IP ADDRESSING SCALING
IMPROVING OUR APPLICATION SUMMARY
6 DEPLOYING THE APPLICATION
BARE METAL, VIRTUAL MACHINES, AND CONTAINERS ORCHESTRATION AND CONFIGURATION MANAGEMENT MONITORING AND METERING
ELASTICITY
UPDATING AND PATCHING SUMMARY
BOOK WRAP UP TITLE PAGE
COPYRIGHT
ABOUT THE AUTHOR
ABOUT THE TECHNICAL EDITORS CREDITS
List of Illustrations
Chapter 1
Figure 1.1 Figure 1.2 Figure 1.3 Figure 1.4 Figure 1.5 Figure 1.6
Chapter 2
Figure 2.1 Figure 2.2 Figure 2.3 Figure 2.4 Figure 2.5 Figure 2.6 Figure 2.7 Figure 2.8 Figure 2.9 Figure 2.10 Figure 2.11 Figure 2.12 Figure 2.13
Chapter 3
Figure 3.9 Figure 3.10 Figure 3.11 Figure 3.12 Figure 3.13
Chapter 4
Figure 4.1 Figure 4.2 Figure 4.3 Figure 4.4 Figure 4.5 Figure 4.6
Chapter 5
Figure 5.1 Figure 5.2 Figure 5.3 Figure 5.4 Figure 5.5 Figure 5.6 Figure 5.7 Figure 5.8 Figure 5.9 Figure 5.10
Chapter 6
INTRODUCTION
WHO THIS BOOK IS FOR
WHAT THIS BOOK COVERS
HOW THIS BOOK IS STRUCTURED
This book was written in two parts. Part 1 provides an overview of OpenStack. The purpose of this part is to lay the groundwork, covering all of the OpenStack
technologies and what is most important.
Part 2 takes the reader through developing and deploying applications with
OpenStack. In this part you will build an example on top of OpenStack that drills down much deeper on the technologies, provides tips, and helps you learn about OpenStack through the lens of these same technologies.
Here is a list of the chapters:
Part I: OpenStack Overview
Chapter 1: Introduction to OpenStack
Chapter 2: Understanding the OpenStack Ecosystem: Core Projects
Chapter 3: Understanding the OpenStack Ecosystem: Additional Projects
Part II: Developing and Deploying Applications with OpenStack
Chapter 4: Application Development
Chapter 5: Improving on the Application
WHAT YOU NEED TO USE THIS BOOK
You should understand the basics of application development - how applications are composed of multiple servers like web servers, application servers, and
CONVENTIONS
To help you get the most from the text and keep track of what’s happening, we’ve used a number of conventions throughout the book.
Examples that you can download and try out for yourself generally appear in a box like this:
EXAMPLE TITLE
Source
This section includes the source code.
Output
This section lists the output:
Example output Example output Example output
NOTE Notes indicates notes, tips, hints, tricks, or and asides to the current discussion.
As for styles in the text:
We highlight new terms and important words when we introduce them.
SOURCE CODE
As you work through the examples in this book, you may choose either to type in all the code manually, or to use the source code files that accompany the book. All the source code used in this book is available for download at www.wrox.com. Specifically for this book, the code download is on the Download Code tab at:
www.wrox.com/go/openstackcloudappdev
and at:
https://github.com/johnbelamaric/openstack-appdev-book
You can also search for the book at www.wrox.com by ISBN (the ISBN for this book is 978-1-119-19431-6) to find the code. And a complete list of code downloads for all current Wrox books is available at
www.wrox.com/dynamic/books/download.aspx.
NoteBecause many books have similar titles, you may find it easiest to search by ISBN; this book’s ISBN is 978-1-119-19431-6.
Once you download the code, just decompress it with your favorite compression tool. Alternately, you can go to the main Wrox code download page at
ERRATA
We make every effort to ensure that there are no errors in the text or in the code. However, no one is perfect, and mistakes do occur. If you find an error in one of our books, like a spelling mistake or faulty piece of code, we would be very grateful for your feedback. By sending in errata, you may save another reader hours of frustration, and at the same time, you will be helping us provide even higher quality information.
To find the errata page for this book, go to
www.wrox.com/go/openstackcloudappdev
And click the Errata link. On this page you can view all errata that has been submitted for this book and posted by Wrox editors.
If you don’t spot “your” error on the Book Errata page, go to
P2P.WROX.COM
For author and peer discussion, join the P2P forums at http://p2p.wrox.com. The forums are a Web-based system for you to post messages relating to Wrox books and related technologies and interact with other readers and technology users. The forums offer a subscription feature to e-mail you topics of interest of your choosing when new posts are made to the forums. Wrox authors, editors, other industry experts, and your fellow readers are present on these forums.
At http://p2p.wrox.com, you will find a number of different forums that will help you, not only as you read this book, but also as you develop your own applications. To join the forums, just follow these steps:
1. Go to http://p2p.wrox.com and click the Register link. 2. Read the terms of use and click Agree.
3. Complete the required information to join, as well as any optional information you wish to provide, and click Submit.
4. You will receive an e-mail with information describing how to verify your account and complete the joining process.
NOTE You can read messages in the forums without joining P2P, but in order to post your own messages, you must join.
Once you join, you can post new messages and respond to messages other users post. You can read messages at any time on the Web. If you would like to have new messages from a particular forum e-mailed to you, click the Subscribe to this
Forum icon by the forum name in the forum listing.
PART I
OpenStack Overview
CHAPTER 1: INTRODUCING OPENSTACK
CHAPTER 2: UNDERSTANDING THE OPENSTACK ECOSYSTEM: CORE PROJECTS
1
Introducing OpenStack
WHAT’S IN THIS CHAPTER?
Models of cloud computing
Relevance of cloud computing to application developers
Why OpenStack is a good cloud platform choice
WHAT IS CLOUD COMPUTING?
There is so much hype around cloud computing that it is often difficult to get a clear sense of what anyone means by those words. Is it just virtualization? Is it Software-as-a-Service (SaaS), such as Microsoft’s Office 365 and Salesforce.com? Or is it the ability to get a virtual machine instantly from Amazon Web Services (AWS) or Azure? And what about online storage such as Dropbox?
Types of Cloud Computing
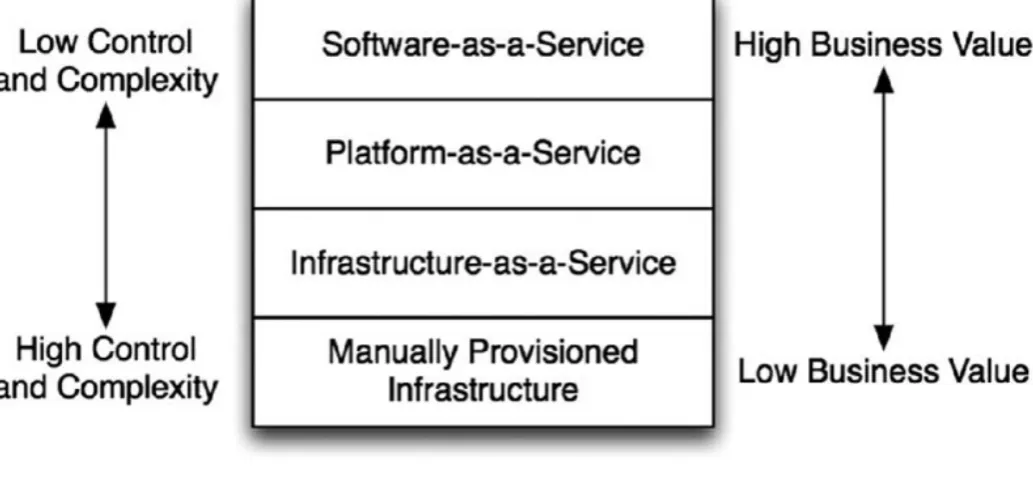
[image:23.595.41.558.355.597.2]The reality is that cloud computing refers to all of these things just described and more. The National Institute of Standards and Technology (NIST) has come up with an “official” definition based upon five key components: on-demand self-service, broad network access, pooled resources, elasticity, and metered service. In general, these characteristics may be provided in several different models. These models help sort out the confusion and hype. In fact, these can be thought of as layers in a stack, with each layer being built on top of the previous one (see Figure 1.1).
Figure 1.1
In Figure 1.1, “Manually Provisioned Infrastructure” represents the traditional method of building your information technology infrastructure—this is not cloud computing. In this environment, physical machines are racked, connected, and configured on a one-by-one basis. This provides complete control, but requires substantial time and effort to build out, or to change when necessary. Of course, all clouds need to run on physical gear at some point, so this provides the basic foundation for everything else. One of the keys to making cloud computing successful, however, is to move the complexity out of this layer and up higher in the stack.
stack. This is OpenStack’s primary focus, as well as the primary focus for AWS. It enables automated or self-service provisioning of compute, networking, and storage. Typically, these resources are provided as Virtual Machines (VMs), but you could also use it to spin up bare metal servers (i.e. physical hosts). This is known as “Metal-as-a-Service,” and OpenStack provides a project for managing this service as well. Alternatively, you can also spin up containers rather than VMs or bare metal servers. The essential point is that it enables the provisioning of compute instances, with (optionally) attached networking and storage.
Platform-as-a-Service (PaaS) builds on top of IaaS to enable the provisioning of applications, rather than simply the infrastructure that might be used to run the application. So, a PaaS provides core common services needed by applications, along with the machinery to configure and deploy applications to use those services. A PaaS typically will provide a complete application stack (web server, application server, database server, etc.) into which you can easily deploy your application. Heroku (https://www.heroku.com) is an example of a popular PaaS for
applications built with a variety of standard frameworks, such as Ruby-on-Rails. With Heroku you can deploy your application to the Internet with a simple git push. As the application author and deployer, you don’t need to worry about
configuring and deploying the different tiers, or even worry about how to scale them. If you follow the Heroku conventions, everything is handled by the PaaS.
Software-as-a-Service (SaaS) is the layer farthest from the underlying physical infrastructure. It may be built on IaaS or a PaaS, but need not be—the point is the user never really knows. This is the simplest form of cloud computing from the point of view of the user because they have no insight into the actual mechanics or systems behind the service. It’s just a service they use. Often this is provided in the form of a website, such as Salesforce.com. But you can also get lower-level services such as Database-as-a-Service, where you simply request via an API (or website) for a database with certain parameters, and are given an IP and port to connect to. As a user of the service, you don’t need to worry about how to scale that service— though you will need to pay more as your use of the service increases.
Put succinctly, IaaS provides the tools to “build” your systems from the ground up. PaaS allows you to “deploy” your applications, without needing to worry about the underlying infrastructure. SaaS allows you to “buy” your applications—you do not even need to deploy or manage them at all. This is a steady progression of
decreasing control and complexity, while increasing direct business value.
While these are general models for cloud computing, in reality the distinctions between them are not always crystal clear. The relationship of SaaS to PaaS in particular can be complicated. A specific, complex Software-as-a-Service may use PaaS or even other more granular Software-as-a-Service. Even a PaaS may
to applications. However, there is no reason that service cannot be, in turn, provided by some external SaaS! In this case, a key function of the PaaS is provided via a low-level SaaS.
Cloud Infrastructure Deployment Models
In addition to the functionality provided by a cloud, there are several different deployment models for clouds. Public clouds are the ones familiar to most
developers. These cloud services are made available to the general public for a fee. The fee is generally on a usage basis, enabling organizations to utilize their
operating budgets rather than their capital budgets. The customers have no need to maintain or operate the hardware or cloud infrastructure, leaving that
responsibility completely to the cloud operator.
Amazon Web Services (AWS) is currently the largest public cloud and dominates the industry. Microsoft and VMware also operate public clouds, and a number of service providers do as well. Rackspace, in particular, provides an OpenStack-based public cloud, and is one of the primary contributors to the OpenStack project.
Private clouds, on the other hand, are internal to an organization. They represent the evolution of the traditional corporate data center. Only internal customers within the enterprise, and perhaps close partners, use private clouds. The
corporate IT department or a contractor will purchase, setup, and maintain the hardware and software for the cloud. The cloud infrastructure may use chargeback to distribute costs among the business units, but the cloud itself is still dedicated to the single enterprise.
Organizations may operate private clouds for a number of reasons. The cost of a private cloud, if well run, may be less than utilizing the public clouds.
Figure 1.2
Hybrid clouds combine both private and public clouds. The goal with hybrid
clouds is to keep general operating costs low by using the private cloud for most of the workloads, but to enable spillover into the public cloud when necessary. The spillover could happen due to capacity reasons—perhaps during the holiday
WHY SHOULD I CARE?
As an application developer or architect, you may wonder—why does all of this matter to me? All of this discussion covered so far focuses on the reason a business may want to move to the cloud. But why should that affect the
application developer? The answer lies in a couple of different areas: the effect on the development process, and the effect on your application architecture.
Cloud services enable much more efficient processes for managing development, test, and production environments. These updated processes and methods
represent the “DevOps” mentality—applying standard software development practices, such as source code version control, to the operational aspects of the application. This means capturing all of the configuration and deployment information in scripts and templates, and controlling their changes just as you would application code.
Scripts and templates can be built that produce a complete application
environment. These can be used to automatically deploy not only the application, but also infrastructure required for the application, including virtual machines, networking, firewalls, load balancers, domain name services—you name it, and someone is working on making it available “as-a-Service.” By automating the creation and destruction of these environments, you can ensure consistency between development, test, and production environments. For complex
applications with many different services running on different machines, this can be a dramatic time saver.
OpenStack, and “as-a-Service” thinking in particular, will also end up changing the software and deployment architectures of your application. By relegating the common and routine functions to the cloud infrastructure, you free your time and thought to focus on the most important thing—your application’s functionality. For example, a traditional application that allows large file uploads will need to designate temporary and permanent storage locations for those files, and manage the storage resources to ensure that the disk doesn’t fill. The system administrator or deployer will need to devise a strategy to backup that data or replicate it to other data centers. But with the right cloud platform, you can simply delegate that function to the infrastructure, and get all of the benefits without devoting special effort.
Designing your application to work with the cloud services also dramatically simplifies scaling the application. The scalability of the individual services
becomes the responsibility of the cloud operator, not the application developer or administrator. As long as the application makes effective use of those services, it will scale as needed with little to no work from the developers themselves.
machines (vertically). With most applications today, it is easiest to scale by getting a bigger, faster machine. This locks you into planning for peak capacity of each application individually. For each application you need to provision the largest machine you may need at peak load. But with applications built for the cloud, you instead scale by adding more machines. These machines can be smaller, and with cloud automation, can be added, removed, or resized as needed. This ability to scale up and down as needed is called elastic scaling, and is one of the key features of cloud computing.
A frequently used analogy is that traditional servers are like “pets,” while cloud-based servers are “cattle.” This describes a necessary shift in mentality for a
traditional application architect. The idea is that a pet is unique and special, with its own unique name. A lot of resources are spent to raise and nurture one, and if it is sick, it will be nursed back to health. Cattle, on the other hand, are not treated specially or carefully raised. They are treated en masse—they are given numbers, not names—and a sick one is culled to prevent any spread of disease through the herd.
The implication here is that cloud-based servers should be disposable and easily re-deployed, and not require careful hand configuration. That way, if there is a problem with one, you do not spend time trying to figure it out and fix it—you simply replace it with a new one. This is the logical extension of the ability to scale elastically. Why take the time to figure out what’s wrong with a machine when it’s behaving badly? Just pull it out of the application and replace it with a new one while you debug the problem (not to fix that machine, but to prevent the issue in the future).
What Is OpenStack?
OpenStack bills itself as a “cloud operating system.” Fundamentally, it solves the IaaS problem. It provides the ability to abstract the physical compute, storage, and networking resources into pools. Those resources can then be divvied up among users in a secure way. Users only need to pay for what they are using, rather than having to provision their applications for peak load.
OpenStack is a collection of open source software projects, backed by a non-profit organization, the OpenStack Foundation. These projects work together to provide a consistent API layer, while enabling the actual services to be provided by a
KEEPING TRACK OF RELEASES
OpenStack has official releases every six months. In order to make it easier to keep track of all these releases, they are given names in alphabetical order. Below is the name of each release, and its release date, through the Liberty release.
Austin: October 2010
Bexar: February 2011
Cactus: April 2011
Diablo: September 2011
Essex: April 2012
Folsom: September 2012
Grizzly: April 2013
Havana: October 2013
Icehouse: April 2014
Juno: October 2014
Kilo: April 2015
Liberty: October 2015
In addition to the release name, each release is identified by the year and
release during that year—<year>.<release>.<patch>. For example, Kilo is also known as 2015.1, as the first release in 2015. Patch releases for Kilo are
2015.1.1, 2015.1.2, etc. The second major release of 2015 is Liberty, which is also known as 2015.2.
Figure 1.3
Name Service Description
Horizon Dashboard A graphical user interface for managing your cloud Keystone Identity Authentication, authorization, and OpenStack service
information
Nova Compute Spin up, manage, and terminate virtual machines Cinder Block Storage Disk volumes (that outlive an instance) and snapshots
of instances Swift Object
Storage
Shared, replicated, redundant storage for images, files, and other media accessible via Hypertext Transfer Protocol (HTTP)
Neutron Network Provide secure tenant networking
Glance Image Provide storage and access to VM images and snapshots
Heat Orchestration Spin up groups of machines, networks, and other resources via templates
Designate DNS Create domains and records in the DNS infrastructure Ceilometer Telemetry Monitor resources usage across the cloud
Trove Database Provide access to private tenant databases Ironic Bare Metal Spin up instances on physical hardware Magnum Containers Manage containers within instances
Murano Application Deploy packaged applications across multiple instances
Sahara Data
Processing Cluster
Provides a Hadoop or Spark cluster as a service
A default installation of OpenStack will include “reference” versions of each service. For example, by default an OpenStack cloud will use the Kernel-based Virtual Machine (KVM) hypervisor to manage virtual machines. One of the most important aspects of the OpenStack architecture, however, is the driver or plugin-based nature of each service. With this design, you can use an implementation other than the reference one. In your cloud, you can swap out KVM with ESXi, Xen, or other hypervisors. The APIs used to launch and manage VMs remain the same, regardless of the underlying hypervisor. This same concept extends across OpenStack services, enabling the same APIs with different service
implementations.
themselves into a single backend provider of computer, networking, or storage. The APIs won’t change even if they swap out the backend.
OpenStack is frequently used in enterprises for private clouds, though there are some public cloud services that are based on it. There are also companies that will create and operate a private OpenStack cloud for you within their data centers. In this case, the hardware is not shared with other customers, so you have the
predictability and security of the private cloud but do not have to find and hire the experts to maintain it.
Even in private cloud environments, OpenStack is a multi-tenant cloud platform. This means that multiple users or groups of users—tenants—can utilize the
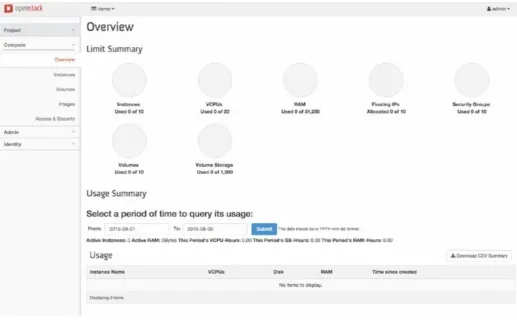
physical resources of the cloud, while keeping all of their virtualized resources private. For a tenant, the OpenStack environment appears, for the most part, to be theirs and theirs alone. But for the operator, the underlying physical resources and software systems are shared. In OpenStack, tenants are also sometimes referred to as projects.
In a multi-tenant OpenStack cloud, each tenant is allocated a quota for the various types of resources that may be used. The quota provides a maximum limit for that tenant for that particular resource. You will have a quota for CPUs, memory,
storage, networks, subnets, and floating IPs, among other resources. This prevents any single tenant from consuming all of the resources.
Why OpenStack?
There are a number of cloud management platform options out there. The most obvious and dominant player is VMware with their vRealize suite of software. So, why should you take your time to learn about OpenStack rather than vRealize, AWS, Azure, CloudStack, or any of the other solutions?
About 15 years ago, IT professionals faced a very similar set of questions about Linux and proprietary UNIX systems. Solaris, HP-UX, AIX and their competitors were solid, well known, and widely deployed products, whereas Linux was a
graduate student’s project that was difficult to install and operate and was fairly immature, with driver and other compatibility issues. It was not clear at all at the time that spending effort learning and understanding Linux was worth it. History though, has proven that such a choice would have been the right one. All of those expensive, proprietary UNIX implementations have lost their value proposition— they really don’t have much that is unique to offer anymore. Linux has continued to grow and has taken over most of the environments where those systems once thrived.
can rely and build. There is no need to repeat the process of developing that architecture over and over, allowing you to focus on the new functionality.
The way you achieve “cheaper” is to make those standards open and free. This combination of open and standard leads to commoditization—essentially the development of interchangeable components that are the same regardless of the manufacturer or vendor. Commodities imply a lot of competition, and there is little or no product differentiation for which to charge extra. This drives down the costs dramatically.
Linux has both of these characteristics—open and standard—in UNIX-like
operating systems, and that is why it won. Not because it was better, but because it was cheaper and faster to use as a base for building new functionality. Linux is just one example, of course. This story has repeated over and over in the technology industry. With machine architectures we have the x86 platform, and standard architectures for memory, disks, and serial bus-based peripherals.
In fact, if you take the broader view, you can see that the commoditization has continuously moved up the value chain. It started with hardware, moved to operating systems, and these days even sophisticated databases and distributed system components are being commoditized. In databases, we used to have
Informix, DB2, Oracle, Sybase, and others. But MySQL and PostgresSQL are open and standard, and they have completely dominated the low-end of the database market. Oracle still leads in the high-end, and is able to provide value in those more specialized environments, but as the open source products improve, the space for the proprietary vendors constricts.
In some way, cloud computing is the culmination of this commoditization process in the industry. Broadly, you can think of the revolution happening in the
computing industry as a refocusing of the industry on the core functions of
computing. The abstraction of the computing infrastructure into simply compute, storage, and networking components, and breaking of these out from being
vertically integrated, to horizontally integrated, is truly transformative. It brings full commoditization to these elements, which are the basic foundation of the industry.
Cloud platform management will follow the same pattern. The proprietary platforms like vRealize will thrive for a time, but in the long run the open and standard systems will win. While there may always be a place for the proprietary solutions in more specialized environments, the most common platforms will be open source. You can see this already happening: the Zenoss 2014 State of the Open Source Cloud Survey ( http://www.zenoss.com/resource-center/white-papers) found that 30 percent of respondents were already using an open source cloud, up 72 percent from 17.2 percent in 2012. Another 34 percent of the
There are several open, standard cloud management platforms. So even if you believe that the bet on open and standard is the way to go, why should you bet on OpenStack? The answer here is simple—momentum. OpenStack is by far the most widely used and supported open source cloud management platform, and it has the largest community of developers and vendors push it forward. The same survey mentioned above found that 69 percent of respondents with an open source cloud were using OpenStack in 2014, up from 51 percent in 2012. An amazing 86 percent of those considering an open source cloud deployment are looking at OpenStack.
The OpenStack developer and user communities have grown dramatically as well. The OpenStack Foundation 2014 Annual Report
(https://www.openstack.org/assets/reports/osf-annual-report-2014.pdf) provides detailed insight into this growth. In 2013, the best quarter for mean monthly
active developers had 391 developers—in 2014 this measure was up 45 percent to 569 developers. Large investments from HP, Cisco, RedHat, IBM, Dell, Mirantis, Rackspace, and many other vendors have driven this surge. The incredible growth in the number of users, developers, and other interested parties can be seen from the attendance at the twice annual OpenStack Summits, seen in Figure 1.4
(source: openstack.org).
Figure 1.4
UNDERSTANDING THE ARCHITECTURE
OpenStack is built on a loosely coupled architecture. Each component is built independently and runs its own services. These services may be distributed among a number of different machines with different responsibilities. This enables
scaling of particular functions, by adding machines with particular roles. It also enables redundancy; a highly available deployment will contain several of each type of machine.
Software Architecture
Individual components interact with one another via well-defined application programming interfaces (APIs)—typically based on representational state transfer (REST) conventions, though in some cases using remote procedure calls (RPC) or notifications over a message bus. Typically, these services will maintain data in a relational database—usually MySQL or PostgreSQL. The message bus and
database are shared across services, but the interactions between those services remain clearly delineated. This enables different services to grow and change independently from the others, so long as they provide backward-compatibility in the APIs.
Each of the major services—compute (Nova), networking (Neutron), block storage (Cinder), etc.—have several internal processes and components. Generally, they will each have an API service that provides an HTTP-based RESTful API. This API service will communicate with the other components via the message bus.
Figure 1.5
In Figure 1.5, what you see is a simplified depiction of how the services interact. Each service has an API component, which communicates with Keystone’s API via HTTPS to provide authentication and authorization information. Each API service uses the message bus to communicate with several other processes for that service (just called “Services” in the diagram). As needed, these downstream service
processes will call the APIs of other services. For example, Nova will call the Neutron API to acquire a port on a particular network.
Deployment Architecture
How are all of these different pieces of software deployed on the hardware? This is actually pretty flexible. For development or just experimentation, you can even run everything on a single machine. However, a more typical deployment will have several controller nodes (for high availability purposes), along with additional network, compute, and controller nodes.
Each high-level service (compute, networking, storage, and others) consists of multiple daemons (background processes). These daemons are spread out across the various types of nodes. That is, you do not run individual services on
individual nodes, but rather spread each service out across different types of nodes.
separate clusters, with each cluster spread over different failure domains.
Additionally, you may have several physical nodes that provide the API endpoints, behind a physical load balancer. Different daemons for Nova and Neutron will be spread across the network and compute nodes. Figure 1.6 shows a simplified diagram of this layout.
Figure 1.6
Notice the different types of nodes in Figure 1.6. Compute nodes run the hypervisor and therefore the actual VM instances, as well as provide the
ephemeral storage for instances. They will also run Neutron networking agents to manage the connectivity between VMs (called east-west traffic).
The network nodes usually provide the connectivity between VMs and outside the cloud (called north-south traffic), as well as the advanced network services like load balancing and VPN access. Depending on the choices made by the
administrators and users, there may be agents providing network routing services on the network nodes, directly on the compute nodes, or both.
detached to instances. Clouds that offer object storage will also have separate clusters for that. Object storage provides shared, replicated, redundant storage for images, files, and other media accessible via HTTP.
Various segregated networks connect all of these nodes. Every node is accessible via the management network, which is used for different parts of OpenStack to communicate with one another. All of the message bus, database, and cross-project API traffic go over the management network. The data network connects all of the compute nodes, network nodes, and block storage nodes. The internal cloud tenant traffic is carried on this network, whereas the external network
provides access to the outside world. Since the compute nodes do not
communicate with the outside world, but only with other nodes in the cloud infrastructure, they need not have connectivity to the external network, but only need access to the data network. Only the network nodes need to connect to the external network. Finally, some installations will use an API network, which
provides access between the outside world and the OpenStack end points (API and Horizon), separate from the external network used by tenants.
Pros and Cons
This architecture provides a great deal of flexibility. This enables the scalability by letting the cloud operator deploy additional nodes to scale the infrastructure. It also allows the ability to create highly available services, since you can split each service out and make them redundant across failure domains. However, it is very complex, and can be quite difficult to set up and maintain.
As a user of the cloud, this will be transparent to you. But a properly run cloud will have enough redundancy built in that you can expect a high-level of reliability from the OpenStack infrastructure.
Another substantial benefit to this architecture is avoiding vendor lock-in. Each service provides a plugin or driver-based architecture. This enables each service to work with any number of vendor platforms to provide the actual service. For
compute, you can use the default KVM hypervisor, ESXi, Xen, or one of many other hypervisor choices. The networking service defaults to using Open vSwitch to provide Layer 2 (the data link or MAC address layer) connectivity, and the Linux networking stack (iptables, routing, and namespaces) to implement Layer 3 (IP layer) functionality. However, there are more than 20 different vendor plugins to swap all or part of that default implementation. In fact, these vendor
implementations can be used at the same time, in the same cloud.
By avoiding vendor lock-in, OpenStack enables more competition between the vendors, pushing down prices in the market. The ability to use multiple vendors at once makes transitioning from one vendor to another more feasible, and also
allows the choice of vendor for solving specific use cases.
across multiple clouds, even from different providers. Two cloud providers can set up a trust relationship, enabling users of one provider to use the same credentials with another, trusted provider. Thus the same workload management tools you use for a single cloud can theoretically be used to manage workloads across multiple clouds. For capacity burst use cases, this is a powerful feature.
OpenStack Distributions
With the complexity of the architecture, a number of companies have stepped in to help with installation and management of an OpenStack platform in a private cloud. These include names familiar from the Linux distribution world, such as RedHat, SUSE, and Canonical (Ubuntu), as well as new players that are focused only on OpenStack, such as Mirantis.
INDUSTRY CONSOLIDATION
In fact the OpenStack industry has seen a great deal of consolidation in 2014 and 2015. Several pure-play OpenStack companies have been gobbled up by the bigger players.
Many large integrators and enterprise software vendors are also jumping into the OpenStack distribution game, with the likes of IBM, HP, and Oracle joining the fray.
If you don’t have an OpenStack cloud available already, or you want to learn more about the architecture and how all of the pieces fit together, you can setup your own OpenStack playground. You can use one of these distributions to setup your own small cloud. Each of the distribution vendors provides their own tools for setup of OpenStack. They are primarily targeted at production environments, and as such can be pretty hard to get started with on your own. For example,
Canonical’s offering requires a minimum of seven physical nodes just to bring up the environment.
If you are setting something up small, your best options are probably RedHat’s open source distribution (as opposed to their supported version running on RedHat Enterprise Linux), called RDO (www.rdoproject.org). The nice thing about this distribution is that it offers a simple “all in one” option to deploy the entire environment on a single node.
If you would like to tinker with the actual code of the various OpenStack services, you could also setup a devstack environment. Devstack (www.devstack.org) is a powerful set of scripts to create and configure an OpenStack development
environment.
While the detailed instructions online are quite good, here are a few hints to make your devstack setup go smoothly. You’ll want a fresh Ubuntu
try to run devstack on your regular machine—you’ll want a dedicated machine (virtual or physical). If you have a virtualization product like VMware Workstation or Fusion, or the free VirtualBox for your laptop or desktop, the best thing to do is create a base server installation of your OS of choice (enabling all of the extra repositories), and then snapshot it. This will make it easy to start over if you trash your environment.
The instructions will have you create a local.conf file, which the devstack scripts
use to capture all of the specifics of your installation. There are only a few items you need to set in your local.conf.
[[local|localrc]] ADMIN_PASSWORD=stack
DATABASE_PASSWORD=$ADMIN_PASSWORD RABBIT_PASSWORD=$ADMIN_PASSWORD SERVICE_PASSWORD=$ADMIN_PASSWORD SERVICE_TOKEN=some-random-string
FIXED_RANGE=10.0.0.0/24
FLOATING_RANGE=192.168.20.0/25
PUBLIC_NETWORK_GATEWAY=192.168.20.1
LOGFILE=/opt/stack/logs/stack.log
disable_service n-net
enable_service neutron q-svc q-agt q-dhcp q-l3 q-meta
The first section here sets up the networking. You should pick a FIXED_RANGE that
does not overlap your existing network. Your FLOATING_RANGE can correspond to an
existing unused subnet on your network, with the PUBLIC_NETWORK_GATEWAY being
the local default gateway on your subnet.
The LOGFILE setting simply helps you debug if your devstack does not come up
properly, whereas the remainder of the file disables Nova networking and enables Neutron networking.
GETTING THE OPENSTACK CLI CLIENTS
To follow along with the examples, you’ll need access to a machine with the OpenStack clients installed. You can learn how to install the clients at
http://docs.openstack.org/cli-reference/content/, which will include
instructions for a variety of operating systems. The examples in this book will use Linux.
The easiest way to use these clients is to set the necessary authentication information in environment variables:
$ export OS_USERNAME=username OS_PASSWORD=password
OS_TENANT_NAME=tenant-name
$ export OS_AUTH_URL=http://keystone-ip:keystone-port/v2.0
This allows you to call the clients without passing those parameters:
$ openstack flavor list
+----+---+---+---+---+---+---+ | ID | Name | RAM | Disk | Ephemeral | VCPUs | Is Public | +----+---+---+---+---+---+---+ | 1 | m1.tiny | 512 | 1 | 0 | 1 | True | | 2 | m1.small | 2048 | 20 | 0 | 1 | True | | 3 | m1.medium | 4096 | 40 | 0 | 2 | True | | 4 | m1.large | 8192 | 80 | 0 | 4 | True | | 42 | m1.nano | 64 | 0 | 0 | 1 | True | | 5 | m1.xlarge | 16384 | 160 | 0 | 8 | True | | 84 | m1.micro | 128 | 0 | 0 | 1 | True | +----+---+---+---+---+---+---+
If your services endpoints are using HTTPS, you’ll need to change the
OS_AUTH_URL to reflect that. If you are using self-signed certificates, you also
SUMMARY
In this chapter, you have learned about the various types of cloud computing— IaaS, PaaS, and SaaS—and how they related to one another. OpenStack fills the IaaS, and perhaps in the future the PaaS functions, in the clouds. More
2
Understanding the OpenStack Ecosystem: Core
Projects
WHAT’S IN THIS CHAPTER?
How the different OpenStack components work together and how authentication works within the infrastructure
A look at how a compute instance is composed and the different hypervisors supported in OpenStack
How data is stored in the infrastructure and understanding the differences between Block Storage and Object Storage
How instance templates and snapshots are created and where they are stored
The different ways to manage your OpenStack resources: GUI versus CLI versus APIs
How the network is designed in OpenStack and the different network components available and exposed through the APIs
At this point, you have an understanding of why cloud computing is important to application developers, and a general overview of OpenStack. In this chapter, you will learn the core services in more detail. These are the services most critical to running an application—compute, network, and storage. You will also learn about the management services to make those possible, such as the identity service, which allows you to authenticate in order to create your applications.
Sometimes, it may seem that the descriptions in this chapter go into more detail than you need to run an application. However, you can think of these features as tools and building blocks. You need to have a solid understanding of what is
IDENTITY
The identity service within OpenStack, named Keystone, is responsible for authentication, authorization and accounting (AAA) and currently implements and provides the OpenStack Identity API.
The main goal of this identity service is to process and validate authentication and authorization requests, then return an “authentication token,” which is used to authenticate the user against the APIs and can be used to contact the other services of an OpenStack infrastructure. These services can be discovered using the catalog returned in the authentication response (detailed later in this chapter).
Keystone currently implements two versions of the Identity API (v2, v3). The second version has been used for years and is still mainly used today in the different libraries and clients supporting OpenStack. The third version is quite recent and provides a more pluggable and flexible design, allowing using multiple authentication mechanisms (the original “password” method, but moreover well-known and used mechanisms, such as OAuth or SAML2), and the ability to
combine these methods in a single request.
This last Identity API has a multi-tenant design and has simple resources:
Region: an OpenStack infrastructure that optionally may have sub-regions
Service with Endpoints: an OpenStack registered service in Keystone that can have zero, one, or multiple endpoints to reach this one (e.g. public,
internal, admin)
Domain: a container for the users, groups, and projects
Project (known as “Tenant” in the second version of the API): owning a set of OpenStack resources
User: a single API consumer, which should have really restricted authorizations in your application
Group: a collection of different users of the same domain
Role: an authorization that a user or a group of users can obtain on a project or a domain
All of these resources can be managed using the Identity Admin API, which is available as a create, read, update, and delete (CRUD) RESTful API.
Using Tokens and Re-Authentication
The authentication against the different OpenStack services is based on tokens provided by the identity service (Keystone) or configured in the service itself (e.g. admin tokens).
A token provided by an identity service is an arbitrary string that contains the
attached to this token grants access to a Project or a Domain, allowing you to access Project or Domain-related resources.
You can easily create a token using the Identity API with the method POST /auth/tokens with a user identity and the wanted scope:
{
"auth": {
"identity": { ... }, "scope": { ... } }
}
Token Identities
When requesting a new token, the identity parameter will contain the used
authentication mechanisms. Here is an example using password. The unique
identifier of the user is used here, however it is possible to use the username if the domain is explicitly specified.
{ "auth": { "identity": { "methods": [ "password" ], "password": { "user": { "id": "042042", "password": "secret-password" } } } } }
Scoped and Non-Scoped Tokens
If specified in the request, the authorization scope must contain the project
identifier or the domain identifier.
{ "auth": { "scope": { "project": { "id": "123456" } } } }
If a scope has been provided in the token creation request, the Identity API will return a catalog containing the different OpenStack services that can be used by
X-Subject-Token: ff00ff84 { "token": { "catalog": [ { "endpoints": [ { "id": "c3ac301342a381b895743659d0956de1", "interface": "public", "region": "RegionOne",
"url": "http://my.identity.service:5000" }
],
"id": " 9192d6fb0f120a188133cb569b8db832", "type": "identity", "name": "keystone" } ], "expires_at": "2015-07-14T13:37:00.000000Z", "issued_at": "2015-07-15T13:37:00.000000Z", "methods": [ "password" ], "user": { "id": "042042" } } }
If no scope is specified in the token creation request, the Identity API will return a
non-scoped token that can be used to identify the user in a next Identity API request. One example would be to create a scoped token using the token
authentication mechanism.
A scoped token can be re-scoped using the token authentication mechanism with a
smaller scope, for example this is extremely useful to provide a limited authorized token to an application sub-component or another API client that doesn’t need the full authorization of the original token to operate.
Using an Authentication Token
The obtained authentication tokens can be passed in all of the HTTP requests against the different REST APIs as a X-Auth-Token HTTP header. These tokens will
be checked by the requested OpenStack service to ensure their validity (i.e.
expiration, revocation, etc.) and if the authorization of this token allows access to the requested resource with the policy of the service applied to the user role.
How Various Pieces of OpenStack Communicate with Each Other
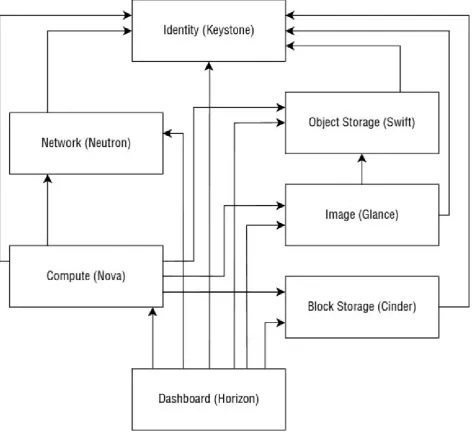
OpenStack has a modular architecture where all of the different components are separate services that communicate together using standardized REST APIs (see
life because different teams led by different people are developing each
component. All of the OpenStack components’ features and updates start by an API design discussion. All of these APIs should be simple, standard, re-usable and re-implementable by any developer who would want to use them and have custom services that would implement the API open-specifications. Moreover, these
[image:49.595.63.536.167.607.2]standard REST APIs have features that use a messaging queue to internally process the different actions and events.
Figure 2.2
The requests processed between the different OpenStack services are
authenticated with the tokens of the original request (see the earlier section about authentication token generation) and the authorization of these requests between the OpenStack services are checked as a direct request to the end-service.
two services using the original authentication token (see Figure 2.2).
Can Applications Use Keystone?
When creating an application that uses OpenStack, the usage of Keystone is required to ensure appropriate authorizations and structure of the different services or parts of the application.
Let’s take the example of an application that would have documents (e.g. pictures) uploaded by a guest user. So, we need a service to convert or resize these pictures. We also need to store the pictures (that we call objects) using an OpenStack object storage service. We then need to automatically provision and manage the
instances using the compute instances. We’ll have two different roles or projects and two different users because we don’t want the public accessible application to manage our instances for security reasons.
DEMO APPLICATION SOURCE CODE
You can access the source code from our demo application via GitHub:
COMPUTE
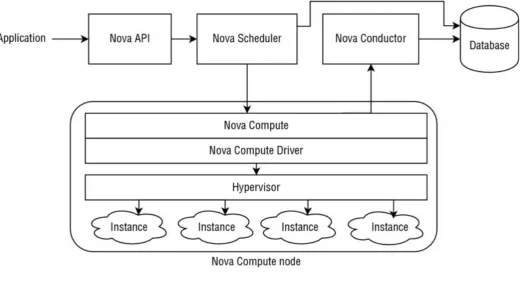
The Compute project in OpenStack, named Nova, includes all of the APIs and tools to provision and manage the instances (the virtual machines provisioned on physical compute nodes) across multiple physical hosts at scale. This project provides an abstraction of the configuration of the main used hypervisors in the world, allowing you to easily provision virtual machines with a standard API, independent of a specific hypervisor technology.
[image:51.595.39.560.280.561.2]In this part, you’ll discover the different pieces that compose an instance on OpenStack, how the instances models are managed (called flavors), how the instances are scheduled in a compute infrastructure and the main hypervisors supported by the project (See Figure 2.3).
Figure 2.3
Pieces of an Instance
In OpenStack, an instance has the traditional components of a virtualized server provided by a hypervisor. These characteristics are defined by the flavors in the compute service:
One or multiple allocated dedicated or virtual CPUs (vCPUs)
Some allocated memory (RAM)
A root disk that can be any device attached to the host server (virtual or not virtual, local, remote, or distributed)
can be provisioned by the Nova service in the host using the Network API and configured in the instance by the hypervisor.
The instances can have persistent block storages attached to them (i.e. a virtual hard drive in the instance), which can be provisioned and managed using the volume service and attached by the hypervisor to the instance.
The console (screen) of an instance can be viewed using the VNC service in Nova, which can be compared to a physical keyboard, video and mouse (KVM) for a physical server. KVM was traditionally used to share these devices with multiple computers (https://en.wikipedia.org/wiki/KVM_switch). Today the same term is used to describe the virtual access to these input/outputs of an OpenStack
instance. This Nova service is presented as a good way to abstract the way to
access all of the graphical interfaces and consoles of all the instances, regardless of the used virtualization technology and the instances’ operative systems. There are different protocols to access an instance’s interface and Nova provides a unified and transparent way to access them. For example, this service can also proxy a RDP (Remote Desktop Protocol) for the instances that run Microsoft Windows.
Understanding Flavors
A flavor in OpenStack represents a model of an instance: a set of allocated
resources for a virtual machine and its specificities. In public cloud services where host servers are shared across multiple projects or tenants (customers), the flavors can be compared to commercial offers, where the billed resources are calculated using the total time the instances of a specific flavor run during a month. This information is calculated using the OpenStack Telemetry Service (Ceilometer, see section 3.6).
A compute flavor contains some of the following resource details:
The name of a unique identifier
The amount of cores (vCPUs) and the weight if they are shared with multiple instances
The memory (RAM) and the swap size
The root disk and ephemeral disk space
A flavor may contain extra specifications that are useful to make decisions during the scheduling of an instance in a compute infrastructure, and to allocate the required resource to run the instance (e.g. processor architecture,
over-provisioning, PCI devices required etc.). The flavors may be public or linked to some specific OpenStack projects. Since we can associate this to a commercial offer or a compute instance model, a specific model (or compute instance) can be limited to a simple project or can be public and used by any project in an
to use these new physical server models to create new instances.
Scheduling Filters
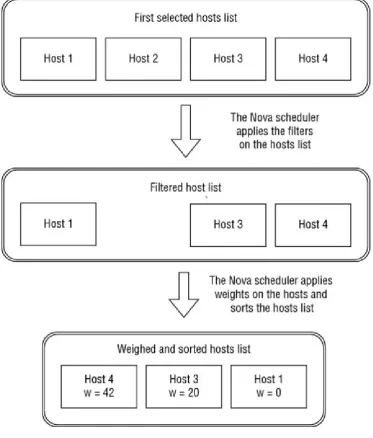
[image:53.595.111.485.176.615.2]When an instance is provisioned on an OpenStack compute infrastructure, one task of Nova, and especially of its scheduler, is to choose the compute node (physical host) where the instance will be created or moved. You can find an overview of the scheduler operations (Filtering and Weighting) in Figure 2.4.
Figure 2.4
Filtering
This task is processed using a simple concept: the compute scheduler takes a set of nodes available to use and applies a set of filters to this list to eliminate the ones that don’t match the different criteria of the required configuration (refer to
Figure 2.4).
Here are some examples of scheduling filters:
Match only a host that has the exact amount of resources available
Use the same host of another instance
Use a physical host where some specific PCI devices are available
The physical hosts can be added in aggregation groups that are usually used to match one or multiple specific flavors or projects using a scheduling filter. Here are two common use cases of this feature:
An aggregation group can be created for a customer with some dedicated hosts and hardware. Using extra specifications in a dedicated flavor (private for a domain, a project, or multiple projects), when the user will create an instance using this specific flavor the scheduler will filter only the hosts contained in this specific aggregation group.
Some hosts with specific hardware (e.g. SSD hard drives, specific CPU architecture, etc.) or allocation rules (e.g. dedicated resources,
over-provisioned resources) can be set in an aggregation group and the matching flavors created. Here the hosts may be shared with all of the projects
(customers) of the compute infrastructure and the flavor will act as a public commercial offer where the hosts are shared with some specifies.
Weights
Once the hosts are filtered, the scheduler applies some weights on each resource of the host or instance to determine the best host to choose to allocate and install the instance. For example, we could add a higher weight to fill an almost full physical server with an instance that exactly matches the remaining amount of reserved and allocable resources, or conversely to set higher weight to the less-used servers and get the one that is currently the less loaded.
Types of Hypervisors
The companies or contributors of hypervisor products or projects are usually the main contributor of compute virtualization drivers. It is easy to add a custom driver that implements one part or all of the features abstracted by the compute service, which is available via the compute API.
Libvirt
The libvirt in Linux is an abstraction library to access and manage the virtual machines and containers in a Linux server and their network and storage
configuration. It supports multiple technologies: KVM/QEMU, Xen, VirtualBox, VMware ESX, Hyper-V, OpenVZ, LXC, etc.
This is the default driver used by OpenStack and the most popular one for the kernel-based virtual machine/quick emulator (KVM/QEMU) virtualization. One of the pro arguments is managing the virtual machines regardless of the
weaknesses, especially given how it is mainly designed for KVM/QEMU, and some features provided by other virtualization technologies might be hidden by this abstraction layer. Hopefully other virtualization technologies are directly supported using their own Nova drivers.
VMware
Using VMware in OpenStack allows you to enjoy the advantages of both
technologies: virtualization features for VMware and management/standard APIs for OpenStack.
VMware provides a great virtualization technology that provides the following:
High Availability (HA); the ability to automatically reboot an instance on a full working hardware when an issue is detected by the hypervisor. In the
marketed world of VMware, the “HA” is more branded as “fault tolerance.”
Fault tolerance (the live migration without restart of an instance on a working host when a host is down).
Distributed Resource Scheduler (DRS), the smart dispatching of the running instances depending of the resources usage in real time.
STORAGE
The concept of object storage (named Swift in OpenStack) can be quite
complicated to understand for an application developer when you are using a local file system to store all of the static medias (e.g. images, videos, music, etc.) and documents created and used by your application. But this is often one of the main steps to horizontally scale an application that uses these medias.
Good examples are the traditional content management systems (CMS) and blog engines that by default store locally all of the medias uploaded using the web application. This transition to an object storage infrastructure for any application is not always easy to realize since the code often needs to be partially rewritten to support this new storage system. It needs to be re-written because an application needs to change the way it accesses files (objects), for instance accessing local files in a hard drive is not the same as accessing objects using a REST API.
There are advantages for switching to object storage:
You don’t have to worry about the total space size; this is the job of the infrastructure provider, and an object storage service like Swift easily scales horizontally.
You can split objects into multiple small blocks and the size of an object can almost be unlimited.
You can store an unlimited number of objects in a single container or bucket of objects.
The replication of the objects is done at the infrastructure level; it can even be done across multiple infrastructure regions.
Here are some potential blocking design and implementation points when you want to switch an application using a local file system to an object storage service:
You can access your objects only using HTTP(s), but this can be great when the clients of your application are already using the HTTP protocol: you can
provide access to an object without having to download it in your application server.
Object storage is not a file system and should not be used like one. One of the worst examples is to try to match an existing file system hierarchy when developing an application using an application. In many use cases, the
hierarchy logic should be on the application-side and the object storage should only contain the object data (blobs). The best example of this bad usage is
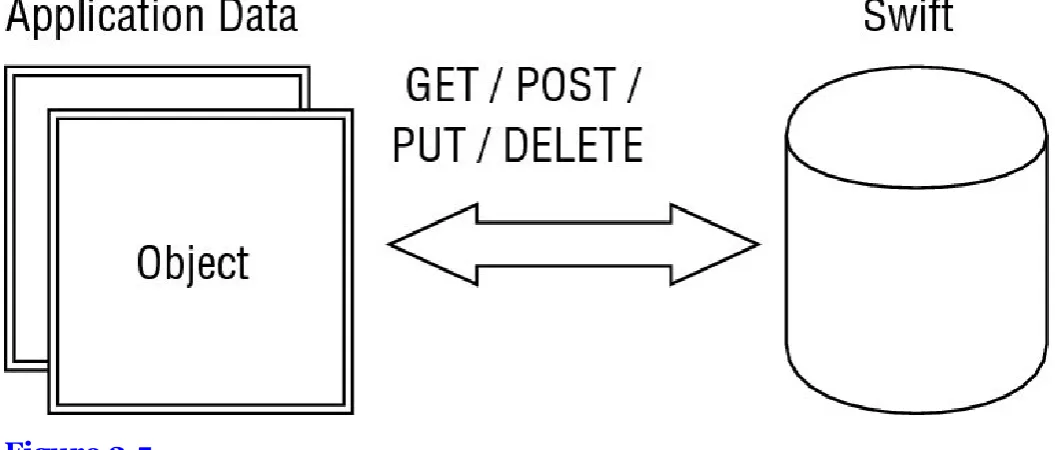
Introducing OpenStack Swift
[image:57.595.34.562.144.369.2]The Swift service (OpenStack’s object storage) provides all of the OpenStack projects with a HTTP REST API, allowing the processing of all the common operations on a stored object using the standard HTTP design and features to manage the resources (see Figure 2.5).
Figure 2.5
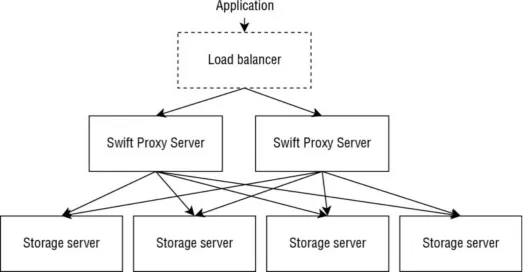
This project is horizontally scalable, distributed and highly available by design with different main components:
Swift proxy server: this service dispatches the HTTP requests accessing the different objects to all the backend nodes. This component can be easily scaled since the positions of an object in an infrastructure are determined by hashing its name and finding its position using a ring algorithm.
Swift account server: this service is responsible for storing the listing of the containers in the different existing accounts.
Swift container server: this is similar to the account server, but responsible for listing the objects in a container.
Swift object server: this is a storage backend installable on a physical host that provides an internal object storage API to manage the objects stored on the local server.
Figure 2.6
Eventual Consistency
OpenStack Swift is eventually consistent. For example, if a container server is under a heavy load and an object is PUT, the object will be available to GET as soon as the object is stored in different object servers, and as soon as the Swift proxy server handling the HTTP request responds to the client with success. In other words, the proxy stores the object in several objects’ servers, and then responds to the PUT with a successful HTTP response. However, the addition of the object in the listing by the container server may be queued and delayed, and a GET request on the container may not list this new object. Another example is that by deleting an object (DELETE), an empty object is created with a more recent modification timestamp to ensure that the file can’t be synchronized again if object server replica, where the object is stored, is down. Depending upon the synchronization delay between the different object servers storing the object, this might be available for a moment after the DELETE operation.
Storing Your First Object In Swift
The first step to store an object in your Swift account is to create a container for it. Containers regroup multiple objects with the same purpose using a specific set of settings. The grant to publicly read it or list it is an example. You can easily create it using the API with curl as the HTTP client:
$ curl –I -X PUT $swift/my-container -H "X-Auth-Token: $token" HTTP/1.1 202 Accepted
Content-Length: 76
Content-Type: text/html; charset=UTF-8
Connection: close
As mentioned earlier, the authentication is done using a token created using the identity service and specified as a X-Auth-Token HTTP header.
Once the container is created, it is now possible to store the objects inside of it. To realize this action, another PUT request can be processed against the new stored resource path:
$ curl -I -X PUT -T $object $swift/my-container/my-object HTTP/1.1 201 Created
Last-Modified: Mon, 27 Jul 2015 22:25:43 GMT Content-Length: 0
Etag: 168e1afe97b471eb8948a1b612283d04 Content-Type: text/html; charset=UTF-8
X-Trans-Id: 5B44C388:35C8_05C4F7D0:01BB_55B6AFE5_2125569:444C Date: Mon, 27 Jul 2015 22:25:42 GMT
Connection: close
That’s all! Your first object is stored in your OpenStack object storage service and is now privately accessible using the HTTP API:
$ curl -X GET -i $swift/my-container/my-object.json \ -H "X-Auth-Token: $ktoken"
HTTP/1.1 200 OK Content-Length: 42 Accept-Ranges: bytes
Last-Modified: Mon, 27 Jul 2015 22:25:43 GMT Etag: 168e1afe97b471eb8948a1b612283d04
X-Timestamp: 1438035942-04822 Content-Type: application/json
X-Trans-Id: 5B44C388:CCFA_05C4F7C0:01BB_55B6B352_1039A1B:637A Date: Mon, 27 Jul 2015 22:40:18 GMT
Connection: close […]
All of these requests can be executed using the command line from the Python Swift Client (https://github.com/openstack/python-swiftclient). This provides a simple way to browse your accounts, containers, and objects:
# Upload an object
$ swift upload <container> <file_or_directory>
# Download an object
$ swift download <container> <object>
Temporary Swift URLs
Any request processed against the OpenStack Swift API can be pre-authenticated with a cryptographic signature. This mechanism allows the sharing of an
authorization to access a single resource with a single HTTP method (e.g. POST swift/my-container/my-object) that can be used by third-party software, or a
and shares a single Swift Account for multiple users.
Let’s take the example of an application that will store some PDF bills in an object container and will return to a customer of this application a temporary link to download one of them. The application will be able to return to the browser a signed URL to only GET the object for a limited time.
The signature will be verified using a secret key set in your account.
# Set the key as a account metadata "X-Account-Meta-Temp-Url-Key"
$ swift post -m "Temp-URL-Key:92cfceb39d57d914ed8b14d0e37643de0797ae56"
# Display the account information (returned as HTTP headers when # processing a 'GET /v1/AUTH_account' request)
$ swift stat
Account: AUTH_account Containers: 1
Objects: 42 Bytes: 4200
Meta Temp-Url-Key: 92cfceb39d57d914ed8b14d0e37643de0797ae56 Connection: close
X-Timestamp: 1365615113.11739
X-Trans-Id: 5B44C388:D669_5CDEF184:01BB_55C72581_2160:50A3 Content-Type: text/plain; charset=utf-8
Accept-Ranges: bytes
Here is an example of a temporary URL that contains two additional query strings: the timestamp representing the link expiration date (temp_url_expires)
and the cryptographic signature itself (temp_url_sign):
/v1/AUTH_acount/c/o?temp_url_sig=9da40a8a7e288027809129d03ea2e5b09be70 d57&temp_url_expires=1439116248
For testing purposes and when using a terminal, you can easily create temporary links by using the swift-temp-url
(https://github.com/openstack/swift/blob/master/bin/swift-temp-url) tool from the OpenStack Swift project. Here, though, is a programmatic example in Python that could be used in your application:
#! /usr/bin/env python
import hmac
from hashlib import sha1 from time import time
# Expiration timestamp for the link, here this one is in 1h expires = int(time() + 60 * 60)
# Method authorized by the signed URL method = 'GET'
# Relative path of the object from the server origin path = '/v1/AUTH_account/c/o'