WEEKEND
CR
ASH
COURSE
WEEKEND
CR
ASH
COURSE
™MICROSOFT
®SQL
SERVER 2000
ALEX
KRIEGEL,
MCSD
2 CD-ROMs
with a SQL Server
2000 trial, an
assessment test,
and more
30 Sessions
That Will Have
You Up and
Running with
SQL Server 2000
in Only 15 Hours
MICROSOFT ®
SQL
S
ER
V
ER
2
0
0
0
HOUR
15
15
he big day is Monday. The day you get to show off what you know about SQL Server 2000. The problem is, you’re not really up to speed. Maybe it’s been a while since you worked with SQL Server. Or maybe you just like a challenge. In any event, we’ve got a solution for you —
Microsoft SQL Server 2000 Weekend Crash Course. Open the book Friday evening and on Sunday afternoon, after completing 30 fast, focused sessions, you’ll be able to get right to work on a SQL Server 2000 database. It’s as simple as that.
The Curriculum
Get Up to Speed on
SQL Server 2000 —
in a Weekend!
SQL Server 2000 —
in a Weekend!
2 CD-ROMS INCLUDE:
• SQL Server 2000 120-day Evaluation Edition
• SQL Programmer trial version
• Evaluation versions of database utilities, including Rapid SQL, DB Artisan, and ER/Studio
• Web links to useful SQL Server sites
• Sample code and scripts
• Assessment software
System Requirements: PC with Pentium 133 or higher; Windows 2000 Server: 128MB RAM. See the About the CD Appendix for details and complete system requirements. Category:
Database
WEEKEND CRASH COURSE
WEEKEND CRASH COURSE
T
™
ISBN 0-7645-4840-9
,!7IA7G4-feieag!:p;M;t;t;T
FRIDAY
Evening: 4 Sessions, 2 Hours
• Microsoft SQL Server 2000: Getting Started
• Go Configure: After Installation
• First Look at Enterprise Manager Console
• Second Look at Enterprise Manager Console
SATURDAY
Morning: 6 Sessions, 3 Hours
• Relational Database Concepts
• SQL Server System Databases
• Creating and Using a Custom Database
• Transact-SQL Programming • SQL Query Analyzer • More Transact-SQL
Programming
SATURDAY, continued Afternoon: 6 Sessions, 3 Hours
• Creating and Using Stored Procedures and Triggers • OSQL and ISQL
• Introducing Cursors • Understanding
Transactions • Locking
• Rules, Defaults, and Constraints
Evening: 4 Sessions, 2 Hours
• Data Transformation • SQL Server Back Up • Server Replication • User Management
SUNDAY
Morning: 6 Sessions, 3 Hours
• Managing Your Databases — Visually
• Microsoft Distributed Transaction Coordinator • System Functions and
Stored Procedures • Automating
Administration Tasks with SQL Server Agent • SQL Mail Agent
• Performance Tuning and Optimization
Afternoon: 4 Sessions, 2 Hours
• Disaster Recovery • SQL Server Security • Database Connectivity • Advanced Features of
SQL Server 2000
WEEKEND
CRASH
COURSE
HOURS
*85555-AIGGHi
For more information on Hungry Minds, go to www.hungryminds.com $29.99 USMicrosoft
®
SQL Server 2000
Weekend Crash Course
™
Alex Kriegel
Best-Selling Books • Digital Downloads • e-Books • Answer Networks e-Newsletters • Branded Web Sites • e-Learning
Microsoft®SQL Server 2000 Weekend Crash
Course™ Published by
Hungry Minds, Inc.
909 Third Avenue New York, NY 10022
www.hungryminds.com
Copyright © 2001 Hungry Minds, Inc. All rights reserved. No part of this book, including interior design, cover design, and icons, may be reproduce-dor transmitted in any form, by any means (elec-tronic, photocopying, recording, or otherwise) without the prior written permission of the publisher.
Library of Congress Control 2001089349 ISBN: 0-7645-4840-9
Printed in the United States of America 10 9 8 7 6 5 4 3 2 1
1B/RW/QZ/QR/IN
Distributed in the United States by Hungry Minds, Inc.
Distributed by CDG Books Canada Inc. for Canada; by Transworld Publishers Limited in the United Kingdom; by IDG Norge Books for Norway; by IDG Sweden Books for Sweden; by IDG Books Australia Publishing Corporation Pty. Ltd. for Australia and New Zealand; by TransQuest Publishers Pte Ltd. for Singapore, Malaysia, Thailand, Indonesia, and Hong Kong; by Gotop Information Inc. for Taiwan; by ICG Muse, Inc. for Japan; by Intersoft for South Africa; by Eyrolles for France; by International Thomson Publishing for Germany, Austria, and Switzerland; by Distribuidora Cuspide for Argentina; by LR International for Brazil; by Galileo Libros for Chile;
by Ediciones ZETA S.C.R. Ltda. for Peru; by WS Computer Publishing Corporation, Inc., for the Philippines; by Contemporanea de Ediciones for Venezuela; by Express Computer Distributors for the Caribbean and West Indies; by Micronesia Media Distributor, Inc. for Micronesia; by Chips
Computadoras S.A. de C.V. for Mexico; by Editorial Norma de Panama S.A. for Panama; by American Bookshops for Finland.
For general information on Hungry Minds’ products and services please contact our Customer Care department within the U.S. at 800-762-2974, out-side the U.S. at 317-572-3993 or fax 317-572-4002. For sales inquiries and reseller information, includ-ing discounts, premium and bulk quantity sales, and foreign-language translations, please contact our Customer Care department at 800-434-3422, fax 317-572-4002 or write to Hungry Minds, Inc., Attn: Customer Care Department, 10475 Crosspoint Boulevard, Indianapolis, IN 46256.
For information on licensing foreign or domestic rights, please contact our Sub-Rights Customer Care department at 212-884-5000.
For information on using Hungry Minds’ products and services in the classroom or for ordering exam-ination copies, please contact our Educational Sales department at 800-434-2086 or fax 317-572-4005. For press review copies, author interviews, or other publicity information, please contact our Public Relations department at 572-3168 or fax 317-572-4168.
For authorization to photocopy items for corporate, personal, or educational use, please contact Copyright Clearance Center, 222 Rosewood Drive, Danvers, MA 01923, or fax 978-750-4470.
LIMIT OF LIABILITY/DISCLAIMER OF WARRANTY: THE PUBLISHER AND AUTHOR HAVE USED THEIR BEST EFFORTS IN PREPARING THIS BOOK. THE PUBLISHER AND AUTHOR MAKE NO REPRESENTA-TIONS OR WARRANTIES WITH RESPECT TO THE ACCURACY OR COMPLETENESS OF THE CONTENTS OF THIS BOOK AND SPECIFICALLY DISCLAIM ANY IMPLIED WARRANTIES OF MERCHANTABILITY OR FITNESS FOR A PARTICULAR PURPOSE. THERE ARE NO WARRANTIES WHICH EXTEND BEYOND THE DESCRIPTIONS CONTAINED IN THIS PARAGRAPH. NO WARRANTY MAY BE CREATED OR EXTENDED BY SALES REPRESENTATIVES OR WRITTEN SALES MATERIALS. THE ACCURACY AND COMPLETENESS OF THE INFORMATION PROVIDED HEREIN AND THE OPINIONS STATED HEREIN ARE NOT GUARAN-TEED OR WARRANTED TO PRODUCE ANY PARTICULAR RESULTS, AND THE ADVICE AND STRATEGIES CONTAINED HEREIN MAY NOT BE SUITABLE FOR EVERY INDIVIDUAL. NEITHER THE PUBLISHER NOR AUTHOR SHALL BE LIABLE FOR ANY LOSS OF PROFIT OR ANY OTHER COMMERCIAL DAMAGES, INCLUDING BUT NOT LIMITED TO SPECIAL, INCIDENTAL, CONSEQUENTIAL, OR OTHER DAMAGES.
About the Author
Alex Kriegel, MCSD, has worked for Psion Teklogix International Inc., Integration Services Group for the past three years. Their main product is TekRF Integration Components for SAP R/3. Alex participated in designing and implementing it from the very beginning back in 1997. In addition to programming, he is also responsible for troubleshooting SQL Server installations, optimizing performance, and devising SQL stored procedures and such. For the past two years Alex has taught a course on SQL/SQL Server for a group of SAP analysts.
Acquisitions Editor
Terri Varveris
Project Editor
Valerie Perry
Technical Editors
Allen Wyatt and Trevor Dwyer
Copy Editor
S.B. Kleinman
Project Coordinator
Dale White
Graphics and Production Specialists
Joyce Haughey Adam Mancilla Betty Schulte Brian Torwelle
Quality Control Technicians
Laura Albert Susan Moritz Angel Perez Charles Spencer
Permissions Editor
Laura Moss
Media Development Specialist
Travis Silvers
Media Development Coordinator
Marisa Pearman
Proofreading and Indexing
TECHBOOKS Production Services
S
QL Server 2000 is a major milestone for Microsoft, which is trying to position itself as a significant player in the database market. The demand for database-driven sites on the Internet is exploding (some major sites are running SQL Server 2000 as their back end, Microsoft included), creating a demand for qualified people who understand the product — from technical support people to analysts to programmers without database experience.With so many SQL Server books on the market you may wonder why there is any need for another one. There is more than one way to tell a story, and I like to think that this book offers a special angle from which to approach the rather com-plex topic of Relational Database Management Systems in general and SQL Server 2000 in particular.
I intend for this book to provide a no-nonsense, hands-on introduction to SQL Server for the widest audience possible: technical-support people whose company product includes SQL Server as part of its solution, small companies’ “jacks of all trades” doing in-house maintenance, beginning and intermediate programmers breaking into the field or switching careers or upgrading from some other database system, managers who would like to know what SQL Server can do for them with-out getting involved in a “holy war” of database vendors — and so on.
Who Should Read this Book
This crash course is comprised of a set of short lessons that you can grasp quickly — in one weekend. While writing this book I kept two kinds of people in mind:
Those who need to learn SQL Server 2000 fast and do not know where to start. These people have just the right mix of basic technical knowledge and curiosity, and need to feel comfortable using SQL Server.
Those who worked with previous versions of SQL Server and would like a brief, hands-on introduction to SQL Server 2000 — one basic enough for beginners, but deep enough for intermediate users.
What You Need to Have
In order to make the most of this book, you’ll need the following:
A computer (Pentium 166 or higher) running Windows NT 4.0 Server or
Windows 2000 Server.
Microsoft SQL Server 2000 Standard Edition installation.
Lots of patience and the desire to find out what SQL Server 2000 is all about.
You can get by with most of the material in this book using Windows 98 and the Personal Edition of SQL Server 2000, though this could not be considered “making the most of it.”
What Results Can You Expect?
Can you become a SQL Server database administrator in a weekend? As much as I would like to say the opposite, the answer is no. It takes much more than just three days of studying to become a database administrator. Can you become a com-petent user of SQL Server, and gain an understanding of some of the finer points of SQL Server 2000 features, in a weekend? Absolutely.
This is not a reference book and it does not pretend to cover each and every aspect of SQL Server in depth. It will help you to get up and runningand, at the same time, show you where to look for further information.
You can expect to learn how to set up SQL Server 2000 with most standard fea-tures (and troubleshoot the installation if anything goes wrong). I will provide a thorough introduction to the most important SQL Server features and objects — SQL Server administration, creating and destroying database objects, optimizing performance, publishing information on the Internet, and much more — and to using them for your own purposes.
Layout and Features
This book follows the standard Weekend Crash Course layout and includes the stan-dard features of the series so that you can be assured of mastering basic SQL Server 2000 skills within a weekend — 30 hours, to be precise. The book contains 30 sessions, each about one hour long, to be read over the course of three and a half days. At the end of each session you’ll find “Quiz Yourself” questions, and at
Preface
the end of each part you’ll find Part Review questions. These questions enable you to test your knowledge and exercise your newly acquired skills. (The answers to the part-review questions are in Appendix A.)
Layout
This Weekend Crash Course contains 30 one-hour sessions organized into six parts. Each part corresponds to a time during the weekend, as outlined in the following sections.
Part I: Friday evening
This is the “get started” part. You will go through the complete process of setting up SQL Server 2000, starting from hardware and software considerations to select-ing installation options to havselect-ing an up-and-runnselect-ing instance of SQL Server. You will go through the process of installing and configuring your server and will also get a glimpse of what lies ahead.
Part II: Saturday morning
In this part you will get into the fundamental concepts of relational databases, both examining SQL Server system databases and getting an introduction to creat-ing and uscreat-ing user databases. You also will get an introduction to Structured Query Language (SQL), the language of relational databases.
Part III: Saturday afternoon
In these sessions you will take your SQL Server 2000 programming skills to a new level: You will be introduced to stored procedures, triggers, and cursors. The ses-sion on indices will give you a thorough understanding of this important concept. This part also includes in-depth discussions of locking, transactions, and the integrity mechanisms of SQL Server 2000.
Part IV: Saturday evening
This part will introduce you to some advanced features of SQL Server such as Data Transformation Services, backing up and restoring, and replication. It also will cover the basics of user management in the context of SQL Server 2000.
Part V: Sunday morning
Here you will be introduced to database-management issues. You will learn about distributed transactions, obtaining system information, and automating adminis-trative tasks with SQL Server Agent. The sections in this part will show you how to configure SQL Server to send and receive e-mail. You will also learn how to opti-mize and tune the performance of SQL Server.
Part VI: Sunday afternoon
In this part you will learn about disaster recovery and receive a comprehensive introduction to SQL Server 2000 security. The sessions in this part will also address connectivity issues and give an overview of the most advanced features in SQL Server 2000.
Features
As you go through each session, look for the following icons that let you know how much progress you’ve made in the session:
Remember, these are just suggestions: You may need more or less time to finish the section. The book also contains other icons that call your attention to special points of interest:
These alert you to important pieces of information that you should file away in your head for later.
These give you helpful advice about the best ways to do things, or tell you about a tricky technique that can make your HTML programming go more smoothly.
These tell you where you can find related material in other sessions.
Cross-Ref Tip Note
Preface
Accompanying CD-ROM
You will find a CD-ROM at the back of this book. It contains a skills-assessment test, a PDF version of the book, and as many useful tools and as much information as it is possible to fit there. For a complete description of each item on the CD-ROM, see Appendix B.
Reach Out
I know this book could have been better given enough time and space (uh . . . about five more years to write and 5,000 pages to hold the information). Neither you nor I have this luxury. Any feedback that will help to make revised editions of this book better and more comprehensive will be appreciated. Send your comments about the content of this book to:
As the saying goes, all you know today is obsolete. With this cheerful thought, you are ready to plunge into the relational database world — through the SQL Server 2000 entrance.
M
y gratitude goes to Grace M. Buechlein, who introduced me to the world of book-writing and convinced me that I could do it. Thank you very much, Grace!I thank with all my heart my Development/Project Editor Valerie Perry, who taught me how to be eloquent without sacrificing technical details along the way, and who helped me with every step — all in spite of power shortages in California. I really appreciate your help.
I am very grateful to my acquisitions editor, Terri Varveris, who pressed me hard to meet deadlines, and who encouraged me and guided me with extreme patience through all the intricacies of writing a technical book. Thank you, Terri!
I am very grateful to my copy editor, S. B. Kleinman, for all the work she did to make the original text better, a lot better.
I would like to express my gratitude to my technical editor, Allen Wyatt, for actually reading through these pages, picking out inconsistencies, bloopers, and outright errors, and making valuable suggestions about how to improve the con-tent of the book, chapter by chapter. My thanks also go to Trevor Dwyer, my other technical editor who helped edit the first several chapters of this book.
This book would have been impossible without the meticulous work of the Hungry Minds team that helped me to get everything in shape: Kyle Looper, Laura Moss, Marissa Pearman, Nancy Maragioglio and Dale White. Thank you.
My thanks also go to Bradley Ruste, my colleague, for helping me to write the chapter on SQL Server 2000 backup, as well as the general discussions of the SQL Server topics we’re having from time to time.
I thank my parents, Lazar and Raisa Kriegel, for their lifelong understanding and support, sometimes even against their best judgment.
My deepest gratitude goes to my wife, Liana, for her support when I needed it most, and to my two sons, Phillip and Michael, for giving me endless hours of fun as I explained to them the finer points of relational-database systems, and being there for me when I needed them. Thank you.
Preface...vii
Acknowledgments...xiii
FRIDAY
...2
Part I—Friday Evening
...4
Session 1–Getting Started ...5
Session 2–Go Configure ...19
Session 3–First Look at Enterprise Manager Console...29
Session 4–Second Look at Enterprise Manager Console ...37
SATURDAY
...48
Part II—Saturday Morning ...50
Session 5–Relational Database Concepts ...51
Session 6–SQL Server Databases ...61
Session 7–Creating and Using a Custom Database ...73
Session 8–Transact-SQL Programming Language ...81
Session 9–T-SQL and SQL Query Analyzer ...95
Session 10–Programming with T-SQL ...107
Part III—Saturday Afternoon ...124
Session 11–Creating and Using Stored Procedures ...125
Session 12–Trigger Happy ...137
Session 13–Introducing Cursors ...145
Session 14–Understanding Indexes...155
Session 15–Rules, Defaults, and Constraints ...167
Session 16–Understanding Transactions and Locks ...177
Part IV—Saturday Evening ...190
Session 17–Data Transformation Services ...191
Session 18–SQL Server Back Up ...201
Session 19–SQL Server Replication ...213
Session 20–User Management ...225
SUNDAY
...238
Part V—Sunday Morning ...240
Session 21–Managing Your Databases Visually ...241
Session 22–Distributed Transaction Coordinator ...251
Session 23–Accessing SQL Server System Information...263
Session 24–Automating Administration Tasks with SQL Server Agent ...273
Session 25–Configuring SQL Server Mail ...283
Session 26–Performance Tuning and Optimization ...293
Part VI—Sunday Afternoon ...308
Session 27–Disaster Recovery ...309
Session 28–SQL Server Security ...319
Session 29–Database Connectivity ...331
Session 30–Advanced Features of Microsoft SQL Server 2000 ...341
Appendix A–Answers to Part Reviews...355
Appendix B–What’s on the CD-ROM?...367
Preface...vii
Acknowledgments...xiii
FRIDAY
...2
Part I—Friday Evening
...4
Session 1–Getting Started...5
Understanding Microsoft SQL Server ...5
Installing SQL Server 2000 ...6
System requirements...7
Before you begin the installation ...8
Stepping through the installation...9
Completing the installation and rebooting your computer...17
Session 2–Go Configure ...19
Fixing a Faulty Installation...20
Running SQL Server Service Manager ...20
Managing Configuration Tasks ...22
Windows NT...22
Windows 2000 ...23
Locating SQL Server Files ...23
Adding Components ...25
Uninstalling SQL Server...25
Session 3–First Look at Enterprise Manager Console...29
Starting the Enterprise Manager ...29
Creating Server Groups and Registering Servers ...31
Down Under: Inspecting Registered SQL Server Nodes ...33
Considering Your Options ...34
Accessing SQL Server Books Online ...36
Session 4–Second Look at Enterprise Manager Console ...37
Meeting the Wizards ...37
Database administration wizards...39
Database wizards ...40
The Replication Wizard ...41
The Web Assistant Wizard ...41
Running Command-Line Utilities ...42
Understanding Data Transformation Services ...44
Accessing SQL Server Agent ...45
SATURDAY ...48
Part II—Saturday Morning ...50
Session 5–Relational Database Concepts ...51
Identifying the Limitations of Spreadsheet Programs...51
Understanding Legacy Database Models ...52
Hierarchical databases ...52
Network databases ...54
Introducing the Relational Database Model ...54
Many-to-many relationships ...55
One-to-many relationships ...56
One-to-one relationships...56
Exploring Relational-Database Management-System Implementations ...56
Learning Relational-Database Terminology...58
Session 6–SQL Server Databases ...61
Understanding the SQL Server System Databases ...61
The Master database...62
The TempDB database ...62
The Model database...63
The MSDB database ...63
Exploring the SQL Server Sample Databases...64
The Pubs database ...64
The Northwind database ...65
Learning the Basics of Relational Database Design ...65
Get normal ...68
Common pitfalls of database design...70
Flat-file design ...70
Spreadsheet design...70
Design tied to a particular RDBMS implementation ...70
Session 7–Creating and Using a Custom Database ...73
Creating a New Database in SQL Server 2000 ...73
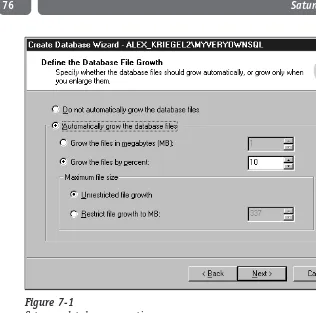
Modifying Database and Transaction Log Properties ...77
Deleting a Database ...79
Session 8–Transact-SQL Programming Language ...81
Learning about Transact SQL ...81
Using the SELECT Keyword...82
Working with the JOIN and UNION Keywords ...87
The JOIN keyword ...87
The UNION keyword...90
Using the INSERT, UPDATE, and DELETE Keywords ...90
Using the INSERT keyword ...90
Using the UPDATE keyword...91
Using the DELETE keyword ...92
Knowing about Additional T-SQL Keywords and Functions ...93
Contents
Session 9–T-SQL and SQL Query Analyzer...95
Learning about T-SQL and SQL Query Analyzer ...95
Creating, Altering, and Dropping Databases with T-SQL ...98
Creating databases ...98
Altering databases ...99
Dropping databases ...100
Creating, Altering, and Dropping Tables with T-SQL...100
Creating tables ...100
Altering tables ...101
Deleting tables...102
Getting Information about Your SQL Server ...102
Working with the Query Analyzer Templates and the Object Browser...103
Session 10–Programming with T-SQL ...107
Declaring and Using T-SQL Variables ...107
Implicit conversion...109
Explicit conversion ...110
Using Control-of-Flow Statements ...111
Exploring T-SQL Operators ...113
Arithmetic operators...114
Comparison operators ...114
Logical operators...115
The assignment operator ...116
The string concatenation operator...116
Unary operators ...116
Operator precedence ...117
Working with Aggregate Functions ...118
Running Subqueries ...118
Using the CASE Function ...119
Part III—Saturday Afternoon ...124
Session 11–Creating and Using Stored Procedures ...125
Creating Stored Procedures ...125
Commenting Transact-SQL Code ...128
Error Handling ...129
Using Different Types of Stored Procedures ...132
Temporary stored procedures ...132
Nested and recursive stored procedures ...133
System stored procedures ...134
Renaming and Dropping a Stored Procedure ...134
Session 12–Trigger Happy ...137
Introducing Triggers...137
AFTER triggers ...139
INSTEAD OF triggers ...141
Recursive triggers...142
Nested triggers ...142
Managing Triggers...143
Creating triggers ...143
Dropping (deleting) triggers ...143
Modifying triggers ...144
Session 13–Introducing Cursors ...145
Understanding Cursors ...145
Using Different Types of Cursors ...148
Scrollable cursors ...148
Static cursors...149
Dynamic cursors...149
Keyset cursors...150
Forward-only cursors ...150
Understanding the Scope of the Cursors ...150
Setting Cursor Concurrency Options ...151
Choosing the Right Cursor ...152
Session 14–Understanding Indexes ...155
Using Indexes ...155
Clustered indexes ...156
Non-clustered indexes...157
Designing an Index ...157
Creating and Deleting an Index...158
Managing an Index...164
Session 15–Rules, Defaults, and Constraints ...167
Enforcing Data Integrity ...167
Types of integrity...168
Types of constraints ...168
PRIMARY KEY constraints...168
FOREIGN KEY constraints ...169
UNIQUE constraints ...170
CHECK constraints ...171
RULE constraints ...172
DEFAULT constraints ...173
Understanding NULL Values ...175
Session 16–Understanding Transactions and Locks ...177
Understanding Transactions ...177
Explicit and implicit transactions ...180
Distributed transactions ...181
Setting Isolation Levels ...182
Introducing SQL Server Locks ...183
Exploring Lock Types...184
Dealing with Deadlocks ...185
Contents
Part IV—Saturday Evening ...190
Session 17–Data Transformation Services ...191 Introducing Data Transformation Services...191 Importing and Exporting Data through DTS ...192 Maintaining DTS Packages ...197 Using the Bulk Copy Command-Line Utility...198 Session 18–SQL Server Back Up ...201 Implementing Backup and Recovery Planning ...201 Using Different Backup Strategies...202Complete database backups ...203 Differential backup...207 Transaction-log backup ...207
Selecting a Recovery Mode ...207
Simple recovery ...208 Full recovery...208 Bulk-logged recovery ...208
Restoring a Database ...208 Managing Backups...211 Session 19–SQL Server Replication ...213 Reviewing SQL Server Replication ...213
Basic replication terminology ...214
Selecting a Replication Model ...216 Preparing for Replication ...216
Snapshot replication...217 Transactional replication ...217 Merge replication ...217
Setting up Replication ...217
Creating publications ...220 Managing subscriptions...222 Monitoring replication ...223
Session 20–User Management ...225 Setting Up a User Account ...225
Roles ...226 Logins...226
Managing User Permissions ...230 Managing a Multiuser Environment ...233
SUNDAY ...238
Part V—Sunday Morning ...240
Session 21–Managing Your Databases Visually ...241 Devising a Database-Maintenance Plan...241 Scripting and Documenting Your Database ...247 Moving and Copying Database Files ...248Session 22–Distributed Transaction Coordinator ...251 Using Remote Servers and Linked Servers ...251
Remote servers...252 Linked servers ...254
Accessing External Data Sources...258 Using Microsoft Distributed Transaction Coordinator (MSDTC) ...259 Session 23–Accessing SQL Server System Information ...263 Obtaining SQL Server System Information ...263 Using Information Schema Views...264 Using System Stored Procedures...266
General stored procedures ...267 Catalog stored procedures...267 Security stored procedures ...268 SQL Server Agent stored procedures...269 Extended stored procedures ...269
Session 24–Automating Administration Tasks with SQL Server Agent ...273 Configuring and Using SQL Server Agent ...273
Configuration screen ...274 Properties...274
The Alert tab ...275 The Jobs tab ...275 The Connection tab ...275
Scheduling Jobs ...276 Creating Alerts ...278 Managing Operators...280 Administering Multiple Servers...281 Session 25–Configuring SQL Server Mail ...283 Setting Up Your Mail Profile ...283 Configuring SQL Mail and SQL Server Agent Mail ...286 Sending Mail through Extended Stored Procedures ...288 Troubleshooting ...289 Session 26–Performance Tuning and Optimization...293 Monitoring and Profiling ...293 Tuning SQL Queries ...296 Using the Index Tuning Wizard...299 Optimizing TempDB and the Transaction Log...301
Optimizing TempDB performance...301 Optimizing Transaction Log performance ...302
Using Database Consistency Check (DBCC)...302
Contents
Part VI—Sunday Afternoon ...308
Session 27–Disaster Recovery...309 Planning for Disaster...309 Identifying Basic Disaster Scenarios ...310Physical destruction ...311 Failed operating system ...311 Database corruption ...311 Verifying functionality...312
Creating Standby Servers ...312 Managing the Disaster ...313 Session 28–SQL Server Security ...319 Planning for Security ...319 Introducing SQL Server Authentication Modes ...320 Configuring SQL Server Roles...321
Fixed server roles ...322 Adding a member to a fixed server role ...322 Database roles...323 Adding a member to a database role ...324 Application roles...326
Using Views as a Security Mechanism...327 Understanding SQL Server File Permissions ...328 Auditing SQL Server ...328 Session 29–Database Connectivity ...331 Introducing DBLIB, ODBC and OLE DB...331
DBLIB ...332 Open Database Connectivity (ODBC)...332 OLE DB...332
Configuring ODBC Data Sources ...333 Presenting DAO, RDO, and ADO...337 Interoperability with Non-Windows Machines and the Internet ...339 Session 30–Advanced Features of Microsoft SQL Server 2000 ...341 Using English Query ...341 Performing Full-Text Searches...343 Using SQL Server 2000 Analytical Services ...345 Running the Web Assistant Wizard ...347 Getting SQL Server XML Support ...349 Appendix A–Answers to Part Reviews...355 Appendix B–What’s on the CD-ROM?xxii...367 Index...371
Part I — Friday Evening
Session 1
Getting Started
Session 2
Go Configure
Session 3
First Look at Enterprise Manager Console
Session 4
Friday
Evening
I
Session 1
Getting Started
Session 2
Go Configure
Session 3
First Look at Enterprise Manager Console
Session 4
Session Checklist
✔
Understanding Microsoft SQL Server
✔
Installing SQL Server 2000
T
his session will introduce you to SQL Server and guide you through theinstallation process step-by-step. It explains hardware and software require-ments and the reasons for making necessary choices along the way. The final sidebar comparing SQL Server to other major players on the database market lists the costs and benefits of various database-system implementations.
Understanding Microsoft SQL Server
Microsoft SQL Server is a scalable database system whose primary purpose is to serve as a back-end database for a client program, such as your Web browser, an accounting program, or a human resources application — anything that makes use of the data. In the most common usage scenario, a client program connects to SQL Server and requests some information, whereupon SQL Server processes the request and returns results. The client must then interpret and display these results (for
S E S S I O N
Getting Started
example, a custom human-resources application displaying a list of employees in alphabetical order).
Unlike text editors or games, which do not require any additional components in order to be useful, MS SQL Server does not make much sense as a stand-alone program or as a program that runs on a stand-alone computer. Although it is pos-sible to have both a client and SQL Server running on the same computer, it is not very useful. It would be something like hammering nails with a microscope, as SQL Server is meant to be part of a network (local, wide, Internet — you name it) and to serve more than one user.
SQL Server can store structured information in a variety of formats, and it enables you to manipulate this information. For example, you can instantly search through millions of records and view the results of the search in many different formats; you can combine different data into one set; you can transform some for-mats into others; you can set security rules to be enforced by SQL Server; and so on.
Advanced features of MS SQL Server 2000 include On-Line Analytical Processing (OLAP) and Data Mining, which enable you to analyze huge amounts of data to discover hidden trends. Whatever business you’re in and however many users you have, SQL Server will provide support for all your data needs and seamlessly inte-grate into your enterprise.
You cannot expect SQL Server to think for you. To be even marginally useful, it has to be told exactly what to do. SQL Server is very flexible, but it won’t prevent you from shooting yourself in the leg.
Installing SQL Server 2000
Installing SQL Server 2000 is a snap — that is, if you stick to the default settings. I recommend that you postpone trying your hand at mission-critical installations until you actually understand the options and their ramifications.
All SQL Server 2000 installations require a Pentium 166 or higher computer that’s equipped with a VGA monitor and at least 95MB of free disk space (the typi-cal installation uses about 250MB). Unless you’re planning on installing from a network, a CD-ROM drive is also required.
Microsoft warns against installing the product on older Cyrix processor-equipped computers. They might not support the full set of instructions that SQL Server requires.
Note
Friday Evening
System requirements
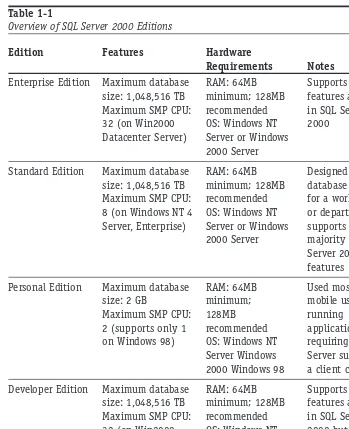
[image:30.639.91.440.177.606.2]Table 1-1 lists the operating system and RAM requirements as well as an overview of the most important features.
Table 1-1
Overview of SQL Server 2000 Editions
Edition Features Hardware
Requirements Notes
Enterprise Edition Maximum database RAM: 64MB Supports all
size: 1,048,516 TB minimum; 128MB features available
Maximum SMP CPU: recommended in SQL Server
32 (on Win2000 OS: Windows NT 2000
Datacenter Server) Server or Windows
2000 Server
Standard Edition Maximum database RAM: 64MB Designed as a
size: 1,048,516 TB minimum; 128MB database server
Maximum SMP CPU: recommended for a workgroup
8 (on Windows NT 4 OS: Windows NT or department;
Server, Enterprise) Server or Windows supports the
2000 Server majority of SQLS
Server 2000 features
Personal Edition Maximum database RAM: 64MB Used mostly by
size: 2 GB minimum; mobile users
Maximum SMP CPU: 128MB running
2 (supports only 1 recommended applications
on Windows 98) OS: Windows NT requiring SQL
Server Windows Server support on
2000 Windows 98 a client computer
Developer Edition Maximum database RAM: 64MB Supports all
size: 1,048,516 TB minimum; 128MB features available
Maximum SMP CPU: recommended in SQL Server
32 (on Win2000 OS: Windows NT 2000 but is
Datacenter Server) Server or Windows licensed only for
2000 Server development and
testing
Continued
Session 1—Getting Started 7
Table 1-1 Continued
Edition Features Hardware
Requirements Notes
Desktop Engine Varies according to Varies according A re-distributable
the application it to the application version that can
ships with it ships with be packaged with
an independent vendor’s application
Windows CE Edition Bound by Windows OS: Windows CE 3.0 A SQL Server
CE limitations version for
Windows CE devices; can be synchronized with a enterprise database
After you figure out your system requirements, you can start the installation.
Before you start your installation, make sure that all nonessen-tial services are stopped, especially all members of the Microsoft BackOffice family: Close your e-mail program, anti-virus pro-gram, and so on. You also need to be logged onto your computer with full administrative privileges (thus having a full access to Windows registry on that machine).
Before you begin the installation
I have chosen Standard Edition for my examples, as it is the edition most suitable for a workgroup or small department. For the purposes of this book I will assume that you are running it on a Microsoft Windows NT 4.0/ 2000 Server. (I assume that you’re installing MS SQL Server 2000 on a machine on which no previous ver-sions of the product have been installed; if you are upgrading from any previous MS SQL versions please refer to Appendix C.) If you’ve followed me this far, you are ready to install SQL Server 2000 Components.
If you are running MS Windows 95, you must first install SQL Server 2000 Prerequisites (Common Controls Library Update). Keep in mind that Windows 95 supports only the client connectivity option, which allows applications to access
Tip
Friday Evening
instances of SQL Server 2000 on other computers — that is, you will need a server to connect to; you also may need to upgrade to Microsoft Internet Explorer 5.0 and HTML Help 1.3. You can update Internet Explorer and HTML Help by downloading
the latest versions from http://www.microsoft.com. The HTML Help update file
is named Hhupd.exe. SQL Server 2000 was not designed to run on Win95, and if you’re serious about learning SQL Server, it’s time to upgrade.
Stepping through the installation
Follow these steps to perform the installation:
1. Insert the Microsoft SQL Server 2000 Standard Edition CD into your
CD-ROM drive. If your computer supports the autorun feature, the instal-lation will start automatically; otherwise, find your CD-ROM from Windows Explorer and start autorun.exe.
2. From the very first installation screen, select SQL Server 2000
Components. The next screen gives you the following options:
Install Database Server
Install Analysis Services
Install English Query
You may want to consider installing Analysis Services and/or English Query — some other time. These are advanced options that deserve a separate book, and I recommend mastering the basics before moving on.
3. Click Install Database Server. The Installation Wizard comes to life. It
guides you through the whole installation process. (You can go back and change your choices until you click Finish.)
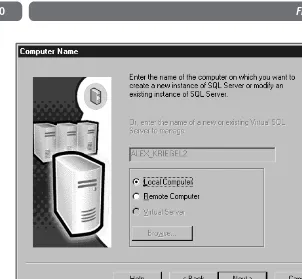
You can install SQL Server 2000 either locally or on a remote machine, as shown in Figure 1-1.You need to specify your computer (server) name if you are installing on a remote machine. Virtual Server is an advanced option for enterprise-level database systems.
The installation program detects any previous instances of SQL Server running on your machine and gives you appropriate install and/or upgrade options. Depending on what is already installed on your com-puter, you might have slightly different installation options enabled or disabled.
Session 1—Getting Started 9
P
art I
—
Friday Ev
ening
Figure 1-1
This screen enables you to specify the computer on which you’re going to install SQL Server 2000.
New Instance means that you can install and run several copies of SQL Server 2000 on the same computer at the same time. All instances will be administered from a single management con-sole, but each instance is absolutely independent of the others.
Because you’re creating a new instance of SQL Server, the default option shown in Figure 1-2 is the one you want. After you install SQL Server, you can always change configuration settings and upgrade, remove, or add components. Click Next to continue.
Advanced options are — as the name implies — for advanced users; after you finish this book, you may want to explore them on your own.
Note Note
Friday Evening
Figure 1-2
Choose an installation type on the Selection screen.
4. Enter your name and the name of your company in the spaces provided.
Click Next to continue to the License Agreement screen.
5. Before you can proceed, you need to agree to the terms of the license
agreement that comes with your copy of SQL Server 2000. Later in the installation process, you will be prompted to select a licensing mode; therefore, make sure that you select the proper licensing options.
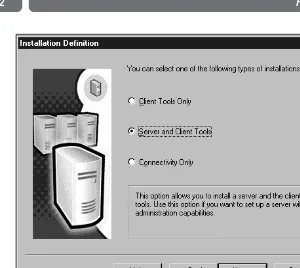
6. Specify installation options, as shown in Figure 1-3. Choose Server and
Client tools and click Next. (The two other options are for users working from remote servers.)
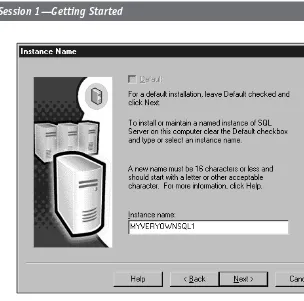
7. In order to install an instance of SQL Server, you need to specify a name
(I specified MYVERYOWNSQL, as shown in Figure 1-4); every subsequent installation will have to have a different unique name. Only one instance will be designated as the default (the grayed-out check box on this screen indicates that I already have a default instance of SQL Server run-ning). Click Next.
Session 1—Getting Started 11
P
art I
—
Friday Ev
ening
Figure 1-3
Select what you’re going to install.
Keep instance names to less than 15 characters; it makes them easier to read.
8. Select the type of setup you wish to perform. I recommend sticking with
the Typical setup type until you have more SQL Server experience. Click Next.
You also may want to change the physical location of the program and database files by clicking Browse. Generally, it is not a very good idea to keep program and data files in the same directory, as this can cause costly mistakes when you are maintaining your databases or installing service packs and upgrades.
I strongly advise against installing the minimum required options, because if you do, you will not have most of the fea-tures I am going to talk about in this book.
Never Tip
Friday Evening
Figure 1-4
Name your SQL server or use the default name.
9. Choose your SQL Server collation order, default language, and so on, as
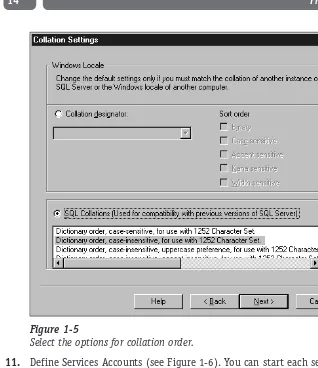
shown in Figure 1-5. Collationdefines how your data will be compared
and sorted. For English and any language using Latin characters, the choice is easy; for Asian characters, it might not be so obvious. The colla-tion order specified here determines the default code page and sort order for all non-UNICODE characters and is the UNICODE collation order for all SQL Server system databases. The sort order determines whether opera-tions on your data will be case-sensitive or not. Click Next.
You can always reconfigure your server for a different collation/sort order later. There is a high price to pay — you have to rebuild all your databases and possibly lose some data. It is better to use the correct order from the beginning.
10. Unless you have a valid reason (for example, if you need direct access to
your server from the Internet or from a client running on an Apple com-puter), I recommend leaving the Network Libraries screen with its default values, which are Named Pipes and TCP/IP. Click Next.
Tip
Session 1—Getting Started 13
P
art I
—
Friday Ev
ening
Figure 1-5
Select the options for collation order.
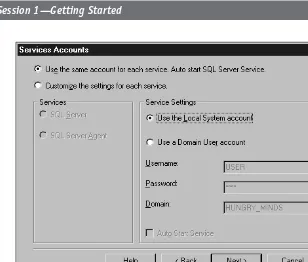
11. Define Services Accounts (see Figure 1-6). You can start each service on a
different account, thus fine-tuning access privileges. I recommend select-ing the same account for each service and auto-start for SQL Server. That way, the SQL Server and SQL Server Agent services will be started each time you log on to you machine account and won’t require special autho-rization. Click Next.
If your computer is part of a network, you should install SQL Server on a domain user’s account, which does not need all the privileges of your administrator’s account.
12. Specify the authentication mode to be used to start up SQL Server. SQL
Server 2000 has built-in security to protect data from unauthorized access. If you choose Windows Authentication Mode your SQL Server databases will be accessible as soon as you log onto your account with your Windows NT/2000 login; Mixed Mode requires a user ID and pass-word in order to connect to SQL Server after you log on. Click Next.
Note
Friday Evening
Figure 1-6
Set up your Services Accounts.
If your computer is a part of a network and you have access rights to this network, you will normally use your domain user account if your machine is part of the domain. A domainis a group of computers defined by an administrator; it has a unique name and its own set of security policies that apply to all the computers that comprise it.
13. The setup process informs you that it has collected enough information
to start the installation. This is your last chance to change your settings before the install. (Once you’ve got SQL Server up and running you’ll always be able to change it through SQL Server itself, using the SQL Server Enterprise Manager interface or built-in commands.) Click Next. Unless you are installing evaluation software you see one more screen, which prompts you to choose your licensing mode. For the purposes of this book I select Licensing Per Seat — meaning that only one connection to my installation of SQL Server will be allowed at any one time.
Note
Session 1—Getting Started 15
P
art I
—
Friday Ev
ening
Consult the license agreement that comes with your installation package. The Per Seat licensing mode requires a Client Access License for each device that will access SQL Server 2000. Per Seat is often the most economical choice for networks in which clients connect to more than one server. With Processor licensing you need a license for each processor installed on the computer running SQL Server. The Processor license allows any number of devices to access the server, whether over an intranet or the Internet.
Tip
Friday Evening
16
How Does SQL Server 2000 Compare to the Other Guys?
Microsoft SQL Server has come a long way from obscurity in 1988 to being one of the major databases employed around the world today. Some esti-mates indicate that more than half of the Web servers running on Windows NT/2000 use SQL Server as a back end. It is reasonably priced, robust, relatively easy to set up and administer, and very well integrated with Windows and the rest of the Microsoft products. It enjoys tremendous popularity, which means that you do not have to pay an arm and a leg for database expertise.
In a recent survey of five database vendors, Microsoft SQL Server came first in terms of pricing, value, and programming expertise. SQL Server gets less stellar marks in terms of customer referrals, service, responsive-ness, features, innovation, reliability, availability and so on. IBM’s DB2 came in first in these areas, followed by ORACLE, Sybase Adaptive Server, and Informix.
Completing the installation and rebooting your computer
Depending on your computer resources the whole installation process should take between 15 minutes and an hour. Depending on the operating system you are run-ning, the last screen you see may or may not prompt you to reboot. It is always a good idea to reboot your computer after installation, even if the install program doesn’t suggest it.
If you have followed the preceding steps, after restarting your computer and logging on you should see a small icon (a computer tower and a small encircled green triangle or encircled red square) in your system tray (usually in the lower right-hand corner, with the clock). This icon provides you with quick access to your SQL Server Service Manager. Make sure that the icon displays a small green triangle: This means that SQL Server is up and running. You can bring up the SQL Server Service Manager console by right-clicking the icon and then check the sta-tus of installed services: MSDTC, SQL Server and SQL Server Agent. You also can stop, start, or pause any of these services from this console. Depending on your installation you may or may not see some additional services, but these three should always be there.
R
EVIEWI described the different editions of SQL Server 2000 and their major
features.
I discussed the hardware and software requirements for SQL Server 2000
installation.
You performed a complete installation of the Microsoft SQL Server 2000
Standard Edition.
Q
UIZY
OURSELF1. What is SQL Server?
2. Can you run more than one instance of SQL Server 2000 on the same
machine?
3. On which operating systems does SQL Server 2000 run?
4. What authentication modes are available for SQL Server 2000?
5. What licensing modes are available for SQL Server 2000?
Session 1—Getting Started 17
P
art I
—
Friday Ev
ening
Session Checklist
✔
Fixing a faulty installation
✔
Running SQL Server Service Manager
✔
Managing configuration tasks
✔
Locating SQL Server files
✔
Adding components
✔
Uninstalling SQL Server
I
f you followed all the steps in Session 1, you should not have any problemswith your installation. If for some reason your SQL Server installation was unsuccessful, however, there is still hope. This session begins by showing you how to fix a faulty installation. If you don’t need to do this, skip to the explana-tions of how to run SQL Server Service Manager, manage configuration tasks, add components, and uninstall SQL Server.
S E S S I O N
Go Configure
Fixing a Faulty Installation
Start by examining the error-log files that SQL Server installation process has cre-ated for sqlstp.log (loccre-ated in the Windows directory) and errorlog (with no exten-sion). It can also be helpful to examine the event log on your machine.
The first file — sqlstp.log — contains detailed information about all the errors (and events) that occurred during setup. Although most of the messages may seem incomprehensible, they can still help you determine the cause of your problem — or help you explain the problem to an experienced database administrator (DBA).
The errorlog file is created during the configuration portion of the setup. At this stage, all program files are already transferred, and setup tries to start SQL Server and connect to it. Any errors that occur during this process are recorded in errorlog (some are also recorded in sqlstp.log).
If you find some clues to what might have happened, you might be able to fix the problem right away; read Books Online or on the Net for more information. Setup problems are usually caused by inadequate administration privileges, soft-ware incompatibility problems, currently running programs, corrupted OS installa-tion, previous SQL Server installations, or hardware problems.
The Web sites listed on the accompanying CD might help you solve the problem. Make sure that you know the error description, error number, your computer configuration, and so forth because it all might be useful.
Running SQL Server Service Manager
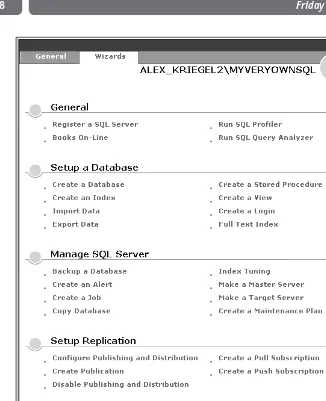
Figure 2-1 shows the top-level options that Microsoft SQL Server Standard Edition
has installed on your computer. Select Start➪Programs➪Microsoft SQL Server to
access these options. In this session, I address the Service Manager option only. You can start SQL Server 2000 as a service (which is its normal operational mode) or from the command line as a standard Windows program. You can also start SQL Server in single-user mode in order to perform advanced administration procedures and troubleshooting.
NT Service is a special type of executable. It gets special treatment from the Windows operating system and is not allowed to have any kind of user interface.
Start the Service Manager from the system tray taskbar or from Start (Start➪
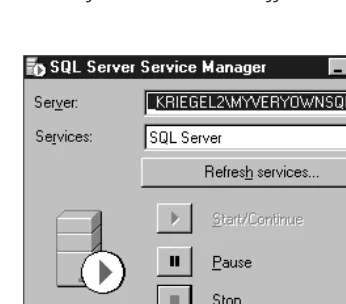
Program Files➪Microsoft SQL Server➪Service Manager). You will see the dialog
box shown in Figure 2-2.
CD-ROM
Friday Evening
Figure 2-1
Microsoft SQL Server 2000 offers these top-level menu options.
Figure 2-2
Microsoft SQL Server 2000 Service Manager.
The Server drop-down list box contains a list of SQL Servers accessible from your machine: If you have sufficient privileges, you can start and stop the services of any of these. The Services drop-down list box contains all the following services pertaining to the SQL Server that you have selected from the Server list:
SQL Server—SQL Server can run in two modes: as a command-line pro-gram or as a service. Normally you use it as a service, resorting to com-mand-line mode only to troubleshoot your server or change some advanced configuration options.
SQL Server Agent—You can use the SQL Server Agent for jobs, alerts, or tasks automation. I cover it in greater detail in Session 24.
Session 2—Go Configure 21
P
art I
—
Friday Ev
ening
Microsoft Distributed Transaction Coordinator (MSDTC)—The Distributed Transaction Coordinator is a transaction manager that allows any client application to work with disparate sources of data within one transaction (the application should not care whether the data it requested is local or somewhere across the network).
You can start, pause, or stop any of these services using either the SQL Server Service Manager utility or the command-line utility. SQL Server Service is usually marked for auto-start when OS starts by default, and if you decide to use the SQL Server Agent, you’ll probably want it to auto-start as well.
Managing Configuration Tasks
Let’s look into the most common configuration tasks that you may need to do. If you selected automatic startup of the SQL Server Service during installation, your service will be up and running after you log on to your machine; if you opted for a manual startup, you need to start up your SQL Server Service before you can pro-ceed. You can do this from the SQL Server Service Manager utility, as I described earlier in this session.
After you install your SQL Server, you will be able to connect to it with the user ID and password that you specified during installation. No matter what interface you use to connect to SQL Server (Query Analyzer, Enterprise Manager, a third-party application), you will be prompted for a user ID and password. Unless you have selected integrated security (wherein your OS login will be your SQL Server login), at this point, you should change your password and ID so that you can remember them. It is good practice to change your login entries after installation.
It is all too common for users to leave the default options for login and password (saand a blank password). Doing so compro-mises the security of your system. Change your login and pass-word as soon as possible.
In the next two sections, I’ll show you how to change the login account infor-mation for Windows NT and Windows 2000, respectively.
Windows NT
Follow these steps to change SQL Server Services login account information for Windows NT:
Note
Friday Evening
1. From the Control Panel, double-click the Services group. The Services dia-log box presents the full list of services running on your machine.
2. Double-click the service for which you want to change account
informa-tion. In the Services dialog box, under Log on as, select This account and enter your information.
You now need to change the user-account information in SQL Server Enterprise Manager (I cover this in Session 3).
Windows 2000
Follow these steps to change SQL Server Services login account information for Windows 2000:
1. Select Start➪Programs/Administrative Tools.
2. Select Services.
3. Right-click the MSSQLServer service.
4. Select Properties.
5. Click the Log On tab and change your password.
You must set up each service individually. You can set distinct IDs and pass-words for each service. These changes take effect after the service is restarted. You must have administrator privileges to change security entries.
I’ll cover issuing SQL Server commands in Sessions 7, 8, and 9.
Locating SQL Server Files
SQL Server 2000 installs many files and alters some Registry settings. Table 2-1 shows files shared for all instances of SQL Server running on your machine.
The dBinn, Data, HTML, and 1033 directories are sacred. Never delete or modify these files; you will need to reinstall SQL Server if you do.
Note Cross-Ref
Session 2—Go Configure 23
P
art I
—
Friday Ev
ening
Table 2-1
Locations of SQL Server 2000 Files
Location Description
\Program Files\Microsoft SQL Server Dynamic-link libraries (DLLs) for
\80\Com Component Object Model (COM) objects.
\Program Files\Microsoft SQL Server Resource files (RLLs) used by the DLLs in
\80\Com\Binn\Resources\1033 this COM directory. (Note: 1033 is for
U.S. English; localized versions use different directory numbers.)
\Program Files\Microsoft SQL Server Tools for use with SQL Server — resource
\80\Tools\Binn executables, command-line utilities, and
so on.
\Program Files\Microsoft SQL Server Resource files used by the executables in
\80\Tools\Binn\Resources\1033 the Tools\Binn directory.
\Program Files\Microsoft SQL Server SQL Server Books Online files.
\80\Tools\Books
Program Files\Microsoft SQL Server Files for use by developers creating SQL
\80\Tools\DevTools\ Server client applications.
Program Files\Microsoft SQL Server HTML files containing the graphical
\80\Tools\Html interface to SQL Server used by Microsoft
Management Console (MMC) and SQL Server. Opening these files in your Web browser is not recommended.
Program Files\Microsoft SQL Server Template files containing SQL scripts for
\80\Tools\Templates creating database objects.
Some of the advanced features of SQL Server will actually require you to look into the Tools\Binn directory. Some executable files in this directory (such as bcp.exe) can be invoked from the command line; others (such as the DTS Wizard executable) have a visual interface. Normally, the path to these utilities is auto-matically added to the environment when you install SQL Server, though some pro-grams you may install on the machine at a later time can change this convention.
Friday Evening
Adding Components
Whenever you need to add a component for SQL Server, you need to rerun the installation. Follow the steps described in Session 1 until you reach the screen pre-sented in Figure1-2; then follow this procedure:
1. Instead of creating a new instance of SQL Server, choose the Upgrading,
Adding, or Removing components option from this screen and click Next.
2. If you want to modify the default instance of SQL Server, click Next.
Otherwise, uncheck the default check box and select the name of the SQL Server you wish to add components to.
The SQL Server installation detects installed components and in the Select Components dialog box presents you with a list of those available for installation. All components are grouped in a hierarchy, and you can select a top level and everything beneath it or select subcomponents individually. When you select an item a brief description appears in the Description box in the Select Components dialog box.
If you need to change your character set sort order or UNICODE collation order, you must rebuild your master database (which I show you how to do in Session 6); all custom databases will be tossed (with all the data), and you will need to rebuild them from scratch. It is not as scary as it sounds, but it requires care-ful planning. You should have a very good reason for even con-sidering it.
Unselecting a component does not remove it from the installation; you have to remove SQL Server completely to do so. Selected components will be added (or reinstalled, if they existed before) after you click Next on the Start Copying Files dialog screen.
Uninstalling SQL Server
If you plan to uninstall SQL Server 2000 you have two options:
Rerun the setup program and select Uninstall.
Select the Add/Remove Programs utility from the Control Panel.
Note
Session 2—Go Configure 25
P
art I
—
Friday Ev
ening
To uninstall SQL Server Installation from the setup program (the first option) follow these steps:
1. Start SQL Server Installation (from CD-ROM or the network).
2. Select SQL Server 2000 components and then select Install Database
Server.
3. Select the name of the computer (local or remote).
4. Select Upgrade, Remove, or Add Components.
5. Select the instance name from the presented dialog box. Leave the
default selected if you want to uninstall the default instance of SQL Server.
6. Select Uninstall your existing installation.
7. Click Finish on the final dialog box to complete the uninstallation.
Quit all applications before uninstalling SQL Server, as some of them may interfere with the process. Removing SQL Server from the standard Control Panel option is no different from removing any other program. To remove SQL Server from the Control Panel, double-click the Add/Remove Programs icon and select the instance you wish to remove. Each named instance must be removed separately.
When SQL Server 2000 is uninstalled, some files may remain on your computer. You may have to manually delete remaining directories and files whose physical locations are specified in Table 2-1.
R
EVIEWExamining error-log files is the first step in fixing a faulty installation.
SQL Server, SQL Server Agent, and MSDTC are the three essential SQL Server
2000 services.
It’s good practice to change login entries after installation.
You must rerun your installation before adding components.
Note
Friday Evening
Q
UIZY
OURSELF1. Where do you look for clues if an installation fails?
2. How do you reinstall a SQL Server component?
3. What are two options for uninstalling SQL Server 2000?
4. Why do you need to change your login properties?
5. What is a service?
6. What services are accessible from the SQL Server Service Manager?
Session 2—Go Configure 27
P
art I
—
Friday Ev
ening
Session Checklist
✔
Starting up Enterprise Manager
✔
Creating server groups and registering servers
✔
Inspecting SQL Server nodes
✔
Considering your options
✔
Accessing SQL Server Books Online
I
n this session, you learn about Enterprise Management console — what it isand how to find your way around it. You go through the complete process of registering SQL Server and organizing your SQL Servers into groups. I also explain SQL Server 2000 nodes and their use, as well as the most useful options on the SQL Server toolbar and menus.
Starting the Enterprise Manager
Fire up the SQL Server Enterprise Manager (Start➪Programs➪Microsoft SQL
Server➪Enterprise Manager). For the time being, it is your main means of