Cover LOC
Chapter 1 -- Introduction to Windows XP Professional Lesson 1: Exploring New Features and Improvements Lesson 2: Troubleshooting Using Help and Support Center Lesson 3: Understanding Workgroups and Domains
Lesson 4: Logging On and Off Windows XP Professional Chapter 2 -- Installing Windows XP Professional
Lesson 1: Getting Started
Lesson 2: Installing Windows XP Professional from a CD-ROM Lesson 3: Installing Windows XP Professional over the Network
Lesson 4: Upgrading Earlier Versions of Windows to Windows XP Professional Lesson 5: Troubleshooting Windows XP Professional Setup
Chapter 3 -- Setting Up and Managing User Accounts Lesson 1: Understanding User Accounts
Lesson 2: Planning New User Accounts
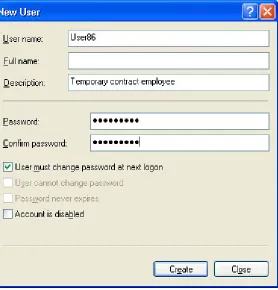
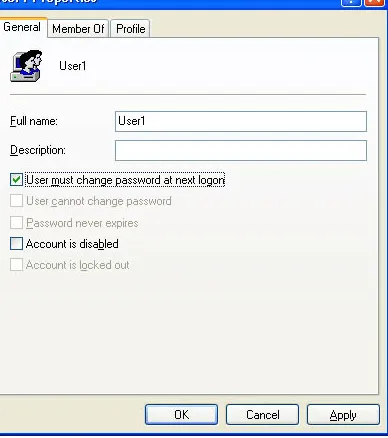
Lesson 3: Creating, Modifying, and Deleting User Accounts Lesson 4: Setting Properties for User Accounts
Lesson 5: Implementing Groups
Chapter 4 -- Installing, Configuring, and Troubleshooting Network Protocols Lesson 1: Understanding the TCP/IP Protocol Suite
Lesson 2: Configuring and Troubleshooting TCP/IP
Lesson 3: Installing, Configuring, and Troubleshooting NWLink Lesson 4: Network Bindings
Chapter 5 -- Using the DNS Service and Active Directory Service Lesson 1: Understanding DNS
Lesson 4: Understanding Active Directory
Lesson 5: Understanding Active Directory Structure and Replication Lesson 6: Understanding Active Directory Concepts
Chapter 6 -- Setting Up, Configuring, and Troubleshooting Common Setup and Configuration Problems for Network Printers
Lesson 1: Introduction to Windows XP Professional Printing Lesson 2: Setting Up Network Printers
Lesson 3: Connecting to Network Printers Lesson 4: Configuring Network Printers
Lesson 5: Troubleshooting Setup and Configuration Problems
Chapter 7 -- Administering and Troubleshooting Common Administrative Problems for Network Printers
Lesson 1: Understanding Printer Administration Lesson 2: Managing Printers
Lesson 3: Managing Documents
Lesson 4: Administering Printers Using a Web Browser Lesson 5: Troubleshooting Common Printing Problems Chapter 8 -- Securing Resources with NTFS Permissions
Lesson 1: Understanding and Applying NTFS Permissions Lesson 2: Assigning NTFS Permissions and Special Permissions Lesson 3: Solving Permissions Problems
Chapter 9 -- Administering Shared Folders Lesson 1: Understanding Shared Folders
Lesson 2: Planning, Sharing, and Connecting to Shared Folders
Lesson 3: Combining Shared Folder Permissions and NTFS Permissions Chapter 10 -- Configuring Windows XP Professional
Lesson 1: Configuring and Troubleshooting the Display Lesson 2: Configuring Power Management
Lesson 3: Configuring Operating System Settings
Lesson 5: Managing Windows Components
Chapter 11 -- Installing, Managing, and Troubleshooting Hardware Devices and Drivers Lesson 1: Understanding Automatic and Manual Hardware Installation
Lesson 2: Configuring and Troubleshooting Hardware Devices Lesson 3: Viewing and Configuring Hardware Profiles
Lesson 4: Configuring, Monitoring, and Troubleshooting Driver Signing Lesson 5: Configuring Computers with Multiple Processors
Chapter 12 -- Auditing Resources and Events Lesson 1: Planning an Audit Policy
Lesson 2: Implementing an Audit Policy Lesson 3: Using Event Viewer
Chapter 13 -- Configuring Security Settings and Internet Options Lesson 1: Configuring Account Policies
Lesson 2: Configuring User Rights Lesson 3: Configuring Security Options
Lesson 4: Configuring Internet Explorer Security Options Chapter 14 -- Managing Data Storage
Lesson 1: Managing Compression Lesson 2: Managing Disk Quotas
Lesson 3: Increasing Security with EFS
Lesson 4: Using Disk Defragmenter, Check Disk, and Disk Cleanup
Chapter 15 -- Monitoring, Managing, and Maintaining Network Resources Lesson 1: Monitoring Access to Shared Folders
Lesson 2: Creating and Sharing Local and Remote Folders Lesson 3: Monitoring Network Users
Lesson 4: Using Offline Folders and Files Lesson 5: Using Scheduled Tasks
Lesson 6: Using Task Manager
Chapter 16 -- Backing Up and Restoring Data Lesson 1: Using the Backup Utility
Lesson 2: Backing Up Data Lesson 3: Restoring Data
Lesson 4: Using the Automated System Recovery Wizard Chapter 17 -- Configuring Network and Internet Connections
Lesson 1: Configuring Inbound Connections Lesson 2: Configuring Outbound Connections
Lesson 3: Enabling and Configuring Home and Small Business Components Chapter 18 -- Modifying and Troubleshooting the Boot Process
Lesson 1: Understanding the Boot Process Lesson 2: Editing the Registry
Lesson 3: Using Startup and Recovery Tools
Chapter 19 -- Deploying Windows XP Professional
Lesson 1: Automating Installations Using Windows Setup Manager Lesson 2: Using Disk Duplication to Deploy Windows XP Professional Lesson 3: Performing Remote Installations
Lesson 4: Using Tools to Simplify Deployment Appendix A -- Questions and Answers
[Previous] [Next] PUBLISHED BY Microsoft Press
A Division of Microsoft Corporation One Microsoft Way
Redmond, Washington 98052-6399
Copyright © 2002 by Microsoft Corporation
All rights reserved. No part of the contents of this book may be reproduced or transmitted in any form or by any means without the written permission of the publisher.
Library of Congress Cataloging-in-Publication Data pending. Printed and bound in the United States of America.
1 2 3 4 5 6 7 8 9 QWT 6 5 4 3 2
Distributed in Canada by Penguin Books Canada Limited.
A CIP catalogue record for this book is available from the British Library.
Microsoft Press books are available through booksellers and distributors worldwide. For further information about international editions, contact your local Microsoft Corporation office or contact Microsoft Press International directly at fax (425) 706-7329. Visit our Web site at
www.microsoft.com/mspress. Send comments to tkinput@microsoft.com.
Active Directory, BackOffice, FrontPage, HotMail, Intellimirror, Microsoft, Microsoft Press, MS-DOS, MSN, Outlook, Win32, Windows, and Windows NT are either registered trademarks or trademarks of Microsoft Corporation in the United States and/or other countries. Other product and company names mentioned herein may be the trademarks of their respective owners.
The example companies, organizations, products, domain names, e-mail addresses, logos, people, places, and events depicted herein are fictitious. No association with any real company, organiza-tion, product, domain name, e-mail address, logo, person, place, or event is intended or should be inferred.
Project Editor: Karen Szall Author: Rick Wallace
[Home] [Previous][Next]
Chapter 1
Introduction to Windows XP Professional
About This Chapter
This book is written to prepare you to install, configure, and support Windows XP Professional. This chapter introduces you to some of the areas in which Microsoft has improved Microsoft Windows XP Professional over earlier versions of Microsoft Windows. It also describes the features available in Windows XP Professional Help and Support Center, introduces the concepts of workgroups and domains, and explains how to log on and off Windows XP Professional.
Before You Begin
[Home] [Previous][Next]
Lesson 1: Exploring New Features and
Improvements
This lesson introduces a number of the features and enhancements incorporated into Windows XP Professional since the release of Microsoft Windows 2000.
After this lesson, you will be able to
● Identify the key new features of Windows XP Professional Estimated lesson time: 45 minutes
Automatic Updates
Windows XP Professional includes an Automatic Updates (AU) feature. AU is a proactive service that allows users with administrative privileges to automatically download and install critical operating system updates, such as security fixes and patches. Because the installation might require you to restart your computer, you are notified before the installation takes place and given the opportunity to postpone the download operation. Updates are downloaded in the background so that you can continue to work during downloading.
AU uses the Windows Update control to scan the system and decide which updates apply to a particular computer. AU uses its innovative bandwidth-throttling technology for downloads. Bandwidth throttling uses only idle bandwidth so that downloads do not interfere with or slow down other network activity, such as Internet browsing. Only one administrative user at a time can run the AU client.
For more information about the Automatic Updates feature, see Chapter 10, "Configuring Windows XP Professional."
Copying Files and Folders to a CD
disc (CD) without using third-party software. Because CD-recordable R) and CD-rewritable (CD-RW) drives are now inexpensive options on computers, this feature enhances the standard conveniences that Windows offers to users.
Users can select a folder of images from a digital camera, drag it to the CD-R icon, and then create a CD. They can also transfer files more easily to a CD instead of copying them to a smaller capacity floppy disk.
This feature also provides options for original equipment manufacturers (OEMs) and independent software vendors (ISVs). OEMs can create branded applications that generate emergency boot CDs instead of emergency boot floppy disks, and ISVs can offer a "burn to CD" option on their Windows versions.
To copy files or folders to a CD follow these steps: 1. Insert a blank, writable CD into the CD recorder.
You must have a blank, writable CD and a CD-ROM drive that has the capability of writing CDs to use this feature.
2. Click Start, right-click My Computer and select the files and folders you want to write to the CD. 3. Under File And Folder Tasks, click Copy This File, Copy This Folder, or Copy The Selected
Items.
4. In the Copy Items dialog box, click the CD recording drive and then click Copy.
5. In My Computer, click the CD recording drive and then under CD Writing Tasks, click Write These Files To The CD.
Standard CDs hold 650 MB of information. High-density CDs hold at least 700 MB of information. You must have enough space on your hard drive to temporarily hold the files you want to copy to the CD or the operation will fail.
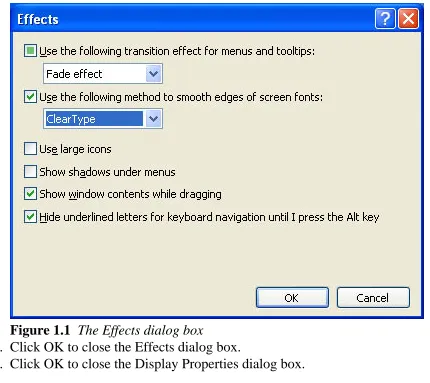
ClearType Support
Windows XP Professional supports ClearType, a new text display technology. ClearType triples the horizontal resolution available for rendering text through software, which provides a clearer text display on a liquid crystal display (LCD) screen with digital interface.
To specify ClearType follow these steps: 1. Click Start and then click Control Panel.
3. In the Appearance And Themes dialog box, click Appearance. 4. In the Appearance tab, click Effects.
[image:11.612.40.470.104.487.2]5. Select the Use The Following Method To Smooth Edges Of Screen Fonts check box, and then select ClearType from the drop-down list (see Figure 1.1).
Figure 1.1 The Effects dialog box
6. Click OK to close the Effects dialog box.
7. Click OK to close the Display Properties dialog box.
Compressed Folders
The Compressed Folders feature provides the ability to create ZIP folders and view their contents.
Compressed folders allow you to compress large files so that you can store more files on a floppy disk or hard drive.
To create a compressed folder follow these steps:
1. Click Start, right-click My Computer, and then click Explore. 2. On the File menu, click New, and then click Compressed Folder.
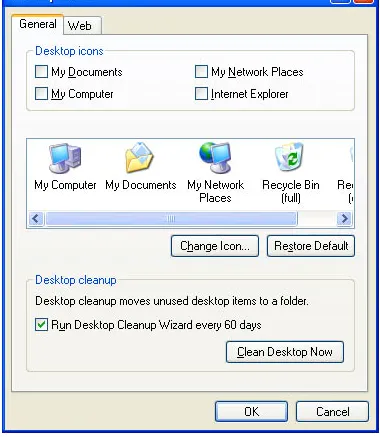
Desktop Cleanup Wizard
The Desktop Cleanup Wizard helps keep your desktop uncluttered by periodically checking for unused shortcuts and removing them without harming the installed program. By default, the Desktop Cleanup Wizard checks for unused shortcuts every 60 days and offers to move them to a folder on the desktop called Unused Desktop Shortcuts.
To run the Desktop Cleanup Wizard follow these steps: 1. Click Start, and then click Control Panel.
2. Click Appearance And Themes, and then click Display. 3. Click Desktop and then click Customize Desktop.
Figure 1.2 The Desktop Items dialog box
4. Under Desktop Cleanup, click Clean Desktop Now to run the Desktop Cleanup Wizard now.
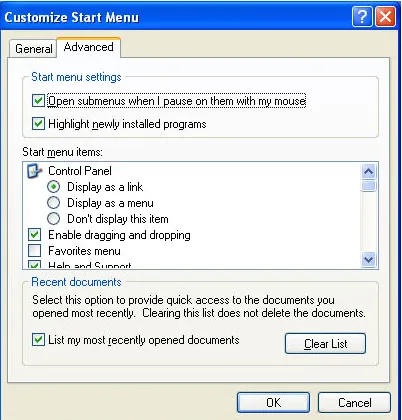
Start Menu
The Start menu has been redesigned for easier access to important and frequently used tasks. In addition to prominent Internet and e-mail links, the new Start menu lists the programs that you use most
frequently. Windows XP Professional continually updates this list based on your usage of programs. It adds programs that you are using and removes programs from the list that you have not been using. Windows XP Professional does not remove the programs from your computer, just from this list. The Start menu also lists important user folders such as My Documents, My Pictures, and My Music. To customize the Start menu follow these steps:
2. Click the Start Menu tab.
The Start Menu tab lets you choose between the Windows XP Professional Start menu and the Classic Start menu used in earlier versions of Windows.
3. Click Customize.
The Customize Start Menu dialog box has two tabs: General and Advanced.
The General tab allows you to select an icon size for programs, configure the amount of
frequently used programs you want displayed on the Start menu, and select the Internet and e-mail items shown on the Start menu.
[image:14.612.52.454.308.728.2]The Advanced tab, shown in Figure 1.3, allows you to configure Start menu settings, items, and recent documents.
Fax Support
Windows XP Professional provides fax support that enables you to send faxes over a network from a computer with an attached fax modem or fax board or with a local area network (LAN) connection. You can print to fax from any application, send cover fax pages, and track and monitor faxes. New wizards enable simpler configuration of this feature and fax sending.
IT administrators can use the Component Object Model (COM) application programming interface (API) to control fax capabilities and the Microsoft Management Console (MMC) to set up the fax service
within their infrastructure. Developers can use COM to send faxes programmatically. In addition, they can use the fax APIs to write applications to automatically send faxes.
To send or manage faxes follow these steps:
1. Click Start, point to All Programs, and point to Accessories. 2. Point to Communications and point to Fax.
For more information about fax support, see Chapter 11, "Installing, Managing, and Troubleshooting Hardware Devices and Drivers."
Fast User Switching for Multiple Users of a
Computer
The Fast User Switching feature allows multiple users to simultaneously share a computer without closing all of their applications first. For example, if you are creating a Microsoft Word document and leave your computer for a short time, Fast User Switching permits another person to use your computer to access another computer account-perhaps to find a customer's account balance-while leaving your Word session open. All of this is done without either of you logging off the computer.
For more information about Fast User Switching, see Chapter 3, "Setting Up and Managing User Accounts."
Locale Support Additions and Regional Options
Enhancements
feature adds support for the following locales: Galician, Gujarati, Kannada, Kyrgyz, Mongolian
(Cyrillic), Punjabi, Divehi, Syriac, and Telugu. The feature also includes enhancements to the Regional and Language Options control panel.
For more information about Locale Support and the Regional and Language Options enhancements, see Chapter 10, "Configuring Windows XP Professional."
Auto-Configuration for Multiple Network
Connectivity
The Auto-Configuration for Multiple Network Connectivity feature provides easy access to network devices and the Internet. It also allows a mobile computer user to seamlessly operate both office and home networks without manually reconfiguring Transmission Control Protocol/Internet Protocol (TCP/IP) settings.
You can use this feature to specify an alternate configuration for TCP/IP if a Dynamic Host Configuration Protocol (DHCP) server is not found. The alternate configuration is useful when a
computer is used on multiple networks, one of which does not have a DHCP server and does not use an automatic private Internet Protocol (IP) addressing configuration.
For more information on specifying an alternate configuration for TCP/IP for multiple network connectivity, see Chapter 4, "Installing, Configuring, and Troubleshooting Network Protocols."
Microsoft Internet Explorer 6.0
Microsoft Internet Explorer 6.0 provides visual refresh and enhanced support for Document Object
Model (DOM) Level 1 and Cascading Style Sheets (CSS) Level 1. Internet Explorer 6.0 also provides the following features:
● Media acquisition enhancements, which include a shortcut menu to make saving images more discoverable and support for My Videos and My Music folders as defaults for those media types.
● Native support for Macromedia Flash and Macromedia Shockwave Player files.
● Automatic Image Resize, which allows you to automatically resize an image to fit entirely within the current browser frame. This feature works only when you have directly navigated to an image; it does not resize images embedded within Hypertext Markup Language (HTML) pages.
For more information about configuring Internet Explorer, see Chapter 13, "Configuring Security Settings and Internet Options."
Instant Messaging
Instant Messaging allows users to quickly communicate with one another over the Internet. Internet Explorer 6.0 includes the ability to show MSN Messenger, Outlook Express, and Outlook contacts in a side panel. The Windows Messenger in Windows XP Professional offers multimedia audio, video, and data real-time communication over the Internet. All you need is a .NET passport, which you can create using your Microsoft Hotmail account or using MSN Messenger, and a dial-in connection to the Internet. If you want real-time audio and video, you will need a microphone and a Web cam.
To access Instant Messaging follow these steps:
1. Click Start, point to All Programs, and then click Internet Explorer.
2. Click Online Buddies, and double-click the contact name for the person you want to talk to.
If you are using a Web cam, you will have to click Start for the camera and both you and your friend will need to be using Windows Messenger and have audio/video enabled on your computers.
Internet Connection Firewall (ICF)
Microsoft designed the Internet Connection Firewall (ICF) for use in the home and by small businesses. It provides protection on computers directly connected to the Internet. It is available for LAN or dial-up networking, virtual private networking (VPN), and Point-to-Point Protocol over Ethernet (PPPoE) connections. It also prevents scanning of ports and resources (file and printer shares) from external resources.
For more information about Internet Connection Firewall, see Chapter 17, "Configuring Network and Internet Connections."
Terminal Services: Remote Desktop and Remote
Desktop Connection
Windows XP Professional includes two Terminal Services features: Remote Desktop and Remote
● The full set of installed applications, work in progress, and all connectivity usually found on a workstation or server
● Sessions on a computer running Windows 2000 Server products that can be used for computer administration or server-based computing
In addition, Remote Desktop enables Remote Console access, allowing the primary screen output to be redirected to a Terminal Server client.
The Remote Desktop Connection feature is the end-user tool for establishing connections to computers running Terminal Services. Corporate employees who work at home, using a line-of-business application that is hosted on a Terminal Server, can use the Remote Access Service (RAS) to dial in and the Remote Desktop Connection to use the application. Remote Desktop Connection has many features that allow optimization for almost any network speed.
To access the Remote Desktop Connection follow these steps: 1. Click Start, and then point to All Programs.
Figure 1.4 The Remote Desktop Connection dialog box
WebDAV Redirector
The Web Distributed Authoring and Versioning (WebDAV) redirector is a new mini-redirector that supports the WebDAV protocol for remote document sharing over Hypertext Transfer Protocol (HTTP). The WebDAV redirector supports the use of existing applications and allows file sharing across the Internet (through firewalls and routers) to HTTP servers. For example, the WebDAV redirector allows users at different locations to share and collaborate on a file. A user can also use WebDAV redirectors to publish Web data, or make use of Internet repositories for storing data or sharing information with family and friends.
1. Click Start, and then click My Computer. Click My Network Places. 2. Under Network Tasks, click Add A Network Place.
Windows XP Professional starts the Add Network Place Wizard. 3. Click Next in the Welcome screen.
The Add Network Place Wizard displays the Where Do You Want To Create This Network Place dialog box (see Figure 1.5).
4. Follow the instructions for adding a shortcut to a Web site that supports Web folders (WebDAV). The Web server must support Web folders (the WebDAV protocol) and Microsoft Internet Information Services (IIS) or the Web Extender Client (WEC) protocol and FrontPage extensions.
Web Publishing
The Web Publishing feature enables users to publish files to a Web-hosting service. This feature uses the .NET Passport Wizard to sign up for passports so a user does not need to enter a password at the Web site.
To publish files, click Start, click My Documents, and select the files you want to publish. Under File And Folder Tasks, click Publish This File To The Web. In the Web Publishing Wizard page, click Next. In the Destination Web Site page, select a destination location for your files, and then follow the wizard prompts to complete publishing the files.
Welcome Screen
The Welcome screen provides the ability to set up multiple user accounts on one computer. You create these accounts during Setup or from the Control Panel. The separate accounts establish profiles that separate each user's data. By default, the accounts are not password protected, but users can set passwords on their specific accounts if they want.
For more information about configuring the Welcome screen, see Chapter 3, "Setting Up and Managing User Accounts."
Lesson Review
The following questions will help you determine whether you have learned enough to move on to the next lesson. If you have difficulty answering these questions, review the material in this lesson before beginning the next lesson. The answers are in Appendix A, "Questions and Answers."
1. Which of the following statements about Automatic Updates (AU) are correct? (Choose all that apply.)
a. AU is a proactive service that runs in the background and automatically detects, downloads, and installs Windows updates on a computer.
b. AU allows multiple administrative users to run the AU client concurrently.
d. AU uses only idle bandwidth so that downloads do not interrupt or slow down other network activity.
2. What is ClearType support?
3. The Desktop Cleanup Wizard helps you keep your desktop free of ________________ that you don't use regularly. By default, it runs every _______ days.
4. What does the Fast User Switching for Multiple Users of a Computer feature provide on computers running Windows XP Professional?
5. Internet Explorer version _________________ comes included with Windows XP Professional.
Lesson Summary
● AU is a proactive service that allows users with administrative privileges to automatically download and install Windows updates, such as security fixes and patches, on a computer.
● The CD Burning feature enables users to save information to a CD as easily as to a floppy or hard disk.
● Windows XP Professional supports ClearType, a new text display technology that triples the horizontal resolution available for rendering text through software. This feature provides a clearer text display on an LCD screen with digital interface.
● The Compressed Folders feature allows you to drag and drop files and folders into a compressed folder to compress large files. This enables you to store more files on a floppy or hard drive and to easily send large files as an attachment in e-mail.
● Windows XP Professional fax support enables users to send faxes using their network.
● Fast User Switching allows multiple users to share a computer without forcing each user to close all running applications and log off before another user can log on to the computer.
● Instant Messaging allows users to quickly communicate with one another using multimedia audio, video, and data real-time communication over the Internet.
● Internet Connection Firewall (ICF) protects computers in the home and small businesses environment.
[Home][Previous][Next]
Lesson 2: Troubleshooting Using Help and Support Center
Microsoft has greatly enhanced and improved the Help and Support Center in Windows XP Professional. This lesson acquaints you with the features available in Help and Support Center.
After this lesson you will be able to
● Identify the features in and use the Windows XP Professional Help and Support Center
Estimated lesson time: 15 minutes
Assisted Support
Windows XP Professional now includes two Assisted Support services-Microsoft Incident Submission and Management and Windows Newsgroups-which help users resolve computer support issues.
Microsoft Incident Submission and Management
The Microsoft Incident Submission and Management feature allows you to submit electronic support incidents to Microsoft, collaborate with support engineers, and manage submitted incidents. For example, if you are having problems installing drivers for new hardware on your computer, you can launch Help and Support to submit an electronic incident report to Microsoft.
To access Help and Support follow these steps:
1. Click Start.
2. Click Help And Support.
Figure 1.6 Help And Support Center window
Windows Newsgroups
Windows Newsgroups provide valuable information to help you resolve computer support issues in a free, online setting. You can use the connectionless message boards and the real-time chat rooms to get answers quickly without submitting incident reports to a Microsoft or OEM support organization. The goal of this feature is to promote Windows and MSN Community offerings in Windows XP Professional Help and Support, as well as to encourage users to add or extend this service in their own communities.
To access the Windows Newsgroups follow these steps:
1. Click Start, and then click Help And Support.
2. In the Help And Support Center window, under Get Assistance, click Get Support Or Find Information In Windows XP Newsgroups.
Compatible Hardware and Software
The Compatible Hardware and Software feature provides up-to-date, comprehensive, user-friendly hardware and software compatibility information to aid users in upgrading equipment, making purchasing decisions, and troubleshooting problems. For example, if you purchase an application that requires a 3-D accelerator card, you might not know which cards are compatible with your computer. You can use Help and Support to run a comprehensive query and find compatible 3-D accelerator cards. You can run queries based on manufacturer, product type, software, or hardware. The Microsoft compatibility teams use data from user interactions, independent hardware vendors (IHVs), and ISVs to improve their products.
1. Click Start, and then click Help And Support.
2. In the Help And Support Center window, under Pick A Task, click Find Compatible Hardware And Software For Windows XP.
Device Driver Referral Site
The Device Driver Referral Site helps you install device drivers that are not included with Windows XP Professional or on a disk with the device. When such a device is connected, Windows XP Professional starts Help and Support Center and asks the user to send device information to Microsoft. After uploading the information, Help and Support Center offers additional information, including the following:
● A search for compatible devices, which can include product status, downloadable updates, and drivers available at third-party Web sites
● A list of compatible devices
● Knowledge Base articles related to the device in question
The Microsoft Knowledge Base is a comprehensive database containing detailed articles with technical information about Microsoft products, fix lists, documentation errors, and answers to commonly asked technical support questions. To access Knowledge Base, connect to the following address: http://www.microsoft.com/mspress/support/search.asp
● Additional Help topics related to finding and installing devices
● A method to submit and manage incidents escalated to Microsoft Product Support Services
Full-Text Search
The Windows Help system uses HTML to format and display information. If you have an Internet connection, you can search for every occurrence of a word or phrase across all Windows compiled HTML Help files. Because the Windows Help System is also extensible, multiple search engines can plug into the Help and Support Center application using a set of standard interfaces. Users can search for content across multiple remote and online providers. For example, you can search for information resident on your computer or located remotely in the Microsoft Knowledge Base or in a participating OEM's knowledge base.
To access Full Text Search follow these steps:
1. Click Start, and then click Help And Support.
Figure 1.7 Help And Support Center Set Search Options window
My Computer Information
My Computer Information provides an easily understood, highly accessible view of personalized software and hardware information about your computer or another computer for which you have administrative permissions.
To access My Computer Information follow these steps:
1. Click Start, and then click Help And Support.
2. In the Help And Support Center window, under Pick A Task, click Use Tools To View Your Computer Information And Diagnose Problems. 3. Under Tools, click My Computer Information.
You can view information in five categories, as described in the following sections.
View General System Information about This Computer
The My Computer Information - General category allows you to view information about your computer such as the computer manufacturer, model, basic input/output system (BIOS) version, processor version and speed, operating system, amount of memory, and amount of available disk space.
View the Status of My System Hardware and Software
The My Computer Information - Status category allows you to examine diagnostic information about your computer, including the following:
● Obsolete applications and device drivers
● System software
● Hardware: video card, network card, sound card, and universal serial bus (USB) controller
● Hard disks
● Random access memory (RAM)
Find Information about the Hardware Installed on This Computer
The Computer Information - Hardware category allows you to examine descriptive information about your computer's hardware including the local disk, display, video card, modem, sound card, USB controller, network cards, CD-ROM drives, floppy drives, memory, and printers.
View a List of Microsoft Software Installed on This Computer
The Software category allows you to view a list of Microsoft products that are installed and registered by a product identification (PID) number on your computer, including products that run automatically from Startup. It also shows you Windows Watson Crash Information about any software that crashed while running on your computer.
View Advanced System Information
Advanced System Information allows you to choose from the following options:
Figure 1.8 The System Information window
● View Running Services.
● View Group Policy Settings Applied.
● View The Error Log.
● View Information For Another Computer. If you have administrative permissions on a remote computer, you can view My Computer Information on that remote computer. If you click View Computer Information On Another Computer, the Web Page dialog box appears prompting you to enter the name of the remote computer you want to view. Enter the remote computer name and then click Open to view the remote computer information.
Multiple Instances
You can open two sessions of the Help and Support Center application at the same time. Running concurrent sessions enables you to submit incident reports while looking at Help or System Information.
Printing
Figure 1.9 The Help And Support Center Print option
Remote Assistance
The Remote Assistance feature allows you to remotely view and control a computer for any support task. It also enables chat and file transfers. If you have a computer problem, you can invite another person (a remote assistant) to help you over the Internet. The remote assistant can accept your invitation, chat with you about the problem, and view your desktop. The remote assistant can also transfer any files required to fix the problem. With your permission, the remote assistant can also get full control of your computer to perform any complex steps needed to fix the problem.
For more information about the Remote Assistance feature, see Chapter 10, "Configuring Windows XP Professional."
Lesson Review
The following questions will help you determine whether you have learned enough to move on to the next lesson. If you have difficulty answering these questions, review the material in this lesson before beginning the next lesson. The answers for these questions are in Appendix A, "Questions and Answers."
1. How can Windows XP Professional help you in making a recommendation about how to upgrade the equipment in your office?
your computer, how can you use Help and Support Center to find this information?
3. If you have administrative responsibility for your company's workgroup and have administrative control over all computers in the workgroup, how can you easily determine the model and driver for each network adapter in the workgroup?
Lesson Summary
● Assisted Support allows you to submit electronic support incidents to Microsoft, collaborate with support engineers, and manage submitted incidents.
● Windows Newsgroups are valuable facilities available to you to get information and resolve computer-related support issues in a free, online setting.
● The Compatible Hardware and Software feature provides up-to-date, comprehensive, user-friendly hardware and software compatibility information to aid users in upgrading, making purchasing decisions, and troubleshooting support issues.
[Home][Previous][Next]
Lesson 3: Understanding Workgroups
and Domains
Windows XP Professional supports two secure network environments in which users are able to share common resources, regardless of network size: workgroups and domains.
After this lesson, you will be able to
● Identify the key characteristics of workgroups and domains and explain how they work
Estimated lesson time: 15 minutes
Workgroups
A Windows XP Professional workgroup is a logical grouping of networked computers that share resources, such as files and printers. A workgroup is also called a peer-to-peer network because all computers in the workgroup can share resources as equals (peers) without a dedicated server.
Figure 1.10 An example of a Windows XP Professional workgroup
A workgroup can contain computers running one of the Microsoft Windows NT and Windows 2000 Server products as long as the server is not configured as a domain controller. (Domain controllers are explained later in this lesson.) In a workgroup, a computer running Windows NT or Windows 2000 Server is called a stand-alone server.
Because workgroups have decentralized administration and security, the following are true:
● A user must have a user account on each computer to which he or she wants to gain access.
● Any changes to user accounts, such as changing a user's password or adding a new user account,
must be made on each computer in the workgroup. If you forget to add a new user account to one of the computers in your workgroup, the new user will not be able to log on to that computer and will be unable to access resources on it.
A workgroup provides the following advantages:
● It does not require inclusion of a domain controller in the configuration to hold centralized security
information.
● It is simple to design and implement. It does not require the extensive planning and administration
● It is a convenient networking environment for a limited number of computers in close proximity.
However, a workgroup becomes impractical in environments with more than 10 computers.
Domains
A domain is a logical grouping of network computers that share a central directory database (see Figure 1.11). A directory database contains user accounts and security information for the domain. This database is known as the directory and is the database portion of Active Directory service, the Windows 2000 directory service.
Figure 1.11 A Windows 2000 domain
In a domain, the directory resides on computers that are configured as domain controllers. A domain
controller is a server that manages all security-related aspects of user and domain interactions,
centralizing security and administration.
domain controller. If all computers on the network are running Windows XP Professional, the only type of network available is a workgroup.
A domain does not refer to a single location or specific type of network configuration. The computers in a domain can share physical proximity on a small LAN, or they can be located in different corners of the world. They can communicate over any number of physical connections, including dial-up lines,
Integrated Services Digital Network (ISDN) lines, fiber lines, Ethernet lines, token ring connections, frame relay connections, satellite connections, and leased lines.
The benefits of a domain include the following:
● Centralized administration, because all user information is stored centrally.
● A single logon process for users to gain access to network resources (such as file, print, and
application resources) for which they have permissions. In other words, you can log on to one computer and use resources on another computer in the network as long as you have appropriate permissions to access the resource.
● Scalability, so that you can create very large networks.
A typical Windows 2000 domain includes the following types of computers:
● Domain controllers running Windows 2000 Server. Each domain controller stores and
maintains a copy of the directory. In a domain, you create a user account once, which Windows 2000 records in the directory. When a user logs on to a computer in the domain, a domain
controller authenticates the user by checking the directory for the user name, password, and logon restrictions. When there are multiple domain controllers in a domain, they periodically replicate their directory information.
● Member servers running Windows 2000 Server. A member server is a server that is not
configured as a domain controller. A member server does not store directory information and cannot authenticate users. Member servers provide shared resources such as shared folders or printers.
● Client computers running Windows XP Professional, Windows 2000 Professional, or one of
the other Microsoft Windows client operating systems. Client computers run a user's desktop
environment and allow the user to gain access to resources in the domain.
Lesson Review
lesson. If you have difficulty answering these questions, review the material in this lesson before
beginning the next lesson. The answers for these questions are in Appendix A, "Questions and Answers."
1. Which of the following statements about a Windows XP Professional workgroup are correct? (Choose all that apply.)
a. A workgroup is also called a peer-to-peer network.
b. A workgroup is a logical grouping of network computers that share a central directory database.
c. A workgroup becomes impractical in environments with more than 100 computers.
d. A workgroup can contain computers running Microsoft Windows 2000 Server as long as the server is not configured as a domain controller.
2. What is a domain controller?
3. A directory database contains user accounts and security information for the domain and is known as the __________________. This directory database is the database portion of
______________________________, which is the Windows 2000 directory service.
4. A ____________ provides a single logon for users to gain access to network resources that they have permissions to access, such as file, print, and application resources.
Lesson Summary
● A Windows XP Professional workgroup is a logical grouping of networked computers that share
resources such as files and printers.
● A workgroup is referred to as a peer-to-peer network because all computers in the workgroup can
share resources as equals (peers) without a dedicated server.
● Each computer in the workgroup maintains a local security database, which is a list of user
accounts and resource security information for the computer on which it resides.
● A domain is a logical grouping of network computers that share a central directory database
containing user accounts and security information for the domain.
● This central directory database is known as the directory and is the database portion of Active
Directory service, which is the Windows 2000 directory service.
● The computers in a domain can share physical proximity on a small LAN or can be distributed
worldwide, communicating over any number of physical connections.
● A computer running Windows 2000 Server can be designated as a domain controller. If all
[Home] [Previous][Next]
Lesson 4: Logging On and Off Windows
XP Professional
This lesson explains the Welcome screen and the Enter Password dialog box, the two options that you use to log on to Windows XP Professional. It also explains how Windows XP Professional authenticates a user during the logon process. This mandatory authentication process ensures that only valid users can gain access to resources and data on a computer or the network.
After this lesson, you will be able to
● Explain how to use the Welcome screen to log on to Windows XP Professional
● Explain how to configure Windows XP Professional to use the Log On To Windows dialog box
● Identify the features of the Log On To Windows dialog box
● Identify how Windows XP Professional authenticates a user when the user logs on to a local computer or to a domain
● Explain how to log off or turn off a computer that is running Windows XP Professional
● Identify the features of the Windows Security dialog box Estimated lesson time: 20 minutes
Logging On Locally to the Computer
Windows XP Professional offers two options for logging on locally: the Welcome screen and the Log On To Windows dialog box.
The Welcome Screen
other user accounts have been created. To use Ctrl+Alt+Delete, you must enter the sequence twice to get the logon prompt.
For more information about creating user accounts during installation, see Chapter 2, "Installing Windows XP Professional." For more information about creating user accounts after installation, see Chapter 3, "Setting Up and Managing User Accounts."
A user can log on locally to either of the following:
● A computer that is a member of a workgroup
● A computer that is a member of a domain but is not a domain controller
Because domain controllers do not maintain a local security database, local user accounts are not available on domain controllers. Therefore, a user cannot log on locally to a domain controller.
The User Accounts program in the Control Panel includes a Change The Way Users Log On Or Off task, which allows you to configure Windows XP Professional to use the Log On To Windows dialog box instead of the Welcome screen.
The Log On To Windows Dialog Box
To use the Log On To Windows dialog box to log on locally to a computer running Windows XP Professional, you must supply a valid user name; if the user name is password protected, you must also supply the password. Windows XP Professional authenticates the user's identity during the logon
process. Only valid users can access resources and data on a computer or a network. Windows XP Professional authenticates users who log on locally to the computer at which they are seated and one of the domain controllers in a Windows 2000 domain authenticates users who log on to a domain.
When a user starts a computer running Windows XP Professional that is configured to use the Log On To Windows dialog box, an Options button also appears. Table 1.1 describes the options in the Log On To Windows dialog box for a computer that is part of a domain.
Table 1.1 Log On To Windows Dialog Box Options
Option Description
User Name
Password
The password that is assigned to the user account. Users must enter a password to prove their identity. Passwords are case sensitive. For security purposes, the password appears on the screen as asterisks (*). To prevent unauthorized access to resources and data, users must keep passwords secret.
Log On To Allows the user to choose to log on to the local computer or to log on to the domain.
Log On Using Dial-Up Connection
Permits a user to connect to a domain server by using dial-up
networking. Dial-up networking allows a user to log on and perform work from a remote location.
Shutdown Closes all files, saves all operating system data, and prepares the computer so that a user can safely turn it off.
Options
Toggles on and off between the Log On To option and the Log On Using Dial-Up Connection option. The Options button appears only if the computer is a member of a domain.
If your computer is not part of a domain, you will not get the Log On To option.
Windows XP Professional Authentication Process
To gain access to a computer running Windows XP Professional or to any resource on that computer, whether the computer is configured to use the Welcome screen or the Log On To Windows dialog box, you must provide a user name and possibly a password.
Figure 1.12 Windows XP Professional authentication process at logon
The steps in the authentication process are as follows:
1. The user logs on by providing logon information, such as user name and password, and Windows XP Professional forwards this information to the security subsystem of that local computer.
2. Windows XP Professional compares the logon information with the user information in the local security database, which resides in the security subsystem of the local computer.
3. If the information matches and the user account is valid, Windows XP Professional creates an access token for the user. An access token is the user's identification for that local computer. It contains the user's security settings, which allow the user to gain access to the appropriate resources on that computer and to perform specific system tasks.
In addition to the logon process, any time a user makes a connection to a computer, that computer authenticates the user and returns an access token. This authentication process is invisible to the user. If a user logs on to a domain, Windows XP Professional contacts an available domain controller in the domain. The domain controller compares the logon information with the user information that is in the directory for the domain. If the information matches and the user account is valid, the domain controller creates an access token for the user. The security settings contained in the access token allow the user to gain access to the appropriate resources in the domain.
Logging Off Windows XP Professional
Figure 1.13 The Start menu provides a way to log off Windows XP Professional
The Windows Security Dialog Box
The Windows Security dialog box provides information such as the user account currently logged on and the domain or computer to which the user is logged on. This information is important for users with multiple user accounts, such as a user who has a regular user account as well as a user account with administrative privileges.
Figure 1.14 Windows Security dialog box
Table 1.2 The Windows Security Dialog Box Options
Option Description
Lock Computer
Allows users to secure the computer without logging off. All programs remain
running. Users should lock their computers when they leave for a short time. The user who locks the computer can unlock it by pressing Ctrl+Alt+Delete and entering the valid password. An administrator can also unlock a locked computer. This process logs off the current user.
Log Off Allows a user to log off as the current user and close all running programs, but leaves Windows XP Professional running.
Shut Down Allows a user to close all files, save all operating system data, and prepare the computer so that it can be safely turned off.
Change Password
Task Manager
Provides a list of the programs that are running and a summary of overall CPU and memory usage, as well as a quick view of how each program, program component, or system process is using the CPU and memory resources. Users can also use Task Manager to switch between programs and to stop a program that is not responding. Cancel Closes the Windows Security dialog box.
Lesson Review
The following questions will help you determine whether you have learned enough to move on to the next chapter. If you have difficulty answering these questions, go back and review the material in this lesson before proceeding to the next chapter. The answers for these questions are in Appendix A, "Questions and Answers."
1. What can you do when you log on locally to a computer, and what determines what you can do when you log on locally to a computer?
2. What is the main difference in the authentication process for logging on locally to a computer and logging on to a domain?
3. How can you configure Windows XP Professional to use the Log On To Windows dialog box instead of the Welcome screen to allow users to log on locally to the computer?
4. Which of the following computers can a user log on to locally? (Choose all that apply.) a. A computer running Windows XP Professional that is in a workgroup
b. A computer running Windows XP Professional that is in a domain
c. A computer running Windows 2000 Server that is configured as a domain controller d. A computer running Windows 2000 Server that is a member server in a domain
5. Which of the following statements about the Windows Security dialog box are correct? (Choose all that apply.)
a. It is accessed by pressing Ctrl+Alt+Delete.
b. It tells how long the current user has been logged on. c. It allows you to log off the computer or domain.
d. It allows a user with administrative permissions to change other users' passwords.
Lesson Summary
the computer.
● You can configure Windows XP Professional to use the Log On To Windows dialog box instead of the Welcome screen.
● When a user logs on, he or she can log on to the local computer or, if the computer is a member of a domain, the user can log on to the domain.
● When a user logs on locally, the local computer does the authentication.
● When a user logs on to a domain, a domain controller must do the authentication.
● In a workgroup environment, an access token is the user's identification for that local computer, and it contains the user's security settings. These security settings allow the user to gain access to the appropriate resources on that computer and to perform specific system tasks.
● The Windows Security dialog box, which is accessed by pressing Ctrl+Alt+Delete, provides information such as the user account that is currently logged on and the domain or computer to which the user is logged on.
[Home] [Previous][Next]
Chapter 2
Installing Windows XP Professional
About This Chapter
This chapter prepares you to install Microsoft Windows XP Professional. You will learn some
preinstallation tasks that help ensure your installation of Windows XP Professional will go smoothly. These tasks include verifying that your hardware and any software installed on the computer are
compatible with Windows XP Professional, determining which file system to use, and deciding if your computer is going to join a workgroup or a domain. You will learn about installing Windows XP Professional from a CD-ROM and over the network. Finally, you will learn how to modify the installation using switches and how to troubleshoot Setup.
Before You Begin
To complete this chapter, you must have
[Home][Previous][Next]
Lesson 1: Getting Started
When you install Windows XP Professional, the Windows XP Professional Setup program asks you to specify how to install and configure the operating system. Preparing in advance helps you avoid problems during and after installation.
After this lesson, you will be able to
● Identify the hardware and installation information required to install Windows XP Professional
successfully
Estimated lesson time: 30 minutes
Preinstallation Tasks
Before you start the installation, complete the following tasks:
● Ensure that your hardware meets the requirements for installing Windows XP Professional.
● Determine whether your hardware is on the Hardware Compatibility List (HCL).
● Decide how you will partition the hard disk on which you will install Windows XP Professional.
● Choose a file system for the installation partition.
● Determine whether your computer will join a domain or a workgroup.
● Complete a preinstallation checklist.
Hardware Requirements
You must determine whether your hardware meets or exceeds the minimum requirements for installing and operating Windows XP Professional, as shown in Table 2.1.
Table 2.1 Windows XP Professional Hardware Requirements
Central processing unit (CPU) Pentium 233 megahertz (MHz) or equivalent
Memory 64 megabytes (MB) minimum; 128 MB recommended 4 gigabytes (GB) of random access memory (RAM) maximum
Hard disk space
1.5 GB on a 2-GB hard disk minimum The minimum amount of hard disk space allows for auto-updates over the Internet, additional Windows components, applications that you will be installing, and users' data
Networking Network adapter card and related cable
Display Video display adapter and monitor with Video Graphics Adapter (VGA) resolution or higher
Other drives
CD-ROM drive, 12X or faster recommended (not required for installing Windows XP Professional over a network), or DVD drive
A high-density 3.5-inch disk drive as drive A, unless the computer supports starting the Setup program from a CD-ROM or DVD drive
Accessories Keyboard and mouse or other pointing device
Hardware Compatibility List
Although the Windows XP Professional Setup Wizard automatically checks your hardware and software for potential conflicts, before you install Windows XP Professional, you should verify that your hardware is on the Windows XP Professional HCL. Microsoft provides tested drivers for the listed devices only. Using hardware not listed on the HCL could cause problems during and after installation. The most recent versions of the HCL for released operating systems are on the Microsoft Web site at
http://www.microsoft.com/hcl/.
If your hardware is not on the HCL, the hardware manufacturer might be able to provide you with a Windows XP Professional driver for the component.
Disk Partitions
The Windows XP Professional Setup program examines the hard disk to determine its existing
create a new partition on which to install it.
New Partition or Existing Partition
Depending on the hard disk configuration, do one of the following during installation:
● If the hard disk is unpartitioned, create and size the Windows XP Professional partition.
● If the hard disk is partitioned and contains enough unpartitioned disk space, use the unpartitioned
space to create the Windows XP Professional partition.
● If the existing partition is large enough, install Windows XP Professional on that partition.
Installing on an existing partition overwrites any existing data.
● If the existing partition is not large enough, delete it to provide more unpartitioned disk space for
creating the Windows XP Professional partition.
Remaining Free Hard Disk Space
Although you can use Setup to create other partitions, you should create and size only the partition on which you will install Windows XP Professional. After you install Windows XP Professional, use the Disk Management administrative tool to partition any remaining unpartitioned space on the hard disk.
Installation Partition Size
Microsoft recommends installing Windows XP Professional on a 1.5-GB or larger partition. Although Windows XP Professional requires less disk space for installation, using a larger installation partition provides the flexibility to install Windows XP Professional updates, operating system tools, or other necessary files in the future.
File Systems
Figure 2.1 NTFS and FAT/FAT32 file system features
Use NTFS when the partition on which Windows XP Professional will reside requires any of the following features:
● File- and folder-level security. NTFS allows you to control access to files and folders. For
additional information, see Chapter 8, "Securing Resources with NTFS Permissions."
● Disk compression. NTFS compresses files to store more data on the partition. For additional
information, see Chapter 14, "Managing Data Storage."
● Disk quotas. NTFS allows you to control disk usage on a per-user basis. For additional
information, see Chapter 14, "Managing Data Storage."
● Encryption. NTFS allows you to encrypt file data on the physical hard disk, using the Microsoft
Encrypting File System (EFS). For additional information, see Chapter 14, "Managing Data Storage."
The version of NTFS in Windows XP Professional supports remote storage, dynamic volumes, and mounting volumes to folders. Windows XP Professional, Windows 2000, and Windows NT are the only operating systems that can access data on a local hard disk formatted with NTFS.
FAT and FAT32
FAT and FAT32 do not offer many of the features (for example, file-level security) that NTFS supports. Therefore, in most situations, you should format the hard disk with NTFS. The only reason to use FAT or FAT32 is for dual booting with another operating system that does not support NTFS. If you are setting up a computer for dual booting, you need to format only the system partition as FAT or FAT32. For example, if drive C is the system partition, you could format drive C as FAT or FAT32 and format drive D as NTFS.
Converting a FAT or FAT32 Volume to NTFS
Windows XP Professional provides the Convert command for converting a partition to NTFS without reformatting the partition and losing all the information on the partition. To use the Convert command, click Start, click Run, type cmd in the Open text box, and then click OK. This opens a command prompt, which you use to request the Convert command. The following example shows how you might use
switches with the Convert command.
Convert volume /FS:NTFS [/V] [/CvtArea:filename] [/Nosecurity] [/X]
Table 2.2 lists the switches available in the Convert command and describes their functions.
Table 2.2 Convert Command Switches
Switch Function Required
Volume Specifies the drive letter (followed by a colon), volume mount point, or
volume name that you want to convert Yes
/FS:NTFS Specifies converting the volume to NTFS Yes
/V Runs the Convert command in verbose mode No
/CvtArea:filename Specifies a contiguous file in the root directory to be the placeholder for
NTFS system files No
/NoSecurity Sets the security settings to make converted files and directories accessible
by everyone No
/X Forces the volume to dismount first if necessary, and all open handles to the volume are then not valid No
then press Enter. For example, to receive help on the Convert command, type Convert /? and then press
Enter.
Domain or Workgroup Membership
During installation, you must choose the type of network security group that the computer will join: a domain or a workgroup. Figure 2.2 shows the requirements for joining a domain or workgroup.
Figure 2.2 Domain or workgroup membership requirements
Joining a Domain
When you install Windows XP Professional on a computer, you can add that computer to an existing domain. Adding a computer to a domain is referred to as joining a domain.
A computer can join a domain during or after installation.
Joining a domain during installation requires the following:
domain that the computer will join. An example of a DNS-compatible domain name is
microsoft.com, in which microsoft is the name of the organization's DNS identity.
● A computer account. Before a computer can join a domain, you must create a computer account in
the domain. You can ask a domain administrator to create the computer account before installation or, if you have administrative privileges for the domain, you can create the computer account during installation. If you create the computer account during installation, Setup prompts you for the name and password of a user account with authority to add domain computer accounts.
● An available domain controller and a server running the DNS service (called the DNS server).
At least one domain controller in the domain that you are joining and one DNS server must be online when you install a computer in the domain.
Joining a Workgroup
When you install Windows XP Professional on a computer, you can add that computer to an existing workgroup. This process is referred to as joining a workgroup.
If you join a computer to a workgroup during installation, you must assign a workgroup name to the computer. The workgroup name you assign can be the name of an existing workgroup or the name of a new workgroup that you create during installation.
Preinstallation Checklist
Use the following preinstallation checklist to ensure that you have all the necessary information available before you begin installing Windows XP Professional.
Task Done
Verify that your components meet the minimum hardware requirements.
Verify that all of your hardware is listed on the HCL.
Verify that the hard disk on which you will install Windows XP Professional has a minimum of 1.5 GB of free disk space.
Determine the name of the domain or workgroup that each computer will join. If the computer joins a domain, write down the domain name in the DNS format: server.subdomain.domain. If the
computer joins a workgroup, use the 15-character NetBIOS naming convention: Server_name.
Determine the name of the computer before installation.
If the computer will join a domain, create a computer account in that domain. You can create a computer account during installation if you have administrative privileges in the domain
Determine a password for the Administrator account.
Lesson Review
The following questions will help you determine whether you have learned enough to move on to the next lesson. If you have difficulty answering these questions, review the material in this lesson before beginning the next lesson. The answers are in Appendix A, "Questions and Answers."
1. What are the minimum and recommended memory requirements for installing Windows XP Professional?
2. The minimum hard disk space required for installing Windows XP Professional is a. 1.5 GB on a 2-GB hard disk
b. 1 GB on a 2-GB hard disk c. 500 MB on a 1-GB hard disk d. 750 MB on a 2-GB hard disk
3. Where can you find the most recent versions of the HCL for released operating systems?
4. Joining a domain during Windows XP Professional installation requires which of the following? (Choose all that apply.)
a. You must know the DNS name for the domain the computer will join. b. You must have a user account in the domain.
c. At least one domain controller in the domain must be online when you install a computer in the domain.
d. At least one DNS server must be online when you install a computer in the domain. 5. Which of the following statements about file systems are correct? (Choose all that apply.)
a. File- and folder-level security are available only with NTFS. b. Disk compression is available with FAT, FAT32, and NTFS.
only with NTFS.
d. Encryption is available only with NTFS.
Lesson Summary
● The first preinstallation task is to ensure that your hardware meets the hardware requirements for
installing Windows XP Professional.
● The next preinstallation task is to ensure that your hardware is on the Windows XP Professional
HCL.
● Additional preinstallation tasks include determining how to partition the hard disk on which you
will install Windows XP Professional and deciding whether to format the partition as NTFS, FAT, or FAT32.
[Home][Previous][Next]
Lesson 2: Installing Windows XP
Professional from a CD-ROM
This lesson covers the four-stage process of installing Windows XP Professional from a CD-ROM. After you learn about these four stages, you will install Windows XP Professional on your computer.
After this lesson, you will be able to
● Install Windows XP Professional from a CD-ROM
Estimated lesson time: 70 minutes
The Windows XP Professional Setup Program
The installation process for Windows XP Professional combines the Setup program with wizards and informational screens. Installing Windows XP Professional from a CD-ROM to a clean hard disk consists of these four stages:
1. Running the Setup program.
Setup prepares the hard disk for the later installation stages and copies the files necessary to run the Setup Wizard.
2. Running the Setup Wizard.
The Setup Wizard requests setup information about the computer, such as names, and passwords. 3. Installing Windows XP Professional networking components.
After gathering information about the computer, the Setup Wizard prompts you for networking information and then installs the networking components that allow the computer to communicate with other computers on the network.
4. Completing the installation.