Continue to Introduction
|
Continue to Contents List
Introduction
Part I
Chapter 1: Understanding Your Networking Options
●
Deciding to create a home network
●
Honing in on the right operating system
●
Understanding how networks work
●
Figuring out what hardware you need
●
Choosing between wireless or cable
●
Purchasing kits or individual components
Chapter 2: Configuring Your Network
●
Showing your computer how to find your network adapter
●
Installing network components
●
Naming your computer and giving it a workgroup
●
Setting up your network for file and printer sharing
●
Creating a username and password
Part II
Chapter 3: Sharing the Internet
●
Taking a look at Internet connection hardware options
●
Configuring dial-up networking connections
●
Sharing Internet connections
●
Examining hardware devices that provide connection sharing
Chapter 4: Sharing Printers and Peripherals
●
Setting up shared printers
●
Installing a network printer
●
Sharing CD-ROM, removable, and other drives
Chapter 5: Other Networking Techniques
●
Adding Windows NT 4.0 to your network
●
Networking a laptop computer
●
Getting a Mac to communicate with your PC network
Part III
Chapter 6: Ten Good Reasons to Set Up a Home PC Network
Chapter 7: Ten Ways to Keep Your Network Healthy
About the Authors
Chapter 1
Understanding Your Networking Options
In This Chapter
●
Deciding to create a home network
●
Honing in on the right operating system
●
Understanding how networks work
●
Figuring out what hardware you need
●
Choosing between wireless or cable
●
Purchasing kits or individual components
Simply defined, a network is a system of two or more connected computers such that each computer has access to the files and peripheral equipment (such as printers or modems) on another computer. You create those connections with the following elements:
● Hardware in each computer that permits the computer to communicate
● A cable or a wireless connection that sends data between the computers (using the hardware you installed)
● Software (called a driver) that operates the hardware
If you have more than one computer in your home, you will definitely benefit by having a network. Besides being generally lazy and miserly, we believe everyone should do everything in the easiest and cheapest way possible. With a network, you can work anywhere in your home and access files from any other computer in your home (even from your bed). You can also save a heap of money on things like printers and external disk drives because you can share these types of devices across your network rather than buying separate such devices for each computer in your home.
In this chapter, we explain some reasons for setting up a network in your home, explain your software and hardware alternatives, and tell you more about how different networks work. We also discuss some of the technology that’s available for putting your network together.
You don’t have to start creating your network with computers that already contain the hardware and software required for networking because you can easily install that stuff yourself. However, you must have an operating system that can
participate in a network environment. Any flavor of Windows except the old Windows 3.1 will work. That includes Windows 95, 98, 98 Second Edition (SE), 2000, NT, Me, and XP.
Sharing the Internet
One of the most compelling reasons to set up a home network is to share an Internet connection. If you share an Internet connection on your network, then anyone on your network can check e-mail or use the Web without having to connect independently with multiple phone lines and modems.
You have two ways of sharing the Internet on your home network. You can use either the Windows built-in Internet connection-sharing feature, or preferably, a U. S. Robotics broadband router. The following sections explain these options.
Windows built-in Internet connection sharing
The most recent versions of Windows (Windows 98 SE, Windows Me, Windows 2000, and Windows XP) include the Internet connection-sharing feature. Though this method works, it can be clunky and demands that the computer sharing the Internet connection act as an Internet server (that is, it must “serve” the other computers with a connection to the Internet). This task is something the computer wasn’t specifically designed to do, and providing this service will take its attention away from whatever else the computer is doing.
This method also requires that the computer sharing the Internet connection be turned on, which can be a major hassle if you actually want to browse the Web from a different computer on your network.
U.S. Robotics router with Internet sharing
U.S. Robotics offers an Internet-sharing solution, which comes built in to the Model 9003 ADSL Ethernet/USB and the Model 8000 Broadband Routers. This solution is preferable for three big reasons.
First, sharing an Internet connection with a router doesn’t burden any computer with the duties of Internet sharing, as with the Windows Internet connection-sharing feature. The advantage of router-based Internet connection-sharing becomes even more apparent with a high-speed connection to the Internet such as ADSL (we discuss ADSL further in Chapter 3).
Second, the U.S. Robotics Broadband routers include something called VPN passthrough. The “VPN” stands for Virtual Private Network. The specifics of this technology are hardly worth worrying about. The important thing is that VPN
passthrough is required to connect to many corporate networks, because it allows a corporate network to extend itself to a home network via a dial-up or broadband connection. So, if you want to connect to your office network from a computer on your home network, with a U.S. Robotics Broadband router, you’re all set.
Finally, the U.S. Robotics Broadband routers include some pretty high-level security, including a firewall. A firewall is a piece of software or hardware that protects your network from the Internet at large. You can still access everything on the Internet you want, but other people on the Internet can’t sneak into your
network to rummage around. The U.S. Robotics Model 9003 includes excellent firewall features, which we further describe in Chapter 3.
Peer-to-Peer Networking
You can configure networks to operate in any of several modes, or configuration types. Like personality types, some network configuration types are interested in controlling computer users; other network types are more relaxed about controls. The basic hardware and configuration stuff that goes into creating a network doesn’t change much among the network types, so your choices mostly depend on how you want to communicate among computers.
For nearly all home and small-business networking situations, peer-to-peer networking is the way to go. A peer-to-peer network permits all the computers on the network to communicate with each other. In Figure 1-1, you see a typical peer-to-peer network communication structure.
Figure 1-1: Everybody talks to everybody in a peer-to-peer network.
If you have computers running Windows (95/98/Me/NT/2000/XP), you can easily build a peer-to-peer network because the support for this type of network is built in to the operating system. In fact, this book is about creating a peer-to-peer network in your home, so we assume that you have one of these Windows operating systems on every PC in your house. It’s worth noting that you don’t actually need to have the same version of Windows on every computer in your network, just as long as every computer has one or another of these versions.
With a peer-to-peer network, you can impose security on some resources, such as files, but the security levels don’t come close to the security of a client/server network. A client/server network is a type often used in large business situations where one master computer (the server) typically controls all data transfer with very strict password controls for all the other computers on the network (the clients).
Though a client/server network is really burdensome and unnecessary for the typical home network, elements of client/server mentality can be useful in a peer-to-peer network. As an example, you may want to take that old computer sitting in your closet, install a large hard drive in it, and designate it as a “data server” for your network. You can then use your data server as a place for anyone to store large files that need to be backed up. Then all you need to do is back up data on that one designated data-server computer rather than going around to each computer in your network and backing them up individually.
The Nuts and Bolts of Hardware
In most networks, the list of basic hardware you need is as follows:
● A network adapter in each computer you want to include in your network. ● Sufficient cable (for a cabled Ethernet network).
● An access point (for a wireless network).
● A router or switch where all your network cables connect to one another. In the case of a wireless network, the router is where your access point(s) connect to one another and where other devices, such as printers or an Internet
connection, tie in to your network.
The following sections explain these hardware pieces.
More on network adapters
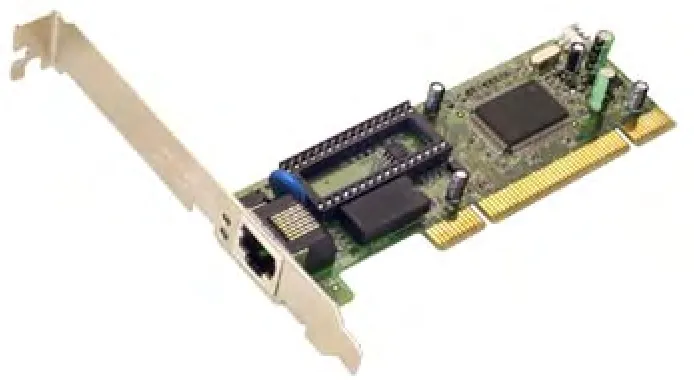
Traditionally, network adapters come in the form of a network interface card, or NIC for short (say “Nick”) and use a cable to connect the computer to the network. The standard NIC goes inside the computer and provides a jack at the back where the network cable connects. Figure 1-2 shows an example.
Figure 1-2: U.S. Robotics PCI network card.
We say traditionally because wireless solutions are also available for small
networks, and you may prefer to take that route. In fact, wireless is at a point now where the network speed is comparable to traditional wired networks while offering the flexibility of moving your computers just about anywhere in your home and being able to connect. Think about how a cordless phone lets you talk anywhere in your house without running cables everywhere — it’s basically the same idea.
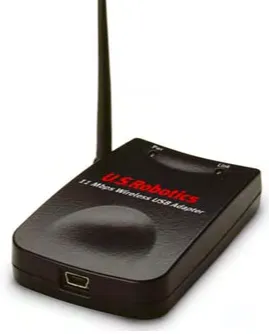
Not all network adapters are cards anymore either. Today, many network adapters connect to a Universal Serial Bus (USB), which comes standard on pretty much every new computer. An example of this type of network adapter is shown in Figure 1-3. This is a nice way to go if you don’t want to fuss with the inner workings of your computers.
Figure 1-3: U.S. Robotics 1120 Wireless USB adapter.
The only consistent rule for creating a network is that you must have an adapter installed on each computer. Beyond that, network adapters come in lots of flavors, and when you buy network adapters, you must match them to two important
elements:
● The type of network adapter that your computer accepts.
● The type of network cabling (or lack thereof, if you go wireless) that you want to use. (See the section, “Connections: Cables, wires, and thin air,” in this chapter.)
Many new computers these days can be configured to come with a network adapter already installed. This option is a good one if you’re planning to build a wired network. Just make sure the network adapter is compatible with the cable type you plan to use (typically Category 5 or Ethernet cable).
We discuss internal (PCI slot), USB (Universal Serial Bus), and PC Card network adapters in the following sections. Although other types of adapters are available that connect to the parallel port, which is the same port where your printer
connects, these types are fraught with problems because they often interfere with your printer. So, we stick to the types that we know work well.
Getting your network adapter on the right bus
Forget public transportation. Bus means something else in computer jargon. A bus is a slot on your computer’s motherboard into which you insert cards. Technically,
the name of the slot is expansion slot, and the bus is the data path along which information flows to the card. However, bus is the common term in computerese.
Each card (sometimes called a controller card) that you insert in a bus has a specific use. Your computers may have video cards, sound cards, hard drive controller cards, or other assorted cards.
Instead of using cards, some computers have one or more of these devices built right in to a chip on the motherboard. These built-in devices are called embedded cards or embedded controllers.
The network adapter you purchase must go into an empty bus, and you must make sure that the adapter is manufactured for the bus type that’s available on your motherboard. The common bus types are:
● ISA (Industry Standard Architecture): ISA is a standard bus that’s been used for a number of years, though it’s quickly disappearing from newer computers. An ISA is a 16-bit card, which means that it sends 16 bits of data at a time between the motherboard and the card (and any device attached to the card). Unless you’ve decided to dust off an old computer and put it back into service on your network, you probably won’t be dealing with an ISA bus.
● PCI (Peripheral Component Interconnect): The PCI bus is built for speed. Most new computers contain a PCI bus, which comes in two configurations: 32-bit and 64-bit. Its technology is far more advanced (and complicated) than the technology of the ISA bus. Most, if not all, internal network adapters are designed for a PCI bus.
The internal network adapters available from U.S. Robotics are all PCI types. Even older computers that have an ISA bus also have at least one PCI bus, so in most cases, installing a network adapter in an older computer is easy.
You can read the documentation that comes with your computer to find out what kind of cards you must buy. However, if you have mixed bus types on the
motherboard, the documentation doesn’t tell you which slots are already occupied. You have to open your computer to find out what type of network adapter you need to buy.
Follow these safety tips when you open your computer:
● Don’t use a magnetic screwdriver. Magnets and disk drives do not peacefully coexist — the magnetic field from the screwdriver can delete data.
● Make sure that the computer is turned off and unplugged. Either pull the plug from the wall or pull the plug from the back of the computer.
● Discharge any static electricity in your body before you touch anything inside the computer. Static electricity has the power to zap chips. Discharge yourself by touching something metal (other than your computer).
● Remove any metal jewelry, especially rings. Gold is a particularly efficient conductor of electricity, including static electricity.
You can tell at a glance what type of bus is available if you know what to look for. An ISA bus is usually black, with metal pins or teeth in the center and a small crossbar about two-thirds of the way down the slot. Check out an ISA bus in Figure 1-4.
Figure 1-4: If it’s black and long, it’s an ISA bus.
A PCI bus is usually white, and it’s shorter than an ISA bus, as shown in Figure 1-5. A PCI bus has a crossbar about three-quarters of the way down its length.
Figure 1-5: A PCI bus.
For specific installation instructions for your adapter card, take a look at the Installation Guide that came with your U.S. Robotics product.
Avoiding the bus with some network adapters
Although internal network adapters are the most common type, you have several other options available.
USB connectors
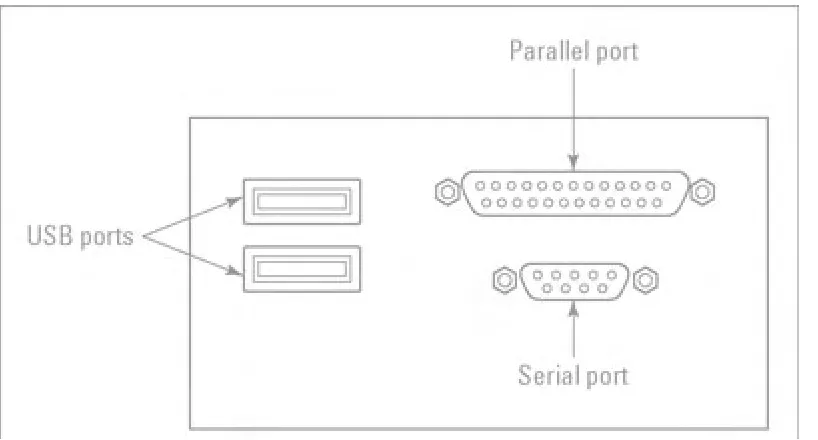
Most of today’s computers come with at least one USB port, and you can buy network adapters that plug into a USB port. You don’t have to worry about the bus type because all USB ports are identical. In fact, you don’t even have to open your computer because USB ports are external. Look at the back of your computer to find port connectors that look like those shown in Figure 1-6.
PC card connector
[image:12.595.93.502.444.664.2]For laptop computers that don’t have a built-in network adapter, the way to connect is with a PC card connector. This type of connector is a card that is roughly the size of a credit card, only a little thicker, as shown in Figure 1-7. The PC card installs in the side of a laptop computer.
Figure 1-6: USB ports are identical in every computer.
Figure 1-7: PC card is your best laptop option.
PC card network adapters are available for both cabled and wireless networks.
Specific installation instructions for your U.S. Robotics network hardware are included with your U.S. Robotics product.
Connections: Cables or thin air?
You have one more decision to make before you go shopping for your hardware — how your computers are going to pass data among each other. Your decision affects not only the type of cable you buy (or don’t buy), but also the network adapters you need.
You have two real choices for connecting your computers into your network:
● Wired connection (typically Ethernet, or Category 5 cable) ● No cable (wireless connection)
Although some other types of network connections are available on the market, such as telephone line networking and electrical line networking, these types of networks suffer from slow speed, plus security and compatibility issues.
Network speeds are rated in megabits per second (Mbps). A megabit is a million binary pulses, and the best way to put that into perspective is to think about a modem. The fastest telephone modems transmit data at the rate of 56,000 bits per second (56 kilobits, or 56 Kbps), which is pretty slow. Networks transmit data much faster, as the following sections explain.
Ethernet cable
Ethernet is fast, accurate, and pretty much trouble-free. The current version of
Ethernet can transfer data across the network at 100 Mbps, depending on the rated speed of the network adapters and routers in your network. Some older Ethernet equipment can send data only at 10 Mbps, but that’s still ten times faster than most of the other cabling technologies.
Most of today’s Ethernet equipment can determine the speed of individual devices on the network and automatically drop or raise the speed to match the device’s capabilities.
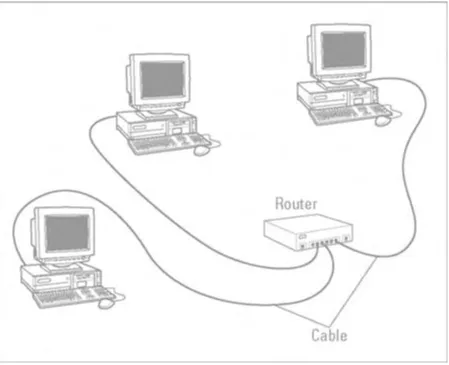
[image:14.595.95.544.304.669.2]Ethernet is the cable that you find in business networks. Today, Ethernet cable is purchased in the form of 100Base-T cable, which is also called twisted-pair cable or Category 5 UTP cable. Although Ethernet cable looks like telephone wire, it’s not the same thing. Using 100Base-T requires the purchase of something called a switch or a router. A switch and a router basically do the same thing — they make sure that data moves around your network efficiently and without conflicts. This setup is shown in Figure 1-8.
Figure 1-8: Each computer is connected to its own port in the router or hub.
The connector at the end of the cable looks like the connector at the end of your telephone cable, but it’s actually slightly bigger. 100Base-T cable connectors are RJ-45 connectors — telephone connectors are RJ-11 connectors.
Ethernet networks require the following hardware components:
● A network adapter for each computer you want to connect ● A switch or a router
Wireless connections for the cable-phobic
Wireless technology has helped to simplify networking by enabling you to connect your computers without having to run cable or wire all over your house. With a wireless network, you can achieve all the benefits of, and comparable speed to, an Ethernet network without the physical installation hassle.
Wireless also has the advantage of letting you move computers around without having to worry about the physical location of a network wall jack or other connection. This feature is especially cool if you want to connect a laptop computer to your network and work while you laze around in bed.
If you opt for wireless technology, you have two choices: radio frequency (RF) communication and infrared (IR) communication. Each has its own set of pros and cons.
Radio frequency wireless connections
Radio frequency wireless (or RF for short) is the best way to go in our opinion. RF is the most flexible and fastest of the wireless networking types.
RF wireless comes in several flavors, all beginning with the number 802.11. In short, here’s the breakdown of these RF networking standards:
● 802.11. This standard was the original for RF networking and provided 1 to 2 Mbps (about one-tenth as fast as traditional Ethernet) and operated in the 2.4 GHz range. This technology had some radio frequency interference problems that have been corrected by the later, faster standards.
● 802.11a. This standard is commonly available in 6, 12, and 24 Mbps ranges, though it is capable of 54 Mbps. It uses frequencies in the 5 GHz range. This standard also built in some resistance to radio frequency interference.
● 802.11b. Improving upon 802.11a, this standard operates in the 2.4GHz range and can work with earlier 802.11 equipment (that is, it’s backwards compatible with 802.11). The difference between 802.11b and 802.11 is that 802.11b has some improvements to avoid signal interference and can achieve a faster 11Mbps data rate.
● U.S. Robotics 22Mbps 802.11b. These products are compatible with older, standard 802.11b, as well as newer 802.11g products (see next bullet). These products provide up to twice the data rate of 802.11b, greater coverage (you can have your computers farther apart and still connect them), and improved security over standard 802.11b.
● 802.11g. The next standard operates in the 2.4GHz frequency range and can achieve up to a 54 Mbps data rate over a limited distance. It is backwards compatible with 802.11b and will work with both 11 and 22 Mbps U.S. Robotics wireless products. 802.11g is sort of a “greatest hits” of the 802.11 standards, offering all the best features of 802.11a and 802.11b.
U.S. Robotics wireless networks require the following hardware components to set up a complete network:
● A network adapter for each computer you want to connect. ● A switch or a router.
● At least one wireless access point. This component is basically the antenna that picks up the signal from the wireless network adapters and feeds it into the switch or router.
Bluetooth wireless technology
One technology you may hear about, Bluetooth, is a new industry standard initially developed by Ericsson, the Swedish communications technology company. The standard aims to make all sorts of devices connect wirelessly. The idea behind Bluetooth is to allow cellular phones, computers, handheld devices, headphones, digital cameras, and just about anything that uses data to connect to just about anything else. The two latest Bluetooth standards support data rates of 2 Mbps and 10 Mbps, but they’re not yet on the market.
So, although Bluetooth is not yet quite ready for prime time, the concept is very strong. Imagine having your digital camera simply “know” when it’s near your computer and make itself and its images available to your network? Or what if you could bring your handheld device with some driving directions along on a trip, and your car’s navigation assistant can grab the appropriate map from your handheld? The possibilities of Bluetooth are really exciting — it’s definitely something to keep an eye out for.
For more information, check out www.bluetooth.org.
Here are some things to consider about RF network connections:
● They require a network adapter that’s specific to RF technology, which means the adapter has to be equipped with the devices necessary to transmit and receive RF signals.
● Metal and large bodies of water can diminish the signal and cause connection difficulties. Putting the computer (with its RF technology device attached) under a metal desk or near a wall that has a lot of metal plumbing pipes can keep computers from communicating. Unless you’re trying to communicate between two submarines, the large body of water issue shouldn’t “surface.”
● The specific frequencies and methods of security used for RF networking products vary somewhat from country to country. Be wary of purchasing RF devices cheaply overseas and expecting that they’ll work with a product you bought in your own country, even if they are from the same manufacturer.
Infrared wireless connections
Infrared (IR) technology works by creating a direct signal between computers via a light beam. The connection is not as fast as RF wireless and much slower than Ethernet. IR technology is the same type of technology your television remote control uses to transmit your channel-surfing choices to your television.
Infrared connectors must “see” each other, which limits IR networks. IR technology doesn’t travel through walls or around corners and works only in a straight line, which means it’s suitable for networks only if all the computers are in the same room. Because one computer can’t make a straight-line connection with two other computers at the same time, IR devices are available that collect and bounce the IR signals around the room. This feature enables you to build a network of multiple computers.
Most laptops have an IR connector built in — look for a small glass square on the back of the computer. The same thing is true for many printers, especially laser printers, which are equipped with that same glass square on the front of the unit. For desktop computers, which usually don’t have IR ports built in, you can buy IR network interface devices, most of which attach to your USB port.
One problem we’ve encountered during our tests of IR connections is that bright sunlight interferes with the signal. You need opaque window coverings if you want to go with IR connections.
Saving Time, Trouble, and Money on Hardware
If you’re putting together a network from scratch, you may want to consider buying a kit or “bundle” that contains the necessary hardware to hook up a few
computers. Most manufacturers offer such bundles, and the cost savings can be substantial over buying the necessary pieces separately. Here are some things to keep in mind before you buy a kit:
● Most kits are designed for a two-computer network. If you have a third computer, you may need to buy the additional components individually.
● Kits work only if every computer on your network needs the same hardware. For example, if you’ve decided to install an Ethernet network, the kit has two
network adapters, two pieces of Ethernet cable, and one switch or router. However, both network adapters in the kit are the same bus type. If one
computer only has an empty ISA bus and the other computer has an empty PCI bus, or you want to use a USB network adapter on one computer, you probably can’t buy a kit for your situation.
● Kits aren’t necessary if your computers have pre-installed network adapters. Many computer manufacturers sell computers already set up with network hardware for cabled Ethernet networks.
Even if you buy a kit, you may also have to buy some individual components. Perhaps you have three computers, or perhaps one of the Ethernet cables in the kit isn’t long enough to reach the computer on the second floor. After you measure the distances, figure out where the available ports are, and do all the rest of your research, you may find that individual components are your only solution. Most people find that buying individual components costs about the same as a kit.
Every retail computer store sells individual hardware components for all types of network connections. Many large office-supply retail outlets also carry these products.
Planning an Ethernet Network
If you choose to set up a standard Ethernet network, you have to consider several planning issues.
Ethernet requires cable to run between all of your computers and your switch or router. For this reason, you need to centrally locate your router or switch so that
you can conveniently run cable to it from every computer on your network.
In addition, unless you plan to have all of your networked computers in one room, you need to run cable between rooms in your house. The results can be either somewhat unsightly if you choose to keep your cables exposed, or a somewhat serious exploration into your carpentry skills if you plan to run your cables inside the walls of your home.
If you do plan to run your cables inside your walls, you may want to just plan your network, being sure to consider where you want wall jacks in every room, and then hire a contractor to do the actual cable runs. The tools for the installation and testing of wall jacks are actually fairly specialized and are probably best left to a professional. A professional network cable installer can also help you map out and plan your network.
In terms of planning where to put wall jacks and a hub or router, consider these issues:
● Install wall jacks near plugs so that you can connect your computer to your network and the electrical outlet.
● Consider placing your hub or router location in a closet or some other hidden place. A hub or router will have several cables connecting to it, and you’ll want to keep foot traffic, pets, garbage, and splatters of pasta sauce away from these devices.
● Consider installing jacks in every room in which you think you may want to eventually use a computer. Having a contractor visit your home twice is always more expensive than doing a larger job once.
Planning a Wireless Network
Planning a wireless network is really easy.
As with an Ethernet network, it’s a good idea to place your hub or router out of harm’s way, such as in a closet or other low-traffic area. With wireless, you don’t have any wall jacks to worry about and no contractor to hire for cable installation.
Your main issue is where to place your access points. The access points are the “antennas” for your network that pick up the signal from the wireless network adapters on your computers and transmit that signal via a short Ethernet cable to your router or hub. Figure 1-9 shows an access point.
Figure 1-9: U.S. Robotics Model 2249 access point.
You’ll need to run a short length of Ethernet cable from the access point to your router or hub, so positioning these devices close to one another is good
housekeeping.
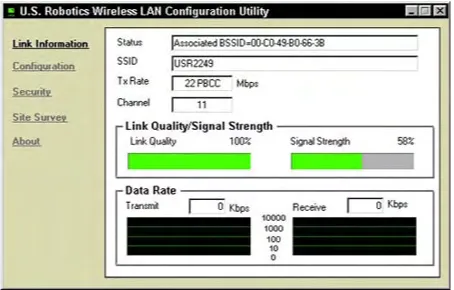
Your next issue is picking up a good signal. U.S. Robotics wireless products come with software that shows you the strength of the signal between your access point and your network computer, as shown in Figure 1-10. Your only planning issue here is to make sure that your computer and access point are positioned relative to one another in such a way that your Link Quality is 100%. Looks like the computer we’re writing this book with is just fine!
Figure 1-10: U.S. Robotics Wireless LAN Configuration Utility.
Continue to Chapter 2
|
Back to Contents List
Chapter 2
Configuring Your Network
In This Chapter
●
Showing your computer how to find your network adapter
●
Installing network components
●
Naming your computer and giving it a workgroup
●
Setting up your network for file and printer sharing
●
Creating a username and password
After you have the hardware for your network in place, you’re ready to configure it and install the software components that make it work.
In this chapter, we cavalierly assume that you already have your networking hardware successfully installed in all of the computers you want to include in your network. Whether that means you opened up computers and installed PCI network adapters (see Chapter 1 for more on that), simply plugged an appropriate network adapter into the USB ports of the computers you want to include, or popped a PC card into a laptop is up to you. In either case, you need to have your physical and software installation complete.
Refer to the Installation Guide that came with your U.S. Robotics product for specific installation instructions.
What is a network protocol?
You may notice a few acronyms and abbreviations in this book — things like NETBEUI, IPX/SPX, and TCP/IP. Take our advice: Don’t bother learning what these things mean. The short story is that they are all network protocols, which are analogous to “languages” that computers can use to communicate with one another across a network.
The important thing to understand is that all devices on a given network must use the same language. For example, if you see NETBEUI installed on one computer and not the other, they won’t communicate using the NETBEUI protocol. If you see TCP/IP installed on one computer but not the other, they won’t communicate using the TCP/IP protocol.
Internet sharing requires TCP/IP. TCP/IP is the protocol of the Internet at large, as well as the most common and easy-to-deal-with protocol for local networks, such as the one you’re building. For the sake of keeping things simple, we suggest you use TCP/IP. In fact, the U.S. Robotics networking software that comes with the U.S. Robotics wireless PC Cards uses TCP/IP automatically.
Adding File and Printer Sharing Services
One of the best things about having a network is that it enables you to share files and devices, such as printers. We discuss how to set up a shared printer in Chapter 4. However, before you can make use of the information in that chapter, you need to add something called File and Printer Sharing Services. The following numbered steps enable this important feature of your network.
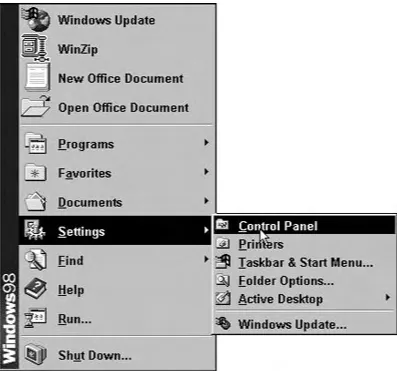
[image:22.595.95.492.401.772.2]1. Click the Start → Settings → Control Panel, as shown in Figure 2-1.
Figure 2-1: Selecting the Control Panel.
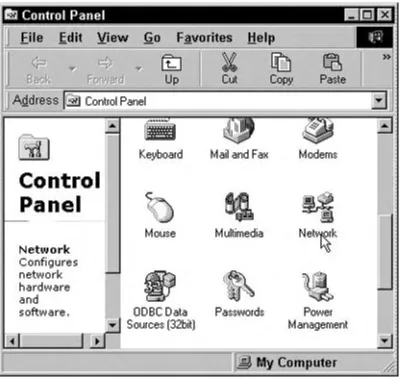
The Control Panel appears, as shown in Figure 2-2.
Figure 2-2: The Control Panel.
2. Double-click the Network icon to view the network properties.
The Network dialog box appears, as shown in Figure 2-3.
Figure 2-3: The Network dialog box.
3. Click the Configuration tab. 4. Click the Add... button.
The Select Network Component Type dialog box appears, as shown in
Figure 2-4.
Figure 2-4: The Select Network Type dialog box.
5. Select Service.
6. Click the Add... button.
The Select Network Service dialog box appears, as shown in Figure 2-5.
Figure 2-5: The Select Network Service dialog box.
7. Select File and printer sharing for Microsoft Networks. 8. Click OK.
[image:25.595.94.535.372.697.2]Windows may prompt you for additional files that need to be copied in order
to update the configuration changes you made. Make sure you have your
Windows CD-ROM available to insert as the installation requires.
You return to the Network dialog box.
9. Click OK to close the Network dialog box.
You are prompted to restart your computer.
10. Click Yes to restart your computer. You’re almost there — just one more set of steps.
Naming Your Computer and Putting It in a Workgroup
You may already have a name for your computer — Fred, Nimby, or maybe *&@ $^ depending on how well it’s been behaving. In this section, we show you how to teach your computer its name.
Naming each computer in your network is what allows other computers in your network, or more specifically, their users, to identify the location of resources (for example, files, a printer, or a CD-ROM drive) in the network. We explain in
Chapter 4 how to share a drive on a computer in your network, thereby giving other computers in the network access to that drive. This concept is much easier if each computer has a name — the computer named Dad can access a shared resource on the computer named Mike and so on.
We suggest that you name the computers in your network after their users. Or, maybe by the room they’re in (kitchen, office, garage, and so on). Any way you do it is fine, just remember that the name should be short, one word, and contain no funny characters (like / or *).
Here’s how to name them:
1. In the Network dialog box (you should still have it open from the previous set of numbered steps in this chapter), click the Identification tab, as shown in Figure 2-6.
2. Enter a name and workgroup for your computer.
For instance, you may want to name the computer you’re working on
“Mike” and put it in the workgroup called “Home.”
You must remember two important things when creating computer and workgroup names: First, you need to give each computer in your network a unique name. Second, you need to put all of your computers in the same workgroup — they must all have the same workgroup name down to the exact spelling.
[image:27.595.95.436.148.576.2]That’s it. Remember to perform these steps for all the computers in your network.
Figure 2-6: The Network dialog box with the Identification tab selected.
Entering Your Network Password
After you restart your computer, Windows prompts you for a Username and a Password. This process is called a login. Your username and password may consist of any combination of letters and/or numbers except for a few of the punctuation symbols — Windows tells you to try a different password if you enter one of the “forbidden” symbols. When entering a password, choose one that you will remember. You’ll be prompted for the password each time you turn on your computer.
You can also choose not to enter anything (simply click OK when the login appears). Doing so will mean that anyone who turns on your computer can gain access to your network. However, if you’re in an environment where network security is not an issue (for example, at home with kids you trust), you may not want to bother with a password.
If this is your first time logging in, Windows asks you to verify the password you entered. Re-type the password in the pop-up window and click OK.
You will not have access to the network if you press <ESC> or click Cancel, but you will be able to use Windows.
Installing Network Protocols and Services for Windows Me
If you’re running Windows Me on any computer, you can automate all the steps in this section for every computer on the network as well as set up a shared Internet connection. This magic is accomplished with the Windows Me Home Networking Wizard.
Note: The Windows Me Home Networking Wizard will not work to connect a
computer running Windows 2000 Professional. If you find yourself in this situation, you need to manually install network protocols and services (similar to the
numbered steps earlier in this chapter). Remember to consult the guide that came with your networking products for specific instructions.
You can connect your network either through an Internet device connected to your Broadband router, or via an Internet device connected to one of your networked computers. As we cover in Chapter 3, connecting through an Internet device
connected to your Broadband router is the preferred method. Be sure to determine which method you plan to use before launching the Home Networking Wizard.
To launch the wizard, double-click the My Network Places icon on your desktop and then double-click the Home Networking Wizard icon. The first wizard window is a welcoming message that requires no action on your part, except clicking Next to get started on the real work.
The Home Networking Wizard may prompt you to enter some information
regarding protocols, identifying your network hardware (type of network adapters and so on), and whether to start file and printer sharing services. You can find the information you need to enter in the first part of this chapter or in the installation guide that came with your network hardware.
Installing Network Protocols and Services for Windows XP
If you’re running Windows XP on any computer, you can set up your home network using the cleverly named Network Setup Wizard. To get to the Wizard,
click Start → My Network Places and then double-click the Network Setup Wizard.
[image:29.595.92.546.182.500.2]You can connect your network to the Internet in one of two basic ways: Through an Internet device connected to your Broadband router, or via an Internet device connected to one of your networked computers. For reasons we explain in Chapter 3, connecting through an Internet device connected to your Broadband router is the preferred method. The Network Setup Wizard asks you a question on the third screen about how you connect to the Internet, as shown in Figure 2-7.
Figure 2-7: The Network Setup Wizard asking how you connect to the Internet.
We’ve selected the option to connect via a residential gateway (that’s the Network Setup Wizard’s term for connecting through a router) because we have a DSL modem connected to our U.S. Robotics Broadband router.
If you’re using the Windows Internet Connection Sharing feature to connect to the Internet, you need to specify whether you are
● Connecting all of your networked computers via the computer you are currently setting up (the first option in Figure 2-7), or
● Connecting the computer you are currently configuring to the Internet via another computer’s Internet connection (the second option in Figure 2-7).
As you go through the steps in the Home Networking Wizard, you may need to enter some information regarding protocols, your network hardware (type of
network adapters and so on), and whether you want to start file and printer sharing services. You can find this information in the numbered steps in the first part of this chapter or in the installation guide that came with your network hardware.
Continue to Chapter 3
|
Back to Contents List
Chapter 3
Sharing the Internet
In This Chapter
●
Taking a look at Internet connection hardware options
●
Configuring dial-up networking connections
●
Sharing Internet connections
●
Examining hardware devices that provide connection sharing
Sharing the Internet is a fantastic way to take advantage of your network. For starters, using a single Internet connection for all the computers on your network means that everyone can access the Internet at the same time without having to tie up multiple phone lines.
However, the real fun begins when you share a broadband connection, such as DSL, ISDN, or a cable modem. We cover these technologies later in this chapter, but for now, the important thing is to understand that broadband is a catch-all phrase for fast Internet access. With a broadband Internet connection and a network, you can get blazing fast access to the Internet for all your computers.
Figuring Out What You Need
To use the Internet, including e-mail and Web surfing, you need a few basic elements:
● A hardware device that can connect to an Internet service provider (ISP), such as a modem, cable modem, DSL device, or ISDN device
● Software that drives the connection to the ISP (this software is either included in Windows or included with the hardware device)
● E-mail software ● A Web browser
Web browser software is free — Microsoft Internet Explorer comes with Windows, or you can use Internet Explorer to download Netscape Communicator (www.netscape.com).
mail software is also included with Windows (Microsoft Outlook), or comes with
Netscape Communicator, or you can purchase a program such as Eudora (www.eudora. com).
As for the hardware device used to connect to an Internet service, most computers come with a standard telephone modem. And with a standard modem, you can use the built-in Windows Internet connection-sharing feature to make a modem on one computer in your network available to all the other computers in your network.
Although this method works, you probably want to consider something faster, especially since the cost of the device and the service can be shared across all the computers in your network. By connecting via a hardware connection, that is, connecting your Internet device directly to your network, you gain many advantages over Windows Internet
connection sharing. The next few sections lay out all the details.
Sharing the Best Way
You can share an Internet connection in one of two ways:
● By using a software solution, such as the Windows Internet connection-sharing feature
● By using a hardware solution, such as a U.S. Robotics Broadband router
Although both of these methods work to share an Internet connection, they have some significant differences. Your choice will affect the type of hardware you need.
Sharing the Internet with the Windows Internet
connection-sharing feature
The good news is that Windows 98 and later (2000, Me, and XP) include an Internet connection-sharing feature. However, while the Internet connection-sharing feature included in Windows does work, it isn’t the ideal solution for sharing the Internet for several reasons.
The difficulty with this method is that it requires one computer to function as an Internet server, that is, a computer that “serves” as an Internet connection to the other computers in your network (also known as the “clients”). The Internet server computer must also be turned on if another computer on the network needs to use the Internet. Turning on two computers just to connect one to the Internet isn’t terribly efficient. Simply put, this duty wasn’t in the job description.
In addition, to obtain adequate security for your shared network connection, you would need to purchase additional firewall software to safeguard your network from tampering via the Internet.
Finally, because Windows Internet connection sharing doesn’t allow something called VPN passthrough, you may have difficulty connecting to other networks. Without VPN
passthrough, you may not be able to connect properly to your corporate network in order to work at home.
VPN passthrough stands for Virtual Private Network passthrough and refers to the ability for a large network to “extend” itself to another network through an Internet connection.
For some users, Windows Internet connection sharing may be adequate. Consult the documentation that came with your version of Windows for how to configure this feature.
If you choose to go with Windows Internet connection sharing, your choice of Internet connection hardware (such as a telephone modem, DSL, or cable modem) is pretty open. The device can be internally installed in one computer, externally installed via a USB port, or connected via some other method. As long as one computer in your network can gain access to the Internet, it can then be set up as the Internet server (or host) and share its connection with the other computers in your network.
Sharing the Internet with a hardware connection
For our money, sharing the Internet via a hardware connection is the best option.
Using a router that’s capable of sharing an Internet connection, such as the U.S.
Robotics Model 8000A or Model 9003 Broadband Routers, gives your network the ability to take full advantage of an always-on broadband Internet connection, such as DSL, ISDN, or a cable modem.
With a hardware Internet connection, any computer on your network can connect at any time, regardless of whether any other computers are turned on and without burdening any other computers. This feature is great because it saves on electricity and on the hassle of turning on multiple computers in order to connect to the Internet.
If you choose to use the hardware Internet sharing method, the best type of Internet device is one that can connect to your broadband router directly. For most broadband routers, this will be an Internet device with an Ethernet connection — you then simply run a short piece of cable between the Internet device and the router. See Chapter 1 for a description of Ethernet and the type of cable it uses.
In the case of routers, broadband means that the router is capable of taking a broadband (high-speed) Internet connection offered by a broadband Internet device and sharing it across your network. U.S. Robotics broadband routers, such as the Model 8000A, 8011, 8022, and 9003 have this capability built in. Figure 3-1 shows an example.
Figure 3-1: How a U.S. Robotics Model 8022 broadband router and an Internet connection all work together.
In addition, the current line of U.S. Robotics Broadband routers offer robust firewall protection to keep your network safe from unwanted visitors.
Choosing the Right Internet Connection Hardware
To reach the Internet from your home computer, you need a hardware device that can communicate with an Internet server at your ISP. Depending on where you live, you have some choices about the type of hardware you can use. Your options may include
● A modem
● An ISDN device ● A cable modem
● A DSL (Digital Subscriber Line) device
Each of these options has its individual pros and cons — and some options aren’t as widely available. Read on for more information that can help you determine which connection is the right one for you.
What’s behind a firewall?
The term firewall is often heard in the company of network professionals. A firewall is important technology for keeping your network safe from intrusion if your network is connected to the Internet.
U.S. Robotics Broadband routers include several firewall technologies to keep your network safe. These technologies include NAT (Network Address Translation), Packet Filtering, and SPI (Stateful Packet Inspection), among others.
NAT works to keep your network invisible to would-be intruders on the Internet by making it appear as one IP address. As far as the rest of the world is concerned, your network stops at your Internet connection (that is, your cable modem, DSL device, or ISDN device) without revealing the fact that multiple computers are connected to the Internet through that one IP (Internet Protocol) address.
Packet filtering works by inspecting data to make sure it is acceptable as it enters your network from the Internet. Basically, data is sent around a network and across the Internet in small chunks called packets. Each packet has a header, which briefly identifies the data. Packet filtering looks at the header of all data entering your network and matches it to the data that left the network to request it. For example, if you visit a Web page, some data goes to the Web server where that Web page resides to ask to see the Web page. The Web server then responds with the page — packet filtering makes sure these two pieces of data match up so that you get what you ask for. Any unrequested data could be an attack on your network.
Stateful packet inspection goes one step further than packet filtering by examining not just the header of the data packets, but some of the contents as well.
The more time you spend on the Internet, the more you realize how much speed counts. Make speed a priority — go for the fastest solution you can afford.
Telephone modems
A standard telephone modem works by taking computer data (digital data) and
translating it into a form that the telephone line can handle (analog data). The maximum speed you can attain with a modem is 56K. In fact, today you can probably only buy 56K modems — don’t even accept a slower modem as a gift.
When you use a modem to access the Internet, you dial out to your ISP, and the ISP’s servers provide you with access to the World Wide Web and e-mail.
A modem is the least expensive Internet connection and dial-up access is available everywhere. Most new computers come with a 56K modem built in. It’s nothing to get too excited about — a 56K modem is really a slow connection compared to the other
possibilities. Also, with a modem, you have to dial out each time you want to use the Internet, which ties up your phone line. If you want a dedicated modem line to avoid missing incoming phone calls, you have the added cost of paying for a second line.
ISDN
ISDN stands for Integrated Services Digital Network. ISDN is basically a type of phone line that uses a digital signal instead of the traditional analog signal. ISDN connections are typically available at 128Kbps (twice that of a standard telephone modem) and make a good alternative to a standard telephone modem if you don’t want to spend a bundle.
Another advantage of ISDN is that in most cases, you can still use your telephone (although ISDN is a type of phone line) to make voice calls while connected to the Internet. Check with your ISDN provider to make sure that they offer this feature.
ISDN (as with the other broadband options discussed in the following sections) is not available everywhere. Check with your local phone company or search the Web to see if ISDN service is available in your area. Often, ISDN is available in urban and semi-urban areas, but not in rural locales.
If ISDN is available in your area, you can typically purchase the necessary hardware (called a terminal adapter) from the phone company or another company that offers the ISDN connection.
Make sure to read the section, “Sharing the Best Way” earlier in this chapter before choosing an ISDN terminal adapter. Your adapter needs to be able to connect to your network, which means that your adapter must have an Ethernet connection if you want to connect it to a broadband router.
Cable modems
Cable modems send data over your cable-television company’s line. Some cable modems are stand-alone devices that can then be connected to your network while others are internal or Universal Serial Bus (USB) devices that must be installed in one computer, which can then share the Internet connection via the Windows Internet connection-sharing feature.
For the reasons we describe in Chapter 1, connecting your cable modem directly to a broadband router is the way to go. To do this, the cable modem you buy needs to have an Ethernet connection so that you can connect it directly to your router. Building your network Internet connection this way gives all the computers in your network solid Internet access without tying down one computer with the task of sharing its Internet connection.
One great, good thing about cable modems (and DSL devices, as we discuss in the next section) is that you’re always connected to the Internet — no need to dial out each time you want to use the Internet. (This type of connection is sometimes called an always-on connection.)
Plus, cable modems download data really fast — up to 1 million bits per second (1 Mbps). In practice, you won’t likely get 1 Mbps, but the speed will still handily outpace ordinary phone modems and ISDN. Finally, you don’t have to perform any configuration chores to get your cable modem to connect to an ISP. The installation process the cable company performs hooks you up with its ISP automatically.
The main downside to cable modems is that they work by connecting you to a network of other cable-modem users. So, as this network of cable-modem users grows (more
people use the service in your area), each of you loses some speed because everyone is trying to use a portion of the same network bandwidth.
In addition, you will almost certainly have to use your local cable company as both your cable modem service and your ISP. This can be a good thing or a bad thing, depending on the service record of your local cable company.
In contrast to how a telephone modem completely ties up your phone line, a cable modem doesn’t interfere with your ability to watch television.
Digital Subscriber Line (DSL and ADSL) devices
A DSL device is like a digital modem (modems are analog) that hooks into your telephone line. DSL uses a separate frequency range (one that can handle digital transmissions) in your telephone wires so that you can continue to use your telephone for voice and fax while simultaneously connecting to the Internet.
DSL devices typically connect via an Ethernet cable or a USB connection. If you’ve cabled your network with Ethernet or have a U.S. Robotics wireless network, you can connect the DSL device directly to a U.S. Robotics broadband router (8000A, 8011, 8022, or 9003) and make the Internet available to all the computers on your network.
For your home network, you’re probably going to want ADSL, which stands for
Asymmetric Digital Subscriber Line. Because ADSL is the most common form of DSL service, most people ignore the A, and when they talk about DSL, they usually mean ADSL.
Technically, ADSL can support download speeds of 8 Mbps and upload speeds of 1.5 Mbps. That’s beyond blazing fast. But don’t get excited — in practice, ADSL runs slower than its maximum speed, but still much faster than a telephone modem.
DSL devices have several advantages over other devices. They don’t tie up your phone line (you can use your telephone and fax at the same time as DSL). Also, like a cable modem, DSL provides an always-on connection with the Internet, and unlike a cable modem, with DSL, your connection is private — you’re not competing for part of a shared network with other users.
Setting up your DSL connection is easy and is performed in one of two ways. Either a technician from your DSL service provider will visit you and install and configure your connection, or you can use a software program such as SureConnect, shown in Figure 3-2.
Figure 3-2: The U.S. Robotics SureConnect software in action.
The downside to DSL is that (just like sports cars), fast speeds command high prices — the higher the speed you want, the higher the monthly fee.
Also, the service must be available for the physical location of your home. Before you can rush to order DSL services, your telephone company must provide the technology that DSL requires, and you must live within about 3.5 miles (5.5 km) of a telephone company central switching office (CO), or local telephone exchange as its known in Europe. You don’t have to get out your tape measure and walk from your house to the CO — any DSL service provider can tell you if you qualify.
Before you sign up with a DSL provider, do some research on the Web, read the fine print, and make sure that the company you’re considering has a good repair record if things go awry.
Continue to Chapter 4
|
Back to Contents List
Chapter 4
Sharing Printers and Peripherals
In This Chapter
●
Setting up shared printers
●
Installing a network printer
●
Sharing CD-ROM, removable, and other drives
One terrific side effect of installing a computer network in your home is the ability to easily share printers and drives. Network-deficient households (that seems to be a politically correct term, don’t you think?) have had to rely on some pretty kludgy solutions for printing and moving files around.
Just as with sharing an Internet connection, as we discuss in Chapter 3, you have two basic options for sharing printers and drives: through Windows, or through a hardware solution.
The current U.S. Robotics routers come with a printer connection so that you can connect your printer directly to your network. With a printer “hanging” off your network directly, each computer in your network has equal access to the printer.
In contrast, if you connect the printer to a single computer on your network and then share the printer through Windows, the computer with the printer has to start doing double duty as a print server, performing an additional function it wasn’t exactly designed to do. You may also notice the computer with the printer attached slowing down when other users try to print from other computers on your network.
Sharing CD-ROM, hard disk, or other drives is a little bit different because people usually share drives in order to move files from one computer to another. But, drives are also available that can connect directly to a network via an Ethernet connection.
To share files or printers, you need to enable file and printer sharing in your network options. Chapter 2 explains how.
Understanding Your Printer Options
Many network-ready printers are available. Most of these printers have an
Ethernet connection and can be connected directly to your network at the hub or switch. Network-ready printers also usually come with software that tells you what the printer is doing at any given moment — does it need paper? Is it jammed? This feature can be pretty useful if your printer is in another room and you want to keep an eye on it.
[image:40.595.103.549.346.550.2]On the other hand, U.S. Robotics routers come with a standard parallel-port printer connection that connects nearly any printer directly to your network, as shown in Figure 4-1. You may not get all the fancy software that a network-ready printer offers, but you do get all of the convenience and speed of network printing.
Figure 4-1: The printer connection on the back of a U.S. Robotics Model 8011 Wireless Cable and DSL Router.
The U.S. Robotics routers have a built-in print server. Notice we mention that term in the beginning of this chapter as well. We do so because the term print server can refer to any piece of hardware or software that makes a printer available to multiple users.
If you have a printer connected to your network along with an always-on
connection to the Internet, such as DSL or a cable modem, you need to have a firewall or at the very least to password-protect your printers. The U.S. Robotics routers come with a firewall, so you’re in good hands there.
Installing Your Printer
Before you can share a printer on your network, you have to install it. The installation process simply involves setting up the files that Windows needs to communicate with the printer. These files are called printer drivers. You then must tell Windows that this printer is going to be shared with other users on the network. Well, of course, installing also means the physical installation of the printer. If you plan to install your printer on a single computer, the documentation that comes with your printer explains all the steps. If you plan to connect your printer to your router, take a look at your U.S. Robotics guide for the steps.
If you’ve already installed a printer for this computer, you can skip this task and move ahead to the section “Sharing the Printer,” later in this chapter.
When you first connect a printer to your computer or network, Windows may automatically search for the driver files within the Windows driver database. It is, however, much better to use the installation files supplied with most printers to perform the installation. Doing so is better because the drivers and software that come with the printer are going to be the most up-to-date and offer the complete set of software to help manage your printer.
We show you how to install a printer by using either method in the following two sections — just keep in mind that the first method (using the manufacturer disks) is the best way to go.
Using manufacturer disks to install a printer
The preferred method of installing a printer is to use the drivers supplied by the manufacturer. Those drivers probably came with the printer (either on a CD or floppy disk), but if not, you can call the company or visit its Web site to get the files. In addition, some printers come with software that works with the
manufacturer’s drivers to enhance your ability to control and manipulate the printer’s features.
To install a printer by using the manufacturer software, you need to consult the installation guide that came with the printer. Typically, you will need to insert a CD-ROM, which will start a Wizard installation program, reboot, and you’re ready to go.
Be sure to consult the Web site for the manufacturer of your printer to find out if updates to the drivers are available for your particular printer model.
Using Windows files to install a printer
Though this isn’t the preferred method for installing a printer, in some cases it works just fine. If your printer came with installation software, your best bet is to install it by using that software, as we explain in the previous section, “Using
manufacturer disks to install a printer.”
If you choose to install your printer by using the Windows files, you may need your Windows CD to install a printer because the printer driver files are on the disk. Often, new computers have the entire contents of the Windows CD stored on the hard drive, and your printer installation will occur nearly automatically. It’s a good idea, however, to have the Windows CD handy anyway.
Put the Windows CD in the CD-ROM drive. Hold down the Shift key so the CD doesn’t open automatically. If it does open, just click the X in the upper-right corner of the window to close it. Then follow these steps to install your printer:
1. Double-click the My Computer icon.
The My Computer window appears.
2. Double-click the Printers folder in the My Computer window.
The Printers window opens. If this is the first printer you’re installing on
this computer, the only icon in the folder is the one named Add Printer. (If
you installed faxing services, you also have an icon for Microsoft Fax.)
3. Double-click the Add Printer icon.
The Add Printer Wizard window opens. The first window explains that the
wizard helps install a printer. Click Next.
4. Select Local Printer.
The wizard wants to know whether this printer is a local printer (attached to
the computer) or a network printer (attached to another computer).
(Information on installing a network printer is in the section “Installing a
Network Printer,” later in this chapter.)
Click Next after you make your selection.
5. Select the manufacturer and model for the printer.
Scroll through the Manufacturers list in the left pane (see Figure 4-2) to find
the company that made your printer. When you select it, the Printers pane on
the right displays all the printers from that manufacturer. Scroll through the
list to find the right printer model. Then click Next.
Figure 4-2: The wizard lists a slew of manufacturers and models.
If you can’t find the exact printer model, read the documentation that came
with your printer. Look for the section on printer emulation and see which
model matches your printer.
6. Select the port to which you’ve attached your printer.
The port is probably LPT1, but if this is the second printer you’re attaching
to this computer and you’ve installed another printer port, choose LPT2.
Click Next after you select the port.
7. Name the printer and specify whether it is the default printer. See Figure 4-3.
Figure 4-3: That’s as good a name for a printer as we could invent.
Enter a name for this printer in the Printer Name text box. By default, the
wizard inserts the model name for the printer, which is usually perfectly
acceptable.
You also have to tell Windows whether or not this is the default printer for
Windows software. Select Yes if this is the printer you expect to use when
you print from your software programs. Of course, if this printer is the first
one you’re installing, it has to be the default printer.
The default printer is the printer that is automatically selected when you
print from software. If you have other printers, you can use the software
Print dialog box to change to another printer.
Click Next to move on.
8. Select Yes to print a test page.
Click Finish because this is the last wizard window, although you’re not
quite done.
The files that Windows needs are transferred from the CD to your hard
drive. Then the test page is sent to the printer. Look at the test page and see
if it printed correctly.
9. Tell Windows whether the test page printed correctly.
If the test page printed successfully, you’re finished. If not, Windows opens
a Print Troubleshooter.
Select the appropriate choices, and the troubleshooter will make
suggestions. Keep going until you solve the problem. If the problem can’t be
solved using the troubleshooter, you’re advised to call the printer
manufacturer for more help.
Sharing Your Printer
After your printer is installed, you can begin using it on your computer.
You need to have File and Print Sharing services started for the following steps to work. Chapter 2 explains how.
Follow these steps to share the printer with the rest of the network:
1. Choose Start → Settings → Printers.
The Printers folder opens, displaying an icon for the printer you installed on
this computer.
2. Right-click the icon for the printer you want to share and choose Sharing from the shortcut menu that appears.
The printer’s Properties dialog box opens, and the Sharing tab appears in the
foreground. The Not Shared option is selected, and all the other fields on the
dialog box are grayed out.
3. Select Shared As.