1
Relational Databases
and
Microsoft Access
2 © 2014-2017, Ron McFadyen
Department of Applied Computer Science University of Winnipeg
515 Portage Avenue
Winnipeg, Manitoba, Canada R3B 2E9
This work is licensed under Creative Commons Attribution-NonCommercial-ShareAlike 4.0 International Public License. To view a copy of this license visit
http://creativecommons.org/licenses/by-nc-sa/4.0/.
This work can be distributed in unmodified form for non-commercial purposes.
Modified versions can be made and distributed for non-commercial purposes provided they are distributed under the same license as the original. Other uses require permission of the author.
3
TABLE OF CONTENTS
Table of Contents ... 3
Preface... 9
1 Relational Databases and MS Access ... 10
1.1 Relational Databases ... 10
1.2 Microsoft Access ... 15
1.2.1 Modifying Rows ... 19
1.2.2 Adding New Rows... 20
1.2.3 Deleting Rows ... 21
1.2.4 Table Design View ... 22
2. Creating Tables ... 28
2.1 Using Design View to Create Tables ... 30
2.1.1 Data Types ... 32
2.1.2 Properties ... 35
2.1.3 Primary Keys ... 39
3. Creating Forms... 44
3.1 Using the Form Wizard ... 44
3.2 Modifying the Form ... 45
3.2.1 Adding a Button... 46
3.2.2 Adding a Label ... 47
3.2.3 Adding a Calculated Field ... 48
3.3 Advanced Forms ... 49
4
4.1 Simple Query... 52
4.2 Projection Query ... 55
4.3 Selection Query ... 56
4.4 Sorting the Result ... 58
4.6 And ... 60
4.7 Or ... 61
4.9 Joins ... 63
5 Relationships and the Relationships Tool ... 66
5.1 Integrity ... 68
5.2 Relationships ... 69
5.2.1 One-to-Many ... 70
5.2.2 One-to-One ... 71
5.2.3 Many-to-Many ... 71
6 Microsoft Access Queries – Advanced ... 75
6.1 Logical Expressions ... 75
6.1.1 And ... 76
6.1.2 Or ... 77
6.1.3 Not ... 78
6.2 Query Operators ... 80
6.2.1 Like ... 80
6.2.2 In ... 82
6.3 Query Properties ... 84
5
6.3.2 Unique Values ... 86
6.4 Totals Query ... 88
6.5 Parameter Query ... 93
6.6 Crosstab Query ... 95
6.7 Action Queries... 97
6.8 Inner and Outer Joins ... 101
6.8.1 Inner Join ... 103
6.8.3 Outer Join ... 106
6.8.5 Cartesian Product ... 109
6.8.7 Self-Join ... 110
6.8.9 Anti-Join ... 112
6.8.11 Non-Equi Join ... 113
6.9 SQL Select Statement... 114
6.10 SQL Union and Union ALL ... 117
7 Entity Relationship Modelling ... 118
7.1 Introduction ... 118
7.2 Entities ... 124
7.2.1 Weak Entities ... 126
7.3 Attributes ... 129
7.3.1 Atomic Attributes ... 130
7.3.2 Composite Attributes ... 131
7.3.3 Single-Valued Attributes ... 132
6
7.3.5 Derived Attributes ... 135
7.3.6 Key Attributes... 136
7.3.7 Partial Key ... 138
7.3.8 Surrogate Key ... 141
7.3.9 Non-Key Attributes ... 141
7.3.10 Nulls... 143
7.3.11 Domains ... 143
7.4 Relationships ... 144
7.4.1 Degree ... 144
7.4.2 Participation ... 145
7.4.3 Cardinality ... 146
7.4.4 Recursive Relationships ... 150
7.4.5 Identifying Relationships ... 152
8 Mapping an ERD to a Relational Database ... 156
8.1 Mapping Rules ... 156
8.2 Examples ... 159
9 Data Definition Language (DDL) ... 163
9.1 Running DDL in MS Access ... 163
9.2 Example ... 164
9.2.1 DDL Commands ... 165
9.2.2 Creating the Database ... 166
10 Normalization ... 170
7
Example 1. ... 172
Example 2. ... 173
Example 3. ... 175
10.1.2 Keys and Non-Keys ... 178
10.1.3 Anomalies ... 179
10.1.4 Partial Functional Dependencies ... 181
10.1.6 Transitive Functional Dependencies ... 183
NORMAL FORMS ... 185
10.2 First Normal Form (1NF) ... 186
Example 1. ... 186
Example 2. ... 187
10.3 Boyce-Codd Normal Form (BCNF) ... 189
Example 1. ... 191
Example 2 ... 192
Example 3 ... 194
Example 4. ... 197
10.4 summary ... 199
Appendix A: Forms Involving Multiple Tables... 205
Appendix B: SuperTypes and Subtypes ... 209
B.1 Drawing Supertypes and Subtypes on the ERD ... 209
B.2 Supertypes, Subtypes and Relationships ... 211
B.3 Supertypes, Subtypes and Attributes ... 211
8
B.4 Mapping Supertypes and Subtypes to a Relational Database... 213
B.4.1 Relations for all Entity Types ... 214
B.4.2 Relations for Bottom-Most Entity Types ... 218
9
PREFACE
This text is a free introductory text that introduces MS Access and relational database design. The motivation is to support a second-year course on database systems which, to the student, is either a service course providing an introduction to database concepts, or, as a prerequisite for more advanced study in the field.
Various texts have been used with some success but were felt lacking for various reasons such as: (1) being workbook style with extensive tutorial lessons, (2) being too focussed on a
technology, (3) having design material that did not fit well with more advanced courses, and (3) being so expensive that some students opted not to purchase.
Our second-year course has no prerequisites and is taken by students from various disciplines. However, most students are registered in either a Computer Science major program or the
Computer Science minor. Students who enroll in the course obtain: (1) a working knowledge of a personal database system (MS Access), (2) knowledge of SQL (primarily the Select statement), and (3) awareness of concepts and techniques necessary to database design.
Following this course, students can take third- and fourth-year courses in the database subject area. The coverage of Entity Relationship Modelling in those courses is based on the Chen notation – as is usual for academic texts. To be consistent with those higher level courses the same approach is used here.
It is our opinion that many students find normalization theory a difficult topic. Many
presentations on normal forms are more complicated than necessary (e.g. some texts will give more than one definition of some normal forms). Our approach has been largely motivated by writings of Chris Date. We have attempted to give a suitable introduction to normalization theory for the beginning database student and to relate that material to other topics such as entity
relationship diagrams.
10
1 RELATIONAL DATABASES AND MS ACCESS
A database is an organized collection of data. A database may be on paper, or held in computer files such as spreadsheets or more formally in a software system known as a computerized database management system (for example: DB2, db4o, IMS, MS Access, MS SQL Server, mySQL, Oracle, Sybase, Total, Versant). In this book we focus on Relational databases and one specific relational database system: Microsoft Access.
There are many different commercial relational database systems and what you learn here will assist you in using those others. Because MS Access is a workstation/personal system it is a convenient system for beginners.
1.1 RELATIONAL DATABASES
Relational Databases were introduced by E. F. Codd in 19691; Codd’s 1970 paper2 is considered one of the great papers in Computer Science.
We begin with a very small example: a database with one relation, the list of employees shown in figure 1.1. You should notice this looks just like a two dimensional table of rows and columns. The name of the table is Employees, each column of the table has its own title, and each row has the same structure. Each row has a value for employee number, first name, last name, and gender. As tables of data appear in so many places (newspaper articles, text books, web pages, etc.) it is very likely you have seen and used this representation for data previously.
1Derivability, Redundancy, and Consistency of Relations Stored in Large Data Banks, IBM Research Report, 1969.
2
11 Employees
Employee ID First Name Last Name Gender
123 Joe Smith Male
333 Jim Jones Male
456 April Smith Female
842 Jenny Jones Female
777 Tom Lee Male
Figure 1.1 A list of employees.
Let us assume the Employees table in figure 1.1 has one row for each employee who works for some hypothetical company. Data kept for each employee comprises their employee
identification number, their first and last names, and their gender. Information structured in tables is very concise; at a glance we can obtain useful information.
According to the database design methodology in Information Modeling and Relational Databases 3, a database designer must be able to express structured information as
verbalizations. A verbalization that fits the information in one row of the Employees table is:
Employee with ID … has a first name …, a last name …, and is of … gender
In verbalizations like this the ellipses are placeholders: we can use values from a single row to create complete statements that explain the meaning of a row. For example,
Employee with ID 123 has a first name Joe, a last name Smith, and is of Male gender Employee with ID 333 has a first name Jim, a last name Jones, and is of Male gender
A similar approach to organizing knowledge about data appears in the literature on literacy. In the Journal of Reading several articles by Kirsch and Mosenthal discuss the organization of information and its conceptualization as document sentences. In Building Documents by
Combining Simple Lists4, Kirsch and Mosenthal present an example based on information from
3 Information modeling and relational databases, 2nd edition, by Terry Halpin and Tony Morgan; Morgan Kaufmann Publishers; ISBN -13 978-0-12-373568-3.
12 The World Almanac and Book of Facts: 1980 (Newspaper Enterprise Association, p. 427). That data is reproduced in figure 1.2.
Circulation of Leading U.S. Magazines
Magazines Circulation
TV Guide 19,547,763
Reader's Digest 18,094,192 National Geographic 10, 249,748 Better Homes & Gardens 8,007,202 Family Circle 7,611,578 Woman 's Day 7,535,855
McCall's 6,502,880
Figure 1.2 Circulation of leading U.S. magazines.
A major point the authors make is that such information can be re-conceptualized as a series of simple document sentences formed from a basic document sentence. This document sentence expresses an understanding of the tabular data in natural language. The document sentence for figure 1.2 is:
Magazine X has a circulation of Y.
Kirsch and Mosenthal use variables (X and Y) to stand for data that comes from a table. Taking values from a row, we plug values for X and Y into the document sentence to obtain sentence instantiations:
TV Guide has a circulation of 19,547,763. Reader's Digest has a circulation of 18,094,192. National Geographic has a circulation of 10,249,748. Better Homes & Gardens has a circulation of 8,007,202. Family Circle has a circulation of 7,611,578.
Woman's Day has a circulation of 7,535,855. McCall's has a circulation of 6,502,880.
Document sentences and verbalization sentences are essentially the same. Both sentences use natural language to express in words the meaning of tabular data. Whether one is designing databases or reading structured information, it can be useful for understanding to re-formulate data as statements in natural language.
13 where each attribute value is taken from some corresponding domain, and where a domain
represents a set of valid values for an attribute.
Figure 1.3 General structure of a relation
The Employees table in figure 1.1 can be considered a relation of 5 tuples where each tuple has 4 values drawn from each of the employee identifier, first name, last name, and gender domains. Similarly we can say the lists comprising the Circulation of leading U.S. Magazines in figure 1.2 can be considered a relation with 7 tuples each having 2 attribute values.
Relations are typically implemented in commercial databases as tabular structures comprising rows and a fixed number of columns. Everybody is familiar with tables as they are commonplace in textbooks, papers, magazines, etc. This simplicity of representation is one reason why
14 Exercises
To design a database, a database engineer needs to find good representations of how an
organization uses data. Good sources include: input forms, reports, web pages, etc. A challenge for database designers is to find these sources and interpret them.
1. Consider the following table of product information sold by ABC Foods. Verbalize the information presented.
Product ID Product Name Unit Price Units In Stock
1 Black Tea $2.00 44
2 Green Tea $3.00 33
3 Vegetarian Lasagne $10.00 20
4 Cajun Seasoning $11.00 29
5 Cranberry Sauce $21.00 0
2. Consider the following report that the Human Resources department of ABC Foods must produce. Verbalize the information in that report.
Employee ID First Name Last Name Department
1 John Smith Receiving
2 Lee Daniels Sales
3 April Turner Sales
4 Thomas Trump Marketing
5 Lee Smith Marketing
15 1.2 MICROSOFT ACCESS
MS Access is a relational database system for workstations that run the Microsoft Windows operating system. MS Access is typically used by individuals for data they use personally, but in some situations a single MS Access database may be used by a group of people or small
department.
MS Access databases are stored in a single file that has a file suffix of “.accdb” or “.mdb”. Databases created using MS Access 2007 and later have a file suffix “.accdb”, and databases created using MS Access 2003 or earlier have a file suffix “.mdb”. We will be using databases where the files have names ending in “.accdb”. You need to use MS Access 2007 or later to open these databases.
Our first sample database is in a file named Library.accdb; this database is available from the website associated with this text.
To use this database, you must first download the file containing the database, and then open the database by double-clicking the file name:
Figure 1.4 Double-click the database file to open the sample database.
16 Figure 1.5 The Home tab in MS Access shows you the table names.
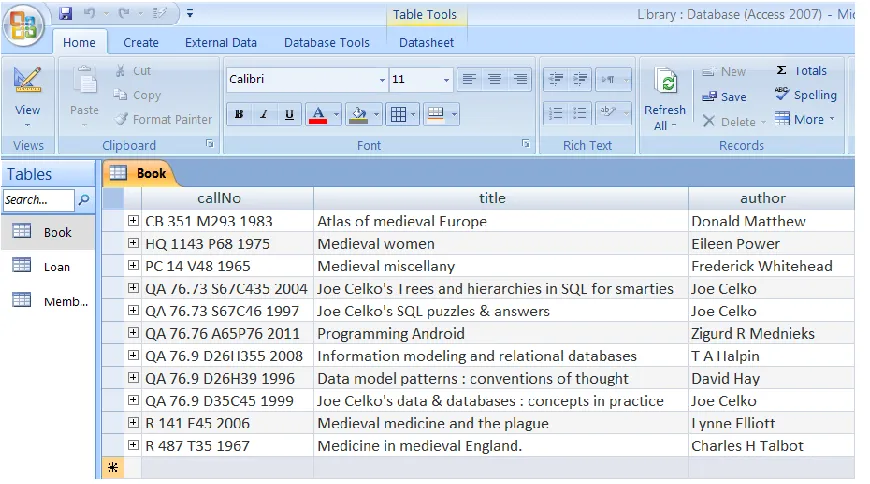
[image:16.612.92.527.400.642.2]Double-click a table name and MS Access opens the table in Datasheet View; you can see the contents of Book in figure 1.6. The datasheet view for a table is easily obtained, but it’s not a particularly user-friendly way to view and manage data in a table. We will learn other ways of handling data with MS Access Forms. The Book table has three fields (i.e. attributes): callNo, title, author. When we view a table we see data organized into rows and columns. The data in one row corresponds to one book; if there are 11 books, then we have a table of 11 rows.
17 The Book table contains one row for each book in the library. We can verbalize the content of a row as
The book identified by call number … is titled … and is authored by …
Substituting actual values from rows we can make explicit statements such as: The book identified by call number PC 14 V48 1965 is titled Medieval miscellany and is authored by Frederick Whitehead
The book identified by call number QA 76.76 A65P76 2011is titled Programming Android and is authored by Zigurd R Mednieks
Knowing that books are identified by their call number and since the above statements use the conjunction ‘and’, the above verbalization can be expressed in an elementary form as:
The book identified by call number … is titled … The book identified by call number … is authored by …
Each of these expressions is considered elementary because each states one fact about a specific book. We cannot make these statements any simpler.
Of course, we can now substitute values from the table and obtain:
The book identified by call number PC 14 V48 1965 is titled Medieval miscellany The book identified by call number PC 14 V48 1965 is authored by Frederick Whitehead The book identified by call number QA 76.76 A65P76 2011 is titled Programming Android The book identified by call number QA 76.76 A65P76 2011 is authored by Zigurd R Mednieks
At this point, expressing verbalizations this way may seem trivial and unnecessary, but they do serve a purpose – they make it clear that the title and the author’s name serve only to describe a book, and that the call number identifies the book. An aim of a database designer is to
understand data requirements in terms of these elementary forms. We’ll have more to say about this in a later chapter.
Up to this point we have seen how to open an MS Access database;
recognize the database comprises a number of tables;
open a table to see it displayed as a collection of rows and columns; verbalize the information in a table.
18 Exercises
Recall that an elementary verbalization is one where the verbalization cannot be simplified in any further way. Simpler statements would result in a loss of information.
1. Rewrite the verbalization for the Employees table using elementary verbalizations.
2. Is the verbalization given for Circulation of Leading U.S. Magazines in elementary form?
3. What verbalizations apply to the Loan table in the Library database?
4. What verbalizations apply to the Member table in the Library database?
5. View the data in the Loan table. Each row in the table corresponds to a member borrowing a book. Notice how the call number field contains values that appear in the Book table and how the id field contains values that appear in the Member table. All rows have a value for the data borrowed field. Why would some of the date returned fields appear to have no value at all?
6. The web site for these notes has a number of databases. Download the University
database and examine its contents. This database contains information about departments and courses in a fictional university. Typically a university is organized into faculties which comprise departments and those departments offer courses. For instance many universities have a Faculty of Science which itself may contain departments such as Mathematics, Statistics, and Physics. Each of these departments will offer courses for students to take: Introduction to Calculus, Introduction to Statistics, Discrete
19 1.2.1 MODIFYING ROWS
With the Book table open in MS Access and with the cursor positioned in a row, try modifying the data recorded for that book. If you position the mouse cursor you can change the value recorded for the book’s call number, title or author. Try doing this - remember you can always download this database again if you wish to get back to what you started with. As you begin modifying a value (e.g. adding an ‘s’ to make the last name Matthews) an editing symbol appears to the left of the row:
Figure 1.7 Editing a row.
If you recognize that you are making a mistake you can undo your editing action by pressing the Escape key.
To make your change permanent you must move the cursor to another row for the update to be completed – when you do this, you will note the editing symbol disappears.
In some situations you will find MS Access provides a formal Undo capability. Consider the following figure that shows an Undo icon in the upper left corner that appeared after changed Matthew to Matthews and moving the cursor to the next row:
20 1.2.2 ADDING NEW ROWS
Try adding a new book to the Book table. You can add a new book by first clicking on the New Record button shown near the bottom of the window:
Figure 1.9 Add new record button.
To complete your action you must type values for callNo, title, and author. As a first example use a call number that does not appear for any other book. As we will soon see the Book table is designed in such a way that each book must have a different call number. Your addition will be successful if your book is given a call number that no other book has. When you add a new row you must move the cursor out of the row for the addition to be completed.
As a second example try to add a new book, but this time, use a call number that already appears in the table. In this case MS Access will reject your new record. Try this and you will see a response similar to:
Figure 1.10 MS Access message for duplicate primary key
The important part of this message for us is the part that refers to duplicate values or duplicate data. When we try to add a row with the same call number as some other row MS Access refers to the duplicated call number value. Note that you can press the Escape key to remove the new row from the table display. Soon we discuss table design where you will see that the call number field is designed to be the primary key of the Book table.
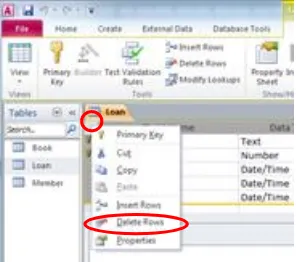
21 1.2.3 DELETING ROWS
You can remove a book from the table by highlighting a row (click in the cell just to the left of a call number) and then press the Delete key on the keyboard:
Figure 1.11 Delete a record: select, press delete.
When you press the Delete key MS Access will respond in one of two ways depending on whether or not there is an existing reference to the row you are trying to delete:
No, a reference to the book does not appear in the Loan table.
Yes, a reference to the book appears in the Loan table.
Figure 1.12 Attempting to delete a row
When you view the Loan table you are able to see the books that library members have taken out and whether or not a book has been returned. Rows in the Loan table have references to rows in the Book table and to rows in the Member table. The default action in MS Access is that a deletion is disallowed if there is some row in a table that has a reference to it. So we cannot delete a book if there is a Loan row referencing it.
22 1.2.4 TABLE DESIGN VIEW
So far we have been opening tables in Datasheet View where we can view and change data in rows of a table. When in Datasheet View we can switch from datasheet view to Design View by clicking on the design icon located near the upper left hand corner (see figure 1.13). When the Design View icon is clicked, the display changes: the icon becomes a Datasheet View icon and the display changes to reveal design information (see figure 1.14).
Figure 1.13 Click on the Design View Icon to Switch to Design View.
When you click the Design View icon you will see the display change as shown in figure 1.14 – you will see the field names listed along with their datatype, and according to the field where the cursor is located you see other properties for that field. Datatypes vary somewhat from one database system to another, but of course there are many similarities too. Properties are other characteristics that you can define for a field such as the maximum length of values stored for the field.
Generally we want data in a database to be reasonable and correct. We can use datatypes and properties to achieve certain types of correctness. Consider the following integrity rules as rules we would like to enforce:
Call numbers, titles, and authors are alphanumeric. Any text you can type on the keyboard is acceptable.
Each call number must be unique (there can be no duplicates) Each book must have a title
23 A value for author must be no more than 255 characters long
The author field can be left out (it can be null).
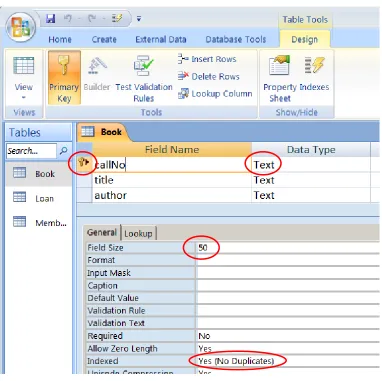
[image:23.612.118.500.135.516.2]Now we discuss how these integrity rules are obtained in Table Design View.
Figure 1.14 Table Design View
In figure 1.14 the cursor is located on the callNo field; some properties of callNo are circled and discussed below:
24 The callNo field has a datatype of Text and a field size of 50. Any value you can type on
the keyboard is acceptable but the overall length, number of characters, is restricted to at most 50.
The callNo field is indexed and in this case no duplicates are allowed. The index
constructed by MS Access is similar in purpose to the index at the back of any book: the index allows MS Access to quickly locate a specified row. However, this index is different from that at the back of a book because it allows only one entry per indexed value (No Duplicates is specified for the Indexed property). Each call number is unique.
As you move the cursor up and down you should note the following for this sample table:
For title:
The title field has a datatype of Text with a field size of 255. A text field can comprise any combination of letters, digits, and punctuation. Any value entered by a user cannot exceed 255 characters in length.
A value is required. When entering data for some book, the user cannot omit the title.
There is no index on title.
For author:
The author field has a datatype of Text with a field size of 255. A text field can comprise any combination of letters, digits, and punctuation. Any value entered by a user cannot exceed 255 characters in length.
A value is not required. When entering data for some student, the user can omit the author.
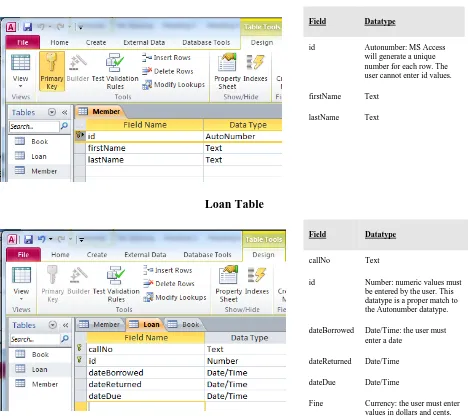
25 Now, open the Member table and then the Loan table in design view. Examine the properties of each field. For reference see figure 1.15.
Member Table
Field Datatype
id Autonumber: MS Access will generate a unique number for each row. The user cannot enter id values. firstName Text
lastName Text
Loan Table
Field Datatype
callNo Text
id Number: numeric values must be entered by the user. This datatype is a proper match to the Autonumber datatype. dateBorrowed Date/Time: the user must
enter a date dateReturned Date/Time dateDue Date/Time
[image:25.612.72.540.130.550.2]Fine Currency: the user must enter values in dollars and cents.
Figure 1.15 The fields of the Member and Loan tables.
26 Exercises
1. Use Design View to add fields to the Member table as indicated:
gender: Text field of length 6 to accommodate the values male and female. Make this a required field that is not indexed.
birthDate: a Date/Time field; required; not indexed.
Switch back to Datasheet View (You must reply yes to the system prompt to save your changes). You should notice there are no values for gender nor birthDate.
2. Now enter values you deem appropriate in the gender and birthdate fields for each member. Close the table and reopen it. You will see the values you entered are still there. 3. When new members join the library information about them must be entered into the
Member table. Each member is given an id value automatically. Add new members to the library and note how MS Access will not let you enter id values; instead, MS Access generates those values for you – id values are generated sequentially. Close the table and then reopen the table to confirm your additions worked.
4. Typically a library assesses a fine the user must pay if they keep a book out past the due date. As well the library needs to track the amount, if any, the member has paid. In this exercise we add two fields to the Loan table so we can keep track of fines that are assessed and the amount the member has paid.
a) Open the Loan table in design view and add two new fields named fineAssessed and finePaid. These fields must have a datatype of Currency.
b) Save the Loan table and then view the rows of the table. There are no amounts for these fields.
c) Choose some row(s) in the Loan table and enter values for the fineAssessed and finePaid fields. Note the values you enter will appear as dollars and cents.
5. In exercise 3 you added a new member and in exercise 4 you added fields to the Loan table. Consider that the person you added now borrows a book and so a row must be entered into the Loan table. Enter such a row.
27 a) View the Member table and try to delete that member, and then view the Book table
and try to delete that book. These deletion attempts are unsuccessful because of the references to the Loan table.
28
2. CREATING TABLES
The typical MS Access database comprises several kinds of database objects such as indexes and tables. Each table represents a kind of entity (persons, places, things, events, etc.), or relationship between entities. For instance, if we are keeping track of departments and courses at our
University then we should have two tables:
Department: to keep information about departments
Course: to keep information about courses.
For each department suppose we need to know things such as: department code, department name, location of the department (an office number), phone number for the department, and the name of the department’s chair. Suppose departments can be identified by their department code (e.g. ACS) and by their department name (e.g. Applied Computer Science); both of these fields are assigned by the University and each will be unique across departments. We will choose to use the department code as the primary key; that is, we choose to use department code as the primary identifier for departments. We show Department with some sample data:
Department
deptCode deptName deptLocn deptPhone chairName
ENGL English 3D05 786-9999 April Jones
MATH Mathematics 2R33 786-0033 Peter Smith
ACS Applied Computer Science 3D07 786-0300 Simon Lee
PHIL Philosophy 3C11 786-3322 Judy Chan
BIOL Biology 2L88 786-9843 James Dunn
Figure 2.1 Department table
29 Course
deptCode courseNo title description creditHours
ACS 1453 Introduction to Computers This course will introduce students to the basic concepts of computers: types of computers, hardware, software, and types of application systems.
3
ACS 1803 Introduction to Information Systems
This course examines applications of
information technology to businesses and other organizations.
3
ENGL 2221 The Age of Chaucer This course examines a selection of medieval poetry and drama with
emphasis upon Chaucer's Canterbury Tales.
6
PHIL 2219 Philosophy of Art Through reading key theorists in the history of esthetics, this course examines some of the fundamental problems in the philosophy of art, including those of the definition and purpose of art, the nature of beauty, the sources of genius and originality, the problem of forgery, and the possible connection between art and the moral good.
3
BIOL 4451 Forest Ecosystems Field Course
This is an intensive three-week field course designed to give students a comprehensive overview of forest ecology field skills.
2
BIOL 4931 Immunology Immunology is the study of the defence system which the body has evolved to protect itself from external threats such as viruses and internal threats such as tumour cells.
3
30 2.1 USING DESIGN VIEW TO CREATE TABLES
In this section we will step through the process of creating a table. From the web page for these notes download and open the MyUniversity Database.
1. Click on the Create tab – use the mouse and click it to see the options available (Table, Table Templates, SharePoint Lists, Table Design, etc.):
Figure 2.3 Create a table using Table Design
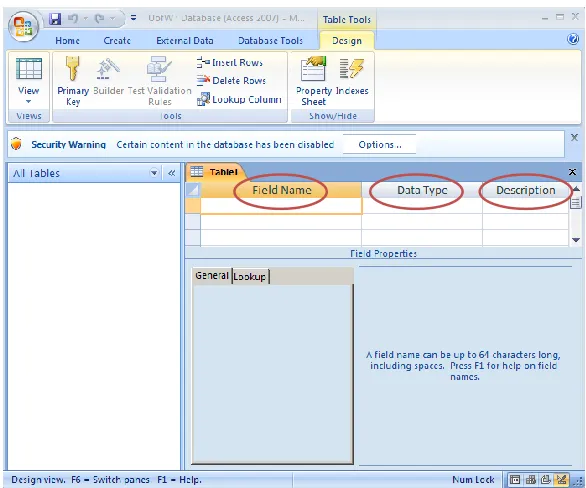
[image:30.612.159.452.388.632.2]2. Click the Table Design option to begin a process to create a new table, the Department table. You are presented with a form where you can enter field definitions for a table. A field definition comprises field name, data type, and description. You can also set the table’s primary key. The Table Design form is shown below:
31 3. Begin by entering each field name and choosing Text as the data type. In the description
column you may enter a longer description of the field’s contents – these are treated as comments that may be useful for someone who is learning about your tables. Once you have done this you should have a form that looks like:
Figure 2.5 Department Table
4. Next we set the primary key for the table to be the deptCode field. Click the mouse in the spot just to the left of deptCode and then click the Primary Key icon which is in the upper left area of the form beside the View button. Access uses an icon to show the deptCode as the PK:
32 5. At this point you should save your work by clicking the Save icon in the upper left hand
corner of the form – you will be prompted to give the table a name – name it Department.
You should still be in Design View for the Department table. Note that you can press the F1 function key to get help pertinent to the location of the mouse cursor. If your cursor is positioned on a Field Name and you press F1 you will see a window pop open that displays suggestions from MS Access regarding how you should name fields. Try this. Before going any further, try pressing F1 in other locations too, such as Data Type and Description. We recommend that you read some of the information available to become more familiar with MS Access.
2.1.1 DATA TYPES
MS Access provides several data types – we will discuss Text, Memo, Number, Date/Time, Currency, AutoNumber, Yes/No, and Lookup Wizard.
Figure 2.7 MS Access Data Types
Text
33 Memo
A designer selects Memo if the field will have character data but the length might be longer than 255. Memo allows for a maximum length of 63,999 characters. Consider the description field of the Course table: could these be longer than 255 characters?
Number
If a field is used for storing values that are used in numerical calculations (e.g. quantity ordered) then Number is appropriate. The Field Size property (properties are discussed later) can be used to limit the number of storage locations used per value.
Date/Time
If a field contains date and or time values, then the Date/Time data type should be chosen. The Format property (discussed later) allows you to control how these values will appear to the user.
Currency
If a field will contain monetary values then the Currency data type should be chosen. This data type provides for numeric calculations that are accurate to 15 digits to the left of the decimal and 4 digits to the right of the decimal.
AutoNumber
If you choose AutoNumber MS Access will generate a value for you when a row is inserted into the table. You can, via the New Values property, arrange the numbers to be generated
sequentially or randomly. Often control numbers for things like orders, invoices, registrations, etc. are numeric and we can leave it to the system to generate a next value for us.
Yes/No
This data type restricts possible values to yes or no.
Lookup Wizard
34 Exercises
These exercises refer to the Library database.
1. Consider the Member table. The id field was defined with the AutoNumber datatype. Experiment by adding new members and you will note that id values increase by 1. Now try deleting the last two members that you added. If you add those members back in what id values do they get? Are id values reused?
2. Consider the Book table. Add a field, paperback, that can be used to indicate whether or not a book is a paperback. Choose the YES/NO datatype. Save the design and switch to datasheet view. Now you will see how to enter such values – MS Access provides a box that is to be checked, or not. You can select (a ‘Yes’) using the mouse or by using the space bar. You should experiment with this.
3. Consider the Member table. Previously you added a gender field. Open the Member table in design view and change the datatype for gender to be Lookup Wizard. The wizard will automatically present 3 successive popup windows where you will:
i) specify that you are providing the lookup values; ii) enter the values (Male and Female);
iii) specify that values are to be limited to your list.
35 2.1.2 PROPERTIES
Each field must have a data type as discussed above. According to the data type, MS Access will present to you a set of field properties that you can tailor for your table. We will discuss the following: Field Size, Format, Input Mask, Caption, Default Value, Validation Rule & Validation Text, Required, Indexed, Show Date Picker, and New Values.
Field Size
Consider a field like deptCode. Suppose the University uses 3 and 4 character values for
department codes. Because of this it is reasonable to set the Field Size to 4 to limit the possibility that an end-user accidentally types a longer string of characters and thereby enters incorrect data. In this way we can limit the kinds of errors users make when they enter data and thus improve the overall quality of our database.
Data integrity is a serious issue for databases. Setting Field Size for Text data and Number data is a common thing to do. Often organizations will limit the data they collect for fields such as last name and first name (for example, 30 characters). If the data type is Number then values selected for Field Size are values such as Byte, Integer, Long Integer, etc. These kinds of values are associated with increasing number of memory locations used per value. A selection of Byte restricts storage to 1 byte of memory (8 bits), and since the largest positive integer that can be stored in a byte is 255, the values stored in the field are forced to be in the range from 0 to 255. Further information is readily available if you use the F1 function key on Field Size for a Number data type.
Format
36 Value in field Format Property Displayed as
barack obama > BARACK OBAMA
January 14, 2013 Medium Date 14-Jan-13
January 14, 2013 Long Date January-14-13
@;None None
786456789 @@@-@@@-@@@ 786-456-789
@@@-@@@-@@@;None None
Figure 2.8 Format Examples
Input Mask
The Input Mask property is used to force the user to add data according to some pattern. This is another nice feature to help improve the overall quality of data added to a database. When the cursor is in the Input Mask area a ‘builder button’ appears. When you click this button you will see a list of popular controls. If you were to choose the mask for phone number you will see the control !(999) 000-0000 appear. As a result of this choice, the user must enter a 7-digit phone number with an optional 3-digit area code).
Caption
If there is no caption, then the heading used in displays of data is the field name. Sometimes the field name is not what you want your users to see. For example, instead of the heading deptCode above a list of department codes, you may prefer to use the words Department Code. To
accomplish this just enter such a heading in the caption property for the field.
Default Value
If some value for a field is very common then you should consider setting a default value. For example, if most courses are 3-credit hour courses then the value 3 can be set as the default for all new courses.
Validation Rule & Validation Text
37 Required
Consider the deptName field of the Department table. If a user enters data for a new department then it is unreasonable for the deptName field to not have a value. To ensure there will be a value we make the field required – i.e. we choose Yes for the Required property.
Indexed
MS Access automatically creates an index (unique – no duplicates) on a field that is the primary key. A unique index is a special internal data structure that Access builds to facilitate two things: (1) to ensure fast access to rows of data when the user specifies a value for such a field in a query, and (2) to ensure in the case of no duplicates that no two rows of the indexed table could have the same value for that field. The index data structure is very similar to the index you see at the back of books. An index comprises several entries where each entry has a value (a term used in the book) and a reference (a page number in a book) – in the case of duplicates allowed there can be several references (several pages where the term appears).
You may choose to have an index on any field. If a field could have duplicate values then you must choose an index that allows duplicates.
Show Date Picker
If the data type is Date/Time, then this selection enables the user to select a date using a picker – a convenient tool for data entry.
New Values
38 Exercises
In the next two exercises you are working with your University database.
1. Consider the Department table. In design view, set the deptCode field to have a length of 4 and use > as the display format. Set the length of the deptPhone field to be 10, and choose the Phone Number input mask. Save the table and switch to datasheet view. Use figure 2.1 as a guide and enter data into the Department table.
2. Create a Course table with attributes for department code, course number, title, short description, and credit hours. The credit hours field should be numeric with no decimal places, and the other fields are Text fields. Set the deptCode field to be Text with a length of 4 so that it matches the properties of deptCode in Department. Later it will be
important that the deptCode field in both Department and Course are defined the same. Use figure 2.2 as a guide and enter data into the Course table.
The following exercises relate to the Library database.
3. Consider the firstName and lastName fields in the Member table of the Library database. Modify the caption for these fields to be First Name and Last Name respectively. Save the table and reopen in datasheet view. You will see these captions at the top of their respective columns.
4. The Loan table has fields that are defined with the DateTime datatype. Experiment with different formats for these dates.
5. Consider the id field in the Member table of the Library database. In design view change the increment property of the id field to be random instead of increment. This is a non-reversible action (but you can download the database later to get a fresh copy). Now add some new members. What can you say about the id values that are assigned?
6. Validation rules and validation text are important features to assist database users. a. Consider the Loan table and its date fields. MS Access has many built in
functions one of which is Date() which always returns today’s date. So, to ensure that someone always enters a due date later than today, in the properties section for the date due field enter the following:
Validation rule: >= Date()
Validation text: Enter a future date.
39 this validation rule by switching to datasheet view and entering valid and invalid values for the due date.
[image:39.612.269.417.197.328.2]b. To ensure the date borrowed value is less than or equal to the date returned value we construct a validation rule that involves two fields. MS Access will not let you enter this rule at the field level; instead, such a rule must be specified at the table level. To enter a table level rule you must click in a small square just below the table name and choose properties:
Figure 2.9 Table level properties
and enter the properties:
Validation rule: [dateBorrowed]<=[dateReturned]
Validation text: Date returned cannot be prior to date borrowed. The square braces, [ ], that appear in the expression are required. These inform MS Access of references to fields in the table.
Enter this rule and verify that it prevents the user from entering improper dates.
2.1.3 PRIMARY KEYS
This section assumes you have created the Department and Course tables. Every table should have a primary key, but this is just a rule-of-thumb that most database designers follow. In our database:
The Department table has deptCode as its primary key.
40 To set a primary key the table must be open in Design View. You must first select the field (or combination of fields) and then click the Primary Key icon. This is straightforward for the Department table, but not for the Course table because its’ primary key comprises two fields. Because the PK involves more than one field we say this primary key is composite.
Exercises
1. Set the primary key for the Department table. With the Department table in Design View, select the deptCode field and then click on the Primary Key button. When done
successfully you will see the deptCode field with a key icon beside it:
Figure 2.10 Setting the PK for Department
If MS Access rejects your primary key then you must examine the values you previously entered for deptCode – there must be some duplicated value. If this happens you must view the table in Datasheet View and find the duplicated value and make necessary changes.
Once MS Access has accepted your primary key you should open the table in datasheet view and experiment: How does MS Access respond if you try to create a new row with an existing primary key value?
41 a. Select the deptCode (click to the left of the deptCode field).
b. To select the next field to be part of the PK: while holding the Control key down, click the courseNo field (and now release the Control key).
c. Next, click the Primary Key icon. You will now see the key image beside both fields as in:
If MS Access rejects your primary key then you must examine the values you previously entered for deptCode and courseNo – there must be some duplicated value. If this
happens open the table in Datasheet View and examine the rows to find duplicate values of the combination {deptCode, courseNo}.
Once MS Access has accepted your primary key you should open the table in datasheet view and experiment: How does MS Access respond if you try to create a new row with an existing primary key value?
3. (Advanced) Later on we discuss relationships between tables. Perhaps you are willing to try this now. The Department and Course tables are related to one another through the deptCode field. It is reasonable for us to expect that a deptCode value in a row of the Course table also appears in a row of the Department table. That is, if we are recording a course for the mathematics department then we expect the database to have a
42 a. First, click Database Tools. Then click Relationships:
b. The Relationships Tool opens and you see a blank relationships diagram:
c. Position the mouse in the window, then right-click and choose Show Table. From the list of tables, select both Department and Course, and then click Add.
43 d. With both tables showing on the diagram you must select the PK of Department,
drag it to the Course table, and release the mouse button above the deptCode field of Course. If you follow the directions on the screen you will be able to select enforce referential integrity (RI) and then you end up with the following:
e. If RI is enforced then it becomes impossible to have a row in Course without a matching row in Department.
44
3. CREATING FORMS
For each table you should create a basic form that can be used to manage data for the table. Once forms have been created your users will have a more user-friendly way of entering and managing data in your database (datasheet view is not considered user-friendly).
3.1 USING THE FORM WIZARD
There are many ways to create forms. We discuss the simplest approach here. Click the Create tab and then select the Form Wizard:
Figure 3.1 Use Form Wizard
The Form Wizard steps you through a sequence of choices where you choose the table for the form, the fields to appear on the form, the layout for the form, the style, and the title to appear at the top of the form. At this point you should create two forms in your University database, one for the Department table and one for the Course table. As the wizard steps you through each case, you should select/enter:
1. All fields of the table to appear on the form (try clicking the button when it shows) 2. A Columnar layout
3. A style of your choice 4. A title of your choice
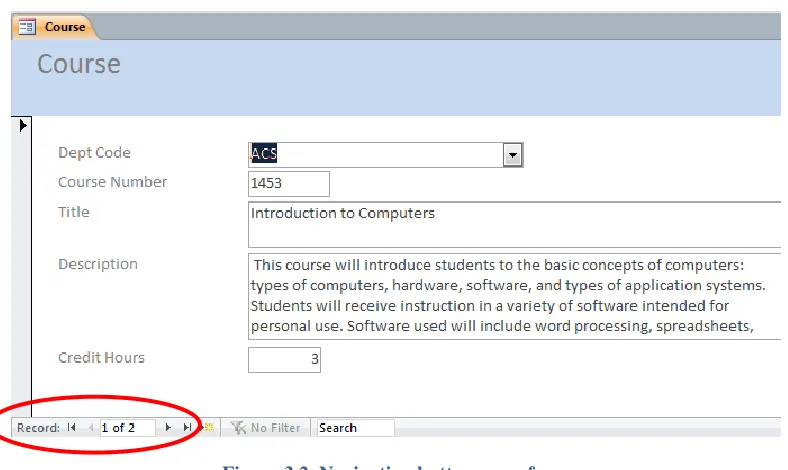
45 A major difference now is that the user will see just one row at a time. Notice the navigation buttons at the bottom of the form where the user can click to navigate through the rows of the table or to add a new row:
Figure 3.2 Navigation buttons on a form
3.2 MODIFYING THE FORM
You can make forms easier to use by adding buttons for common operations of, say,
1. adding a new row
2. deleting the currently displayed row
46 3.2.1 ADDING A BUTTON
To add buttons to an existing form you must open the form in Design View. At this point make sure that wizard capabilities are available – if necessary select the Use Control Wizards: (see below) to turn wizard capabilities on. To add a button you click the Button button:
Figure 3.3 Use Control Wizards when adding controls to a form
Next, you click a location on the form where you would like the button to be placed. Click in the area labeled Form Footer and space will be added to the form’s design to accommodate the button.
Because Use Control Wizards is on, the system will take you through a series of prompts where you specify the nature of the button. You need to add three buttons to each form. Consider selecting/entering the following at the pertinent prompts:
Button Category Action Text/Picture
Add button Record operations Add new record New Row Delete button Record operations Delete a record Delete Row Close button Form operations Close form Close
47 A Course form in Design View with three buttons in the Form Footer section:
Figure 3.5 Course form with three buttons in form footer
Anytime after creating a button you can switch to Form View to test your design. If some button is not working as you like then just switch back to Design View, delete the button and try again.
3.2.2 ADDING A LABEL
A label is a control that holds text for display purposes only. By default, MS Access adds a label containing the table name in the Form Header area of the form.
To add a label you must click the Label control, then click (and drag for sizing) where you want the label placed. You can then type the content for the label and adjust its properties for
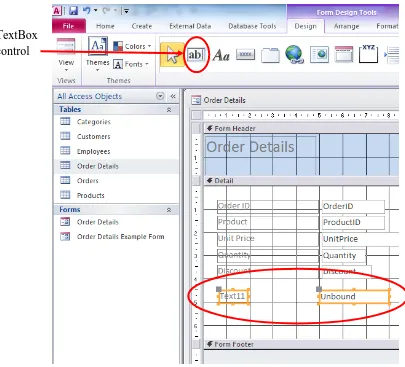
48 3.2.3 ADDING A CALCULATED FIELD
A calculated field is one that involves a calculation using existing fields; for instance to multiply a quantity and a unit price to get an extended price.
To add a control where a calculated value will be displayed you must click the Text Box control, then click (and drag for sizing) where you wish the control placed. You will see two controls placed in the form: a label and a text box. For the label one could enter Extended price, and in the text box you would enter a formula (e.g. for an extended price a formula would be:
[image:48.612.82.487.231.598.2]=[quantity]*[unitprice]).
Figure 3.6 A TextBox control on a form TextBox
49 Adjust the size and location of the controls as necessary. To do this can be a little tricky. To move a control you must select the control, and then click (and drag) the large dot in the control’s upper left corner:
To resize a control you must position the mouse so you can see a resizing indicator:
Exercises
1. Open the Orders database (see databases for these notes) and create a form for OrderDetails. You will be able to incorporate the calculated field discussed above. Open your form in Form View and view the data to verify your calculated field displays properly.
Note that you can modify the properties of fields on a form. When you are in Design View for this form you can right-click a field and select properties – the first property on the Format tab is Format and, for this calculated field, you could choose Currency. 2. Open the Library database and create forms for each of Book, Loan and Member.
3.3 ADVANCED FORMS
50
4 MICROSOFT ACCESS QUERIES
Queries are used for multiple purposes in a database environment. They can be used directly to restrict the information a user can see,
as the basis of a MS Access form, as the basis of a MS Access report.
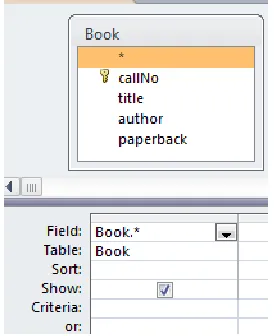
[image:50.612.149.465.404.607.2]We shall use the Library database for examples. With MS Access you can create a query in multiple ways; we will examine the use of the Query Designer. To create a query, click the Create tab and then click the Query Design icon:
Figure 4.1 Create a query
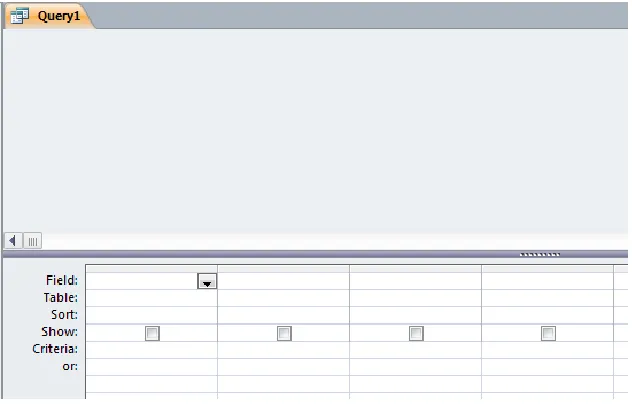
As a result MS Access opens a Query By Example (QBE) window that you use to specify components of a query:
Figure 4.2 QBE window
51 The Grid area is used to specify:
• fields and tables,
• sort fields,
• fields to be included in the results display,
• criteria fields must meet for a row to be included in the query result,
• calculations,
• grouping of rows for displaying summary information
52 4.1 SIMPLE QUERY
The simplest query is one that displays a complete table – all rows and columns. Suppose we want to list all books in the library. The process of creating the query is as follows:
Click on the Create tab if necessary and then click on the Query Design icon. Now you can right-click in the Relationships area and choose the Show Table option
[image:52.612.224.387.204.358.2] A window pops up, and from the list of tables you must double-click Book:
Figure 4.3 The QBE List of table
Choose Close from the Show Table pop up window
MS Access displays the Book table and its fields in the Relationships area. The first in this list is an * which stands for all attributes – double-click the *. This results in the following:
[image:52.612.238.375.459.627.2]53 We can run the query to test it and confirm it does what we expect: list all rows in Book. To run a query, click the Run icon:
Figure 4.5 Run a query
There are other views of a query. If you click the drop down just below the View icon:
Figure 4.6 Several views for a query
You can see all the ways of viewing a query, including:
Datasheet View
Design View
SQL View.
[image:53.612.258.351.292.441.2]54
callNo title author paperback
[image:54.612.218.396.347.426.2]CB 351 M293 1983 Atlas of medieval Europe Donald Matthew True HQ 1143 P68 1975 Medieval women Eileen Power False PC 14 V48 1965 Medieval miscellany Frederick Whitehead True QA 76.73 S67C435 2004 Joe Celko's Trees and hierarchies in SQL for smarties Joe Celko False QA 76.73 S67C46 1997 Joe Celko's SQL puzzles & answers Joe Celko True QA 76.76 A65P76 2011 Programming Android Zigurd R Mednieks True QA 76.9 D26H355 2008 Information modeling and relational databases T A Halpin True QA 76.9 D26H39 1996 Data model patterns : conventions of thought David Hay True QA 76.9 D35C45 1999 Joe Celko's data & databases : concepts in practice Joe Celko False R 141 E45 2006 Medieval medicine and the plague Lynne Elliott False R 487 T35 1967 Medicine in medieval England. Charles H Talbot False
Figure 4.7 Query results
You can save the query:
Figure 4.8 Pop-up for saving a query
Now you can see the query listed as a database object. The query can be run any time by an end user. The results of the query are not stored or saved – only the definition of the query.
55 4.2 PROJECTION QUERY
[image:55.612.243.368.156.333.2]Next we build a query that displays a subset of the columns of a table. Suppose we need to produce a listing of call numbers and titles. Proceed as in the previous example so that the Book table is shown in the Relationships area. Now, double-click the callNo and title fields:
Figure 4.9 Query showing specific fields
The definition of the query is now complete. The grid area indicates the fields involved, and both fields will be displayed because each has a check mark on the Show line. Only fields checked on the Show line are displayed in the results. Running this query yields:
callNo Title
CB 351 M293 1983 Atlas of medieval Europe
HQ 1143 P68 1975 Medieval women
PC 14 V48 1965 Medieval miscellany
QA 76.73 S67C435 2004 Joe Celko's Trees and hierarchies in SQL for smarties QA 76.73 S67C46 1997 Joe Celko's SQL puzzles & answers
QA 76.76 A65P76 2011 Programming Android
QA 76.9 D26H355 2008 Information modeling and relational databases QA 76.9 D26H39 1996 Data model patterns : conventions of thought QA 76.9 D35C45 1999 Joe Celko's data & databases : concepts in practice
R 141 E45 2006 Medieval medicine and the plague
R 487 T35 1967 Medicine in medieval England.
56 4.3 SELECTION QUERY
Suppose we want a list of paperbacks. That is, we want to list information about books where the paperback field has a value Yes. Requirements like this are placed on the criteria line of the pertinent field(s).
To develop this query we need to select the Book table and then add its’ fields to the grid. For the paperback field we also enter the value Yes on the criteria line:
Figure 4.10 Query with selection criteria
When we run the query we get results listing paperbacks:
callNo title author paperback
CB 351 M293 1983 Atlas of medieval Europe Donald Matthew True
PC 14 V48 1965 Medieval miscellany Frederick Whitehead True
QA 76.73 S67C46 1997 Joe Celko's SQL puzzles & answers Joe Celko True
QA 76.76 A65P76 2011 Programming Android Zigurd R Mednieks True
QA 76.9 D26H355 2008 Information modeling and relational databases T A Halpin True
QA 76.9 D26H39 1996 Data model patterns : conventions of thought David Hay True
57 When a query runs, the query processor accesses the underlying table(s), and displays results where the data meets the criteria specified. For a query accessing a single table consider that the query processor is performing these actions:
For each row in the table:
o retrieve the row from the database
o test the row to see if it meets the criteria specified
o if the row meets the criteria then display the fields marked for show
Save your query as paperbacksQuery. This is a selection query that selects, according to criteria, specific rows for display; this type of query produces a horizontal subset of a table.
58 4.4 SORTING THE RESULT
Sometimes an end user wants to see data in a particular order. Let us extend the previous
example so books are listed in alphabetic order by title and, since they are all paperbacks we will not display the paperback field.
Create another query similar to the last one. Now, place the cursor in the Sort line beneath the title field: click and select ascending from the choices. Then click the Show check box for paperback to turn Show off.
Figure 4.12 Query results can be sorted
59 Exercises
1. List the titles of books in descending order. 2. List the titles of books written by Joe Celko. 3. List all members of the library.
4. List the members in sequence by last name.
5. List the members sequenced by last name and then by first name. (If members have the same last name they appear on consecutive lines, and those lines are in sequence by first name.)
60 4.6 AND
Suppose we want to list Celko’s books on SQL. In this case there are two criteria a book must meet:
criteria 1: the author’s name must end with “Celko” criteria 2: “SQL” must appear in the title.
Criteria 1 must be true and criteria must be true – we say the two criteria are anded. When using QBE we must place these two criteria on the same criteria line in order that MS Access finds rows that match both criteria.
In this example we are looking for titles that have the text SQL anywhere within the title. MS Access provides a way for us to define such a pattern. The character * when used in a text string is a wildcard character that matches any number (zero or more) of characters. For criteria 1 we need two wildcards and so we specify the pattern that title must match: Like “*SQL*”.
[image:60.612.202.410.337.552.2]For criteria 2 we specify the pattern that author must match: Like “*Celko”.
61 4.7 OR
[image:61.612.203.410.177.393.2]Instead of books with titles containing “SQL” and authored by Celko, suppose the end user wants a list of books with “SQL” in the title or where Celko is the author. In this situation we place the criteria on separate lines. MS Access ORs the criteria; a row is selected for the result set if either or both of the criteria are true for a row.
62 Exercises
1. List the titles of books where the author name ends with “Celko”.
2. List the titles of books where the author name ends with “Celko” and the text “data” appears in the title.
3. List the titles of books where the author name ends with “Celko” or the text “data” appears in the title.
4. List titles of books where the title contains the word “medieval”.
63 4.9 JOINS
If a query must be answered using data that appears in more than one table then the query requires a database join.
Suppose we wish to produce a list of member names and the call numbers of books they have borrowed. Important points about this query:
The Loan table has the loan information we need The Member table has the member names we need.
Before we compose the query consider how you would produce the results if you were to do this manually. If you had two listings showing the rows of each table in front of you on your desk you could proceed as follows going through the Loan table listing row by row starting with the first row:
1. For the current row in Loan:
a) Write down the call number of this loan.
b) Let N stand for the value of the member`s id for this loan.
c) Now look at the Member listing row by row starting with the first row:
Examine the row to determine if the row is for member N, and if it is, write down the member`s name beside the call number.
2. If there are more rows in Loan, advance to the next row and go back to step 1
64 1. Create a new query
2. Right-click the Relationships Area and select both the Member and Loan tables from the popup window:
3. Note the line connecting the two tables. This is called a relationships line which causes MS Access to join pairs of rows - a row in Member is joined to a row in Loan where the two rows have the same value for id.
4. Select the call number, first name, and last name fields by double-clicking them to obtain:
5. Run the query and you see the results:
callNo firstName lastName
65 Exercises
In each of the following exercises the necessary data is in more than one table and so it is necessary to specify a join.
1. For each loan show the title of the book and the date it was borrowed. Note that the title is in the Book table and the date borrowed is in the Loan table.
2. Modify the previous query to produce a listing that is in order by title and then by date.
3. Produce a list that shows for each loan the book title, the name of the member who borrowed the book, and the dates the book was borrowed and then returned. Note that 3 tables are needed for this query.
4. Produce a list of members and the books they have taken out on loan. Include the member’s last name, first name, and titles of the books. The information to be displayed is in 2 tables, but it is necessary to specify 3 tables for this query:
Member joins to Loan Book joins to loan
5. Modify the previous query to produce a listing that is in order by last name and then by first name.
6. For member id 2, list the person`s name and the titles borrowed.
7. Produce a list of book titles and member names for those books that are due back May 18, 2014.
66
5 RELATIONSHIPS AND THE RELATIONSHIPS TOOL
The Relationships Tool is used to define relationships between tables based on common fields. Relationships defined using the Relationships Tool are important as they help ensure integrity of data and they provide us with default join criteria for queries involving more than one table. In this section we will use the University and the Library databases in our examples.
Consider the University database we have been using that contains a Department table and a Course table. These two tables have the deptCode field in common:
In the Department table, deptCode is the primary key and is used to identify a specific department.
In the Course table, the deptCode field is a part of the primary key and indicates the department to which the course belongs.
To ensure that a row in Course is related to an existing row in Department we can use the
Relationships Tool to define a relationship between these two tables based on this common field. Using a diagram we can illustrate this connection between these two tables:
Figure 5.1 Showing a relationship between two tables
In this situation we say that deptCode in Course is a foreign key referencing the deptCode field in Department.
deptCode deptName deptLocn deptPhone head
Department
deptCode courseNo title
67 Now, consider the Library database:
The Loan table has a callNo field and so does the Book table; the callNo field identifies a specific book.
The Loan table has an id field and so does the Member table; the id field identifies an individual member.
In the Library database we can establish a relationship between Loan and Book based on the callNo field, and a second relationship between Loan and Member based on the id field. Using a diagram we can illustrate these two relationships:
Figure 5.2 Showing relationships involving three tables
The Loan table has two foreign keys, callNo and id:
The callNo field in Loan references the primary key (callNo) in Book. The id field in Loan references the primary key (id) in Member.
callNo title author
Book
callNo id
dateBorrowed dateReturned dateDue fine
Loan id
firstName lastName
68 5.1 INTEGRITY
Primary Key
Recall that a table’s PK is a field (possibly composite) that has unique values – each row has a PK value different from any other row in the table. Such a field is a unique identifier – if a query were designed to retrieve a row of that table based on a value of the PK, then at most one row of the table will be retrieved.
Foreign Key
A foreign key is a field (or combination of fields) in a table B that is associated with a PK in a table A through a relationship (A and B can be the same table).
Entity Integrity
When we define a PK for a table we are enforcing entity integrity. Entity integrity means that each row in the table is identifiable through its primary key. MS Access requires a value for a PK in a newly added row, and MS Access enforces uniqueness of those values.
Referential Integrity
Suppose we have two tables, A and B, where a relationship is defined between the primary key of table A and a foreign key in table B. We say RI exists for this relationship if for each row in B either:
the FK has no value at all (i.e. it is null), or