May 1999
726+,%$
Telecommunication Systems DivisionDigital Business Telephone Systems
DKQuote
Release 4.x
Publication Information
Toshiba America Information Systems, Inc., Telecommunication Systems Division, reserves the right, without prior notice, to revise this information publication for any reason, including, but not limited
© Copyright 1999
Toshiba America Information Systems, Inc. Telecommunication Systems Division
All rights reserved. No part of this manual, covered by the copyrights
Limited Warranty
Contents
i
Contents
Introduction
Organization ...iii
Conventions...iii
Related Documents ... v
Chapter 1 – The Grand Tour
User Levels, IDs, & Passwords... 7Basic Operation ... 9
Task Messages and Online Help ... 9
Existing Parts ... 10
Future Parts... 10
Additional Parts ... 10
Installation Charges ... 10
Final Quotation ... 10
Main Menu ... 11
Screen Variations... 12
Toolbar ... 12
Status Bar ... 12
Keyboard Navigation ... 13
Mouse Navigation ... 13
Online Help ... 14
Quote Screen ... 14
Screen Messages ... 15
Configuration Conflict Message... 15
Warning Message ... 16
Chapter 2 – Installation
Step 1: Before You Begin ... 17Step 2: Getting Started ... 17
Non-Autorun Operation... 18
Speeding Up Operation ... 19
Uninstalling Acrobat Reader ... 19
Chapter 3 – Using DKQuote
Log On ... 21Log Off... 22
Generating Quotes... 22
Additional Parts ... 24
Equipment Selection... 24
Final Quote Worksheet... 24
New Quotes ... 24
Modifying Existing Quotes ... 28
Making Equipment Selections ... 28
Using Existing Parts ... 29
Ordering Additional Parts ... 30
Transfer In ... 32
Transfer Out ... 32
Installation Charges... 33
Final Quote Worksheet ... 35
Saving/Printing a Quote ... 36
Configured Parts List ... 37
PCB Placement Guide ... 37
Pricing Menu ... 38
Price List... 38
Report Menu... 39
Update Menu ... 43
Setup Menu ... 44
Chapter 4 – Customizing DKQuote
Pricing Menu ... 47Category Pricing ... 47
Price Definitions ... 48
Parts/Price Setup Screens ... 48
Hiding Price Categories... 51
Creating/Changing Names and Descriptions... 51
Parts/Price Setup... 52
Required Add-on Parts Setup ... 55
Optional Add-on Parts Setup... 56
Hiding Obsolete Parts ... 59
Changing National Accounts Description and Price ... 59
Dealer Installation Setup ... 60
Question File Setup ... 61
Update Menu ... 61
User Password Level... 62
Customized Splash Screen ... 64
Appendix – Final Quote Printout
Cover Sheet ... 65Introduction
iii
Introduction
This guide provides installation and operating instructions for the DKQuote software application. It is written for dealers and their sales/technical staff.
Organization
This guide is divided into the following chapters:
♦ Chapter 1 – The Grand Tour gives a general description of the capabilities, screen
conventions, and basic operations of the DKQuote software.
♦ Chapter 2 – Installation provides step-by-step installation instructions for the DKQuote
software onto your PC and/or network.
♦ Chapter 3 – Using DKQuote provides instructions on how to prepare and print a quote
and outlines available menu options.
♦ Chapter 3 – Using DKQuote describes instructions for customizing quotes; using price
and parts lists; adding/changing/deleting user IDs and passwords; and preparing installation disks with the customized information for sales/technical staff.
♦ Appendix – Final Quote Printout provides a copy of a sample printout after the final
quote is completed.
Conventions
This guide uses these conventions:
➤
Denotes a procedure1. Actions you perform appear in this column. They can consist of either a single step or a series of numbered steps.
Conventions–––––––––––––––––––––––––––––––––––––––––––––––––––––––––––––––––––––––––––––––––––
Note Elaborates specific items or references other information. Within some tables, unnumbered notes apply to the entire table and numbered notes apply to specific items.
Important! Calls attention to important instructions or information.
CAUTION! Advises you that hardware, software applications or data could be damaged if the instructions are not followed closely.
2. When the action you perform results in a screen, menu, dialog box, etc., the example to the right displays.
Courier shows a computer keyboard entry or screen display. “Type” indicates entry of a string of text. “Press” indicates entry of a single key. Example: Type prog then press Enter.
Times Roman words that are capitalized represent a specific dialog box button. For example: Transfer button.
“Click” means to press and then release the mouse button without moving the mouse.
+ shows a multiple PC keyboard or phone button entry. Entries without spaces between them show a simultaneous entry. Example:
Delete+Enter. Entries with spaces between them show a sequential entry. Example: + .
~ means “through”.
➤ denotes the step in a one-step procedure.
represents an icon button on a feature toolbar. When you click on this icon, it achieves the same result as the step that it appears next to.
see Figure 12 Grey words within the printed text denote cross-references. In the electronic version of this manual (Strata DK Library CD-ROM or FYI Internet download), cross-references appear in blue hypertext.
27
––––––––––––––––––––––––––––––––––––––––––––––––––––––––––––––––––––––– Related Documents/Media
Introduction
v
Related Documents/Media
Refer to the following documents for more information.
♦ Strata DK Price Lists includes Authorized Toshiba Dealer, National Accounts,
Authorized Communications Schedule – GSA.
♦ Strata DK Programming Manual provides all instructions necessary to program the
system and system record sheets.
♦ Strata DK Installation & Maintenance Manual provides installation instructions for
configuring and installing Strata DK systems.
♦ Strata DK Library CD-ROM enables you to view, print, navigate and search
The Grand Tour
7
The Grand Tour
1
DKQuote Release 4.x is a powerful interactive software application, compatible with Microsoft® Windows® 98, 95 or Windows NT® 4.0. The software guides you through the configuration of a Strata DK system and prepares a dealer worksheet and Printed Circuit Board (PCB) placement diagram. It offers many advantages and provides your customers with quick, accurate, and up-to-date component and pricing information for all Strata DK
configurations.
DKQuote for DK Release 4.x configures Strata DK14, DK40, DK40i, and DK424 systems with the proper processors depending upon the options that you choose during the quote process. You do not have to know what kind of system you want when you begin the quote process, only the station equipment, CO line types, and feature options.
Important! When DK424 system quotes are generated, DKQuote configures Release 4.x RCTU processors unless equivalent Release 2.0 or 3.0 RCTU processors are selected from the Existing Parts menu.
Your generated quotes can be viewed and printed, saved in a database, and transferred to and from the hard/floppy disk drives, network drive, and/or other users. Dealers can provide sales/ technical staff with customized information from DKQuote for the quote process.
DKQuote enables you to completely customize quotations to suit your exact needs. New parts are added, existing parts hidden (so they do not display in your quotes), multiple pricing schedules created, and part names changed.
If you have used 424Quote Release 1.0, you will find the basic operation for processing quotes in DKQuote Release 4.x is the same.
Note Quotes generated by 424Quote Release 1.0 are compatible with DKQuote Release 4.x. 424Quote Release 1.0 is not overwritten by DKQuote Release 4.x, so existing quotes are not erased and you can still access your existing 424Quotes.
This version of DKQuote configures new DK features, such as ISDN PRI, BRI (S/T or U interfaces), E911 CAMA lines, HMIS, Call Center Viewer, and the DKT2001 Digital
telephone. It does not configure Strata AirLink™ Wireless systems or handsets, but these parts can be selected from the DKQuote Additional Parts list and added to your quote.
User Levels, IDs, & Passwords
User levels, IDs, and passwords are assigned by the System Administrator and enables access to various menu options. The IDs and passwords are assigned to Level 1, 2, or 3.
User Levels, IDs, & Passwords ––––––––––––––––––––––––––––––––––––––––––––––––––––––––––––––––––––
Table 1 Levels and Main Menu Options
Main Menu Bar Master
(Level 1)
Sales (Level 2)
Tech (Level 3) Quote Menu
New Quote ✓ ✓ ✓
Existing Quote ✓ ✓ ✓
Transfer In ✓ ✓ ✓
Transfer Out ✓ ✓ ✓
Exit ✓ ✓ ✓
Pricing Menu
Pricing List ✓ ✓
Price Category Setup ✓
Parts/Price Setup ✓
Required Add On Parts Setup ✓
Optional Add On Parts Setup ✓
Obsolete Parts Setup ✓
Nat’l Accounts Installation Setup ✓
Dealer Installation Setup ✓
Question File Setup ✓
Report Menu
Parts List ✓ ✓
Question File ✓ ✓ ✓
Customer List ✓ ✓ ✓
Print/Save Quote ✓ ✓ ✓
Update Menu
Backup Dealer Price/Parts ✓ ✓ ✓
Restore Dealer Price/Parts ✓ ✓ ✓
Restore Toshiba List Prices ✓ ✓ ✓
Backup to Installation Disk ✓
Setup Menu
Customer ✓ ✓ ✓
––––––––––––––––––––––––––––––––––––––––––––––––––––––––––––––––––––––––––––––––Basic Operation
The Grand Tour
9
Basic Operation
DKQuote configures customized quotes by using the information supplied by you in the setup process. The quotes can be viewed, printed, and saved.
The process of configuration and generation of a quote starts by reviewing the following basic questions, even if existing parts are used.
♦ How many digital telephones and CO lines do you require?
♦ Are there any customer-owned parts (existing parts) that you want to use on a no-charge basis?
♦ What account category do you want to use for pricing?
♦ Are there any used parts (in your stock) that you want to use for a specified price?
♦ Who will supply the cable—the customer or dealer?
Once you have reviewed these questions, you are ready to begin the configuration of the required cabinets and PCBs.
Task Messages and Online Help
DKQuote displays task and help messages during the quote process. It prepares your quote by presenting a series of screens. Each screen must have a specific number of selections even when existing parts are used. When you are finished, DKQuote automatically configures the cabinet and PCBs that are required based on your selections. Some fields required a numeric value input, while others require a “yes” or “no” answer (toggled by using the space bar).
Online Help is available in each screen by either clicking the Help button or pressing F1. The appropriate topic displays giving you information about the screen. There is also Help available from the Main Menu. When selected, all of the Help topics all displayed in a list that you can easily access by clicking on the topic you want to view. You can search the list by using the Find feature or the Index.
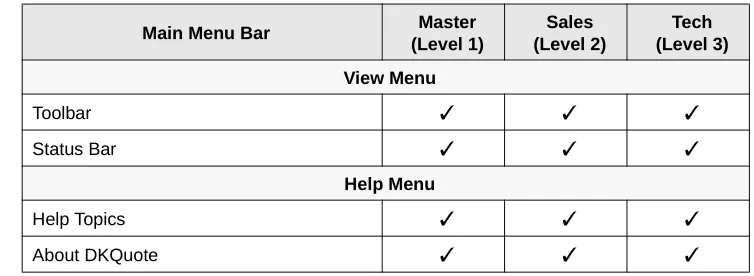
View Menu
Toolbar ✓ ✓ ✓
Status Bar ✓ ✓ ✓
Help Menu
Help Topics ✓ ✓ ✓
About DKQuote ✓ ✓ ✓
Table 1 Levels and Main Menu Options (continued)
Main Menu Bar Master
(Level 1)
Sales (Level 2)
Basic Operation ––––––––––––––––––––––––––––––––––––––––––––––––––––––––––––––––––––––––––––––––
Existing Parts
If you are going to use existing parts (used parts in stock), they are selected from the Existing Parts list. Existing telephones and consoles are always included in the configuration. Existing PCBs are only configured if they support the telephone and CO line requirements of the configuration.
Release 2.0 and 3.0 RCTU processors are used in place of equivalent size Release 4.0 processors if the appropriate RCTU PCBs are selected in Existing Parts.
Note Toshiba published list prices can be updated while maintaining current Dealer Discounts and Markups.
Future Parts
Future parts (added for future growth) should be considered and added as existing parts. Telephones, PCBs, and cabinets, selected from the Existing Parts list, are added at no charge because the selected price for each item is set to $0.00. They are also configured into the Strata DK system cabinets.
Additional Parts
Once the configuration is complete, you can enter additional parts that are not included in the basic configuration (spare parts, voice mail equipment, and documentation). These parts are not configured in the cabinets, but are added to the final quote parts lists.
Installation Charges
You can also enter itemized installation charges, including taxes and appropriate quantities that are applied to the across-the-board cost of all parts (see Page 33). If National or GSA Accounts is selected in the Quote Setup screen, you must indicate who supplies the cable— the dealer or the customer. If the cable is customer supplied (see levels below), the installation price is reduced by $25.00 per cable run.
Levels of cable for Voice/data, shielded, and Plenum are:
♦ Level III - duplex jacks (4 pair)
♦ Level IV - quad jacks (4 or 6 pair)
♦ Level V - quad jacks (4 or 6 pair)
Final Quotation
Once your system configuration is complete, you can view, save, and/or print the:
♦ Quote
♦ Summary sheet
♦ Itemized installation and parts prices
––––––––––––––––––––––––––––––––––––––––––––––––––––––––––––––––––––––––––––––––––––Main Menu
The Grand Tour
11
Main Menu
DKQuote is “menu driven” and very easy to use. All basic operations are executed from the Main Menu bar (shown at right) that displays across the top of your screen.
When you select one of the Main Menu submenus, a drop-down menu displays all of the available options (shown at right).
The figure below lists all of the drop-down menus that are accessed from the Main Menu bar.
3107 3108 Quote Pricing View New Quote Existing Quote Transfer In Transfer Out Exit Price List
Price Category Setup Parts/Price Setup
Required Add on Parts Setup Optional Add on Parts Setup Obsolete Parts Setup
Nat'l Accounts Installation Setup Dealer Installation Setup Question File Setup
Toolbar Status Bar Report Update Setup Help Parts List Question File Customer List Print/Save Quote
Backup Dealer Price/Parts Restore Dealer Price/Parts Restore Toshiba List Prices Backup to Installation Disk
Customer
Company General Information User Password Level
Select Customized Splash Screen Printer Setup
Help Topics About DKQuote
Toolbar–––––––––––––––––––––––––––––––––––––––––––––––––––––––––––––––––––––––––––––––––––––––
Screen Variations
DKQuote screens may vary from those shown in this document because changes are made frequently.
Toolbar
The DKQuote Toolbar™ (shown at right) displays just below the Main Menu bar. It provides shortcuts to the most frequently used commands.
You can click and drag the Toolbar to any
position in your window. When you exit DKQuote, the Toolbar returns to its original position.
➤ To display or hide the Toolbar
➤ Click Toolbar (toggles) from the View menu. Each Toolbar icon is explained below.
Status Bar
The Status Bar displays at the bottom of the DKQuote window (shown below). The left area of the Status Bar shows the menu items that you point to using your mouse. The right side of the Status Bar shows the date and time.
CLICK TO
Open a new quote.
Open an existing quote. An Open dialog box displays, in which you can locate and open the desired quote.
Open the Price List screen that lists all parts and prices.
Display the print/save dialog box. You can select Save to File to save existing quotes to a file (i.e., Final Quotes Parts List and quote cover sheet) or Print to printer.
Display program information on DKQuote (e.g., version number).
Display pop-up Help topics – often called “What’s This?”.
2322
––––––––––––––––––––––––––––––––––––––––––––––––––––––––––––––––––––––––––––Keyboard Navigation
The Grand Tour
13
Keyboard Navigation
The following describes how to navigate within the DKQuote program using your keyboard.
Mouse Navigation
When you use the mouse, an on-screen arrow or cursor moves as you move the mouse. The resulting actions are described below.
KEYBOARD KEYS DESCRIPTION
Alt + [Letter] Selects Main Menu items. Moves directly to the item with the underscore mark. For example, pressing Alt + r in the Main Screen displays Report options.
[Letter] Selects pull-down menu items. Pressing the underscored letter of an item on your keyboard, opens that item.
Tab Moves forward from section to section, or button to button in screens and
dialog boxes.
Shift + Tab Moves backwards from section to section or button to button in the screens and dialog boxes.
Alt + Tab Moves between open application windows (Windows feature).
←→ Moves the highlight left/right.
↑↓ Moves the highlight up/down in most instances. In some screens, these keys
are not functional. The Tab and Shift + Tab keys are also used to move the highlight up/down.
Enter Moves the highlight to the next field in most instances. In some screens, it closes the screen.
Page Up/Page
Down Scrolls up/down through a list.
Esc Returns to the previous dialog box.
Spacebar Toggles between Yes/No in the parts configuration dialog box. Toggles check mark ON/OFF in the Hide column of specific screens.
MOUSE DESCRIPTION
Move the cursor to an item in the Main Menu, then click the mouse button. If there is more than one button, click the left button.
Highlights Main Menu item before you click. When you click the mouse button, the selection opens. When you select on-screen buttons, you do not have to press the
Enter key, just double-click the mouse button.
Double-click the mouse button. If there is more than one button, double-check the left button.
Online Help––––––––––––––––––––––––––––––––––––––––––––––––––––––––––––––––––––––––––––––––––––
Note For more information on adjusting Windows controls for the DKQuote program, such as keyboard and mouse speed and colors, see your Windows 98, 95 User Guide or Help in the Windows 98, 95 Start button.
Online Help
DKQuote Online Help is built into the software and provides help from both the Main Menu and individual screens. The functions are described below.
Quote Screen
The following buttons display at the bottom of the quote screens during the quote process.
Scrolls up or down.
Resizes the column width. Place the double-headed cursor on the line between two columns. Click and hold the left mouse button. Drag the line left or right to change the column width.
HELP FUNCTION DESCRIPTION
Accesses What’s This? Help. When the cursor changes to a question mark, click the topic, a menu option or any other area, that you want help on. The topic displays.
F1 Opens the specific topic you have highlighted by pressing F1.
Accesses Online Help from the Main Menu that contains:
● Contents – lists main topics (e.g., Quote Menu, Update Menu, etc.).
● Index – lists all topics in alphabetically order.
● Find – searches for available topic.
Displays specific information about the dialog box currently open.
MOUSE DESCRIPTION
Scroll arrow Scroll bar
––––––––––––––––––––––––––––––––––––––––––––––––––––––––––––––––––––––––––––––Screen Messages
The Grand Tour
15
Screen Messages
There are two displayed messages that can occur when you adding or modifying a quote – configuration conflict and warning. Both appear after you click Process.
Configuration Conflict Message
If you have entered an item that creates a conflict, you are prompted with a configuration conflict message (shown at right).
Click OK to return to the screen where you must correct the conflict. Once the correction is made, click Process to proceed with the quote.
Important! Since the information is critical to the completion of the quote, you cannot continue until the conflict is resolved.
Discard the changes in the current screen.
Discard all of the selection changes in all the pages for the session.
Display configured cabinet drawings.
Display the Parts Selection screen at the end of the configuration process for ordering additional parts that were not configured.
Search for a part number by entering all or part of the number.
Save and add the current quote to the Existing Quote list.
Print or save a quote to a file. Save to File creates a file containing the Configured Parts List and Final Quote cover sheet. This file can be modified in MS Excel.
Close current quote session.
Start the saving or transferring of files.
Cancel an operation or any changes made and closes the screen.
CLICK TO
Screen Messages–––––––––––––––––––––––––––––––––––––––––––––––––––––––––––––––––––––––––––––––
Warning Message
A warning message (shown at right) occurs when you have not completed all the requirements in the previous screen.
The messages display when the information is needed, but not critical to the completion of the quote.
If you click Yes in this screen, DKQuote returns to the screen where you can correct the problem. If you click No, DKQuote continues to process the quote without the information.
Installation
17
Installation
2
This chapter provides installation steps for DKQuote, Release 4.x. DKQuote has one installation CD-ROM.
Step 1: Before You Begin
The following minimum specifications are required for optimum performance of DKQuote:
♦ Pentium® PC
♦ 110MB hard disk space (100MB free disk space for DKQuote operation and 10MB for DKQuote files)
♦ 16MB RAM
♦ CD-ROM drive (4x speed or better)
♦ 640 x 480 resolution, 256 colors, VGA monitor (1024 x 768, 65K + colors recommended)
♦ Microsoft Windows 98, 95, or Windows NT 4.0
♦ Adobe™ PostScript® or PCL printer (for printing documents)
♦ Adobe Acrobat® Reader program (included for viewing documents)
Step 2: Getting Started
Important! Exit all Windows programs before inserting the CD-ROM for installation.
1. Insert this CD-ROM into your CD-ROM drive.
Acrobat Reader automatically runs and loads the Home Page. This may take awhile on some systems. You can perform all the functions on this CD-ROM from the Home Page.
Notes
● For security purposes, Acrobat Reader may
confirm certain selections after you make them. When prompted, click Yes, or, if you do not want to be prompted again. click All.
● Autorun may not be enabled on your PC and may
Screen Messages–––––––––––––––––––––––––––––––––––––––––––––––––––––––––––––––––––––––––––––––
Non-Autorun Operation
If the Home Page did not load after you inserted the CD-ROM into your CD-ROM drive, follow these steps:
2. From the Home Page, make a selection:
Click “Install DKQuote” to install the program from the CD-ROM to your hard drive.
Click “Make Floppy Disks” to copy DKQuote to floppies.
Click “View DKQuote User Guide” to view the user guide.
Click “Install Acrobat Reader” to install Acrobat Reader on your hard drive.
Click “Quit to Desktop” to leave the Home Page and exit the Acrobat Reader program.
1. Click Start, Run, then Browse.
2. Select your CD-ROM drive from the Look in: pull-down list.
3. Locate and double-click the AcroRd32 folder.
4. Double-click the AcroRd32.exe file.
Acrobat Reader opens.
5. From Acrobat Reader, click File, then Open.
6. Click the Up One Level folder (just to the right of the Look in: pull-down list).
7. Locate and double-click homepage.pdf.
––––––––––––––––––––––––––––––––––––––––––––––––––––––––––––––––––––––––––––––Screen Messages
Installation
19
Speeding Up Operation
You may wish to speed up Acrobat Reader by installing and running it from your hard drive. Follow these steps:
Uninstalling Acrobat Reader
Important! The Dealer Discounts and Markups, passwords, Dealer custom “add-on” parts and installation items should have been added to the Installation Disk #4 by the Administrator. If these have not been added, you must obtain an Update Price/ Parts floppy disk from the Administrator to update these items before generating quotes. To install the disk, use the Restore Dealer Price/Parts option under the Update Menu (see “Update Menu” on Page 43 for instructions).
1. Insert this CD-ROM into your CD-ROM drive, Acrobat Reader automatically runs off the CD-ROM and loads the Home Page.
1. Click the Install Acrobat Reader button. Follow the prompts to install the program.
Note If Autorun is not enabled on your PC, click Start, Run, the Browse. Select your CD-ROM drive from the Look in: pull-down list. Locate and double-click the AcroRd32 folder, then locate and double-click Setup32.exe and follow the prompts.
2. After installation, click Quit to Desktop and exit the Home Page.
3. Click Start, Programs, then Adobe Acrobat group.
4. Click Acrobat Reader 3.01. Acrobat Reader opens from your hard drive instead of the CD-ROM.
5. Click File, then Open.
6. Select your CD-ROM drive from the Look in: pull-down list.
7. Locate and double-click homepage.pdf.
The Home Page loads. See “Getting Started” on Page 17 for available selections.
1. Click Start, Settings, then the Adobe Acrobat group.
2. Click Uninstall Acrobat Reader 3.01.
This message displays: “Are you sure you want to completely remove the selected application and all of its components?”
Using DKQuote
21
Using DKQuote
3
This chapter describes how to use DKQuote including logging on and off, generating quotes, and available features of the menus.
Log On
Once you have installed the DKQuote program, you must log on, using your password. See your System Administrator for additional information.
1. From the Windows desktop, double-click DKQuote.
2. Enter your User ID and password.
Note The default log on User ID and Password is “master.”
If you are the first person to log on after a new installation, the Company General
Information screen displays. If you do not want to complete this screen at this time, you can access it anytime from the Setup Menu.
3110
Log Off–––––––––––––––––––––––––––––––––––––––––––––––––––––––––––––––––––––––––––––––––––––––
Log Off
When you have completed your DKQuote session, you must log off.
Generating Quotes
DKQuote configures systems quickly and efficiently. It determines what hardware is required to meet your customer’s needs from the information that you have input into various dialog boxes and screens. It prepares a configuration and quote based on as much or as little information as you supply.
The quote process begins with the Quote Setup dialog box that has data fields for the following:
♦ Customer ID
♦ For a new customer, enter the name before going to the next field. DKQuote retains
the name when you click OK.
♦ For an existing customer, highlight the name in the drop-down menu. ♦ Quote Number – automatically assigned by DKQuote
♦ Basic Configuration (with new parts and/or) ♦ Use Existing Parts
♦ Order Additional Parts ♦ Order Additional Parts Only ♦ Account Category
1. Highlight Quote from the Main Menu bar.
2. Click Exit. You are returned to Windows.
––––––––––––––––––––––––––––––––––––––––––––––––––––––––––––––––––––––––––––– Generating Quotes
Using DKQuote
23
The figure below illustrates the stages of the quote process.
At any time during the quote process, you can click Previous to return to the prior screen to modify your prior selections. Once you have selected the parts for your system configuration, click View Diagrams to view the cabinet and PCB configuration diagrams.
When you are finished, you can save the quote to the DKQuote local directory, save it to a file (with *.fqt extension) to use with another program (e.g., Excel), or print it. If you decide to print, you can select:
♦ All (includes Final Quote Worksheet, Configured Parts List, and the PCB Placement
Guide).
♦ Parts/installation information only ♦ Cabinets/diagram information ♦ Questions list
♦ Don’t Print Items with 0 Quantities
New Parts
If an existing customer, select the customer ID. Click Quote on the Main Menu.
Use Existing Parts & Order Additional Parts Order Additional
Parts
Configure System with Parts
3573
If a new customer, enter new customer
information.
Equipment Selection displays; enter all required equipment.
Click Process.
Configured Parts List displays. Click Process.
Final Quote Worksheet displays. Click Save or Print.
Existing Parts displays. Click process.
Use Existing Parts Order Parts Only
Final Quote Worksheet displays. Click Save or Print.
Equipment Selection displays; enter all required equipment.
Click Process.
Configured Parts List displays. Click Process.
Final Quote Worksheet displays. Click Save or Print.
Equipment Selection displays; enter all required equipment.
Click Process.
Configured Parts List displays. Click Process.
Generating Quotes––––––––––––––––––––––––––––––––––––––––––––––––––––––––––––––––––––––––––––––
♦ Don’t Print Questions Answered with No or 0 Quantities ♦ Portrait or Landscape printing
DKQuote also enables you to link all quotes created for a customer to a single customer ID code. This simplifies tracking and retrieval, as well as quote maintenance.
Existing Parts
Existing parts include all current and many discontinued Toshiba parts that can be configured in Strata DK systems. See “Using Existing Parts” on Page 29 for step-by-step configuration instructions when processing a new quote.
Additional Parts
Additional parts are parts that are needed as spares for system maintenance and any Toshiba or Dealer custom parts that are not configured in Strata DK cabinets (for example, batteries). See
“Using Existing Parts” on Page 29 for more information.
Equipment Selection
DKQuote determines what hardware is required and calculates the cost based upon the equipment you select. There are ten categories from which you configure the basic system. See “Making Equipment Selections” on Page 28 for step-by-step instructions on selecting equipment for your specific configuration.
Final Quote Worksheet
DKQuote calculates the number of cabinets, slots, processors, and the prices for each and displays the Final Quote Worksheet. You can input additional charges as appropriate. For more information, see “To enter charges” on Page 35.
New Quotes
A new quote starts by double-clicking New Quote in the Quote drop-down menu (shown at right). You can use new parts, existing parts, and/or additional parts. All user levels can access this menu.
If there are conflicts with the equipment and parts selection, the program prompts you with a message. You may be prompted
to choose a larger processor, if you selected this as an option during the quote process.
You can also choose the account category that you want to use for pricing or create a new one. Some of the DKQuote default categories are:
♦ Dealer, Regular Account
♦ National Account (MFG, schedule A/B or C)
––––––––––––––––––––––––––––––––––––––––––––––––––––––––––––––––––––––––––––– Generating Quotes
Using DKQuote
25
➤ To create a new quote using new parts
1. Click New Quote on the Toolbar
...or Quote on the Main Menu and New Quote.
2. Enter a new customer ID
Note The name is the only requirement to creating a new record. Valid entries can be up to 34 alphanumeric characters. No spaces are allowed.
...or select an existing ID.
3. Select the DKQuote assigned quote number
...or enter a different, unique number.
Valid entries are up to 15 alphanumeric characters. No spaces are allowed.
3112
Generating Quotes––––––––––––––––––––––––––––––––––––––––––––––––––––––––––––––––––––––––––––––
4. Click Configure System with Parts.
Note If you do not click any other options, the Existing Parts screen displays.
5. Select an Account Category from the drop-down menu.
There can be up to 11 available Account Categories (price schedules), depending on how your
Administrator set up the application.
6. Click OK. Important! Once you select OK, your selections cannot be changed for the current quote.
7. Enter the equipment quantities in each tab (11).
8. Click Process
...or Discard All.
Note If you click Discard All, all of your input is deleted.
9. Click OK.
3121
––––––––––––––––––––––––––––––––––––––––––––––––––––––––––––––––––––––––––––– Generating Quotes
Using DKQuote
27
10. Click Process
...or View Diagram.
11. Click Save Quote
...or Print Quote.
The Quote is saved to the DKQuote default directory.
2303
3115
Making Equipment Selections –––––––––––––––––––––––––––––––––––––––––––––––––––––––––––––––––––––
Modifying Existing Quotes
Making Equipment Selections
There are 10 categories of equipment in the Equipment Selection screen that you use to configure the basic system:
♦ Digital telephones ♦ Electronic telephones ♦ Standard telephones ♦ Attendant Consoles ♦ CO lines
♦ DTMF receivers ♦ Auto Attendant ♦ Stratagy DK ♦ Feature option
You also have configuration (guarantee spare slots, PESUs, RDSUs, etc.) and feature options (headsets, SMDI, HMIS, OAI, etc.).
1. Click Existing Quote from the Toolbar
...or click Quote from the Main Menu and Existing Quote from the drop-down menu.
2. Highlight the Quote Number.
3. Select OK. The quote displays at the Quote Setup screen. You can modify the selected quote or change the quote number to create a new one.
Note The original quote remains intact with its original quote number.
–––––––––––––––––––––––––––––––––––––––––––––––––––––––––––––––––––––––––––– Using Existing Parts
Using DKQuote
29
➤ To select the equipment
Using Existing Parts
To DKQuote, existing parts are discontinued parts and include DK280 cabinets and older RCTU processors, current parts at a modified price, customer-owned parts at no charge for DK424 upgrades, and future parts at no charge to prepare for future growth. They are selected from the Existing Parts screen.
PCBs and system cabinets are used only if they are needed in the system configuration. This is determined by the selections you make during the quote process. For example, CO line PCBs are used only if the CO lines require them.
When telephones are selected, DKQuote configures the appropriate interface PCBs. The PCBs are considered as new parts unless they are selected from the existing parts list.
1. Click on a tab in the
Equipment Selection screen.
2. Input the quantities and prices that you want
...or toggle Yes/No.
Each field has a unique number and a default listed next to it (usually NO or 0). If the default is appropriate, leave it.
Change your entry by moving the mouse to the answer column and inputting the change. You can change the YES/NO fields by pressing the Spacebar to toggle between YES and NO.
DKQuote can prompt you for additional information with a pop-up window.
3. Click Process. There are two types of messages that you could see:
♦ Missing part – If a part is required for the configuration but you did not select it, DKQuote prompts you to include the it.
♦ Configuration conflict – If you exceed a maximum number of items (e.g., the maximum number of CO lines is 200), DKQuote displays a configuration conflict message.
If there are no conflicts or other messages, the Configured Parts List screen displays.
Ordering Additional Parts–––––––––––––––––––––––––––––––––––––––––––––––––––––––––––––––––––––––––
➤ To use existing parts
Ordering Additional Parts
This function enables you to select parts that are needed, but are not configured in Strata DK cabinets (for example, batteries). You select these parts after processing the cabinet
configuration.
Note If you selected Configure System with Parts and Order Additional Parts, the View Diagram (PCB Placement Guide) button is active on all subsequent screens once you choose your parts. If your quote is for Order Parts Only, you cannot view the
placement guides.
1. In the Existing Parts screen, enter the equipment quantities in each tab.
A brief description of the part appears at the bottom of the screen.
2. Enter the price in the Price column.
Note All prices are initially set to 0.00.
3. Click Process. The Equipment Selection screen displays.
–––––––––––––––––––––––––––––––––––––––––––––––––––––––––––––––––––––––– Ordering Additional Parts
Using DKQuote
31
➤ To select order parts
1. From the Parts Selection screen, enter the number of parts in the quantity column
A brief description of the highlighted part appears at the bottom of the screen.
...or search for a part number, by clicking Find.
As you enter the part number, the screen highlighter jumps to the first match.
2. Click Process. If this quote is for more than parts only, Installation Charges displays (see “Installation Charges” on Page 33).
If you selected Order Parts Only, this displays (viewing only):
Note The spare parts selections are not included in the configuration.
3122
Transfer In–––––––––––––––––––––––––––––––––––––––––––––––––––––––––––––––––––––––––––––––––––––
Transfer In
This function copies your quotes from a floppy disk or another directory on the hard disk drive/network into the DKQuote directory. Your quote is not deleted from its current drive/ path.
Important! You must generate the quotes from the DKQuote Transfer Out option and not from the 280Quote program.
Transfer Out
This function copies your quotes to a floppy disk or another directory on the hard disk drive/ network. Your quote is not deleted from the current drive/path.
1. Click Quote from the Main Menu and Transfer In from the drop-down menu.
2. Type in the drive, directory, and file name.
Note Do not enter a file extension. DKQuote adds the appropriate extension for you. The default is
a:\dkquote.
3. Click Start. DKQuote checks the drive/path you entered in the dialog box for three quote files, *.hdr, *.pri, and *.qes. The files are copied to the default directory unless you changed it. The asterisk (*) is the entered file name.
Note To transfer in more than one quote at a time, the quotes must have been transferred out of the original DKQuote database using the same file name.
1. Click Quote from the Main Menu and Transfer Out from the drop-down menu.
–––––––––––––––––––––––––––––––––––––––––––––––––––––––––––––––––––––––––––––Installation Charges
Using DKQuote
33
Installation Charges
Installation charges display only if you selected one of the National Account categories as a price basis for your quote. If you did not select National Accounts, your dealer must include the installation description/charges, using the Dealer Installation Setup option (Pricing Menu).
You must also indicate who supplies the cable—the dealer or the customer. If the cable is customer supplied (see levels below), the installation price is reduced by $25.00 per cable run.
Levels of cable for voice/data, shielded, and Plenum are:
♦ Level III - duplex jacks (4 pair) ♦ Level IV - quad jacks (4 or 6 pair) ♦ Level V - quad jacks (4 or 6 pair)
3. Click OK.
4. Type in the drive, directory, and file name.
Note Do not enter a file extension because DKQuote adds the appropriate extension for you. The default is a:\dkquote.
It is recommended you give the quote a file name that is easily identifiable, for example, customer name or quote number.
5. Click Start. Whether you select one quote or several quotes to transfer, only three files are created on the drive/path you chose: *.hdr, *.pri, *.qes. The asterisk (*) is the file name entered in the Transfer Quotes Out dialog box.
Installation Charges –––––––––––––––––––––––––––––––––––––––––––––––––––––––––––––––––––––––––––––
➤ To enter installation charges
➤ To enter cable installation charges 1. Enter the number of required
installations.
The Extension (total) price changes as the quantity changes.
2. Click Process. If you selected National Accounts in the Quote Setup screen, Cable Installation displays. Otherwise, the Final Quote Worksheet displays.
1. Enter the quantity of installations (deinstalling stations, installing software, running cable, etc.).
The Price and Extension (total) columns change as the quantity changes.
2. Click Process. The Final Quote Worksheet displays.
2307
––––––––––––––––––––––––––––––––––––––––––––––––––––––––––––––––––––––––––Final Quote Worksheet
Using DKQuote
35
Final Quote Worksheet
When you are finished with your quote, the Final Quote Worksheet displays. In this screen, you can enter additional charges:
♦ Other installation charges ♦ Database preparation ♦ Training
♦ First-year Warranty ♦ Maintenance agreement ♦ Other hardware and software ♦ Taxes (Parts/Labor)
Taxes, if selected, are not calculated for fees for database preparation, first-year warranty, or the maintenance agreement. Labor tax, if applicable, is calculated using installation charges. The first five items in the worksheet are calculated by the program and cannot be changed in this screen.
➤ To enter charges
1. Click Other Installation Charges and enter an amount
...and/or Database Preparation and enter an amount
...and/or Training and enter an amount
...and/or First Year Warranty and enter an amount
...and/or Maintenance Agreement and enter an amount
...and/or Other Hardware (Taxable) and enter an amount
...and/or Other Software (Taxable) and enter an amount
...and/or Parts Tax at
Percentage Rate and enter the rate
The correct taxable amount is calculated and displays in the right-hand column.
...and/or Labor Tax at Percentage Rate and enter the rate
The correct taxable amount is calculated and displays in the right-hand column.
Saving/Printing a Quote––––––––––––––––––––––––––––––––––––––––––––––––––––––––––––––––––––––––––
Saving/Printing a Quote
You can save and/or print your quote from the Final Quote Worksheet or the Report drop-down menu (see “To print/save to file/delete a quote” on Page 41 for information on using print/save a quote from the Report drop-down menu).
Important! Since DKQuote saves each quote in three files, you cannot use copy/paste commands to copy quotes from one directory to another. You must use the Transfer Out and Transfer In options from the Quote Menu.
2. Click Save Quote The quote is saved.
...or Print Quote. Print/Save to File dialog box displays.
3. Click Close. You are returned to DKQuote’s opening window.
➤ Click Save Quote The quote is saved and can be selected from the Existing Quote list.
...or Print Quote.
You can print All, Parts/Installation, Cabinets Diagram, or the Questions List. You can also select:
♦ Don’t Print Items with “0” Quantities
♦ Don’t Print Questions Answered with “No” or “0” Quantities
♦ Save To File
♦ Orientation For Parts List – Portrait or Landscape After your quote is printed, you are returned to the Final Quote Worksheet.
––––––––––––––––––––––––––––––––––––––––––––––––––––––––––––––––––––––––––––Configured Parts List
Using DKQuote
37
➤ To save to file
Configured Parts List
After all of the necessary information is entered and the configuration conflicts are corrected, the Configured Parts List displays. It lists all required parts in alphabetical order by part number along with quantities, prices, and total prices. As you select parts, a brief description appears at the bottom of the screen.
The Configured Parts List can only be viewed. If you need to make modifications to the parts and pricing, select Previous to return to the Equipment Selection screen.
Note Technical personnel (level 3) cannot see the price column in this screen.
PCB Placement Guide
The PCB Placement Guide is viewable from the Configured Parts screen by clicking View Diagram. At the top of the System Capacity Summary/PCB Placement Guide, DKQuote lists what ports, lines, and cabinet slots are configured and the maximum future growth allowed with your particular processor. The guide and capacity summary print when the quote is printed.
For example, in a Strata DK424 with 24 station ports, 48 lines, and 23 cabinet slots already configured, the maximum allowable future growth is 183 station ports, 96 lines, and 23 cabinet slots. DKQuote also notes that the station ports and lines are not to exceed 288 with the configured processor.
1. Click Save to File from the Print/Save Quote dialog box.
2. Enter a file/path name. Note The program defaults to dkquote.fqt and places the file in the DKQuote directory.
3. Click Start. The file, consisting of the final parts list and cover sheet, is saved to the destination file/path name. The file can be modified in Excel.
4. Click Close. You are returned to DKQuote’s opening window.
Pricing Menu–––––––––––––––––––––––––––––––––––––––––––––––––––––––––––––––––––––––––––––––––––
➤ To view the PCB placement guide
Pricing Menu
Pricing and description options are available from the Main Menu by clicking Pricing. The drop-down menu (shown at right) displays all of the available options. The Price List is available to Level 1 (Administrators) and 2 (Sales). All other options on the Pricing Menu are available only to the Administrator and are described in
“Customizing DKQuote” on Page 47.
Price List
The Price List displays:
♦ All parts (the entire parts list) ♦ Cabinets/power supplies
♦ Digital and lectronic telephone equipment ♦ Telephone options
♦ Attendant Console equipment
1. ClickView Diagram from the Configured Parts List.
Note Table 3 (which is not shown, but is referenced at the bottom of this screen) displays the placement and function of interface PCBs (for example, RSIU and PIOU).
2. Click Close. The Configured Parts List screen displays again.
3115
––––––––––––––––––––––––––––––––––––––––––––––––––––––––––––––––––––––––––––––––––Report Menu
Using DKQuote
39
➤ To view the price list
Report Menu
The Report drop-down menu (shown at right) enables you to print and save:
♦ Customized quotes
♦ Parts list
♦ Question file
♦ Customer list
If you select Save to File from the Print/Save Quote option, a pop-up dialog box displays. You can save the file to a floppy-disk drive, hard disk drive, or network drive.
1. Click Price List from the Toolbar
...or click Pricing from the Main Menu and Price List.
2. Click the Category that you want to view.
The available parts display for that category.
3. Click the Part Number.
The price for the highlighted part appears at the bottom of the screen in the pre-programmed price schedule. For more information, see the
Administrator.
4. Click Close.
3126
Report Menu–––––––––––––––––––––––––––––––––––––––––––––––––––––––––––––––––––––––––––––––––––
➤ To print the parts list or save to file
➤ To print the question file or save to file 1. Click Report from the Main
Menu and Parts List.
2. Click Print Your file is sent to the printer.
...or Save to File.
Enter the file destination. The default file extension is.pqt.
3. Click Close. You are returned to the DKQuote opening window.
1. Click Report from the Main Menu and Question File.
2. Click Print Your file is printed.
...or Save to File.
3127
3561
––––––––––––––––––––––––––––––––––––––––––––––––––––––––––––––––––––––––––––––––––Report Menu
Using DKQuote
41
Notes
● The Question File input fields display in the Equipment Selection screens. Because
DKQuote continually provides you with the most current system components available, the input fields and selection choices change with different versions of the software.
● It is recommended that you make a printout of the Question file for review and to become
familiar with the inputs and selection choices that you will be asked when you are configuring a system and generating a quote.
➤ To print/save to file a customer list
➤ To print/save to file/delete a quote 4. Click Start
...or Cancel.
Your file is saved.
The save process is canceled.
1. Click Report from the Main Menu and Customer List.
2. Click Print Your file is printed.
...or Save to File.
Enter the file destination. The default file extension is .cqt.
1. Click Print/Save Quote from the Toolbar
3129
Report Menu–––––––––––––––––––––––––––––––––––––––––––––––––––––––––––––––––––––––––––––––––––
...or Report from the Main Menu and Print/Save Quote.
2. Highlight an existing quote.
3. Click Delete A pop-up box asks you to confirm the deletion. If you click Yes, the quote is deleted.
...or print/save.
4. Click All These items are printed:
♦ Final Quote Worksheet
♦ Quote Total Parts List
♦ Installation Items
♦ PCB Placement Guide
...or Parts/Installation All selected parts and installation charges print.
...or Cabinets Diagram
The system capacity screen prints.
3130
––––––––––––––––––––––––––––––––––––––––––––––––––––––––––––––––––––––––––––––––––Update Menu
Using DKQuote
43
Update Menu
The Update Menu (shown at right) enables you to backup and restore Dealer Price/Parts and Toshiba List Prices.
Note Backup to Installation Disk is only available to Level 1 (Administrator) and is described in “Customizing DKQuote” on Page 47.
Backup Dealer Price/Parts saves the current Dealer Price setup to a floppy disk, hard disk drive, or network drive. All custom parts, prices, markups, discounts and company general information is saved.
Restore Dealer Price/Parts enables you to obtain the dealer prices and parts that were saved on a floppy diskette or another directory on the hard drive/network. If the restored file is not compatible with the current DKQuote database, an error message displays and the file is not restored.
The Restore Toshiba List Prices menu option restores the current or a new Toshiba price from a file on a floppy disk, or directory on the hard disk drive, or network drive. It does not affect Dealer Discounts or Markup. You can update all Toshiba list prices, Authorized Dealer prices, National Accounts and GSA.
➤ To back up dealer price/parts
...or Save to File.
5. Enter a file/path name.
The program defaults to dkquote.fqt and saves to the DKQuote directory unless you change the name and path. The file can be modified in Excel.
1. Click Update from the Main Menu and Backup Dealer Price/Parts.
2. Enter the drive, directory and file name.
The suggested backup file extension is .qdb.
3. Click Start. The file is saved and the screen closes.
2323
3118
Setup Menu –––––––––––––––––––––––––––––––––––––––––––––––––––––––––––––––––––––––––––––––––––
➤ To restore dealer price/parts
➤ To restore Toshiba list prices
Setup Menu
The Setup menu (shown at right) enables you to setup:
♦ Customers
♦ Company general information
♦ User password levels
♦ Customized splash screen 1. Click Update from the Main
Menu and Restore Dealer Price/Parts from the drop-down menu.
2. Enter the drive, directory and file name.
3. Click Start. The file is restored and the screen closes.
1. Click Update from the Main Menu and Restore Toshiba List Prices from the drop-down menu.
2. Enter the drive, directory and file name.
The suggested list price database file extension is mdb.
3. Click Start. The file is restored and the screen closes.
2326
2327
Using DKQuote
45
➤ To add, modify or delete a customer record➤ To enter/modify company general information 1. Click Setup from the Main
Menu and Customer from the drop-down menu.
1. Highlight the customer.
2. Click Add and enter the information
The Customer record screen displays.
...or Delete A pop-up screen asks you to confirm the deletion.
...or Modify. The Customer record screen displays.
3. Enter the changed
information and click OK.
The modified information is retained and you are returned to the previous screen.
4. Click Close. The changes are saved.
1. Click Setup from the Main Menu and Company General Information from the
drop-down menu.
2. Enter or change the company name, address, telephone, and fax number.
3. Click OK.
3131
Customizing DKQuote
47
Customizing DKQuote
4
This chapter describes the DKQuote features available to Level 1 password users only (usually assigned only to the System Administrator). Features available to Level 2 and 3 users are described in Chapters 1~3 of this guide. The features described in this chapter are:
♦ Pricing Menu
♦ Price Category Setup
♦ Parts/price Setup
♦ Required Add-on Parts Setup
♦ Optional Add-on Parts Setup
♦ Obsolete Parts Setup
♦ National Accounts Installation Setup
♦ Dealer Installation Setup
♦ Question File Setup
♦ Update Menu
♦ Backup to Installation Disk
♦ Setup Menu
♦ User Password Level
♦ Customized Splash Screen
Pricing Menu
As the System Administrator, you control and customize almost all of the quote options and pricing. You can add new parts, hide existing parts (so they do not display in your quotes), create multiple pricing schedules, and change part names.
Category Pricing
The following categories are Toshiba default price schedules:
♦ Regular Account Dealer Column – Authorized Toshiba Dealer Price (Dealer Cost X Dealer Markup)
♦ National Account, MFG – Manufacturer’s suggested retail price
♦ National Account, Schedule A/B or C – Toshiba National Accounts Price
Pricing Menu–––––––––––––––––––––––––––––––––––––––––––––––––––––––––––––––––––––––––––––––––––
Note The number of price schedules available (from 1 to 10) depends on how you customize the schedule structure. There are four standard schedules (shown above) and up to four categories that you can use to customize your Dealership.
Price Definitions
The following definitions apply to all price schedules:
♦ List Price – authorized Toshiba Dealer Price List.
♦ Dealer Cost – Initially the Dealer Cost is List Price. After Dealer Discount is added, it
becomes List Price X (1-Dealer Discount).
♦ Dealer Price – Dealer Cost X (1+ Dealer Markup).
♦ Dealer Markup – Defaults to 0. Markups should only be set after establishing (setting) the
Dealer Discount.
♦ National Account, Schedules A~C – Toshiba National Accounts Price (non-variable
pricing).
♦ MFG Price – Manufacturer’s suggested retail price (non-variable pricing).
♦ General Service Administration – Authorized Communications Schedule Price List (GSA)
(non-variable).
♦ Cat07~Cat10 – Dealer customized prices – Base X (1+ Cat07~Cat10 Markup). Initially
these categories contain Dealer Cost (Profit Margin, Cat. Price – Dealer Cost/Cat. Price).
The base of a category price can be changed from Dealer Cost to Toshiba MFG, Schedule A~C, GSA or any lower category. Any markup can be set for each category.
Parts/Price Setup Screens
Many of the price screens (shown below) have special function buttons/columns. You can hide information by using the Hide Column, sort columns, and use the special function buttons at the bottom of the screen. There is also a Special Pricing Section in which you can customize your pricing structure.
Special
––––––––––––––––––––––––––––––––––––––––––––––––––––––––––––––––––––––––––––––––––Pricing Menu
Customizing DKQuote
49
The buttons at the bottom of the Setup screen perform the following:
Column Sorting
You can sort a column in an ascending or descending order depending upon the type of column it is. If it is a price column, the prices are sorted in ascending order. If it is a alphanumeric column (for example, Part Number or Description), it is sorted in numeric/alphabetic order.
CLICK TO
Save all changes.
Apply all changes and make calculations in the Special Pricing Section of the screen. All of the modifications remain in memory. Reset all current changes in the Special Pricing Section of the screen.
Display Cat07~Cat10 profit margins.
Cancel any changes and close.
Discard all changes.
Edit all data fields in a pop-up dialog box (shown below).
1. Click at the top of the column that you want to sort (shown below)
A “>” symbol or “<“ symbol in the column indicates it has been sorted in an ascending or descending order.
...or right click on the column.
2272
Pricing Menu–––––––––––––––––––––––––––––––––––––––––––––––––––––––––––––––––––––––––––––––––––
Special Pricing Section
Special Pricing customizes the price lists (Cat07~Cat10) for your Dealership. 2. Click Sort Ascending
...or Sort Descending.
The column sorts.
3. Click again on the same column.
The column sorts in the opposite direction
4. Click Discard All Changes to return the column to its default.
Important! Do not Click Discard All Changes if you have made other changes to the screen and have not saved them. The changes are lost.
1. Click the category field (Cat07~Cat10) to be customized.
Note The default calculation base is the Dealer cost.
2. Click a calculation base (other than Dealer) from the drop-down menu.
3. Click Leave existing markups
The word Existing is placed in the Markup column.
...or Compute markups The word Compute is placed in the Markup column.
2316
2289