by Emily Vander Veer, Doug Lowe,
Eric Ray, Deborah Ray, Damon Dean,
Camille McCue, Emily Weadock, Joyce Nielsen,
Mariva Aviram, Stephen Lockwood,
and Madhu Siddalingaiah
Creating Web Pages
A L L - I N - O N E D E S K R E F E R E N C E
FOR
DUMmIES
‰by Emily Vander Veer, Doug Lowe,
Eric Ray, Deborah Ray, Damon Dean,
Camille McCue, Emily Weadock, Joyce Nielsen,
Mariva Aviram, Stephen Lockwood,
and Madhu Siddalingaiah
Creating Web Pages
A L L - I N - O N E D E S K R E F E R E N C E
FOR
DUMmIES
‰Wiley Publishing, Inc. gratefully acknowledges the contributions of these authors and contributors: Emily Vander Veer, Doug Lowe, Eric Ray,
Publisher’s Acknowledgments
We’re proud of this book; please send us your comments through our online registration form located at www.dummies.com/register/.
Some of the people who helped bring this book to market include the following: Acquisitions, Editorial, and Media
Development
Associate Project Editor:Rebecca Huehls Senior Acquisitions Editor:Steve Hayes Copy Editors:Kelly Ewing, Rebecca Senninger Technical Editor:Dennis Short
Editorial Managers:Leah Cameron, Carol Sheehan
Senior Permissions Editor:Carmen Krikorian Media Development Specialist:Greg Stafford Media Development Manager:
Laura VanWinkle
Media Development Supervisor: Richard Graves
Editorial Assistant:Amanda Foxworth Cartoons:Rich Tennant
(www.the5thwave.com)
Production
Project Coordinator: Courtney MacIntyre Layout and Graphics: Seth Conley,
Stephanie D. Jumper, Jacque Schneider, Julie Trippetti, Melanee Wolven
Proofreaders: Andy Hollandbeck, Carl Pierce, Dwight Ramsey, Charles Spencer, Brian Walls
Indexer: Betty Kish
Special Help: Becky Whitney
Publishing and Editorial for Technology Dummies
Richard Swadley,Vice President and Executive Group Publisher Andy Cummings,Vice President and Publisher
Mary C. Corder,Editorial Director Publishing for Consumer Dummies
Diane Graves Steele,Vice President and Publisher Joyce Pepple,Acquisitions Director
Composition Services
Contents at a Glance
Introduction ...1
Book I: Web Page Basics...9
Chapter 1: Creating a Successful Web Site ...11
Chapter 2: Building Your First Web Site ...27
Chapter 3: Exploring the Essential Elements of Web Page Design ...41
Chapter 4: Working with Graphics, Sounds, and Video ...65
Chapter 5: Building Your Web Workshop ...79
Chapter 6: Publishing Your Web Site ...87
Chapter 7: Publicizing Your Web Site ...97
Book II: HTML...105
Chapter 1: Creating an HTML Page ...107
Chapter 2: Setting Background and Text Characteristics ...117
Chapter 3: Adding Internal and External Links ...127
Chapter 4: Working with Images ...137
Chapter 5: Controlling Page Layout ...147
Chapter 6: Creating Forms ...155
Chapter 7: Working with Frames ...167
Chapter 8: Developing Style Sheets ...179
Book III: FrontPage 2003 ...193
Chapter 1: Getting to Know FrontPage ...195
Chapter 2: Getting Started with FrontPage: Your First Web Site ...201
Chapter 3: Customizing FrontPage to Your Liking ...211
Chapter 4: Laying the Groundwork for Your Web Pages ...221
Chapter 5: Getting the Basics on Your Page: Text, Tables, and Links ...229
Chapter 6: Perking Up Your Pages with Interactive Buttons, Counters, and More ...243
Chapter 7: Image Editing for Everyone ...251
Book IV: Dreamweaver ...267
Chapter 1: Getting to Know Dreamweaver ...269
Chapter 2: Creating Your First Web Site with Dreamweaver ...279
Chapter 3: Creating Basic Web Pages ...287
Chapter 4: Incorporating Interactive Images ...305
Chapter 5: Adding Multimedia Objects ...317
Chapter 6: Punching Up Your Pages with Forms and Frames ...323
Chapter 7: Laying Out Pages with Layers ...337
Chapter 8: Using Templates for a Consistent Look ...347
Chapter 9: Publishing and Maintaining Your Site ...353
Book V: Multimedia: Pulling Together Graphics,
Sound, Video, Animations, and Applets ...365
Chapter 1: Adding Visual Appeal with Graphics and Photos ...367
Chapter 2: Creating Media Files and Putting Them on Your Site ...385
Chapter 3: Spicing Up Your Site with Java Applets ...405
Book VI: JavaScript ...419
Chapter 1: JavaScript Syntax and Keywords ...421
Chapter 2: Basic JavaScript Constructs ...431
Chapter 3: Working with the Document Object Model ...443
Chapter 4: Exploring Built-In Data Types ...465
Chapter 5: Defining and Using Functions ...471
Chapter 6: Adding Interactivity with Event Handlers ...477
Chapter 7: Working with Forms ...481
Chapter 8: More Cool Things You Can Do with JavaScript ...491
Book VII: Flash...503
Chapter 1: Getting to Know Flash ...505
Chapter 2: Getting Acquainted with the Tools Window ...521
Chapter 3: Using Layers ...539
Chapter 4: Creating Reusable Symbols ...551
Chapter 5: Making Movies ...563
Chapter 6: Optimizing Movies ...579
Chapter 7: Publishing and Printing Your Movie ...587
Book VIII: Adding E-Commerce Capability...601
Chapter 1: Getting to Know E-Commerce ...603
Chapter 2: Simplified E-Commerce Solutions ...615
Chapter 3: Hosted E-Commerce Solutions ...631
Chapter 4: Create-Your-Own E-Commerce Solutions ...639
Chapter 5: Online Marketing: The Key to a Successful E-Commerce Site ...649
Book IX: XML ...665
Chapter 1: Getting to Know XML ...667
Chapter 2: The XML Specification ...677
Chapter 3: Designing a DTD ...689
Chapter 4: Logical Structures ...699
Chapter 5: Physical Structures ...713
Chapter 6: Converting, Publishing, and Serving XML ...731
Appendix: About the CD ...737
Index ...745
Table of Contents
Introduction...1
About This Book...2
How to Use This Book ...2
Who Are You? ...3
How This Book Is Organized...4
Book I: Web Page Basics ...4
Book II: HTML ...4
Book III: FrontPage 2003 ...5
Book IV: Dreamweaver...5
Book V: Multimedia: Pulling Together Graphics, Sound, Video, Animations, and Applets...5
Book VI: JavaScript...5
Book VII: Flash ...5
Book VIII: Adding E-Commerce Capability ...6
Book IX: XML...6
What’s on the CD? ...6
Icon Alert!...6
Book I: Web Page Basics ...9
Chapter 1: Creating a Successful Web Site . . . .11
Web Site Basics...11
Different kinds of Web sites ...11
Creating a Web site: An overview...13
Planning Your Web Site...13
Creating Your Web Pages ...14
From scratch, using a text editor ...14
Using a graphical Web page editor...14
Beyond HTML: Adding nifty features...14
Publishing Your Web Pages...15
Finding space for your Web site ...15
Publicizing your Web site ...16
Elements of a Successful Web Site ...17
Organizing Site Content...18
Sequential organization ...18
Hierarchical organization ...19
Combination sequential and hierarchical organization ...20
Creating Web Pages All-in-One Desk Reference For Dummies
xii
Chapter 7: Publicizing Your Web Site . . . .97
Springing For a Domain Name ...97
Choosing a domain name ...98
Registering a domain name...98
Understanding Search Services ...99
Specifying a descriptive HTML title ...100
Optimizing Web page text ...100
Using HTML meta tags ...101
Exploring automated submission tools...101
Going Beyond Search Services ...101
Getting links ...102
Advertising your site...102
Using site statistics ...103
Book II: HTML ...105
Chapter 1: Creating an HTML Page . . . .107
Understanding HTML Basics: Text and Tags ...107
Formatting text ...108
Nesting tags...109
Using HTML Structure Tags ...109
The !DOCTYPE tag...110
The <HTML> tag ...110
The <HEAD> and <TITLE> tags ...111
The <META> tag ...111
The <BODY> tag...112
Getting Familiar with Basic HTML Tags ...113
Making headings...113
Making paragraphs...113
Emphasizing text ...113
Making lists ...114
Chapter 2: Setting Background and Text Characteristics . . . .117
Applying a Color Background...117
Applying an Image Background...118
Finding Images to Use...119
Setting Document Text Colors...120
Changing text colors ...120
Changing link colors ...120
Specifying Text Alignment...121
Table of Contents
xiii
Chapter 3: Adding Internal and External Links . . . .127
Understanding Links...127
About URLs ...128
Anatomy of URLs ...128
Absolute and relative URLs...129
Understanding Anchors ...131
Making Links ...131
Linking to documents within your site...131
Linking to pages out on the Web ...132
Linking to other stuff on the Internet ...133
Making Links within Documents ...134
Making internal links...134
Marking internal targets ...135
Using a Link-Checker Utility...136
Chapter 4: Working with Images . . . .137
Adding Images ...137
Optimizing Images for Quick Download...141
Controlling Image Alignment ...142
Surrounding Images with Blank Space ...143
Making Clickable Images ...144
Chapter 5: Controlling Page Layout . . . .147
Developing Tables ...147
Embedding Horizontal Rules ...150
Forcing Line Breaks ...152
Chapter 6: Creating Forms . . . .155
Creating a Basic Form...155
Using Form Components to Collect Information ...158
Including Submit and Reset buttons...158
Including check boxes, radio buttons, and more...159
Making check boxes ...159
Making radio buttons...161
Using other input types ...162
Including select lists ...162
Including text areas...164
Chapter 7: Working with Frames . . . .167
About Frames ...167
Developing Content ...170
Developing Alternative Content ...170
Establishing the Frameset Document...171
Setting Up the Frames ...173
Setting Up Links and Targets ...175
Creating Web Pages All-in-One Desk Reference For Dummies
xiv
Chapter 8: Developing Style Sheets . . . .179
About Style Sheets ...179
Accommodating browser differences...179
Understanding inheritance ...180
Connecting Style Sheets to HTML Documents ...181
Embedding style sheets...182
Linking style sheets...183
Understanding Style Rules ...184
Applying style rules ...186
Setting a font for an entire document ...186
Specifying text and background colors ...187
Specifying background images ...189
Book III: FrontPage 2003 ...193
Chapter 1: Getting to Know FrontPage . . . .195
“What Is FrontPage, and What Can I Do with It?”...195
How FrontPage Is Organized...195
Viewing Your Web Site ...196
Introducing the FrontPage Editor ...200
Chapter 2: Getting Started with FrontPage: Your First Web Site . . .201
Creating a New Web Site...201
Creating Web Pages...204
Creating an empty Web page ...204
Creating a Web page from a template ...204
Creating framed Web pages ...206
Changing a Filename ...207
Saving Your Web Pages...208
Opening Files from Other Programs with FrontPage...209
Chapter 3: Customizing FrontPage to Your Liking . . . .211
A Quick Guide to the Three Modes of the FrontPage Editor ...211
Using FrontPage Toolbars ...213
Creating Folders ...214
Deleting Files and Folders ...215
Importing Webs and Web Pages ...216
Importing files that you created elsewhere ...217
Importing folders that you created elsewhere ...217
Importing a Web site that you created elsewhere ...218
Chapter 4: Laying the Groundwork for Your Web Pages . . . .221
Applying a Theme to a Web Page (Or an Entire Web Site) ...221
Table of Contents
xix
Creating Transparent Images...372 Creating Clickable Images ...374 Adding the image...375 Mapping clickable areas ...377 Defining the map ...380
Chapter 2: Creating Media Files and Putting Them on Your Site . . .385
The Difference between Downloadable and Streaming Media...385 Creating Streaming Audio Files ...387 Creating Downloadable Audio Files...391 Creating Video Files for Your Web Pages ...393 Gathering the hardware and software you need ...394 Converting a video file to RealVideo format ...395 Creating an Animated Effect ...396 Editing your animated effect...401 Optimizing your animated effect...402 Finding Media Files ...402 Adding Media Files to Your Web Page ...403 Adding a link to a media file...403 Embedding a media file ...404Chapter 3: Spicing Up Your Site with Java Applets . . . .405
Finding Applets...406 Inserting Applets into HTML: An Overview...406 Inserting Applets with the <APPLET> Tag ...406 Looking at the <APPLET> tag syntax ...407 Placing an applet on a page using the <APPLET> tag ...410 Inserting Applets with the <OBJECT> Tag ...410 Looking at the <OBJECT> tag syntax ...411 Placing an applet on a page using the <OBJECT> tag...413 Understanding Applet Security ...414 Creating Your Own Java Applets ...415 What you need to create Java applets...415 From source to executable code: A look at the appletdevelopment life cycle ...417
Book VI: JavaScript ...419
Table of Contents
xxi
radio...457 reset ...459 select...459 submit...461 text ...461 textarea...462 window ...463
Chapter 4: Exploring Built-In Data Types . . . .465
Array ...465 Date ...466 Invoking Date Methods...467 String...468Chapter 5: Defining and Using Functions . . . .471
About Using Functions ...471 Calling a function...471 Defining a function ...472 Returning values...473 Taking Advantage of Built-In Functions...473 Using Functions to Create Custom Objects ...474Chapter 6: Adding Interactivity with Event Handlers . . . .477
Calling Event Handlers ...477 Examining the Event Handlers Supported by JavaScript ...478Chapter 7: Working with Forms . . . .481
Data Validation Basics ...481 Field-Level Validation...482 Ensuring that a value exists ...482 Ensuring that a value is numeric ...484 Ensuring that a value matches a pattern ...486 Form-Level Validation ...488Creating Web Pages All-in-One Desk Reference For Dummies
xxiv
Optimizing Lines and Objects ...585 Optimizing Text ...586
Chapter 7: Publishing and Printing Your Movie . . . .587
Publishing and Exporting Your Movie ...587 Publishing your movie ...588 Exporting your movie ...589 Flash publish settings ...590 HTML publish settings...591 Printing Your Movie ...592 Printing designated frames ...592 Printing a storyboard filled with thumbnails ...593Chapter 8: Using Flash with Other Programs . . . .595
Bringing a File into Flash ...595 Importing Non-Flash Files ...596 Importing a file into Flash ...596 File types that Flash can import ...597 Importing a file sequence ...597 Pasting Non-Flash Files into Flash...598 Compressing Imported Bitmaps ...599Book VIII: Adding E-Commerce Capability ...601
Chapter 1: Getting to Know E-Commerce . . . .603
Understanding E-Commerce ...603 E-commerce overview ...605 Anatomy of a successful e-commerce site ...607 Choosing an E-Commerce Solution...611 Simplified e-commerce solutions ...611 Hosted e-commerce solutions ...612 Off-the-shelf e-commerce software ...612 Build-your-own e-commerce solutions ...613Table of Contents
xxv
Chapter 3: Hosted E-Commerce Solutions . . . .631
What Is a Hosted E-Commerce Solution? ...631 Finding a Hosted E-Commerce Solution ...632 Evaluating a Hosted E-Commerce Solution...633 Implementing a Hosted E-Commerce Solution ...634 Signing up for the e-commerce service ...634 Building your e-commerce Web site ...635 Signing up for a merchant account ...637Chapter 4: Create-Your-Own E-Commerce Solutions . . . .639
What Is a Custom E-Commerce Solution? ...640 Why a custom solution? ...641 Popular e-commerce programming languages ...642 Standard E-Commerce Components...643 Storefront...643 Security measures ...646 Credit-card processing...647Chapter 5: Online Marketing: The Key to a Successful
E-Commerce Site . . . .649
Online Marketing: The Basics...649 Designing a Credible Storefront ...651 Sticking to sound design principles ...652 Creating professional copy ...653 Including contact information ...654 Keeping your site up-to-date...655 Streamlining the Purchase Process ...655 Adding a Click To Buy button ...656 Telling your customers the damage — in advance...656 Guiding customers through the buying process...657 Providing order confirmation and tracking information...658 Offering special sales, promotions, and incentives ...659 Offering Top-Notch Online Customer Service ...659 Providing product information...660 Communicating company policies ...661 Offering order- and product-related support...661Book IX: XML...665
Creating Web Pages All-in-One Desk Reference For Dummies
xxvi
The Downside of XML...673 Applications Tailor-Made for XML ...674 XML Development Tools ...675 Editors...675 Parsers and processors ...675
Chapter 2: The XML Specification . . . .677
Logical and Physical Structures ...677 Logical structures...678 Physical structures ...679 Notation in XML Rules...680 Expression code syntax and meaning ...681 Expression extensions ...682 Prefix operator...683 Suffix operators ...683 Syntactic Constructs...684 Literals ...684 Names and tokens ...686Chapter 3: Designing a DTD . . . .689
What Is a DTD? ...689 Prolog and document type declarations ...690 Document type declaration examples ...692 Declaring the root element...693 Associating a DTD with an XML Document ...694 Including an internal DTD ...694 Referencing an external DTD ...694 DTD Markup...695 Characters ...695 CDATA sections...696 Comments ...696 Processing instructions ...696Table of Contents
xxvii
Chapter 5: Physical Structures . . . .713
Entities...713 Document entity ...714 Entity declarations ...715 Entity processing...716 External entities...719 Internal entities...720 Parameter entities ...721 Parsed and unparsed entities ...722 Referencing Characters and Entities ...723 Character encoding in entities ...724 Character references...725 Entity references...726 Notations and Notation Declarations ...729Chapter 6: Converting, Publishing, and Serving XML . . . .731
Converting Non-XML Documents to XML ...731 Publishing XML...732 Serving XML...733 Clients (and client-side includes)...733 Servers (and server-side includes) ...734 Managing and Maintaining XML ...735Appendix: About the CD...737
Index...745
Creating Web Pages All-in-One Desk Reference For Dummies
Introduction
T
he Web is long past novelty, if-you’ve-heard-about-it-you-must-be-a-geek status. (I know this because a long-distance friend of mine — a friend so technology-phobic she bakes bread by hand, not trusting those newfangled grocery store bakeries — recently told me she’d found inexpensive plane tickets on a travel Web site, and would I be so kind as to make up the bed in my spare bedroom?) Everyone, it seems, either has a Web site or is putting one together.The trouble is, if you want to join in the fun (and profit) and don’t happen to be a Web developer by trade, you may have trouble deciding exactly where to start. HTML! HTTP! XML! Java! JavaScript! Just trying to figure out what all these strange-sounding acronyms meancan give you a headache — let alone trying to figure out which acronyms you really need to understand and which you don’t.
If any of this sounds familiar, you’ve come to the right place. This book begins with a minibook (called, appropriately enough, Creating Web Pages) that introduces you to the wonderful world of the Web, helps you decide what kind of Web site you want to focus on creating, and outlines the steps you need to take to go from your great idea to a live Web site.
The rest of the book is organized into concise minibooks,each of which tackles a specific aspect of Web development — everything from adding graphic images and sounds to your Web pages to turning a simple home page into a full-fledged e-commerce site. You don’t need to read through all of them all at once; just pick the one that corresponds to the feature you most want to add to your site and go from there.
About This Book
2
Because you (like me) may learn best when you perform tasks as you read along, the CD that comes with this book contains a handful of the most pop-ular Web-development tools on the market. To cement your understanding of the concepts I present in this book, all you need to do is pop in the CD, install one or more of the development tools you find there, and try out the examples I provide in each minibook.
Creating a Web site is one of the most creative, communicative endeavors in which you can engage. Whether you’re interested in creating a personal home page for your own enjoyment, or developing a multimedia-rich e-commerce site for your boss, you can use the tips and examples in this book to create an interactive work of art that folks all over the planet can access and enjoy.
About This Book
The Creating Web Pages All-in-One Desk Reference For Dummiesis intended to be a reference for all the great things (and maybe a few not-so-great things) that you may need to know when you’re creating or expanding a Web site — from designing a cool-looking page to creating multimedia effects and e-commerce capability. Of course, you could go out and buy a book on each of these Web-development-related topics, but why would you want to when they’re all conveniently packaged for you in this handy reference? Creating Web Pages All-in-One Desk Reference For Dummiesdoesn’t pretend to be a comprehensive reference for every last detail of all things Web. Instead, this book shows you how to get up and running fast so that you have more time to do the things that you really want to do. Designed using the easy-to-follow For Dummiesformat, this book helps you get the information you need without laboring to find it.
How to Use This Book
This book acts like a reference so that you can locate what you want to know, get in, and get something done as quickly as possible. In this book, you can find concise descriptions introducing important concepts, task-oriented topics to help you realize what you need, and step-by-step instruc-tions, where necessary, to show you the way.
At times, this book presents you with specific ways of performing certain actions. For example, when you must use a menu command, you see a com-mand sequence that looks like this:
File➪Print
Who Are You?
3
Sometimes, we tell you about keyboard shortcuts. These shortcuts are key combinations such as
Ctrl+C
When you see this shortcut, it means to press and hold down the Ctrl key as you press the C key. Then release both keys together. (Don’t attempt to type the plus sign!)
Names of dialog boxes, menu commands, and options are spelled with the first letter of each main word capitalized, even though those letters may not be capitalized on your screen. This format makes sentences filled with long option names easier for you to read. (Hey, I think of everything!)
Just one more thing: When you’re asked to click or double-click something, this book assumes that your mouse settings have not been changed from the default. So, when you’re told to click, use the left mouse button. When you need to use the right mouse button (to display a shortcut menu, for example), you’ll be specifically told to right-click. Be sure to make the mental adjustments to these instructions if, for example, you’re left-handed and have reversed your mouse buttons.
Who Are You?
Although making too many assumptions about readers (or anything else, for that matter!) can be a dangerous thing, you probably fit into one or more of the following categories:
✦ You’ve surfed the Web for a while and are now contemplating creating your very own home page — but don’t know where to start.
✦ You’ve already put up a home page and are interested in expanding it to create a full-fledged personal Web site.
✦ You’re a small-business owner who wants to hop on the e-commerce bandwagon.
✦ You’re studying Web design, Web marketing, or e-commerce at school and could use a practical, hands-on reference book like this one.
✦ You work for a company that has its own Web site, and part of your job is (or soon will be) helping to create, improve, or expand your com-pany’s site.
How This Book Is Organized
4
✦ You’re already a crackerjack Web developer, but you could use a good, solid reference book to consult when you know whatyou want to do — but can’t remember the specific details for how to go about doing it.
What this book doesn’tassume (despite the title) is that you are a dummy. Unfortunately, Web development tools and technologies — most of which seem to be created for geeks in the first place — change faster than the scenes in a music video. Creating Web pages can be downright confusing and intimidating, even for software professionals, and you probably don’t have time to devote to learning every single aspect of Web design from the ground up. If you want to help yourself — to get started creating Web pages as quickly and easily as possible — this is the book for you.
How This Book Is Organized
Each of the minibooks contained in Creating Web Pages All-in-One Desk Reference For Dummies can practically stand alone. The first minibook pro-vides a quick-and-dirty overview of the Web site creation process, covering the basics you should know to help you get the most out of the rest of the stuff in the book. The remaining minibooks cover just about everything you ever wanted to know about creating pages. Here’s a brief description of what you find in each minibook.
Book I: Web Page Basics
This minibook presents an overview of the Web page creation process: why you might want to create Web pages, how to go about designing top-notch pages, what steps you need to take to publish your site so that everyone connected to the Web can view it. Here you also find a list of the elements common to all attractive, professional-looking sites — elements you can easily incorporate into your own efforts using the information you find in the rest of the book.
Book II: HTML
How This Book Is Organized
5
Book III: FrontPage 2003
FrontPage 2003, from Microsoft, is several Web-creation tools all rolled into one: It’s an HTML editor you can use to create Web pages, an image editor you can use to create Web-friendly graphic images, and a Web site publisher you can use to publish your pages on the Web (in other words, make your pages accessible to everyone hooked up to the Internet running a Web browser). This minibook walks you through the process of creating and publishing a Web site using FrontPage 2003.
Book IV: Dreamweaver
Macromedia Dreamweaver is another popular Web creation tool. Like FrontPage 2003, Dreamweaver allows you to create and publish Web pages with point-and-click ease.
Book V: Multimedia: Pulling Together Graphics,
Sound, Video, Animations, and Applets
For those who want to add a bit of visual or aural interest to their Web pages, this minibook has the answers. Here you find how to create your own graphic images, sound files, Java applets, and animated effects from scratch (or find ones that you can use, if you’re not the creative type). You also find out how to make sure your multimedia additions are optimized for viewing and listen-ing over the Web — as well as a frank discussion of when multimedia isn’ta good choice for your Web site.
Book VI: JavaScript
This minibook introduces you to the JavaScript scripting language, a special programming language that allows you to access and work with the compo-nents of a Web page to make your Web pages interactive. Here you find out how to create popular JavaScript effects such as mouse rollovers (push but-tons that change their appearance in response to a user’s mouse move-ment) and intelligent forms (input forms that alert users when incorrect information is entered).
Book VII: Flash
What’s on the CD?
6
Book VIII: Adding E-Commerce Capability
E-commerce, or electronic commerce, is one of the fastest-growing uses of the Web. Whether you want to sell your homemade cookies to cookie afi-cionados across town or your company’s product line to customers all over the world, this minibook presents your e-commerce options. And, because e-commerce is much more than just software, this minibook also lists the latest approaches to Web marketing and fulfillment.
Book IX: XML
XML (short for eXtensible Markup Language) has an awful lot of developers excited because it defines a way to exchange data over the Web without falling prey to the limitations HTML (and browsers) impose. In this mini-book, you find out what XML is and how you use it; you also find out what tools are available to help you create your very own XML applications.
What’s on the CD?
The CD that comes with this book is packed with useful software applica-tions you can use to begin creating your own Web pages right away. Here you find HTML editors, programs that help you create multimedia files (such as graphics, animations, and sound files), and much more. For details on exactly what’s included, refer to the “About the CD” Appendix.
Icon Alert!
As you flip through this book, little pictures — called icons — in the margins draw your attention to important information. You’ll discover the following icons in this book:
This icon points out tidbits of information that save you time and help you perform a task more easily.
Just a reminder . . . This information may be worth keeping in mind.
Icon Alert!
7
This icon appears beside in-depth, nerdy, technical guru-type stuff you may want to skip over or read later.
This icon alerts you to where the applications on the companion CD are mentioned in the book.
Creating Web Pages All-in-One Desk Reference For Dummies
Book I
Contents at a Glance
Chapter 1: Creating a Successful Web Site ...11
Chapter 2: Building Your First Web Site ...27
Chapter 3: Exploring the Essential Elements of Web Page Design ...41
Chapter 4: Working with Graphics, Sounds, and Video ...65
Chapter 5: Building Your Web Workshop ...79
Chapter 6: Publishing Your Web Site ...87
Chapter 1: Creating a
Successful Web Site
In This Chapter
Understanding the different kinds of Web sites Determining what to include on your Web site Creating a Web site step by step
Finding space for your Web site
W
eb sites are many things to many people. To some, a Web site is an electronic business card; to others, an online storefront; to still others, a classified advertisement or a family photo album. The trick to cre-ating a successful Web site is to figure out what a Web site is to you— and then to build your site and make it available on the Web by following a few simple steps.Web Site Basics
Although the steps you take to create and publish(make it available on the Web) a Web site are pretty straightforward, the geeky terminology surround-ing the Web can make the whole process seem downright confussurround-ing. The fol-lowing sections give you an overview of the different kinds of sites you can create, followed by a description of the “big picture” — in other words, a description of what you need to do to turn your great idea into a live Web site that people all over the world can view and enjoy.
Different kinds of Web sites
The following sections describe three very broad categories of Web sites. The Web site that you intend to publish probably falls into one of these three categories.
Personal home pages
Web Site Basics
12
and any special interests you may have. You can also throw in a picture. Oh, and links to your favorite pages on the Web are also commonly included in personal home pages.
More elaborate personal home pages can include pictures from your last family vacation, the first chapter of your soon-to-be-published novel, or any-thing else you think others may be interested in.
If you’re looking for a job, you should also include your résumé on your per-sonal home page.
Company Web sites
More and more companies are joining the Web bandwagon. Even mom-and-pop pizza parlors are putting up Web pages. The simplest corporate Web pages provide basic information about a company, such as a description of the company’s products or services, phone numbers, and so on.
A more elaborate corporate Web site can include any or all of the following:
✦ An online catalog that enables Internet users to see detailed information about products and services. The catalog may include pictures and, if you want, prices.
✦ Online ordering, which enables Internet users to actually place orders over the Internet.
✦ A customer survey.
✦ Lists of frequently asked questions (FAQs) about the company’s prod-ucts or services.
✦ Online support, where a customer can leave a question about a problem he or she is having with a product and receive an answer within a day or two.
✦ Articles and reviews of the company’s products.
✦ Press releases.
✦ Biographies of company employees.
Special-interest Web sites
Book I Chapter 1
Creating a
Successful
W
eb Site
Planning Your Web Site
13
Creating a Web site: An overview
Although you don’t have to be obsessively methodical about creating a Web site, following these three basic steps helps ensure that you end up with a site you’re proud to call your own (in the least possible amount of time).
1.
Plan your Web site.Taking a bit of time up front to decide exactly how you want your site to look and behave can save you loads of time, as you see in the follow-ing section, “Plannfollow-ing Your Web Site.”
2.
Create your Web pages.A Web site is a collection of Web pages. And although all Web pages must be created in a special language called HTML (which stands for HyperText Markup Language), you have several options besides becom-ing an HTML guru and typbecom-ing all your HTML code into a text editor by hand. The section “Creating Your Web Pages,” later in this chapter, describes some of those options.
3.
Publish your Web pages.Before anyone hooked up to the Web can view your Web site, you must first publishit — that is, you must first copy your Web pages to a Web server. In the section “Publishing Your Web Pages,” later in this chapter, you find out how to do that.
Planning Your Web Site
Start by making a plan for your Web site. If all you want to do is create a simple, one-page “Here I Am” type of personal Web site, you may not need a plan. However, if this Web site is your first one, a little planning can help you avoid some frustration as you figure out the nuts and bolts of creating a Web page. Your plan may be a simple sketch (you can even do it on a napkin) of what information your site will contain and how that info will look. For a more elaborate Web site, the planning is more complicated and even more necessary, but the principle remains the same.
Creating Your Web Pages
14
Creating Your Web Pages
You can take a couple of different approaches to creating the pages that will make up your Web site: You can hand-code the site from scratch, using a text editor, or you can use a point-and-click graphical editor that generates HTML code for you. Either approach works just fine. You can always choose one approach, work with it awhile, and then switch to the other approach later if you change your mind.
From scratch, using a text editor
If you dream in Boolean, feel free to fire up Notepad and start banging away HTML code from scratch. You have to figure out the intricacies of using HTML code to format your Web pages, but you gain satisfaction from know-ing you did it the hard way! (You also have complete control over every aspect of your Web pages — something you don’t always have when you use a graphical Web page editor.) Book II introduces you to the HTML basics you need to get started creating HTML code from scratch.
Using a graphical Web page editor
If the mere thought of programming gives you hives, you can use a simple Web page editor to create your Web pages. (Book I, Chapter 2, shows you a free Web-page-creation tool in action.) Or, you can purchase inexpensive programs for creating complete Web sites. Two of the best known Web site development programs are Microsoft FrontPage 2003 and Dreamweaver. (Dreamweaver is included on the CD that comes with this book.) For more information on these programs, Book III covers FrontPage, and Book IV covers Dreamweaver.
Beyond HTML: Adding nifty features
After you have your basic site up and running, you may want to get fancy and add some cool extras — features such as:
✦ Images, sound, animations, and Java applets (see Book V)
✦ Interactive images and forms that automatically check user input for errors (see Book VI, which covers JavaScript)
✦ Movie clips (see Book VII, which covers Flash)
✦ Credit-card handling (see Book VIII, which covers e-commerce)
Publishing Your Web Pages
16
outages, scheduled equipment maintenance, and so on. Because some ISPs have backup servers that minimize (or even eliminate) downtime and others don’t, be sure to ask any ISP you’re considering what you can expect in terms of average site.
✦ Services: Knowing up front which additional services (in addition to plain vanilla Web hosting) you want makes deciding on an ISP easier. Some common services an ISP may offer include:
• The ability to assign a unique URL of your own choosing (for example,
www.RalphsWidgets.com) to your Web site
• The ability to stream special multimedia formats, such as RealAudio files
• Built-in management and e-commerce tools, such as shopping carts and usage monitors
• The ability to create and run server-side applications (such as server-side JavaScript)
Free Web hosts
If you can’t find a home for your Web page at your Internet Service Provider, consider using a free Web host to host your Web site.
The best known, free home page service is Yahoo! GeoCities, which hosts well more than 1 million home pages. Each free Web site can use up to 15MB of disk space. The only limitation is that you must include a banner adver-tisement at the top of your Web page and a link to the GeoCities home page at the bottom of your page. (For a $10 one-time fee and $4.95 per month, you can eliminate the advertising and increase your space allotment to 25MB.) You can find Yahoo! GeoCities at geocities.yahoo.com.
Many other free home page services are available, although most cater to specific types of home pages, such as artist pages, churches, chambers of commerce, and so on. You can find a good directory of free home page serv-ices by going to Yahoo! (www.yahoo.com) and searching for free Web pages.
If your idea of the perfect Web site is a simple online diary, or Web log (blog for short), check out Blogger (www.blogger.com) for free hosting.
Publicizing your Web site
Organizing Site Content
18
pages in which you incorporate advanced features of the newer
browsers work well with older browsers as well by testing your pages in as many different browsers as possible. (For more information on creat-ing Web pages that look great in different browsers, check out Book VI, Chapter 8.)
✦ Don’t make hardware assumptions.Remember that not everyone has a 21-inch monitor and a high-speed cable-modem connection to the Internet — folks in other countries, for example. Design your Web site so that the poor sap who is stuck with a 14-inch monitor and — gasp — a 28.8 Kbps modem connection to the Internet can use it.
✦ Publicize it.Few people will stumble across your Web site by accident. If you want people to visit your Web site, you have to publicize it. Make sure that your site is listed in the major search engines, such as Yahoo! and Google. Also, you can promote your site by putting its address on all your advertisements, correspondences, business cards, e-mails, and so on. For more information about publicizing your site, check out Book I, Chapter 7.
Organizing Site Content
Organizing your site’s content can mean the difference between creating a great site and a site that visitors click away from screaming in frustration. The following sections describe several popular ways to organize the infor-mation on your Web site.
Sequential organization
In sequential organization,you simply organize your pages so that they follow one after another, like the pages in a book, as shown in Figure 1-1.
On each page, provide navigation links that enable the user to go to the next page, go to the previous page, or return directly to the first page. You imple-ment navigation links using HTML links and anchors (both of which I describe in Book II, Chapter 3), but you can also make them more descriptive than a plain underlined text link. For example, you can create navigation links that look like right and left arrows (for “next” and “previous” pages, respectively).
Page 1 Page 2 Page 3 Page 4
Book I Chapter 1
Creating a
Successful
W
eb Site
Organizing Site Content
19
One of the most popular ways to arrange navigation links is the navigation bar. A navigation bar is a strip of navigation links that runs either across the top or bottom of a page, or vertically, along the left-hand side of a Web page. You find more information about navigation bars in Book I, Chapter 3.
Hierarchical organization
In hierarchical organization, you organize your Web pages into a hierarchy, categorizing the pages according to subject matter. The topmost page serves as a menu that enables users to access other pages directly (see Figure 1-2).
On each page, provide a navigation link that returns the user to the menu.
If you want, you can include more than one level of menu pages, as shown in Figure 1-3.
Page 1 Page 2 Page 3 Menu
Page 4 Page 5 Page 6 Menu
Menu
Figure 1-3: Hierarchical organization with multiple menu levels.
Page 1 Page 2 Page 3 Menu
Page 4
Organizing Site Content
20
However, don’t overdo the menus. Most users are frustrated by Web sites that have unnecessary menus, each containing only two or three choices. When a menu has more than a dozen choices, however, consider splitting the menu into two or more separate menus.
Combination sequential and
hierarchical organization
Many Web sites use a combination of sequential and hierarchical organiza-tion, in which a menu enables users to access content pages that contain sequential links to one another, as shown in Figure 1-4.
In a combination style of organization, each content page includes a link to the next page in sequence in addition to a link back to the menu. The menu page contains links to the pages that mark the start of each section of con-tent pages.
Web organization
Some Web sites have pages that are connected with links that defy a strict sequential or hierarchical pattern. In extreme cases, every page in the site is linked to every other page, creating a structure that resembles a web, as shown in Figure 1-5.
Web organization — where every Web page links to every other page in a Web site — is a good style of organization if the total number of pages in the web is limited and you can’t predict the sequence in which a user may want to view the pages.
Page 1-1 Page 1-2 Page 1-3 Menu
Page 2-1 Page 2-2 Page 2-3
Book I Chapter 1
Creating a
Successful
W
eb Site
What to Include on Every Page
21
What to Include on Every Page
Although every Web page should contain unique and useful information, all Web pages must contain the following three elements:
✦ Title: At the top of every page, place a descriptive title that identifies the specific contents of the page and the Web site itself. A descriptive title is important because some users may not enter your site through your home page. Instead, they may go directly to one of the content pages in your site. In addition, many users bookmarkpages for quick access at a later date, and a good title, such as, “Sarah Bellum’s Definitive Guide to Lemurs,” helps users remember why they book-marked your page in the first place.
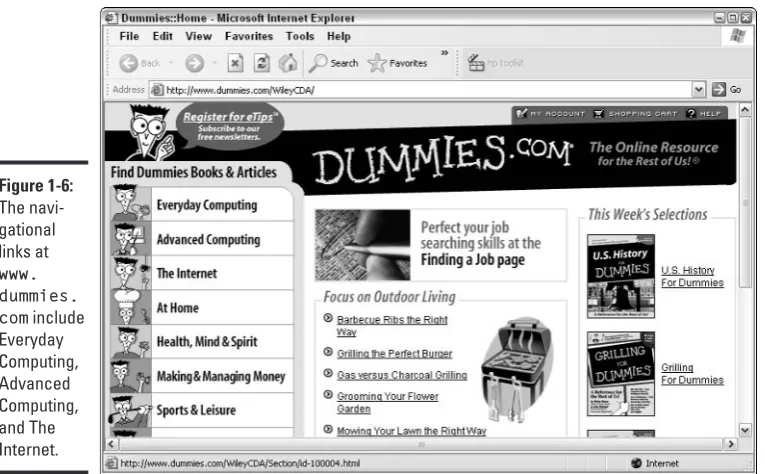
✦ Navigation links:All the pages of your Web site should have a consis-tent set of navigation links. At a minimum, provide a link to your home page on every page in your site. In addition, you may want to include links to the next and previous pages if your pages have a logical sequen-tial organization. Figure 1-6 shows examples of navigational links at
www.dummies.com.
✦ Author and copyright information:Every page should also include author credits and a copyright notice. Because users can enter your site by going directly to any page, placing the authorship and copyright notices on only the home page isn’t sufficient.
Page 2 Page 5
Page 3 Page 4
Page 1 Page 6
What to Include on Every Web Site
22
What to Include on Every Web Site
Although every Web site is different, you can find certain common elements on most Web sites. The following sections describe the items you should consider including on your Web site.
Home page
Every Web site should include a home page that serves as an entry point into the site. The home page is the first page that most users see when they visit your site (unless you include a cover page, as described in the next section). As a result, devote considerable time and energy to making sure that your home page makes a good first impression.
Place an attractive title element at the top of the page. Remember that most users have to scroll down to see all of your home page. They see just the top of the page first, so you want to make sure that the title is immediately visible.
After the title, include a site menu that enables users to access the content available on your Web site. You can create a simple text menu, or you can opt for a fancy graphics-based menu in which the user can click different parts of the image to go to different pages. However, if you use this type of menu, called an image map,be sure to provide a text menu as an alternative Figure 1-6:
What to Include on Every Web Site
24
Many users are annoyed by cover pages, especially those that take more than a few seconds to download and display. Think carefully about whether the splashy cover page actually enhances your site or is more of an annoyance.
Site map
If your site has a lot of pages, you may want to include a site map. A site map is a detailed menu that provides links to every page on the site. By using the site map, a user can bypass intermediate menus and go directly to the pages that interest him or her.
Contact information
Be sure your site includes information about how to contact you or your company. You can easily include your e-mail address as a link right on the home page. When the user clicks this link, most Web browsers fire up the user’s e-mail program, ready to compose a message with your e-mail address already filled in.
This should go without saying, but just in case, if you decide to include con-tact information, make sure that you’re diligent in reading and responding to the comments your visitors e-mail you. (This advice goes double for those of you contemplating a commercial Web site.)
If you want to include complete contact information, such as your address and phone number, or if you want to list contact information for several individuals, you may want to place the contact information on a separate page that can be accessed from the home page.
Help page
If your Web site contains more than just a few pages, consider providing a help page that provides information about how to use the site. The help page can include information about how to navigate the site, as well as information such as how you obtained the information for the site, how often the site is updated, how someone would go about contributing to the site, and so on.
FAQ
Book I: Web Page Basics
Chapter 2: Building
Your First Web Site
In This Chapter
Registering with a free Web host
Creating and publishing your first Web page Using a free Web site creation tool
Viewing your first Web page
N
othing helps give you a feel for how a process works better than walk-ing through each of the steps yourself. In this chapter, you see how to create, publish, and view your first Web page using the free graphical Web editor available from Yahoo! GeoCities, a free Web host.Registering with a Free Web Host
You have many options when it comes to finding space for your Web site. (Book I, Chapter 1 describes several of these options.) In this chapter, I show you how to register and create a site with Yahoo! GeoCities, one of the most popular free Web hosting services.
Other free Web hosting services at the time of this writing are Angelfire
(angelfire.lycos.com) and Tripod (www.tripod.lycos.com).
If you already have a Yahoo! GeoCities account, go ahead and skip to “Using a Free Web Site Creation Tool,” later in this chapter. Otherwise, to register with Yahoo! GeoCities, follow these steps:
1.
Type geocities.yahoo.com/home/into your browser’s address field and press Enter.The Yahoo! GeoCities home page appears, as shown in Figure 2-1.
2.
Click the Free link on the Yahoo! GeoCities home page, as shown in Figure 2-1.The Free: Highlights window appears.
Registering with a Free Web Host
28
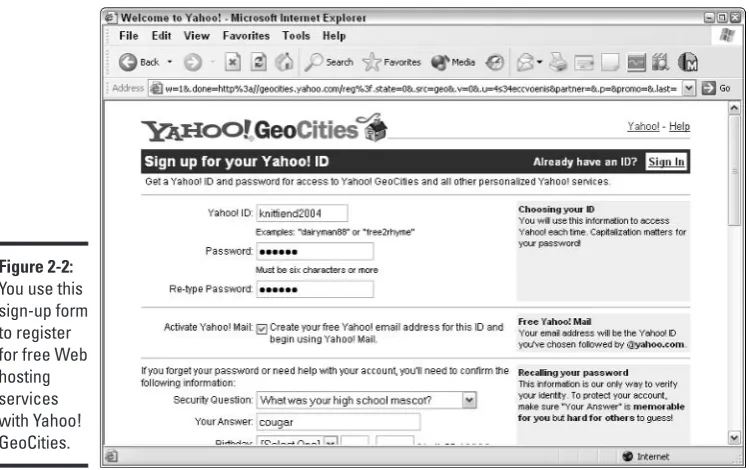
A Sign Up for Your Yahoo! ID window similar to the one you see in Figure 2-2 appears.
Book I Chapter 2
Building Y
our First
W
eb Site
Using a Free Web Site Creation Tool
29
4.
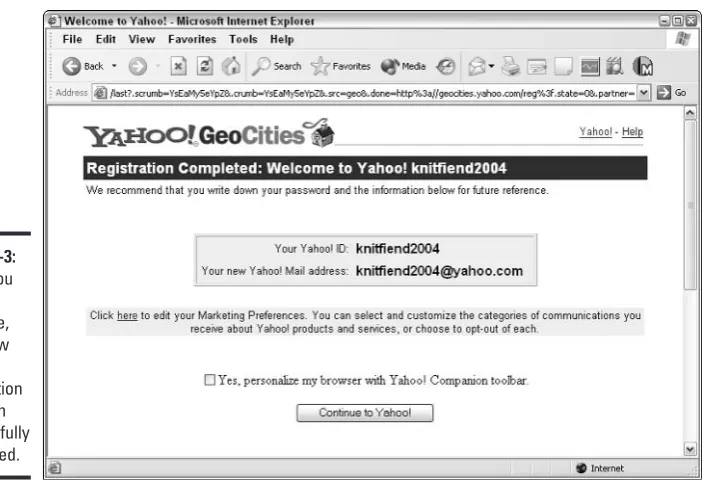
Fill out each field following the instructions provided on the form and then click the Submit This Form button.If you forget the ID or password you choose, you won’t be able to access your account (or the Web page creation tools). Chances are your memory, like mine, isn’t infallible — so make sure you write this information on a slip of paper and tuck it in a safe place next to your computer.
The Registration Completed window you see in Figure 2-3 appears.
5.
Click the Continue to Yahoo! button you see on the Registration Completed window.You’re done!
Using a Free Web Site Creation Tool
Most free Web services provide their own graphical Web site creation tools to make creating your first Web pages quick and easy.
Using a Free Web Site Creation Tool
30
Most free Web services don’t restrict you to using their Web site creation tools; instead, they allow you to create Web pages using any tool you like. If you choose not to use their built-in tools, however, you need to take an extra step to transfer your Web pages to your free site host — typically by using a transfer utility based on ftp(File Transfer Protocol).
As you become more and more skilled at creating Web pages, you may want to switch to a more sophisticated tool, such as Dreamweaver. You can find a trial version of Dreamweaver on the CD that comes with this book.
In the following steps, you see how to use the Yahoo! PageWizards Web tool available free when you register with Yahoo! GeoCities to create a simple Web page. First, I show you how to choose a look, or theme,for your Web page; then I show you how to add content, such as text, links, and a picture.
To use Yahoo! PageWizards to create a simple Web page, follow these steps:
1.
Type geocities.yahoo.com/home/into your browser’s address field and press Enter.A Welcome page appears (refer to Figure 2-1).
2.
Click the Free link on the Yahoo! GeoCities home page, as shown in Figure 2-1.The Free: Highlights window appears.
No such thing as a free lunch?
As you may suspect, “free” Web services aren’t
completelyfree. Most free Web services don’t charge you setup or hosting fees, but they do require you to display advertising messages on your site. Although you may be able to restrict the types of advertising the Web services dis-play on your site (for example, you may request family- or environmentally friendly messages), the Web service always has the last word. One more thing to consider when choosing a service: Free providers such as Yahoo! GeoCities
Book I Chapter 2
Building Y
our First
W
eb Site
Using a Free Web Site Creation Tool
31
3.
Click the Sign Up link you see on the Free: Highlights window. When the Welcome to Yahoo! GeoCities page appears, type your previously registered ID and password into the Yahoo! ID and Password fields, respectively, and then click Sign In.The previous section describes how to register an ID and password with Yahoo! GeoCities.
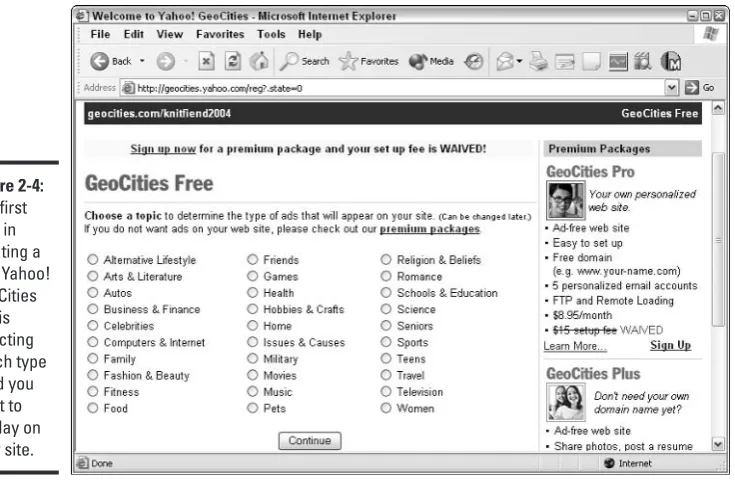
A Yahoo! GeoCities page personalized with your ID, similar to the one you see in Figure 2-4, appears.
4.
Select an ad topic and then click the Continue button. A page containing your Web site URL appears.Be sure to write down your Web site URL so you don’t forget it.
5.
Click the Build Your Web Site Now! link.A page similar to the one you see in Figure 2-5 appears.
6.
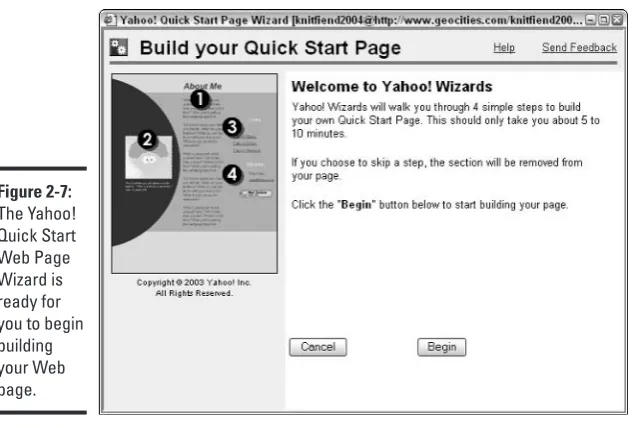
Click the Yahoo! PageWizards link.A Yahoo! GeoCities PageWizards window appears, offering a selection of page themes (see Figure 2-6).
Using a Free Web Site Creation Tool
32
Book I Chapter 2
Building Y
our First
W
eb Site
Using a Free Web Site Creation Tool
33
7.
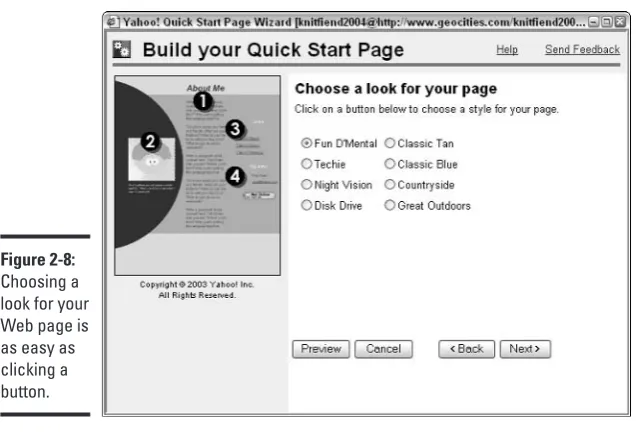
Click any of the theme links shown in Figure 2-6 (for example, you can click Fun D’Mental).A themeis a named set of characteristics — color, layout, and so on. A window titled Yahoo! Quick Start Web Page Wizard appears (see Figure 2-7).
Themes are sometimes referred to as styles or templates.
To see what your Web page looks like at any stage of the building process, click the Preview button located near the bottom of the Yahoo! Quick Start Web Page Wizard window.
8.
Click the Begin button located at the bottom of the screen. The screen shown in Figure 2-8 appears.9.
Click one of the radio buttons shown in Figure 2-8 to choose a theme (style) and click Next.For example, you can choose Fun D’Mental, Techie, or Night Vision. (If you wait a few seconds after clicking a style button, a preview of that style appears on the left-hand side of the screen.)
Does this step sound familiar? It should. You chose a theme, or style, for your Web page in Step 7. Unfortunately, Yahoo! Quick Start Web Page Wizard requires you to specify the style you want for your Web page again! If you want, you can use this opportunity to change your mind and select a different style.
Using a Free Web Site Creation Tool
34
10.
In the next screen, type the text you want to appear at the top of your Web page into the Enter Page Title field (see Figure 2-9). Type the text you want to appear in the middle of your Web page into the Enter Text field. When you’re ready, click Next.Book I Chapter 2
Building Y
our First
W
eb Site
Using a Free Web Site Creation Tool
35
11.
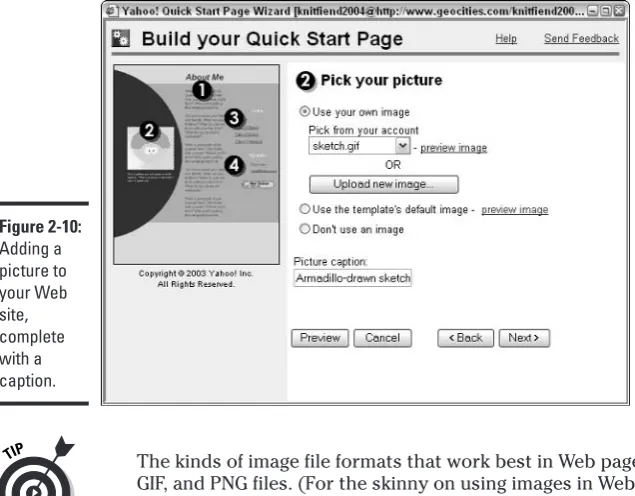
In the next screen (Figure 2-10), add a picture to your Web site by choosing the Use Your Own Image radio button and then clicking the Upload New Image button. When the Upload Image dialog box appears, type the fully qualified name of an image file in the field next to the Browse button and click the Upload button.A fully qualified filenameincludes both the filename and the directory in which that file resides on your computer: for example, c:\photos\
ralph.gifis the fully qualified filename of a file (ralph.gif) located
in the photosdirectory, which is located in turn on the c:drive.
If you’re not sure whether you have image files or where those files might be, you can click the Browse button shown in Figure 2-10.
The kinds of image file formats that work best in Web pages are JPEG, GIF, and PNG files. (For the skinny on using images in Web pages, check out Book I, Chapter 4.)
You can choose not to include a picture on your page by choosing the Don’t Use an Image radio button. To use a picture ready-made by GeoCities, choose the Use The Template’s Default Image radio button. (The ready-made picture is the goofy-looking cartoon face you see next to the big 2 in Figure 2-10, but hey — if you don’t happen to have a pic-ture file of your own on hand, a goofy-looking cartoon face may be better than nothing!)
Using a Free Web Site Creation Tool
36
12.
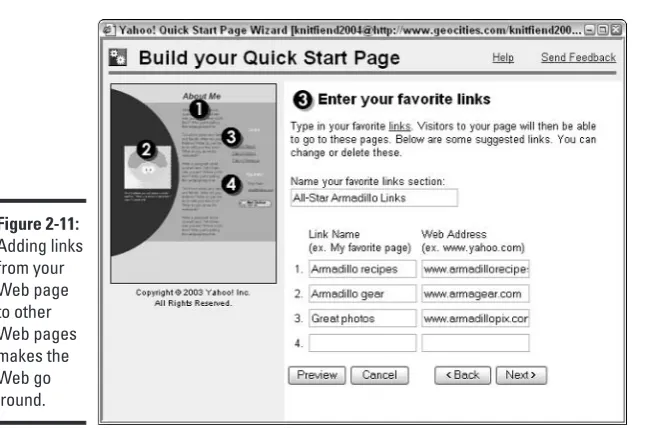
Type a few words of descriptive text in the Picture Caption field and click Next.The screen shown in Figure 2-11 appears.
13.
Add links from your Web site to others by typing a descriptive name for the link in the Link Name field and the URL of the link in the cor-responding field marked Web Address (refer to Figure 2-11). If you want, you can also type a heading for your link section in the field called Name Your Favorite Links section.14.
Click Next.The screen in Figure 2-12 appears.
15.
Add contact information to your site by typing your name and e-mail address into the Your Name and Your Email Address fields. Click Next.Adding contact information to your Web site is a good idea, especially if you’re creating a business or community-oriented site.
Even if you’re setting up a personal Web site, you’ll want to create a spe-cial e-mail address just for your e-mail from your Web site. If you put your personal e-mail address on the Web for all to see, you’ll be deluged with junk e-mail.
16.
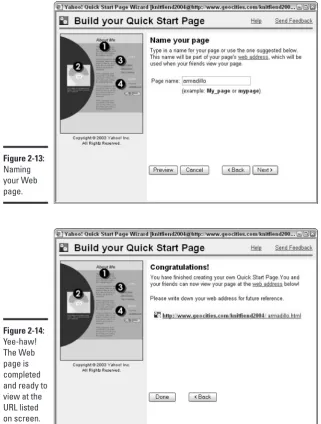
In the next screen, name your page by typing a short, descriptive name into the Page Name field (see Figure 2-13).Book I Chapter 2
Building Y
our First
W
eb Site
Using a Free Web Site Creation Tool
37
17.
Click Next.Don’t bother adding an .htmor .htmlsuffix; Yahoo! GeoCities Quick Start Page Wizard adds the appropriate extension for you.
The congratulations screen appears (see Figure 2-14), complete with the URL of your brand-spanking-new Web page. As the wizard suggests, take a second to jot down the URL on a piece of scratch paper. (You need this URL to view your new Web page, which I show you how to do in the next section.) Figure 2-12:
Adding contact information to your Web site.
Keeping copies of your files
Online Web creation tools like the one demon-strated in this chapter save your Web page files directly to their Web server. What this means is that your Web page is available on the Web as soon as you create it. But this also means that you don’t have a copy of the file saved on your own computer, which, depending on how para-noid you are, may be a problem — or maybe not. Web creation tools that you install on your own machine work differently. In the case of a Web
Viewing Your First Web Page — Live
38
Viewing Your First Web Page — Live
To view your newly created Web page, type the URL (Uniform Resource Locator) of your Web page into your browser’s address field and click Return.
Book I Chapter 2
Building Y
our First
W
eb Site
Viewing Your First Web Page — Live
39
Figure 2-15 shows a newly created Web page as it looks loaded into Microsoft Internet Explorer.
Book I: Web Page Basics
Chapter 3: Exploring the Essential
Elements of Web Page Design
In This Chapter
Starting an HTML page Adding headings and titles Formatting text
Creating lists and tables
Specifying page and background settings Adding navigation tools and links
Y
ou can think of HTML as a kind of primitive word-processing language for Web pages. HTML defines a bunch of directives, or tags,that you use to surround individual Web page elements to tell the browser how to display those elements. For example, if you want to display a paragraph in italics, you surround that paragraph with the beginning and ending HTML italic tags <I>and </I>. Book II describes what you can do with HTML in detail; this chapter gives you a quick overview of the most essential, most popular features to get you up and running in record time.HTML Basics
HTML defines two types of tags: beginning tags and ending tags.
✦ Beginning tags, as you may guess, tell a Web browser to begin some kind of formatting process. For example, <B>tells a Web browser to begin displaying text in bold font.
✦ Ending tagstell a Web browser to stop a particular formatting process. Ending tags are identical to beginning tags except for one tiny detail: Ending tags sport a backslash just after the opening angle bracket, like this: </B>
The following HTML code snippet shows you how the beginning and ending tags look in a typical HTML file:
Adding Text
42
Most HTML tags come in the beginning-ending pair, but not all.
Now that you’re familiar with beginning and ending tags, you’re ready to take a look at the bare-bones tags that virtually all HTML documents contain.
<HTML> <HEAD>
<TITLE>Your title goes here</TITLE> </HEAD>
<BODY>
The body of your document goes here. </BODY>
</HTML>
Here’s an explanation of each of these tags:
✦ The <HTML>tag always appears as the very first thing in an HTML
docu-ment. It tells the browser that the file is an HTML file.
✦ The <HEAD>and </HEAD>tags mark the section of the document
called the header,which contains information that applies to the entire document.
✦ The <TITLE>and </TITLE>tags mark the document title. Any text that
appears within the <TITLE>and </TITLE> tags is used as the title for your HTML document.
✦ The <BODY>and </BODY>tags mark the beginning and ending portions
of your document that is displayed by the browser when the page is viewed. In most HTML documents, a lot of stuff falls between the
<BODY>and </BODY>tags.
✦ The </HTML>ending tag is always the last tag in your document.
Adding Text
To add text to an HTML document, you place the text you want to add between the beginning <BODY>and ending </BODY>tags:
<BODY>
All the text for this Web page goes right here. You can surround this text with many different HTML tags to format it attractively.
</BODY>
You typically include many HTML tags in a Web page — not just the
Book I Chapter 3
Exploring the
Essential Elements
of W
eb Page Design
Adding Text
43
accidentally slipping text inside an HTML tag. If that happens, you may be surprised when you try to load your Web page and the text doesn’t display! So, for example, the following text does notappear on the screen when the HTML snippet loads:
<BODY Text inside tag declarations is NOT displayed onscreen.></BODY>
Instead, make sure that text falls between tags:
<BODY>Text placed properly between tag pairs IS displayed onscreen.</BODY>
Aligning text
HTML doesn’t give you many options for aligning text. By default, text is left aligned on the page. But you can use the <CENTER>tag to specify text to be centered, as in the following example:
<CENTER>This text is centered.</CENTER>
For more precise control of text alignment, use the text-align style property. It gives you four text-alignment options: left, right, center, and justify. The following example creates a right-aligned heading using the <H1>tag:
<H1 STYLE=”text-align: right”>This heading is right aligned.</H1>
In the preceding HTML code, double quotes (“) surround the value assigned to the STYLEattribute of the <H1>tag. You can assign values to tag attributes — a process some folks refer to as defining an attribute inline— for many HTML tags. Just remember that when you do, you need to include the double quotes.
For more information about using the STYLEattribute to create different display styles, see Book II, Chapter 8.
Specifying headings
Don’t fill your Web pages with a constant stream of uninterrupted text. Instead, use headings and paragraphs to organize the content on each page. The HTML heading tags make creating headings that break your text into manageable chunks easy.
Adding Text
44
<H1>This is a heading 1</H1> <H2>This is a heading 2</H2> <H3>This is a heading 3</H3> <H4>This is a heading 4</H4> <H5>This is a heading 5</H5> <H6>This is a heading 6</H6>
<P>This is a normal text paragraph.</P>
Figure 3-1 shows how this HTML appears when displayed in Internet Explorer 6.
Each Web browser uses its own point sizes for displaying the various heading levels, and most browsers use huge type for the highest heading levels —
<H1>and <H2>. Fortunately, you can override the browser’s type size by using styles as described in Creating Web Pages For Dummies, 6th Edition, by Bud Smith and Arthur Bebak (published by Wiley Publishing, Inc.).
Changing text appearance
In addition to changing font face, size, and color (see “Changing fonts,” later in this section, for details), you can make text appear bold or italicized. Figure 3-1:
Book I Chapter 3
Exploring the
Essential Elements
of W
eb Page Design
Adding Text
45
Bold
You can use the <B>tag to format your text in boldface type. Add a <B>tag immediately before the text you want to appear in bo