Testing User’s Guide
Release 05.01Please direct questions about QALoad or comments on this document to:
QALoad Customer Support Compuware Corporation
One Campus Martius Detroit, MI 48226-5099
1-800-538-7822
Outside the USA and Canada, please contact your local Compuware office or agent.
© 1997-2004 Compuware Corporation. All rights reserved. Unpublished - rights reserved under the Copyright Laws of the United States.
U.S. GOVERNMENT RIGHTS
Use, duplication, or disclosure by the U.S. Government is subject to restrictions as set forth in Compuware Corporation license agreement and as provided in DFARS 227.7202-1(a) and 227.7202-3(a) (1995),
DFARS 252.227-7013(c)(1)(ii)(OCT 1988), FAR 12.212(a) (1995), FAR 52.227-19, or FAR 52.227-14 (ALT III), as applicable. Compuware Corporation.
THIS PRODUCT CONTAINS CONFIDENTIAL INFORMATION AND TRADE SECRETS OF
COMPUWARE CORPORATION. USE, DISCLOSURE, OR REPRODUCTION IS PROHIBITED WITHOUT THE PRIOR EXPRESS WRITTEN PERMISSION OF COMPUWARE CORPORATION. ACCESS IS LIMITED TO AUTHORIZED USERS. USE OF THIS PRODUCT IS SUBJECT TO THE TERMS AND CONDITIONS OF THE USER’S LICENSE AGREEMENT WITH COMPUWARE CORPORATION. Compuware, QACenter, QALoad, QARun, QADirector, Interval, EcoTOOLS, ActiveAnalysis, and ActiveData are trademarks or registered trademarks of Compuware Corporation.
Acrobat® Reader copyright © 1987-1998 Adobe Systems Incorporated. All rights reserved. Adobe, Acrobat, and Acrobat Reader are trademarks of Adobe Systems Incorporated.
This product contains a genuine RSA encryption engine.
This product contains cryptographic software written by Eric Young and Tim Hudson.
ACE™, TAO™ © Washington University and University of California, Irvine 1993-2001. All rights reserved. All other company or product names are trademarks of their respective owners.
Doc. CWQLUX510 April 06, 2004
Table of Contents
Summary of Changes ... vii
Introduction ... ix
Who Should Read This Guide... x
Related Publications ... x
Typographical Conventions ... xi
World Wide Web Information ... xi
Getting Help ... xii
Chapter 1. QALoad Testing Overview... 1-1
Introduction to the Load Testing Process... 1-2 Script Development Components... 1-2 Test Components... 1-3 Performing Load Tests Using QARun Scripts ... 1-4 Server and Performance Monitoring ... 1-4 Remote Monitoring ... 1-4 Server Analysis Agents ... 1-5 Application Expert\Application Vantage... 1-5 ServerVantage ... 1-6 EcoTOOLS 6 (UNIX only)... 1-6
Chapter 2. Getting Started... 2-1
Setting Up the Conductor ... 2-1 Starting the Conductor ... 2-1 Configuring the Conductor ... 2-2 Setting Up a Test Session... 2-6 Validating Scripts ... 2-10
Chapter 3. Running a Load Test ... 3-1
Preparing for a Load Test... 3-1 Starting a Load Test ... 3-2 Monitoring a Load Test... 3-3 Viewing General Test Information ... 3-3 Runtime Tree ... 3-4 Workspace Pane ... 3-4
Test Control Panel ... 3-4 Accessing Detailed Test Data ... 3-4 View Virtual User Statistics ... 3-5 (WWW) View Virtual User Activities ... 3-5 (WWW) Step to the Next Request ... 3-5 Display the Current Datapool Record ... 3-5 Display a Virtual User’s Running Script ... 3-6 Display Player Messages ... 3-7 Display Communication Statistics ... 3-7 Show/Hide Runtime Tree or Control Panel ... 3-7 Synchronize Virtual Users ... 3-7 Exit, Abort, or Quit a Test ... 3-7 Running a Batch Test ... 3-7 Creating a Batch File... 3-8 Running a Batch Test ... 3-8 Stopping a Load Test... 3-8 Adding Post Test Comments to the Test... 3-9 Viewing SAP 4.x Post-Test Log Files... 3-9 Opening a Virtual User Log File... 3-9 Viewing Request or Response Details ... 3-10
Chapter 4. Including QARun Scripts in Load Tests ... 4-1
Creating a QARun Script... 4-1 Automatically Creating a Test Script... 4-2 Manually Creating a Test Script ... 4-3
Chapter 5. Load Testing the Network with NetLoad ... 5-1
NetLoad Server Modules for TCP/IP and UDP... 5-2 Starting the NetLoad Server Module... 5-3 Starting a NetLoad Session ... 5-3 Creating a Datapool... 5-4 Entering Datapool Data... 5-4 Datapool Fields ... 5-6 Editing a Datapool... 5-8 Verifying CDO Support for MSExchange ... 5-9
Chapter 6. Analyzing Load Test Results... 6-1
Accessing Test Results... 6-1 Opening Test Results ... 6-2 Displaying Test Data in QALoad Analyze... 6-3 Workspace ... 6-4 Data Window ... 6-5 Viewing Test Data... 6-5 Understanding Durations... 6-7 Transaction duration... 6-8 Checkpoint duration ... 6-8
Displaying Detail Data ... 6-10 Creating a Detail View... 6-10 Sorting Information on the Detail View ... 6-12 Graphing Test Results ... 6-13 Managing Large Amounts of Data... 6-13 Creating a Graph ... 6-15 QALoad Analyze Graph Types ... 6-18 Customizing Graphs... 6-23 Graph Type ... 6-24 Color ... 6-25 Grid Lines ... 6-25 Legend Box ... 6-25 Data Editor ... 6-25 Dimensional View ... 6-25 Rotation ... 6-25 Z-Clustered ... 6-25 Tools ... 6-25 Integrating ServerVantage Agent Data ... 6-26 Displaying ServerVantage Agent Data ... 6-26 Displaying Agent Data Point Details ... 6-26 Graphing ServerVantage Agent Data... 6-27 Viewing Application Expert and QALoad Integrated Reports ... 6-29 Exporting Test Results to CSV or HTML Formats or RIP files ... 6-30 Exporting Test Results to HTML... 6-30 Exporting Test Results to CSV ... 6-31 Exporting RIP Files... 6-31 Emailing Test Results... 6-31
Summary of Changes
For up-to-date details about new features, known issues, and recent updates in this release, please refer to the QALoad Release Notes. Access the Release Notes from the Windows Start menu by choosing Programs\Compuware\QALoad\Release Notes.
Introduction
QALoad is a high performance tool that allows for automated load testing of client/server-based systems and associated networks. A QALoad test eliminates the need and expense of having rooms of users testing new systems before going live. This guide includes the following chapters to assist you in performing client/server load and stress testing using QALoad:
• Chapter 1: QALoad Testing Overview — Provides an overview of the testing process and descriptions of the script development and testing components. • Chapter 2: Getting Started — Describes how to prepare QALoad’s Player and
Conductor components to run a load test.
• Chapter 3: Running a Load Test — Describes how to prepare for, start, monitor, and stop a load test.
• Chapter 4: Including QARun Scripts in Load Tests — Describes how to create a test script that includes QARun transactions.
• Chapter 5: Load Testing the Network with NetLoad — Describes how to use QALoad’s NetLoad component to generate traffic on your network in a controlled manner and gather performance timings from the network.
• Chapter 6: Analyzing Load Test Results — Provides information for analyzing test results using QALoad’s Analyze component.
Who Should Read This Guide
The QALoad Testing User’s Guide is intended to be a general reference guide for QALoad users. It provides a basic product and component overview and explains how to configure the system, set up tests, run tests, and view the results of a test. It also explains how to incorporate QARun scripts into load tests, and how to use QALoad’s NetLoad component to load the network.
The QALoad Testing User’s Guide does not include reference or procedural information to assist you in preparing test scripts. That information, including special techniques for inserting variable information into your scripts, is detailed in the QALoad Script Devel-opment Guide.
We recommend that you use the QALoad Testing User’s Guide to familiarize yourself with the QALoad testing process and to set up your test. Then, use the QALoad Script Development Guide to create your test script(s). When you are finished creating test scripts, use the procedures detailed in the QALoad Testing User’s Guide to run your test and analyze the results.
Related Publications
In addition to this guide, the QALoad documentation set includes the following related publications:
• QALoad Script Development Guide provides procedural information for creating test scripts for your application. It is designed to guide you through the preparation of a test script, including recording a transaction, converting it to a reusable test script, and modifying the code to accommodate variable information and other spe-cial circumstances.
• QALoad’s online help facilities provide field-level and overview information for the QALoad product screens, as well as detailed step-by-step procedures for all steps in the load testing process and reference information for commands that can be used in QALoad scripts.
• QACenter Installation and Configuration Guide details the system requirements and procedures for installing each product on the QACenter Performance Edition CD-ROM.
• The Distributed License Management Installation Guide includes instructions for licensing your QACenter products.
• Release Notes detail system requirements for using QALoad, enhancements made to the product for this release, technical information that may affect how you use the product, any known issues related to using the product, and technical support con-tact information.
Viewing and Printing Online Books
QALoad’s online books are provided in PDF format, so you need Adobe Acrobat Reader 3.0 or above to view them. To install the Adobe Acrobat Reader, click Install Adobe Acrobat Reader on the QACenter CD, or go to Adobe’s web site at www.adobe.com. You can access the online books from the documentation bookshelf. To do so, click the taskbar’s Start button and choose Programs>Compuware>QALoad>Bookshelf. Select the book you want to view.
Because PDF is based on PostScript, a PostScript printer is the most reliable way to print the online books. In most cases, you can also print PDF files to PCL printers. If you cannot print the PDF files to your printer, refer to Adobe’s web site at www.adobe.com
for troubleshooting information.
Typographical Conventions
The QALoad documentation set uses the following typographical conventions:
World Wide Web Information
To access Compuware Corporation’s site on the Internet World Wide Web, point your browser at http://www.compuware.com. The Compuware site provides a variety of product and support information.
FrontLine Support Web Site
You can access online technical support for Compuware products via our FrontLine support web site. FrontLine provides you with fast access to critical information about your QACenter product. You can read or download documentation, frequently asked questions, and product fixes, or directly e-mail Compuware with questions or comments. In order to access FrontLine, you must first register and obtain a password. To register, point your browser at http://frontline.compuware.com. FrontLine is currently available
Description Examples
Window controls (buttons, menu items, etc.) are shown in bold type.
Click OK. Select File>New. A fixed pitch font is used for script
exam-ples and error messages.
BEGIN_TRANSACTION();
Items in angle brackets indicate place-holders for information you supply.
for customers in the United States and Canada. FrontLine services for other countries will be available in the future.
Getting Help
At Compuware, we strive to make our products and documentation the best in the industry. Feedback from our customers helps us maintain our quality standards. If you need support services, please obtain the following information before calling
Compuware’s 24-hour product support hotline:
• The release (version), and build number of your QALoad product. This information is displayed when you select the About command from the Help menu. The name and release are also on the covers of the product documentation.
• Installation information, including installed options and whether it is installed in the default directories.
• Environment information, such as the operating system and release on which the product is installed, memory, hardware/network specifications, and the names and releases of other applications that were running.
• The location of the problem in the QALoad product software, and the actions taken before the problem occurred.
• The exact product error message, if any.
• The exact application, licensing, or operating system error messages, if any. • Your Compuware client, office, or site number, if available.
QALoad Customer Support Compuware Corporation One Campus Martius Detroit, MI 48226-5099 1-800-538-7822
Chapter 1. QALoad Testing Overview
Load testing of server-based applications need not involve complete simulation of user activity. Many distributed applications support different types of clients using standard communication methods. QALoad allows you to load test servers by sending high-level requests directly from QALoad to the server. This process eliminates the need to emulate a specific client platform.
QALoad testing duplicates clients interacting with the server portions of a client/server application. QALoad emulates users by driving the servers under test in the same way your actual clients do. For example, if your production clients connect to a database server using TCP/IP over Ethernet, QALoad makes the same database requests as the workstations. Unlike testing with real machines, you do not need the hardware or staff to create full test scenarios.
QALoad tests emulate terminal, browser, or client-application requests through user-developed test scripts. The scripts consist of QALoad test management commands and standard C commands, which invoke processing on your servers. QALoad allows you to scale up a load on a host or server by running multiple copies of scripts from one or more workstations at the same time. This saves you staffing and investment when conducting large-scale stress tests.
In addition to creating predictable and repeatable loads, QALoad can measure host or server response times from the client’s perspective. Typically, you want to measure the time that the host or server takes to complete client requests such as database inquiries, WWW requests, and Tuxedo transactions. QALoad centrally records this information for subsequent analysis. QALoad duplicates and measures the load of handling large numbers of clients and their associated networking functions.
Introduction to the Load Testing Process
You begin the testing process by determining the types of application transactions you want to emulate. You then develop these transactions into QALoad scripts by creating the same types of requests that your applications invoke on the server. Each transaction becomes its own script. The QALoad Script Development Workbench lets you easily create full-function scripts.
When you plan your test, you need to decide which transactions to run, the number of simulated clients that will run each transaction script, and the frequency at which each script will run. When you run the test on a workstation with the QALoad Player component, you can specify transaction rates as well as fixed and random delays to better emulate real-system activity. QALoad considers these factors a test scenario and stores them in a session ID file.
While a test is running, the test operator can dynamically view overall run times as well as individual transaction performance. QALoad’s Conductor component collects this data for analysis at the conclusion of the test.
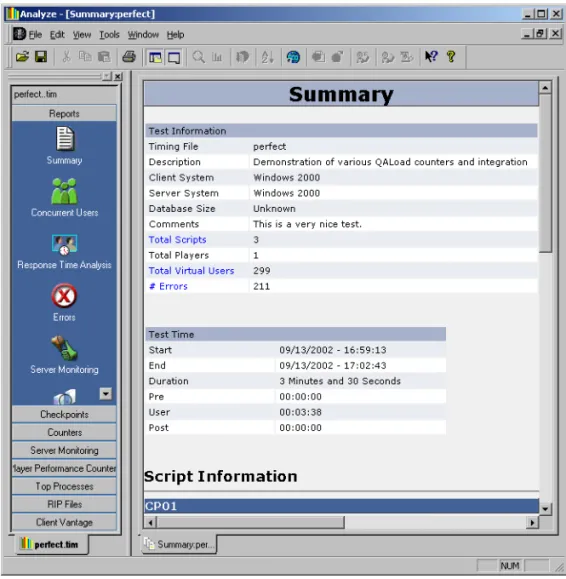
After executing the test, summary reports show the response times that the emulated clients experienced during the test. Individual and global checkpoints let you view and identify specific areas of system performance. You can export all test output data to spreadsheet and statistical packages for further analysis or use QALoad’s Analyze component to create presentation-quality reports and graphs.
Script Development Components
The QALoad Script Development Workbench is used to develop test scripts. This section provides a brief description of its script development components.
QA
Load Script Development Workbench
You use the QALoad Script Development Workbench to develop scripts. It contains facil-ities for capturing sessions, converting captured sessions into scripts, and modifying and compiling scripts. Once you compile your script, you can use QALoad’s Conductor and Player components to test your system.
Record Facility: QALoad’s Record facility, which you can access through the QALoad Script Development Workbench, records the transactions that your terminal, browser, or client makes. It stores these transactions in a capture file.
Convert Facility: QALoad’s Convert facility, which you can access through the QALoad Script Development Workbench, converts capture files into scripts. It generates a one-to-one correspondence of transactions from the original session to your QALoad script.
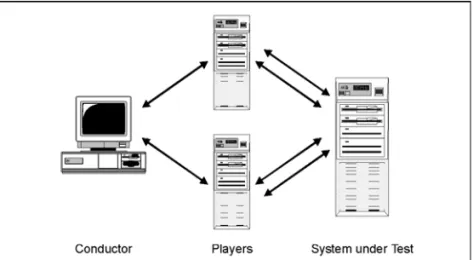
Test Components
As shown in Figure 1-1, a typical load test setup consists of a QALoad Conductor, one or more QALoad Players, and the system under test. This section provides an overview of these test components.
Figure 1-1. Test Components
QA
Load Conductor
QALoad’s Conductor controls all testing activity such as setting up the session description files, initiating and monitoring the test, and reporting and analyzing test results.
QA
Load Player
A QALoad Player creates virtual users that simulate multiple clients sending middleware calls to a server under test. In a typical test setup, one or more QALoad Player worksta-tions run under any Windows 32-bit platform (Windows XP/2000/NT) or UNIX. For large tests (thousands of simulated clients), you can connect a maximum of 32 Players to QALoad’s Conductor. The Conductor and Players communicate using TCP/IP.
The hardware and software capabilities of the Player machine are the only factors that limit the capacity of an individual QALoad Player. Therefore, a Windows Player may simulate 50 to 100 users; single-processor RISC systems may simulate 200-400 users, and large multiprocessor systems may simulate in excess of 1,000 users. The maximum number of virtual users per Player is 1024.
System under Test
The servers you test are typically production systems or a duplicate of a production system that is set up at a test facility. If you perform any kind of system selection or performance stress test, the system under test must use the same hardware and software
(including current versions) as the production environment. Compuware has found that even subtle changes have profound effects on performance.
Performing Load Tests Using
QA
Run Scripts
QALoad provides you with the functionality to perform load tests using your QARun scripts. By inserting your QARun script into a QALoad script template, you can time your GUI-driven business transactions and include those timings in QALoad post-test reports. For information on preparing a QARun script for load testing, refer to Chapter 4, “Including QARun Scripts in Load Tests”.
Server and Performance Monitoring
QALoad integrates several mechanisms for merging load test response time data with server utilization data and performance metrics. Select the method that best suits your needs, or for which you are licensed (if applicable). Most methods produce data that is included in your load test timing results and processed in QALoad Analyze. The exception is Application Vantage. Data captured from Application Vantage can be opened in Application Vantage or Application Expert, but not in QALoad.
This section briefly describes each method, and explains where to find detailed infor-mation to help set up a test to include the appropriate method.
Remote Monitoring
Remote Monitoring is QALoad’s own solution that allows you to monitor Windows Registry counters or SNMP counters from a remote machine without installing any software on the remote machine.
To use Remote Monitoring:
• To monitor Windows Registry counters, you must have login access to the machines you want to monitor.
• You must select the counters to monitor on the machines to monitor using the QALoad Conductor’s Machine Configuration tab.
• To collect SNMP counters, SNMP must be enabled on the remote machine being monitored. Refer to your operating system help for information about enabling SNMP.
While your test is running, QALoad will collect the appropriate counter data and write it to your timing file where you can view it in Analyze after the test.
To configure a test to use Remote Monitoring, refer to the QALoad Online Help while setting up a test. Online help can be accessed directly from any QALoad menu, or by pressing F1 from any QALoad screen.
Server Analysis Agents
Server Analysis Agents use enhanced EcoTOOLS 7.2 technology to provide server utili-zation data without a complete EcoTOOLS deployment. Server Analysis Agents can be installed from the QACenter Performance Edition CD onto the servers that you wish to monitor during a load test. Server Analysis Agents provide you with valuable server utili-zation metrics — called counters — on Web servers, application servers, and database servers being exercised by your load test to help you to pinpoint performance bottlenecks when load testing.
Server Analysis Agents are configured from the the QALoad Conductor. Data collected through the Agents is automatically downloaded to the QALoad Conductor and is available for post-test analysis through QALoad Analyze.
To configure a test to use Server Analysis Agents, refer to the QALoad Online Help while setting up a test. Online help can be accessed directly from any QALoad menu, or by pressing F1 from any QALoad screen.
Application Expert\Application Vantage
Application Expert is a Windows-based tool that enables you to examine the effects the network will have on the performance of new or modified applications prior to live deployment. Application Expert provides granular thread details that allow network managers to identify poorly performing applications. QALoad integrates with Appli-cation Expert to help you analyze network performance during a load test, and provides test data that you can open in both Application Expert and Application Vantage. Before QALoad can collect network data during a load test, the following must be true: • The Vantage Agent is installed on the same machine as the QALoad Conductor. If Application Vantage is installed on the QALoad Conductor machine, you can install either the Vantage Agent or the Application Vantage Remote Agent.
• The QALoad Conductor and QALoad Player machines are located on the same LAN.
• You have set up IP address pairs to monitor in the QALoad Conductor.
To configure a test to integrate with Application Expert, refer to the QALoad Online Help while setting up a test. Online help can be accessed directly from any QALoad menu, or by pressing F1 from any QALoad screen.
ServerVantage
ServerVantage (formerly EcoTOOLS) monitors the availability and performance of applications, databases and servers, allowing users to centrally manage events across all application components- Web servers, firewalls, application servers, file systems, databases, middleware, and operating systems. ServerVantage simultaneously monitors these components, analyzes both historical and real-time events, and correlates monitored information for problem detection.
Integration with ServerVantage is configured from the QALoad Conductor. Performance counters collected during a load test are included in the test’s timing file and can be sorted and displayed in QALoad Analyze in much the same way as QALoad timing data. To configure a test to integrate with ServerVantage, refer to the QALoad Online Help while setting up a test. Online help can be accessed directly from any QALoad menu, or by pressing F1 from any QALoad screen.
EcoTOOLS 6 (UNIX only)
EcoTOOLS contains hundreds of Agents that can monitor resources on your servers. Specifically, QALoad supports Agents for monitoring UNIX systems. By using EcoTOOLS with QALoad, you can generate a load on your UNIX system while monitoring it for resource utilization problems.
QALoad’s EcoTOOLS integration allows you to view EcoTOOLS resource utilization data in graphs you create using QALoad’s Analyze component. Once you set up EcoTOOLS to monitor your server, it periodically collects resource utilization data. When you execute a load test, QALoad synchronizes with EcoTOOLS and runs the test. Upon completion of the test, QALoad requests the resource utilization data that EcoTOOLS collected during the test. You can view this data in QALoad Analyze in much the same way as QALoad timing data.
To configure a test to integrate with EcoTOOLS 6, refer to the QALoad Online Help while setting up a test. Online help can be accessed directly from any QALoad menu, or by pressing F1 from any QALoad screen.
Chapter 2. Getting Started
The purpose of this chapter is to help you prepare to run a test by setting up the Conductor, a test session, and by validating your test scripts.
This chapter includes the following sections:
• Setting Up the Conductor — Describes how to start and configure the QALoad Conductor.
• Setting Up a Test Session — Describes how to set up a test session.
• Validating Scripts — Describes how to validate a script by running it in a simple test.
Setting Up the Conductor
This section describes how to start the Conductor, configure the Conductor, and set up a session ID file.
Starting the Conductor
1. Start the Conductor: From Windows:
— From the Windows taskbar, click the Start button. — Select Programs>Compuware>QALoad>Conductor.
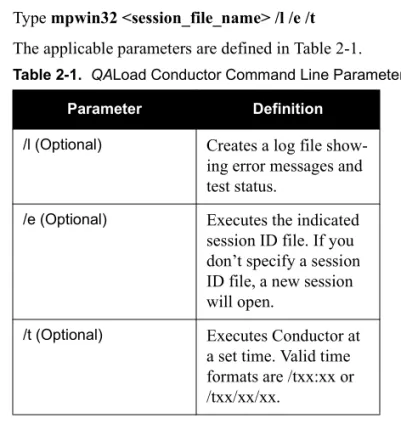
From a Command Prompt:
— Type mpwin32 <session_file_name> /l /e /t The applicable parameters are defined in Table 2-1.
2. When the Session Options dialog box opens, select the appropriate option to create a new session ID file or to open an existing one. Click OK.
3. If you chose to open an existing session ID file, the Open dialog box appears. Navigate to the session ID file you wish to open, select it, and click Open. The selected session ID file opens in the Conductor Test Information Window.
If you chose to set up a new session ID file, the Conductor opens displaying the Test Information Window, and the configuration and setup toolbar shown in Figure 2-1 below. For information on the Conductor’s configuration and setup toolbar buttons, refer to the Conductor’s online help.
Figure 2-1. Conductor Configuration and Setup Toolbar
Configuring the Conductor
After starting the Conductor, you may need to verify that the Conductor’s configuration parameters are set properly using the following procedure:
Table 2-1. QALoad Conductor Command Line Parameters
Parameter Definition
/l (Optional) Creates a log file show-ing error messages and test status.
/e (Optional) Executes the indicated session ID file. If you don’t specify a session ID file, a new session will open.
/t (Optional) Executes Conductor at a set time. Valid time formats are /txx:xx or /txx/xx/xx.
2. On the General tab:
a. In the General Options area:
— Select Launch Analyze After Test to start QALoad’s Analyze program immediately after the test completes.
— Select Close Runtime Screen After Test to automatically close the test window after a test has finished.
— Select Gracefully exit users when Session Duration interval expires to gracefully exit all virtual users when the test duration you specified on the Test Information tab runs out.
b. In the Dialog Options area, determine which warnings and prompts QALoad Conductor should display. For details about each, press F1 from the General Options tab to access online help.
3. On the Screen and Colors tab:
a. Use the Color Settings area to change the colors of QALoad Conductor rows and headers, if necessary.
b. Select the Enable Row Divider Lines check box to enable grid lines on the Test Information Window for better visual separation of data.
c. In the Refresh Intervals area, use the slider controls to set the rates at which the QALoad Conductor interface, runtime graph, and Summary Report are refreshed at runtime.
d. In the Show Timings area, select how to display timings in the Runtime Win-dow while a test is running: the average, minimum, maximum, or the current timing.
4. On the Player tab:
a. Select the Show Communications check box to display all messages from the Conductor to the Player on the Player’s Main Window at runtime.
b. Select the Log Messages to File check box to record all messages from the Conductor to the Player in a text file in your installation directory. The file will be named Player####Messages.log, where #### is the Player’s port number.
c. Select the Start Player Minimized check box to launch the QALoad Player minimized on your task bar when starting a test.
d. Random number generation is used within the Player to determine end of trans-action (End_Transtrans-action) and Rnd_delay sleeps. You may also use random number generation in your script.
The Conductor allows you to determine whether to use the system-generated sequence of numbers, or whether to seed the sequence so that virtual users use different sequences.
— Choose All users the same to assign the same random number sequence to all virtual users.
— Choose Different for each user and then enter values in the Seed and Multiplier fields to set a different random number seed for each user. The seed value is determined by the following algorithm:
seed value = <seed> + <virtual user #> * <Multiplier>
The <virtual user #> is a value ranging from 0 to N-1, where N is the num-ber of simulated users.
e. In the Display Options area, determine how many lines of messages from the Conductor should be displayed on the Player’s Main Window at runtime. The default is 2000.
f. In the VU Startup Delay field, set a startup interval (in milliseconds) for vir-tual users.
5. On the Machines tab:
a. In the General Options area:
— Select Require requesting before allowing assignment if a Player machine should be successfully requested before it can be added to a test.
— Select Query network name during discover machines if you want the Conductor to return network names instead of IP addresses for each work-station where the QALoad Player is installed.
— (WWW tests only) Select Generate IP Spoofing Data for the Conductor to command the Players to create local datapools of static IP addresses at runtime to direct each virtual user on that machine to use a different source IP address.
— Select Show warning for machines with incompatible versions to be prompted when the QALoad Conductor discovers Player machines on the network that have previous version of QALoad installed.
b. The Discovery Options area lists the port number(s) the Conductor should monitor when discovering available Players. The default port is 3031. If you changed the port number of any Player, add it to the Discovery Options area by typing it in the edit field and clicking the Add button.
c. In the File Transfer Options area, indicate when/if to automatically transfer the script from the Conductor to the Players, and whether to transfer Java infor-mation.
d. The Machine Defaults area displays the recommended number of thread- and process-based Players to assign per 64 MB of RAM, and the default port num-ber for the first Player launched. You can change these values, if necessary.
6. On the Runtime tab:
a. In the Timing Information Transfer Rate area, select whether to disable tim-ing transers, always send all timtim-ing information includtim-ing checkpoint timtim-ings, or send summary information at intervals you specify. If you select Send Peri-odic Updates containing Summary information, use the slider control to set a time interval, in seconds, at which to transmit data.
b. Select the Delete timing file after successful transfer check box to delete the timing file after it has been transferred successfully to the Conductor from the Players. Then, set a value at which the Conductor should stop attempting to transfer the file if the transfer is not successful.
c. In the Counter Data area, select Enable Counters to track Player counters at test time. That is, how many virtual users are running and how many have failed. Then choose whether to graph that data at runtime (Retrieve at runtime) or simply store it in the timing file for later analysis (Store in timing file only).
7. On the Monitoring tab, configure the intervals at which monitoring information is gathered by Server Analysis Agents or Remote Monitoring Agents, or for top processes.
8. When you are finished, click OK.
For more information on the Options dialog box, refer to the Options dialog box topic in the QALoad online help.
Setting Up a Test Session
For every test you run you will create a session ID file containing information the Conductor needs to run the test such as which scripts to run, which Player machines to use, and whether to collect server or performance monitoring data. You use the Conductor to create and save session ID files in the directory \QAload\Session.
To define a session ID file for your test, complete the following steps.
1. From the Conductor’s File menu, select New to open a new instance of the Test Information Window.
2. On the Test Information tab:
a. Enter descriptive information about the test in the Test Description, Client System, Server System, Database Size, and Comments fields.
b. In the Session Duration field, enter a value to specify the maximum duration for the test to run. Enter zero if you do not want to specify a maximum dura-tion.
c. Select the Enable Test Recording check box to save a visual re-enactment of the load test.
d. In the Time Out field, enter a value to specify the amount of time a virtual user waits for a response. If the virtual user does not get a response within the speci-fied time period, the virtual user displays a time out status.
3. On the Script Assignment tab, add the appropriate scripts to the test and set script options for each:
a. Click the New button to open the Select Script dialog box. The Select Script dialog box lists the scripts available for your transaction type. If it does not, select your transaction type from the Scripts of Type drop-down list.
b. Select a script from the list and click the Select button to return to the Script Assignment tab.
c. (SAPGUI only) Click the browse [...] button to set custom options for the mid-dleware.
d. In the Transactions column, specify the maximum number of transactions that you want each virtual user running this script to run. Once a workstation exe-cutes the number of transactions that you specify, script execution continues with the line following the End_Transaction command rather than jumping to the beginning of the transaction loop
e. In the Debug Options column, click the browse button to open the Debug Options dialog box, where you can specify virtual users to display trace infor-mation or generate log files for debugging.
f. In the Error Handling column, choose whether to restart, continue, or abort a transaction upon encountering a non-fatal error.
g. Enter a value in the Sleep Factor column to specify the percentage of any orig-inally recorded delay to preserve in the script (for example, a value of 80 means preserve 80% of the original sleep).
h. In the Service Level Threshold column, type a maximum duration for this script. At runtime, the QALoad Conductor will display a runtime graph com-paring the Service Level Threshold with the actual duration.
i. Enter a value, in seconds, in the Pacing field. Pacing is the time interval between the start of a transaction and the start of the next transaction on each workstation running this script. For example, if a transaction duplicates the pro-cess of someone handling incoming telephone calls and those calls arrive at a rate of 40 per hour/per person, set the pacing at 90 seconds.
j. In the Timing Options column, click the browse button to open the Timing Options dialog box, where you can set options related to checkpoints and tim-ing data thinntim-ing. Press F1 from the Timtim-ing Options dialog box for descriptions of the available options.
k. (Optional) In the External Data column, click the browse button to open the External Data dialog box to associate any external files with your selected script. Press F1 from the External Data dialog box for descriptions of the avail-able options.
— In the Central Datapool area, click the browse button to navigate to a datapool file to use. Then, select the Rewind check box if you want to re-use the datapool data in this test once the last field in the file has been re-used, or select the Strip check box to remove the datapool from the script after using it, that is, if you do not want to re-use the same set of data from your datapool in subsequent tests.
— In the Attached Files area, click the Add button to navigate to any addi-tional files you may need to include in your test. For instance if you are posting binary files to a web site, those files can be downloaded to the Players at runtime if you add them.
4. On the Machine Configuration tab, configure Player Agent workstations, Server Analysis Agents, Remote Monitor Machines, and integration with Application Expert. Select the appropriate option to configure each in turn. Press F1 from the Machine Configuration tab for descriptions of each option to set.
5. (Optional) Use the Monitoring Options tab to set options for your integration with Compuware’s EcoTOOLS 6 or ServerVantage. Press F1 from the Monitoring Options tab for detailed descriptions of the integration options.
7. On the Machine Assignment tab:
a. Assign scripts to specific Player Machines:
— Manual assignment — In the Machine column for the appropriate script, select a Player machine from the drop-down list to assign it to that script. If no Player machines are available in the drop-down list, click the Machine Configuration tab to set up a Player.
— Automatic assignment — Type the total number of virtual users to assign to the test in the Starting VUs column, then click the Auto Configure but-ton. QALoad will automatically assign scripts to each Player machine.
b. Type the number of virtual users that should start and end the test for each script in the Starting VUs and Ending VUs columns.
— Ramp-up scripts — If QALoad should add virtual users incrementally, type a value in the VU Increment column to indicate how many to add with each increment. Then, determine how often QALoad should increment vir-tual users in the Time Interval column. Make sure the Ending VUs column is larger than the Starting VUs column.
— Dial-up\Dial-down scripts — To add (dial-up) or remove (dial-down) scripts or virtual users at runtime manually, type values in the Starting VUs and Ending VUs columns but leave the VU increment and Time Interval columns blank. At runtime, use the dial control in the Test Control Panel to dial-up or dial-down the number of virtual users running.
When all scripts have been assigned and configured correctly, the Run button on the Machine Assignment tab will become available.
8. When you are finished, choose File>Save As to save the session ID file with a unique name.
Validating Scripts
Before you conduct an actual load test, you should individually validate the script(s) you plan to use in the load test by running it in a simple test. If the script runs to the end without any errors and runs multiple times without errors, it is valid to use in a load test. If the script aborts on an error, debug the script and run it through a simple test again. You can validate Win32 scripts from the QALoad Script Development Workbench, the QALoad Player, or the QALoad Conductor. All three methods are described in the sections that follow. Use the method that is most convenient for you.
This section describes how to validate Win32 and UNIX C-based scripts by running them in a simple test.
Validating from the
QA
Load Script Development Workbench
1. With a session open in the QALoad Script Development Workbench, select Options>Workbench to configure the QALoad Script Development Workbench and Player for validation.
2. On the Script Validation tab:
a. Select the Automatically Recompile check box if you want QALoad to com-pile a script before attempting to validate it. QALoad will list any compilation errors in the editor after compiling.
b. (Java or OFS only) Select the Ask for Automatic Compilation of Java and OFS Scripts check box to always be prompted to validate a Java or OFS script after compiling it.
c. Select the Only Display Player Output on Script Failure check box to only generate a Validation error report (.val) if the script fails.
Note
(WWW scripts only) Before you run a UNIX script containing SSL requests, copy the file do_www.exp (for 40-bit encryption) or do_www.128 (for 128-bit encryption) from your QALoad operating system-specific UNIX directory (for example, c:\program
files\compuware\qaload\unix\solaris) to the UNIX directory where the QALoad Player is installed. Then, rename the file do_www.so.
d. Type a value in the Wait up to field the QALoad Script Development Work-bench should wait for a script to execute before timing out.
e. In the Player Settings area, select the Abort on Error check box for QALoad to stop script execution upon encountering an error.
f. Select the Debug Data check box for the script to display a debug message indicating which command the script is executing.
g. In the Run As area, indicate whether the transaction should be run as thread- or process-based.
h. Type a number of virtual users to assign for validation in the Number of users field.
i. Type the number of transactions to run in the Transactions field. For valida-tion, Compuware recommends that you accept the default value of 1 transac-tion.
j. In the Sleep Factor % field, type a value to indicate the percentage of an origi-nally recorded sleep (pause) to maintain when validating a script.
3. Click OK to save your changes.
4. In the Workspace window, click the Scripts tab to access the available scripts.
5. Double-click on the appropriate script name to open the script.
6. From the Session menu, select Validate Script.
If the script executes successfully, it is valid to use in a load test. If it does not, a Validation error report (.val) will open in the Output window to help you identify errors.
Validating from the
QA
Load Player
1. From the Compiled Script field, browse for the compiled script DLL you want to validate. Compiled scripts are usually located in the directory \Program Files\Com-puware\QALoad\Scripts.
2. Assign a number of virtual users to validate the script in the Users field. Compuware recommends one user for script validation.
3. Assign a number of transactions in the Transactions field. Compuware recom-mends one transaction for script validation.
Note
For SAP and Citrix, due to the time required to logon to the server, you may need to increase the timeout value to 100 seconds or more, depending on your particular setup. Set the timeout value to 100 seconds or to the length of the capture (in seconds), whichever is greater.
4. Select the Debug Data check box to have the Player display a debug message indicating each command as it is executed.
5. Select the Abort on Error check box if you want the QALoad Player to stop script execution upon encountering an error in the script.
6. In the Run As area, select whether the transaction should run as thread- or process-based.
7. Click the Start button to run the script.
If the script runs without errors, it is valid to use in a load test.
Validating from the
QA
Load Conductor
You can run the Conductor and Player on separate machines or on the same machine to validate your Win32 script.
1. From the QALoad Conductor, click the Script Assignment tab.
2. Click the New button to access the Select Script dialog box.
3. Highlight the script you wish to use and click the Select button to return to the Script Assignment tab.
4. Type a 1 (one) in the Transactions column to indicate that you want the virtual user running this script to run one transaction.
5. Click the Machine Assignment tab.
6. Type a 1 (one) in the Starting VU’s column for the script to assign it to 1 virtual user.
7. Select your Player machine from the Machine drop-down list. If the appropriate Player machine is not listed, click the Machine Configuration tab to set up a Player machine.
If the script runs to the end without any errors, it is valid to use in a load test.
8. To start the test, click the Run button on the Machine Assignment tab or choose Run>Start Test. You can monitor the progress of your script’s execution by reading the debug messages on the Player machine.
In addition, you can use the Conductor debug function to see the script executing commands. To start the Conductor debug function, click the Debug button on the Conductor’s Runtime toolbar.
Chapter 3. Running a Load Test
After validating a script using one of the methods described in “Validating Scripts” on page 2-10, it is safe to run a load test with that script. This chapter describes how to prepare for, start, monitor, and stop a load test. It includes the following sections: • Preparing for a Load Test — Describes the tasks to complete before running a
load test.
• Starting a Load Test — Describes how to start a test.
• Monitoring a Load Test — Describes how to monitor a test, including Player activity and datapool usage.
• Stopping a Load Test — Describes how to stop a load test and generate a timing file.
• Viewing SAP 4.x Post-Test Log Files — Describes how SAP testers using versions 4.x can view detailed information about each request and response.
If the test scripts you intend to use have not been validated to ensure they run correctly, see “Chapter 2, Getting Started” before completing the procedures in this chapter.
Preparing for a Load Test
Before you run a load test, you need to complete the following tasks:
• Prepare a datapool file: If you created a datapool file using the QALoad Script Development Workbench, QALoad stores the file where the Conductor can auto-matically access it. However, if you created a datapool file using a text editor (for example, Notepad), you must place the file in your appropriate
\Middle-wares\<middleware_name>\scripts directory (for example, \QAload\Middle-wares\Oracle\Scripts) so the Conductor can access the file.
For information on datapool files, see “Chapter 4, General Advanced Scripting Techniques” in the QALoad Script Development Guide.
• Set Up SSL Client Authentication for Virtual Users (SSL scripts only): If you are running a load test with a WWW script containing SSL requests, you should export a Client Certificate from your browser into QALoad or create a QALoad Cli-ent Certificate for each virtual user that runs the script. This setup facilitates a one-to-one ratio of Client Certificates to virtual users, which more realistically simulates your testing environment.
To export Client Certificates from your browser and convert them for use in QALoad or to create QALoad Client Certificates, refer to the QALoad Script Devel-opment Guide.
Once you export or create the necessary Client Certificates, you can insert them into your script using data pools. For more information on using datapools, refer to the QALoad Script Development Guide.
To start a load test, see “Starting a Load Test” on page 3-2.
To run a batch test (a series of tests) see “Running a Batch Test” on page 3-7.
Starting a Load Test
While a load test is running, the Conductor’s toolbar changes from the Configuration and Setup Toolbar to the Runtime Toolbar shown in Figure 3-1. The Runtime Toolbar buttons let you control the test and access detailed information about the test while it is running. For more information about what to expect from the QALoad Conductor while a test is running — including descriptions of the Runtime Toolbar buttons — see “Monitoring a Load Test” on page 3-3.
Figure 3-1. Conductor Runtime Toolbar
To start a load test, click the Run button on the configuration and setup toolbar or select Start Test from the Conductor’s Run menu.
Note
While any window on the desktop is re-sizing or re-positioning, all Windows applications pause. Do not click and hold on a window caption or border for extended periods during a load test because it delays message handling and may impact the test results.
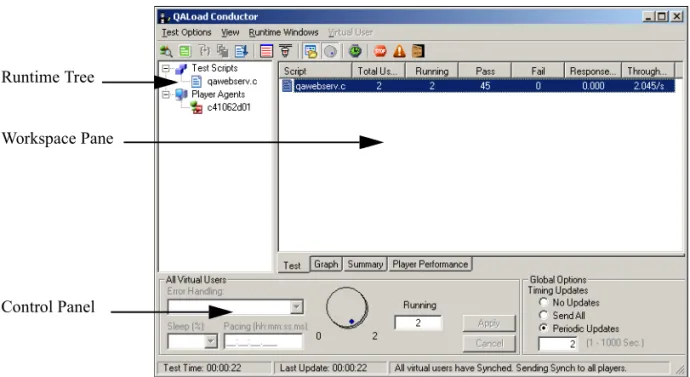
Monitoring a Load Test
When a test is started, the QALoad Conductor’s interface changes to an interactive test control station (see Figure 3-2), referred to as the Runtime Window. The Runtime Window displays information about the scripts, machines, and virtual users that are executing the load test. From the Runtime Window, you can observe the progress of individual scripts and Player machines, view real-time graphs, and start or suspend scripts and Players from a running test to better simulate the unpredictability of real users. This window has three unique areas. The following sections briefly describe the Runtime Window and the options available for monitoring a running test. For detailed information, refer to the QALoad online help.
Viewing General Test Information
The Runtime window is divided into three panes.
Figure 3-2. Runtime Window
Note
During a load test, if the CPU idle time of your machine falls below 25%, check the individual processes on your machine. If the Players and virtual users are utilizing most of the active CPU time, you should use additional Player machines and fewer virtual users per Player to conduct your load test.
Runtime Tree Workspace Pane
Runtime Tree
The Runtime Tree displays an interactive tree-view of the scripts and Player machines involved in the test, and displays the status of each. It provides access to real-time statistics and additional views of real-time test data. For instance, you can monitor a script’s datapool usage by clicking on the script name and then clicking the Datapool Monitor button.
Workspace Pane
The Workspace Pane opens multiple tabs that display real-time test data, statistics, WWW.rip files, and graphs. The data on these tabs is updated according to the time interval you set in your Session ID file before the test on the QALoad Conductor’s Options dialog box, Runtime tab. You can override those options at runtime using the Global Options area in the bottom tab.
Test Control Panel
The Control Panel is a dockable control station that allows you to change virtual user options and data transfer options while your test is running. The Control Panel is the means of controlling dial-up\dial-down scripts, which allow you to manually start or suspend virtual users at runtime.
Accessing Detailed Test Data
In addition to the test data shown by default on the Runtime Window, you can access detailed test information using the QALoad Conductor’s Runtime Toolbar buttons. You can:
• view statistics for a single virtual user
• view the activities of a virtual user in a browser-like window (WWW only) • step to the next request (WWW only)
• view the current datapool record
• display the script running on a single virtual user
• display messages sent from a Player workstation to the QALoad Conductor • display statistics about Conductor/Player communication
• show/hide the Runtime Tree or Control Panel • synchronize all virtual users
• exit, abort, or quit the test
These options are briefly described in the following sections. For more detailed infor-mation, refer to the QALoad Online Help.
View Virtual User Statistics
(WWW) View Virtual User Activities
(WWW) Step to the Next Request
Display the Current Datapool Record
Figure 3-3. Datapool Window
Click the Virtual User Info button to open the Virtual User Info dialog box, which displays detailed information about the selected virtual user.
(WWW only) Click the Monitor Web User button to open the Web User Monitor in the top pane, displaying the selected virtual user’s script in a browser window.
(WWW) Click the Step button to step to the next request in the Web User Monitor.
Click the Datapool Monitor button to display the current datapool record the script is using.
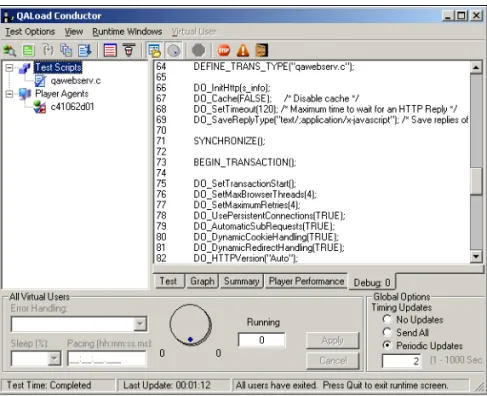
Display a Virtual User’s Running Script
Figure 3-4. Debug Window
Click on a Player in the tree-view and then click the Debug tab button to open a tab in the Workspace pane displaying the script’s statements as they are executed (see Figure 3-4). Note that the Conductor highlights the line in the script that is currently executing.
Display Player Messages
Display Communication Statistics
Show/Hide Runtime Tree or Control Panel
Synchronize Virtual Users
Exit, Abort, or Quit a Test
Running a Batch Test
By setting the appropriate options in the Conductor, you can elect to run a series of tests as a batch, rather than one at a time. A batch test is comprised of multiple session ID files that are executed sequentially.
Select a Player in the tree-view and then click the Display Player Messages button to toggle the Player Messages window, which displays any messages sent from the Player to the QALoad Conductor at runtime.
Select a Player workstation in the tree-view and then click the Show messaging statistics button to open the Conductor\Player Message Statistics dialog box, displaying infor-mation about the communications between the QALoad Conductor and the selected Player workstation at runtime.
Click the Show/Hide Runtime Screen Tree button to toggle the tree-view. Click the Show/Hide Control Panel button to toggle the Test Control Panel.
Click the Synchronize button to manually release all virtual users that are pausing script execution as a result of encountering a SYNCHRONIZE() command.
Click the Exit button to cleanly stop all running virtual users.
Click the Abort button to force all virtual users to stop executing the script. Click the Quit button to completely quit the load test.
Creating a Batch File
Create a batch test by adding a number of session ID files to a batch file. Before you can add a session ID to a batch file, the following must be true:
• The session must include a defined number of transactions. Sessions of unlim-ited transactions cannot be used in a batch test.
• All scripts to be included must exist prior to starting the batch test. This means the .c files referenced in the selected session ID files must be present in the scripts directory.
1. From the Conductor menu, select Run>Batch Test.
2. Select the session ID files to add from the Session Files list and click the Add button. Sessions included in the current batch file are listed in the Batch List.
3. When you are finished adding sessions, click the Save button to name and save the batch test. Batch tests are saved in your scripts directory with the file extension .run. For example, c:\Program Files\Compuware\QALoad\Middlewares
\Oracle\Scripts\batch.run.
Running a Batch Test
1. From the Conductor main menu, select Run>Batch Test.
2. If a batch test you already defined is not listed in the Batch List, click the Load button and navigate to the appropriate batch test.
To create a new batch test, select session ID files from the Session Files list and click the Add button to add them to the batch.
3. Set a time delay between tests, in seconds, in the Delay Between Tests field.
4. To begin running the test, click the Run button. The Conductor executes each of the session ID files in sequence. You can cancel a batch test at any time by clicking the Cancel button.
Stopping a Load Test
A load test is complete when all virtual users exit. A virtual user automatically exits when one of the following occurs:
• A script encounters an EXIT command. • A script completes its transaction loop. To stop a load test, click the Exit button.
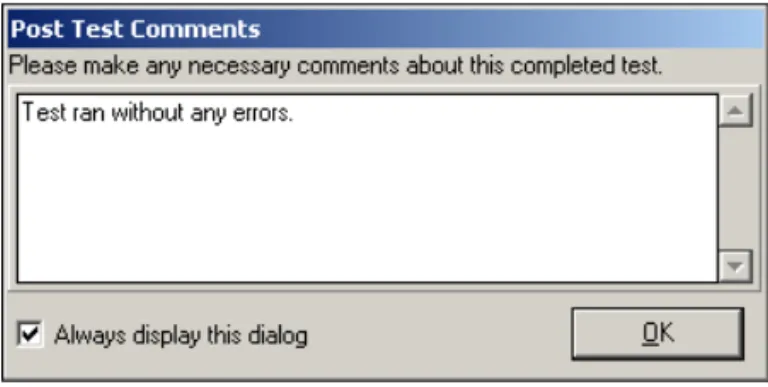
Adding Post Test Comments to the Test
Figure 3-5. Post Test Comments Window
Viewing SAP 4.x Post-Test Log Files
If you selected the option Detailed Logging on the QALoad Script Development Workbench’s SAP Conversion Options dialog box before you ran the test, QALoad automatically generated a log file for each virtual user named saplg###.log (where ### is the virtual user number) during the test. Each log file contains a graphical
repre-sentation of the events sent to and received from the server for a particular virtual user. You can open and delete a log file from the QALoad Script Development Workbench using the following procedure.
Opening a Virtual User Log File
1. With a SAP session open in the QALoad Script Development Workbench, select File>Browse.
2. On the Browse dialog box, double-click Log Files.
3. After QALSAP opens, select File>Open.
4. In the Files of Type field, select Log File. The Browse Log Files dialog box opens, displaying the available SAP log files.
5. Double-click on the log file you wish to open to open. Log files are named saplg###.log, where ### is the virtual user number.
QALSAP opens the selected log file. Figure 3-6 shows a virtual user log file open in QALSAP. Note that, in the Line # column, each request by the client is marked by a blue “client” icon, while each response from the server is marked by a white “server” icon. If you selected the Display Post Test Comments dialog option on the General tab of the Options dialog box when you configured the Conductor, the Post Test Comments window in Figure 3-5 opens when you click the Quit button. Type any comments, which will then be saved to the test’s Summary Report which is viewable in QALoad Analyze.
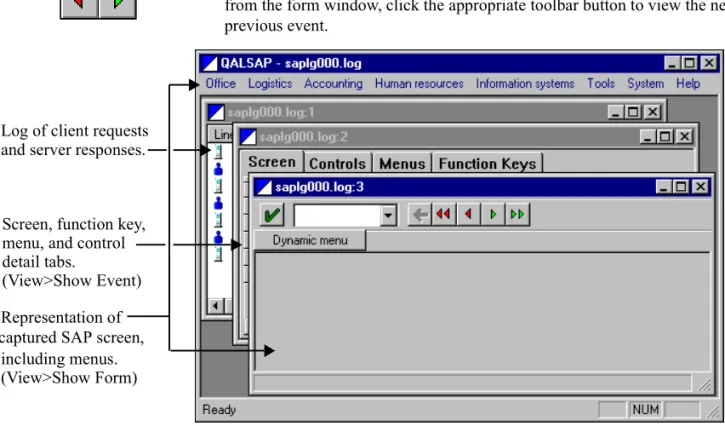
Figure 3-6. SAP virtual user log file, open in QALSAP
Viewing Request or Response Details
QALSAP allows you to view detailed information about each request and response in the log file, including each logged SAP screen, and its menus, function keys, and controls. You determine which information to display by selecting one or both of the following commands from the View menu:
• View>Show Event — Opens a detail window, displaying detailed information about each logged event, including screen names, key names, tool tip text, and so on.
• View>Show Form — Opens a form window, displaying a graphic representa-tion of the logged SAP screen and related menus.
To view a specific request or response:
1. With a log file open in QALSAP, select the appropriate command(s) from the View menu to determine what amount of detail to view.
2. Double-click on the line number of the request or response you want to view. Detail windows open for the selected request or response, depending on the options you set in the View menu. In Figure 3-7, both Show Event and Show Form were selected.
Client request Server response
• To view the next like response—for example, if you are viewing a client request and want to view the next client request—select View>Goto Next Response. Alternately, from the form window, click the appropriate toolbar button to view the next or previous response.
Figure 3-7. QALSAP log views for a single SAP client request
• To view the next event in the log, select View>Goto Next Event. Alternately, from the form window, click the appropriate toolbar button to view the next or previous event.
Screen, function key, menu, and control detail tabs.
Log of client requests and server responses.
Representation of captured SAP screen,
including menus. (View>Show Event)
Chapter 4. Including QARun Scripts in Load Tests
The QALoad Script Development Workbench provides a C-based template script that you can build upon to create a QARun script within a QALoad script. By entering pertinent information about your QARun script into the QALoad Script Development Workbench, you can instruct QALoad which QARun script to run and what QARun environment to run the script under. At test time, QALoad will launch the specified script in QARun so you can time your GUI-driven business transactions and include those timings in QALoad post-test reports.
The procedures in this chapter assume you have QARun installed and operational on the machine(s) where you have QALoad’s Player installed.
Creating a
QA
Run Script
To create a QARun script, you insert any number of QARun transactions (QARun scripts) into a QALoad template script accessible from the QALoad Script Development Workbench. The template script is a simple QALoad script that can be compiled and run; however, it contains no functionality until you insert the QARun transactions appropriate for your testing needs. QALoad provides two methods for inserting QARun transactions: automated, and manual.
Using the automated method, you enter information in the QALoad Script Development Workbench about the QARun transactions to use and then let QALoad generate the test script using the information you provided. This method is fast and efficient when you know exactly which QARun scripts to use and where they are located.
The manual method allows you to open a copy of the QALoad template script and insert transactions and commands manually. You may want to use this method if you suspect you may need to edit your script while you’re creating it.
Automatically Creating a Test Script
Use the following procedure to automatically create a QARun script.
1. From the QALoad Script Development Workbench, select Session>QARun to start a QARun scripting session.
2. Select Session>Generate Script. The Create New QARun Execution Script dialog box opens.
3. In the Login String field, select or type a valid username and password to access your installation of QARun.
4. In the Environment field, select the appropriate QARun environment.
5. In the QARun Script field, enter the name of the QARun transaction to insert, or select it from the drop-down list, which contains a record of the last five QARun script names you entered. Note that you can enter a script name from any database; however, when the test is actually running and QALoad invokes QARun, QARun will attempt to retrieve that script from its default database. Therefore, in the QARun program installed on the Player, you should designate a default database that contains the script(s) you want to run.
6. Select the Automatically Include Checkpoint check box if you want QALoad to automatically insert a checkpoint into the script after this QARun transaction.
7. In the QALoad Script Name field, enter a name for this QALoad script. To write over an existing script, click the Browse button to the right of this field and select a script from the list of available scripts.
8. To add additional QARun transactions to this script, click the Add Script button and repeat Steps 3–6 for each additional transaction.
9. When you are finished, click the Create Script button. The QALoad script is saved in the directory \Program Files\Compuware\QALoad\Middlewares
\QARun\Scripts, and the script opens in the script editor.
10. To compile the script for testing, select Session>Compile.
Before using this script in a load test, you should validate it by running a simple test to ensure that it plays back correctly. For information on validating a script, refer to “Validating Scripts” on page 2-10.
Manually Creating a Test Script
Use the following procedure to manually insert QARun transactions (scripts) into the QALoad template script.
1. From the QALoad Script Development Workbench, select Session>QARun to start a QARun scripting session.
2. Select Session>New Template to create a new script from the QALoad template script.
3. In the Choose Script Name dialog box, enter a name for the new QALoad script and click OK. The script is saved in the directory \Program Files\Compuware
\QALoad\Middlewares\QARun\Scripts, and the script opens in the script editor.
4. Edit the script as necessary:
• You can manually enter any transactions or scripting commands directly in the script.
• You can insert a QARun transaction by positioning the cursor on the appropri-ate line and selecting Session>Insert>Transaction. On the Insert a QARun Transaction dialog box that opens:
— In the Login String field, select or type a valid username and password to access your installation of QARun.
— In the Environment field, select the appropriate QARun environment. — In the QARun Script field, enter the name of the QARun transaction to
insert, or select it from the drop-down list, which contains a record of the last five QARun script names you entered. Note that you can enter a script name from any database; however, when the test is actually running and QALoad invokes QARun, QARun will attempt to retrieve that script from its default database. Therefore, in the QARun program installed on the Player, you should designate a default database that contains the script(s) you want to run.
— When you are finished, click the Insert button to insert the script you just created into the QALoad script.
5. When you are finished, save any changes.
6. To compile the script for testing, select Session>Compile.
Before using this script in a load test, you should validate it by running a simple test to ensure that it plays back correctly. For information on validating a script, refer to “Validating Scripts” on page 2-10.
Chapter 5. Load Testing the Network with NetLoad
NetLoad is QALoad’s suite of load generation scripts that allows you to simulate load conditions on your network using any of the following protocols:
• FTP • HTTP • PING • LDAP • POP3 • SMTP • TCP • UDP • MSExchange
NetLoad includes QALoad-provided scripts, which you can access from the Conductor to run in a test, for each protocol. You can customize the activity of the script by creating reusable datapools in the QALoad Script Development Workbench to use during testing. When you run a test, each virtual user will request a single datapool record. Once all the records have been read, the datapool file is rewound and the process starts again. You can use QALoad’s components to run scripts and analyze the results as usual, or you can integrate your results with Compuware’s EcoTOOLS product.
In short, NetLoad allows you to generate traffic on your network in a controlled manner and gather performance timings from the network. To facilitate testing under TCP/IP and UDP, NetLoad provides you with a server module to simulate server activity — allowing you to gather network timings without expending your actual server resources.
For more information on the NetLoad Server modules, see “NetLoad Server Modules for TCP/IP and UDP” on page 5-2.
Note
To use NetLoad for MSExchange to test on Outlook 2000, you must ensure that CDO support is installed on your workstation before you continue. For instructions, see “Verifying CDO Support for MSExchange” on page 5-9.