9
Desktop
Management
Desktop Management
Tools
Mac OS X includes three desktop manage-ment tools that you might find helpful to work more efficiently and productively:
u Stacks puts expandable folders in the Dock. Clicking a folder displays its con-tents, making it quick and easy to open files you use often.
u Exposé helps you cope with screen clutter by arranging open windows so you can see their contents or your desktop with a press of a button. Snow Leopard adds Exposé integration to the Dock, making it even more functional.
u Spaces enables you to organize windows into groups, thus helping you to manage projects or tasks.
In this chapter, I explain how to take advan-tage of each of these features. I also explain how you can set preferences for them so they work the way you want them to.
Deskt
op Mana
gement
Stacks
Mac OS X Stacks feature displays the con-tents of any folder in the Dock as a fan
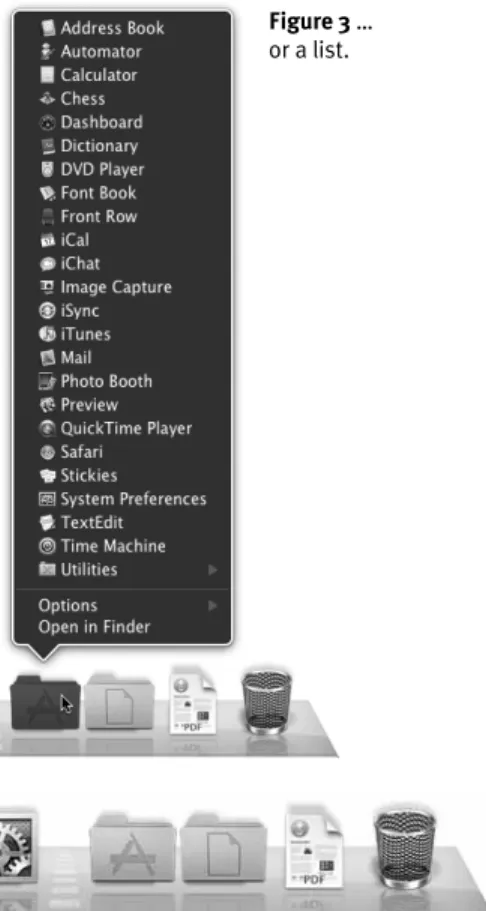
(Figure 1), grid (Figure 2), or list (Figure 3). Click the folder icon to display the stack. Then click the item in the stack to open it. This makes it easy to organize Dock items and access the applications, folders, and files you use most.
By default, Mac OS X 10.6 is preconfigured with three stacks folders (Figure 3):
u Applications is the computer’s Applica-tions folder—default location for installed applications.
u Documents is your Documents folder— the default location for saved documents.
u Downloads is your Downloads folder— the default location for files you download from the Internet.
You can add your own stacks to the Dock by simply adding folders.
4
Tips
n Whether a stack appears as a fan, grid, or list depends, in part, on settings for the stacks folder or the number of items in the folder. I explain how to set Stacks options for a folder on page 170.
n A stack’s Dock icon appears as a pile (or stack) of icons with the most recently added item on top (Figure 4). This helps give you an idea of the folder’s contents.
n I explain how to customize the Dock, including how to add and remove Dock items, on page 155.
St
ack
s
Figure 1 The Stacks feature displays the contents of a folder in the Dock as a fan…
Figure 2 …a grid, … Click here to see more
To display a stack
In the Dock, click the icon for the stack folder you want to display.
The contents of the folder appear in a fan
(Figure 1), grid (Figure 2), or list (Figure 3).
To hide a stack
Click anywhere other than on a stack item.
Or
Click the stack folder again.
The stack collapses back into the Stack icon in the Dock.
To open an item in a stack
1. Display the stack containing the item you want to open (Figure 1, 2, or 3).
2. Click the item you want to open. The item opens.
To open a stack folder
1. In the Dock, click the folder to open to display its stack (Figure 1, 2, or 3).
2. Click the appropriate button:
s For a fan (Figure 1), click the Show in
Finder or More in Finder button at the top of the fan. The wording of this command varies depending on whether all items are showing.
s For a grid, click the Open in Finder
button at the bottom of the grid. You may have to scroll down in the grid
(Figure 2)to display this button
(Figure 5).
s For a list (Figure 3), click the Open in
Finder button at the bottom of the list. The stacks folder opens in its own Finder window.
W
orking with S
ta
ck
s
Figure 4 Here are three stacks folders: Applica-tions, Documents, and Downloads folders.
Figure 5 If there are many items in a grid, you can scroll down within it.
Figure 3 … or a list.
To navigate folders within a
stack grid
1. Display the stack grid you want to navi-gate and, if necessary, scroll to display the folder you want to open (Figure 5).
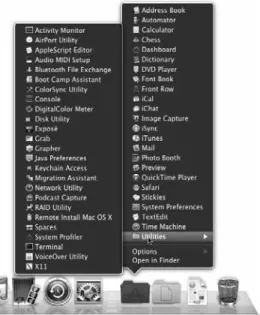
2. To open a folder in the grid, click it. The grid displays the contents of the folder you clicked. Figure 6 shows what the Applications stack might look like after clicking the Utilities folder within it.
3. To back out of a folder, click the name of the parent folder in the upper left corner of the grid stack (Figure 6).
4
Tips
n You can repeat step 2 as desired to dig deeply into the file hierarchy.
n Stacks navigation as discussed here is brand new in Snow Leopard.
To navigate folders within a
stack list
1. Display the stack list you want to navigate (Figure 3).
2. To open a folder in the list, point to it. The list turns into a hierarchical menu with the folder’s contents displayed in a submenu (Figure 7).
4
Tips
n You can repeat step 2 as desired to open multiple submenus for deeply nested folders.
n This is a great way to organize the files and folders you need to access using the stacks feature.
Na
viga
ting F
older
s within S
ta
ck
s
Figure 7 When viewing a stack as a list, point to the name of a folder to display its contents in a subfolder. Figure 6 Clicking a folder in a grid displays the con-tents of that folder in the grid.
Click the name of the parent folder to view the contents of that folder again.
To customize the display of a
stack folder
1. In the Dock, point to the folder you want to set options for.
2. Do one of the following to display a menu of options (Figure 6):
s Hold down C and click. s Right-click or, on a buttonless
track-pad, click with two fingers.
s If the stack is set to display as a list,
click to display the list and then choose Options to display the Options submenu (Figure 9).
3. To change the sort order of items in the stack, choose a Sort by option.
4. To set the appearance for the the stack’s icon on the dock, choose a Display as option:
s Folder displays the stack’s icon using
the same icon as its source folder.
s Stack displays the stack’s icon as a
stack of icons (Figure 10).
5. To set the appearance for the folder’s open stack, choose a View content as option:
s Fan always displays the stack as a fan
(Figure 1).
s Grid always displays the stack as a
grid (Figure 2).
s List always displays the stack as a list
(Figure 3).
s Automatic displays the stack as a fan
(Figure 1) unless there are too many items in the folder to fit—then it displays them as a grid (Figure 2).
Cus
tomizing S
ta
ck App
ear
ance
Figure 8 You can display a menu of options for a stack.Figure 9
If a stack is displayed as a list, you’ll need to display the Options submenu to change its options.
Figure 10 In this example, I’ve changed the Display as option for the Applications and Documents folder from Folder to Stack.
Exposé
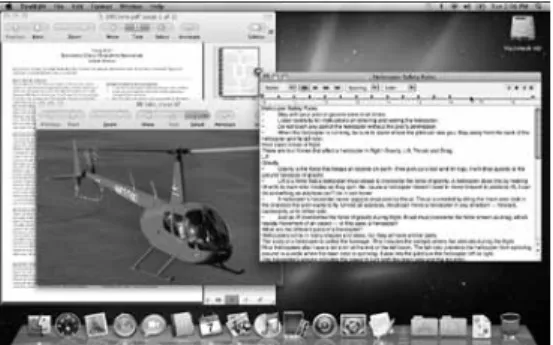
If you’re like most Mac OS X users, you prob-ably have multiple applications and windows open at the same time while you work. The result can be a cluttered screen, with many layers of windows hiding other windows and the desktop.
Exposé helps solve the problem of screen clutter by making it easy to see all open windows in all applications (Figure 11), all open windows in a single application (Figure 12), or the entire desktop (Figure 16) at once. Simply press one of Exposé’s shortcut keys
(Table 1) to see what you need to see. Mac OS X 10.6 adds Exposé integration with the Dock. Now you can view all open win-dows in a specific application by simply clicking that application’s icon in the Dock
(Figure 13). And when windows are displayed in Exposé, they now appear in a neat grid, making them even easier to see and access.
4
Tips
n If you’re using a laptop Macintosh, such as a MacBook or MacBook Pro, you may need to hold down the key while pressing the appropriate key in Table 1
to activate Exposé.
n You can customize Exposé’s shortcut keys or add additional Exposé triggers. I explain how on page 174.
n You can use Exposé while copying or moving items. Begin dragging the item you want to move or copy, use the appro-priate Exposé keystroke for the view you need, and complete the drag and drop while Exposé is active.
Exposé
Table 1
Standard Shortcut Keys for Exposé
Key Description
9 Displays all open windows at once. 0 Displays all open windows for the current
application at once. - Displays the desktop.
To see all open windows at once
Press 9.
All open windows resize and arrange them-selves into a grid so you can see into each one (Figure 11).
4
Tip
n Another way to open Exposé is to open the Exposé icon in the Utilities folder inside your Applications folder. This is not exactly as easy as pressing a single key, but you could add the Exposé icon to the Dock, making it accessible with just a click.
To see all open windows in the
active application
Press 0.
All open windows in the active application resize and arrange themselves into a grid while other windows simply disappear
(Figure 12).
To see all open windows in a
specific application
1. Press 9 or 0 to activate Exposé (Figure 11 or 12).
2. Click the Dock icon for the application windows you want to view. Exposé dis-plays only the windows for that application (Figure 13).
4
Tip
n As shown in Figures 13 and 14 clicking a Dock icon while Expose is active dis-plays a menu of options for an active application.
Using E
xposé
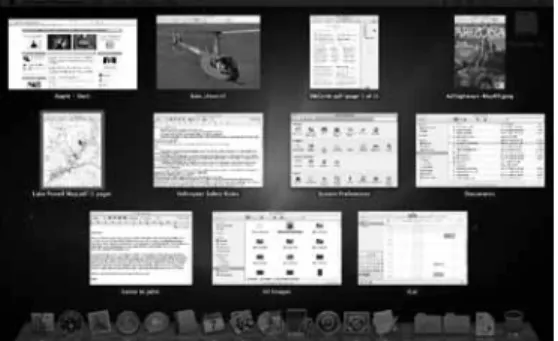
Figure 11 Pressing 9 displays all open windows.
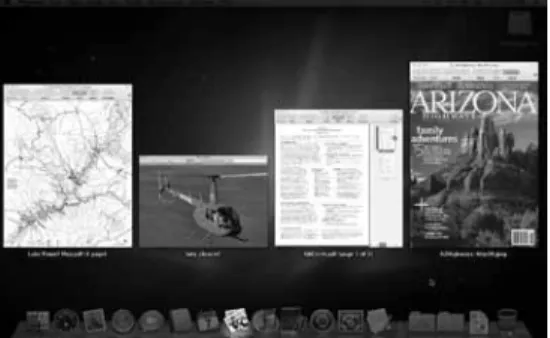
Figure 12 Pressing 0 displays all of the windows in the currently active application—in this case, Preview.
Figure 13 Clicking an icon in the Dock displays the open windows for that application, as well as a small menu of options.
Figure 14 Exposé also gives you access to a menu of options for an application.
To activate a specific window
1. With Exposé active, point to the window you want to activate. A blue border appears around it (Figure 15).
2. Click the window. Exposé is released and the window comes to the front.
To see the desktop
u Press -.
All open windows shift to the edges of the screen so you can see the desktop
(Figure 16).
To switch from one Exposé view
to another
Press the shortcut key for the other view.
To release Exposé
Press q.
Using E
xposé
Figure 15 When you point to a window while Exposé is active, a dark blue border appears around it. (It’s times like these when I wish they’d let me do color books.)
Figure 16 Exposé also enables you to display just the desktop. You might find this handy if you keep a lot of icons on your desktop, like I do on my main produc-tion Mac.
To set Exposé preferences
1. Choose Apple > System Preferences, or click the System Preferences icon in the Dock.
2. In the System Preferences window that appears, click the Exposé & Spaces icon.
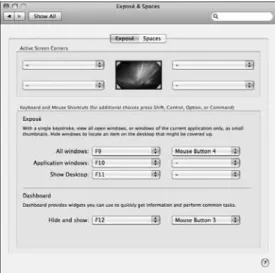
3. If necessary, click the Exposé button to display Exposé configuration options (Figure 17).
4. To set “hot corners” to activate Exposé, choose an option from the appropriate pop-up menu in the Active Screen Cor-ners area. Each menu is the same (Figure 18) and corresponds to a specific corner of the screen. The Exposé options are:
s All Windows uses Exposé to display
all open windows (Figure 8). This is the same as pressing 9 with default Exposé settings.
s Application Windows uses Exposé to
display all windows for the active application (Figure 10). This is the same as pressing 0 with default Exposé settings.
s Desktop uses Exposé to move all
windows aside so you can see the Desktop (Figure 12). This is the same as pressing - with default Exposé settings.
5. To set shortcut keys and mouse buttons for Exposé functions, choose options from the pop-up menus in the Exposé area (Figures 15 and 16).
6. When you’re finished setting options, click the Exposé & Spaces preferences pane’s close button to save your settings and dismiss the window.
S
etting E
xposé P
references
Continued on next page… Figure 17 Use the Exposé panel of the Exposé & Spaces
preferences pane to set hot corners, shortcut keys, and mouse buttons for Exposé functions.
Figure 18 Use pop-up menus like this one to set up hot corners for Exposé and other Mac OS X features.
4
Tips
n When you position the pointer in a “hot corner” of the screen, your computer performs the task you assigned to it with the corresponding Active Screen Corners pop-up menu (Figure 18).
n The Active Screen Corners pop-up menus (Figure 18) enable you to set corners for Dashboard activation (page 312), screen saver (page 164), and display sleep (page 539).
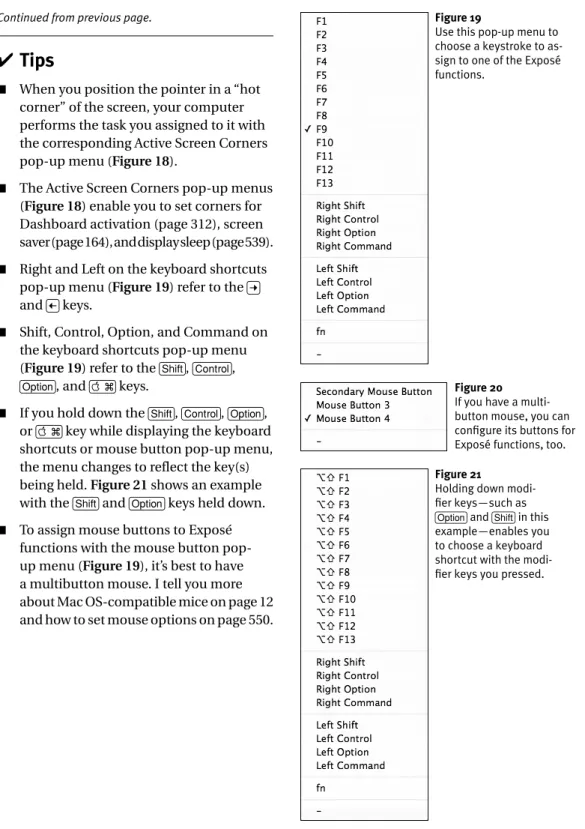
n Right and Left on the keyboard shortcuts pop-up menu (Figure 19) refer to the S and A keys.
n Shift, Control, Option, and Command on the keyboard shortcuts pop-up menu (Figure 19) refer to the s, C,
o, and $% keys.
n If you hold down the s, C, o, or $% key while displaying the keyboard shortcuts or mouse button pop-up menu, the menu changes to reflect the key(s) being held. Figure 21 shows an example with the s and o keys held down.
n To assign mouse buttons to Exposé functions with the mouse button pop- up menu (Figure 19), it’s best to have a multibutton mouse. I tell you more about Mac OS-compatible mice on page 12 and how to set mouse options on page 550.
S
etting E
xposé P
references
Continued from previous page. Figure 19
Use this pop-up menu to choose a keystroke to as-sign to one of the Exposé functions.
Figure 21
Holding down modi-fier keys—such as o and s in this example—enables you to choose a keyboard shortcut with the modi-fier keys you pressed.
Figure 20 If you have a multi-button mouse, you can configure its buttons for Exposé functions, too.
Spaces
Mac OS X’s Spaces feature enables you to organize groups of windows into multiple spaces (Figure 22). Then, when you work in a space, only the windows that are part of that space appear onscreen (Figure 23).
For example, while working on a chapter of this book, I might have a space that includes my InDesign chapter document, Photoshop
(which I use to edit screenshots), and the three Finder windows that I use for the chapter’s documents. I might also have another space set up with Mail, iChat, and Safari. I can then quickly switch from my work space to my communication space when I need to check e-mail or track down someone for a chat. When I want to return to work without distractions from those other applications, I can quickly switch back to my work space.
Setting up Spaces is pretty straightforward. After enabling the feature and specifying the number and layout of spaces that you want, simply switch to a space and start filling it with windows. You can also assign applica-tions to specific spaces, ensuring that they open in the space you plan to use them in. You can have up to 16 spaces and access them several ways, including clicking, short-cut keys, or the Spaces menu.
In this part of the chapter, I explain how to set up and use the Spaces feature.
Sp
aces
Figure 22 In this example, I’ve created four different spaces.
Figure 23 When you switch to a space, only its win-dows appear.
To enable & configure Spaces
1. Choose Apple > System Preferences or click the System Preferences icon in the Dock.
2. In the System Preferences window that appears, click the Exposé & Spaces icon.
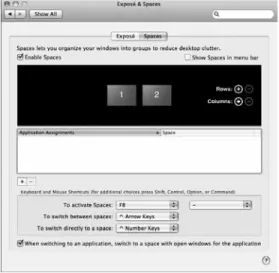
3. If necessary, click the Spaces button to display Spaces configuration options (Figure 24).
4. Turn on the Enable Spaces check box.
5. To display a Spaces menu in the menu bar (Figures 25 and 26), turn on the Show Spaces in menu bar check box.
6. Set the number of spaces in the black box. To add a row or column, click the
+
button beside Rows or Columns.7. To always switch to a space with open windows for an application you switch to, turn on the check box at the bottom of the Spaces pane. This keeps all of an application’s open windows in the same space.
8. Click the Exposé & Spaces preferences pane’s close button to save your settings and dismiss the window.
4
Tips
n You can configure Mac OS to have from 2 to 16 spaces.
n To change the number of spaces, you can repeat these steps and click the
+
or –button beside Rows or Columns to add or remove spaces.
n The Spaces menu displays the number of the currently displayed space as its menu bar icon (Figures 25 and 26).
Enabling & C
onfiguring Sp
aces
Figure 24 The Spaces panel of the Exposé & Spaces preferences pane.
Figure 26 The Spaces menu makes it easy to switch from one space to another.
To switch from one space
to another
1. Press 8 (or 8 on a laptop, such as a MacBook or MacBook Pro) or click the Spaces icon in the Dock.
The screen goes black and rectangles representing each space appear (Figures 22 and 27).
2. Click the space you want to view.
Or
If the Spaces menu is enabled (Figure 25), choose the space you want from the menu
(Figure 26).
Or
Press CA or CS to cycle through all spaces, one at a time.
Or
Press C with the number key corre-sponding to the space you want to view. For example, C2 displays space No. 2.
To add windows to a space
1. Switch to the space you want to add windows to.
2. Open the windows you want to add. Those windows become part of that space (Figure 28).
4
Tip
n If a window belongs to an application that is associated with a specific space, that window will only open in that space. For example, if you set Preview to open in space No. 2, when you open a Preview document, it appears in space No. 2, no matter which space was open when you opened the document. I explain how to associate applications with spaces next.
S
witching Sp
aces, Adding
W
indo
ws
Figure 27 In this very simple example, I’ve created two spaces and I haven’t added any windows to either one.
Figure 28 Adding windows to a space is as simple as opening the windows you want to add.
To associate an application with
a specific space
1. Follow steps 1 through 3 under “To enable & configure Spaces” on page 178 to open the Spaces preferences panel (Figure 24).
or
Choose Open Spaces Preferences from the Spaces menu (Figure 26).
2. Under Application Assignments, click
+
to display a menu like the one in Figure 29.3. Choose an open application’s name to add it to the Application Assignments list (Figure 31).
or
Choose Other to display dialog like the one in Figure 30. Use the dialog to locate and select the application you want to assign to a specific space. Then click Add to add it to the Application Assignments list (Figure 31).
4. In the Space column of the application’s line in the Application Assignments list, use the pop-up menu (Figure 32) to choose the space you want to assign the application to.
5. Repeat steps 2 through 4 for each appli-cation you want to add.
4
Tips
n In step 4, the Every Space option (Figure 32) allows the application to display in any space.
n When you associate an application with a specific space, that application and its document windows will only open in that space. If you want an application to open
Associa
ting App
lic
ations with Sp
aces
Figure 30 Use this dialog to add an application to the Application Assignments list.
Figure 31 The item you added appears in the list.
Figure 32 Choose a space assignment from the pop-up menu in the Space column.
Figure 29 When you click the + button, a menu of open applications appears.
To set Spaces shortcuts
1. Follow steps 1 through 3 under “To enable & configure Spaces” on page 178 to open the Spaces preferences panel (Figure 24).
or
Choose Open Spaces Preferences from the Spaces menu (Figure 26).
2. Choose options from the pop-up menus at the bottom of the Spaces panel (Figure 24):
s To activate Spaces enables you to
choose a shortcut key (Figure 33) and mouse button (Figure 34) to display the spaces panes (Figures 22 and 27).
s To switch between spaces enables
you to choose a shortcut key combi-nation (Figure 35) to cycle through all spaces.
s To switch directly to a space enables
you to choose a shortcut key combi-nation (Figure 36) to switch directly to a specific space.
4
Tip
n If you hold down the s, C, o, or $% key while displaying any of the pop-up menus, the menu changes to reflect the key(s) being held, thus offering additional shortcut key options.
S
etting Sp
aces Shor
tcut
s
Figure 33 Use this pop-up menu to choose a shortcut key for invoking the Spaces feature.Figure 34 If you have a multi-button mouse, you can choose a button to invoke Spaces.
Figure 35 You can also set a shortcut key to cycle through all spaces…
Figure 36
…and to go directly to a specific space.