An Oracle White Paper August 2010
Oracle Data Integrator
Preface ... 4
Purpose ... 4
Audience ... 4
Additional Information ... 4
Introduction to Oracle Data Integrator (ODI) ... 5
Objectives... 5
Business-Rules Driven Approach ... 5
Traditional ETL versus E-LT Approach ... 6
Understanding Oracle Data Integrator Interfaces ... 7
A Business Problem Case Study ... 8
Implementation using Manual Coding ... 10
Implementation using Traditional ETL tools ... 12
Implementation using ODI’s E-LT and the Business-rule Driven Approach 14 Benefits of E-LT Combined with a Business-rule Driven Approach ... 17
Using ODI in your Data Warehouse Project ... 19
ODI and the Data Warehouse Project ... 19
Organizing the Teams ... 19
Reverse-engineering, Auditing and Profiling Source Applications ... 21
Designing and Implementing the Data Warehouse’s Schema... 23
Specifying and Designing Business Rules ... 24
Building a Data Quality Framework... 27
Developing Additional Components ... 28
Packaging and Releasing Development ... 29
Versioning Development ... 29
Scheduling and Operating Scenarios ... 30
Monitoring the Data Quality of the Data Warehouse ... 30
Publishing Metadata to Business Users ... 30
Planning for Next Releases ... 31
Oracle Data Integrator for Oracle Best Practices ... 32
Architecture of ODI Repositories ... 32
Reverse-engineering an Oracle Schema ... 32
Oracle Loading Strategies ... 32
Using Changed Data Capture ... 34
Oracle Integration Strategies ... 35
Defining a Data Quality Strategy ... 36
Setting up Agents in an Oracle environment ... 37
Setting up Repositories... 38
Using ODI Version Management ... 41
Going to Production ... 44
Setting up Agents ... 46
Backing up Repositories ... 48
Appendices ... 49
Appendix I. Oracle Data Integrator for Teradata Best Practices ... 49
Architecture of ODI Repositories ... 49
Reverse-engineering a Teradata Schema ... 49
Teradata Loading Strategies ... 50
Teradata Integration Strategies ... 51
Setting up Agents in a Teradata environment ... 52
Appendix II: Additional Information ... 53
Preface
Purpose
This document describes the best practices for implementing Oracle Data Integrator (ODI) for a data warehouse solution. It is designed to help setup a successful environment for data integration with Enterprise Data Warehouse projects and Active Data Warehouse projects. This document applies to Oracle Data Integrator 11g.
Audience
This document is intended for Data Integration Professional Services, System Integrators and IT teams that plan to use Oracle Data Integrator (ODI) as the Extract, Load and Transform tool in their Enterprise or Active Data Warehouse projects.
Additional Information
The following resources contain additional information:
• Oracle website: http://www.oracle.com
• Oracle Data Integrator 11g on-line documentation:
http://download.oracle.com/docs/cd/E14571_01/odi.htm
• Java reference : http://www.oracle.com/technetwork/java/index.html
Introduction to Oracle Data Integrator (ODI)
Objectives
The objective of this chapter is to
• Introduce the key concepts of a business-rule driven architecture
• Introduce the key concepts of E-LT
• Understand what an Oracle Data Integrator (ODI) interface is
• Through a business problem case study, understand and evaluate some different
development approaches including:
o Manual coding
o Traditional ETL
o ODI’s business-rule driven approach combined with E-LT
Business-Rules Driven Approach
Introduction to Business rules
Business rules specify mappings, filters, joins and constraints. They often apply to metadata to transform data and are usually described in natural language by business users. In a typical data integration project (such as a Data Warehouse project), these rules are defined during the specification phase in documents written by business analysts in conjunction with project managers.
Business Rules usually define “What” to do rather than “How” to do it.
They can very often be implemented using SQL expressions, provided that the metadata they refer to is known and qualified in a metadata repository.
Examples of business rules are given in the table below:
BUSINESS RULE TYPE SQL EXPRESSION
Sum of all amounts of items sold during May 2010 multiplied by the item price
Mapping SUM(
CASE WHEN SALES.YEARMONTH=201005 THEN SALES.AMOUNT * PRODUCT.ITEM_PRICE ELSE
0 END )
Products that start with ‘CPU’ and that belong to the hardware category
Filter Upper(PRODUCT.PRODUCT_NAME) like ‘CPU%’
And PRODUCT.CATEGORY = ‘HARDWARE’
Customers with their orders Join CUSTOMER.CUSTOMER_ID = ORDER.ORDER_ID
BUSINESS RULE TYPE SQL EXPRESSION and order lines
Reject duplicate customer names
Unique Key Constraint
CONSTRAINT CUST_NAME_PK PRIMARY KEY (CUSTOMER_NAME)
Reject orders with a link to an non-existent customer
Reference Constraint CONSTRAINT CUSTOMER_FK FOREIGN KEY (CUSTOMER_ID)
REFERENCES CUSTOMER(CUSTOMER_ID)
Mappings
A mapping is a business rule implemented as a SQL expression. It is a transformation rule
that maps source columns (or fields) onto one of the target columns. It can be executed by a relational database server at run-time. This server can be the source server (when possible), a middle tier server or the target server.
Joins
A join operation links records in several data sets, such as tables or files. Joins are used to link multiple sources. A join is implemented as a SQL expression linking the columns (fields) of two or more data sets.
Joins can be defined regardless of the physical location of the source data sets involved. For example, a JMS queue can be joined to a relational table.
Depending on the technology performing the join, it can be expressed as an inner join, right outer join, left outer join and full outer join.
Filters
A filter is an expression applied to source data sets columns. Only the records matching this
filter are processed by the data flow.
Constraints
A constraint is an object that defines the rules enforced on data sets’ data. A constraint ensures the validity of the data in a given data set and the integrity of the data of a model. Constraints on the target are used to check the validity of the data before integration in the target.
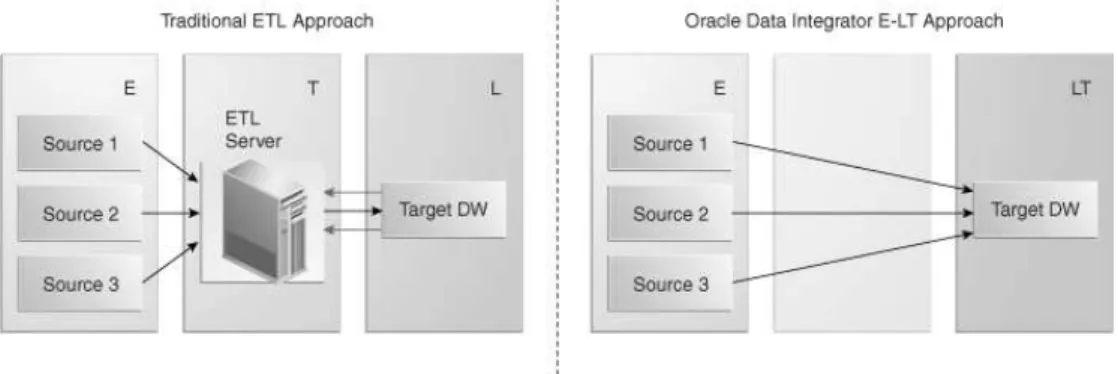
Traditional ETL versus E-LT Approach
Traditional ETL tools operate by first Extracting the data from various sources, Transforming
the data on a proprietary, middle-tier ETL engine, and then Loading the transformed data onto
the target data warehouse or integration server. Hence the term “ETL” represents both the names and the order of the operations performed, as shown in Figure 1 below.
Figure 1: Traditional ETL approach compared to E-LT approach
In response to the issues raised by ETL architectures, a new architecture has emerged, which in many ways incorporates the best aspects of manual coding and automated code-generation approaches. Known as “E-LT”, this new approach changes where and how data
transformation takes place, and leverages existing developer skills, RDBMS engines and server hardware to the greatest extent possible.
In essence, E-LT moves the data transformation step to the target RDBMS, changing the order of operations to: Extract the data from the source tables, Load the tables into the
destination server, and then Transform the data on the target RDBMS using native SQL
operators. Note, with E-LT there is no need for a middle-tier engine or server as shown in Figure 1 above.
Understanding Oracle Data Integrator Interfaces
An interface is an ODI object stored in the ODI Repository that enables the loading of one
target datastore with data transformed from one or more source datastores, based on
business rules implemented as mappings, joins, filters and constraints.
A datastore can be:
• a table stored in a relational database
• an ASCII or EBCDIC file (delimited, or fixed length)
• a node from a XML file
• a JMS topic or queue from a Message Oriented
• a node from a LDAP directory
• an API that returns data in the form of an array of records
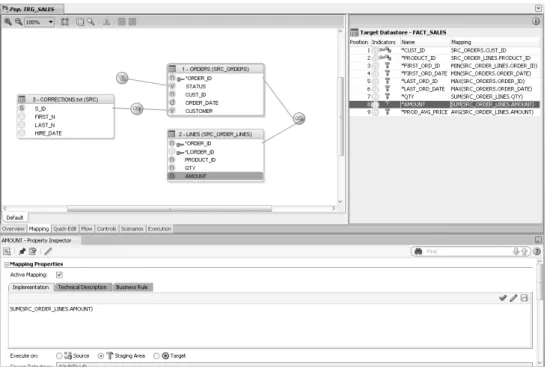
Figure 2 shows a screenshot of an ODI interface that loads data into the FACT_SALES target table. Source Data is defined as a heterogeneous query on the CORRECTIONS file, the ORDERS and LINES tables.
Mappings, joins, filters and constraints are defined within this window.
Figure 2: Example of an ODI Interface
Wherever possible, ODI interfaces generate E-LT operations that relegate transformations to the target RDBMS servers.
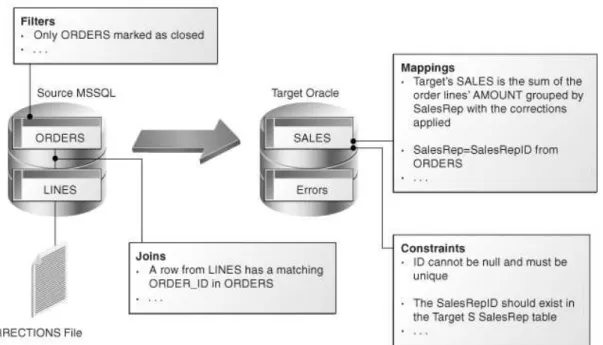
A Business Problem Case Study
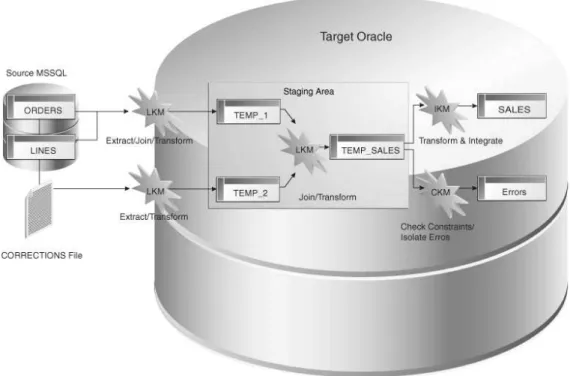
Figure 3 describes an example of a business problem to extract, transform and load data from a Microsoft SQL Server database and a file into a target Oracle table.
Data is coming from two Microsoft SQL Server tables (ORDERS joined to LINES) and is combined with data from the CORRECTIONS file. The target SALES Oracle table must match some constraints such as the uniqueness of the ID column and valid reference to the SALES_REP table.
Figure 3: Example of a business problem
Translating these business rules from natural language to SQL expressions is usually straightforward. In our example, the rules that appear in the figure could be translated as follows:
TYPE RULE SQL EXPRESSION / CONSTRAINT
Filter Only ORDERS marked as closed ORDERS.STATUS = ‘CLOSED’
Join A row from LINES has a matching ORDER_ID in
ORDERS
ORDERS.ORDER_ID = LINES.ORDER_ID
Mapping Target’s SALE is the sum of the order lines’ AMOUNT grouped by sales rep., with the corrections applied.
SUM(LINES.AMOUNT + CORRECTIONS.VALUE)
Mapping Sales Rep = Sales Rep ID from ORDERS ORDERS.SALES_REP_ID
Constraint ID must not be null ID is set to “not null” in the data model
Constraint ID must be unique A Primary Key is added to the data model with (ID) as
set of columns Constraint The Sales Rep. ID should exist in the Target sales
Rep table
A Reference (Foreign Key) is added in the data model on SALES.SALES_REP =
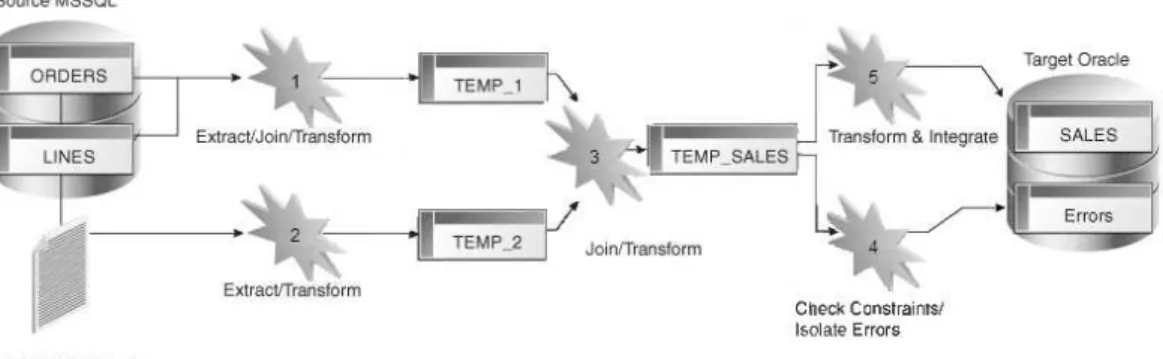
Implementation using Manual Coding
When implementing such a data flow using, manual coding, one would probably use several steps, several languages, and several scripting tools or utilities.
Figure 4 gives an overview of the different steps needed to achieve such an extract, transform and load process.
Figure 4: Sequence of Operations for the Process
There are, of course, several technical solutions for implementing such a process. One of them (probably the most efficient, as it uses an Oracle data warehouse as a transformation engine) is detailed in the following table:
STEP DESCRIPTION EXAMPLE OF CODE
1 Execute the join between ORDERS and LINES as well as the filters on the source Microsoft SQL Server database using a database view.
Extract the content of the view into a flat file using the BCP utility.
Use the SQL*Loader utility to load the temporary BCP file into the TEMP_1 Oracle table.
Create view C$_SALES As select ... from ORDERS, LINES where ORDERS.STATUS = ‘CLOSED’ and ORDERS.ORDER_ID = LINES.ORDER_ID
bcp C$_SALES out c$_sales_extract.bcp –c -S... -U... -P... – t\b
sqlldr control=TEMP_1.ctl log=logfile.log userid=.../...
2 Use the SQL*Loader utility to load the CORRECTIONS ASCII file into the TEMP_2 Oracle table.
sqlldr control=TEMP_2.ctl log=logfile.log userid=.../...
3 Join, transform and aggregate the 2 temporary tables TEMP_1 and TEMP_2 and load the results into a 3rd table (TEMP_SALES) using SQL
insert into TEMP_SALES (...) select SUM(TEMP_1.AMOUNT+TEMP_2.VALUE), TEMP1.SALES_REP_ID, ... from TEMP_1, TEMP_2
STEP DESCRIPTION EXAMPLE OF CODE ...
4 Check Unique constraints using SQL and insert the errors into the Errors table
Check Reference constraints using SQL and insert the errors into the Error table
insert into Errors(...) select ... from TEMP_SALES where ID in (select ID from TEMP_SALES group by ID having count(*) > 1)
insert into Errors(...) select ... from TEMP_SALES where SALES_REP not in
(select SALES_REP_ID from SALES_REP) 5 Finally, use SQL logic to insert / update into the target
SALES table using a query on TEMP_SALES
update SALES set ... from ...
where ID in (select ID from TEMP_SALES where IND_UPDATE=’U’)
insert into SALES (...) select ...
from TEMP_SALES where IND_UPDATE=’I’ ...
The benefits of this approach are:
• High performance:
o Uses pure set-oriented SQL to avoid row-by-row operations
o Uses Oracle as a transformation engine to leverage the power of the
RDBMS
o Uses in-place utilities such as External Tables
• Code flexibility:
o Leverages the latest features of Oracle such as the built-in transformation
However, this approach raises several issues that become painful as the Enterprise Data Warehouse projects grow, and more developers get involved. These issues are:
• Poor productivity
o Every load process needs to be developed as a set of scripts and programs,
within different environments and with several languages.
o Business rules (“what happens to the data” – SUM(AMOUNT + VALUE))
are mixed with technical logic (“how to move / load the data” – SQL*Loader, External Table, insert etc.)
o Moving to production is often difficult when developers haven’t designed
environment variables, or variable qualified names for their objects.
• High cost of data quality implementation
o Data cleansing / data quality according to predefined constraints is usually
avoided due to the cost of its implementation
o Every project has its own definition of the data quality without any
centralized framework (default structure of the error tables, error recycling etc.)
• Hard maintenance
o Even when project managers have set up a framework, every script may
“reinvent the wheel” and contain specific routines that make it hard to understand
o Developments are spread in several machines and folders, without a central
repository
o Impact analysis is impossible as there is no metadata management and no
cross references mechanism
• No project flexibility
o The cost of a change to the data models or to the business rules becomes
such a constraint that IT teams refuse it, leading to frustration amongst the business users.
Implementation using Traditional ETL tools
Traditional ETL tools perform all the transformations in a proprietary engine. They often require additional hardware to stage the data for the transformations. None of them really leverages the power of the RDBMS.
Figure 5: Implementation Using an ETL
Every transformation step requires a specific connector or transformer. ETL tools are often known for the following advantages:
• Centralized development and administration
o Single graphical user interface
o Centralized repository
• Easier maintenance
o Impact analysis (for certain tools)
Unfortunately this ETL approach presents several drawbacks:
• Poor performance
o As the data needs to be processed in the engine, it is often processed row by
row
o When data from the target database is referenced - table lookups for
example - it needs to be extracted from the database, into the engine and then moved back again to the target database.
o Very few mappings, joins, aggregations and filters are given to the powerful
engine of the RDBMS
• Bad productivity
o Every load process needs to be developed as a set of steps that mix business
rules (“what happens to the data” – SUM(AMOUNT + VALUE)) with technical logic (“how to load the data” – connector 1, connector 2 etc.)
o Moving to production is often difficult when developers haven’t designed
environment variables, or variable qualified names within their queries
o Some of them still require the use of heavy manual coding to achieve certain
particular tasks, or to leverage the RDBMS’ powerful transformation functions
• High Cost
o ETL tools require additional hardware
o ETL tools require specific skills
Implementation using ODI’s E-LT and the Business-rule Driven Approach
Implementing a business problem using ODI is a very easy and straightforward exercise. It is done by simply translating the business rules into an interface. Every business rule remains accessible from the Diagram panel of the interface’s window.
Specifying the Business Rules in the Interface
Figure 6 gives an overview of how the business problem is translated into an ODI interface:
• The ORDERS, LINES and CORRECTION datastores are dragged and dropped into
the “Source” panel of the interface
• The Target SALES datastore is dropped in the “Target Datastore” panel
• Joins and filters are defined by dragging and dropping columns in the “Source” panel
• Mappings are defined by selecting every target column and by dragging and dropping
columns or by using the advanced expression editor.
• Constraints are defined in the “Control” tab of the interface. They define how flow data
is going to be checked and rejected into the Errors table.
Business Rules are Converted into a Process
Business rules defined in the interface need to be split into a process that will carry out the joins, filters, mappings and constraints from source data to target tables. Figure 7 defines the problem to be solved.
Figure 7: How to convert business rules into a process?
By default, Oracle Data Integrator will use the RDBMS as a staging area for loading source
data into temporary tables and applying all the required mappings, staging filters, joins and constraints.
The staging area is a separate area in the RDBMS (a user/database) where ODI creates its temporary objects and executes some of the rules (mapping, joins, final filters, aggregations etc). When performing the operations this way, ODI leverages the E-LT architecture as it first extracts and loads the temporary tables and then finishes the transformations in the target RDBMS.
In some particular cases, when source volumes are small (less than 500,000 records), this staging area can be located in memory in ODI’S in-memory relational database – ODI Memory Engine. ODI would then behave like a traditional ETL tool.
Figure 8 shows the process automatically generated by Oracle Data Integrator to load the final SALES table. The business rules, as defined in Figure 7 will be transformed into code by the Knowledge Modules (KM). The code produced will generate several steps. Some of these steps will extract and load the data from the sources to the staging area (Loading Knowledge Modules - LKM). Others will transform and integrate the data from the staging area to the target table (Integration Knowledge Module - IKM). To ensure data quality, the Check Knowledge Module (CKM) will apply the user defined constraints to the staging data to isolate erroneous records in the Errors table.
Figure 8: ODI Knowledge Modules in action
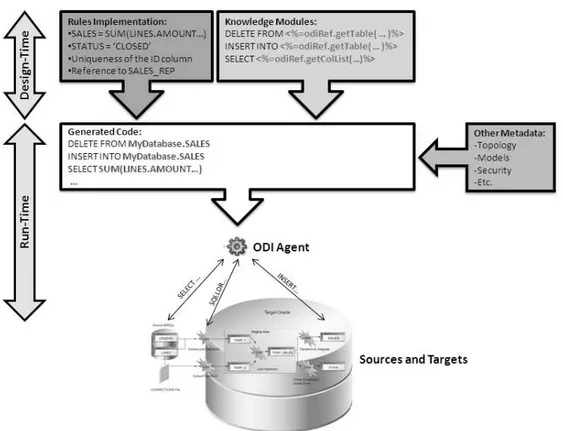
ODI Knowledge Modules contain the actual code that will be executed by the various servers of the infrastructure. Some of the code contained in the Knowledge Modules is generic. It makes calls to the ODI Substitution API that will be bound at run-time to the business-rules and generates the final code that will be executed. Figure 9 illustrates this mechanism. During design time, rules are defined in the interfaces and Knowledge Modules are selected. During run-time, code is generated and every API call in the Knowledge Modules (enclosed by <% and %>) is replaced with its corresponding object name or expression, with respect to
the metadata provided in the Repository.
For example, a call to <%=odiRef.getTable(“TARG_NAME”)%> will return the name of the
target table of the interface with the appropriate qualifier according to context information, topology setup etc.
A typical SQL INSERT statement would be coded in a Knowledge Module as follows:
INSERT INTO <%=odiRef.getTable(“TARG_NAME”)%> ...
This template of code will of course generate different SQL statements depending on the
target table (“INSERT INTO MyDB1.SALES...” when the target is the SALES table, “INSERT
INTO DWH_DB.PRODUCT” when the target is the PRODUCT table etc.). This is also particularly
useful when migrating ODI processes from an environment to another (promoting processes from Development to QA for example) as ODI will automatically substitute the correct
schema information based on the specified environment without requiring any code modifications.
Figure 9: How Knowledge Modules generate native code
Once the code is generated, it is submitted to an ODI Agent, which will either redirect it to the appropriate database engines and operating systems, or will execute it when needed (memory engine transformation, java or jython code etc.)
In most cases, the agent is simply a conductor that does not touch the data.
Benefits of E-LT Combined with a Business-rule Driven Approach
Compared to other architectures (manual coding and traditional ETL), ODI mixes the best of both worlds:
• Productivity / Maintenance
o The business-rules driven approach delivers greater productivity as
developers simply need to concentrate on the “What” without caring about the “How”. They define SQL expressions for the business rules, and ODI Knowledge Modules generate the entire set of SQL operations needed to achieve these rules.
o When a change needs to be made in operational logic (such as “creating a
simply applied in the appropriate Knowledge Module and it automatically impacts the hundreds of interfaces already developed. With a traditional ETL approach, such a change would have necessitated opening every job and manually adding the new steps, increasing the risk of mistakes and inconsistency.
o Flexibility and a shallow learning curve are ensured by leveraging the
RDBMS’ latest features.
o With a centralized repository that describes all the metadata of the sources
and targets and a single unified and comprehensive graphical interface, maintenance is greatly optimized as cross-references between objects can be queried at any time. This gives the developers and the business users a single entry point for impact analysis and data lineage (“What is used where?”, “Which sources populate which targets?” etc.)
o In the ODI repository, the topology of the infrastructure is defined in detail,
and moving objects between different execution contexts (Development, Testing, QA, Production, etc.) is straightforward. With a powerful version control repository, several teams can work on the same project within different release stages, with guaranteed consistency of deliverables.
o With a centralized framework for Data Quality, developers spend less time
on defining technical steps, and more time on the specification of data quality rules. This helps to build a consistent and standardized Data Warehouse.
• High Performance:
o The E-LT architecture leverages the power of all the features of in-place
databases engines. ODI generates pure set-oriented SQL optimized for each RDBMS which can take advantage of advanced features such as parallel processing or other advanced features.
o Native database utilities can be invoked by the ODI Knowledge Modules
provided.
o When data from the target database is referenced - table lookups for
example, it doesn’t need to be extracted from the database, into an engine. It remains where it is, and it is processed by database engine.
• Low Cost:
o Oracle Data Integrator doesn’t require a dedicated server. The loads and
transformations are carried out by the RDBMS.
In conclusion, with its business-rule driven E-LT architecture, Oracle Data Integrator is the best solution for taking advantage of both manual coding and traditional ETL worlds.
Using ODI in your Data Warehouse Project
ODI and the Data Warehouse Project
The main goal of a Data Warehouse is to consolidate and deliver accurate indicators to business users to help them make decisions regarding their everyday business. A typical project is composed of several steps and milestones. Some of these are:
• Defining business needs (Key Indicators)
• Identifying source data that concerns key indicators; specifying business rules to
transform source information into key indicators
• Modeling the data structure of the target warehouse to store the key indicators
• Populating the indicators by implementing business rules
• Measuring the overall accuracy of the data by setting up data quality rules
• Developing reports on key indicators
• Making key indicators and metadata available to business users through ad-hoc query
tools or predefined reports
• Measuring business users’ satisfaction and adding/modifying key indicators
Oracle Data Integrator will help you cover most of these steps, from source data investigation to metadata lineage and through loading and data quality audit. With its repository, ODI will centralize the specification and development efforts and provide a unique architecture on which the project can rely to succeed.
Organizing the Teams
As Oracle Data Integrator relies on a centralized repository, different types of users may need to access it. The list below describes how ODI may be used by your teams.
PROFILE DESCRIPTION ODI MODULES USED
Business User Business users have access to the final calculated key indicators through reports or ad-hoc queries. In some cases, they need to understand what the definition of the indicators is, how they are calculated and when they were updated. Alternatively, they need to be aware of any data quality issue regarding the accuracy of their indicators.
ODI Console
Business Analyst Business Analysts define key indicators.
They know the source applications and specify business rules to transform source data into meaningful target indicators.
They are in charge of maintaining translation data from operational semantics to the unified data warehouse semantic.
Designer Navigator (limited access) ODI Console
Developer Developers are in charge of implementing the business rules in respect to the specifications described by the Business Analysts. They release their work by providing executable scenarios to the production team. Developers must have
Topology Navigator (read only access) Designer Navigator:
PROFILE DESCRIPTION ODI MODULES USED both technical skills regarding the infrastructure and business knowledge of the
source applications.
Limited access to Models
Full access to Projects Operator Navigator ODI Console Metadata
Administrator
Metadata Administrators are in charge of reverse-engineering source and target applications. They guarantee the overall consistency of Metadata in the ODI Repository. They have an excellent knowledge of the structure of the sources and targets and they have participated in the data modeling of key indicators. In conjunction with Business Analysts, they enrich the metadata by adding comments, descriptions and even integrity rules (such as constraints). Metadata Administrators are responsible for version management.
Topology Navigator (limited access) Designer Navigator: Full access to Models Restore access to Projects ODI Console
Database Administrator
Database Administrators are in charge of defining the technical database infrastructure that supports ODI. They create the database profiles to let ODI access the data. They create separate schemas and databases to store the Staging Areas. They make the environments accessible by describing them in the Topology Topology Navigator (full access) Designer Navigator (full access) Operator Navigator (full access) ODI Console System Administrator System Administrators are in charge of maintaining technical resources and
infrastructure for the project. For example, they may install and monitor Scheduler Agents
backup / restore Repositories install and monitor ODI Console
Setup environments (development, test, maintenance etc.)
Agents
Topology Navigator (limited access) ODI Console
Security Administrator The Security Administrator is in charge of defining the security policy for the ODI Repository. He or she creates ODI users and grants them rights on models, projects and contexts.
Security Navigator (full access) Designer Navigator (read access) Topology Navigator (read access) ODI Console Operator Operators are in charge of importing released and tested scenarios into the
production environment. They schedule the execution of these scenarios. They monitor execution logs and restart failed sessions when needed.
Operator Navigator ODI Console Oracle Enterprise Manager Plug-in For ODI
The ODI Master Repository contains built-in default profiles that can be assigned to users. The following table suggests how to use these built-in profiles:
PROFILE BUILT-IN PROFILE IN ORACLE DATA INTEGRATOR
Business User CONNECT, NG REPOSITORY EXPLORER
Business Analyst CONNECT, NG REPOSITORY EXPLORER, NG DESIGNER
Developer CONNECT, DESIGNER
Metadata Administrator CONNECT, METDATA ADMIN, VERSION ADMIN
Database Administrator CONNECT, DESIGNER, METADATA ADMIN, TOPOLOGY ADMIN
System Administrator CONNECT, OPERATOR
Security Administrator CONNECT, SECURITY ADMIN
Operator CONNECT, OPERATOR
Reverse-engineering, Auditing and Profiling Source Applications
A good starting point for projects is to understand the contents and the structure of source applications. Rather than having paper-based documentation on source applications, a good practice is to connect to these source applications using ODI and to capture their metadata. Once this is achieved, it is usually helpful to define some data quality business rules in ODI Repository. This helps check the data consistency in the source and validate your
understanding of the data models. At this phase of the project it is important to start having an answer to the following questions:
• How many different sources do we have to take in account to calculate our indicators?
• Is the data needed for our indicators present in the source systems?
• What data quality challenges will we have to address to ensure the accuracy of the target
warehouse?
• What source system(s) will provide the master data (dimensions) that will be referenced
by our indicators?
• What data volumes are we going to manipulate?
• And so forth.
In some cases, source applications are not accessible directly. Only ASCII or binary files extracts from these applications are provided. Starting to work with these source files before implementing the data warehouse model is recommended, as they represent the “vision of the truth” that the production source systems want to give you. The metadata of these files should typically be described in the repository. Samples of the files can also be initially loaded into temporary target tables to validate their structure and content.
All this can be implemented in Oracle Data Integrator as follows:
• Connect source applications or files in Topology Navigator
• Define a logical architecture in Topology Navigator
• Create one model per logical schema in Designer Navigator
• Reverse Engineer models when possible or manually describe datastores
o Use standard JDBC Reverse-engineering to get database metadata
o Use Customized Reverse-engineering strategies (Reverse Knowledge
Modules) when standard JDBC reverse is not applicable (or not accurate)
o Use Cobol Copy Book import for ASCII or binary files if available
o Use Delimited File Reverse for ASCII delimited files
• Enrich the metadata by adding information when it is not available:
o Datastores and Columns descriptions and titles
o Unique keys information (Primary Keys, Alternate Keys)
o Referential Integrity assumptions between datastores (Foreign Keys)
o Check constraints (for example to check the domain of values for a column)
• When the source data is stored in files, develop simple interfaces to load these files into a temporary area in the target database to better evaluate their level of data quality.
• Locate the important entities in the source data and use the following features to profile
the contents:
o View Data on a datastore
o View distribution of values for a column of a datastore
o Count the number of records
o Run ad-hoc SQL queries from Designer Navigator
• Validate the constraints that you have defined in the models by performing data quality
control:
o Schedule or interactively run data quality “static” control on the datastores
and models
o Access and understand the contents of the error tables
o Propose alternatives for handling data discrepancies in the future
o Define the “acceptable” level of data quality for the target warehouse
Of course, these action items should be done in conjunction with business analysts. Normally, in parallel to this phase, you will be designing the data model of the target Data Warehouse.
Data quality audit errors and data profiling will help you refine your understanding of the truth, and consequently, will lead you to a better modeling of the target warehouse.
Designing and Implementing the Data Warehouse’s Schema
This section could be a book on its own. The goal here is not to provide you with guidelines in Data Warehouse modeling, but rather to give some general hints and tips that may affect your ODI development.
It is always a good practice to have an Operational Data Store (ODS) to store raw operational data. Usually, the data model of the ODS is very close to the OLTP source applications data model. Any source data should be accepted in the ODS and almost no data quality rule should be implemented. This ensures to have a store representing all the data-of-the-day from the operational systems.
When designing the Data Warehouse schema, the following general tips may be helpful:
• Where possible, describe columns inside the data dictionary of the database (for
example use “COMMENT ON TABLE” and “COMMENT ON COLUMN” SQL statements). By doing so, you allow ODI to retrieve these comments and descriptions into its metadata repository.
• Design a storage space for the Staging Area where ODI will create its necessary
temporary tables and data quality error tables.
• Do not use primary keys of the source systems as primary key for your target tables.
Use counters or identity columns whenever it is possible. This makes a flexible data model that will easily evolve over time.
• Design referential integrity (RI) and reverse engineer foreign keys in ODI models. Do
not implement these foreign keys in the target database as they may lead to
performance issues. With the automatic data quality checks, ODI will guarantee the consistency of data according to these RI rules.
• Standardize your object naming conventions. For example, use three letters to prefix
table names by subject area. Avoid using very long names as ODI may add a prefix to your table names when creating temporary objects (for example E$_Customer will be the error table for table Customer).
• Use of either 3rd Normal Form modeling (3NF) or dimensional modeling (“Snow
Flakes” or “Star Schemas”) doesn’t have any impact on ODI, but rather on the way you will design your future business rules development and business users’ reports.
Once the ODS and DW are designed, you will have to create the appropriate models in Designer and perform reverse-engineering.
ODI comes with modeling capabilities in the form of a feature called Common Format Designer. It can help you design the structure of the ODS and the DW from the existing structures of the source systems by simply drag and dropping tables columns and constraints.
The generated Data Description Language statements (DDL) automatically include specific features of the target database. It also keeps track of the origin of source columns to automatically generate the interfaces for loading the target, thus resulting in significant time savings. Best practices on the usage of Common Format Designer are out of the scope of this document.
Specifying and Designing Business Rules
Usually this step starts almost at the same time as the design of the target schema.
Understanding the business needs is clearly a key factor in the success of the overall project. This influences the key indicators selected for the warehouse as well as the rules used to transform source to target data. The more accurate the specification of a business rule, the easier the design of this rule in ODI. Several successful projects have used ODI Designer to specify the business rules, thus avoiding having discrepancies between a Word document and the final developed rules.
The following table summarizes what needs to be specified for every target table of the ODS or the DW before designing business rules.
TARGET DATASTORE: Give the name of the target datastore, possibly preceded by a qualification prefix (such as the database or schema name)
DESCRIPTION OF THE TRANSFORMATION:
Give a short description of the purpose of the transformation
INTEGRATION STRATEGY: Define how data should be written to the target. Examples: Replace content with new data from sources
Append incoming data onto the target
Update existing records and insert new ones according to an update key (specify the key here)
Use a Slowly Changing Dimension strategy. Specify the surrogate key, the slowly changing attributes, the updatable ones, the columns for start and end date etc. A home-made strategy (for example: BASEL II compliance, SOX historical audit trail etc.)
Every strategy specified here will correspond to an ODI Integration Knowledge Module. REFRESH FREQUENCY: Specify when this datastore should be loaded (every night, every month, every 2 hours
etc)
DEPENDENCIES: Give all dependencies in the load process (e.g. what datastores have to be loaded prior to the current one; what specific jobs need to be executed prior to this one etc.) SOURCE DATASTORES: Give the list of source datastores involved for loading the target table. This list should
include all the lookup tables as well. For each source datastore, include the following information.
SOURCE ODI MODEL Give the name of the source model as it appears in Designer DATASTORE NAME Give the name of the datastore
PURPOSE/DESCRIPTION Indicate whether it is the main source set or a lookup one. If Change Data Capture is to be used, it should be indicated here.
FIELD MAPPINGS AND TRANSFORMATIONS:
For every target field (or column), indicate what transformations need to be applied to the source fields. These transformations should be written as expressions or formulas as often as possible.
TARGET COLUMN Give the target column name MAPPING DESCRIPTION Describe the purpose of the mapping
MAPPING EXPRESSION Give the expression using the source column names. Try to express it in pseudo code. LINKS OR JOIN CRITERIA For every pair of source datastores, specify the criteria to lookup matching records. This
is often known as an SQL join. DATASTORE 1 Name of the first datastore DATASTORE 2 Name of the second datastore
LINK EXPRESSION Give the expression used to link the 2 datastores in pseudo code DESCRIPTION Describe this link by specifying if it is a left, right or full outer join.
FILTERS: Give the list of filters that apply to source data. Filters should be expressed in natural language and in pseudo code whenever possible.
FILTER DESCRIPTION Describe this Filter.
FILTER DESCRIPTION Give the expression used to implement the filter in pseudo code.
DATA QUALITY REQUIREMENTS: List here all the data quality requirements including error recycling if appropriate. The requirements should be expressed as constraints whenever possible.
CONSTRAINT NAME Name or short description of the constraint to validate. DESCRIPTION Purpose of the data quality check
CONSTRAINT EXPRESSION Expression in pseudo code required to control the data
To illustrate the use of such a form, the following table gives an example for the business problem case study defined in the chapter “Introduction to Oracle Data Integrator (ODI)”.
TARGET DATASTORE: Oracle Warehouse.SALES DESCRIPTION OF THE
TRANSFORMATION:
Aggregate orders and order lines from the Microsoft SQL Server source production system.
INTEGRATION STRATEGY: Append new records of the day REFRESH FREQUENCY: Every night
DEPENDENCIES: The following tables need to be loaded prior to this one for referential integrity: PRODUCT
SALES_REP SOURCE DATASTORES:
SOURCE ODI MODEL DATASTORE NAME PURPOSE/DESCRIPTION
Microsoft SQL Server Source ORDERS Orders from the production system
Microsoft SQL Server Source LINES Order lines. Main source for aggregation
User Data Files CORRECTIONS File containing the value to add to the
amount sold if any manual correction has occurred for a particular order line. FIELD MAPPINGS AND
TRANSFORMATIONS:
TARGET COLUMN MAPPING DESCRIPTION MAPPING EXPRESSION
ID Order Id ORDERS.ORDER_ID
PRODUCT_PK Product Id as it appears in the order lines LINES.PRODUCT_ID
SALES_REP Sales Rep Id as it appears in the order ORDERS.SALES_REP_ID
SALE Amount sold. If a correction for this
amount exists in the “corrections” file, the value should be added. The total value needs to be summed.
SUM ( LINES.AMOUNT +
(CORRECTIONS.VALUE when it exists) )
QUANTITY Total quantity of product sold. SUM ( LINES.QUANTITY )
LINKS OR JOIN CRITERIA
DATASTORE 1 DATASTORE 2 LINK EXPRESSION DESCRIPTION
ORDERS LINES Link orders and order lines
on the order ID. Every order line must match an existing order
ORDERS.ORDER_ID = LINES.ORDER_ID
LINES CORRECTIONS Lookup a correction value
from the correction file if it exists given the line item ID (left join)
LINES.LINE_ITEM_ID = CORRECTIONS.CORR_ID
Filters:
FILTER DESCRIPTION FILTER EXPRESSION
Orders of the day ORDER.ORDER_DATE between yesterday and now
Orders validated ORDER.STATUS = Closed
DATA QUALITY REQUIREMENTS:
CONSTRAINT DESCRIPTION CONSTRAINT EXPRESSION
Reference to SALES_REP Ensure that every SALES_REP ID exists in the SALES_REP reference table
SALES_REP references SALES_REP(ID)
Reference to PRODUCT Ensure that every PRODUCT_PK exists in the PRODUCT reference table
PRODUCT_PK references PRODUCT(ID)
ID Not null ID Column is mandatory Check ID not null
Quantity greater than 0 The quantity sold must always be positive QUANTITY > 0 Uniqueness of sale A sales rep can’t sell the same product twice
inside the same order
The next step is to design these business rules in the Designer Navigator. The translation from the specification to the design is straightforward. Every specification of the loading of a target table will be converted into an interface. This process is even faster if the specification is made directly using the Designer Navigator.
The steps to implement the interface are typically as follows.
• Drag and drop the target datastore
• Drag and drop source datastores
• For every target field, translate the pseudo code of the transformation into SQL
expressions. When possible, decide where to execute the expression (source, staging area, target)
• For every join, define the join in the source panel of the interface. Depending on the
specification, define the join as inner, left, right, natural or full outer join. When possible, try to execute joins on the sources to minimize network traffic.
• For every filter, translate the pseudo code into an SQL expression. When the source
database accepts SQL filters, set it as “execute on source” to minimize network traffic.
• In the flow diagram of the interface, define the loading strategies (LKM) and specify the
integration strategy (IKM) to match the specification. Choose the appropriate options for the Knowledge Module and activate the data quality control when appropriate.
• In the control tab of the interface, select the constraints to control. If the constraints are not defined on the target datastore, define them in the Models view of the Designer Navigator.
After the design of every interface, you should review the code generated using the
Simulation mode and then test it by executing it. The Operator Navigator allows you to easily follow the execution of your interface to get the number of records processed and many other useful indicators (such as the generated code, the elapsed time, the number of inserts, updates, deletes etc.) After the interface completes, the resulting data and errors can be directly selected from Designer to validate the accuracy of the business rules.
Thanks to ODI Contexts, the execution of the interface will happen on a “Development” environment and will not affect production data.
Building a Data Quality Framework
With an approach based on business rules, ODI is certainly the most appropriate tool to help you build a data quality framework to track data inconsistencies. Thanks to the Check Knowledge Modules, you simply have to define the control business rules, and inconsistent data is automatically isolated for you in error tables. However, isolating erroneous data is not the only issue in Data Quality. Even if ODI automatically detects duplicated keys, mandatory fields, missing references, and more complex constraints, you will need to involve business users in the process of qualifying data discrepancies and make the appropriate decisions. You
should have an answer to each of the following questions before defining your data quality strategy:
• What level of data quality is required for the Data Warehouse?
• Who are the business owners of source data?
• What should we do with rejected records?
• Do we need to define an error recycling strategy?
• Do we need to involve business owners of the data and report rejected records?
• How would business users modify erroneous source data?
• Do we provide a GUI to have them modify erroneous records in the error tables?
The document “Comprehensive Data Quality with Oracle Data Integrator” further discusses Data Quality issues and the recommended best practices.
Developing Additional Components
Not all the typical tasks of the loading of the Data Warehouse can be achieved using ODI Interfaces. It is usual to develop additional components or jobs that would carry on tasks such as, for example:
• Receiving and sending e-mails
• Copying, moving, concatenating, renaming files in the file system
• Compressing, decompressing files
• Executing web services
• Writing and executing shell scripts for a specific operating system
• Writing and executing java programs
• And so on.
These components can be developed and tested within the Designer Navigator as Procedures, Variables, User Functions, or Steps in a package. ODI Procedures offer a broad range of possibilities for developing these components. They can include, for example:
• An ad-hoc SQL statement written for any database
• An Operating System call
• ODI built-in tools and APIs (Send Mail, Read Mail, Wait For File etc.)
• Code written in any of the scripting languages supported by the Jakarta Bean Scripting
Framework. This includes Java, Java Script, Python, Perl, NetRexx, Groovy, etc. Of course, the risk here is to start developing transformation processes as Procedures by hand coding shell and SQL scripts rather than using the powerful mechanism of ODI Interfaces
combined with Knowledge Modules. To avoid that, try as much as possible to specify your transformations as business rules and not as a technical processes. ODI Procedures should always be considered as technical steps that have to be achieved in the overall process, but they shouldn’t have in-depth business logic that applies to the data. Typical Data Warehouse projects would have less than 10% of development in the form of Procedures.
Packaging and Releasing Development
Now that the Interfaces, Procedures and Variables are developed and tested, they need to be ordered as steps within Packages. Start thinking about what should happen in case of error in any of these steps. By default, the ODI Agent will stop the execution of a package at the step that has failed and it will rollback any open transaction on all the connected databases. Even though errors are reported in ODI Logs, it is always a good practice to have an “on-error” procedure that is triggered if some of the steps fail. This procedure can for example send an email to an operator to warn them that the package has failed, reporting the session ID. Particular attention has to be paid to the following step attributes:
• Next step on failure
• Number of attempts in case of failure
• Interval between attempts
Try to avoid heavy loops inside packages (more than 50 iterations). In most cases, a loop can be avoided by simply adding a table as source to an interface!
When the package is successfully tested, you will have to release it as a Scenario. Think of a scenario as a compiled version of your source objects such as interfaces, procedures, packages, etc. This Scenario will then be imported in the Test environment before validation for Production.
Versioning Development
Before going to production, you should record a stable version of all the objects involved in the release of the Scenarios. Creating versions of objects will allow you to restore previous released items for further maintenance in case of problem.
Starting from ODI 10g, versions of objects are stored in the Master Repository and the dependencies between objects are maintained in objects called Solutions. To make sure all the objects involved in the release are consistently versioned, it is thus recommended that you create a Solution object and add the Project to this Solution. Designer calculates all the dependencies between objects and automatically creates a new version for Projects, Models, Scenarios and global objects used. Restoring these objects from a previous version can be done when needed from the Designer Navigator by simply selecting the Restore menu. Section “Using ODI Version Management” further discusses the best practices for version control.
Scheduling and Operating Scenarios
Scheduling and operating scenarios is usually done in the Test and Production environments in separate Work Repositories. The Operator Navigator provides a graphical interface to perform these tasks. Any scenario can be scheduled by an ODI Agent or by any external scheduler, as scenarios can be invoked by an operating system command.
When scenarios are running in production, agents generate execution logs in an ODI Work Repository. These logs can be monitored either through the Operator Navigator, through any web browser using the ODI Console or the Oracle Enterprise Manager Plug-in for ODI. Operating teams need to be trained on the use of the Operator Navigator, ODI Console or Oracle Enterprise Manager. They will have to monitor logs, restart failing jobs and submit ad-hoc tasks for execution.
Monitoring the Data Quality of the Data Warehouse
Business users rely on the accuracy of key indicators of the Data Warehouse to make decisions. If these indicators are wrong, the decisions are worthless.
Depending on the data quality strategy you have defined, business users will actively participate in the monitoring of data discrepancies. They will have to help the IT team to better refine the calculations of the indicators as well as the qualification of the erroneous data. This generally leads to modifications of the business rules. These updates are done in the development environment and follow the normal release cycle defined for the project. Typical projects report data quality errors to business users through reports generated from ODI’s error tables. These reports are pushed to the data owner in their email system or to any workflow application used internally.
Publishing Metadata to Business Users
Business users usually need to have access to other data quality indicators based on metadata such as:
• When was the last time my table was updated?
• How many records were added, removed or updated in my table?
• What are the rules that calculate a particular indicator?
• Where does the data come from, and how is it transformed?
• Where does the data go to, and how is it transformed?
• Etc.
All these questions can be answered if you give access to the ODI Console to business users. This is done simply by assigning them a user ID in the Security Navigator. The web-based interface allows them to see all the data models, and the interactions between them. This includes:
• Flow Maps
• Data Lineage, which is usefully for understanding the path taken by data and the
transformations between applications
• Execution logs with accurate statistics on the number of records processed (number of
inserts, updates, delete and errors).
Planning for Next Releases
A Data Warehouse evolves as the business need of the enterprise change. This leads to frequent updates of the data models. This constant changing has an impact on the development of new components and the maintenance of existing ones. However it is important to understand that it should always be a cycle driven by business requirements. The general steps listed below give you a brief overview of how this could be planned:
1. Define or refine Business Rules specifications
2. Make sure previous releases of the objects are properly versioned and can be restored
safely in a new empty work repository before modifying anything in your current work repository.
3. Define new sources or targets in Topology Navigator.
4. Reverse-engineer new and/or existing models. Use the ODI cross references to
evaluate the impact of the changes to the structure of source and target fields. Pay special attention to fields that were removed from tables as they may still be used in some transformations.
5. Develop new interfaces and update existing ones. Create or update additional
components. Test every item separately in the development environment.
6. Update existing packages or create new ones. Test every package, even those that
haven’t changed since the last release, as the underlying schema may have changed.
7. Regenerate the new scenarios for your next release.
8. Release the scenarios into each Test environment. Correct any bug that would be
reported from the Test process. Involve business users in the test process.
9. Create new Solutions and version every project and model. Use the change indicators
that appear on every object to detect which objects should be versioned.
Oracle Data Integrator for Oracle Best Practices
Architecture of ODI Repositories
It is recommended that you install the ODI Master and Work repositories in an OLTP database distinct from the source or target applications.
Reverse-engineering an Oracle Schema
The Oracle JDBC driver implements most metadata APIs. You can therefore use the standard JDBC reverse-engineering with ODI. Using this method, you can capture metadata for:
• Tables, Views etc. including table comments,
• Columns including data types, length and scale, and comments
• Primary Keys
• Foreign Keys
• Check Constraints
In some cases a custom reverse-engineering approach using the RKM Oracle may be necessary. For example ODI 11g natively supports database partitions which can only be reverse-engineered using the RKM Oracle.
RKM DESCRIPTION
RKM Oracle Reverse-engineering Knowledge Module for Oracle
This RKM uses the Oracle system tables known as the Oracle Data Dictionary to extract the metadata definition of a table and its related artifacts (columns, keys, partitions etc.).
Oracle Loading Strategies
When loading an Oracle data warehouse the goal is always to load the data into the database in the most efficient manner and Oracle Data Integrator provides several Loading Knowledge Modules optimized for Oracle that will help you achieve this. Choosing the right Knowledge Module for each use case will greatly improve the efficiency of your data integration
You can refer to the following table for a list of the Loading Knowledge Modules optimized for Oracle:
LKM DESCRIPTION
LKM File to Oracle (EXTERNAL TABLE) Loads data from a file to an Oracle staging area using the EXTERNAL TABLE SQL Command.
LKM File to Oracle (SQLLDR) Loads data from a file to an Oracle staging area using the SQL*Loader command line utility. The Oracle client must be installed on the machine hosting the ODI Agent.
LKM SQL to Oracle Loads data through the agent from any SQL RDBMS to an Oracle
staging area.
LKM MSSQL to Oracle (BCP SQLLDR) Loads data from a Microsoft SQL Server database to an Oracle staging area using the BCP and SQL*Loader utilities. The utilities must be installed on the machine hosting the ODI Agent.
LKM Oracle to Oracle (DBLINK) Loads data from an Oracle source database to an Oracle staging area database using database links.
LKM Oracle to Oracle (datapump) Loads data from an Oracle source database to an Oracle staging area database using external tables in the datapump format.
There are also several additional Knowledge Modules which can be used to extract data from SAP ERP, SAP BW or Oracle BI and load the records into an Oracle database.
Using Loaders for Flat Files
When your interface contains a flat file as a source, you may want to use a strategy that leverages the most efficient loading utility available for your staging area technology rather than the standard “LKM File to SQL” which uses the ODI Agent to load the flat file data. The agent uses JDBC to write to the target, using this method would lead to significant performance issues compared to loading into Oracle using the External Table SQL command or SQL*Loader.
We advise against using the ODI Agent when loading large files and recommend the “LKM File to Oracle (EXTERNAL TABLE)” to transfer large files into an Oracle database.
Using Unload/Load for Remote Servers
When the source result set is located on a remote database server, an alternative to using the agent to transfer the data would be to unload the date into a file and then load it into the staging area.
The “LKM MSSQL to Oracle (BCP SQLLDR)” is an example of a Knowledge Module that follows these steps, it uses the BCP utility to bulk unload data from a Microsoft SQL Server database into a file and SQL*Loader to load the data back into an Oracle staging area. This Loading Knowledge Module provides the most optimal approach to extracting data out of Microsoft SQL Server and loading it into an Oracle database.
Several Knowledge Modules use a similar approach including the SAP ERP and BW LKMs.
Oracle to Oracle
There are use cases in which there is a need to move data between Oracle systems and ODI provides several ways to achieve this.
One of the best methods when it comes to loading data in such a scenario is to use Oracle Data Pump and Oracle Data Integrator provides the “LKM Oracle to Oracle (datapump)” which leverages Oracle Data Pump to export and load the data efficiently through the creation of External Tables using Oracle Data Pump on both the source and the target databases.
ODI also provides the “LKM Oracle to Oracle (DBLINK)” which has the ability to create a database link between the source and the target Oracle database to load the data.
Using Changed Data Capture
Applying a Change Data Capture (CDC) approach can significantly improve the performance of your ODI processes.
For example if you are loading your data warehouse nightly you only need to extract the data that has changed in the past 24 hours, loading the entire source data sets will result in a significant degradation of the efficiency of your ODI jobs.
Using CDC ensures that the extract from your various source systems is done incrementally. This reduces the amount of data transferred from your source systems into your target database as well as the amount of data transformed by ODI. The creation of the CDC process can be challenging and ODI simplifies it by providing Knowledge Modules which leverage many CDC mechanisms including the native database CDC capabilities.
Change Data Capture on Oracle
When it comes to detecting changes occurring in an Oracle database ODI offers several options:
• CDC using Oracle GoldenGate
• CDC using Oracle Streams
• CDC using database triggers
The Oracle Journalization Knowledge Modules (JKMs) automatically create the underlying infrastructure required by the ODI CDC framework so that end users do not have to worry about it. For example, the Oracle JKMs have the ability to configure Oracle GoldenGate or the Oracle Streams infrastructure when required.
You can refer to the following table for a list of the JKMs for Oracle provided with ODI:
JKM DESCRIPTION
JKM Oracle to Oracle Consistent (OGG) Creates and manages the ODI CDC framework infrastructure when using Oracle GoldenGate for CDC.
JKM Oracle 10g Consistent (Streams) Creates the journalizing infrastructure for consistent set journalizing on Oracle 10g tables, using Oracle Streams.
JKM Oracle 11g Consistent (Streams) Creates the journalizing infrastructure for consistent set journalizing on Oracle 11g tables, using Oracle Streams.
JKM Oracle Consistent Creates the journalizing infrastructure for consistent set journalizing on Oracle tables using triggers
JKM Oracle Consistent (Update Date) Creates the journalizing infrastructure for consistent set journalizing on Oracle tables using triggers based on a Last Update Date column on the source tables
JKM Oracle Simple Creates the journalizing infrastructure for simple journalizing on Oracle tables using triggers
It is also possible to leverage other mechanism in ODI to detect changes like timestamps, dates or sequence numbers.
There are many more JKMs provided with ODI, you can refer to the ODI Documentation for a complete list of the JKMs.
Oracle Integration Strategies
The Integration Knowledge Modules optimized for the Oracle database are implementing many of the best practices to insert data into an Oracle data warehouse:
- Direct Path loading is applied whenever possible using the /*+ APPEND */ hint
- Additional optimizer hints such as PARALLEL which specifies the degree of
parallelism for a given database operation can be specified via the OPTIMIZER_HINT option of the IKMs
- The ODI Staging Area tables are created by default using NOLOGGING to ensure
best performance
- The MERGE SQL statement can be leveraged using the “IKM Oracle Incremental
Update (MERGE)”. MERGE combines an INSERT and an UPDATE in one single optimized SQL command
- ODI gathers tables statistics to ensure that the Oracle database Cost Based
Optimizer (CBO) selects the most optimal execution plan over time
- Indexes are created to speed up the joins and filters execution. End users can choose
improve the efficiency of joins between large fact tables and smaller dimension tables in a star schema.
You can refer to the following table for a list of the IKMs that can be used with an Oracle database:
IKM DESCRIPTION
IKM SQL Control Append Integrates data in any ISO-92 compliant database target table in
TRUNCATE/INSERT (append) mode.) Data quality can be checked. Invalid data is rejected in the “E$” error table and can be recycled.
IKM Oracle Incremental Update Set-based incremental update for Oracle IKM Oracle Slowly Changing Dimension Slowly Changing Dimension Type II for Oracle IKM Oracle Incremental Update
(MERGE)
Integrates data in an Oracle target table in incremental update mode, using a MERGE statement
IKM Oracle Multi Table Insert Integrates data from one source into one or many Oracle target tables in append mode, using a multi-table insert statement (MTI).
IKM Oracle AW Incremental Update Integrates data in an Oracle target table in incremental update mode and is able to refresh a Cube in an Analytical Workspace.
It is also possible to extend the ODI Knowledge Modules with your own best practices when needed. Thanks to the reusability of the KMs it is simple to ensure that best practices are enforced and utilized by each developer.
Defining a Data Quality Strategy
Loading data that is not clean in your data warehouse can have a major impact on the overall performance of your ETL processes. Primary key or foreign key violations, business rules that are not met, null values that are not expected can waste time and resources if the appropriate Data Quality framework is not in place within your data integration process.
Oracle Data Integrator provides an out of the box framework to handle Data Quality errors occurring while data is being loaded into a database. Business rules and constraints are defined at the metadata level and those validation rules are checked against the data prior to being integrated into the target tables. The constraints can be enabled or disabled when required. The errors that are captured are routed into error tables managed by ODI that can be reviewed through the Designer Navigator as well as the ODI Console.
“CKM Oracle” is the recommended Check Knowledge Module for checking data integrity constraints defined on a given Oracle table.
Setting up Agents in an Oracle environment
Where to Install the Agent(s)?
A typical data warehouse implementation can have one or more ODI agent in production. In an Oracle environment, the agent is usually installed on the host machine that is used to load data in the data warehouse. The agent requires a connection to the source databases or files, and triggers the appropriate load utilities.
Starting from ODI 11g it is also possible to install the ODI agents in WebLogic Server to achieve High-Availability (HA) through a clustered deployment.
Architecture Case Studies
Setting up Repositories
General Architecture for ODI Repositories
In a typical environment for a data warehouse project, you would create the following repositories:
• A single master repository that holds all the topology and security information. All the
work repositories are registered in this master repository. This single master repository contains all the versions of objects that are committed by the designers.
• A “Development” work repository shared by all ODI designers. This repository holds all the projects and models under development.
• A “Testing” work repository shared by the IT testing team. This repository contains all the projects and models being tested for future release.
• A “User Acceptance Tests” work repository shared by the IT testing team and the business analysts. This repository contains all the projects and models about to be released. Business analysts will use the ODI Console on top of this repository to validate the scenarios and transformations before releasing them to production.
• A “Production” work repository shared by the production team, the operators and the business analysts. This repository contains all the projects and models in read-only mode for metadata lineage, as well as all the released scenarios.
• A “Hot fix” work repository shared by the maintenance team and the development team. This work repository is usually empty. Whenever a critical error happens in production, the maintenance team restores the corresponding projects and models in this repository and performs the corrections with the help of the development team. Once the problems are solved, the scenarios are released directly to the production repository and the new models and projects are versioned in the master repository.